Once on the Web, you can open other Web pages in the Folder List or Folders views, or you can even open up another page using the Windows menu. Microsoft Expression Web provides several ways to navigate between pages. After you open a Web page, you can use the document tabs at the top of the editing window in Design view, choose the Web page’s name from the Window menu, or press Ctrl+Tab until the page you want appears in the window to navigate between pages.
One of the most user-friendly components of Expression Web is its capability to automatically convert text and images into HTML format. When you save a Web site or Web page, it is actually being saved in HTML format. After you create a Web site, you can use the Folder List view to quickly and easily manage individual Web pages.
When looking at a Web site, there are certain details that can make your Web pages a site that visitors will return to. Microsoft Expression Web helps you generate that type of site. Visitors might notice a washed out background picture called a watermark. Or maybe it’s a soothing color or light sound as you pass over certain feature of the page. Having a custom feel will express to your visitors that you’ve spent time and looked at every detail of your site.
You can preview your Web pages in a browser, or in Design view. Because each browser can display your site differently, you will want to examine your site using several of the most popular browser formats. You can also create your own template, instead of using one of the built-in page templates that comes with Expression Web.
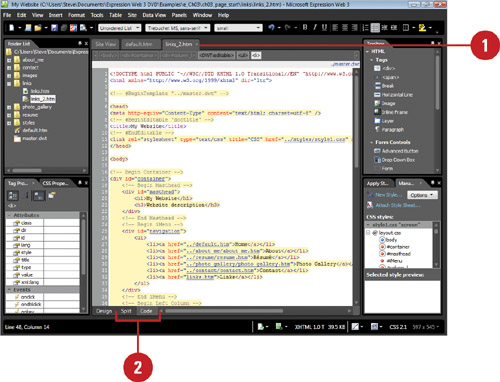
An HTML page is a common Web page. HTML is a coding language that describes the elements on a Web page and instructs a Web browser how to display it. As you add elements to an HTML page in Design view, Expression Web creates the HTML code behind it. If you are familiar with the HTML language, you can use the Code view to make code changes. Split view allows you to display Design and Code view at the same time, which makes it a beneficial learning tool. When you add an element in Design view, you can view the related code in Code view. You can use the New submenu on the File menu or the New button on the Common toolbar to create a new HTML page. With the Page Editor Options dialog box, you can set the default type for new documents and the default file extension—either .html or .htm—for new HTML documents.
 Click the Web Site tab for the site in which you want a new page.
 Use any of the following methods:
Click the File menu, point to New, and then click HTML.
Click the New button arrow on the Common toolbar, and then click HTML.
Click the New button on the Common toolbar (applies when HTML is set as the default document type).
An untitled Web page appears without the use of New dialog box.
 Click the Save button on the Common toolbar, type a name for the page, and then click Save.
- Click the Web Site tab for the site in which you want a new page.
- Click the New button arrow on the Common toolbar, and then click Page.
- In the left pane, click General.
 Click HTML.
 Click OK.
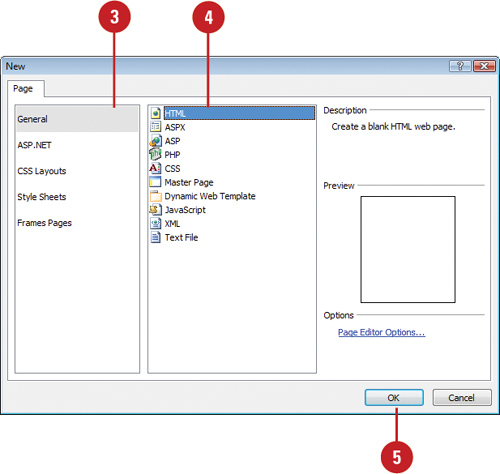
An untitled Web page appears.
 Click the Save button on the Common toolbar, type a name for the page, and then click Save.
- Click the Tools menu, and then click Page Editor Options.
- Click the Authoring tab.
- Click the Default Document list arrow, and then select the document type you want.
- Click the .html or .htm option for the default HTML file extension.
- To add a byte order mark (BOM) to a new UTF-8 document, select the check boxes next to the extensions you want, or deselect the ones you don’t want.
- Click OK.

Expression Web allows you to multi-task, which means you can have more than one Web page open at the same time. After you open a Web site, you can quickly open Web pages in Folders view, or from the Folder List instead of using the Open button on the Common toolbar or the Open command on the File menu. If you want to view open Web pages in a separate Expression Web window, you can display the page, and then choose Open in New Window from the Window menu. You can press Alt+Tab to switch between the separate windows. Instead of starting from scratch to create a new page, you can open a copy of an existing page with the default new Web page title of Untitled_1.htm.
- Open the Web site with the Web page you want to open.
- Click the Web Site tab.
- Click the Folders button.
- Double-click the icon or file name representing the page you want to access.

Did You Know?
You can open a linked page from Design view. Press and hold Ctrl and click a hyperlink in the page, or right-click a hyperlink in a page that’s already open, and then click Follow Hyperlink.
See Also
See “Opening an Existing Web Page” on page 13 for information on opening an external Web page.

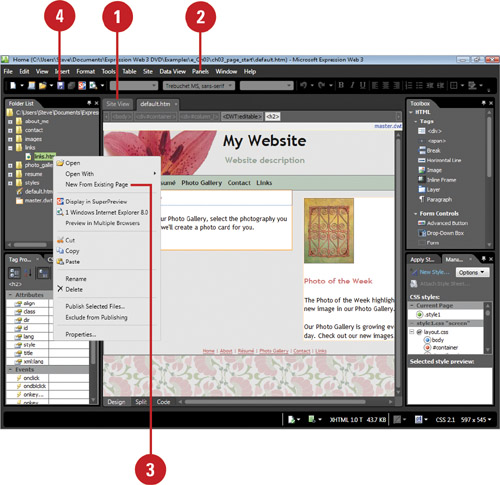
- Open the Web site with the Web page you want to open.
- If necessary, click the Panels menu, and then click Folder List to display the Folder List.
- Right-click the page you want to copy, and then click New From Existing Page.
A new untitled page appears in the Editing window with content and formats from the original template Web page.
- Click the Save button on the Common toolbar.
- Navigate to the Web site folder location where you want to add pages.
- Type a name for the page, or use the suggested name, and then click Save.
Expression Web provides several ways to navigate between pages. After you open a Web page, you can use the document tabs at the top of the Editing window, choose the Web page’s name from the Window menu, or press Ctrl+Tab until the page you want appears in the window to navigate between pages.
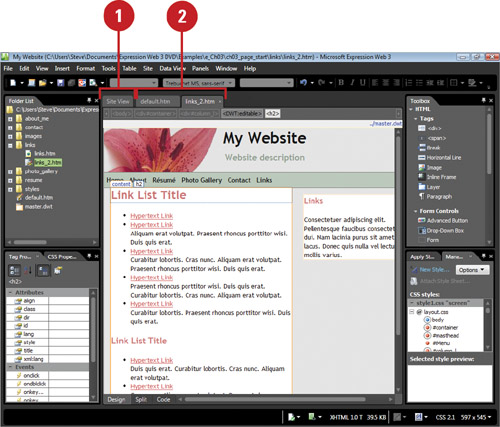

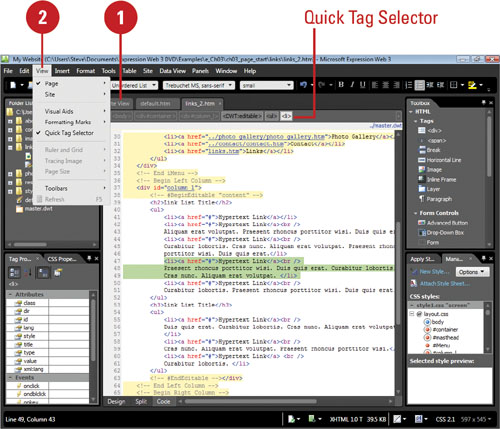
One of the most user-friendly components of Expression Web is its capability to automatically convert text and images into HTML format. If you’re familiar with HTML, you might be comfortable enough to work in this mode. HTML adds a series of format instructions to your content using tags, such as <i>, that indicate how to format the text for display on the Web. Use the Quick Tag Selector to select any tag in your Web page. Use the Quick Tag Editor to insert, wrap, and edit HTML tags. Expression Web uses colored text to distinguish between elements when working in HTML format.
After you create a Web site, you can use the Folder List to quickly and easily manage individual Web pages, files and folders. If a page name is not exactly what you want, you can quickly rename it. The page name is the file name in your folder list, such as default.htm. You can create and name a new folder and move pages to a different location. If you no longer need or want a Web page, you can remove it. You can determine whether you want the page deleted from your hard drive or just from the Web.
- Open the Web site with the Web page you want to rename.
- If necessary, click the Panels menu, and then click Folder List to display the Folder List.
- In the Folder List, right-click the page you want to rename, and then click Rename.

- Select the name of the Web page file, except the extension, such as .htm.
- Type a new name, and then press Enter.
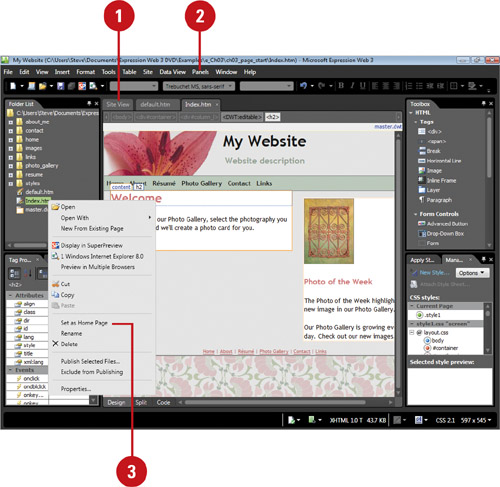
When you create a Web site using a template, Expression Web automatically creates a home page called default.htm or default.html, which is the first page visitors see when they visit your site. If you already have a home page or want to create a different one, you can quickly set the one you want as the new home page using the Folder List.
- Open the Web site with the Web page you want to change.
- If necessary, click the Panels menu, and then click Folder List to display the Folder List.
- In the Folder List, right-click the page you want to set as the new home page, and then click Set as Home Page.
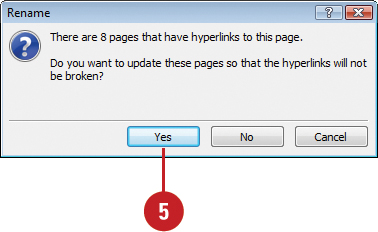
- Click Yes to confirm you want to rename the previous home page.

- If prompted, click Yes to update hyperlinks.
- If prompted, click Yes to confirm you want to rename the home page.
A Web page title is the text that visitors see on the title bar of their Web browser when they display the Web page. Expression Web automatically sets the Web page title to the same text as the Web page file name. However, the two perform different tasks. The Web page title displays a message, while the Web pane name identifies a file. When you save a Web page, you can change the title. If you didn’t change the title during the save process or you want to change it, you can use the Properties dialog box.
- Open the Web site with the Web page you want to change.
- If necessary, click the Panels menu, and then click Folder List to display the Folder List.
- In the Folder List, right-click the page you want to change, and then click Properties.

The Properties dialog box opens, displaying the General tab with the current title selected.
- Type a new name for the title.
- Click OK.

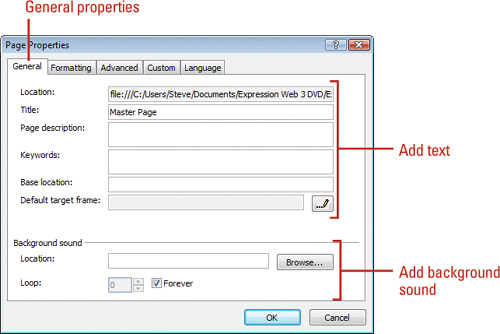
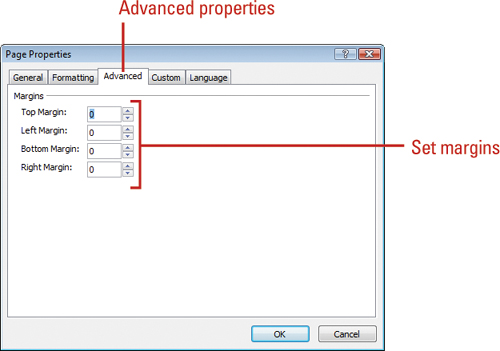
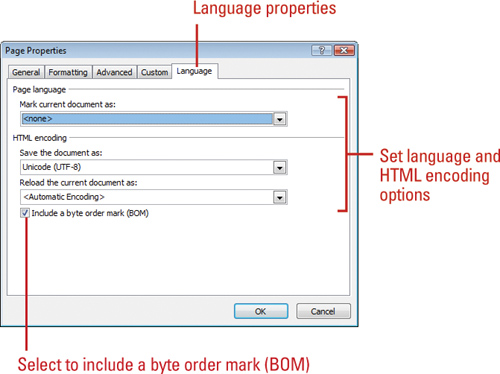
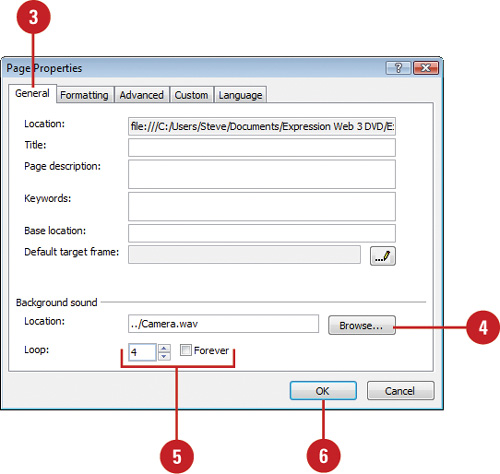
Expression Web allows you to change individual Web page properties using the Page Properties dialog box. You can change the Web page title, add a page description, and specify keywords for search engines (which aren’t used to much anymore; most search engines use other methods). You can also insert a background sound or image, make the background image a transparent watermark, or change the color. When you insert a background sound, it plays once when you open the Web page unless you select the Loop option. In addition, you can change the color of page text and hyperlinks. For advanced feature, you can set page margins, work with code snippets, or specify a language.
- Open the Web site with the Web page you want to change, and then click the Web page tab.
- Click the File menu, and then click Properties.
- Click the tab you want to use, and then select the options you want:
General. Use this tab to change the Web page title, add a page description, specify keywords for search engines, and insert a background sound. You can also specify a base location, which changes the root location (where your home page is typically located).
Formatting. Use this tab to insert a background image, and make it a watermark (transparent). To delete a background, select the image path and delete it. You can also use this tab to change the background, text, or link colors on the current page. If you insert a background sound, you can also select the look option.

Advanced. Use this tab to set margins for the current page. However, it’s more efficient to make margin changes using CSS.
Custom. Use this tab to add, modify, or remove custom code snippets based on system and user variables. A code snippet is a reusable segment of code.
Language. Use this tab to specify the page language and HTML encoding you want to use. These options make sure your Web browser and Expression Web uses the right characters set for the selected language. The default for HTML encoding is Unicode (UTF-8). You can also include a byte order mark (BOM).
- Click OK.
Did You Know?
What is a Unicode? A character coding standard that defines a set of letters, numbers, and symbols that represent almost all of the written languages in the world.
See Also
See “Setting Byte Order Marks” on page 382 for information on byte order marks (BOM).
You can use a picture as the background for a page. Pictures can be taken from elsewhere on your site, a file, clip art, or the Web. You can also use a background picture in watermark form. A watermark is a background effect that displays a graphic in a light shade behind your text on your page. You can use a washed out version of your company logo, or you can add graphical text such as Under Construction. Pictures and watermarks display in the background titled across the page. Be aware that not all Web browsers support watermarks.
- Open and display the Web page you want to use.
- Right-click anywhere on the page to which you want to insert a background picture, and then click Page Properties.
- Click the Formatting tab.
- Select the Background Picture check box.
- Click Browse.
- Locate and select the picture you want to insert, and then click Open.
The picture you selected now opens as a background image.
 Click OK.
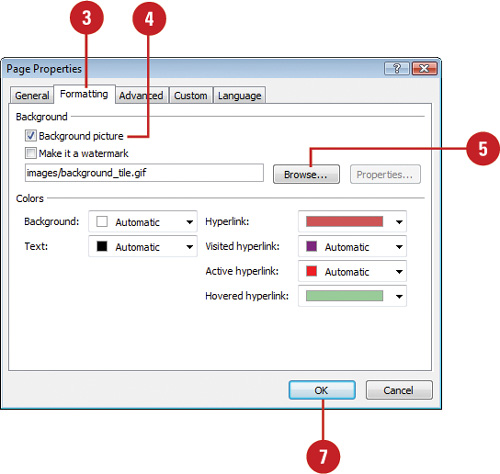
- Open and display the Web page you want to use.
- Right-click anywhere on the page to which you want to insert a background picture, and then click Page Properties.
- Click the Formatting tab.
- Select the Background Picture check box.
- Select the Make it a watermark check box.
- Click Browse.
- Locate and select the picture you want to insert, and then click Open.
The picture you selected now opens as a background image.
 Click OK.
If you’d like to add some interest to your pages, you can add background colors. When selecting background colors, some creative judgment is required. For example, if you choose a dark color for your background, make sure you use a light color for your text (the most commonly used is white) to generate the appropriate contrast required for easy reading.

You can introduce background sounds to accompany and enhance your Web page. There’s nothing like hearing a favorite tune when you enter a site or visit a particular page. The sound can be played continuously in a loop, or you can set it for a desired number of plays. Be aware that not all browsers support background sound.
- Open and display the Web page you want to use.
- Right-click the page to which you want to add a background sound, and then click Page Properties.
- If necessary, click the General tab.
- Type the sound file name or click Browse, locate and select the sound file you want to use, and then click Open.
- To set the sound to repeat continuously, clear the Forever check box, and then click the number arrows in the Loop box to set the number of times you want the sound to play.
- Click OK.
Whenever a visitor opens the page, they will hear the sound effect you chose.
Since visitors to your Web site can use different screen resolutions or window sizes, you need to develop Web pages so a variety of users can view it without having to zoom in or scroll to much. You can use the Page Size command to simulate different page size to see how your pages look. The page sizes available using the Page Size command correspond to standard screen resolutions, which include 640 × 480, 800 × 600 and 1024 × 768 (all maximized).
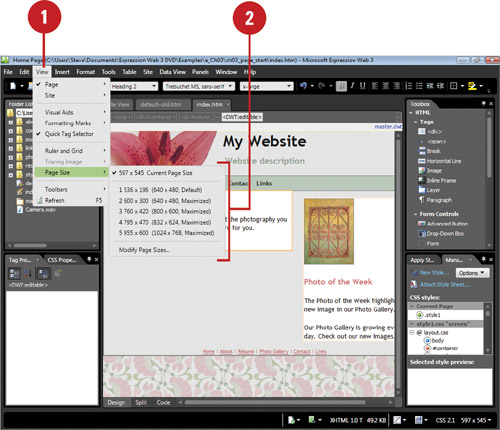
- Click the View menu, point to Page Size, and then click Modify Page Sizes.
- Perform the commands you want:
Add. Click Add, enter width, height and a description, and then click OK.
Modify. Select a page size, click Modify, make changes, and then click OK.
Remove. Select a page size, and then click Remove.
Reset. Click Reset to return to default page sizes.
- Click OK.

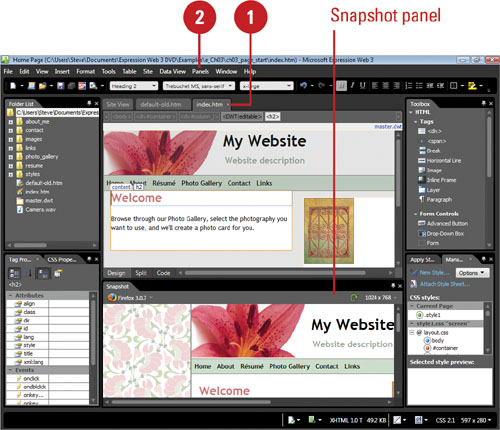
With the Snapshot panel (New!), you can preview Web pages for the different browsers installed on your computer right in Expression Web. The Snapshot panel provides a quick and easy way to preview Web pages. The other preview options—Preview in Browser and SuperPreview—in Expression Web, open another program, so they take more time to use. However, you get a more accurate preview. You can use Snapshot panel to display any HTML, PHP, ASP, or ASPX page that you have opened and selected in Expression Web. In the Snapshot panel, you can select a browser, the browser window size, and refresh the screen. The Snapshot panel works like any other panel in Expression Web. You can move and dock it where ever you want.
- Open the Web page you want to preview.
- Click the Panels menu, and then click Snapshot.
A timer progress meter appears as Expression Web generates the preview snapshot.
- To change the browser preview, click the Browser button in the Snapshot panel, and then select the browser you want.
- To change browser display size, click the Browser window size button in the Snapshot panel, and then select a window size or Custom Size.
- To refresh the contents of the Snapshot panel, click the Always Preview Active Document button in the Snapshot panel.
- When you’re done, click the Close button in the Snapshot panel.

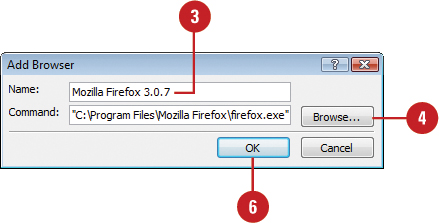
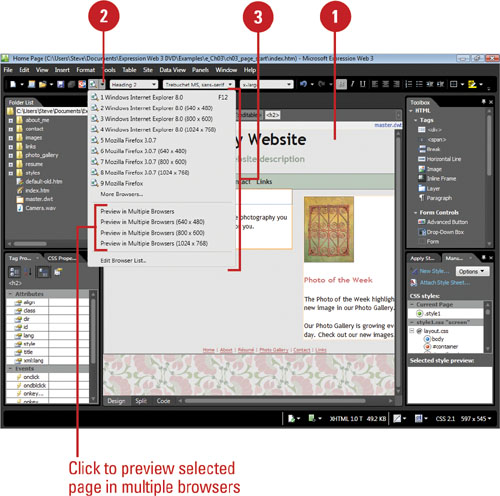
Because each browser can display your site differently, you will want to examine your site using several of the most popular browser formats and different sizes. When you are ready to see how your page will look to visitors, click the Preview in Browser button arrow on the Common toolbar and then select a browser and a window size. When you select a browser, the program starts and displays your Web page as you would see it on the Web. If you want to add additional browsers to the list, you can select them using the Edit Browser List dialog box. You can also simulate the page size of a browser as you work in Design view by selecting different page sizes on the Page Sizes submenu on the View menu.
- Click the File menu, point to Preview in Browser, and then click Edit Browser List.
- Click Add.
- Type the browser’s name.
- Click Browse.
- Navigate to the location where the browser program is stored, select it, and then click Open.
- Click OK.
- To automatically save a Web page before previewing, select the Automatically save page before previewing check box.
- To specify the window sizes you want, select the 640 × 480, 800 × 600, or 1024 × 768 check boxes.
 Click OK.
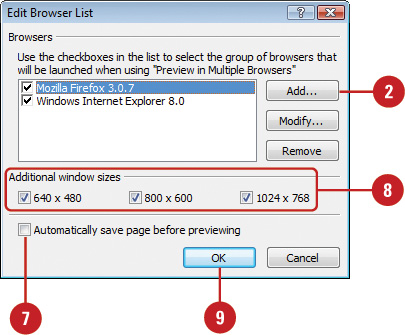
Did You Know?
You need to install other browsers before you can preview your pages. You must have previously installed the full version of other browsers like Netscape Navigator or Firefox if you want to preview how your pages will appear to users of those browsers.
You need to save your pages before you can preview them. To be sure that you have saved the page you want to preview, click the Automatically save page before previewing check box to select it in the Edit Browser List dialog box. Click the File menu, point to Preview in Browser, and then click Edit Browser List.
You can change the Web page size in Design view. Click the View menu, point to Page Size, and then select the size you want. If the Design view window is wider than the width you specify, gray areas appear on either side. If Design view is narrower than the width you specify, you’ll need to scroll the Design view window right or left. A dotted line across the page indicates the bottom of the browser window.

SuperPreview (New!) makes it easy to view and compare a Web page or sections of a Web page in multiple browsers at the same time. SuperPreview gives you an array of tools—such as Selection and Panning Mode pointers, Layout modes (Side-by-side, Stacked, and Overlay), and Zoom, and Positioning Guides—to test and debug Web page issues across different browsers. After you compare a page or sections of a page in specified browsers, you can make adjustments in Expression Web back in Design view.
- Open and display the Web page you want to preview.
- Click the File menu, and then click Display in SuperPreview.
The SuperPreview window opens.
- Click a browser icon to select a browser preview in the Baseline pane (left side) and Comparison pane (right side).

- Click an element to display the size and position of the element.
- To switch panes, click the Switch baseline browser location button.
- To add another comparison browser, click the Add button, and then click a browser icon.
- To switch between comparison browsers, click a browser icon in the Comparison browser selector.
- To view an element in the Document Object Model (DOM), click the DOM tab.
- To remove a browser, click the Close button in the browser selector.
 When you’re done, click the Close button on the program window.
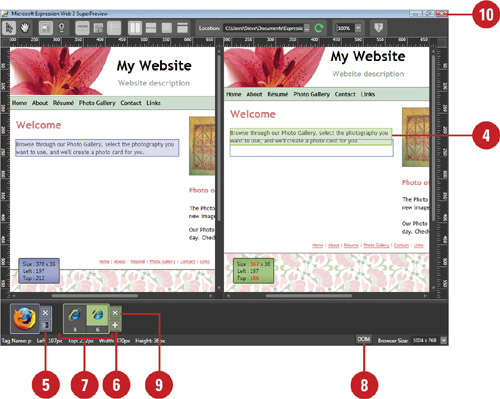
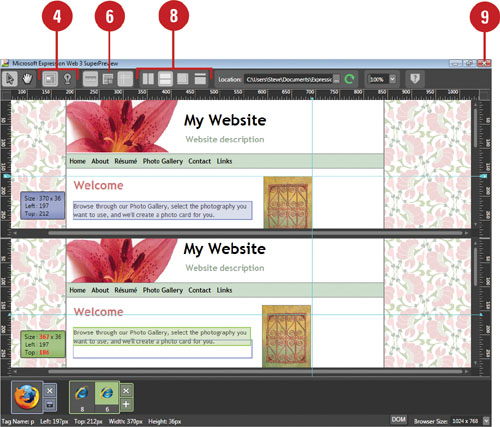
- Open and display the Web page you want to preview.
- Click the File menu, and then click Display in SuperPreview.
The SuperPreview window opens.
- Click a pointer mode button.
Selection Mode. Use to select individual page sections for comparison.
Panning Mode. Use to drag a page inside the browser view.
- In Selection Mode, click a highlighting mode button.
Box Highlighting Mode. Highlights the selected element in blue in the baseline view and green in the comparison view.
Lights-Out Highlighting Mode. Displays the selected element normally, while dimming out everything else.
- To show/hide the ruler, click the Toggle Ruler Visibility button.
- To show/hide guides, click the Toggle Guide Visibility button. Drag the horizontal or vertical ruler onto the page to create a horizontal or vertical guide.
- To show/hide the thumbnail display, click the Toggle Thumbnail Visibility button. Drag the shaded area in the thumbnail to display a region of the page.

- To change the layout, click the Vertical Split Layout, Horizontal Split Layout, Overlay Layout, or Single Layout button.
- When you’re done, click the Close button on the program window.
Printed pages are helpful when you are working in Preview view. Rather than toggling between a page in progress and a Browser Preview of that page, for example, you can print the Preview so that you have it in hard copy format. Printouts are also helpful when editing your pages. Before printing, you can preview the page to determine that there are no obvious errors.
- Open and display the Web page you want to preview.
- Click the File menu, point to Print, and then click Print Preview. This opens a scaled-down image of the page you want to print and a series of buttons. The button choices are:
Print button. Engages the printing process. The preview closes and the Print dialog box opens.
Next Page button. Displays the next page in the sequence for multiple-page printing.
Previous Page button. Takes you to the previous page in a sequence.
Two Page button. Toggles between a single-page and a two-page spread in Preview mode.
Zoom In button. Magnifies the preview image.
Zoom Out button. Reduces the size of the characters to show more of the page preview.
Close button. Closes the Preview mode.
- When you’re done, click the Close button.

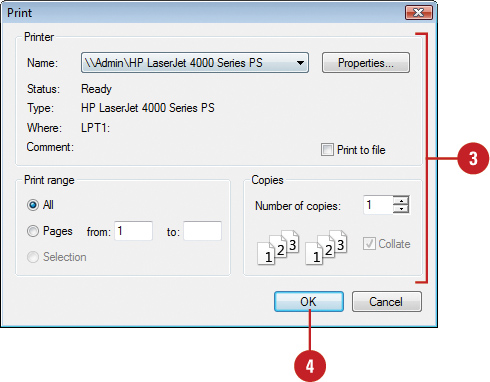
- Click the File menu, point to Print, and then click Print.
- Select the print options you want.
- Click OK.???
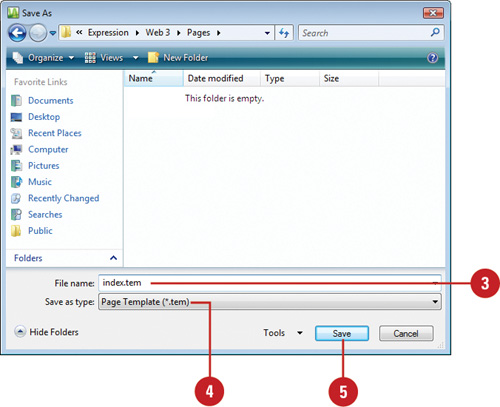
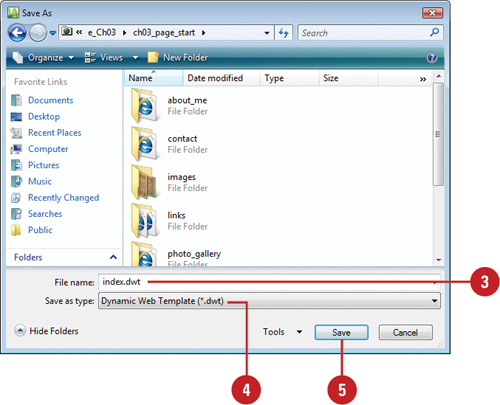
Instead of using one of the built-in page templates that comes with Expression Web, you can create your own. There are two kinds of page templates: static and dynamic. A static template is a Web page you create and design, which is completely editable. After you save a static page template, you can access it in the My Templates tab of the Page Templates dialog box. A dynamic template is a Web page with editable areas like a static template, yet also contains non-editable areas with content that changes based on circumstances, such as actions taken by a user or the date.
- Design and display the Web page you want to create into a static template.
- Click the File menu, and then click Save As.
- Type a name for the template.
- Click the Save as type list arrow, and then click Page Template (*.tem).
The folder location changes to the Pages folder, where Expression Web stores page templates.
- Click Save.
- Type the title you want for the template.
- Type a description for the template.
- To save the template in the current Web site, select the Save Template in Current Web site check box.
- Click OK.

- If prompted, click OK to save embed files.
- Design and display the Web page you want to create into a dynamic template. Be sure to leave areas open to create editable regions.
- Click the File menu, and then click Save As.
- Type a name for the template.
- Click the Save as type list arrow, and then click Dynamic Web Template (*.dwt).
The folder location changes to the Pages folder, where Expression Web stores page templates.
- Click Save.
- If prompted, click OK to save embed files.
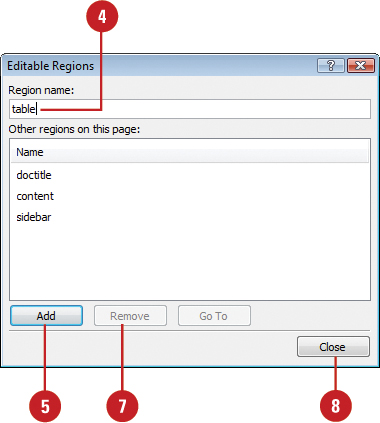
- Display the Dynamic Web Template you want to change.
- Select the page area you want to vary from page to page.
- Click the Format menu, point to Dynamic Web Template, and then click Manage Editable Regions.
- Type a name for the area you selected.
- Click Add.
- To rename an editable region. Select the region name, type a new name, and then click Rename.
- To remove an editable region. Select the region name, and then click Remove.
- Click Close.
After you create a dynamic Web template, you can apply, or attach, the template to an open Web page. When you attach a dynamic Web template to a Web page, Expression Web tries to map regions on the ordinary Web page to editable regions in the template. If you don’t like the initial mapping, you can modify or skip it. After you attach a dynamic Web template to an ordinary Web page, you can modify non-editable regions in Code view, or any editor other than Design view to create updatable content.
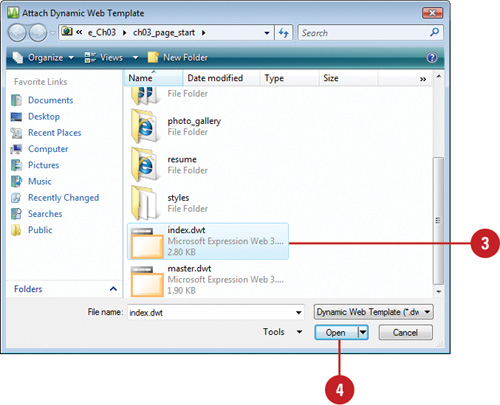
- Display the Web page in which you want to apply a dynamic page template.
- Click the Format menu, point to Dynamic Web Template, and then click Attach Dynamic Web Template.
- Locate and select the dynamic Web template you want to apply.
- Click Open.
- Select which regions in the new page will receive content/regions from the old page.
- Click Modify, select a new mapping, and then click OK.
- Click OK to attach the template.
- Click Close.


Did You Know?
You can detach a Dynamic Web Template from a Web page. Open and display the Web page with the Dynamic Web Template attached, click the Format menu, point to Dynamic Web Template, and then click Detach from Dynamic Web Template. If you want to open an attached Dynamic Web Template page, click Open Attached Dynamic Web Template on the submenu.
A Master page is a special type of ASP.NET page that allows you to share contents, such as graphics, HTML code, and ASP.NET controls, between pages. Master pages are similar to Dynamic Web Templates because they share elements between pages. However, Master pages add the ability to share code. If you have ASP.NET 2.0 available on your Web server, you can take advantage of Master pages. A Master page uses content controls instead of editable regions in a Dynamic Web Template. The content control on the Master page (ContentPlace Holder) maps to the content control on the Content page (Content). After you create a Master page using a template in the New dialog box, you need to save it with the .master file extension. Now, you can create a Content page and link it to a Master page.
- Click the File menu, point to New, and then click Page.
- In the left pane, click General or ASP.NET.
- Click Master Page.
- Click OK.

An Untitled_1.master page appears in the Editing window.
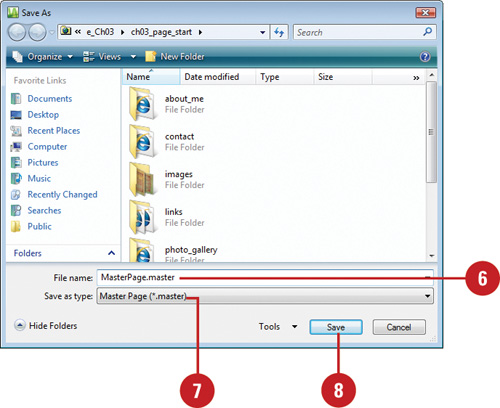
- Click the File menu, and then click Save As.
- Type a name for the master page.
- Click the Save as type list arrow, and then click Master Page (*.master).
- Click Save.
- In the left pane, click General or ASP.NET.
- Click Create from Master Page.
- Click OK.

- Click the Specific Master Page option.
- Click Browse, locate and select the master page, and then click Open.
- Click OK.

An Untitled_1.aspx content page appears in the Editing window.
The Content page pulls in the content from the Master page in the ControlPlaceHolder control.
- Click the File menu, and then click Save As.
- Type a name for the content page.
- Click the Save as type list arrow, and then click Web Pages.
In this case, the content page is saved with the .aspx extension.
 Click Save.
A file type specifies the file format (for example, a template) as well as the program and version in which the file was created (for example, Expression Web). You might want to change the type if you’re creating a custom template or sharing files with someone who needs them for use in another program. You use the Save As dialog box to change the file type for a page. The Save as type list arrow displays a list of the available formats for the program or current selection.
- Open and display the Web page you want to save in a different format.
- Click the File menu, and then click Save As.
- Navigate to the drive and folder location where you want to save the Web page.
- Type a name for the page, or use the suggested name.
- Click the Save as type list arrow, and then click the file type you want.
- Click Save.

See Also
See “Expression Web Formats” on page 75 for information on selecting the right file format.???
Table . Expression Web Open and Save File Formats
Extension | Used to save | |
|---|---|---|
All Files | *.* | Complete Web site |
Web Pages | Files in their native format; includes the formats in this list and the ones in the side bar on the previous page | |
HTML Files | .htm, .html | Web pages as a HTML file |
Dynamic Web Template | .dwt | Web pages as a changeable Expression Web template |
ASP and ASPX Files | .asp, .aspx | Web pages as a Microsoft Active Server Page |
Master Page | .master | Web pages as Expression Web master page file; a special type of ASP.NET file |
JScript Files | .js | Scripts as a Microsoft Scripting Language “JScript” file |
VBScript Files | .vbs | Scripts as a Visual Basic for Applications file |
PHP Files | .php, .php2, .php3, .php4, .php5, .php6 | Web pages as a PHP file |
CSS Files | .css | Web pages as a cascading style sheet |
XML | .xaml, .xml, .xsd,.xsl, .xslt, .dtd | Web pages as an XML file |
Text | .txt | Web pages as a text file |
Page Template (Save only) | .tem | Web pages as a static Expression Web template |
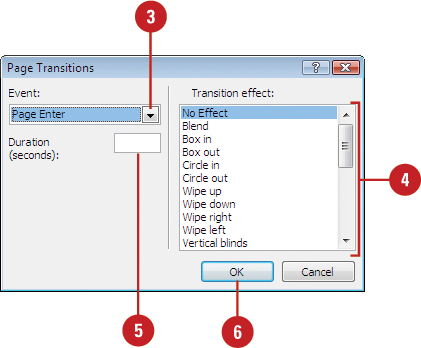
You can use animation in your Web site to provide interest and call attention to important information. When you move from one Web page to another, you can display a transition effect between the two pages. You can select a transition effect, and then specify when the page transition occurs, and how long it lasts. The only disadvantage of page transitions is that the browser must wait for the entire Web page to load before it can apply the transition effect. Be aware that animated page transitions are not supported by all browsers.
- Open and display the Web page you want to use.
- Click the Format menu, and then click Page Transition.
- Click the Event list arrow, and then click an event type: Page Enter, Page Exit, Site Enter, or Site Exit.
- Click the transition effect you want.
- Set the duration (in seconds) of the transition effect.
- Click OK.