Once you’ve become familiar with Microsoft Expression Web and all the features it contains, you might want to customize the way you work with Expression Web. You can change the way Expression Web starts up and whether you want to check if Expression Web is the default editor for Web pages. You can also configure Expression Web to associate editors on your computer with a specific file type you want to use, which makes it easy to open and work with the files, or specify options to determine what information appears in reports.
You can set general options to specify when files are considered “Recent” or “Older”, or the download time that qualifies a Web page for inclusion in the Slow Pages report. You can also set the connection speed, display row and column gridlines when viewing reports, and the maximum number of months shown in usage reports.
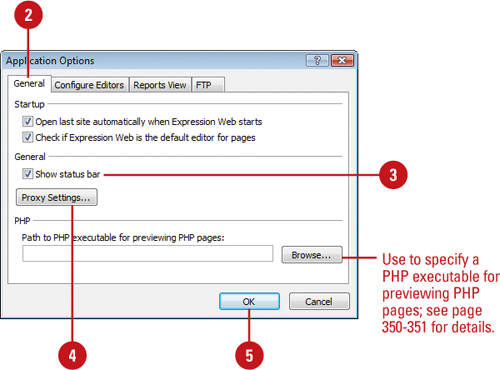
You can customize several settings in the Expression Web work environment to suit the way you like to work. For example, you can set an option to show or hide the Status bar at the bottom of the Expression Web window. The Status bar displays information about your current editing and style application modes and the file you are editing, such as file size, HTML schema, and CSS schema. In addition, you can change proxy firewall settings for the Internet. A proxy server acts as a security barrier between your internal network and the Internet, keeping others on the Internet from being able to get information that is located on your internal network. Networking information is required to change proxy settings; see your system administrator for specifics.
HTML Incompatibility Detected button. Click to display an HTML schema incompatibility in your code, or set schema options.
Code Error Detected button. Click to display an error in the code of a Web page, or run the compatibility checker.
Doctype and Schema. Displays the HTML schema applied to the current Web page. Double-click to change change schema options.
Download Size. Displays the current size of the file.
Visual Aids button. Click to show or hide visual aids.
CSS Mode button. Click to change the CSS mode (Auto or Manual), show or hide the Style Application Toolbar, or change CSS options.
CSS Schema. Displays the current CSS schema applied to the current Web page. Double-click to change change schema options.
Page Size. Click to change the page size for the current Web page.


You can customize the way Expression Web starts up. For example, one option automatically opens the last Web site you worked on when you start Expression Web. If you consistently work with the same Web site, this option can be very handy. Another startup option checks if Expression Web is the default editor for Web pages when you start Expression Web. This allows you to double-click a Web page in Windows Explorer and have Expression Web automatically open to edit it. You can enable or disable these options depending on your working preference.
 Click the Tools menu, and then click Application Options.
 Click the General tab.
 Select the startup options you want:
Open last Web site automatically when Expression Web starts. Opens the Web site you most recently worked on.
Check if Expression Web is the default editor for pages. Verifies Expression Web is the standard editor for Web pages.
 Click OK.
You can configure Expression Web to associate any editor on your computer with any file type you want to use, which makes it easy to open and work with files. You can associate several editors with a file type. However, one of the editors is the default. Expression Web starts the default editor when you double-click the file in the Folder List, Folders view, and other file locations, or when you right-click the file and choose Open from the shortcut menu.
- Click the Tools menu, and then click Application Options.
- Click the Configure Editors tab.
- To add a new extension, click the New Extension button, type the extension, select the editor you want to use, and then click OK.
- To add a new editor, click the New Editor button, select the editor you want to use (if necessary, click Browse for more), and then click OK.
 To add, rename, or remove an existing extension, select the extension, click the Modify Extension button, type the changes you want, and then click OK.
 To set a default editor, select the extension, select the editor you want as the default, and then click Make Default.
 Click OK.
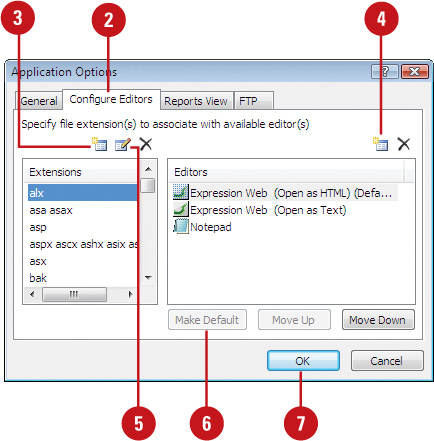
You can customize the way information appears in Reports view by changing settings on the Reports View tab in the Applications Options dialog box. You can set general options to specify when files are considered “Recent” or “Older”, or the download time that qualifies a Web page for inclusion in the “Slow Pages” report. You can also set the connection speed, display row and column gridlines when viewing reports, and the maximum number of months shown in usage reports.
- Click the Tools menu, and then click Application Options.
- Click the Reports View tab.
- Select the general and usage options you want. Some of the common options include:
“Recent” files are less than X days old. Determines which files appear in the Recently Added Files report.
“Older” files are more than X days old. Determines which files appear in the Older Files report.
“Slow pages” take as least X seconds to download. Determines whether a Web page appears in the Slow Pages report.
- To display a grid, select the Display gridlines when viewing reports check box.
- Click OK.

Expression Web allows you to customize FTP (File Transfer Protocol) transfer options for text files (ASCII). When you use FTP to transfer files, you can connect to another computer or server using passive or normal FTP. Most network configurations work with either passive or normal FTP; however if one or the other doesn’t work, you may need to try both settings. The passive FTP mode is more secure. When you transfer text files between a PC and Unix, click the FTP tab in the Application Options dialog box, and then specify the extensions you want to be treated as text files. You can add more extensions to the list; any extension not on the list is transferred as binary. If you no longer want an extension in the list, you can remove it.
- Click the Tools menu, and then click Application Options.
- Click the FTP tab.
- Select the Use Passive FTP check box to use passive FTP mode or deselect the check box to use normal FTP mode.
- To add a new extension, type the extension, and then click Add.
- Select the extension you want to remove, and then click Remove.
- Click OK.

See Also
See “Specifying a Remote Web Site” on page 352 and “Connecting to a Remote Web Site” on page 356 for information on connecting to a server by using FTP.???
Expression Web allows you to configure the way most features and functions work in a single location using the Page Editor Options dialog box. The Page Editor Options dialog box consists of 12 tabs that allows you set options in the following areas: General, Authoring, AutoThumbnail, Picture, Code Snippets, Ruler and Grid, IntelliSense, CSS, Code Formatting, Code Coloring, Default Fonts, and Font Families. The General tab provides varied options that don’t fit in any of the other tabs.
- Click the Tools menu, and then click Page Editor Options.
- Click the General tab.
- Select the general and usage options you want. Some of the common options include:
Automatically enclose form fields within a form. Happens on first field you insert.
Assign unique IDs to new tables. Adds ID attribute to new tables; existing ones unchanged.
Make ID unique on paste. Makes sure no duplicate IDs when you paste.
Use <strong> and <em> when using bold and italic toolbar buttons. Uses updates tags for bold and italic; recommended.
Automatically switch keyboard to match language of surrounding text. Use when you use different virtual keyboard layouts.
Prompt form accessibility properties when inserting images. Prompts for accessibility information when you insert a picture.
- Click OK.

- Click the General tab.
- Select the general code usage options you want. Some of the common options include:
Word wrap. Select to automatically word wrap in Code view.
Auto indent. Select to automatically indent based on the level and structure of the code.
Line numbers. Select to display line numbers along the left side of Code view.
Selection margin. Select to add a left margin in Code view to make selecting code easier.
Highlight invalid HTML. Select to highlight invalid HTML code.
Highlight incompatible HTML. Select to highlight incompatible HTML code with the current schema.
- Click OK.

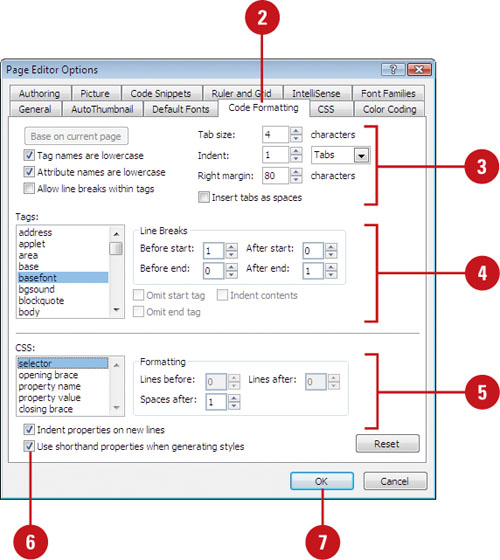
The Page Editor Options dialog box provides two tabs—Color Coding and Code Formatting—to make it easier to work with code. The Color Coding tab allows you to change the way individual elements appear in color while you work in Code or Design view. The Code Formatting tab provides options to format bookmarks, hyperlinks, and HTML, CSS, PHP, and Script elements to suit your preferences and work habits. The settings at the top apply to all new code in Code view, while the CSS options at the bottom of the Code Formatting tab apply to existing and new CSS code.
- Click the Tools menu, and then click Page Editor Options.
- Click the Color Coding tab.
- Click the Code view settings option.
- Select the element you want to change.
- Use the Item foreground and Item background list arrows to select the colors you want.
- Select or clear the Font, Italic, or Underline check boxes.
- Repeat steps 4 through 6 for the elements you want to change.
 Click OK.
Did You Know?
You can change color coding for Design view elements too. On the Color Coding tab in the Page Editor Options dialog box, click the Design view settings option, select the element you want to change, use the Item foreground and Item background list arrows to select colors, select or clear Font style check boxes, repeat for the elements you want, and then click OK.
- Click the Tools menu, and then click Page Editor Options.
- Click the Code Formatting tab.
- Select the tab, indent, margin, and and other related settings you want at the top of the dialog box.
- Select the tag you want to change, and then specify the line break and related options to the right you want.
- Select the CSS element you want to change, and then specify the formatting options to the right you want.
- Select the Use shorthand properties when generating styles check box to combine CSS properties in one element when needed to create complex CSS.
- Click OK.
Did You Know?
You can reformat the code of an existing page. Some of the code formatting options affect all existing pages while others options affect only new pages in the future. To reformat the code of an existing page, open the page in Code or Split view, right-click the code, and then click Reformat HTML.
Code snippets allow you to reuse code while you work in Code view, which can save you time and cut down on errors. Expression Web comes installed with pre-existing snippets you can use. If you’re not sure what is available, you can view a list of installed code snippets on the Code Snippets tab in the Page Editor Options dialog box, where you can also add, modify, or remove ones you no longer use. To insert a code snippet, switch to Code view, press Ctrl+Enter, and then select the code snippet you want from the dropdown list.
- Click the Tools menu, and then click Page Editor Options.
- Click the Code Snippets tab.
- Perform the options you want:
Add. Click Add, type a unique keyword, description, the code you want to use as a snippet, and then click OK.
Modify. Select the code snippet you want, click Modify, make the changes you want, and then click OK.
Remove. Select the code snippet you want, and then click Remove to delete it.
- Click OK.

The Color Coding tab on the Page Editor Options dialog box provides an option to make it easier to work with display elements in Design view. The Color Coding tab allows you to change the way individual elements appear in color while you work Design view. You can set foreground and background (when available) colors for a variety of display items, including Dynamic Web Template editable region, Layout site selection border, Layout positioning lines, Layout table border or cell, Master Page content region, and Web Part border. For some display items, such as Layout label, you can set font styles, including bold, italic and underline.
- Click the Tools menu, and then click Page Editor Options.
- Click the Color Coding tab.
- Click the Design view settings option.
- Select the element you want to change.
- Use the Item foreground and Item background (if available) list arrows to select the colors you want.
- Select or clear the Font, Italic, or Underline check boxes, if available.
- Repeat steps 4 through 6 for the elements you want to change.
- Click OK.

RGB (red, green, blue) is a set of color values that describe colors. RGB identifies a color by a set of hexadecimal numbers, an internal computer numbering scheme, that specify the amounts of red, green, and blue needed to create the color. RGB colors appear best over the Web (true color representation without dithers or substitutes) when you use only browser safe colors, which is a standard set of 216 color combinations. These RGB values are 0, 51, 102, 153, 204, or 255 in decimal or 00, 33, 66, 99, CC, or FF in hexadecimal. When you use the color dialog boxes, you use decimal values. In Code view, you use hexadecimal values. You can create colors using the color menus on the Color Coding tab in the Page Editor Options dialog box. You can define up to 16 different colors, and then save them to a custom palette. The custom colors become available on all color menus.
- Click the Tools menu, and then click Page Editor Options.
- Click the Color Coding tab.
- Click the Code view settings or Design view settings option.
- Click the Item foreground or Item background color list arrow to open a color palette.
- Click More Colors on the color palette.
- Click Custom.
- Click a blank box.
- Select a color by entering a combination of numerical values, or selecting one of the basic colors in the main palette or a custom color in the color spectrum palette.
 Click Add to Custom Colors.
 When you’re done, click OK.
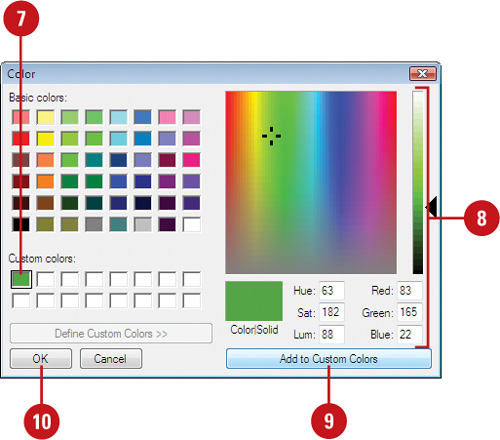
 Click OK again to close the More Colors dialog box.
 Click OK to close the Page Editor Options dialog box.
- Click the Color Coding tab.
- Click the Code view settings or Design view settings option.
- Click the Item foreground or Item background color list arrow to open a color palette.
- Click More Colors on the color palette.
- Click Custom.
- Click the box with the color you want to remove.
- Click the white color in the standard color palette.
- Click Add to Custom Colors.
- When you’re done, click OK.

- Click OK again to close the More Colors dialog box.

- Click OK to close the Page Editor Options dialog box.???
Table . Understanding HSL Colors
Color | Description |
|---|---|
Hue | The color itself; every color is identified by a number, determined by the number of colors available on your monitor. |
Saturation | The intensity of the color. The higher the number, the more vivid the color. |
Luminosity | The brightness of the color, or how close the color is to black or white. The larger the number, the lighter the color. |
You can change the default text for Design and Code views. In Design view, you can change the default proportional and fixed-width fonts. A proportional font has variable spacing between letters, while a fixed-width font has the same spacing between letters. Proportional fonts are typically used for Web page text, while fixed-width fonts are typically used for working with code. When you are working with large amounts of text, a fixed-width font is easier to read. In Code view, you can specify the default font type and size you want to use.
- Click the Tools menu, and then click Page Editor Options.
- Click the Default Fonts tab.
- For Design view, select the following default fonts:
Default proportional font. A proportional font has variable spacing between letters.
Default fixed-width font. A fixed-width font has the same spacing between letters.
- For Code view, select the following default fonts:
Font. Select a font type to display code in Code view.
Size. Select a font size to display code in Code view.
- Click OK.

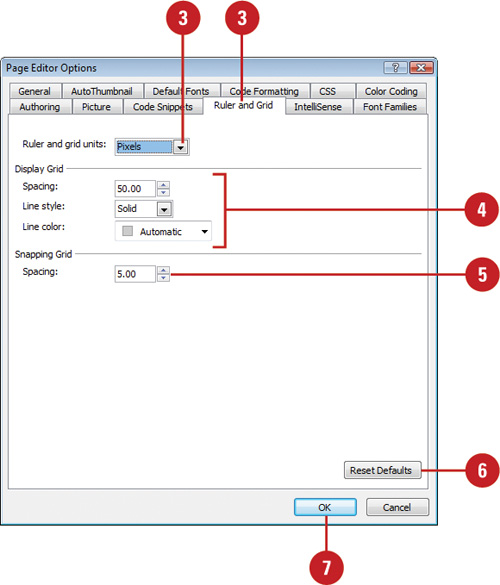
Expression Web provides rulers and a visible layout gride to make it easier to create, modify, and align elements of all types on Web pages in Design view. On the Ruler and Grid tab in the Page Editor Options dialog box, you can select from a variety of options, such as ruler and grid measurement units and the display grid spacing and line color.
- Click the Tools menu, and then click Page Editor Options.
- Click the Ruler and Grid tab.
- Click the Ruler and Grid Units list arrow, and then select a measurement.
- Select the spacing, line style, and line color for the display grid.
- Specify the spacing you want for the snapping grid.
- To reset to default settings, click Reset Defaults.
- Click OK.
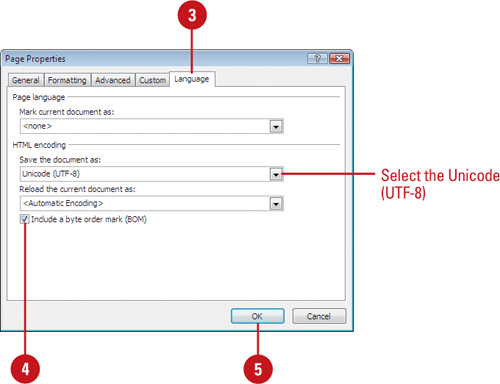
A Byte Order Mark (BOM) is a sequence of bytes embedded in a document that uses the Unicode encoding standard. The BOM helps make sure your documents are read correctly by some web browsers and servers. Expression Web allows you to add or remove a BOM in existing Web pages and documents as well as add a BOM to a new documents. By default, Expression Web adds a BOM to new documents with extensions HTM, HTML, CSS, DWT, JS, TXT, or XML that are encoded as Unicode (UTF-8), unless you change it. Be aware that not all documents, such as PHP, or servers support BOM, so you should not add BOM to them, which add unwanted characters.
- Open the Web page or document you want to add or remove a BOM.
- In Code view, right-click in the page, and then click Encoding.
The Page Properties dialog box (for a Web page) or Text File Encoding dialog box (for a document) appears.
- In the Page Properties dialog box, click the Language tab.
- Select the Include a byte order (BOM) check box to add it to an existing page or document, or clear the check box to remove it.
- Click OK.
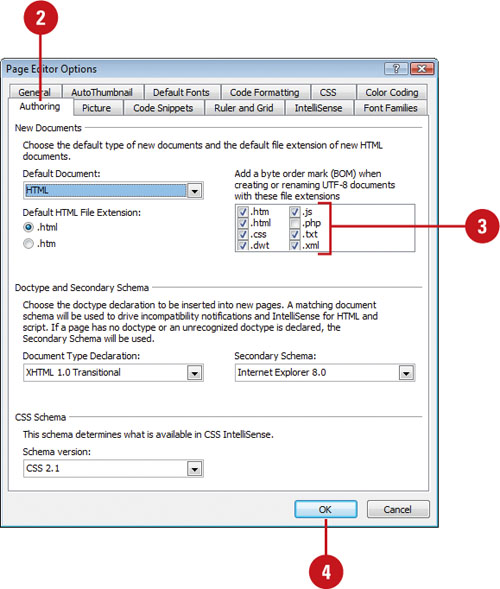
- Click the Tools menu, and then click Page Editor Options.
- Click the Authoring tab.
- Select the check boxes next to the extensions you want to add a BOM when you create new UTF-8 documents, or deselect the ones you don’t want to have a BOM.
HTM or HTML. A Web page.
CSS. A Cascading Style Sheet document.
DWT. A master page.
JS. A JavaScript document.
PHP. A PHP script page.
TXT. A text document.
XML.. An XML page.
- Click OK.
See Also
See “Changing Web Page Properties” on page 54 for information on the Unicode standard.
See “Working with Template Content” on page 26 for information on master pages.
A plug-in is different than an add-in, which is an external program designed to run and add functionality to another program. A plug-in is a software module that integrates into Web browsers to offer a range of interactive and multimedia features. If you open a Web page with an object that uses a plug-in, such as a MOV movie file, you can change plug-in properties in Expression Web. You can change the path to the data source, and object size and layout. You can also include a message for browsers without support for the plug-in.
- Open and display the Web page with the plug-in based object you want to change.
- Double-click the plug-in based object.
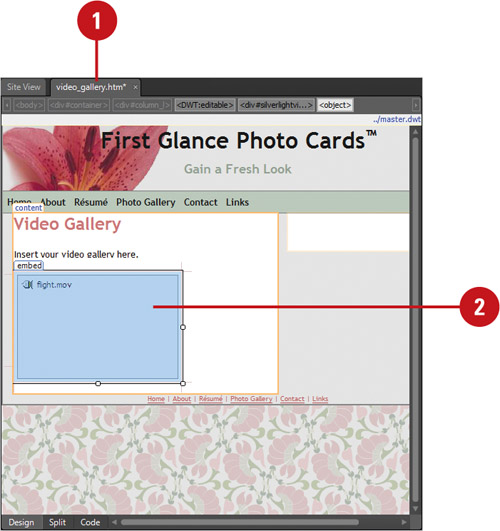
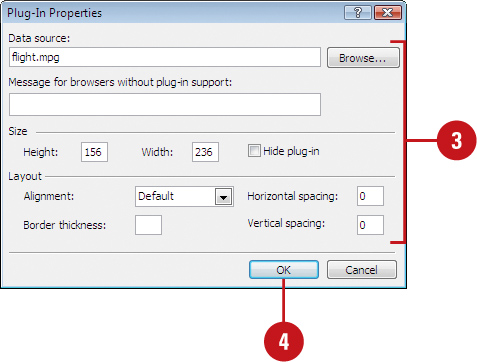
- Perform the options you want (options vary depending on the selected object):
Data Source. Specify the path and file to the data source.
Message for browsers without plug-in support. Enter the message you want a browser to display when it doesn’t support the plug-in.
Size. Specify the height, width, and weather to hide the plug-in.
Layout. Specify options for alignment, border thickness, and horizontal and vertical spacing.
- Click OK.