
In this chapter, you’re going to create Web page forms using Microsoft Expression Web. Forms that appear on Web pages are similar to paper forms. Web page forms share the same purpose (gathering information about your users) and use many of the same devices (check boxes, information fields, etc.) as paper forms. The most popular types of forms include:
Request
Registration
Feedback
Contact information
Survey
Guest book
Order (shipping and billing information)
Log On (prompts users to enter name and password)
Search (enables users to search your site)
After some initial design and thought for your form page, you can get started by adding it to your Web site, and then you can design and display all the various information that you want to gather using text boxes, check boxes, option buttons, labels, list menus, and push buttons. You can also further customize your form by adding pictures, and setting certain rules for entering the data in certain fields.
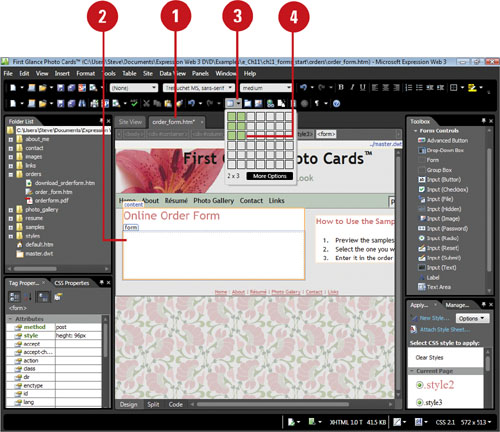
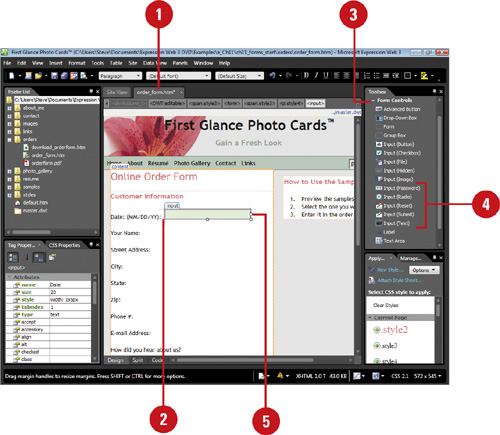
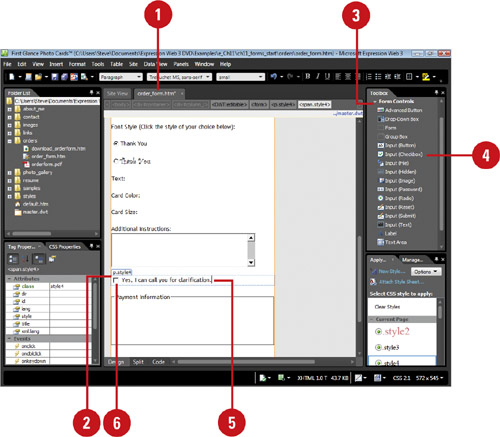
Expression Web offers numerous types of forms so that you can collect information from users to your site. You can start from scratch and create the form by adding information fields to a blank form, or you can use one of the wizard templates. When you first create a form, Expression Web inserts a rectangular box with a perforated line-dash perimeter. Inside this box, you can add everything from check boxes and text fields to list boxes and submit buttons. To help with the layout of the form, you can insert a table. If you no longer need a form or form field, you can select and then delete it.
 Open and display the Web page you want to use.
 Click to place the insertion point where you want to insert a form.
 In the Toolbox panel, click the plus sign (+) to expand Form Controls.
 In the Toolbox panel, double-click the Form button.
A form appears on the page with a dashed outline around the border.
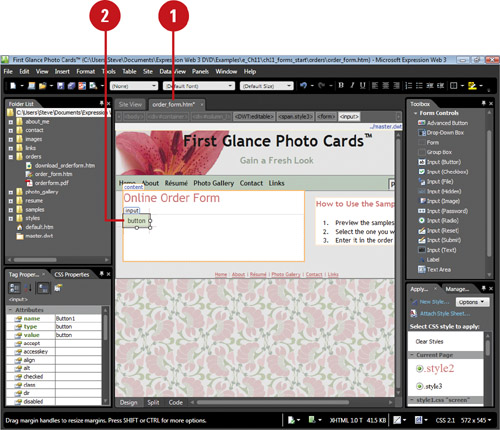
 Insert a table or press Enter to add space between form elements, and then type any text you want.
 To resize the form, click the edge of the form to select it, and then drag a resize handle to the desired size.
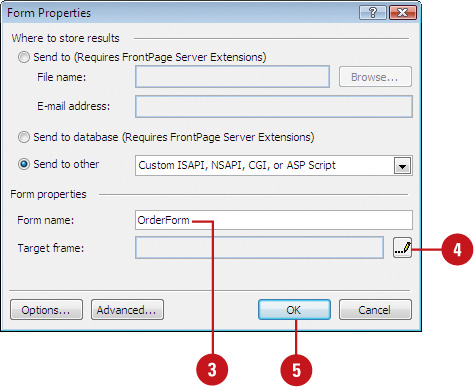
After you create a form, you can set form properties to name the form, specify a target frame and save the form results to a file or database, or send the form results in an e-mail message. When a site visitor fills out a form and submits it, Expression Web enters the data directly into a database or file, or sends an e-mail message. The form name you specify identifies the form in scripts. If you are using frames, you can specify a target frame.
- Open and display the Web page with the form you want to set properties.
- Right-click the form, and then click Form Properties.

- Type a name to identify the form.
- If you are using frames, type the target frame, or click the Browse button, select a target, and then click OK.
- Click OK.
See Also
See “Saving Form Results to a File” on page 276, “Sending Form Results as E-Mail” on page 278, “Saving Form Results to a Database” on page 282, or “Saving Form Results to a Custom Form Handler” on page 280 for information on saving form results to different locations.
One of the keys to creating a form is the creation of fields. There are many different types of fields, including text boxes, text areas, option buttons, list menus, and push buttons. In addition to these fields, there are also Advanced Buttons, which you can customize through font and color selection, and Group Boxes, which you can use to segregate clusters of related controls into one group. Password fields are basically one-line text boxes used to add passwords to your site so that you can restrict access (to charge for membership, for example). When a site user enters their password, it appears on screen as a collection of dots or asterisks to secure confidentiality.
After you’ve decided what types of fields to add to the form, you can define what you want them to do and how you want them to look. You can even set properties for each field, such as the length of a text field, or the available options on a list menu. You can insert form fields using the Form submenu on the Insert menu. If an item on the Form submenu is grayed out, the command is not available. You need a Web server equipped with FrontPage Server Extensions to activate the commands. After you create a form, you have to determine how to collect and display the user data.???
Table . Form Field Element Types
Field Element Type | Description |
|---|---|
Advanced Button | A button that executes an action, yet also embeds HTML content |
Drop-Down Box | Select an item from a list of several choices |
Form | Create a form to place form field elements |
Group Box | A titled border that surrounds a group of related elements |
Input (Button) | A button that executes an action using JavaScript |
Input (Check Box) | Select between two values, such as yes/no or true/false |
Input (File) | Browse and upload a file provided by the user |
Input (Hidden) | A text box that is invisible to users, yet available for data or execute an action |
Input (Image) | A picture as a button |
Input (Password) | A text field that inputs a password with dots instead of characters |
Input (Radio) | Select one value from a list of values |
Input (Reset) | A button that clears form fields |
Input (Submit) | A button that submits form field data |
Input (Text) | Enter short, one line text, such as a name |
Label | A text label that associates with a form control |
Text Area | Enter multiple line text, such as a comment |
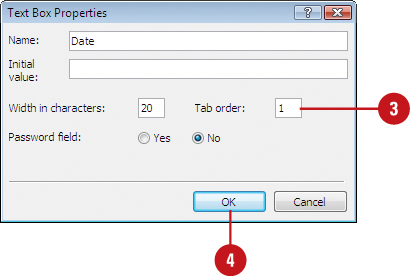
When you fill out a form, many times it is easier for users to move from field to field using the Tab key instead of clicking the mouse each time. Many form elements have a Tab Order field. Tab order determines which fields in a form receive the focus (active where you can enter data) when the user presses the Tab key. A form field with lower tab values receives the focus before any fields with higher values.

After you type a label next to a check box or option button, you can specify whether Web site users select the check box or option button by clicking the box or button, or its label. If you want your users to click the label, you need to active the label.
- Open and display the Web page you want to use.
- Click in the form where you want to place the label.
- In the Toolbox panel, click the plus sign (+) to expand Form Controls.
- In the Toolbox panel, double-click the Label button.
The text label appears surrounded by a perforated border, which indicates the label is active.
- Type the text you want in the label.

You can insert two types of text boxes in a form, Text Box and Text Area. Text boxes ask for information and provide a field where a user can type an answer. Text boxes are used for collecting relatively small quantities of information, such as the user’s online name. Text areas are small text windows best suited for brief text entries. This window scrolls vertically and horizontally to maximize its available space. They are ideal for use as guest books.
- Open and display the Web page you want to use.
- Click in the form where you want to place the text box or text area.
- In the Toolbox panel, click the plus sign (+) to expand Form Controls.
- In the Toolbox panel, double-click the Input (Text) button, Input (Password) button, or Input (Text Area) button.
The Input (Text) and Input (Password) buttons both create a text box. The only difference is an option in the Text Properties dialog box.
A text box or text area appears in the form with an insertion point next to it. You can click to place the insertion point before or after the text box.
- To resize a form field, click to select it, and then drag the sizing handles to the desired size.
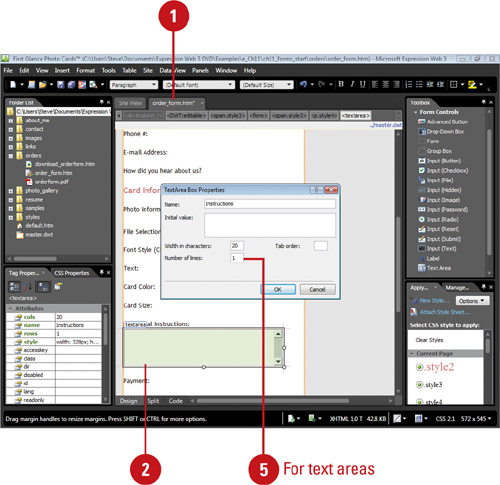
- Double-click the text box or text area.
You can also right-click the text box or text area, and then click Form Field Properties.
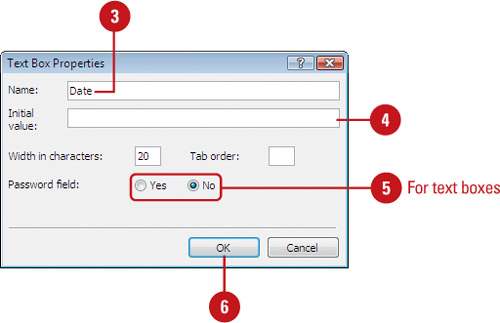
The Text Box or Text Area Properties dialog box opens.
- Enter a name that will identify the text box.
- Enter the text to be displayed in the text box when a site user first opens the form. As you type, the characters will be counted in the Width in characters box.
- Specify the field specific options for text boxes or text areas.
For text boxes, click the Yes option to create a password to your Web site so that you can restrict access. When a Web site user enters their password, it appears as asterisks for confidentiality.
For text areas, type the number of lines in which you want the area.
- Click OK.
The drop-down box allows users to choose one option from a scrollable list of choices. For example, you can create a list of all 50 states from which the user can choose one. The advantage of using a drop-down box is that the users are forced to select an option from the list, which prevents data input errors.
- Open and display the Web page you want to use.
- Click in the form where you want to place the drop-down box.
- In the Toolbox panel, click the plus sign (+) to expand Form Controls.
- In the Toolbox panel, double-click the Input (Drop-Down Box) button.
- Double-click the drop-down box.
- Type a name for the drop-down box.
 Click Add.
 Type the name of the list item you want to list.
 To have the item selected initially, click the Selected option.
 Click OK.
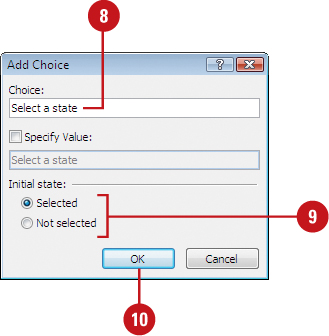
 Perform Steps 7 through 10 for each item you want to include in the list.
 Enter a height for the drop-down box.
 Click the Yes or No option to allow multiple selections.
 Click OK.
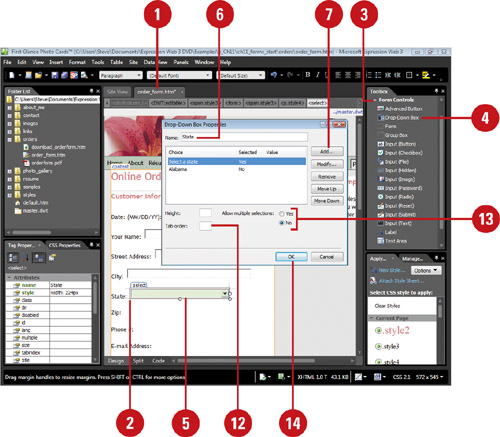
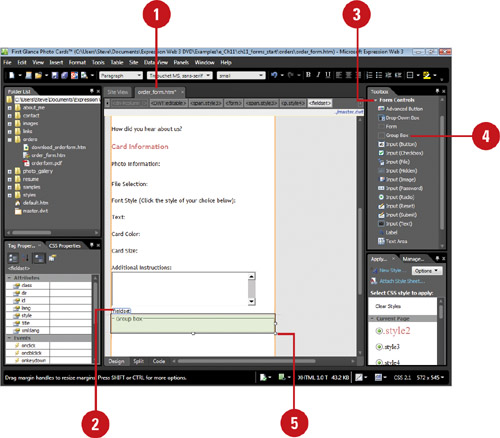
A Group box allows you to group related form elements into a separate area on the form, which provides some organization for the form elements and avoids confusion for the user. The Group box is useful for check boxes and option buttons. A Group box is a separate container on the form, so you can easily move it along with its contents.
- Open and display the Web page you want to use.
- Click in the form where you want to place the Group box.
- In the Toolbox panel, click the plus sign (+) to expand Form Controls.
- In the Toolbox panel, double-click the Group Box button.
- To resize the Group box field, click the edge of the field to select it, and then drag a resize handle to the desired size.
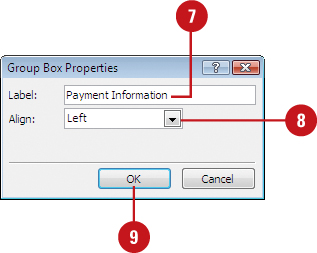
- Right-click the Group box field, and then click Group Box Properties.
- Type the label you want to appear at the top of the Group box.
- Click the Align list arrow, and then select an alignment option.
- Click OK.
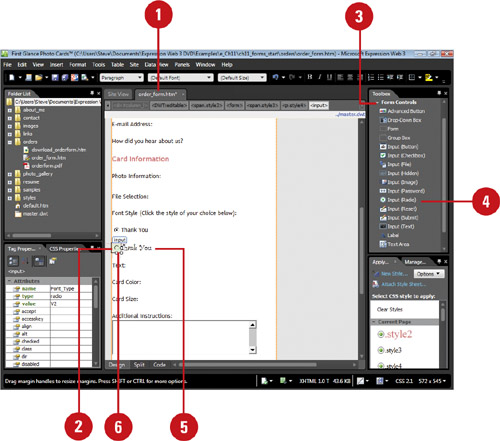
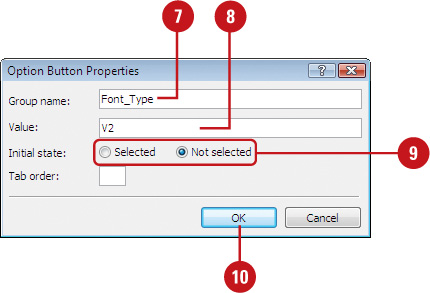
Radio buttons (also known as Option buttons) are used when asking a user a question with more than one possible answer. Only one option button in a group can be selected at a time. Expression Web groups option buttons within a form with the same name. Typically assigning the same name to fields creates errors, but not with the option button. You need to assign option buttons in the same group with the same name to function properly.
- Open and display the Web page you want to use.
- Click in the form where you want to place the option button.
- In the Toolbox panel, click the plus sign (+) to expand Form Controls.
- In the Toolbox panel, double-click the Input (Radio) button.
- Click next to the option, and then type a label.
- Double-click an option button within the group.
- Type a group name (the same one for each option button in the group).
- Enter a value to associate with the option.
This value is returned with the form results and is displayed on the default confirmation page.
- Click the Selected option or the Not selected option to set up the default state when a user opens the form.
- Click OK.
- Repeat steps 6 through 10 for each option button in the group.
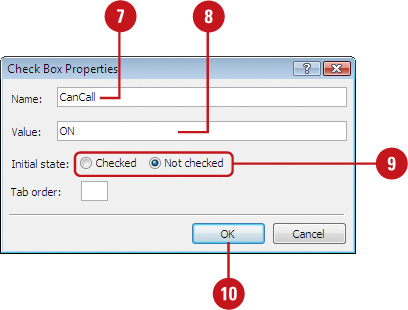
Check boxes are provided to allow users multiple choices from a list or series of options. Check boxes are just what they sound like—a statement which you can either confirm, by checking the box, or decline by leaving the box blank.
- Open and display the Web page you want to use.
- Click in the form where you want to place the check box.
- In the Toolbox panel, click the plus sign (+) to expand Form Controls.
- In the Toolbox panel, double-click the Input (Checkbox) button.
- Click next to the check box, and then type a label.
- Double-click the check box you want to change.
- Enter a name that identifies the check box in the form results.
The name is not displayed on the form.
- Enter a value to associate with the check box.
This value is returned with the form results and is displayed on the default confirmation page.
- Click the Checked option or the Not checked option to set up the default state when a user opens the form.
- Click OK.
Push buttons are functional components that are used when the user needs to do something. When you insert a form field, two buttons appear, Submit and Reset. The Submit button is a command that a user has to click to submit the form when completed, while the Reset button is a command that a user has to click to reset the form and start over. You can create a push button to perform an action.
- Open and display the Web page you want to use.
- Position the insertion point in the form where you want to place the push button.
- In the Toolbox panel, click the plus sign (+) to expand Form Controls.
- In the Toolbox panel, double-click the Input (Button), Input (Submit), or Input (Reset) button.
A push button appears in the form.
- Double-click the button.

- Enter a name that identifies the push button in the form results.
The name is not displayed on the form.
- Type the label that appears on the button.
- Click the button type you want (Normal is the standard button, Submit is a button that submits the completed form, or Reset is a button that clears the form so the user can start over).
- Click OK.

- Open and display the Web page you want to use.
- Position the insertion point in the form where you want to place the advanced button.
- In the Toolbox panel, click the plus sign (+) to expand Form Controls.
- In the Toolbox panel, double-click the Advanced Button button.
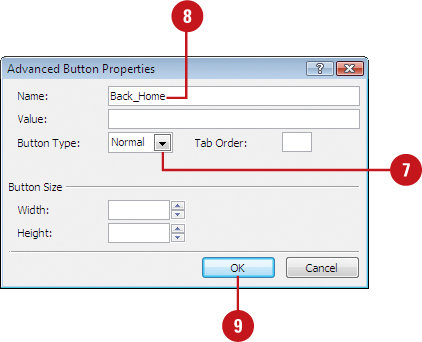
An Advanced button appears in the form with selected default button text.
- Select the button text, and then type a name for the button.
- Right-click the advanced button, and then click Advanced Button Properties.

- Click the Button Type list arrow, and then select a button type.
- Type a name to identify the button.
- Click OK.
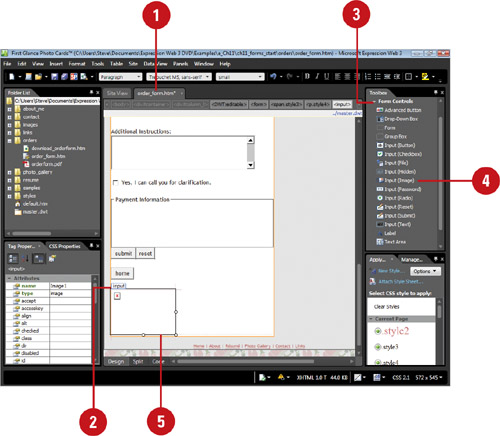
You can insert a picture in a form, which you can use as a button. If you want, you can use a picture button, like a push button, to perform an operation. You can insert a picture in a form in a similar way you insert a picture in a Web page.
- Open and display the Web page you want to use.
- Position the insertion point in the form where you want to place the picture.
- In the Toolbox panel, click the plus sign (+) to expand Form Controls.
- In the Toolbox panel, double-click the Input (Image) button.
- Resize the pictures field, and then double-click the picture field you want to insert a picture.
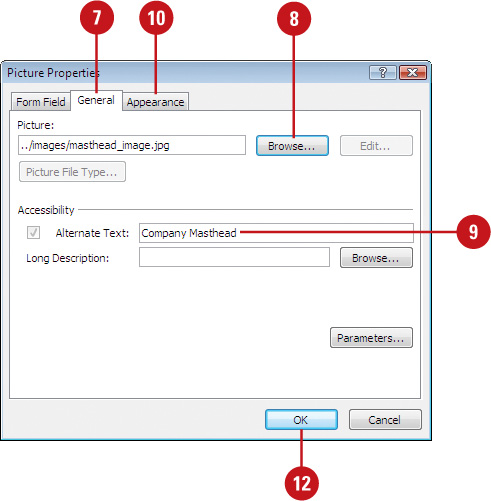
The Picture Properties dialog box opens, displaying the Form Field tab.
- Type a name to identify the picture.
- Click the General tab.
- Click Browse, locate and select the picture you want to use, and then click Open.
- Select the Alternate Text check box, and then enter descriptive text to display accessibility information.
- Click the Appearance tab.
- Select the wrapping style, layout, and size options you want.
- Click OK.
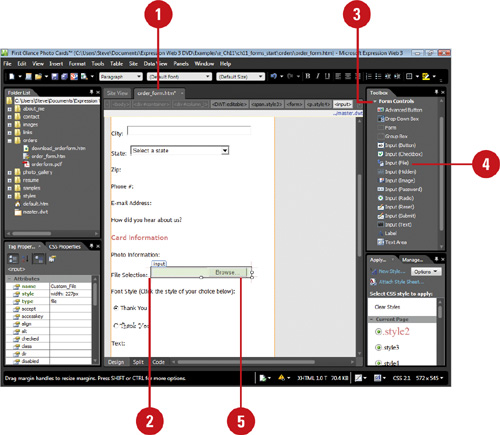
If you need to receive files from co-workers or users to your Web site, you can add a File Upload field to your form. When you add the File Upload field to a form, a text box and push button entitled Browse appear on the page. Users can use the text box to enter a path and file name or the Browse button to select a file to upload to your Web site. The file is transferred when you submit the form. If there is a problem, users can reset the form, and then try again.
- Open and display the Web page you want to use.
- Click in the form where you want to place the file upload field.
- In the Toolbox panel, click the plus sign (+) to expand Form Controls.
- In the Toolbox panel, double-click the Input (File) button.
- Double-click the file upload field.
- Type an internal name for the field.
- Specify the width of the field.
- Click OK.

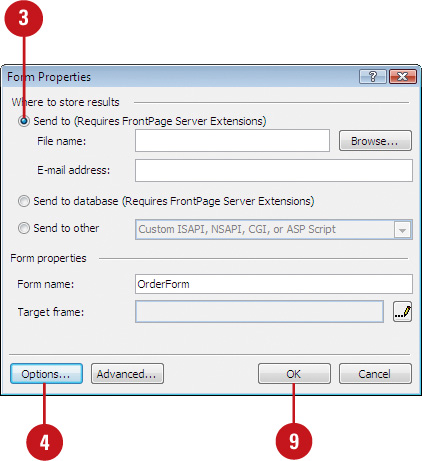
Once you create a form and collect information from users on the Web, you can save the form results to a text or HTML file. When a site user fills out a form and submits it, Expression Web enters the data directly into a file. The File Results tab provides options for saving results to a file. If you want to save results to two different file formats, you have the option of selecting a second file. By default, form results are saved to a text file. In order to save results to a file Expression Web requires FrontPage Server Extensions (FPSE), both on the Web server you use to develop the site and the one users use.
- Open and display the Web page you want to use.
- Right-click the form, and then click Form Properties.
- Click the Send to option.
- Click Options.
- Click the File Results tab.
- Enter the location and name of a new file, or click Browse, locate and select the file to which you want to save the results, and then click Open.
- Click the File format list arrow, and then select a file format.
XML. Select to export as XML data.
HTML. Select to create a definition list or bulleted list.
Formatted Text. Select to create with or without HTML.
Text database. Select a separator type, which you can import into a database.
- To pair the values of each form field with it’s name, select the Include field names check box.
- Click OK.

- Click OK.

A confirmation page provides information to your users submit a form. When a user submits data in a form, Expression Web displays a default confirmation page. If you prefer to use a confirmation page of your own (which needs to be a static page), you can specify one on the Confirmation tab in the Options dialog box for some form handlers. You can specify two different confirmation pages: one for when a user successfully submits a form and another for when a user’s input fails a validation script. Confirmation pages are optional. However, they provide good feedback for users and provide a way to thank them for submitting information.
- Open and display the Web page you want to use.
- Right-click the form, and then click Form Properties.
- Click the Send to option.
- Click Options.
- Click the Confirmation Page tab.
- Enter the URL of the confirmation page, or click Browse, locate and select the page, and then click Open.
- Enter the URL of the validation failure page, or click Browse, locate and select the page, and then click Open.
- Click OK.

- Click OK.
Once you create a form and collect information from users on the Web, you can send the form results in an e-mail message. As you send the results in an e-mail, you can also save the results to a file at the same time, so you have two records of the form results. To help automate part of the process, you can set e-mail settings and insert form field information in the e-mail message. In order to send results in an e-mail message Expression Web requires FrontPage Server Extensions (FPSE), both on the Web server you use to develop the site and the one users use.
- Open and display the Web page you want to use.
- Right-click the form, and then click Form Properties.
- Click the Send to option.
- Type the e-mail address to which you are sending the form results.
- If you want, specify a file to save the results in a file as well as being sent via e-mail.
- Click Options.
The Saving Results dialog box opens, displaying the File Results tab.
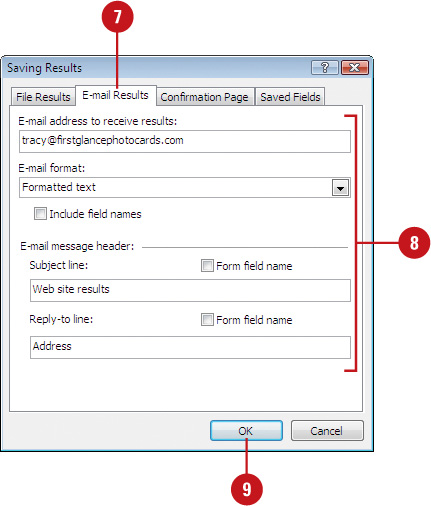
- Click the E-Mail Results tab.
- Perform one or more of the following steps:
In the E-Mail format box, select the text format you want from the list menu.
In the Subject line box, type the text that you want in the subject line of the e-mail (the default subject line in the e-mail is Form Results).
If you want the subject line of the e-mail to contain the results of one field from the form, select the Form Field Name check box, and then type the name of the field in the Subject line box.
In the Reply-to line box, a specific e-mail address can appear as the sender of the e-mail (the From or Reply To line in the e-mail). Enter the address.
If the form contains a field that collects the site user’s e-mail address, that address can be used as the sender’s address. Select the Form Field Name check box, and then type the name of the form field in the Reply-to line box.
- Click OK.
- Click OK to close the Form Properties dialog box.???

You can also set up a form to save results using a custom form handler. A form handler is a program on a server that is executed when a site user submits a form. You can use your custom script (ISAPI, NSAPI, CGI, or ASP Script) as a form handler. These custom scripts require scripting knowledge, which is beyond the scope of this book. In addition to the custom scripts, Expression Web also provides custom form handlers to work with a registration or discussion page. These form handlers require FrontPage Server Extensions (FPSE), both on the Web server you use to develop the site and the one users use.
- Open and display the Web page you want to use.
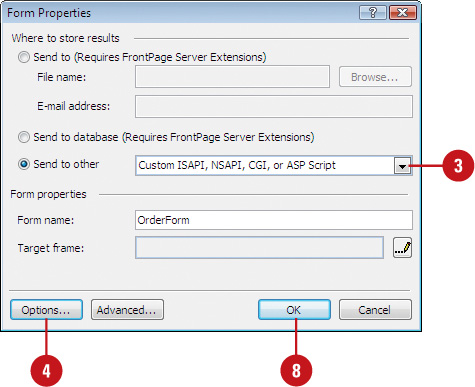
- Right-click the form, and then click Form Properties.
- Click the Send to other option, click the list arrow, and then click Custom ISAPI, NSAPI, CGI, or ASP Script.
- Click Options.
- Type the URL where you stored your script.
- Click the Method list arrow, and then select one of the following formats for submitting data to the form handler:
Post. Passes the name-value pair to the form handler as input.
Get. Encodes the form’s name-value pair and assigns the data to a server variable named Query_String.
Default. Leaves the Encoding type text box empty.
- Click OK.

- Click OK.

- Open and display the Web page you want to use.
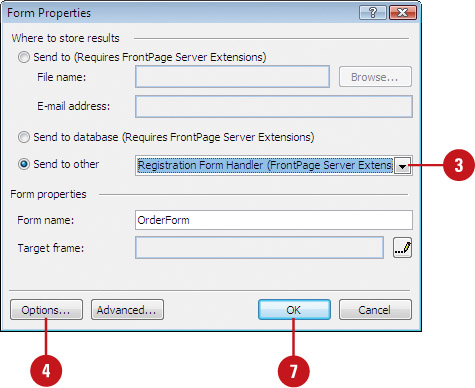
- Right-click the form, and then click Form Properties.
- Click the Send to other option, click the list arrow, and then click Registration Form Handler.
- Click Options.
- Fill in the information you want in the Registration, File Results, Confirmation Page, and Saved Results tabs.
- Click OK.
- Click OK.
Once you create a form and collect information from users on the Web, you can also save the form results to a database. You can save the results to an ODBC-compliant database, which includes Microsoft Access. When a site user fills out a form and submits it, Expression Web enters the data directly into a database. You can save the information in a form to a database by using a database connection. A database connection is a connection that specifies the name, location, and type of database you want to access. You can create a new database or connect to an existing one. The Web site enables you to view, update, delete, or add records. To view the data once you set up the connection, your Web site must be hosted or published on a Web server configured with FrontPage Server Extensions (FPSE) and Active Server Pages (ASP), if necessary. For example, a confirmation page must be an ASP page, other page types will not work with databases.
- Open and display the Web page you want to use.
- Right-click the form you want to save the results from, and then click Form Properties.
- Click the Send to database option.
- Click Options.
- Click the Database Connection to Use list arrow, and then select an existing database connection.
If you don’t have a connection, click Add Connection to create a new one, or click Create Database to have the FrontPage Extensions create a Microsoft Access 2002 database along with a connection for you.
- Click the Table to hold form results list arrow, and then select the table where you want to place the form results data from.
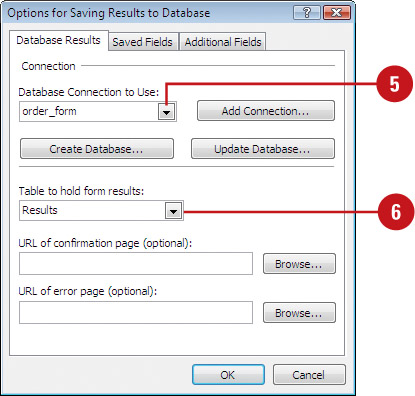
The fields in the form are listed. For each field, you must specify the database column in which you want to save the data.
If FrontPage Extension created the database, the form fields are mapped to the appropriate fields in the database.
- Click the form field you want to modify.
- Click Modify.
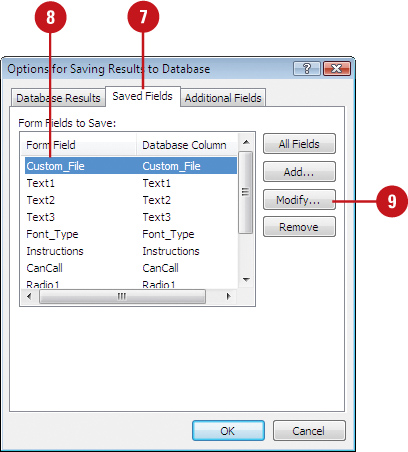
- Click the Save To Database Column list arrow, select the column where you want to save the form field data, and then click OK.
- Repeat steps 8 through 10 for each form field, and then click OK.
- To view and modify additional fields provided by Expression Web, click the Additional Fields tab, and then change the fields you want.
- Click OK.
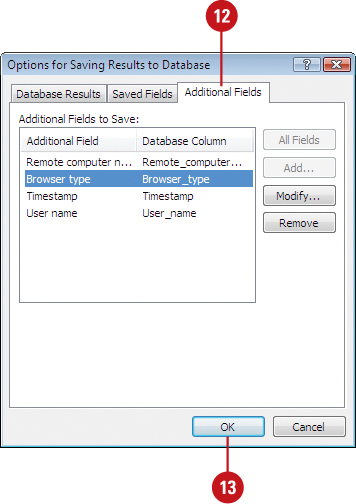
- Click OK.???

If you design a great looking form and then upload it to your Web server, you’ll find that when you fill out the form and click the submit button...nothing at all happens!
In order to get a form working, it is not enough to just design the form itself in HTML. You also have to create a form handler. A form handler is a program that runs on the Web server. The form handler takes the information entered in the HTML form by the user and does something with it. For example, you can use form handlers to send information as an e-mail or to a database. If you have FrontPage Server Extensions (FPSE) installed on your Web server, you can take advantage of Expression Web’s built-in form handlers. See pages 274-281 for topics related to form handlers using FPSE. If you don’t have FPSE or want to use them, you can find a form handlers on the Web.
When you add a form to a Web page, Expression Web inserts <form> tags. The <form> tag tells the browser where the form starts and ends. You can add all kinds of HTML tags between the <form> and </form> tags. When you submit a form, you need a program that can receive the information and do something with it. When you add a form to a Web page, Expression Web also adds the following properties to the <form> tag:
action=address
method=post or method=get

The address is the URL of a form handler, such as a CGI (Common Gateway Interface) script, where the form content is sent and processed. POST and GET are two different methods for submitting data to the script. If you use the GET method, the input values are passed as part of the URL. If you use the POST method, the information is sent to the server as part of the data body and will not be visible in the URL box in the user’s browser. Expression Web uses POST as the default method. Here’s an example of <form> tags in an HTML page:
<html>
<body>
<form action="http://www.mydomain.com/
myformhandler.cgi"
method="post"
name="myform">
<!-- Here goes form fields and HTML -->
</form>
</body>
</html>
Expression Web doesn’t include a form handler. The action property is left blank. However, there are many form handlers available for free or a small fee on the Web. Simply perform a Web search for “form handlers” or “CGI scripts” to find the form handler you need for the task you want to get accomplished.
As you add form fields—such as a text box, check box, radio button, drop-down menu or submit and reset buttons—to a form, Expression Web adds the HTML code between the <form> tags.
