Although flowchart layouts often flow from top to bottom, you can connect shapes from left to right, right to left, or even in a circular fashion. You can change the direction of the connected shapes in a diagram by using the Lay Out Shapes command on the Shape menu. As long as you've created shape-to-shape connections throughout a diagram, you can change the entire layout and reroute connectors.

In addition, if you need to update a large flowchart to include a new process, you can use the Lay Out Shapes command to realign the diagram. For example, you can add a new shape to an existing flowchart. After you connect the new shape, you can use the Lay Out Shapes command to adjust the layout and realign all the shapes.
Troubleshooting
When you change the layout of a diagram, you might find that it no longer fits on the drawing page. In this case, you can change the page size or orientation by clicking Page Setup on the File menu. Then click the Page Setup tab, and select a different page size or orientation.
You can also adjust the spacing between three or more shapes at a time by using the Distribute Shapes command on the Shape menu. When you distribute shapes vertically, the spacing is defined by the top and bottom shapes in the selection. When you distribute shapes horizontally, the spacing is defined by the leftmost and rightmost shapes in the selection.
You can use the Align Shapes command on the Shape menu to align two or more shapes. When you align shapes, the order in which you select the shapes is important. The secondary shapes you select align with the first selected shape (the primary shape). The primary shape is indicated by its dark-magenta selection box.
In this exercise, you use the Lay Out Shapes command to change a top-to-bottom flowchart to a left-to-right flowchart. You distribute several shapes so that they are evenly spaced, and then you align some shapes.
OPEN the ConnectLayout file in the My DocumentsMicrosoft PressVisio 2003 SBSConnectingShapes folder.
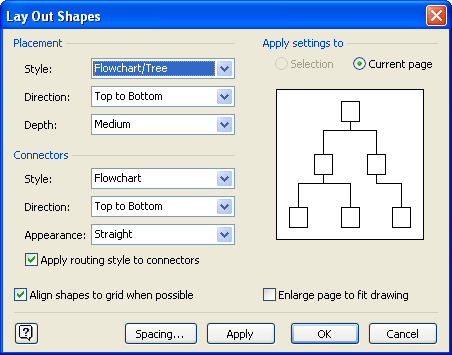
On the Shape menu, click Lay Out Shapes to open the Lay Out Shapes dialog box.
In the Placement area, click the down arrow in the Direction box, and then click Left to Right.
A preview of the new layout appears in the preview area.
Click OK.
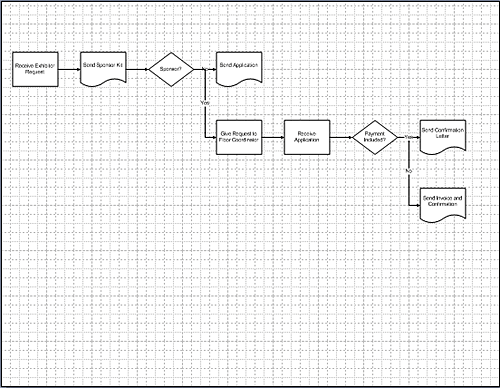
Visio changes the flowchart layout to left to right, but some shapes extend beyond the drawing page onto the pasteboard.
On the File menu, click Page Setup to open the Page Setup dialog box.
Click the Page Size tab, and then in the Page size area, click Pre-defined size.
In the Page orientation area, click Landscape.
A preview of the new page orientation appears in the preview area.
Click OK.
The drawing page is now set to a landscape orientation (wider than it is tall); however, the flowchart is slightly off center.
On the Shape menu, click Center Drawing.
Visio centers the flowchart on the drawing page.
On the Standard toolbar, click the Zoom down arrow, and then click 100%.
Visio zooms in to the center of the drawing page.
If you can't see the shapes on the right side of the flowchart, drag the horizontal scroll bar until you can see the Payment Included? shape, the Send Confirmation Letter shape, and the Send Invoice and Confirmation shape.
Select the Payment Included? shape, hold down the
 key, and select the Send Confirmation Letter shape and the Send Invoice and Confirmation shape.
Visio selects all three shapes.
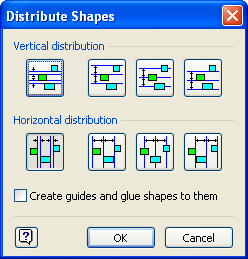
On the Shape menu, click Distribute Shapes to open the Distribute Shapes dialog box.
In the Vertical distribution area, click the leftmost button, and then click OK.
Visio positions the shapes so the spacing between them is even.
Select the Payment Included? shape, hold down the
key, and select the Receive Application shape and the Give Request to Floor Coordinator shape.Visio selects all three shapes. The first shape you selected, Payment Included?, is the primary shape.
On the Shape menu, click Align Shapes to open the Align Shapes dialog box.
In the Vertical alignment area, click the leftmost button, and then click OK.
Visio aligns the top of the secondary shapes with the top of the primary shape.
On the Standard toolbar, click Save to save your changes to the diagram.
CLOSE the ConnectLayout file.