Once in a while you might create a custom shape that you'll use only once. However, more often than not, you'll want to use your custom shapes again and again. Just as you can drag a shape from a stencil onto the drawing page to create a diagram, you can drag a custom shape from the drawing page onto a custom stencil to store it there. For example, if you customized a Visio title shape for your company's logo, you could drag it onto a custom stencil or the Favorites stencil so you could easily access it while creating any diagram. Likewise, if you use the same shapes from several different stencils over and over and you'd like to consolidate them onto a single stencil, you can add those shapes to a custom stencil or the Favorites stencil.
Tip
You can't modify or add shapes to Visio stencils. You must create your own stencils, and then add shapes to them. You can, however, add shapes to the Favorites stencil. To open the Favorites stencil, click the Shapes button on the Standard toolbar, point to My Shapes, and then click Favorites. To add custom shapes to the stencil, drag them from the drawing page onto the stencil. When you drag the first shape onto the stencil, Visio asks you if you'd like to edit the stencil; click Yes. To quickly add Visio shapes to the Favorites stencil, right-click a Visio shape on a stencil, point to Add to My Shapes, and then click Favorites.
Saving your custom shapes on custom stencils also makes it easy to distribute your shapes to other Visio users. When you create a new stencil, Visio saves it on your computer only. However, you can share a stencil just as you share drawing files by saving the stencil in a network folder that others have access to, or by sending the stencil in an e-mail message to your colleagues.
Tip
Stencils are files like Visio drawings files and templates. Stencils have a .vss file extension, which stands for Visio stencil. If someone sends a stencil to you, you can put it in the My Shapes folder in your My Documents folder for easy access. Then just open a Visio drawing file or template, click the Shapes button on the Standard toolbar, point to My Shapes, and click the name of the stencil to open it.
Stencils open, by default, as read-only —that is, a stencil can't be changed unless you specifically open it for editing. When you drag a shape onto a read-only stencil, Visio prompts you to open the stencil for editing so it can add the shape to the stencil. You can also click the stencil icon on the stencil, click Edit Stencil, and then drag the shape onto the stencil. When the stencil becomes editable, a red asterisk appears on the stencil icon on the title bar. When you create a new stencil, Visio opens the new stencil, by default, as an editable stencil; however, after you close it, it becomes read-only.

Shapes on stencils are represented by their corresponding icons and names. When you drag a new shape onto a stencil, Visio creates a shape icon and applies a default name (Master.1, for example). You can easily change the name to something more descriptive by double-clicking the default name and typing a new name.
In this exercise, you create a custom stencil, and then drag custom shapes onto it.
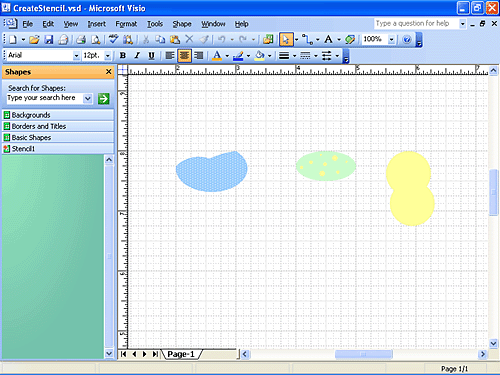
OPEN the CreateStencil file in the My DocumentsMicrosoft PressVisio 2003 SBSCreatingShapes folder.
On the File menu, point to Shapes, and then click New Stencil.
Visio opens a new stencil (named Stencil1) and docks it alongside the drawing page in the Shapes window. Notice the red asterisk that appears on the stencil icon in the stencil's title bar—this indicates that you can edit the stencil.
Drag the blue shape onto the stencil.
Visio creates a new shape (called Master.0) with a gray icon and removes the blue shape from the drawing page.
Troubleshooting
When creating icons for shapes on stencils, Visio uses only 16 colors, by default. If you create a shape that isn't formatted with one of those 16 colors, Visio substitutes the closest color when it creates the stencil icon. Visio does this to save disk space—an important consideration when dealing with a lot of stencils. That's why the icon for the blue shape you just added to the stencil is gray. However, when you drag the shape onto the drawing page, it appears just the way you designed it—blue. To edit the icon for a custom shape, right-click the shape, point to Edit Master, and then click Edit Icon Image.
Drag the green shape onto the stencil window.
Visio creates a new shape (called Master.1) with a gray icon and removes the green shape from the drawing page.
Tip
When you drag shapes from the drawing page onto a stencil, the shapes are deleted from the drawing page. If you want to retain the original shapes on the drawing page and drag a copy of them onto the stencil instead, hold down the
 key while you drag the shapes onto the stencil. Make sure you release the mouse button before you release the key when using this copying method.
Drag the yellow shape onto the stencil window.
Visio creates a new shape (called Master.2) with a gray icon and removes the yellow shape from the drawing page.
Tip
You can also save shapes on the Favorites stencil. To open the Favorites stencil, on the File menu, point to Shapes, point to My Shapes, and then click Favorites. Before you can add shapes to the Favorites stencil, you must make it editable by clicking the stencil icon, and then clicking Edit Stencil.
Right-click Master.0, and then click Rename Master on the shortcut menu.
The name, Master.0, is highlighted so typing the new name replaces the old name.
Type Thymus vulgaris, and press the
 key.
key.Visio changes the name of the shape to Thymus vulgaris.
Right-click Master.1, and then click Rename Master on the shortcut menu.
Type Rudbeckia hirta, and then press the
key.Visio changes the name of the shape to Rudbeckia hirta.
Double-click the shape icon name, Master.2.
Visio highlights the shape name.
Troubleshooting
Make sure you double-click the text for the shape icon and not the shape icon itself. If you double-click the shape icon, Visio opens a shape-editing window instead of selecting the shape icon name. To close the shape-editing window, click the Close Window button in the upper-right corner of the window.
Type Phygelius capensis, and then press the F key.
Visio changes the name of the shape to Phygelius capensis.
On the Stencil1 title bar, click the green stencil icon.
Visio displays a menu of commands for working with the stencil.
Click Save.
The Save As dialog box appears.
In the File name box, type Perennials, and then click Save.
Visio saves the stencil in the My Shapes folder by default, so the new stencil name, Perennials, will appear on the My Shapes submenu.
From the Perennials stencil, drag the Rudbeckia hirta shape onto the drawing page.
From the Perennials stencil, drag the other two shapes—one at a time—onto the drawing page.
On the Perennials title bar, click the green stencil icon, and then click Close.
Visio closes the stencil.
On the Standard toolbar, click the Shapes button, and then point to My Shapes.
The Perennials stencil appears on the My Shapes submenu.
Click Perennials.
Visio opens the Perennials stencil and docks it to the left of the drawing page in the Shapes window.
On the File menu, click Close.
Visio prompts you to save changes to the drawing.
Click No.
Visio closes the drawing and stencils.