As you create your Visio diagrams, you'll need to move shapes around the drawing page, resize shapes, and maybe even rotate and copy them. When you move shapes, you can move one at a time or many shapes at once. Moving one shape is simple—just select the shape and drag it to a new position. Moving multiple shapes at once is as simple as moving one shape. First you select the shapes you want to move, and then you position the pointer over one of the selected shapes. As you drag, all the selected shapes move as one.
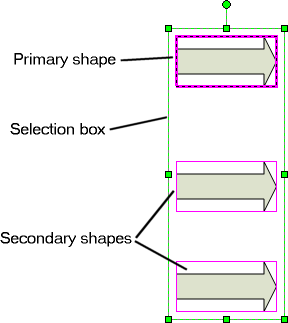
One of the most common ways to select multiple shapes is to select one of the shapes and then hold down the ![]() key while you select the rest of the shapes. The first shape you select is the primary shape. Its selection box turns dark magenta after you click an additional shape while holding down the
key while you select the rest of the shapes. The first shape you select is the primary shape. Its selection box turns dark magenta after you click an additional shape while holding down the ![]() key. The selection boxes for the other shapes you select, called secondary shapes, turn light magenta. Visio also encloses all the selected shapes in a green selection box. Knowing which shape is the primary shape will be useful when you learn about aligning shapes in Chapter 4 and merging shapes in Chapter 10.
key. The selection boxes for the other shapes you select, called secondary shapes, turn light magenta. Visio also encloses all the selected shapes in a green selection box. Knowing which shape is the primary shape will be useful when you learn about aligning shapes in Chapter 4 and merging shapes in Chapter 10.
Visio includes several other methods for selecting multiple shapes. If, for example, all the shapes you want to select are in the same area, as they might be in an office layout, you can use the Pointer tool to drag a green selection net around the shapes you want to select. After you release the mouse button, everything within the net is selected. You can also use the selection tools on the Pointer Tool menu (on the Standard toolbar) to select multiple shapes without holding down the ![]() key. To see the selection tools on the Pointer Tool menu, click the Pointer Tool down arrow.
key. To see the selection tools on the Pointer Tool menu, click the Pointer Tool down arrow.
Tip
To view Visio Help topics that tell you how to use the selection tools on the Pointer Tool menu, type the name of the tool in the "Type a question for help" box, and then press the ![]() key.
key.
The way you resize a shape depends on whether the shape is 1-D or 2-D. You can drag a 1-D shape's endpoints in any direction to lengthen the shape. When you're working with a 2-D shape, you can change the height or width of the shape by dragging a side, top, or bottom handle. You can also resize the entire shape proportionally by dragging a corner selection handle. To rotate a shape, you can simply drag the shape's rotation handle in the direction you want.
Tip
You can resize more than one shape at a time by selecting all the shapes you want to resize and then dragging a selection handle on the green selection box that encloses the selected shapes.
Copying a shape is also a simple procedure. Select a shape, and on the Edit menu, click Copy. Then on the Edit menu, click Paste—just as you would in any program in the Microsoft Office System. With Visio, you can go a step further by copying a shape and positioning it in the same action. To do so, instead of working with commands on menus, hold down the ![]() key while you drag a shape. This action copies the shape and positions it in the location where you release the mouse button. When you're done creating the copy, make sure you release the mouse button before you release the
key while you drag a shape. This action copies the shape and positions it in the location where you release the mouse button. When you're done creating the copy, make sure you release the mouse button before you release the ![]() key. Otherwise, Visio moves the shape instead of copying it.
key. Otherwise, Visio moves the shape instead of copying it.
In this exercise, you continue working with the block diagram that you updated in the previous exercise. You resize, move, rotate, and copy shapes in the diagram.
OPEN the BlockMoving file in the My DocumentsMicrosoft PressVisio 2003 SBSAddingShapes folder.
Click the Perennials, Bulbs, and Tubers shape to select it.
Position the pointer over the middle selection handle on the right side of the shape.
The pointer turns to a two-headed arrow and displays a ScreenTip.
Drag the section handle until the right side of the box is aligned with the right side of the Landscape Competition shape.
To get a closer look, position the pointer over the center of the Perennials, Bulbs, and Tubers shape, and hold down
 while you left-click.
Visio zooms in, and the Zoom box on the Standard toolbar displays the current level of zoom.
If you need to adjust the size of the box, drag the selection handle again.
Click the pasteboard to deselect the Perennials, Bulbs, and Tubers shape.
Position the pointer over the Enter classroom shape.
A four-headed arrow pointer appears, indicating that you can select the shape.
Click the shape to select it.
Position the pointer over the Enter classroom shape.
When a four-headed arrow appears, Visio is ready for you to move the shape.
Drag the shape to move it down a little.
Important
If you resize a shape accidentally instead of moving it, you can immediately undo your mistake by clicking Undo on the Edit menu; the keyboard shortcut for this command is
 . To avoid making this mistake, don't place the pointer over a selection handle when you want to move a shape. Place the pointer over the middle of the shape, and make sure the pointer changes to a four-headed arrow before you move the shape.
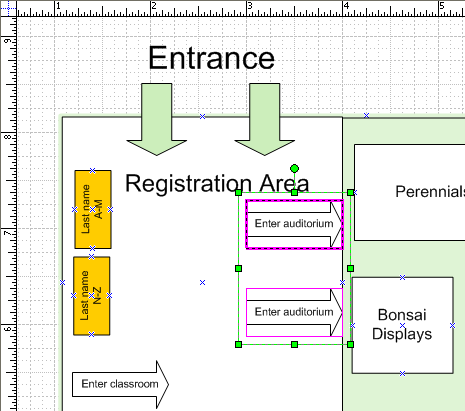
Position the pointer over the Enter auditorium shape.
A four-headed arrow pointer appears, so you know can select the shape.
Click the top Enter auditorium shape to select it.
Hold down the
 key, and then click the bottom Enter auditorium shape.
Visio selects both shapes and encloses the two selected shapes in a green selection box. The selection box for the first shape you select (the primary shape) changes to a dark magenta line. The selection box for the second shape you select (the secondary shape) changes to a light magenta line.
Point to the top Enter auditorium shape.
When a four-headed arrow appears, you can move the selected shapes.
Drag the top shape down approximately one inch.
As you drag, notice that all the selected shapes move at once. Also notice the tick marks that appear on the horizontal ruler to show the shape's position.
Click the pasteboard to deselect both shapes.
Select the Enter classroom shape, and then position the pointer over the rotation handle on the shape.
The pointer changes to a circular arrow, indicating that Visio is ready to rotate the shape.
Drag the rotation handle to the right until the shape points downward or is rotated clockwise 90 degrees. As you drag the rotation handle, watch the status bar, which shows the angle of rotation for the selected shape.
The shape is rotated clockwise 90 degrees and remains selected.
Position the pointer over the selected Enter classroom shape, and then hold down the
 key.
key.When a plus sign pointer appears, Visio is ready for you to copy the selected shape.
Drag the Enter classroom shape to the right to create a copy of the shape, release the mouse button, and then release the
key.A copy of the Enter classroom shape appears to the right of the original shape.
Click the pasteboard to deselect the shape.
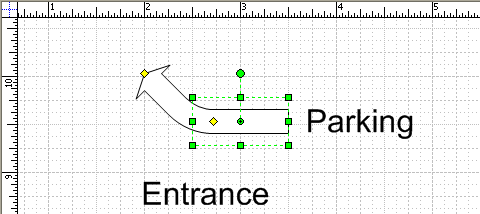
If you can't see the Parking label at the top of the diagram, drag the vertical scroll bar up until it's visible.
From the Blocks stencil, drag the Curved Arrow shape onto the drawing page, and position it to the left of the Parking label.
On the Shape menu, point to Rotate or Flip, and then click Flip Horizontal.
The shape is flipped horizontally.
Pause the pointer over the yellow control handle at the end of the arrow.
Visio displays a ScreenTip.
Drag the control handle down until the shape points toward the Entrance label.
If you need to align some of the shapes in your diagram more precisely, select them, and then nudge them using the arrow keys on your keyboard.
On the Standard toolbar, click Save to save your changes to the diagram.