
The key to creating great-looking shapes is to draw a rough version of the shape first, and then refine it. There are special handles on lines and arcs that you can use to reshape, add, move, and delete line segments. For example, if you draw a crooked line with the Pencil tool, you can edit the line segment to straighten it out and even change it to an arc. A diamond-shaped vertex appears where line segments are joined when you select a shape with the Pencil tool. You can delete, move, or add vertexes to reshape a shape with the Pencil tool. For example, you can delete a vertex from a square to create a triangle. A circular control point also appears on line segments selected with the Pencil tool. You can use a control point to change the curvature of a segment. When you move the control point down on a rolling hill shape, it becomes a sunken valley, and so on. Even if you can't draw a straight line, you can straighten a crooked line by editing the shape's vertices and control points.

Tip
Some Visio shapes are locked to prevent changes. If a shape is locked, its selection box is gray instead of green.
In this exercise, you use the Pencil tool to edit line and arc segments to refine the appearance of a plant shape that The Garden Company wants to use in its landscape plans.
OPEN the ModifyShapes file in the My DocumentsMicrosoft PressVisio 2003 SBSCreatingShapes folder.
 On the Standard toolbar, click the Zoom down arrow, and then click 200%.
Visio zooms in to 200% on the drawing page.
On the Drawing toolbar, click the Pencil Tool button.
Click the blue shape with the white, dotted fill pattern to select it.
Visio display the shape's vertices and control points.
Tip
In addition to moving and resizing shapes, you can use the Pointer tool to modify custom shapes. Select a shape you drew, position the pointer over the shape, and the shape's vertices and control points appear within the shape's selection box. Then drag a vertex or control point to move it. You can also drag a selection handle on the selection box to resize the shape.
Point to the leftmost vertex.
The pointer changes to a four-headed arrow, a selection box appears around the shape, and a ScreenTip for the vertex appears.
Click the vertex.
The vertex turns magenta.
Drag the vertex down approximately 1/4 inch.
Visio redraws the shape.
Click the lower-right vertex to select it.
The vertex turns magenta.
Visio removes the vertex and redraws the shape.
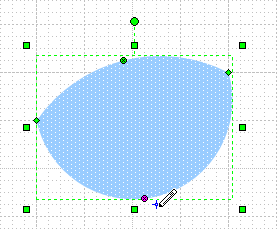
Click the lowest control point to select it.
The control point turns magenta.
Drag the control point slightly down and to the right.
Visio changes the curvature of the arc segment.
Hold down the
 key as you click the top edge of the shape.
Visio adds a vertex.
Drag the new vertex down and to the left approximately 1/4 inch.
On the Standard toolbar, click the Save button to save the changes to the drawing.


CLOSE the ModifyShapes file.