Microsoft Office Visio includes tens of thousands of shapes that you can use to quickly create diagrams. Shapes in Visio can represent both conceptual graphics and real-world objects, such as office furniture and network equipment. Shapes can be as simple as a rectangle that represents a step in a process flowchart, or they can be as complex as a hub in a network diagram. Because shapes can represent real-world objects, you can interact with them in ways that are similar to the ways you interact with the real-world objects. For example, you can use a handle to quickly rotate a chair shape so that it faces a desk. Pie chart shapes have handles that you use to adjust the size of a pie slice. On network hub shapes, you can even drag cables (represented by lines) from the hub to other network equipment shapes. And all Visio shapes include handles that you can drag to resize the shapes. Visio shapes are smart; that's what sets them apart from shapes in other programs and clip art.
As you add shapes to your diagrams, you'll need to arrange them on the drawing page. For instance, in a flowchart, you might move one shape at a time, but in an office layout, you might need to move all the shapes at once. You can also add titles to your diagrams or labels to your shapes by simply typing the text you want to add. You can customize the appearance of your diagram by modifying the text and shape attributes. If you can't find the shape you need on the stencils associated with the template, you can find shapes on other stencils or on the Web. In addition, you can insert a picture, such as a company logo or a piece of clip art, from another program into your Visio diagram.
In this chapter, you'll work with a block diagram—one of the most commonly used diagram types in Visio—that uses simple box and arrow shapes to represent the layout of a gardening expo hosted by The Garden Company. You'll learn how to work with different types of shapes, add text to shapes, move and size shapes, rotate and copy shapes, and otherwise modify the appearance of shapes. You'll learn how to search for shapes you can use to create diagrams and insert pictures from other programs into your diagrams. Last, you'll save the diagram with file information that can help you identify the file without even opening it.
See Also
Do you need only a quick refresher on the topics in this chapter? See the Quick Reference entries. in Quick Reference
Important
Before you can use the practice files in this chapter, you need to install them from the book's companion CD to their default location. See "Using the Book's CD" for more information.
Shapes are the building blocks of all Visio diagrams. To work efficiently with any type of shape in any diagram, you need to understand some basic shape behavior, the differences between the types of Visio shapes, and how to interact with Visio shapes.
One of the fundamentals of interacting with shapes is that you drag shapes—one at a time—from stencils onto the drawing page to add them to a diagram. Another is that before you do something to a shape, such as move it or change its color, you need to select it so that Visio knows you want perform an action on that specific shape. Just place the pointer over the shape you want to select, and when a four-headed arrow appears under the pointer, click the shape to select it. You know that a shape is selected when you see selection handles. To deselect a shape, click the pasteboard or a blank area of the drawing page.

Tip
Don't drag shapes back onto stencils to delete them from the drawing page. To delete a shape, select it, and then press the ![]() key.
key.
All Visio shapes behave like one-dimensional (1-D) or two-dimensional (2-D) shapes. This difference affects the type of selection handles that appear when you select a shape and the way you work with the shape. 1-D shapes behave like lines and 2-D shapes behave like boxes. This information might not seem consequential now, but as you work with Visio and eventually create your own shapes, knowing how both types of shapes behave will help you use Visio more skillfully.

When you select a 1-D shape, two selection handles (called endpoints ) appear that you can drag to resize the shape. The endpoint at the beginning of a 1-D shape is the begin point (represented by a x symbol), and the endpoint at the end of the shape is the end point (represented by a + symbol).

When you select a 2-D shape, a rectangular selection box appears around the shape. The selection box has eight selection handles: one handle on each of the four corners and one handle on each side of the selection box. One round rotation handle also appears above the selection box. You can drag the rotation handle to rotate a shape or any corner selection handle to resize a shape proportionally.

Tip
All Visio shapes behave either like 1-D shapes or 2-D shapes. However, some shapes might look 3-D but behave like 2-D shapes, and others might look 2-D but behave like 1-D shapes. You can determine which way a shape will behave by the selection handles that appear when you select it. If, after selecting the shape, you're still confused about a shape's behavior, on the Format menu, click Behavior to see whether the shape will behave like a 1-D or 2-D shape.
In addition to selection handles, some shapes have special handles called control handles. When you drag a control handle, it performs an action unique to that shape. For example, the Line-Curve Connector shape has a control handle that adjusts the curvature of the shape's arc, as the ScreenTip explains.

Tip
All Visio shape handles—selection, rotation, and control handles—have ScreenTips that explain what you can do with it. If you don't know how to use a particular handle, just pause the pointer over it to display its ScreenTip.
In this short exercise, you practice dragging a few 1-D and 2-D shapes onto the drawing page and selecting them. Then you drag a shape's control handle to change the shape's appearance.
Start Visio. In the Choose Drawing Type window, in the Category area, click Block Diagram.
In the Template area, click Block Diagram.
Visio opens a blank drawing page and four stencils.
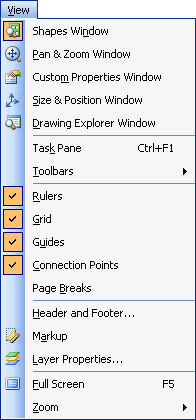
On the View menu, make sure that both Rulers and Grid are checked so that the rulers appear in the Visio drawing window and the grid appears on the drawing page.
In the Shapes window, on the Blocks stencil, pause the pointer over the Box shape. A ScreenTip appears that tells you how to use the shape.
Drag the Box shape onto the drawing page.
The shape is selected on the drawing page. It's a 2-D shape, so it is surrounded by a selection box with eight selection handles and one round rotation handle.
Note
As you drag shapes onto the drawing page, notice how they snap to the nearest grid line on the page to help you easily position and align them.
Click the pasteboard.
The Box shape is no longer selected.
Position the pointer over the Box shape.
A four-headed arrow pointer appears, indicating that Visio is ready for you to select the shape.
Click the Box shape.
The shape is selected again.
From the Blocks stencil, drag the 1-D Single shape onto the drawing page.
The shape is selected on the drawing page. This shape is a 1-D shape, so you can see its begin point and end point. The Box shape is no longer selected.
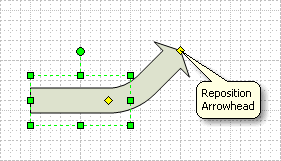
From the Blocks stencil, drag the Curved Arrow shape onto the drawing page.
The shape is selected on the drawing page. It's a 2-D shape, so it is surrounded by a selection box with eight selection handles and one round rotation handle. You can also see two yellow control handles on the shape.
Pause the pointer over the control handle on the arrowhead.
A ScreenTip appears that tells you what you can do with the control handle. The pointer changes to a four-headed arrow, indicating that Visio is ready for you to drag the control handle.
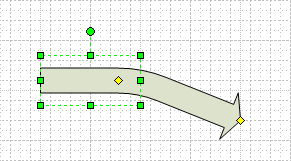
Drag the control handle to reposition the arrowhead.
On the File menu, click Close, and then click No to close the drawing without saving the changes.