
Now that you have laid out the design, it is time to begin building the solution. For this scenario you need to use the SharePoint 2010 web UI as well as SharePoint Designer 2010. The following sections will guide you through the implementation process of creating the site, infrastructure, workflows, and other supporting components that are required. After the implementation is completed, you’ll find a list of steps you can use to verify that the site is functional.
The learning center will be built in its own site collection. Use the information in the following table as input to the corresponding fields during site collection creation.
Field | Value |
|---|---|
Web Application | |
Title | Learning Center |
Description | Central site for users to view the current classes and their associated documents, discussion groups, and external links. |
URL | .../LearningCenter |
Template Selection | Blank Site |
Primary Site Collection Owner | Davis, Sara |
Secondary Site Collection Owner | Albrecht, Brian T. |
Quota Template | Application_40GB |
As you may have guessed, the calendar is going to be the focal point of the learning center. You will start out creating the calendar with a basic set of columns. Later in this chapter, after you have created all of the supporting infrastructure for additional lists and libraries, you will add lookup columns to the calendar to enable associations to be created for those entities.
Start by creating a new calendar on your learning center site. Use the information in the following table to create the Classes calendar.
Many of the columns that you require are provided out of the box on a standard calendar list: start date, end date, location, attendees, and so on. However, some additional columns are necessary to create a fully functioning and useful solution. Reference the information in the following tables to implement two new columns on the calendar.
Note
When creating columns with column names that are multiple words, it is advisable to create the column first without using spaces between the words. After the column is created, go back and add the spaces. For example, Class Id should be entered as ClassId and then changed to Class Id. The reason ties into the underlying structure of how the column name is stored and the ease of use for developers or power users who may work with the column in the future.
Field | Value |
|---|---|
Column Name | Presenter |
Type | Person or Group |
Description | (Leave blank since the column title is self-descriptive.) |
Required | Yes |
Allow Multiple Selections | No |
Allow Selection Of | People Only |
Choose From | All Users |
Show Field | Name (with presence) |
Add to Default View | Yes |
This example assumes that your organization allows only a single presenter for a given class. If that is not the case, select Yes for Allow Multiple Selections. However, this setting might have side effects outside what is intended with this example.
Field | Value |
|---|---|
Column Name | ClassId |
Type | Single Line of Text |
Description | Unique identifier for the class, which will be used in creating associations to other lists and libraries. |
Required | Yes |
Enforce Unique | Yes |
255 | |
Add to Default View | Yes |
Indexed Column | Yes (prompt appears after click OK) |
Why are you creating a separate column for ClassId when you already have the default ID?
In some organizations or companies, classes are identified by a specific combination of numbers or letters (for example, HR-302). To be more closely aligned with these considerations, you can use a Single Line of Text column instead of the default ID integer column to handle this data.
These are all the columns you will be adding at this time. You will revisit this list once you have created additional infrastructure for documents, discussion boards, and links.
Next you will create a view to address one of the business problems: the inability of users to find recently added classes. This view displays all classes that were created within the last 7 days. You can adjust the number of days as you see fit for your organization. Use the information in the following table to create the new view.
Field | Value |
|---|---|
View Name | New Classes |
Start From an Existing View | All Events |
Default View | No |
Audience | Public |
Columns | Title (linked to item) Description Presenter Location Start Time End Time |
Sort | Start Time |
Filter | Created is greater than [Today]-7 |
Inline Editing | No |
Tabular View | No |
Group By | None |
Totals | None |
Style | Newsletter |
Folders | Show items inside folders |
Item Limit | 30, Display in Batches |
Mobile | Enable, 3 |
Now that you have created the Classes calendar, you can begin implementing the rest of the supporting infrastructure. The next list, for announcements, also helps address the issue of finding classes. You will use this list along with a workflow on the Classes calendar to automatically post classes as they are added.
Create a new announcements list on your learning center site. Use the values in the following table to fill in the metadata during list creation.
Name | Template | Description | Navigation |
|---|---|---|---|
Class Announcements | Announcements | This list contains all the announcements able to be viewed by users. | Yes |
Out-of-the-box announcement lists are very simplistic with primary fields of Title, Body, and Expiration. As it turns out, these fields satisfy most of the needs you have for class announcements. One additional column that will help in linking directly to the class is a lookup column. The following table contains the metadata you will use to create this column.
Field | Value |
|---|---|
Column Name | AssociatedClassId |
Type | Lookup |
Description | (Leave blank) |
Required | No |
Enforce Unique | No |
Get Information From | Classes |
In This Column | ClassId |
Add a Column to Show Each of These Additional Fields | Title |
Add to Default View | Yes |
Enforce Relationship Behavior | Yes, cascade delete |
Indexed Column | Yes (prompt appears after click OK) |
An announcements list is a good way to alert users of recently added classes. If you want to take the solution one step further you can optionally configure alerts on the Class Announcements list or Classes calendar to send notifications to users. You will not be creating an alert in this scenario, but it is important to be aware of some of the advantages and disadvantages with alerts in case you do explore this path.
See Also
For more information about creating alerts, go to msdn.microsoft.com/en-us/library/bb802949.aspx.
In terms of advantages, you can specify the delivery schedule (immediate, daily, or weekly), the action conditions (item added, item modified, and so on), and additional criteria that is list-specific. Also, you have additional delivery methods (sending the alert as an email or as an SMS text message), provided that you have properly configured your farm to send alerts via these methods.
See Also
To read more about configuring SMS text messages, go to technet.microsoft.com/en-us/sharepoint/ff679921.aspx.
As for the disadvantages, if you create an alert for another user, that user might not be aware that you have configured the alert. In addition, you lose the ability to modify the alert after it has been created. You can delete the alert if you have permissions to do so, but you cannot modify it.
To make the most out of the Class Announcements list, you will want to add a list view web part for the list to the root page of the learning center site. Browse to the root page by clicking Learning Center on the breadcrumb link near the top of the page. Follow these steps to add the web part to the page:
Click the Page tab at the top of the page, and then click Edit Page on the ribbon.
After the page refreshes, click the Insert tab.
Click Web Part.
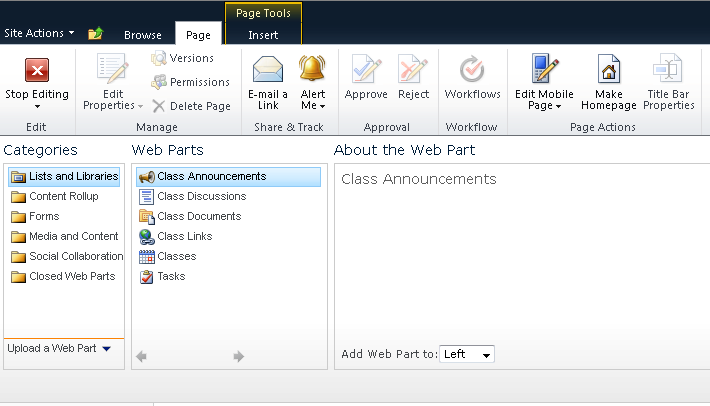
Select the Lists And Libraries category and the Class Announcements web part. Select Left from the Add Web Part To list. Click Add.
The following screenshot shows an example of adding the Class Announcements web part to the page.
After the page refreshes, click the Page tab and then click Stop Editing.
After you have added the web part to the page, your screen should look similar to the following screenshot.

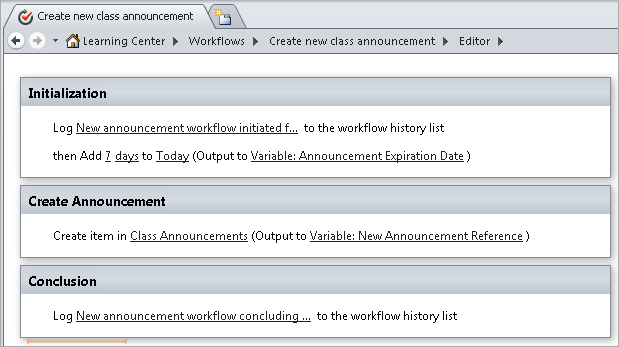
Presenters want other users to know about upcoming classes as soon as a presenter adds a class. Adding an announcement to the Class Announcements list can fulfill this need. To automate the process you will create a workflow on the Classes calendar. The workflow process will be as follows:
Log that workflow has initiated.
Define the expiration date as 7 days from today (store output in variable).
Create a list item in the Class Announcements list (store output in variable).
Log that workflow has concluded.
The workflow will be triggered when items are added to the Classes calendar. The expected outcome is to automatically add an item to the Class Announcements list with a link back to the new class item so that users can find more information about the class. You will also be performing simple logging should you need to troubleshoot the workflow in the future.
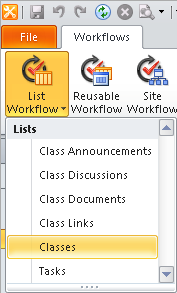
Open SharePoint Designer 2010 and open the URL of your site. Click Workflows in the bar at the left. Use the information in the following table to fill in the metadata for the workflow. To create the workflow, first click the List Workflow button in the upper-left corner and choose Classes. The screenshot shown here displays an example of the list workflow options. Note that the image includes some of the additional infrastructure that you will be adding throughout this chapter. Disregard those items for now.
Type | Target List | Name | Description |
|---|---|---|---|
List Workflow | Classes | Create New Class Announcement | Creates an announcement when new classes are added to the Classes calendar. |
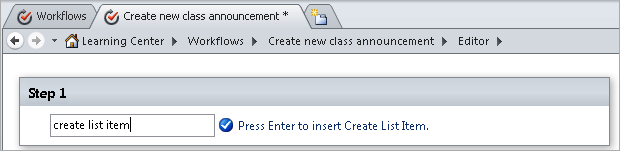
If you are familiar with the design surface for workflows in SharePoint Designer 2007, you may be in for a bit of a surprise, because the design surface in SharePoint Designer 2010 went through quite an overhaul from the previous version. Refer to the following screenshot for an example of using the SharePoint Designer 2010 workflow interface. To add workflow actions, you can begin typing the name of the action you want to use.
Start out by creating three steps for the workflow. Use the values in the following table for the steps and types of actions to create.
Step Name | Action Type |
|---|---|
Initialization | Log to History List Add Time to Date |
Create Announcement | Create List Item |
Conclusion | Log to History List |
As listed in the explanation of the workflow process, two variables need to be defined: Announcement Expiration Date and New Announcement Reference. You will need to define these variables when you fill out the associated action steps. Use the information in the following table to define the necessary variables.
Variable Name | Type |
|---|---|
Announcement Expiration Date | Date/Time |
New Announcement Reference | List Item ID |
With the variables created, you can now fill out the action steps. Use the information in the following table to fill out the Initialization step.
Action Type | Value |
|---|---|
Log to History List | New announcement workflow initiated from item ″[%Current Item:Title%]″ with ID ″[%Current Item:ID%]″ being added. |
Add Time to Date | Add 7 days to Today (Output to Variable: Announcement Expiration Date) |
In the preceding table, you might notice seemingly peculiar syntax for ″[%Current Item:...%]″ in the value column. This is SharePoint Designer’s syntax for specifying a lookup to a column in the Current Item object. In this scenario, Current Item equates to the class list item that the workflow is firing on. Refer to the following screenshots when selecting the ″[%Current Item:Title%]″ and ″[%Current Item:ID%]″ lookups.


Next you will implement the Create Announcement step. Use the information in the following table for the metadata to use.
Action Type | Value |
|---|---|
Create List Item | Create item in Class Announcements (Output to Variable: New Announcement Reference)
|
Next, fill out the Conclusion step’s actions with the values in the following table.
Action Type | Value |
|---|---|
Log to History List | New announcement workflow concluding from item ″[%Current Item:Title%]″ with ID ″[%Current Item:ID%]″ being added. |
At this point your workflow steps should look like the example in the following screenshot.
The last step is to define the workflow start options. Click Workflow Settings (see the following icon) on the ribbon.

You will be taken to the Workflow Settings page, which gives an overview of the workflow metadata, links to customize the workflow, and other useful information. To change the start options, look at the Start Options panel on the right side. By default your workflow will be set to Allow This Workflow To Be Manually Started only. Clear this check box, and then select the option Start Workflow Automatically When An Item Is Created.
After you have made your selections, the Start Options screen should look similar to the following:

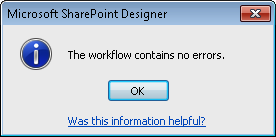
If everything was configured successfully, you should be able to click Check For Errors on the ribbon and see the following dialog box. At this point you can save and publish the workflow back to the site.
See Also
To read more about how accounts affect the starting of workflows, go to blogs.technet.com/b/victorbutuza/archive/2009/03/14/workflows-do-not-start.aspx.
The next major business problem that needs to be addressed is linking content to classes. To do this, you need additional infrastructure. The first component will be a document library in which to store class-related documents such as a syllabus or an agenda, prereading materials, and the like.
Create a new document library on the learning center site. Use the information in the following table as metadata for the new document library.
Name | Template | Description | Navigation |
|---|---|---|---|
Class Documents | Document Library | This document library contains all the documents able to be associated with classes. | Yes |
The Class Documents document library contains all the columns that are required, so there is no need to add other columns at this time.
Many times, classes or homework generate a number of questions, comments, or discussions between attendees and presenters. Discussion boards are a great tool to capture these elements so that multiple users can contribute to them and view them in a threaded manner. You will be creating a discussion board to help facilitate these needs.
Create a new discussion board on the learning center site. Use the information in the following table as input during the creation process.
Name | Template | Description | Navigation |
|---|---|---|---|
Class Discussions | Discussion Board | This discussion board contains all the discussions able to be associated with classes. | Yes |
The Class Discussions discussion board contains all the columns that will be required, so there is no need to add any additional columns at this time.
When a presenter delivers a class, the presenter will typically provide a number of links to websites, articles, or other web references. Even if attendees have enough time to write down these URLs, they might not navigate to them right away. To facilitate attendees being able to visit these URLs, you will be creating a Class Links list that can be linked back to classes.
Create a new links list on the learning center site. Use the information in the following table to create the Class Links list.
Name | Template | Description | Navigation |
|---|---|---|---|
Class Links | Links | This list contains all the links able to be associated with classes. | Yes |
When it comes to using the Links list template, you will run into an issue (which will become apparent in the next section) when you try to link to this list. The problem is that hyperlink columns cannot be the target of a lookup column. By default the Links list template uses a hyperlink (rather than a Title string) to represent the list item. Since you need a column to reference against, you’ll be adding a new Single Line of Text column and a workflow to work around this issue. Use the information in the following table to create a new column.
Field | Value |
|---|---|
Column Name | URLAsText |
Type | Single Line of Text |
Description | Copy of the URL column value in string/text format. |
Required | No |
Enforce Unique | No |
Maximum Number of Characters | 255 |
Add to Default View | No |
As mentioned in the previous section, Create the Columns, the workaround for referencing a link column from a lookup requires a workflow. This custom workflow may be one of the simplest you will ever create. The workflow will set the value of the URLAsText column to the value of the URL column formatted as a string. Use the information in the following table to create a new list workflow.
Type | Target List | Name | Description |
|---|---|---|---|
List Workflow | Class Links | Copy URL to URLAsText | Copies the value of the URL column formatted as a string into the URLAsText column on Class Links list. |
Since this workflow will have only one action step, you can omit additional logging steps and actions. Use the values in the following table to define the single step and action for this workflow.
Step Name | Action Type |
|---|---|
Copy URL value | Set Field in Current Item |
Next, fill out the action step using the following information:
Action Type | Value |
|---|---|
Set Field in Current Item | Set URLAsText to Current Item:URL |
Lastly, you need to define the starting options. Since the value of URLAsText must always be kept in sync with the URL value, you need to trigger the workflow whenever an item is created or edited. As you did with the workflow you created for class announcements, clear any default values and use the values Start Workflow Automatically When An Item Is Created and Start Workflow Automatically When An Item Is Changed.
Click the Check For Errors button on the ribbon. If no errors are returned, save and publish the workflow back to the site.
Now that you have implemented the additional infrastructure for class documents, class discussions, and class links, you can define the columns on the Classes calendar to associate them together.
You need three additional columns on the Classes calendar that correspond to the lists you just created. Use the following table to implement these additional columns.
Column Name | Field | Value |
|---|---|---|
AssociatedDocuments | Type | Lookup |
Description | (Leave blank) | |
Required | No | |
Enforce Unique | No | |
Get Information From | Class Documents | |
In This Column | Title | |
Allow Multiple Values | Yes | |
Add to Default View | Yes | |
Type | Lookup | |
Description | (Leave blank) | |
Required | No | |
Enforce Unique | No | |
Get Information From | Class Discussions | |
In This Column | Subject | |
Allow Multiple Values | Yes | |
Add to Default View | Yes | |
AssociatedLinks | Type | Lookup |
Description | (Leave blank) | |
Required | No | |
Enforce Unique | No | |
Get Information From | Class Links | |
In This Column | URLAsText | |
Allow Multiple Values | Yes | |
Add to Default View | Yes |
With these columns in place, you can now associate classes to documents, discussions, and links that have been added. Because you implemented the relationship in a class-as-child model, the associations will all be visible in a centralized location when users view the class.
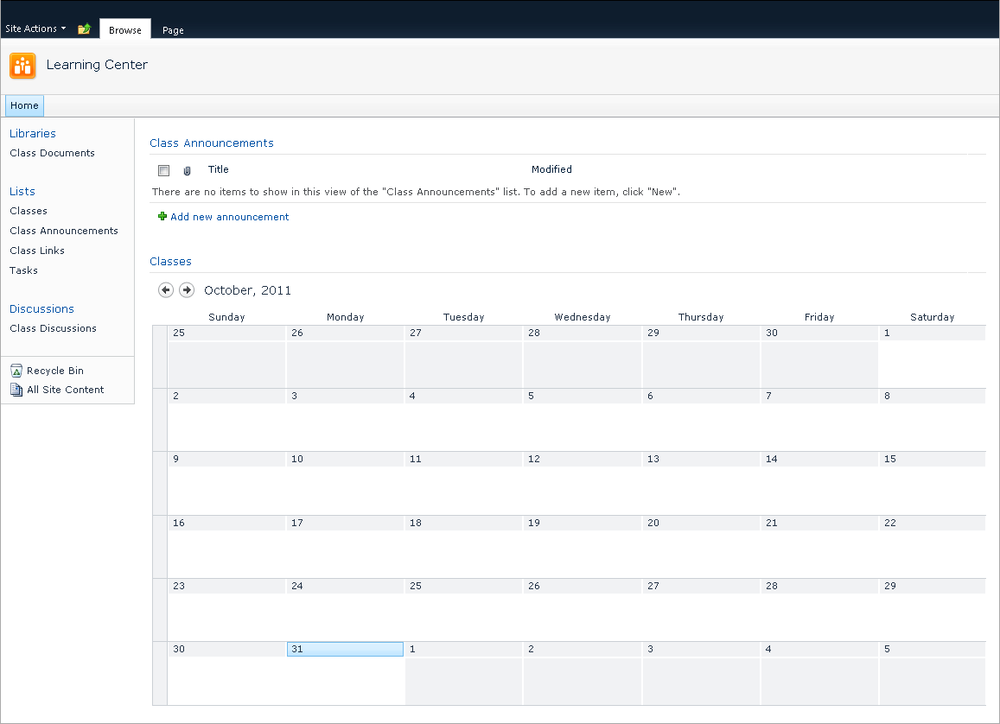
With the Classes calendar completed you can now add it to the root page of the site. This provides users with a quick glance of the classes when they visit the site. Follow the same process you did when you added the Class Announcements web part to the root page, only this time select the Classes calendar for the left web part zone. Once the web part is added, drag it below the Class Announcements web part. After you have completed these steps, your root page should look similar to the following screenshot.
The last business issue to address is automating some of the manual steps during the initialization process. Since the creation of a class triggers the creation of other elements (discussion board, document repository, and so on), you will use class creation to initiate a workflow. This workflow will be separate from the Create New Class Announcement workflow that you created earlier in this solution.
You may be asking yourself “Why am I creating a new workflow? Why don’t I add new logic and actions to the announcement workflow?” The reasons are maintainability and separation of concerns. You want your solution to be modular, meaning that each component addresses a single concern and doesn’t perform more actions than are necessary. By implementing a separate workflow for processes that are not directly related, you reduce the risk of breaking existing functionality.
The goal of this workflow is to add a new discussion thread to the Class Discussions list. The discussion thread subject line will be dynamically built from the name and ID of the class that is being created. After the discussion thread is created, you will go one step further and link the class (via the AssociatedClassDiscussions column) to the newly created discussion thread.
If you still have SharePoint Designer 2010 open, bring it back into focus. If not, launch it again and open the URL of the learning center site. Click Workflows in the left bar and create a new list workflow associated with the Classes list. Use the information in the following table to define the workflow.
Type | Target List | Name | Description |
|---|---|---|---|
List Workflow | Classes | Create New Class Initialization | Creates a discussion thread and links to current item when new classes are added to the Classes calendar. |
This workflow will have four steps. Use the information in the following table to define the steps and types of actions needed.
Step Name | Action Type |
|---|---|
Initialization | Log to History List Set Workflow Variable |
Create Discussion | Create List Item |
Link Discussion to Class | Update List Item |
Conclusion | Log to History List |
As you can see, the Link Discussion to Class step is a new step. This step is where you create the association between the class and the discussion thread. To do that, you need to define workflow variables. Use the values in the following table to define variables for use later in this workflow.
Variable Name | Type |
|---|---|
Discussion Subject | String |
New Discussion Reference | List Item ID |
You will begin by filling out the Initialization step. Use the information in the following table for the values to use for each action.
Action Type | Value |
|---|---|
Log to History List | New class initialization workflow initiated from item ″[%Current Item:Title%]″ with ID ″[%Current Item:ID%]″ being added. |
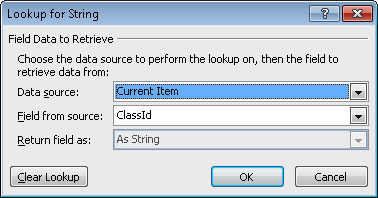
Set Workflow Variable | Welcome discussion for class ″[%Current Item:Title%]″ with class ID ″[%Current Item:ClassId%]″. |
Refer to the following screenshot when selecting the ″[%Current Item:ClassId%]″ lookup.
Next you will implement the Create Discussion step. Use the information in the following table for the metadata to use.
Action Type | Value |
|---|---|
Create List Item | Create item in Class Discussions (Output to Variable: New Discussion Reference)
|
The Link Discussion to Class step is different from what you created in the Create Announcement workflow. In this step you link the discussion just created to the current item. By doing so you replace two manual processes with one automated process, which helps out the learning center administrators. Use the following information to fill out actions in this step:
Action Type | Value |
|---|---|
Update List Item | Update item in Current Item
|
Note in the preceding table that you are setting the value of AssociatedDiscussions equal to Variable: New Discussion Reference (Return field as: Item Key). The last section about returning a field as an item key (the actual reference to the list item) is important and different from returning a value as a string (just the text of the list item property). See the following screenshot for an example of how to configure the lookup.

Next fill out the Conclusion step’s action using the following information:
Action Type | Value |
|---|---|
Log to History List | New discussion workflow concluding from item ″[%Current Item:Title%]″ with ID ″[%Current Item:ID%]″ being added. |
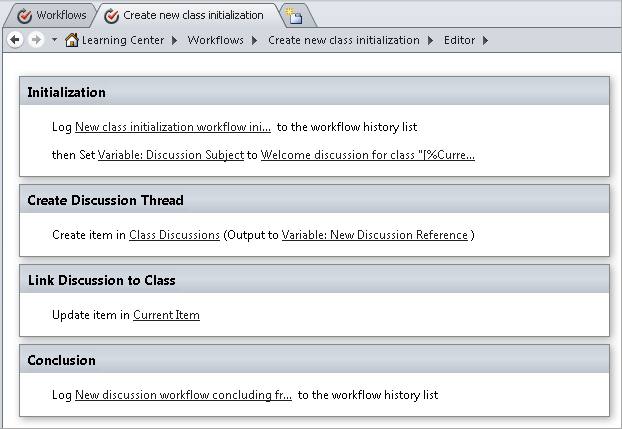
The following screenshot shows what your workflow should look like at this point.
Since you want this workflow to be triggered when a new class is created, you need to change the workflow start options. Click Workflow Settings on the ribbon. Clear the option Allow This Workflow To Be Manually Started, and then select Start Workflow Automatically When An Item Is Created.
Again, you should be able to click the Check For Errors button and receive the dialog box stating there are no errors. Save and publish the workflow to the site to finish up your work.
Security considerations vary greatly by organization. Some organizations must adhere to laws or regulations for implementing security. Other organizations freely allow end users to assign permissions. Based on these variances, you might or might not decide to restrict the out-of-the-box permissions. The security changes in this step will be optional for you to implement.
One of the primary security concerns will be that attendees have contributor access in order to view and add to discussion threads. Contributor access also grants permissions to delete list items (classes, documents, and so on). It is possible to remove the permission to delete items while retaining add and edit permissions through the use of custom permission levels.
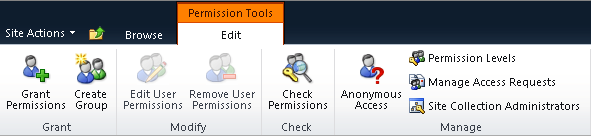
Since you are interested in making modifications to the Contributor permission level, you will make a copy of that permission level and save modifications to a new one. Navigate to the root of the site collection and open Site Permissions from the Site Actions menu in the upper-left corner. Click Permission Levels (see the following screenshot.)
On the list of permission levels, click Contribute. You want to copy these permissions to a new permission level, so scroll to the bottom of the page, and then click the Copy Permission Level button. Once the page refreshes, use the following information to define the new permission level:
Name | Description | Permissions to Remove |
|---|---|---|
Attendee | Copied permissions from Contribute permission level but remove Delete Items and Delete Versions list permissions. |
|
With the custom Attendee permission level created, you can now assign it to a SharePoint group. Navigate back to the Site Permissions screen. Click the Create Group button on the ribbon. Define the group metadata as you see fit, with the exception of the Give Group Permissions To This Site section. You will see that the new Attendee permission level is available. Select the check box for the Attendee permission level before saving. Now you can place attendee users into this group to ensure that they won’t be able to delete content from the site.
At this point you should have a fully functioning learning center—congratulations! Now take a quick review of your solution from the perspective of each user type to ensure that everything is working properly. Use the following information to perform the activities per user role to ensure that your site is working properly. Note that this is not a full test of functionality or compatibility.
Activity to Test | |
|---|---|
Learning Center Administrator |
|
Presenter |
|
Attendee |
|