
Now that you have laid out the design, it is time to begin building the solution. For this scenario you will use the SharePoint 2010 web UI as well as SharePoint Designer 2010. The following sections guide you through the implementation process of creating the site, infrastructure, workflows, and other supporting components. After the implementation steps, you’ll find a wrap-up with steps you can follow to verify that the site is functional.
The help desk will be built in its own site collection to prevent any conflicts with other solutions you may be building. You can create the site collection through Central Administration or the SharePoint PowerShell commandlet New-SPSite. If you do not have access to either of these, contact your administrator for assistance. Use the information in the following table as input for the corresponding fields during site collection creation.
Field | Value |
|---|---|
Web Application | |
Title | Help Desk |
Description | Site used to enter and track service requests for a departmental organization. |
URL | .../HelpDesk |
Template Selection | Blank Site |
Primary Site Collection Owner | Herriman, Annie |
Secondary Site Collection Owner | Price, Jeff |
Quota Template | Application_40GB |
One aspect of the help desk solution is that it will be used by a variety of user types. To provide more targeted content to each user type, you will be creating multiple pages to host the content specific to each group. By default, the Blank Site template does not contain a document library to contain these pages, so you will have to create one.
You will be adding a new document library through a different method than you may be used to. The purpose of this is to highlight that you cannot add a new page to the Blank Site template without the supporting infrastructure—a document library—to support it. Click Site Settings and then click More Options. Choose Page in the Pages And Sites section. You should see the window shown in the following screenshot, stating that you need to have a wiki page library and site assets library in order to create a new wiki page. Click the Create button to create the document libraries.

Note
The preceding screenshot assumes that you have not installed the Silverlight runtime or are using the non-Silverlight interface for creating items. If you are not using this interface, your screen and steps will look slightly different, but the concept is the same.
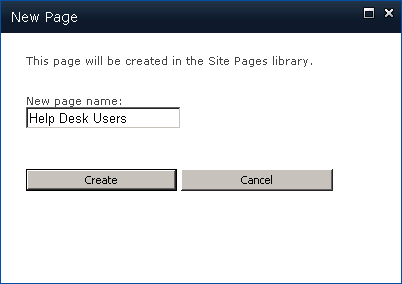
After the document libraries are created, you will be asked to enter the name of the page to create. Enter Help Desk Users as shown here:
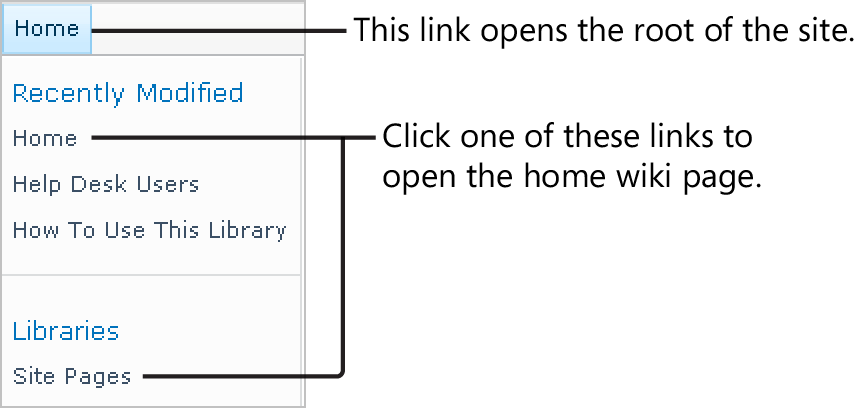
After the wiki page and site assets libraries are created, you are taken to the Help Desk Users wiki page. For the time being, leave this page alone. You need to define the wiki pages for the other user groups, and it will be easiest to complete this work from the home wiki page. You can get to the home wiki page from a number of locations, but two readily available ones are the Site Pages link under Libraries or the Home link under Recently Modified on the left hand navigation bar. Note that the Home link at the top of the navigation list will take you to the root of the site, not the home page of the wiki. See the following screenshot for an example.
Wiki pages use a special markup language that allows users to quickly and easily link to (or add) other pages. The process involves putting the page name you want to use in a set of double square brackets, such as [[Help Desk Users]]. You will be adding links to the three user pages from the Home page.
Once you are on the Home wiki page, click the Page tab on the ribbon and click Edit to edit the page. Clear all content from the page. Next you will enter links to the pages that you want to define and link to. Enter the following links on separate lines on the page:
[[End Users]]
[[Help Desk Users]]
[[IT Managers]]
When you have entered the links on the page, click Save & Close on the ribbon. The following screenshot shows the results.
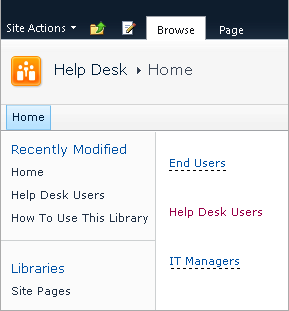
Notice that the links for End Users and IT Managers have dotted lines beneath them. The dotted line signifies that you have linked to a page that does not currently exist. Click the link for End Users. You will then see the following dialog box. Click Create.

You will be taken to a blank page, which is the End Users page. You still need to create the IT Managers page, so return to the Home page using one of the two methods described earlier. Once on the Home page, click the link for IT Managers. You will be presented with a dialog box that asks you to create the IT Managers page. Click Create.
To make it easier for users to access these pages, you can modify the Quick Launch bar. You will create a new heading for Site Pages with direct links to the pages. Then you will clean up the default links that were created.
Start by navigating to the Site Settings page and clicking Quick Launch under Look And Feel. Click the New Heading button. Use the information in the following table to create the new heading. This will be a relative address to the current site because it does not begin with http:// or a slash ( / ).
Web Address | Description |
|---|---|
SitePages | Site Pages |
You will then be returned to the Quick Launch settings page. Next you will create the three links below the Site Pages heading you just created. Use the information in the following table to create the links. You need to click New Navigation Link once for each link to enter the information.
Web Address | Description | Heading |
|---|---|---|
SitePages/End Users.aspx | End Users | Site Pages |
SitePages/Help Desk Users.aspx | Help Desk Users | Site Pages |
SitePages/IT Managers.aspx | IT Managers | Site Pages |
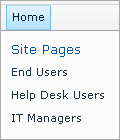
The next step is to remove the default Site Pages link to reduce confusion for all groups of users. Click the edit icon next to Site Pages under the Libraries heading. On the Edit Navigation Link screen, click the Delete button. After you finish this step, your Quick Launch will now contain links directly to each user page, as seen in the following screenshot. Try clicking the links to be sure they work properly.
You will revisit these pages later in the solution to add and configure web parts. Next up is creating lists.
The Service Requests list is going to be the heart of this help desk solution. End users will enter new requests, help desk users will act on service requests, and IT managers will review requests throughout their life cycle.
Start by creating a new custom list on your help desk site. Use the information in the following table to create the Service Requests list.
Name | Template | Description | Navigation |
|---|---|---|---|
Service Requests | Custom List | This list contains service requests entered by users. | Yes |
A default custom list is created with ID and Title fields. You will change the name of the Title column to a more meaningful name. Use the information in the following table to edit the Title column.
Field | Value |
|---|---|
Column Name | Service Request |
Type | Single Line of Text |
Description | (Leave blank since the column title is self-descriptive.) |
Required | Yes |
Enforce Unique | No |
Maximum Number of Characters | People Only |
Choose From | 255 |
Default Value | Text, [blank] |
Next you will create a number of new columns to be used for tracking requests. Use the information in the following table to create these columns.
Note
When creating columns with column names that are multiple words it is advisable to define the column name without spaces first. After the column is created, go back and add in the spaces. For example, Assigned To should be entered as AssignedTo and then changed to Assigned To. The reason ties into the underlying structure of how the column name is stored and the ease of use for developers or power users who may work with the column in the future.
Column Name | Field | Value |
|---|---|---|
AssignedTo | Type | Person or Group |
Description | User who is assigned to the request and is responsible for ensuring it is resolved. | |
Required | Yes | |
Allow Multiple Selections | No | |
Allow Selection Of | People Only | |
Choose From | All Users | |
Show Field | Name (with presence) | |
Add to Default View | Yes | |
Details | Type | Multiple Lines of Text |
Description | (Leave blank since the column title is self-descriptive.) | |
Required | No | |
Number of Lines for Editing | 6 | |
Type of Text | Plain text | |
Append Changes | No | |
Add to Default View | No | |
IsEmergency | Type | Yes/No |
Description | Check this box if this request requires immediate attention, otherwise you will receive an action response within 48 hours. | |
Default Value | No | |
Add to Default View | Yes | |
Status | Type | Choice |
Description | Current status of the service request. | |
Required | Yes | |
Enforce Unique | No | |
Choices | Entered Active Resolved Closed | |
Display Choices Using | Drop-Down Menu | |
Allow Fill-in | No | |
Default Value | Entered | |
Add to Default View | Yes | |
Comments | Type | Multiple Lines of Text |
Description | Comments for actions taken by help desk user towards resolution of request. | |
Required | No | |
Number of Lines for Editing | 6 | |
Type of Text | Plain text | |
Append Changes | Yes | |
Add to Default View | No | |
Resolution Date | Type | Date and Time |
Description | (Leave blank since the column title is self-descriptive.) | |
Required | No | |
Enforce Unique | No | |
Date and Time Format | Date Only | |
Default Value | None | |
Add to Default View | No |
In the description for IsEmergency, you specify that a nonemergency request will receive a response in 48 hours. This is only a sample value. Your organization might have a different value or none defined. Update the value or reword the description to suit your organization’s needs. Note that there are additional references to this 48 hour/2 day wait period that you would also need to update.
There are a number of views that can be created for the Service Requests list. Many of these can be drawn from the Fab 40 Help Desk template. For the sake of brevity, you will define three commonly used views: My Service Requests, Entered and Active Service Requests, and Service Requests Needing Action.
Each of these views will be used primarily by a specific user group. My Service Requests will be used by end users to track the progress of their service requests. Entered and Active Service Requests will be used by help desk users to find incoming service requests to be worked on. Service Requests Needing Action will be used by IT managers to find emergency requests, as well as requests that have been entered but not moved from the entered status after two days.
Use the information in the following table as input to define the My Service Requests view.
Field | Value |
|---|---|
View Name | My Service Requests |
Start From an Existing View | All Items |
Default View | No |
Audience | Public |
Columns | Service Request IsEmergency Status |
Sort | ID |
Filter | Created By = [Me] |
Inline Editing | No |
Tabular View | No |
Group By | None |
Totals | None |
Style | Default |
Folders | Show items inside folders |
Item Limit | 10, Display items in batches |
Mobile | Enable, 3 |
Next you will define the Entered and Active Service Requests view. Use the information in the following table as input to define this view.
Field | Value |
|---|---|
View Name | Entered and Active Service Requests |
Start From an Existing View | All Items |
Default View | No |
Audience | Public |
Columns | Service Request IsEmergency Status |
Sort | Start Time |
Filter | Status = Entered or Status = Active |
Inline Editing | No |
Tabular View | No |
Group By | None |
Totals | None |
Style | Default |
Folders | Show items inside folders |
Item Limit | 30, Display items in batches |
Mobile | Enable, 3 |
The last view is Service Requests Needing Action. This view will have additional sorting and grouping because it captures two different classifications of requests: emergency and nonemergency requests that are inactive for more than two days. Use the information in the following table to create the new view.
Field | Value |
|---|---|
View Name | Service Requests Needing Action |
Start From an Existing View | All Items |
Default View | No |
Audience | Public |
Columns | Service Request IsEmergency Status Created |
Sort | IsEmergency, then Created |
Filter | IsEmergency = Yes or Created is less than [Today] – 2 and Status = Entered |
Inline Editing | No |
No | |
Group By | None |
Totals | None |
Style | Default |
Folders | Show items inside folders |
Item Limit | 30, Display items in batches |
Mobile | Enable, 3 |
This concludes the creation and configuration of the Service Requests list. Next up is the Service Request Tasks list that will be associated with the Service Requests list.
The Service Requests list will be used for tracking individual service requests. Service requests can have a number of subtasks that may need to be completed to fulfill a given service request. You will be creating a customized task list to track these service request tasks.
The Service Request Tasks list will be based on the out-of-the-box Tasks list template. Use the information in the following table to fill out the metadata when creating the list.
Name | Template | Description | Navigation |
|---|---|---|---|
Service Request Tasks | Tasks | This list contains all the tasks associated with service requests. | Yes |
Tasks created in the Service Requests Tasks list will have a parent service request in the Service Requests list. This hierarchical relationship can be represented in a lookup column relating the task to the Service Requests list. Use the following information to create a new column for the Service Request Tasks list.
Field | Value |
|---|---|
Column Name | ParentServiceRequest |
Type | Lookup |
Description | (Leave blank) |
Required | Yes |
Enforce Unique | No |
Get Information From | Service Requests |
Service Request | |
Allow Multiple Values | No |
Add to Default View | Yes |
Enforce Relationship Behavior | Yes, cascade delete |
Indexed Column | Yes (prompt appears after click OK) |
The list of service request tasks could potentially grow very large. It’s helpful to create a view that will filter the tasks to only the ones that the logged-in user owns. Ownership in this scenario is defined by the user who created the service request. Note that this is separate from the out-of-the-box My Tasks view included with a list based on the Tasks template. Use the information in the following table as input for creating a new view.
Field | Value |
|---|---|
View Name | My Service Request Tasks |
Start From an Existing View | All Events |
Default View | No |
Audience | Public |
Columns | Service Request IsEmergency Status |
Sort | ID |
Filter | Created By = [Me] |
Inline Editing | No |
Tabular View | No |
Group By | None |
Totals | None |
Style | Default |
Folders | Show items inside folders |
Item Limit | 10, Display items in batches |
Mobile | Enable, 3 |
As mentioned earlier in this chapter, the management of service requests is very process oriented and follows a defined set of paths. You will be implementing a SharePoint list workflow to follow this path. At a high level, the workflow process will take the following steps (refer to the logical workflow diagram earlier in chapter for more details):
Log initialization and check if request is an emergency
Send confirmation email to requestor
Update item metadata
Send follow-up email to requestor and help desk users
Send resolved email when request completed
Log conclusion
Note
If you have not already done so, please read the section Create the Workflow in Chapter 4 for an example of creating a list workflow with SharePoint Designer 2010. It contains many screenshots and instructions that will be helpful if this is your first time using SharePoint Designer 2010 for implementing a workflow.
Launch SharePoint Designer 2010 and open the URL of the help desk site. Click Workflows in the bar at the left. Use the information in the following table as input for the workflow metadata.
Type | Target List | Name | Description |
|---|---|---|---|
List Workflow | Service Requests | New Service Request Created | This workflow sends notifications throughout life cycle and checks if service request is active after specific time period. |
Next, create the workflow steps. Use the information in the following table to define the step name and action types to insert inside the associated step.
Step Name | Action Type |
|---|---|
Initialization | Log to History List If current item field equals value
|
Send Confirmation Email | Send an Email |
Set Status | Update List Item |
Parallel block (will contain two substeps) | |
Send Resolved Email | Wait for Field Change in Current Item Send an Email |
Conclusion | Log to History List |
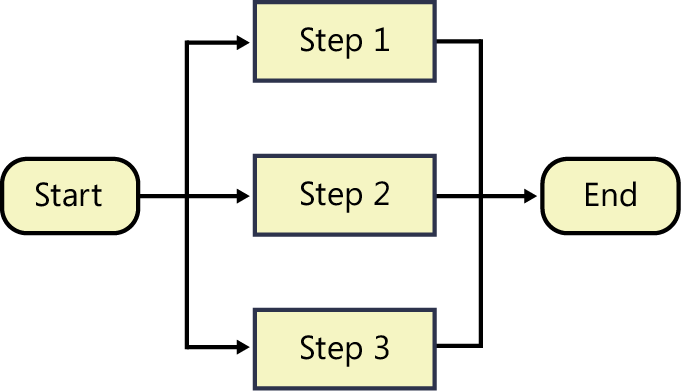
Notice in the Send Follow-Up Email step that you added a parallel block. Practically speaking, a parallel block is not an action type but is more similar to a workflow execution pattern. In a standard SharePoint Designer 2010 workflow, all actions are executed sequentially, meaning that each action follows after the completion of the previous action. A parallel block executes actions (or steps) at the same time and doesn’t wait for the others to finish. The following illustrations show the difference between sequential (first illustration) and parallel (second illustration) actions.

In your scenario, you want to send emails to two different groups of users. Because there are different conditions and configurations, it is best to group these actions into substeps that will run in parallel. Use the information in the following table to create two substeps and associated actions for the parallel block inside the Send Follow-Up Email step.
Step Name | Action Type |
|---|---|
Send Follow-Up Email—To Help Desk | Pause for Duration If current item field equals value
|
Send Follow-Up Email—To Requestor | Wait for Field Change in Current Item
|
There is one workflow variable that you need to create for the workflow. This variable will keep track of the number of days the workflow might need to pause before sending a reminder to defined groups. Use the information in the following table to create the workflow variable.
Variable Name | Type |
|---|---|
Number Days Pause Before Reminder | Integer |
The next step will be to fill in the values of the actions that you have added. Start with the Initialization step. Use the information in the following table to fill in the values for the actions.
Action Type | Value |
|---|---|
Log to History List | New service request workflow initiated from item ″[%Current Item:Service Request%]″ with ID ″[%Current Item:ID%]″ being added. |
If Current Item Field Equals Value | If Current Item:IsEmergency equals Yes |
Set Workflow Variable | Set Variable: Number Days Pause Before Reminder to 0 |
Else | NA |
Set Workflow Variable | Set Variable: Number Days Pause Before Reminder to 2 |
Move on to the Send Confirmation Email step. Use the following information to fill out the Send An Email action.
Action Type | Value |
|---|---|
Send An Email |
|
Note
To properly send emails from SharePoint, you need to be sure that your farm has been configured for outgoing mail via the settings in Central Administration. The steps to configure this feature are outside the scope of our solution, but refer your farm administrator to the following article if necessary: technet.microsoft.com/en-us/library/cc263462.aspx.
The next step to complete is Set Status. Use the following information to fill in the values for the Update List Item action.
Action Type | Value |
|---|---|
Update List Item | Update item in Current Item
|
As mentioned previously, the Send Follow-Up Email step has two substeps. You will configure the Send Follow-Up Email—To Help Desk step first. Use the information in the following table to fill in the actions for this step. Note that the Help Desk Users and Help Desk Managers groups are generic names. The groups that you use will be unique to your environment.
Action Type | Value |
|---|---|
Pause for Duration | Pause for Variable: Number Days Pause Before Reminder days, 0 hours, 0 minutes |
If Current Item Field Equals Value | If Current Item: Status equals Entered |
Send an Email |
|
Next you will complete the Send Follow-Up Email—To Requestor step. Use the following information to fill in the actions for this step.
Action Type | Value |
|---|---|
Wait for Field Change in Current Item | Wait for Status to not equal Entered |
Send an Email |
|
The next step is Send Resolved Email. Use the following information to fill in the actions for this step.
Action Type | Value |
|---|---|
Wait for Field Change in Current Item | Wait for Status to equal Resolved |
Send an Email |
|
The last step to configure is the Conclusion step. Use the information in the following table to fill in the logging message.
Action Type | Value |
|---|---|
Log to History List | New discussion workflow concluding from item ″[%Current Item:Service Request%]″ with ID ″[%Current Item:ID%]″ being added. |
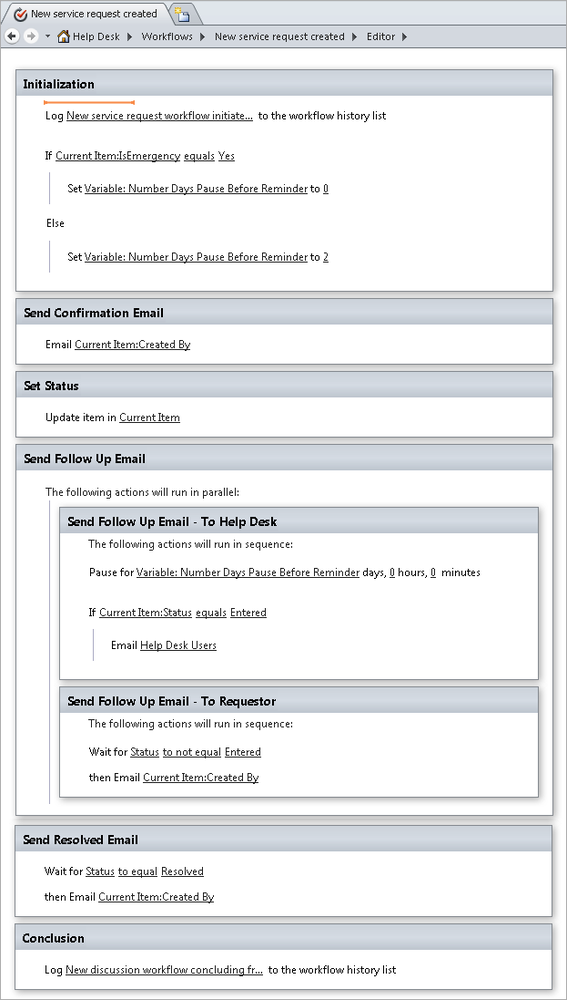
After you complete all of the configuration steps, your workflow should look similar to the following screenshot.
One new feature of SharePoint 2010 is its ability to use external, or pluggable, workflows. External workflows were available in the Workflow Foundation APIs that SharePoint leveraged since SharePoint 2007, but the SharePoint implementation of the workflow engine locked down these APIs until SharePoint 2010. Now it is possible to have a SharePoint workflow make calls to external systems, workflows, or processes and receive data back that is then acted on.
The implementation and configuration of external workflows can be fairly complex. External workflows are available only by building them in Visual Studio 2010. You also need to define an external event receiver for the external process to call into. You can get more information and examples at msdn.microsoft.com/en-us/magazine/ee335710.aspx.
The purpose of mentioning external workflows in this chapter is to provide options for integration with other systems you might use. These could be anything from third-party task-management systems to time-entry workflows to resource-scheduling processes and beyond. Work with your developers and managers to decide if there are integration points that make sense for your scenario and environment.
When the workflow diagram was introduced earlier in this chapter, it was mentioned that you would walk through the process of exporting and importing the workflow in Visio Premium and SharePoint Designer. In this section you can walk through those steps so that you are aware of the process.
First, open the New Service Request Created workflow that you just completed in SharePoint Designer 2010. On the ribbon, look for the Export To Visio button, as shown here:

You will be prompted to save the file with a .VWI (Visio Workflow Interchange) extension. Choose a folder location, type a file name, and click Save. You are now ready to import this file into a Visio diagram.
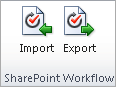
Launch Visio Premium 2010 if you have not done so yet. You cannot import a .VWI file directly to Visio. Instead, you must create a blank workflow diagram that you then overwrite with your imported .VWI file. Create a new diagram by selecting the Flowchart category Microsoft SharePoint Workflow. Next, click the Process tab on the ribbon and click Import in the SharePoint Workflow group. Refer to the following screenshot for the appearance of the Import and Export buttons you use in Visio.
Select the .VWI file that you exported from SharePoint Designer. Visio will convert the SharePoint Designer workflow steps, actions, and interactions into Visio components. The resulting diagram may not look the same as the workflow diagram earlier in this chapter. You can move elements and process flow arrows to match that diagram if you want to.
The process to export a drawing from Visio Premium 2010 to SharePoint Designer 2010 is similar to the process you just went through. Open the Visio diagram if you closed it. Click the Process tab on the ribbon, and then click Export. Again you will be presented with a dialog box to save the file with a .VWI extension. Choose a folder location, type a file name, and click Save.
Now switch back to SharePoint Designer 2010 or launch it if you closed it. Open the help desk site you are implementing. Click Workflows on the menu at the left. You will notice that the Import From Visio button is enabled on the ribbon. The following screenshot shows this button.

Click the Import From Visio button and specify the .VWI file that you exported from Visio. If you are importing into the same site that you originally exported from, you will receive a warning dialog box stating that you will replace the existing workflow. The following screenshot shows an example of that warning dialog box. As the message states, this operation cannot be undone, so be sure that you are overwriting the correct workflow.

Click Finish to continue. If you have not made any changes to the workflow in Visio, the imported workflow should look just as it did when you exported it from SharePoint Designer. This concludes the process of exporting and importing in SharePoint Designer 2010 and Visio Premium 2010.
Earlier in the chapter, you created three wiki pages to be used by the different user groups. Now that you have created the site infrastructure with lists and views, it is time to add and configure useful web parts on those pages.
Each of the three pages needs a list view web part for the Service Requests list, but they will be configured with different views. Use the information in the following table to add an instance of the specified web part and view to the associated page. Since there are no web part zones on these wiki pages, you will add them all to the Rich Content area.
Page | Web Part | View |
|---|---|---|
End Users | Service Requests | My Service Requests |
Help Desk Users | Service Requests | Entered and Active Service Requests |
IT Managers | Service Requests | Service Requests Needing Action |
On the Help Desk Users page, it would be helpful to display any associated service request tasks filtered by a selected service request. You can do this by creating what is called a web part connection. You can add the Service Request Tasks web part and create the web part connection in one action by using the Insert Related List button on the ribbon. With the Help Desk Users page in edit mode, click the upper-right box of the Service Requests web part. Next click Options on the Web Part Tools tab. Click Insert Related List and select Service Request Tasks from the list of options. See the following screenshot for an example.

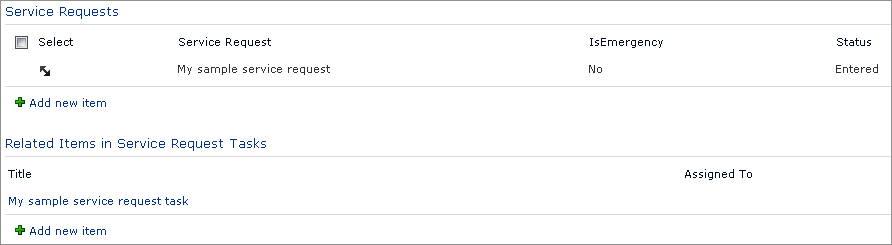
After you have inserted the related list, you can rearrange the web parts to put Service Requests above Service Request Tasks. The following screenshot illustrates this configuration along with a sample service request and associated task.
As mentioned in the section Designing the Solution, you will not be implementing audience targeting in this solution. The following, however, is a quick overview of the process and components that are required. Some of these items might require the assistance of your farm administrator because they involve farmwide configurations.
Audiences are based on user profiles. Thus, the first component that you need is a running instance of the User Profile Service service application. From the User Profile Service settings page you will define an audience. Audiences are composed of one to many filters. Once the filters are defined, you must compile the membership for the audience. At this point, you have a usable audience to which you can target content. When you edit an applicable web part, you will see a new option for target audience. Assign the target audience, and now they will begin to see the targeted content.
You should now have a fully functioning help desk application. As with any application, you should review and test all functionality from the perspective of each user type. Use the following information to perform the activities per user role to ensure that your site is working properly. Note that this is not a full test of functionality or compatibility.
User Role | Activity to Test |
|---|---|
End User |
|
Help Desk User |
|
IT Managers |
|