
10. Manage work tasks
In this chapter
![]() Create and manage project sites
Create and manage project sites
![]() Work with tasks, subtasks, and the timeline
Work with tasks, subtasks, and the timeline
![]() Manage projects by using SharePoint and Project Professional
Manage projects by using SharePoint and Project Professional
Practice files
No practice files are necessary to complete the practice tasks in this chapter.
SharePoint Server 2016 provides a lightweight project management system, where tasks and subtasks are stored in task lists and can be managed with Microsoft Project or Outlook, and you can keep them in sync. Microsoft Project Server extends the capabilities of Project and gives organizations a central location to store project information.
This chapter guides you through procedures related to creating and managing project sites; working with tasks, subtasks, and the timeline; and managing projects by using SharePoint and Project Professional.
Create and manage project sites
There are two types of project sites: ones that you can create by using the Project Site site template, and ones that you can create if your organization is using Project Server 2016, known as the Project Web App (PWA) site. Both can be used in conjunction with Project Professional 2016 to build and manage projects.
SharePoint 2016 project sites
When you create a project site, in addition to a document library and a site assets library, two other lists are created—Tasks (with a timeline) and Calendar—and the Project Summary web part is added to the home page.

Use the Project Summary web part on the project site home page to identify late and upcoming tasks
You can use the Project Summary web part to quickly monitor your projects’ health. It contains two sections:
![]() On the left side, project tasks are displayed by the number of days left until the task’s due date. When the task list contains no task items, the text “Get organized. Edit the task list” is displayed; when you select Edit, the task list is displayed in Quick Edit view.
On the left side, project tasks are displayed by the number of days left until the task’s due date. When the task list contains no task items, the text “Get organized. Edit the task list” is displayed; when you select Edit, the task list is displayed in Quick Edit view.
![]() On the right side, you can display either the timeline or the upcoming tasks pane, where tasks are displayed in the order of their due date. You use the arrows in the upper-right corner to switch between the two.
On the right side, you can display either the timeline or the upcoming tasks pane, where tasks are displayed in the order of their due date. You use the arrows in the upper-right corner to switch between the two.
You can also use the Project Summary web part to add tasks to the list and edit the list. When you add a Project Summary web part to a site that does not contain a task list, the web part displays a link that you can select to create a task list.
Many teams and projects do not initially create project sites, but use team sites and then later find that they need the extra project-related components on their site. Of course, you could manually create a task app, and then a calendar app, and then add the Project Summary web part to your home page; however, the easier way to add these components to any site is by activating a site feature.
![]() Tip
Tip
A site created from the Project Site site template automatically activates the Project Functionality site feature.
A disadvantage of using a project site is that, unlike a team site, a project site does not use wiki pages, and the project site’s home page is a web part page saved in the root of the website; therefore, you need to be a site owner to modify the page. A project site home page contains three web part zones: Top, Left, and Right.
![]() See Also
See Also
For information about creating task and calendar lists, see Chapter 3, “Work with content in lists and libraries.”
You might see other components on your project site, depending on the installation of other Microsoft server products in your organization:
![]() When SharePoint is bound to Microsoft Office Online Server 2016, a Microsoft OneNote notebook is created, allowing your team members to quickly capture and organize information about the project.
When SharePoint is bound to Microsoft Office Online Server 2016, a Microsoft OneNote notebook is created, allowing your team members to quickly capture and organize information about the project.
![]() If SharePoint is connected to Microsoft Exchange Server 2016, a project site can include a site mailbox for unified communication about the project as it progresses.
If SharePoint is connected to Microsoft Exchange Server 2016, a project site can include a site mailbox for unified communication about the project as it progresses.
![]() If a project site in a site collection is associated with Project Server 2016, the Tasks list can be added to the Project Web App site.
If a project site in a site collection is associated with Project Server 2016, the Tasks list can be added to the Project Web App site.
![]() See Also
See Also
For information about using OneNote and Outlook with SharePoint, see Chapter 12, “Collaborate with Office programs by using SharePoint.”
1. Go to the site where you want to create the new project site as a subsite.
2. To display the Site Contents page, do one of the following:
• From the Settings menu, select Site Contents.
• On the Quick Launch, select Site Contents.
3. Scroll to the bottom of the Site Contents page, and then under Subsites, select new subsite.
4. On the New SharePoint Site page, in the Title box, enter the name of the site, and in the URL name box, enter the website address.
5. Select the Collaboration tab, if it is not already active, and then select Project Site.
6. Select Create.
![]() Tip
Tip
If the Collaboration tab is not displayed, or the Project Site site template is not displayed on the Collaboration tab, check to make sure that you are creating the subsite in a site collection where the usage of the Project Site site template is allowed. For information about creating sites, see Chapter 8, “Create and manage sites.”
To add project features to a team site
1. Sign on to the team site as a site owner, and then do one of the following:
• If the site displays the Get Started With Your Site web part, select Working on a deadline?

Use the tile on the Get Started With Your Site web part to activate the project functionality features
In the Working on a deadline? dialog, select Add Them.

Use this dialog to quickly add a task list and calendar list to your site, and add the Project Summary web part to your site’s home page
![]() Tip
Tip
If the project functionality has previously been installed, a dialog that allows you to add another task or calendar list opens
• On the Settings menu, select Site settings to display the Site Settings page, and then under Site Actions, select Manage site features. Then, on the Site Features page, to the right of the Project Functionality site feature, select Activate. You might need to scroll down the page.
To add a Project Summary web part to a page
1. On the page where you want to add the web part, activate edit mode and then do one of the following to open the Web Parts pane:
• On a wiki page or publishing page, place the cursor where you want the web part to be displayed, and then on the Insert tab, in the Parts group, select Web Part.
• On a web part page, in the zone where you want to add the web part, select Add a Web Part.
2. Under Categories, select Content Rollup, and then under Parts, select Project Summary.
3. Select Add.
![]() Tip
Tip
If the current site does not have any task lists, the web part will display the text, “Click to create a new task list.”
To modify the properties of a Project Summary web part
1. Open the web part tool pane as described in Chapter 7, “Work with webpages.”
2. In the properties pane, under Primary Task List, select one of the site’s task lists.
![]() Tip
Tip
The primary task list is used for the due date countdown and items on the timeline. Tasks that are included on the timeline are not included in the list of late and upcoming tasks.

Configure the Project Summary web part properties so that you can quickly monitor your projects
3. Under Headlines, if you want to display a timeline, select the Timeline check box.
![]() See Also
See Also
For information about how to format the timeline and add items to it, see the “Format the timeline” section later in this chapter.
4. If you want to display tasks items that are not completed that have a due date prior to the current date, select the late check box, and then optionally complete the following:
a. To the right of late, select edit to display the Lists To Include In Late Panel dialog.
b. Select one or more task lists, and then select OK.

5. If you want to display those items that are due today or later in the Upcoming panel, select the upcoming check box, and then optionally do the following:
a. To the right of upcoming, select edit to display the Lists To Include In Upcoming Panel dialog.
b. Select one or more calendar and task lists.
c. Enter the number of upcoming days (the default is 14), and then select OK.

In the Upcoming panel, you can display calendar items and task items that are due in the upcoming days
6. Modify other web part properties as needed, and then, at the bottom of the properties pane, select OK. Save the page.
![]() See Also
See Also
For information about webpages and adding web parts to them, see Chapter 7, “Work with webpages.”
Project Server 2016 Project Sites
Project Server 2016 is the Microsoft on-premises solution for project portfolio management (PPM) and includes demand management features that organizations can use to manage work from inception until work is completed.
![]() Tip
Tip
Project Server 2016, unlike previous versions of Project Server, does not need to be installed separately from SharePoint Server 2016; it is installed with SharePoint Server 2016 Enterprise, although it is licensed separately. After you have installed SharePoint Server 2016 Enterprise, you can configure Project Server 2016. For more information about planning, installing, configuring, operating, and managing Project Server 2016, see https://aka.ms/Ypuma1.
The main browser-based interface to Project Server is the Project Web App site, which you can use to manage one or more projects. A Project Web App site can be created as the top level of a new site collection, or you can add a Project Web App site as a subsite to an existing site collection.
![]() Tip
Tip
Only one Project Web App site can be created per site collection.
However, unlike with past versions, there are no webpages that you can use to create a Project Web App site, either as the top-level site of a site collection or as a subsite, or to activate the Project Web App site collection features. Your SharePoint Server administrator will need to use Windows PowerShell to make Project Server capabilities available.
Project Web App sites have all the features of the SharePoint Project Site discussed previously. A task list in a Project Web App is very similar to the task list in SharePoint—you can add tasks, subtasks, and the timeline by using the same methods. However, Project Web App sites offer much greater scheduling capabilities.
Before you create and manage any projects, you will need to configure the Project Web App site, by using the PWA Settings page and the visual tiles on the Project Web App’s home page. You will need to create project-related components, such as Cost Codes, Departments, and Resources.

Use the tiles on a newly created Project Web App site to get started and to track your work
On the Quick Launch of a newly created Project Web App site, there are links to five pages:
![]() Projects Known as the Project Center, this page is used to view the overall project schedule and lists all project sites. Depending on your permissions, you can use this page to create new projects, open projects, check in and check out projects, manage project timelines, and view a project’s Gantt view.
Projects Known as the Project Center, this page is used to view the overall project schedule and lists all project sites. Depending on your permissions, you can use this page to create new projects, open projects, check in and check out projects, manage project timelines, and view a project’s Gantt view.
![]() Approvals Known as the Approval Center, this page is the central location for timesheets and task status.
Approvals Known as the Approval Center, this page is the central location for timesheets and task status.
![]() Tasks Known as the Task Center, this page is used to view and manage all assigned tasks across all projects that are published in a Project Web App site.
Tasks Known as the Task Center, this page is used to view and manage all assigned tasks across all projects that are published in a Project Web App site.
![]() Resources Known as the Resource Center, this page is used to manage people, materials, or costs that are required to complete a project.
Resources Known as the Resource Center, this page is used to manage people, materials, or costs that are required to complete a project.
![]() Reports Known as the Reports Center, this page provides several predefined reports, such as Deliverables, IssuesAndRisks, and MilestonesDueThisMonth.
Reports Known as the Reports Center, this page provides several predefined reports, such as Deliverables, IssuesAndRisks, and MilestonesDueThisMonth.
![]() Tip
Tip
There are no links on the Quick Launch of a Project Web App site for the Site Contents page or the Recycle Bin. To display the Site Contents page, from the Settings menu, select Site Contents. The Site Contents page includes a link to the Recycle Bin.
Your Project Web App site might have many more links on its Quick Launch, such as Timesheet, Strategy, Issues And Risks, and Server Settings. You can make more links available by displaying the Quick Launch page from the PWA Settings page.
Projects that can be managed with a Project Web App site can come from a variety of sources, including:
![]() Microsoft Project Professional project plans (.mmp files).
Microsoft Project Professional project plans (.mmp files).
![]() SharePoint task lists.
SharePoint task lists.
![]() Projects created directly in Project Web App.
Projects created directly in Project Web App.
SharePoint task lists can be included as read-only in the Project Center, so that you can track these tasks in reports generated through the Project Web App site, and users can update their tasks on SharePoint sites. When you use this approach, you can also take SharePoint tasks into consideration when you review a resource’s workload.
![]() Tip
Tip
To make changes to a SharePoint task list within a Project Web App site, you need to change the SharePoint list to an enterprise project.
Full coverage of Project Server 2016 is beyond the scope of this book. For more information, see https://products.office.com/project, https://blogs.technet.microsoft.com/projectsupport, https://social.technet.microsoft.com/Forums/projectserver/, and https://blogs.office.com/product/project.
To administer a Project Web App site
1. On the Settings menu for the Project Web App site you want to manage, select PWA Settings.
Work with tasks, subtasks, and the timeline
You can use the task management capabilities within a SharePoint task list to create tasks, which can have child tasks known as subtasks. Tasks and subtasks can be added to a timeline view, thereby providing a visualization of important tasks. You can also add the Timeline web part to a page, to display a timeline view of task items from a task list from any site within any site collection.
![]() Important
Important
In SharePoint Server 2013, the tasks view on your personal site provided a central location where you could manage your tasks, whether they were assigned to you in SharePoint, Outlook, or Project Server. This is not available in SharePoint Server 2016 or in Office 365, because the ability to create the Work Management service application and the ability to synchronize with Exchange and Project Server have been removed. However, if you are using one of the Office 365 Enterprise E1–E5, Business Essentials, Premium, or Education subscription plans, you might consider using Microsoft Planner. You can use Planner to create new plans; organize, assign, and collaborate on tasks; set due dates; update statuses; and share files; while visual dashboards and email notifications keep everyone informed on progress. For more information about Microsoft Planner, see https://products.office.com/business/office-365-planner.
Manage tasks and subtasks
The easiest and quickest way to create a project plan is to use Quick Edit. You can also paste a list of tasks from a Microsoft Excel spreadsheet. As you work with your list of tasks and subtasks, those with due dates listed in red are late. After you mark a late task as complete by selecting the check box to the left of the task, the due date no longer appears as red text.
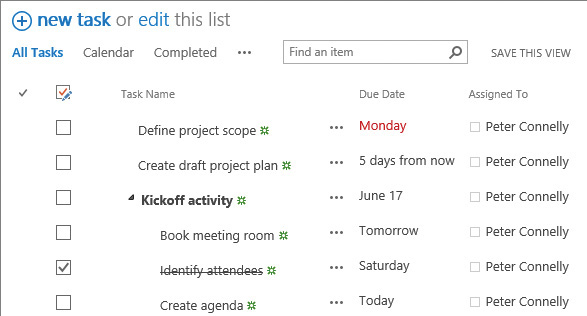
After you add tasks to your list, you might want to change the way they are structured. You can indent or outdent a task to indicate a subtask, or a subtask of a subtask; move a task or subtask up or down in the list, or permanently delete a task or subtask from the list.
When you create a task list, several views are created that allow you to manage tasks. These views are All Tasks, Calendar, Completed, Gantt Chart, Late Tasks, My Tasks, and Upcoming. You can amend these views and create new views.
![]() See Also
See Also
For information about creating and editing items in a task list and views, see Chapter 3, “Work with content in lists and libraries.”
1. Select the ellipses to the right of the task item that you want to use as the parent task, and then, in the callout that opens, select Create Subtask.
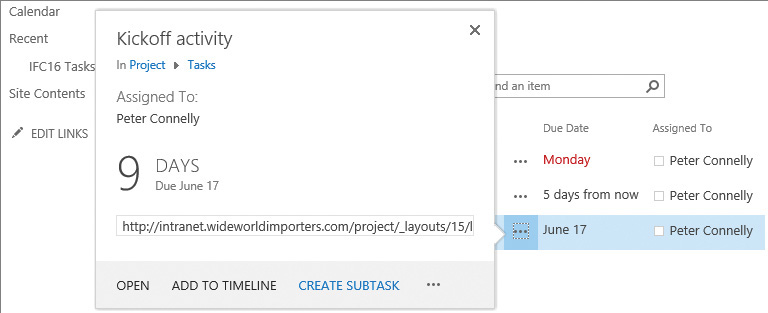
Use the callout to display information about a task item, such as the task item’s due date, a link to the task item, and task-related commands
1. Click or tap to the left of one or more task items, ensuring that you are not selecting the check boxes that are displayed to the left of the items, and then do one of the following:
• On the Tasks tab, in the Hierarchy group, select Indent or Outdent. The new position of the task item is displayed, and the list is displayed in Quick Edit mode.

Use the commands in the Hierarchy group of the Tasks tab to modify the structure of your project
• If the task list is in Quick Edit, press Alt+Shift+Right Arrow to indent the tasks, or Alt+Shift+Left Arrow to outdent the tasks.
To move a task up or down in the task list
1. Click or tap to the left of an item or items, ensuring that you are not selecting the check box that is displayed to the left of the items, and then do one of the following:
• On the Tasks tab, in the Hierarchy group, select Move Up or Move Down to move the item within the list.
• If the task list is in Quick Edit, press Alt+Shift+Up Arrow to move the task up in the list, or press Alt+Shift+Down Arrow to move the task down in the list.
Format the timeline
On the timeline, tasks or subtasks without a start date, or those that have a start date but no due date, appear as diamonds. In Gantt charts, a diamond is traditionally used to indicate a project milestone, which is a major event in the project, and can be used to monitor the project’s progress. Therefore, for most tasks, you could add a start date and a due date, and then add tasks with a due date but no start date, to identify milestones in your project.
On the timeline, when you select a task with no start date (that is, one that is currently displayed as a diamond) and then select Display As Bar on the Timeline tab, the Define Project Scope dialog is opened. You can then enter a Start Date to display the task as a bar.
A task with a start date and a due date can appear as a bar in the timeline that spans those dates, or you can choose to display it as a callout above the timeline. Using callouts is particularly useful when you have created subtasks in your task list as a way to communicate project phases, or for tasks that have several subtasks. Each task could be displayed as a callout, and subtasks as bars.

Format the timeline so you and your team can quickly track important project tasks
You can have more than one timeline, allowing you to group similar tasks. Each timeline includes dates across the top to mark the timescale, task dates, and a marker indicating today’s date. You can include the overall project start and finish dates, or choose to hide any of the default date indicators. You can also select the format for the task start dates and due dates.
After you have added tasks to the timeline and dragged them to arrange them in an order that represents your project, you can lock the timeline width so others can see the timeline the way you want them to. When the timeline width is not locked, the width will vary based on the size of the user’s browser window.
To add a task or subtask to a timeline
1. On the task list that contains the task or subtask, do one of the following:
• Click to the left of the task or subtask that you want to add to the timeline, and then, on the Tasks tab, in the Actions group, select Add to Timeline.
• To the right of the task or subtask, select the ellipsis to open the callout, and then select Add to Timeline.
To remove a task or subtask from a timeline
1. In the timeline, select the task or subtask bar, diamond, or callout, and then do one of the following:
• On the callout, select Remove from Timeline.
• On the Timeline tab, in the Current Selection group, select Remove from Timeline.
To display a task as a callout on a timeline
1. In the timeline, select the task or subtask bar.
2. On the Timeline tab, in the Current Selection group, select Display as Callout.
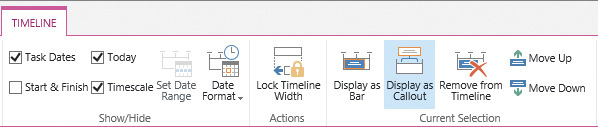
Use the commands in the Current Selection group of the Timeline tab to remove a task from the timeline, display the task as a bar or callout, or move the task to different timeline bars
To configure the display of dates on a timeline
1. Select the title of the timeline, and then, on the Timeline tab, in the Show/Hide group, select the check boxes of any of the following:
• Task Dates Select this check box to display the start date and due date for each task within the task’s bar or next to the task’s diamond.
• Today Select this check box to display an indicator on the timeline for the current date.
• Start & Finish Select this check box to display a start date at the beginning of the timeline, and a finish date at the end of the timeline. These dates relate to the earliest task start date and the latest task due date.
• Timescale Select this check box to display markers at dated intervals across the top of the timeline.
To configure the date format for bars and diamonds
1. Select the title of the timeline, and then, on the Timeline tab, in the ShowHide group, select Date Format.
2. From the menu, select a date format.

Use the Date Format menu to select a date format for the bars and diamonds on a timeline
To configure a timeline to only show a specific date range
1. Select the title of the timeline, and then, on the Timeline tab, in the ShowHide group, select Set Date Range.
2. In the Set Timeline Dates dialog, select Set custom dates, and then select a start and finish date.

Use the Set Timeline dialog to restrict the tasks displayed on the timeline to a specific date range
3. Select OK.
To change the color used to fill the background of a timeline
1. In the timeline, select a space that does not represent a task or subtask.
2. On the Timeline tab, select Highlight Color, and then select a color from the picker.

Use the Highlight Color picker to fill the background of a time bar and a task bar
To change the font of a timeline
1. Select the timeline, and then, on the Timeline tab, in the Font group, use the tools to change the font face, size, format, and color.
![]() Tip
Tip
Changing the font for the timeline affects all timeline bars and is only visible when you have selected the Start & Finish check box.
To add a timeline bar to a timeline
1. Select the timeline, and then, on the Timeline tab, in the Timeline Bar group, select Add.

Use the Add and Remove commands in the Timeline Bar group to add or remove additional timeline bars
![]() Tip
Tip
You can have up to 10 timeline bars on a timeline.
To move a task between timeline bars within a timeline
1. In the timeline that contains the task you want to move, select the task’s bar, callout, or diamond.
2. On the Timeline tab, in the Current Selection group, select either the Move Up or Move Down command.
![]() Tip
Tip
When you select a task in the topmost timeline bar and then select Move Up, the task moves to the last displayed timeline bar. Similarly, when you select a task in the bottom timeline bar and then select Move Down, the task moves to the topmost timeline bar.
To remove a timeline bar from a timeline
1. Select the timeline bar you want to remove, and then, on the Timeline tab, in the Timeline Bar group, select Remove.
![]() Tip
Tip
There must be at least one timeline bar on a timeline; therefore, you cannot remove the last timeline bar on a timeline.
To change the font of a task bar or callout
1. In the timeline, select the task bar or callout.
2. On the Timeline tab, in the Font group, change the font, size, format, and color.
To change the color used to fill in a task bar or line surrounding a callout
1. In the timeline, select the task bar or callout.
2. On the Timeline tab, in the Font group, select Highlight Color, and then select a color.
![]() Tip
Tip
The color used to fill a diamond is also used for the line drawn between the diamond and the task name.
1. Select the timeline, and then on the Timeline tab, in the Actions group, select Lock Timeline Width.
To turn the timeline view on or off for a task list
1. Go to the task list for which you want to turn the timeline view on or off, and activate edit mode.
2. Open the Task web part tool pane, as described in Chapter 7, “Work with webpages.”
3. Under List Views, select or clear the Show timeline check box.

Use the web part tool pane to configure the display of the timeline on the task list view
![]() Tip
Tip
When the web part tool pane is displayed, the timeline within the web part is not displayed, regardless of whether the check box is selected. Only when the page is saved will your changes take effect.
4. At the bottom of the web part tool pane, select OK, and then save the page.
To add and configure a Timeline web part
1. On the page where you want to add the web part, activate edit mode, and place the cursor where you want the web part to be displayed.
2. On the Insert tab, in the Parts group, select Web Part to open the web part pane.
3. Under Categories, select Content Rollup, and then under Parts, select Timeline.
4. Select Add, and then open the web part tool pane for the web part.
5. Under Data Source, in the Web URL box, enter the name of the website that contains the task list you want to display on the timeline, and then select Verify URL to ensure that you have entered a valid web address. The page will refresh, and the text Valid URL is displayed above Verify URL. If you get any other message, repeat the previous step, checking the URL you provided.
6. In the Source list, select the task list whose items you want to display on the timeline.

Use the Timeline web part tool pane to configure the web part to display the task items from a specific task list, either from the same site or from another site
7. Change other web part properties as needed, and then at the bottom of the web part tool pane, select OK.
Manage projects by using SharePoint and Project Professional
Like many other Office applications, Project Professional 2016 includes a set of templates that you can use to jump start the creation of a project plan. It provides a grid similar to an Excel worksheet, which allows for quick management of tasks, measurement of progress, and resource allocation. It also includes reports that adhere to industry guidelines; however, many people find Project Professional complicated to use. By synchronizing tasks between SharePoint and Project, project managers who understand Project can use it to manage their projects, and project members can use content in SharePoint task lists, making this approach a lightweight project management tool for tracking and managing tasks.
There are two methods of synchronizing your tasks between SharePoint and Project, both of which are available with SharePoint Server 2013, SharePoint Server 2016, and SharePoint Online through Project Professional 2013, Project Professional 2016, and Project for Office 365:
![]() You can create a task list in SharePoint and then import those task items to a new Project plan.
You can create a task list in SharePoint and then import those task items to a new Project plan.
![]() You can create the project plan in Project and then create a new SharePoint site that contains a project summary and timeline, a task list, and a calendar. Synchronizing also saves the .mpp file to the site assets for future editing.
You can create the project plan in Project and then create a new SharePoint site that contains a project summary and timeline, a task list, and a calendar. Synchronizing also saves the .mpp file to the site assets for future editing.
![]() Important
Important
The person synchronizing the tasks must be part of the SharePoint Owners group, or at the least have designer permissions, on the existing site or parent site where the new subsite is to be created.
With a synchronized task list, site members can view, add, edit, and report the status of their tasks. You can even view your tasks list in other views, including calendar and Gantt Chart view.
SharePoint does not provide active scheduling; however, when a SharePoint task list is synchronized with Project, you can then edit the task list within Project by using the Project feature set and scheduling capabilities. You would then resynchronize the task list to SharePoint, so the rest of your team can see the results.
![]() See Also
See Also
Full coverage of Project Professional 2016 is beyond the scope of this book. For more information about Project Professional 2016, see Microsoft Project 2016 Step By Step by Carl Chatfield and Timothy Johnson (Microsoft Press, 2016).
To sync a project plan to a new SharePoint site by using Project Professional
1. Open your project by using Project Professional, select the File tab on the ribbon, and then select Save As.
2. In the Save and Sync list, select Sync with SharePoint to display the Sync With SharePoint Tasks List pane.

3. In the Sync with list, select New SharePoint Site if it is not already selected, and then, in the Project name box, enter a name for the project.
4. In the Site Address list, enter or select the address of the SharePoint site where you want to create the new SharePoint site as a subsite.
5. Select Save.
A Sync With Tasks Lists dialog box opens, displaying the site creation and the progress of the task synchronization process. Your project plan is saved in the new site’s site assets library.
You might have to provide a user name and password before your new SharePoint site can be created. Also, when your project plan contains resources (people) that do not exist in SharePoint, a Microsoft Project dialog box opens, reminding you that these users will remain assigned to the tasks in your project plan.
To sync a SharePoint task list with a Project Professional project plan
1. In Project Professional, open a project plan, select the File tab on the ribbon, and then select Save As.
2. In the Save and Sync list, select Sync with SharePoint to display the Sync With SharePoint Tasks List pane.
3. In the Sync with list, select Existing SharePoint Site.
4. In the Site Address list, enter the address of the SharePoint site that contains the task list whose items you want to import.
5. Select Verify Site to populate the Tasks List list.
![]() Tip
Tip
You might have to provide a user name and password before the Task List can be populated.
6. In the Tasks List list, select the name of the task list you want to link to your project plan.
7. Select Save.
8. If you synced the SharePoint task list to a different project plan file, a Microsoft Project dialog box opens. Select OK.

Select OK to add the tasks in the SharePoint list to the end of the project
A Sync With Tasks Lists dialog box opens, displaying the site creation and the progress of the task synchronization process.
![]() Important
Important
Your project plan is saved in the site’s site assets library, with the name <site name> - <task list name>.mpp. If the site assets library already contains a file by that name, the file will be overwritten, with no warning message. However, the site assets library is configured for major versions; therefore, you will be able to restore the previous version of the project plan, if necessary.
To sync a task list from a SharePoint site to Project Professional project plan
1. In your browser, go to the task list you want to sync.
2. On the List tab, in the Connect & Export group, select Open with Project.

Use the commands in the Connect & Export group on the List tab to sync a task list with Project, connect a task list to Outlook, analyze items in a list by using Excel, and work with a list in Access
![]() Tip
Tip
You might have to provide a user name and password before your Task list will open in Project Professional.
A notification appears, stating that new tasks were created in Manually Scheduled mode (this is also known as “User-Controlled Scheduling”).
3. Make your changes in Project, and then select File to display the Info page.
4. Select Save to save and sync your project.
![]() Tip
Tip
The project plan will be saved to the site’s site assets library by using the <site name> - <task list name>.mpp naming convention.
To find information about a synchronized project plan
1. With the project plan opened in Project Professional, select File to display the Info page, and review the information displayed below Save and Sync Your Project.

Use the links in the Save And Sync Your Project section to find out when the project plan was last saved and the SharePoint site it was saved to, and to modify the Project fields that will be synced with the corresponding SharePoint task list columns
![]() Tip
Tip
You can use the link in the Save And Sync Your Project section to open the SharePoint site in the browser.
Skills review
In this chapter, you learned how to:
![]() Create and manage project sites
Create and manage project sites
![]() Work with tasks, subtasks, and the timeline
Work with tasks, subtasks, and the timeline
![]() Manage projects with SharePoint and Project Professional
Manage projects with SharePoint and Project Professional

![]() Important
Important
You must have sufficient permissions to perform the operations involved in each practice task to complete that practice task. For more information, see Appendix A, “SharePoint 2016 user permissions and permission levels.”
Create and manage project sites
Go to your SharePoint team site and perform the following tasks:
1. Create a project site named International Furniture Convention 2016, with the description Use this site to coordinate activities to ensure WWI takes advantage of being a lead sponsor at IFC 2016 and a URL of IFC16.
2. Change the properties of the Project Summary web part so that it displays upcoming tasks for the next seven days.
3. Leave your browser open if you are continuing to the next set of practice tasks.
Work with tasks, subtasks, and the timeline
Go to the project site you created in the previous set of practice tasks, and then perform the following tasks:
1. Add three task items, assigned to you, with the following values:

2. The first task should be automatically added to the timeline. Add the other two task items to the timeline, and configure the kickoff activity as a callout.
3. Create the following three items as subtasks to the kickoff activity task item.

4. Add the three subtasks to the timeline, and fill the three bars with different colors.
5. Leave your browser open if you are continuing to the next set of practice tasks.
Manage projects with SharePoint and Project Professional
Start Project Professional, and then perform the following tasks:
1. Create a project plan based on the Customer Service online template.
![]() Tip
Tip
Use the Search For Online Templates box on the New page, and enter the Customer keyword to find the template.

Project Professional comes with several project templates that you can use as a starting point for your project plan; however, there are a vast number of project templates that you can use online
2. Sync with the task list on the site you created in the first practice task, and then save. Wait while SharePoint and Project are updated.
3. From the New page of Project, open your SharePoint site in your browser and verify the following:
• Tasks from the project plan are displayed in the task list and on the timeline.
• The project plan was uploaded to the site assets library.
4. Go to the task list, open it with Project, and review the task items—for example, in the Gantt Chart view.