12. Collaborate with Office programs by using SharePoint
In this chapter
![]() Share OneNote notebooks with SharePoint
Share OneNote notebooks with SharePoint
![]() Import data from and export data to Excel spreadsheets
Import data from and export data to Excel spreadsheets
![]() Work with SharePoint content in Outlook
Work with SharePoint content in Outlook
![]() Integrate Access with SharePoint
Integrate Access with SharePoint
Practice files
For this chapter, use the practice files from the SP2016SBSCh12 folder. For practice file download instructions, see the introduction.
Microsoft SharePoint Server 2016 provides the collaborative backbone to the Microsoft Office 2016 programs, Office Online apps, and mobile Office apps. Both Office Online apps and mobile Office apps provide a subset of the capabilities and functionality of Office programs. However, if you need to quickly view content or give a presentation by using your smartphone or tablet, you should consider using the platform-specific Office mobile apps.
![]() Tip
Tip
To use the full functionality of the mobile apps, you will need an Office 365 or personal Microsoft OneDrive account.
This chapter guides you through procedures related to editing documents by using Office, sharing OneNote notebooks, importing and exporting data in Microsoft Excel spreadsheets to and from SharePoint lists, connecting Microsoft Outlook with SharePoint lists and libraries (thereby storing SharePoint content as a local copy that is available offline), using SharePoint with Outlook and Skype for Business, and using Microsoft Access with SharePoint.
You can complete many of the tasks documented in this chapter by using earlier versions of Office programs; however, the steps and screenshots in this chapter were created by using Office 2016. If you use Office 2010 or Office 2013, your steps and screenshots will be slightly different. For steps on using Office 2010, see Microsoft SharePoint Foundation 2010 Step by Step, by Olga Londer and Penelope Coventry (Microsoft Press, 2011). For steps on using Office 2013, see Microsoft SharePoint 2013 Step by Step, by Olga Londer and Penelope Coventry (Microsoft Press, 2013).
Edit documents in Office
When you share a file, saving it directly from its Office program to SharePoint allows you to keep one definitive copy of that file. If you save a document to a SharePoint library, your team does not have to find all the different copies of the same document and worry about whether they are editing the most up-to-date copy of that file.
The combination of SharePoint and Office reduces your dependency on using your browser to complete tasks. Together, SharePoint and Office provide a variety of methods for collaborating, whether you are co-authoring a spreadsheet, commenting on the contents of a document, processing a business plan by using a workflow, or categorizing your documents by using metadata stored in document library columns. When you store your files within SharePoint, Office provides your team with a similar experience in Microsoft Word, Excel, PowerPoint, Visio, and OneNote, and provides a Save To SharePoint option in each of these programs.
![]() See Also
See Also
For more information about using Office programs and Office Online, in particular Word and Word Online, see Chapter 3, “Work with content in lists and libraries.” For information about co-authoring, see “Co-author by using Office and Office Online” later in this topic. For information about using a workflow from within Word, see Chapter 11, “Work with workflows.”
View and change file properties
In previous versions of Office, you could use the Document Information Panel (DIP) with Word, PowerPoint, and Excel to view and change the properties for an individual file. These properties, also known as metadata, are details about a file. They are stored in the document, and they have the advantage of allowing you and your team to filter, sort, identify, and search for documents in SharePoint. It is often a struggle to encourage users to tag documents with metadata, and the DIP encouraged users to quickly and easily track and edit metadata for a document even as they continued to work in the Office program.
The DIP has been removed from Office 2016 programs. To view and edit the metadata within Word 2016, Excel 2016, and PowerPoint 2016, you can use the Info page that is available when you select the File tab. In Word, you can also embed metadata in the body of the document by using quick parts, also known as property controls. You can use quick parts to track and edit metadata as you work in a document; the metadata is then saved into the document library columns when the document is saved.
To add a quick part to a Word document
1. Place the cursor in the document where you want to add a quick part.
2. On the Insert tab, in the Text group, select Quick Parts.
3. Select Document Property, and then select the name of the property you want to add.

Select Document Property to choose from a list of properties you can insert in your document
![]() Tip
Tip
Another useful Word quick part is AutoText, which allows you to store content in the Quick Part Gallery that you can use again and again.
To update a Word document property by using a quick part
1. In the document, select the quick part control that references the property you want to change.
2. Change the information.

The quick part displays the SharePoint column name, and allows you to enter or select content, depending on the column type
![]() Tip
Tip
You can use the Developer tab in Word to open the Control Properties dialog box, in which you can lock a quick part control so that it cannot be deleted.
To update a Word document property by using the Properties section of the Info page
1. In Word, select the File tab to display the Info page.
2. If all of the properties are not listed under Properties on the right side of the page, at the bottom of the right side, under Related Documents, select Show All Properties.
3. Point to the right of the property you want to update, and make your change.

Some document library column types can’t be edited directly in the Properties section; in such cases, you use the Show Details link to open the Web Files Properties dialog box
Co-author by using Office and Office Online
When you edit documents by using Office, you have the option of either locking the editing to a single user at a time by using the Check Out/Check In mechanisms or opening the file to multiple users for real-time co-authoring, without interfering with each other’s changes. You can use the Office co-authoring feature when storing documents in SharePoint 2016, SharePoint Online in Office 365, your personal OneDrive, or OneDrive for Business. It can be used in libraries only when checkout is not used.
![]() Tip
Tip
In Microsoft OneNote notebooks, version information is stored within the notebooks themselves, which is different than how Word and PowerPoint store their version information; therefore, you should not enable minor versioning when storing OneNote notebooks in a SharePoint library, because this will interfere with the synchronization and versioning capabilities of OneNote.
The co-authoring functionality in each Office product is similar: however, there are some differences, as detailed in the following table. Only when you use those Office products listed with a “Yes” in the respective SharePoint column can you co-author documents.

![]() Important
Important
Co-authoring, or working on a spreadsheet at the same time with other people, is available in Excel Online but not in Excel 2016 (or earlier) for Windows.
Office programs and SharePoint are designed to minimize any performance or scalability issues that might be associated with co-authoring documents; therefore, only when more than one author is editing the document does the Office program send or download co-author information from the server. Office programs are designed to reduce the frequency of synchronization actions related to co-authoring when the server is under a heavy load or when a user is not actively editing a document.
![]() See Also
See Also
For more information about co-authoring, see Chapter 4, “Make lists and libraries work for you.”
Real-time co-authoring
When you edit a Word or PowerPoint document at the same time that other people are working in it, you will see where they are editing. This is known as real-time co-authoring and is supported when all co-authors are using either Word 2016 or Word Online in Office Online Server, or PowerPoint 2016 or PowerPoint Online in Office Online Server. Word, PowerPoint, and OneNote also support real-time typing, which allows you to see where others are working and what they are typing.

With real-time typing, you can see where others are working and what they are typing as they type
In the status bar of the Office 2016 programs—that is, not the Office Online products—you might see a message that says Updates Available which means that if you save the document now, it will be updated with the changes that others have saved.
You can configure whether others can see your changes by using the Share pane, which is displayed when you select Share in the upper-right corner (in Word, you can also configure this in the Word Options dialog box, on the General Tab).
The Automatically Share Changes options are:
![]() Always Others who have agreed to share their changes will always be able to see yours.
Always Others who have agreed to share their changes will always be able to see yours.
![]() Ask Me If this is the first time you have used real-time co-authoring, you will be asked whether you want to automatically share your changes as they happen. Select Yes to always allow automatic sharing. (Clear the Don’t Ask Me Again check box if you don’t want to be asked about this the next time you open a document.)
Ask Me If this is the first time you have used real-time co-authoring, you will be asked whether you want to automatically share your changes as they happen. Select Yes to always allow automatic sharing. (Clear the Don’t Ask Me Again check box if you don’t want to be asked about this the next time you open a document.)
![]() Never Only you will be able to see your changes until you save your document, and you will not be able to see other users’ changes; how-ever, you will be able to see who has the document open.
Never Only you will be able to see your changes until you save your document, and you will not be able to see other users’ changes; how-ever, you will be able to see who has the document open.

In Word 2016, use the Real-Time Collaboration Options section of the Word Options dialog box to configure how you want Word to share your changes
Visio co-authoring
Visio uses the same Office Document cache as Word and PowerPoint for co-authoring .vsdx files. When more than one user is editing a Visio file, the Visio program displays an icon on the status bar indicating the number of users editing the file. Select the icon to display a list of authors.
When a user edits a shape, a person icon is added to the upper-right corner of the shape, to inform you that someone else is editing the shape. Select the person icon to display the name of the person. Shapes that have been deleted by someone else display an exclamation mark in a square box along with a small red cross in the lower-right corner of the box.

Person icons and exclamation icons indicate shapes that other users are amending or have deleted
![]() Tip
Tip
Developers can create Visio templates that do not allow co-authoring.
Visio does not stop multiple users from editing the same shape; therefore, a more correct name for this feature would be collaborative authoring.
Share OneNote notebooks with SharePoint
You can use OneNote to store information in notebooks, which are organized in pages and sections. OneNote is included as a desktop program as part of Office 2016 and is available as a Universal Windows Platform app that is part of Windows 10. OneNote apps are also available for Apple and Android devices.
If you have a OneNote notebook stored on your local computer and you want to open it by using your smartphone or tablet, you’ll need to first share the notebook to OneDrive or SharePoint.
OneNote 2016, OneNote 2013, and OneNote 2010 use the same file format (.one); therefore, if you have notebooks that were created in previous versions of OneNote, you can open and edit them in any of these versions. However, the newer notebook format is not backward-compatible; for example, you cannot use a notebook you created in OneNote 2016, OneNote 2013, or OneNote 2010 in OneNote 2007 or OneNote 2003.
OneNote integrates with other Office programs, such as Outlook—you can flag a note in OneNote and use the Outlook Tasks command on the Home tab to turn it into an Outlook task, you can send a OneNote page as an email message, or you can send an entire notebook as a OneNote file or as a PDF file as an email attachment.
![]() Tip
Tip
If you are new to OneNote, you might want to look at OneNote 2016 Tips & Tricks, which is a free eBook that can be found at https://support.office.com/en-us/article/eBook-OneNote-2016-Tips-Tricks-4e08cf8b-dc37-4229-bdef-1f580220b6f5.
You can store OneNote notebooks to your computer’s local drive and to your personal OneDrive, to your OneDrive for Business and in SharePoint libraries, thereby sharing the information in the notebook with your team in a central place and allowing easy access to the notebook from any device.
![]() See Also
See Also
For information about OneDrive for Business, see Chapter 6, “Work with My Site and OneDrive for Business.”
OneNote Online
If you have a personal OneDrive account or Office Online Server installed alongside SharePoint Server, or if you are using Office 365, OneNote is also available as a web-based app known as OneNote Online. If this is the case, when you create a team site, a OneNote shared notebook is automatically created as part of the site. With OneNote Online, you can see updates as they happen, see who did what on the page by selecting the Show Authors command on the View tab, and share a notebook by sending a link instead of an email attachment.
Share notebooks by using SharePoint
By sharing a notebook in a SharePoint library, you can use the document management features detailed in this book to manage and share your notebooks. You can manage who has permission to view the notebook or contribute notes. You can store additional information about the notebook or its pages, such as the department name or project number. You can also track versions of the notebook, so that people can view or restore an earlier version if needed, and you can use alerts or RSS Feeds to be informed when the content changes.
![]() Tip
Tip
OneNote backs up your notebook files automatically each week and keeps two backup copies. If you take a lot of important notes, you can back up your notebooks more often by using the Save & Backup settings in the OneNote Options dialog box. If you share your notebook by using OneDrive for Business or SharePoint, your IT department will also maintain copies of the shared notebook.
When you or another user changes the content in a notebook, OneNote automatically saves and syncs the notebook on SharePoint. You can also sync notebooks manually. OneNote also maintains a separate offline copy of the notebook on each user’s computer, thereby allowing you to edit the notebook locally, even when you are disconnected from the network. The next time you connect to the shared notebook, OneNote merges your changes with everyone else’s.
![]() Important
Important
If the document library where your OneNote notebook is stored requires files to be checked out before editing, OneNote cannot save changes to the notebook; therefore, always ensure that the Require Check Out setting is not selected for the document library where notebooks are stored. For information about the Require Check Out setting, see Chapter 4, “Make lists and libraries work for you.” Other causes of synchronization errors are when the library is enabled for minor versions, or one or more columns are configured as required and do not have a default value, or the SharePoint site collection that contains the library has exceeded its storage quota.
![]() Tip
Tip
OneNote Class notebooks are widely used by organizations, particularly those in the education sector, and were designed for Office 365. For information about the OneNote Class notebook, go to onenoteforteachers.com. To download the OneNote Class Notebook add-in, go to https://microsoft.com/en-us/download/details.aspx?id=51934. For information about integrating OneNote Class notebooks with your Learning Management System (LMS), go to onenote.com/lti.
To create a SharePoint library in which to save OneNote notebooks
![]() Important
Important
You can save OneNote notebooks in any type of library. This procedure sets the New command on the File tab to create a OneNote notebook. This is useful if you do not have Office Online Server installed and the common file type for a document library is a OneNote notebook.
1. In SharePoint, do one of the following to display the Your Apps page:
• On the Settings menu, select Add an app.
• On the Quick Launch, select Site Contents, and then select add an app.
2. On the Your Apps page, under Apps you can add, select Document Library to open the Adding Document Library dialog.
3. Select Advanced Options to display the New page.
4. In the Name box, enter a name for the library.
5. In the Document Template list, select Microsoft OneNote 2010 Notebook, and then select Create.
![]() Tip
Tip
Although the name of the document template is OneNote 2010, the format of the notebook has not changed between OneNote 2010 and OneNote 2016, so you can use this document template whether you use OneNote 2010, OneNote 2013, or OneNote 2016.
To create a OneNote notebook in a SharePoint library by using your browser
1. If you have Office Online Server installed and connected to your SharePoint server, or if you are using Office 365, go to the SharePoint library where you want to create the OneNote notebook.
2. Select new, and then select OneNote notebook.

If you have Office Online Server installed, you can quickly create Word, Excel, PowerPoint, and OneNote files
3. In the Name text box, enter the name of your notebook, and then select OK.
Or
1. Go to the SharePoint library where you want to create the OneNote notebook, and do one of the following:
• If the document library is associated with a OneNote notebook document template, on the Files tab, select New.
• If a content type that is associated with a OneNote notebook document template has been added to the library, on the Files tab, select the New arrow, and then select that content type.
2. In the dialog box that opens, select the option that allows OneNote to open. (The form of this dialog box and option depends on your browser. For example, if you are using Internet Explorer, select Allow; if you are using Google Chrome, select Launch Application; or if you are using Microsoft Edge, select OneNote or OneNote 2016. The OneNote program starts and opens the Unpack Notebook dialog box.
3. In the Name box, enter the name of your notebook, and in the path list, enter the web address of the SharePoint library.
4. Select Create.
To create a OneNote notebook in a SharePoint library by using OneNote
1. Open OneNote 2016, select the File tab, and then on the New page, select Other Web Location or Browse. Then do one of the following to open the Create New Notebook dialog box:
• Under Recent Folders, select a SharePoint library where you have previously created or opened other OneNote notebooks.
• Select Browse.
2. If the Create New Notebook dialog box does not display the contents of the SharePoint library where you want to store your team notebook, in the Notebook Name box, enter the web address of the SharePoint site, and press Enter to go to the document library on the SharePoint site.
3. In the Notebook Name box, enter a meaningful, descriptive name for the new notebook, and then select Create.
4. In the Microsoft OneNote dialog box, do one of the following:
• Select Invite people if you want to share the notebook.
• Select Not now to keep the notebook unshared for now.
1. In OneNote, select the notebook list, and then do one of the following to the notebook you want to sync:
• Right-click the notebook, and then select Sync This Notebook Now.

If a syncing error occurs, select the error icon for more information
• Select the notebook and press Shift+F9.
• Right-click the notebook, select Notebook Sync Status, and in the Shared Notebook Synchronization dialog box, to the right of the notebook, select Sync Now.
• Select the File tab. On the Info page, select Settings to the left of the notebook, and then select Sync.
To configure notebook synchronization
![]() Important
Important
Using these settings affects all notebooks.
1. In OneNote, do one of the following to open the Shared Notebook Synchronization dialog box:
• Select the File tab, and then on the Info page, select View Sync Status.
• Right-click the notebook, and select Notebook Sync Status.
2. Under How should we sync your notebooks, select either Sync automatically whenever there are changes or Sync manually.

Use the dialog box to configure how you want to sync your notebooks, to manually sync a notebook, and to investigate syncing errors
Import data from and export data to Excel spreadsheets
You can use Excel 2016, much like previous versions of Excel, to export and import data to and from SharePoint lists. You can create a SharePoint list via your browser by importing an Excel spreadsheet, or from within Excel by exporting an Excel table. You can copy (export) the contents of a SharePoint list or library, or the results of a survey, to an Excel spreadsheet.
The web query that exports the contents from the list or library creates an Excel table named Table_owssvr and maintains a connection between the content in the list or library and the content in the table, making the table an external table or linked object. Changes you make to data in your Excel worksheet do not synchronize with the list or library on your SharePoint site; that is, only a one-way synchronization occurs from the SharePoint site to Excel. Any changes you make to data in the Excel spreadsheet are lost when you next refresh the external table content.
![]() Tip
Tip
When you export a SharePoint library, Excel represents the documents in the list with hyperlinks that point to the documents on the SharePoint site. Similarly, attachments on list items are replaced with hyperlinks. In the Excel spreadsheet, select this link to open the file.
Similarly, when you create a SharePoint list from within Excel, you have an option to create the data within Excel as an external table; after the SharePoint list is created, you cannot link the spreadsheet to the SharePoint list. Therefore, if you want to synchronize updates between the list and the spreadsheet, be sure to select the Create A Read-Only Connection To The New SharePoint List check box. When you use your browser to create a SharePoint list from Excel data, the option to create an external table in Excel is not available.
To create a SharePoint list from an Excel spreadsheet by using your browser
1. In SharePoint, on the Your Apps page, under Apps you can add, select Import Spreadsheet to display the New page.
2. In the Name box, enter a name for the list, and optionally enter a description of the list in the Description box.
3. Select Browse to open the Choose File To Upload dialog box, and go to the folder that contains your spreadsheet.
4. Select your spreadsheet, and then select Open.
5. On the New page, select Import.

You can save time when you create a list by importing an Excel spreadsheet
Excel opens your spreadsheet and opens the Import To Windows SharePoint Services List dialog box.
6. In the Range Type list, select Table Range, Range of Cells, or Named Range, as appropriate, and then in the Select Range list, select the data you want to copy to your SharePoint list.

You can also convert an Excel workbook to an InfoPath form template that you can then use for a Forms library
![]() Tip
Tip
If you import a range of cells from an Excel spreadsheet and want the Excel column names to become the SharePoint list column names, you should first edit the spreadsheet and convert the range of cells to an Excel table.
7. Select Import to create the list.
![]() Tip
Tip
The new SharePoint list is not configured to appear on the Quick Launch.
To create a SharePoint list from within Excel
1. If the data in your Excel spreadsheet is not already formatted as an Excel table, complete the following:
a. In Excel, select any cell within the data you want to create the list from.
b. On the Home tab, in the Styles group, select Format as Table, and then select a table style.

Use this method when you already have the data in Excel and you want to create a SharePoint list during the synchronization process
c. In the Format As Table dialog box, change the range of cells if necessary, and optionally select the My table has headers check box.
![]() Tip
Tip
If your data does not contain headers, Excel creates them for you and labels them as Column1, Column2, and so on.
d. Select OK.
2. Select any cell within your Excel table if one is not already selected, so that the Table Tools Design tab is displayed.
3. In the External Table Data group, select the Export arrow, and then select Export Table to SharePoint List.
4. In the Export Table to SharePoint List – Step 1 of 2 dialog box, in the Address box, enter the name of the SharePoint site to which you want to export the data.
5. Select Create a read-only connection to the new SharePoint list if you want to create a one-way synchronization connection between the Excel table data and the data in the SharePoint list.
6. In the Name box, enter the name of the SharePoint list, and optionally, in the Description box, enter a description for the SharePoint list.

In the Address box, enter the web address for the new SharePoint list
7. Select Next to open the Export Table To SharePoint List – Step 2 Of 2 dialog box.
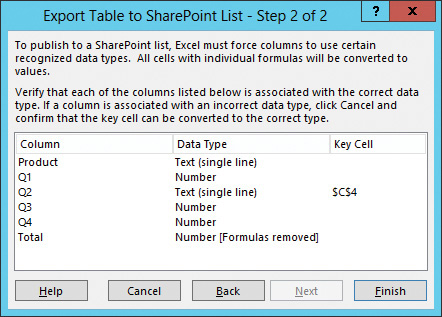
Excel removes formulas during the export process; therefore, you might consider deleting columns and creating calculated columns after you complete the export and the data is in SharePoint
![]() Tip
Tip
Excel checks the data in each column to ensure that the data belongs to a data type supported by SharePoint. If it doesn’t, Excel usually applies the Text data type to each column. Excel also checks whether each column contains only one type of data. If a column contains a mixture of data types, such as numbers and text, Excel chooses Text as the data type. At this point, you can select Cancel, correct erroneous data, and then restart the export process.
8. Select Finish, and then select OK to close the Microsoft SharePoint Foundation dialog box that confirms that the table was successfully published.
![]() Tip
Tip
The new SharePoint list is not configured to appear on the Quick Launch.
To export the contents of a SharePoint list or library to an Excel spreadsheet
![]() Tip
Tip
The export process exports only the columns and rows contained in the list’s current view; if none of the views contain the data that you want to export, you must create a new view to meet your needs. Alternatively, you can choose one of the existing views, export the list to a spreadsheet, and then delete the unwanted data.
1. Go to the list or library, and on the List or Library tab, in the Connect & Export group, select Export to Excel.
If a message dialog box opens stating that to export a list you must have a Microsoft SharePoint Foundation–compatible program, and you have Excel 2016 installed, select OK.
You will see either a File Download dialog box or a notification message at the bottom of your browser that ask whether you want to open or save owssvr.iqy.
2. Select Open. Excel opens a new workbook that contains one worksheet named owssvr.
3. In the Microsoft Excel Security Notice dialog box, select Enable.
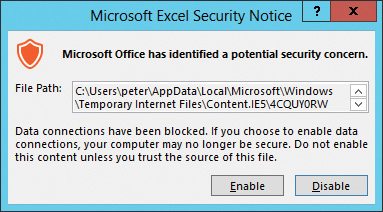
Enable the web query that exports the contents of the SharePoint list
To refresh external table data
1. In Excel, select one cell within your external table, and then on the Table Tools Design tab, in the External Table Data group, select Refresh.
To modify the external table data refresh behavior
1. Select one cell within your external table, and then do one of the following to open the Connection Properties dialog box:
• On the Table Tools Design tab, in the External Table Data group, select the Refresh arrow, and then select Connection Properties.
• On the Data tab, in the Connections group, select Connections. In the Workbook Connections dialog box, select owssvr, if it is not already selected, and then select Properties.
2. Make your changes, and then select OK.
Work with SharePoint content in Outlook
You can use Outlook to access and update content in SharePoint, and to share information within SharePoint across multiple sites. You can maintain shared items from calendars, contacts, and task lists, in addition to previewing and editing documents. You can also receive notifications about changes to content stored in SharePoint.
When you are using an Office program with a document stored in SharePoint, SharePoint Online in Office 365, or OneDrive for Business, if you point to the name of the author of the document or the name of a co-author, that person’s contact information is displayed. If you have Skype for Business installed, the contact information includes options to start an instant message, a call, or a video call, or send an email.
Connect SharePoint lists and libraries to Outlook
You can connect SharePoint calendar, task, contact, and external lists; discussion forums; and most libraries with Outlook, as long as the Offline Client Availability option is set to Yes on the list settings Advanced Settings page. SharePoint permissions are used to decide which items and files you can access in Outlook. The items and files from SharePoint do not increase the size of your Inbox on your mail server because a copy of this content is saved in an Outlook Data File on your computer.
![]() Important
Important
At the time of writing, there are known issues when connecting external lists with Outlook with SharePoint 2016 and Office 365. Currently only when you use Outlook 2013 with SharePoint 2016 can you connect external lists. In Office 365, whether you use Outlook 2016 or Outlook 2013, you cannot connect external lists with Outlook.
After you connect a list or library to Outlook, if you have permissions to edit list items in the SharePoint list, you can modify items from that list from within Outlook. Similarly, if you have permissions to view a document in a SharePoint library, you can view a preview of the contents of the file from the connected library in the Outlook reading pane. However, you do not edit the contents of a file within Outlook; to edit the file, you double-click the file in Outlook to open it in the appropriate program. When you do so, you will be modifying an offline copy of that document, known as a cached copy. When you have completed your modifications, you can choose to save the document to the SharePoint library.
![]() Important
Important
During offline editing, another user could modify the same document, so it is recommended that you always check out your document before you edit it.
You disconnect a list or library from Outlook by using a delete command. This does not delete the SharePoint list or library, but it does remove the related list or library from Outlook on all computers you use.
You can also share a connection with others by right-clicking the list or library name in Outlook and then selecting Share This Folder.
To connect a list or library to Outlook
![]() Important
Important
This procedure can be used with SharePoint libraries and lists that were created by using the following list templates: Calendar, Contacts, Discussion Board, External List, and Tasks.
1. Go to a list or library you want to connect to Outlook.
2. On the List, Library, or Calendar tab, in the Connect & Export group, select Connect to Outlook.
3. If an Internet Explorer - Security Warning dialog box appears asking whether you want to allow this website to open a program on your computer, select Allow.
4. If another Internet Explorer - Security Warning dialog box appears, telling you that a website wants to open web content using this program on your computer, select Allow.
5. A Microsoft Outlook dialog box appears, telling you that you should only connect lists from sources you know and trust. Optionally select Advanced to open a SharePoint List Options dialog box, and in the Folder Name box, enter a new name for the list as it will be shown in Outlook, and then select OK.

Enter a meaningful name for your SharePoint list, so that the purpose of the list and its originating site are obvious in Outlook
6. In the Microsoft Outlook dialog box, select Yes.

Use the Advanced button to enter a new name, display the list on other computers, and update the subscription
![]() Tip
Tip
When you connect a list or library to Outlook, it appears in the related area of the Outlook Navigation pane: calendars appear in the My Calendar pane under Other Calendars; tasks appear in the My Tasks pane under Other Tasks; contacts appear in the My Contacts pane under Other Contacts; and libraries and discussion forums appear in the Mail pane under SharePoint lists. When you connect external lists to Outlook, they are created in the SharePoint External Lists folder.
To disconnect a SharePoint list or library from Outlook
1. In Outlook, do one of the following:
• In the mail navigation pane, under SharePoint lists, right-click the SharePoint library or discussion board, and select Delete Folder.

Use the Delete Folder option to disconnect the SharePoint list or library
• In the calendar navigation pane, under Other Calendars, right-click the SharePoint calendar list, and select Delete Calendar.
• In the contacts navigation pane, under Other Contacts, right-click the SharePoint contact list, and select Delete Folder.
• In the task navigation pane, under Other Tasks, right-click the SharePoint task list, and select Delete Folder.
2. In the Microsoft Outlook dialog box that appears, select Yes.

Before you remove a connected list or library from Outlook, to prevent the loss of changes you made since the last Send/Receive, resync Outlook with SharePoint
Work with SharePoint calendars in Outlook
You can work with multiple calendars when using Outlook, thereby enabling you to create calendars for specific purposes, such as having one for work and one for your personal life. By using Outlook, you can view several calendars at the same time. When you view and scroll multiple calendars, they all display the same date or time period. This feature is particularly useful if you have connected a SharePoint calendar list to Outlook. When you do so, you create an Outlook Calendar folder in which a copy of the data from the SharePoint list is stored locally. In this way, you can keep track of any calendar items in a SharePoint list from the Outlook Calendar folder, even if you are not connected to the network.
To display a connected SharePoint calendar list in Outlook
1. In Outlook, in the calendar navigation pane, select the check box to the left of the connected SharePoint calendar list.
1. In Outlook, in the calendar content area, select the left arrow on the calendar tab.

Overlay calendars to see a unified view of your events and appointments
To copy a calendar item to or from a SharePoint calendar list
1. In the calendar navigation pane, display the source calendar and the SharePoint calendar.
2. Select the calendar item you want to copy, and drag the item onto the other calendar.
To move a calendar item to or from a SharePoint calendar list
1. Complete the copy procedure as described previously, and then delete the calendar item from the original calendar.
Use contacts and tasks with Outlook and SharePoint
When you connect a SharePoint contacts list to Outlook, you create an Outlook contacts folder. Similarly, when you connect a SharePoint task list, you create a task folder. You can then copy the contact and task information from your other Outlook contact and tasks folders into the connected SharePoint contact and task lists. The new contacts and tasks are added to the SharePoint lists the next time Outlook synchronizes with SharePoint. You can use this technique to create a definitive contacts list and a tasks list, which you can access in Outlook, even when you are not connected. You can also use the contacts in the connected contact lists in your emails.
To copy contacts or tasks from Outlook to a SharePoint contacts or task list
1. In Outlook, do one of the following:
• In the contacts navigation pane, under My Contacts, select Contacts, and then select one or more contacts.
• In the task navigation pane, under My Tasks, select To-Do List or Tasks, and then select one or more tasks.
![]() Tip
Tip
You can select multiple items by holding down the Shift key or the Ctrl key while clicking the mouse button. Press Ctrl+A to select all contacts.
2. On the Home tab, in the Actions group, select Move, and then select Copy to Folder.

3. In the Copy Items dialog box, expand SharePoint Lists, select a SharePoint list you previously connected to Outlook, and then select OK.

You can also drag to copy contacts and tasks
![]() Tip
Tip
For contact items, you can also right-click one of the selected contacts and then, from the menu, select Move and then select Copy To Folder to open the Copy Items dialog box. You can also drag contacts and tasks from one folder to another.
To move contacts or tasks from Outlook to a SharePoint contacts or task list
1. In Outlook, do one of the following:
• In the contacts navigation pane, under My Contacts, select Contacts, and then select one or more contacts.
• In the task navigation pane, under My Tasks, select Tasks, and then select one or more tasks.
2. On the Home tab, in the Actions group, select Move and then select the respective connected SharePoint list.
Or
Do one of the following to open the Move Items dialog box:
• On the Home tab, in the Actions group, select Move, and then select Other Folder.
• Press Ctrl+Shift+V.
Expand SharePoint Lists, select a SharePoint list you previously connected to Outlook, and then select OK.
![]() Tip
Tip
For contact items, you can also right-click one of the selected contacts and then, from the menu, select Move, and then select the connected SharePoint list, or select Other Folder to open the Move Items dialog box.
To move or copy an item from a SharePoint list to an Outlook folder
![]() Important
Important
This procedure can be used to move contact information from a SharePoint contact list to your Outlook Address Book, and to move a task item from a SharePoint task list to an Outlook tasks folder.
1. Do one of the following:
• In the contacts navigation pane, under Other Contacts, select the connected SharePoint contacts list, and then select one or more contacts.
• In the task navigation pane, under Other Tasks, select the connected SharePoint task list, and then select one or more tasks.
2. Follow the procedures described earlier in this section to move or copy items between lists and folders.
Manage notifications
Outlook supports Really Simple Syndication (RSS) feeds so that you can subscribe to and stay updated on the latest news sites and blogs. You can manage your RSS feeds in Outlook just like other mail by flagging them for follow-up, assigning them a specific color, or automating any process by using Rules. You can also manage all of your SharePoint alerts from one Outlook dialog box.
To add a SharePoint list RSS feed to Outlook
1. Go to the list or library whose RSS feed you want to subscribe to, and on the List or Library tab, in the Share & Track group, select RSS Feed.
2. Right-click Subscribe to this feed, and then select Copy Shortcut (or if you are not using Internet Explorer, the equivalent option in your browser).
3. Open Outlook, if it is not already open.
4. In the mail navigation pane, right-click RSS Feeds, and then select Add a New RSS Feed.
5. In the New RSS Feed dialog box, in the Enter the location of the RSS Feed box, press Ctrl+V to paste the shortcut that you copied in step 2.
6. Select Add.
7. In the Microsoft Outlook dialog box, optionally select Advanced to enter a meaningful name for the RSS feed as it will be shown in Outlook, and then select OK.
8. Select Yes to close the Microsoft Outlook dialog box.
To create a new SharePoint alert by using Outlook
1. Select the File tab, and then on the Info page, select Manage Rules & Alerts to open the Rules And Alerts dialog box.
2. Select the Manage Alerts tab, and then select New Alert.
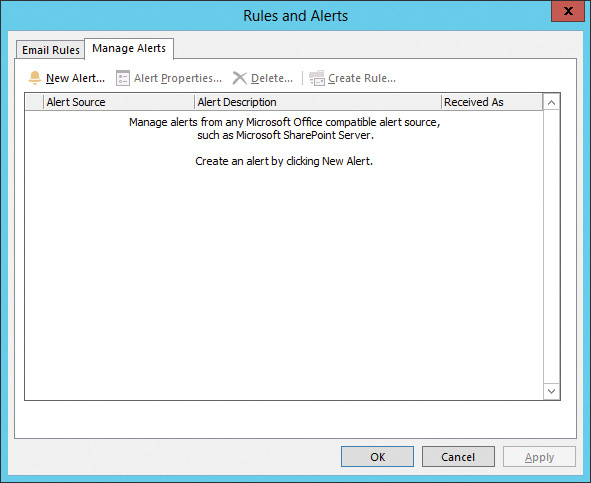
Use the options in the Rules And Alerts dialog box to create Outlook rules and manage alerts
3. In the New Alert dialog box, select a SharePoint site from the list under either Sources currently sending me alerts or Sources I have visited, or, in the Web site Address box, enter the name of the SharePoint site for which you want to create the alert, and then select Open.

Select a SharePoint site that currently sends you alerts or one that you have visited, or enter the web address of a SharePoint site
4. On the New Alert page that opens in your browser, select one of the lists or libraries, and then select Next.
5. Complete the page so that you receive alerts as needed, and then select OK.
![]() See Also
See Also
For more information about managing alerts, see Chapter 3, “Work with content in lists and libraries,” and Chapter 4, “Make lists and libraries work for you.”
Integrate Access with SharePoint
The combination of SharePoint and Microsoft Access 2016 makes it easy for you to build desktop databases by using SharePoint. By doing so, users who do not possess the skills or privileges to be a Microsoft SQL Server database administrator can still obtain the manageability and stability benefits of storing data on the server while retaining the ease of use of Access 2016.
The level of server functionality integrated into Access 2016 increases when it is used in combination with an Access app hosted in SharePoint Server 2016 Enterprise Edition running Access Services, which was first introduced with SharePoint Server 2013 and Access 2013.
In Access 2016, as in Excel and previous versions of Access, you can export and import data both to and from SharePoint lists; however, if you do not want to maintain two copies of that data, one in Access and one in SharePoint, you can link to data that is physically located external to Access.
In an Access app, a table linked to a SharePoint list only provides a read-only connection, whereas a table linked to a SharePoint list in an Access desktop database provides two-way synchronization, so you can work with the SharePoint data offline and then synchronize the changes when you reconnect.
![]() See Also
See Also
For information about the new Access app features introduced with SharePoint 2016, go to https://technet.microsoft.com/en-us/library/mt346121%28v=office.16%29.aspx#access.
Work with an Access app in your browser
You can use Access 2016 to create and design an Access app; you use your browser to add, edit, view, and delete data stored in the Access app. Similar to SharePoint lists and libraries, Access apps can be displayed on the SharePoint Quick Launch and on the Site Contents page.
When you select an Access app, the Access app page is displayed. It includes a Back To Site link in the upper left of the page; when selected, this link displays the home page of the SharePoint site where the Access app was created. You can select the cog icon in the upper right of the page to customize the app in Access.
The Access app page is divided into several elements:
![]() Tables Similar to the Quick Launch in your SharePoint team site, this area displays Access app tables.
Tables Similar to the Quick Launch in your SharePoint team site, this area displays Access app tables.
![]() Views This area displays a list of views associated with the table that is currently selected in the table selector element. Most tables include a List and a Datasheet view.
Views This area displays a list of views associated with the table that is currently selected in the table selector element. Most tables include a List and a Datasheet view.
![]() Filter text box This can be used to search and filter data displayed in the view. Access Services does not search for sequences of characters within a word.
Filter text box This can be used to search and filter data displayed in the view. Access Services does not search for sequences of characters within a word.
![]() Action bar This bar displays buttons that you can use to add, delete, edit, save, and cancel changes. The action bar is the same for each view; however, Access Services enables and disables the buttons depending on what actions are actually available for the view. For example, when the detailed pane is in view mode, the Add, Delete, and Edit buttons are enabled. When the item detailed pane is in edit mode, the Add, Delete, and Edit buttons are disabled, and the Save and Cancel buttons are enabled.
Action bar This bar displays buttons that you can use to add, delete, edit, save, and cancel changes. The action bar is the same for each view; however, Access Services enables and disables the buttons depending on what actions are actually available for the view. For example, when the detailed pane is in view mode, the Add, Delete, and Edit buttons are enabled. When the item detailed pane is in edit mode, the Add, Delete, and Edit buttons are disabled, and the Save and Cancel buttons are enabled.
![]() Item pane This pane displays two fields and an optional thumbnail image from an Image data type field. The values for the field are for the items stored in the table that is currently selected in the table selector element. The item pane displays a scroll bar if there are more items to display.
Item pane This pane displays two fields and an optional thumbnail image from an Image data type field. The values for the field are for the items stored in the table that is currently selected in the table selector element. The item pane displays a scroll bar if there are more items to display.
![]() Item detailed pane This displays fields for the item that is currently selected in the item pane. The item detailed pane only displays those fields that are configured to be visible in the view you select in the view selector. Depending on the action bar button you select, you can view, create, modify, and delete properties of an item by using the item detailed pane.
Item detailed pane This displays fields for the item that is currently selected in the item pane. The item detailed pane only displays those fields that are configured to be visible in the view you select in the view selector. Depending on the action bar button you select, you can view, create, modify, and delete properties of an item by using the item detailed pane.
![]() Related items This area displays items from other tables that are related to the item displayed in the item detailed pane. A tab is displayed for each related table. When there are no related tables, this element is not displayed.
Related items This area displays items from other tables that are related to the item displayed in the item detailed pane. A tab is displayed for each related table. When there are no related tables, this element is not displayed.

An Access page lets you view and enter data
In your browser, you can use keyboard shortcut keys to navigate between tables, views, and items. For example, when your cursor is focused on the table selector, use the Down Arrow and Up Arrow keys to highlight table names. Press Enter to select the highlighted table. Use Tab or Shift+Tab to move your focus to the table selector and to each of the view names in the view selector. Press Ctrl+N to create a new item and Ctrl+E to edit an item.
![]() See Also
See Also
Full coverage of Access apps is beyond the scope of this book. For information about Access apps, see Microsoft Access 2013 Inside Out by Jeff Conrad, (Microsoft Press, 2013).
Skills review
In this chapter, you learned how to:
![]() Share OneNote notebooks with SharePoint
Share OneNote notebooks with SharePoint
![]() Import data from and export data to Excel spreadsheets
Import data from and export data to Excel spreadsheets
![]() Work with SharePoint in Outlook
Work with SharePoint in Outlook
![]() Integrate Access with SharePoint
Integrate Access with SharePoint

![]() Important
Important
You must have sufficient permissions to perform the operations involved in each practice task to complete that practice task. For more information, see Appendix A, “SharePoint 2016 user permissions and permission levels.”
Edit documents in Office
Go to your SharePoint team site, and then perform the following tasks:
1. Create a document library named Survival Guide.
2. Create a choice column named HR Region containing the choices Europe and UK, configured as a drop-down menu. Ensure that the HR Region column is added to the default view of the library.
3. Create a Word document in the library.
4. Open the document in Word and add a quick part to display the HR Region property.
5. In the quick part, select Europe, and then save your document.
6. Close Word. In your browser, you should see the value Europe in the HR Region column for the document.
7. Leave your browser open if you are continuing with the next set of practice tasks.
Share OneNote notebooks with SharePoint
If you have Office Online Server installed, go to the Survival Guide library you created in the previous set of practice tasks; otherwise, create a new document library with OneNote as the default document template. Then perform the following tasks:
1. Create a OneNote notebook named Recruitment Tips & Tricks.
2. If you have the notebook opened in OneNote Online, open in the OneNote program and then create a page named Interview Questions. In the body of the page, enter What is your greatest strength?
3. Manually sync your notebook, and then close OneNote.
4. Leave your browser open if you are continuing with the next set of practice tasks.
Import data from and export data to Excel spreadsheets
Go to your SharePoint team site, and then perform the following tasks:
1. Create a SharePoint list named FurniturePrice by using the Excel Furniture_Price.xslx spreadsheet from the practice file folder, with a description of This list contains the furniture items in stock together with their unit prices.
Select the Stock!FurniturePriceTable table range.
2. Change the list name to Furniture Price, and ensure that the list is displayed on the Quick Launch.
3. Export the Furniture Price list to Excel and add a new row that has the following values: Garden lounger, Bianca, wood, 5, 10.
4. Refresh the external table data. The spreadsheet is updated with a copy of the data from the Furniture Price list on the SharePoint site. Your changes to data in the Excel spreadsheet are lost. Discard the workbook.
5. Open the Sales_Figures.xlsx workbook from the practice file folder, and format the data in the workbook as a table.
6. Export the table to your SharePoint site as a read-only connection, with a list name of SalesFigures and a description of This list contains furniture sales for this year.
7. Open the new list in your browser, and review the data in the list.
8. Leave your browser open if you are continuing with the next set of practice tasks.
Work with SharePoint content in Outlook
Go to your SharePoint team site. If you do not have a contacts list, create a contacts list by following the steps in the “To create a list” procedure in Chapter 3, “Work with content in lists and libraries,” which explains how to create a list. Add at least two contacts to the list, and then perform the following tasks:
1. Connect your contact list to Outlook, and name the folder WideWorldImporters – Contacts.
2. Copy two contacts from your Outlook My Contacts address book to the WideWorldImporters – Contacts folder.
3. Move one of the contacts from the WideWorldImporters – Contacts folder to your My Contacts address book.
4. Get the web address of your contact list and add it in Outlook as a RSS Feed.
![]() Tip
Tip
When you have completed this practice task, you might want to disconnect the contacts list from Outlook and remove the contacts list as an RSS Feed.
Integrate Access with SharePoint
There are no practice tasks for this topic.