8. Create and manage sites
In this chapter
![]() Manage site users and permissions
Manage site users and permissions
![]() Create and use custom site templates
Create and use custom site templates
![]() Manage site content syndication
Manage site content syndication
Practice files
No practice files are necessary to complete the practice tasks in this chapter.
SharePoint sites are containers for webpages and apps such as lists and libraries, and features and settings that provide the sites’ functionality. You can use a site as a single container for your data or you can create as many child sites as you need to make your data easier to find and manage. You will frequently find yourself creating sites to allow a group of people to collaborate. For example, you might create a site to manage a new team or collaborate on a project.
As discussed in Chapter 2, “Navigate SharePoint sites,” sites are organized hierarchically within a site collection. There is always one top-level site, and there can be one or more child sites. Typically, a top-level site is created for an entire team and therefore has many visitors (people who only read content), a few members (people who can create and update content), and one or two owners. But as child sites and grandchild sites are created, the total number of visitors typically decreases while the number of people designated as members increases.
This chapter guides you through procedures related to creating sites, managing site users and permissions, sharing sites, changing site themes, creating and using custom site templates, managing site features, managing site content syndication, and deleting sites.
Create sites
You can provision sites by using site templates. These templates provide site blueprints by packaging together webpages, apps, navigation, settings, and features that are best suited for different sites’ purposes. You can also quickly and easily create personal sites, also known as My Sites, by using Self-Service Site Creation (SSSC).
Create sites
The catalyst for organizing your data into different site containers will often be the same catalyst as for creating multiple subdirectories in a file system. You might have too much information to use a single container and still find what you need easily. If all your files were kept in the root of your hard drive along with the operating system files and other program files, the list of files would be difficult to sort through, work with, and manage. Just as you create subdirectories to organize your file system data, you likely will create child sites to help organize your SharePoint data in logical ways.
The initial site created in a SharePoint site collection is called the top-level site. A top-level site is created from within SharePoint Central Administration because it doesn’t have a parent site. Although the functionality of a top-level site is not different from its child sites, it includes administrative links on its Site Settings page to manage the site collection.
To create a child site, you must navigate to the New SharePoint Site page of the site you want to use as the parent site by selecting the New Subsite link in the Subsites section of the Site Contents page.
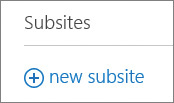
Select New Subsite to create a new site
![]() Tip
Tip
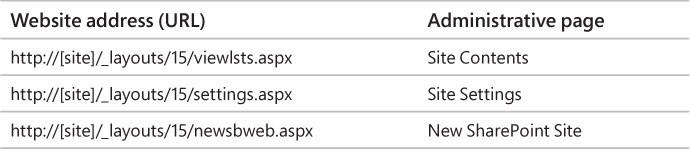
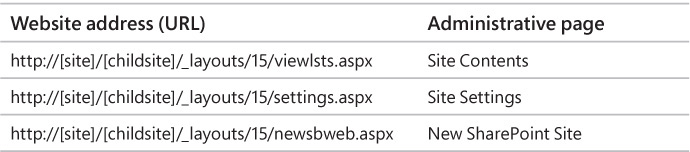
Alternatively, you can navigate to the New SharePoint Site page directly from your browser’s address bar. See the “The _layouts directory” sidebar later in this section for details about how to gain direct access to your destination directly from a browser’s address bar.
On the New SharePoint Site page, you first need to provide a title or name for your new site, a description (optional), and the URL suffix for the new website address.
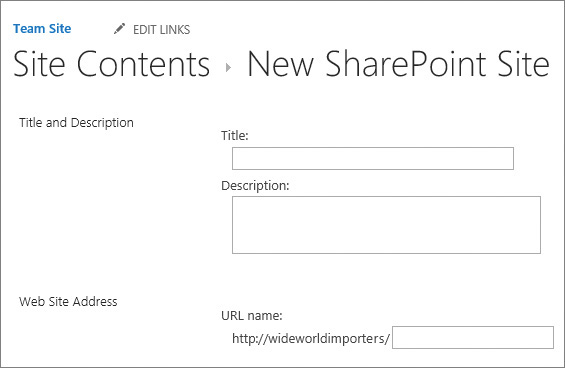
Provide a title, a description, and a URL name for your new site
When you initially create objects like sites, lists, and libraries in SharePoint, you are establishing two name values: the display name—usually labeled Title or Name—and the URL name. Typically, as is the case with sites, there is an option to provide the URL name separately, after the site has been created. The best practices for specifying a URL name are outlined in the “Naming a URL” sidebar later in this section.
![]() Tip
Tip
After a site has been created, you can change its title, description, and logo by using the Title, Description, And Logo page, which you can access via a link in the Look And Feel section of the Site Settings page.
After you’ve provided the title, the optional description, and the URL for your new site, you need to choose how to initially provision your site by using one of the SharePoint 2016 site templates.
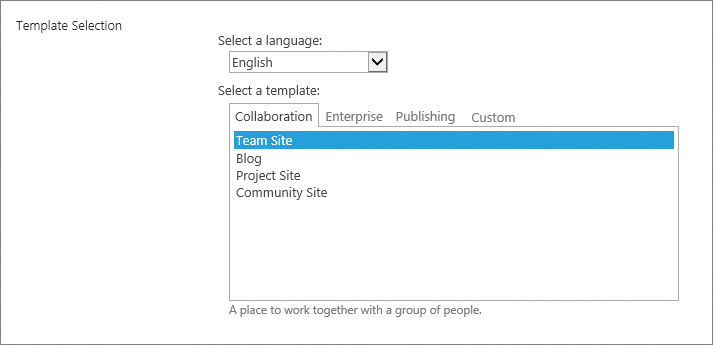
Select a site template to base your new site on
![]() The URL name should be descriptive, intuitive, and easy to remember.
The URL name should be descriptive, intuitive, and easy to remember.
![]() The URL name should be concise. There is a limit on the number of total characters available for the entire website address, so you will eventually encounter problems if you consistently use long URL names.
The URL name should be concise. There is a limit on the number of total characters available for the entire website address, so you will eventually encounter problems if you consistently use long URL names.
![]() The URL name should not contain spaces. Spaces in the address bar are replaced with %20 and take up three characters each. Spaces also make the website address difficult to use in an email and difficult for others to read. To reduce frustration and improve readability, an underscore can be used in place of a space.
The URL name should not contain spaces. Spaces in the address bar are replaced with %20 and take up three characters each. Spaces also make the website address difficult to use in an email and difficult for others to read. To reduce frustration and improve readability, an underscore can be used in place of a space.
![]() The URL name should be used consistently. By default, tasks are found in a list called Tasks, contacts in a list called Contacts, and so on. Similarly, if you frequently create a document library to house proposals, consistently using a name such as Proposals will help others to locate that content. Of course, you cannot have two lists with the same name in a site. Therefore, you may need to differentiate them by putting a prefix on the name, such as Customer_Proposals and Product_Proposals.
The URL name should be used consistently. By default, tasks are found in a list called Tasks, contacts in a list called Contacts, and so on. Similarly, if you frequently create a document library to house proposals, consistently using a name such as Proposals will help others to locate that content. Of course, you cannot have two lists with the same name in a site. Therefore, you may need to differentiate them by putting a prefix on the name, such as Customer_Proposals and Product_Proposals.
A site template is used in SharePoint as a blueprint to jump start a new site’s usefulness by auto-generating lists, libraries, apps, and webpages that likely will be most useful in a particular situation. SharePoint provides many built-in site templates. Each built-in site template provisions a site structure for a specific purpose, with relevant apps, and webpages prepopulated with web parts that use the navigation best suited for the purpose of the site template.
![]() Tip
Tip
The selection of built-in site templates that is available to you for site creation varies depending on the site collection settings in your SharePoint deployment, and on your organization’s SharePoint 2016 licensing for on-premises deployments and its SharePoint Online plan for cloud and hybrid deployments.
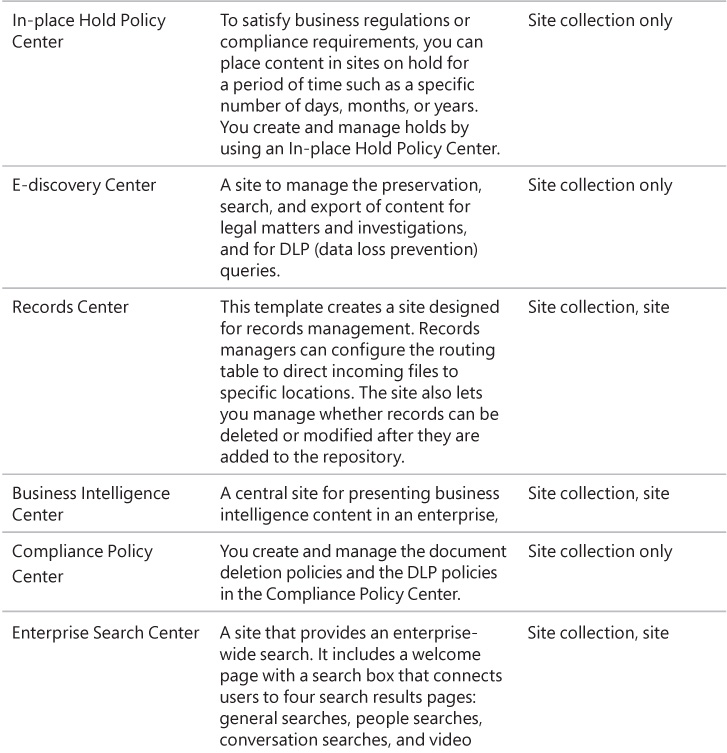
The built-in site templates are grouped into three categories: Collaboration, Enterprise, and Publishing. Most of the built-in templates are available for both the top-level site and the child sites within the site collection. There are also several templates that can only be used for provisioning the site collection’s top-level site.
The following table lists the SharePoint 2016 built-in site templates by category.
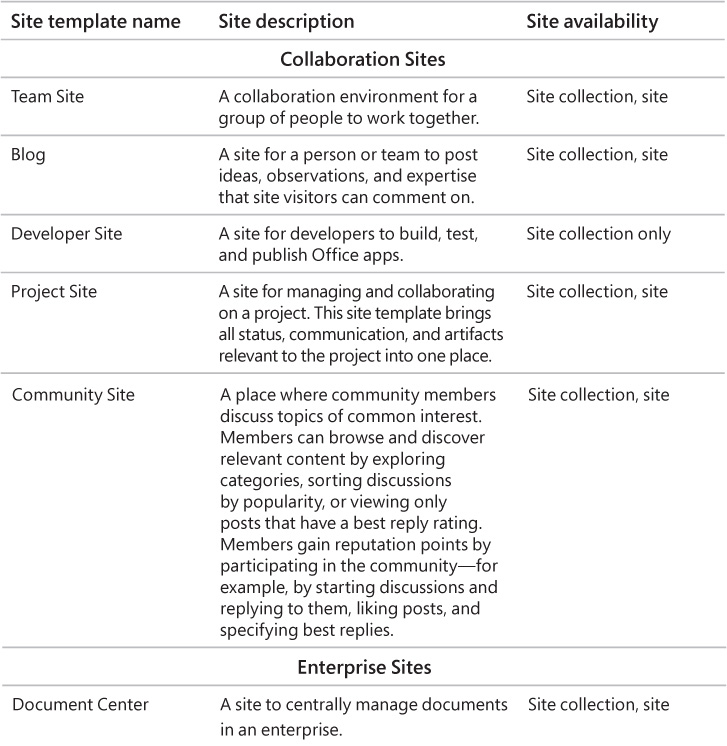
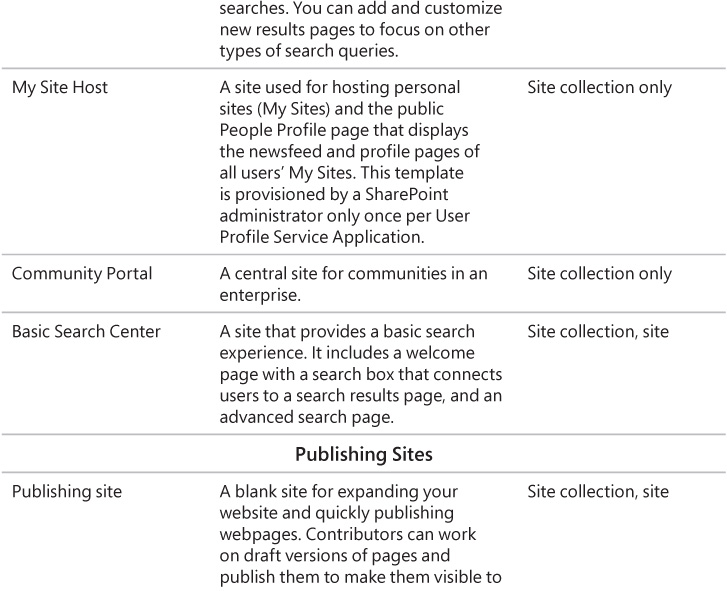
All collaboration site templates provision a Quick Launch navigation panel that contains links to the parts of the site. However, the apps and pages are provisioned differently depending on the site’s purpose.
The Team Site template provisions a Documents library that is made more visible by placing a web part for it on the site’s default home page for easier collaboration. The Blog site template provides a way to publish a type of journal known as a web log or just a blog. The blog owner creates posts on which other users can comment. Each post is a separate content page, and a rollup summary of these pages is typically presented in reverse chronological order (with newest entries listed first) on the home page of the blog site. Blogs are commonly used as news sites, journals, and diaries. A blog focuses on one or more core competencies of the author and is sometimes used as a soapbox for the blog owner to state an opinion. A blog can also be used as a one-way communication tool for keeping project stakeholders and team members informed.
![]() See Also
See Also
For more information about blogs, see Chapter 9, “Work with wikis, blogs, and community sites.”
![]() Tip
Tip
Blog site content can be syndicated by using a Really Simple Syndication (RSS) feed. RSS feed–aggregating software allows people to subscribe to the content they are interested in and have new and updated posts delivered to them. By using such a tool, you can aggregate the content from many blogs into one common reader, where posts from selected authors can be sorted, filtered, and grouped. Microsoft Outlook 2010, Outlook 2013, and Outlook 2016 can aggregate RSS feeds; there are also many vendors who give away or sell RSS feed–aggregating software.
The Developer Site template provides a site for developers to create and publish Office apps. The Project Site template provisions a site for collaborating on a project, with all information and artifacts relevant to the project available in one place.
The Community Site template provisions an environment for community members to discuss topics of common interest.
![]() See Also
See Also
For more information about working with community sites, see Chapter 9, “Work with wikis, blogs, and community sites.”
The type of top-level site in the site collection in which your new site will be located defines the list of built-in templates that are available for the new site. For example, the publishing templates are not available in the site collection where the top-level site is a team site. For a site collection where the top-level site is a publishing site, the site templates available for child site creation can be restricted by using the Page Layout And Site Template Settings link on the Site Settings page.
You will likely focus, at least initially, on using the built-in site templates. However, it is also possible to save the websites you create as custom site templates that you and others can then choose from the list of custom site templates on the New SharePoint Site page. A custom site template is a way to package site features and customizations and make them available as a foundation for other sites. When you save a website as a template, a custom site template is created by SharePoint and saved as a file with a .wsp extension. This is done by using the Save Site As Template link in the Site Action section of the Site Settings page of any site. Custom site templates saved in this way are initially available only in the same site collection in which they are saved. The “Create and use custom site templates” topic later in this chapter explains how to copy a saved web template into another site collection. All alterations to an underlying built-in template except security-related settings are retained on those sites that are provisioned by using custom site templates.
After you’ve selected a site template, you need to choose from the two options for site permissions that are listed on the New SharePoint Site page.

The default option, Use Same Permissions As Parent Site, checks the parent site’s permission every time the user visits the child site, to determine what the user is allowed to do on that site. When the permissions on the parent site change over time, the permissions on the child site reflect those changes. The other option is Use Unique Permissions. When you select this option as the site’s creator, you break the permission inheritance. You will then be the only user with access to the site, and you will be the site owner with the Full Control permission level.
![]() Important
Important
If you select Use Same Permissions As Parent Site, it is possible that you will have the right to create a new site but not the right to delete it. However, if you select Use Unique Permissions, you become the site owner and, as such, will always have the right to delete the new site.
You also have two other options for assigning permissions to a new site that are less obvious. If you initially select Use Unique Permissions, you will be the only user with access to the site and can make any changes you want. You can then switch to Use Same Permissions As Parent Site, whereby everyone who has access to the parent site (including you) will subsequently have access to the child site by using the permissions assigned on the parent site. If you initially select Use Same Permissions As Parent Site, the parent site’s permissions will be used. Yet if you subsequently switch to Use Unique Permissions, all the permissions of the parent site are copied to the child site. This can save you a great deal of time if most of the people who have access to the parent site also need access to the child site.
After you assign user permissions to your new site, you need to set up navigation options.
Set up navigation options
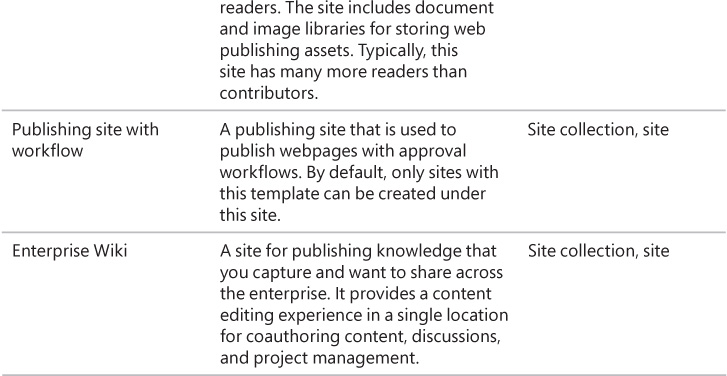
Three navigation options can be specified when creating a new site. The first two deal with the visibility of the child site being created within the navigation areas of the parent site. You can choose to show the child site on either the Quick Launch or the top link bar of the parent site, or both. The default of the former is No, and the default of the latter is Yes. In addition, you can specify whether the top link bar of the parent site should display on the top link bar of the new child site. This setting is referred to as navigation inheritance. The default is No.
![]() Tip
Tip
When you create a grandchild site where the child site above inherits its navigation from the top-level site, the option to show the new site on its parent site top link bar is not available because the top link bar of the parent site is inherited from the grandparent and is therefore locked.
After you have confirmed your choices, SharePoint creates a new site. The new site is listed in the Subsites section of the Site Contents page of the parent site.
![]() Tip
Tip
SharePoint 2016 provides an additional capability for creating site collections. Fast Site Collection Creation is a mechanism designed to improve provisioning performance of site collections by using a copy operation at the level of the content database. In this scenario, a master copy of a site collection for an enabled template provides the source site collection when a request is made for creating a new site collection. Fast Site Collection Creation can be turned on by using the SharePoint Management Shell.
1. On the parent site in which you want to create a child site, on the Site Contents page, in the Subsites section, select new subsite.
2. On the New SharePoint Site page, provide the following information for your new site:
• In the Title and Description section, enter the new site’s title in the Title box and, optionally, enter a description for the site in the Description box.
• In the Web Site Address section, complete the new site URL by entering the suffix in the URL name box.
• In the Template Selection section, select the site template you want to base your new site on.
• In the Permissions section, select whether your new site will use the same permissions as the parent site or unique permissions. The default is to use the same permissions as the parent site.
• In the Navigation section, select the following:
• Whether your site will be displayed on the Quick Launch of the parent site. The default is No.
• Whether your site will be displayed on the top link bar of the parent site. The default is Yes.
• In the Navigation Inheritance section, select whether the new site should display the top link bar of the parent site. The default is No.
3. Select Create.
Create personal sites
In SharePoint Server 2016, you can create a personal site to save and share your work, and to work with other people. Your new site will be based on a Team Site template, but it will not inherit either the navigation or the permission settings of any other site. You will be assigned the site owner permissions and will be able to manage site access and share your site with other people.
The site will be created in the location that your administrator has set up for Self-Service Site Creation (SSSC) under a predefined path. In a hybrid environment, the location can be in the cloud. Depending on how SSSC is set up in SharePoint Central Administration, there might be more than one location available that you can choose from when you create a new site. Your site might be a top-level site in a site collection, or a subsite.
You can create a personal site by using the New link on your Sites page, which is accessible to you via global navigation from any location within your SharePoint on-premises environment.

Select the New link on the Sites page to create a new personal site
![]() Tip
Tip
The new site link is visible on the Sites page only when Self-Service Site Creation is turned on in SharePoint Central Administration and you are granted the appropriate permissions to create SSSC sites.
In SharePoint Online, you can create a personal site by using the Create Site on the Sites page, which is accessible via the SharePoint link on the global navigation bar. It is available by default.
Select the Create Site link to create a personal site in SharePoint Online
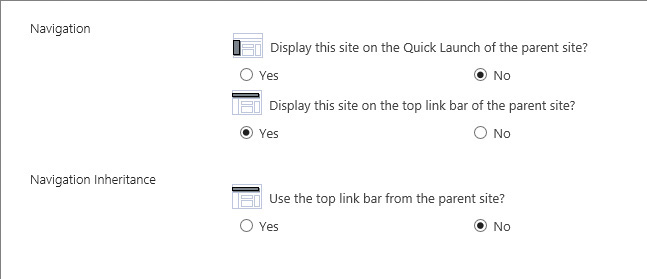
You only need to provide a name for your new site. The site name will be used as a title for your new site and for the suffix of your site’s URL. All other settings are provisioned automatically. Your site will be created in the location your administrator has predefined. Your site will not inherit the permission settings or navigation settings of other sites.
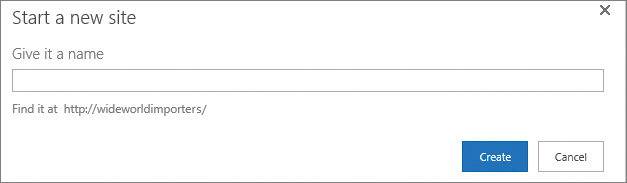
Create a personal site
Remember to follow the best practices outlined in the “Naming a URL” sidebar when specifying the site name. You can change the site display name after it has been created by using the Title, Description, And Logo link on the Site Settings page.
After the new site has been created, it is added to the list of sites you’re following that is displayed on your Sites page, and you can access this site from any location. You can share the site with other users, add content to it, and generally use its capabilities as you would with any other site that you own.
1. In the upper-right, in the global navigation bar, select one of the following links to go to the Sites page:
• Sites in SharePoint 2016
• SharePoint in SharePoint Online
2. On your Sites page, select one of the following links to open the Start A New Site dialog:
• new in SharePoint 2016
• Create site in SharePoint Online
3. In the Start a new site dialog, in the Give it a name box, enter a name for your new site.
4. Select Create.
Manage site users and permissions
After you have created a SharePoint site, you often need to provide or restrict user access to the site or its contents. In SharePoint, a site and its contents can inherit the permission settings of the parent site or have unique permissions. When you assign unique permissions to a site, its permissions are no longer inherited from its parent site. As discussed in Chapter 4, “Make lists and libraries work for you,” information in SharePoint is secured at one of four levels: site level, list or library level, folder level, and list item or document level. By default, the site inherits permissions of its parent site; lists and libraries inherit the permissions of the site that contains them; all folders inherit the permissions of the list or library that contains them; and all list items or documents inherit the permissions of the folder that contains them. If you are a site owner, you can change permission settings for the site, which stops permission inheritance for the site.
![]() See Also
See Also
For a deeper discussion about list, library, folder, and list item security, see Chapter 4, “Make lists and libraries work for you.”
When you create a site, selecting the default option—Use Same Permissions As Parent Site—provides permission inheritance from the parent site to the newly created child site. SharePoint checks the parent site’s permission every time the user visits the child site.
If you select the Use Unique Permissions option when creating a new site, SharePoint initially categorizes users of the new site into three SharePoint groups:
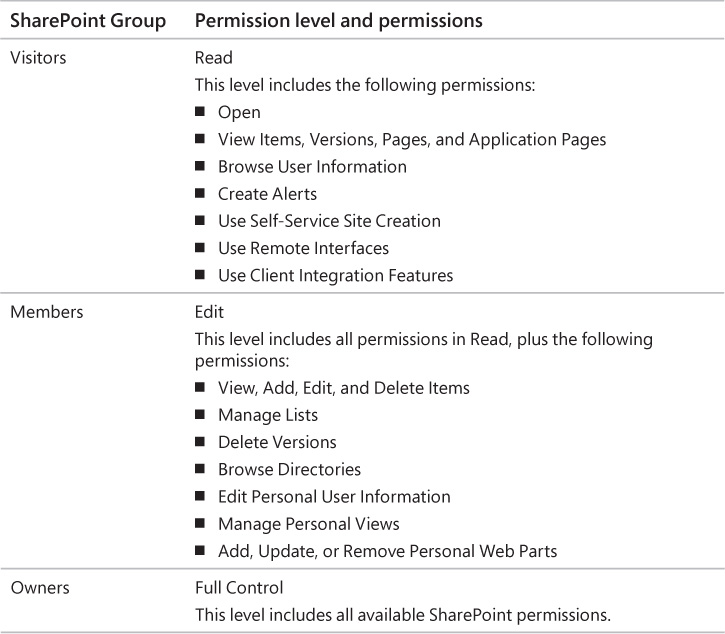
![]() Visitors People or groups who only need to be able to read content on a site
Visitors People or groups who only need to be able to read content on a site
![]() Members People or groups who need to be able to create and edit content, but not create subsites or manage site membership
Members People or groups who need to be able to create and edit content, but not create subsites or manage site membership
![]() Owners People who are responsible for all aspects of managing and maintaining a site
Owners People who are responsible for all aspects of managing and maintaining a site
Selecting the Use Unique Permissions option breaks the permission inheritance and sets you, as the site’s creator, with sole access to the new site as its owner. After you select Create on the New SharePoint Site page, the Set Up Groups For This Site page is displayed, from which you can add users to the three groups to provide them with access to the newly created site.
You can switch between inherited permissions and unique permissions for a site on its Permissions page. On this page, you can select Stop Inheriting Permissions to switch to unique permissions for the site, or Delete Unique Permissions to switch to inherited permissions.
![]() Tip
Tip
On a site that inherits permissions, administrators can access the parent site Permissions page by selecting Manage Parent on the site Permissions page, if they have appropriate rights on the parent site.
A site that has unique permissions has no tie to its parent site, so you are allowed to add and remove users from the site regardless of whether they have permissions on any other site. When users are added to a site, they must be added to a SharePoint group or associated with at least one permission level.
![]() Tip
Tip
When you create a site with inherited permissions and then break the inheritance, all SharePoint users and groups on the child site remain the same as the users and groups on the parent site. If you don’t want to use the same groups as the parent site, you need to create new groups for the child site.
SharePoint groups are maintained at the site collection level and represent a collection of users or groups with a defined set of one or more permission levels and a few governing attributes. When a new user or group is added to a SharePoint group, that user or group is granted the permissions of that group in all sites that the group has access to.
![]() Important
Important
Editing a SharePoint group affects the membership of all sites, lists, folders, and items that are using that SharePoint group.
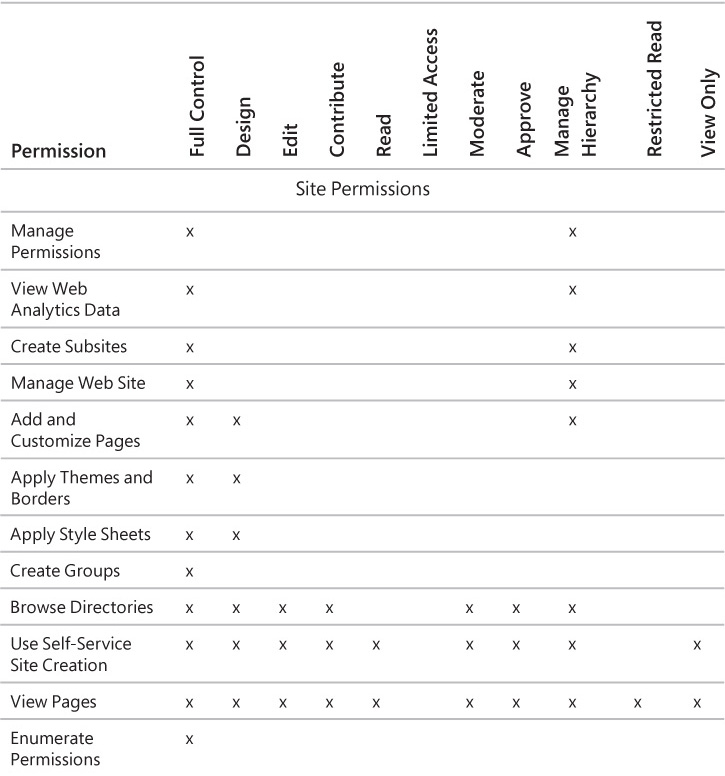
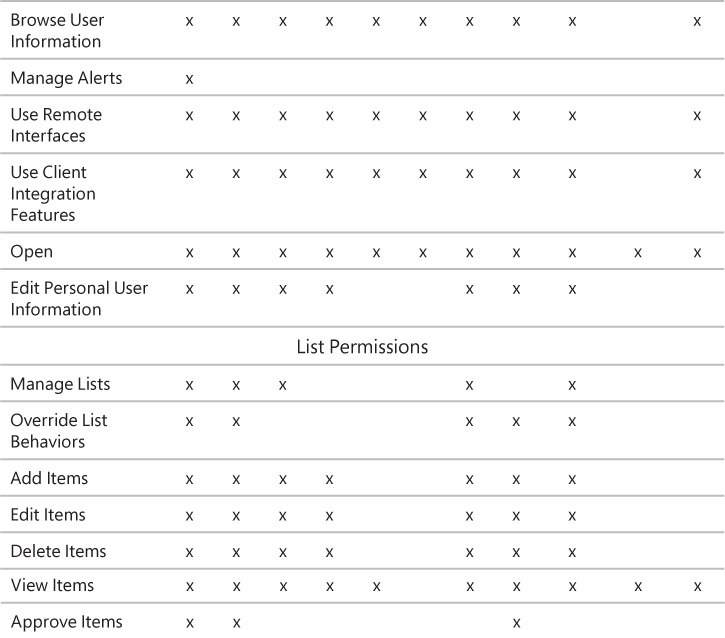
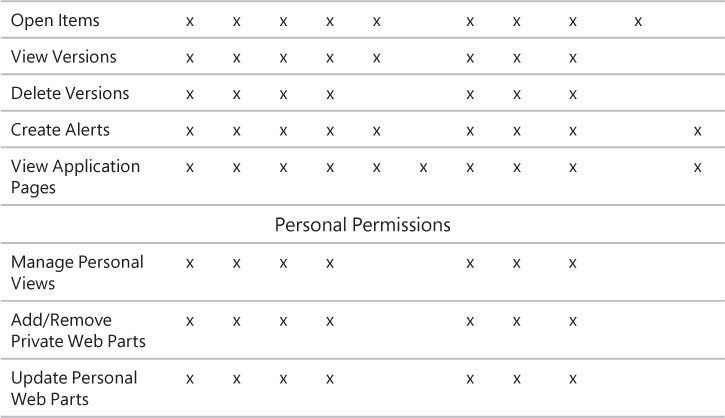
Think of permission levels as a named collection of permissions that can be assigned to SharePoint groups or individual users. There are several default permission levels in SharePoint 2016: Full Control, Design, Edit, Contribute, Read, Limited Access, Moderate, Approve, Manage Hierarchy, Restricted Read, and View Only.
The following table provides the list of individual permissions and shows the permission levels they are included in by default. The individual permissions are grouped into three categories: site permissions for site access, list permissions for lists and libraries access, and personal permissions for personal web parts and pages.
![]() See Also
See Also
For more information about the individual permissions and permission levels, see Appendix A, “SharePoint 2016 user permissions and permission levels.”
When you create a new site based on a site template, SharePoint automatically assigns a predefined set of default SharePoint groups with specific permission levels to the site.
For example, default SharePoint groups in a team site have the following permission levels:
![]() The Visitors group has the Read permission level.
The Visitors group has the Read permission level.
![]() The Members group has the Edit permission level.
The Members group has the Edit permission level.
![]() The Owners group has the Full Control permission level.
The Owners group has the Full Control permission level.
In addition to Visitors, Members, and Owners groups, a community site includes the Moderators group with a permission level of Moderate, and a publishing site with workflow includes the Approvers group with a permission level of Approve.
The following table shows the default permission levels and associated permissions for Visitors, Members, and Owners groups.
Not only can you associate existing SharePoint groups and individual users with permission levels, you can also associate Windows groups (including Active Directory groups and Local Machine groups) with permission levels. This is a very practical approach to providing tight security with minimal maintenance. However, you might not have control over the Windows groups defined in your organization.
![]() Tip
Tip
You can provide all authenticated users with site access on the site’s Permissions page by using the Grant Permissions command and the Everyone group.
Although you can create your own permission levels and even alter all permission levels except for Full Control and Limited, you will likely find the built-in levels to be adequate for most business scenarios. You might also want to provide all users with some level of access to the data on your site—for example, by using permission levels of either Restricted Read or View Only.
The following changes can be made to a permission level:
![]() Update the name or description
Update the name or description
![]() Add or remove permissions
Add or remove permissions
![]() Tip
Tip
To change or create permission levels, you must be a site collection administrator or have the Manage Permissions permission on the top-level site in the site collection.
![]() Important
Important
It is not recommended to make changes to the default permission levels. You can copy a default permission level and change the copy instead. You can’t make changes to the Full Control and Limited Access default permission levels, or delete them.
You can assign permission levels directly to individual users, but when you have many users, this approach can make it difficult to track and manage who has access to your site. A better approach is to assign permissions to groups, and then assign individual users to the appropriate groups.
If anonymous access has been turned on for the Web application in SharePoint Central Administration and has not been denied via the Anonymous User Policy, anonymous users can be granted some access, either to the entire site or to individual lists on a case-by-case basis. This provides the central administrator with the option to decide whether to grant anonymous access for each Web application before its site administrators can begin to turn on this option.
After all users and groups are assigned to various permission levels, it is possible—even likely—that someone will be associated with more than one permission level. Rather than enforcing the most restrictive permission level, all associated rights for a user or a group are aggregated, and the cumulative list of unique rights apply. This can be overridden only by policies created in SharePoint Central Administration.
![]() Tip
Tip
It is wise to associate every user in the various child sites in a site collection with at least the Read permission level in the top-level site. Users might be unable to use custom site templates and list templates that have been imported into a site collection unless they are associated with one of the built-in permission levels for the top-level site.
To display the Permissions page for a site
1. On the Site Settings page, in the Users and Permissions section, select Site permissions.
To turn on unique permissions for a site
1. On the Permissions page of the site, on the Permissions tab of the ribbon, select Stop Inheriting Permissions.
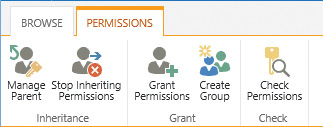
Select Stop Inheriting Permissions to create unique permissions for your site
2. In the warning message that appears, asking you to confirm your action, select OK.
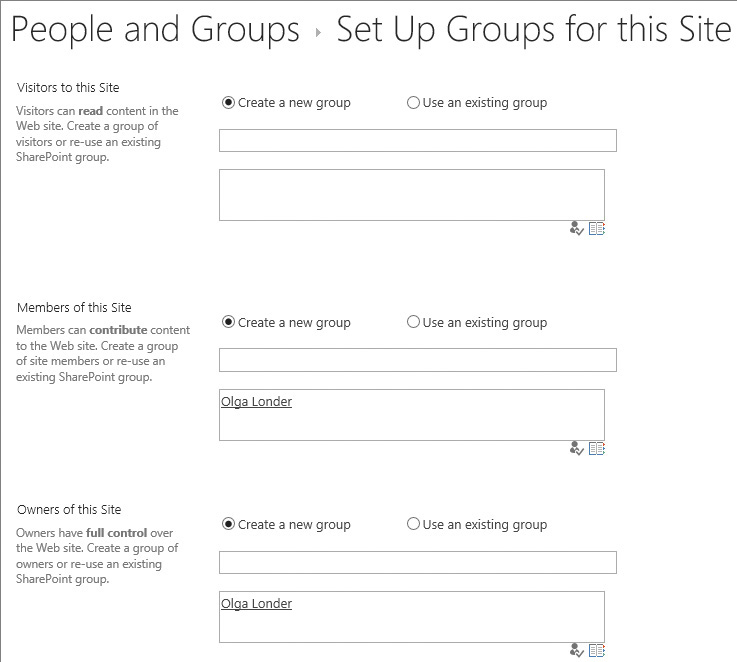
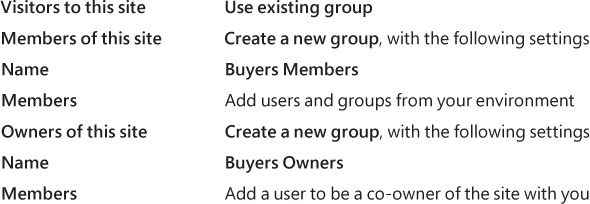
3. On the Set Up Groups page, in each section, do one of the following:
• If you want to keep using the default group, select Use existing group.
• If you want to create a new group, select Create a new group. Then, in the two boxes, do the following:
a. In the first box, enter the new name for the group or keep the default name.
b. In the second text box, enter the names of the members of the new group, separated by semicolons. You can also use the Browse button in the lower-right corner of the box to browse to the users and groups in your organization and add them to the new group.
c. Validate the names by selecting the Validate Names button (the icon of a person with the check mark in the lower-right corner of the box).
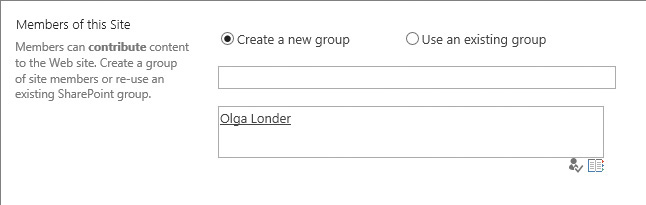
Create a new Members group and add users
4. When you’re done, select OK.
To restore permissions inheritance for a site
1. On the Permissions page of the site, on the Permissions tab, select Delete Unique Permissions.

Select Delete Unique Permissions to restore inheritance from the parent site
2. In the message that appears, asking you to confirm that you want to remove unique permissions, select OK.
To manage permissions for a parent site
1. Go to a site that has inherited permissions, and whose parent site’s permissions you want to manage.
2. Display the Permissions page.
3. On the Permissions tab, select Manage Parent.
To check user permissions for a site
1. On the Permissions page for the site, on the Permissions tab, select Check Permissions.
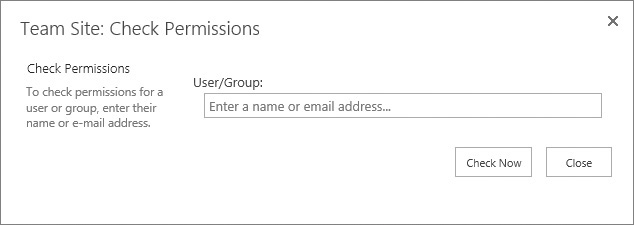
Check access to your site
2. In the Check Permissions dialog, enter the user name you want to check permissions for, and select Check Now.
![]() Tip
Tip
All permission levels assigned to this user on this site are listed in the dialog, including individual permissions and permissions given through group memberships.
3. Check the permission levels for the user listed at the bottom of the Check Permissions dialog, and then select Close when you’re done, to return to the Permissions page.
To grant user permissions for a site
1. On the Permissions page for the site, on the Permissions tab, select Grant Permissions.
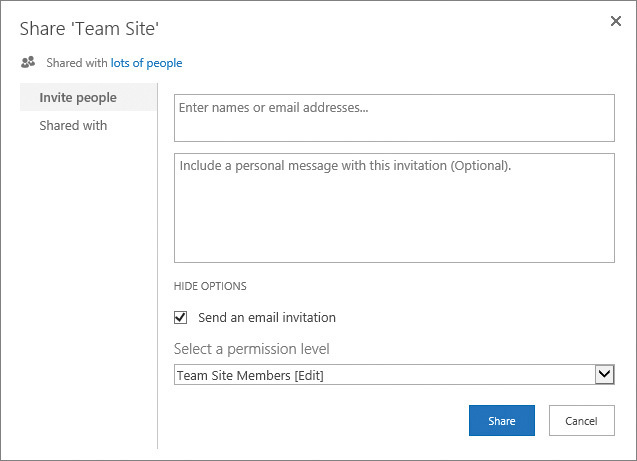
2. In the Share dialog, make sure that Invite people is selected, and then in the Enter names or email addresses box, enter the names or email addresses of the people or groups to whom you want to grant access.
3. Select Show options, and in the Select a permission level list, select the permission level you want to grant to the people and groups defined in step 2.
![]() Tip
Tip
The default permission level in the Select A Permission level list is Edit.
4. Do one of the following:
• In the Include a personal message box, add text for an optional email message that will be sent to everyone in the Invite People box.
• If you don’t want to send the email, clear the Send an email invitation check box.
5. Select Share to apply your changes and return to the Permissions page.
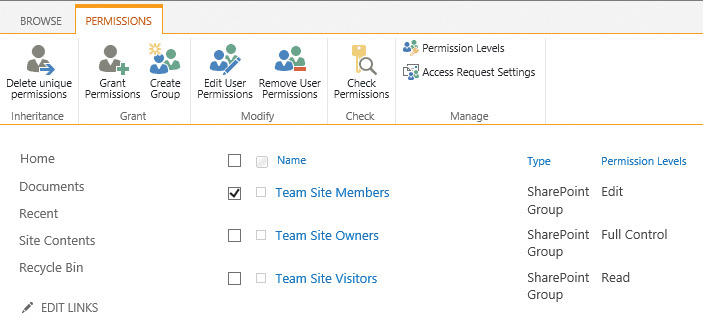
To change the user permissions for a site
1. On the Permissions page for the site, in the Name list, select the check box next to the name of the user or group for which you want to change the permission level.
2. On the Permissions tab, select Edit User Permissions.
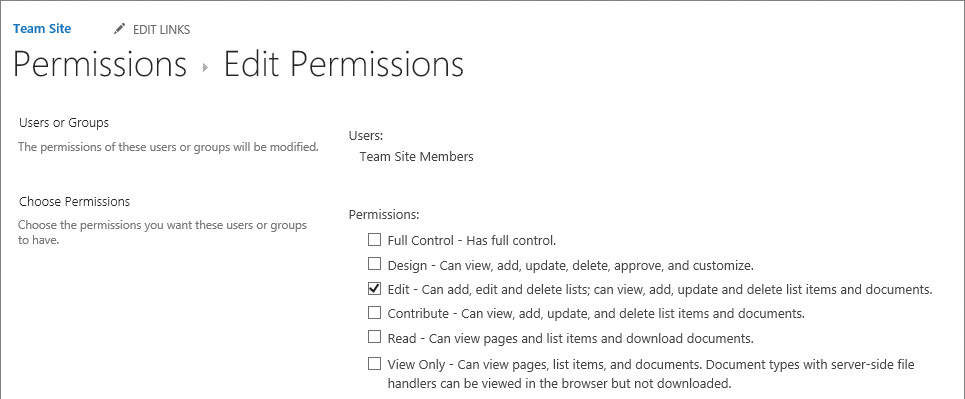
Modify permissions for existing site users and groups
3. On the Edit Permissions page for this user or group, under Permissions, choose the permission level you want this user or group to have.
4. Select OK to apply your changes and return to the Permissions page.
To remove user permissions for a site
1. On the Permissions page for the site, in the Name list, select the check box next to the name of the user or group that you want to remove the permissions from. You can select multiple users and groups.
![]() Tip
Tip
You can remove user permissions only for a site that has unique permissions.
2. On the Permissions tab, select Remove User Permissions.
3. In the message box that appears, asking you to confirm that you want to remove permissions from these users or groups, select OK.
To remove a user from a group on a site
1. On the Site Settings page, in the Users and Permissions section, select People and groups.
2. On the People and Groups page, in the Groups section at the top of the Quick Launch, select the group you want to remove the user from.
3. On the group page, select the user you want to remove. Then, on the Actions menu located above the list of users, select Remove users from group, and then select OK in the confirmation message that appears.
1. Go to the top-level site in the site collection in which you want to create a new permission level.
![]() Tip
Tip
To create or make changes to permission levels, you must belong to a SharePoint group that includes the Manage Permissions permission. By default, you have this permission if you belong to the top-level Site Owners group or if you are a site collection administrator.
2. Display the Permissions page for the site.
3. On the Permissions tab, select Permission Levels.
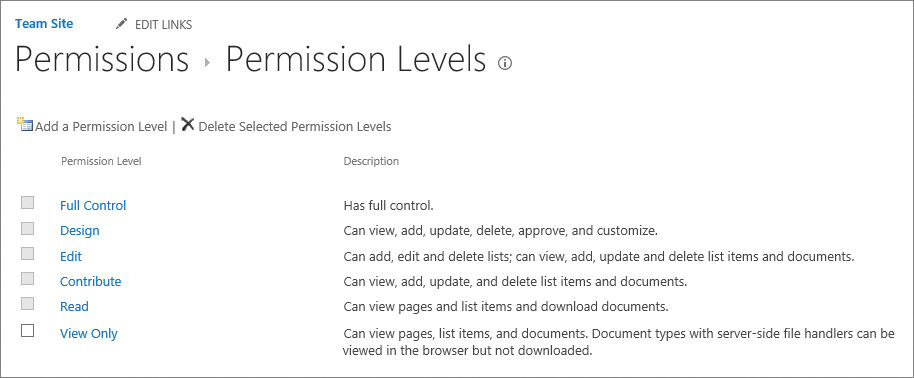
Manage permission levels for a site collection
4. On the Permission Levels page, select Add a Permission Level.
Create a permission level
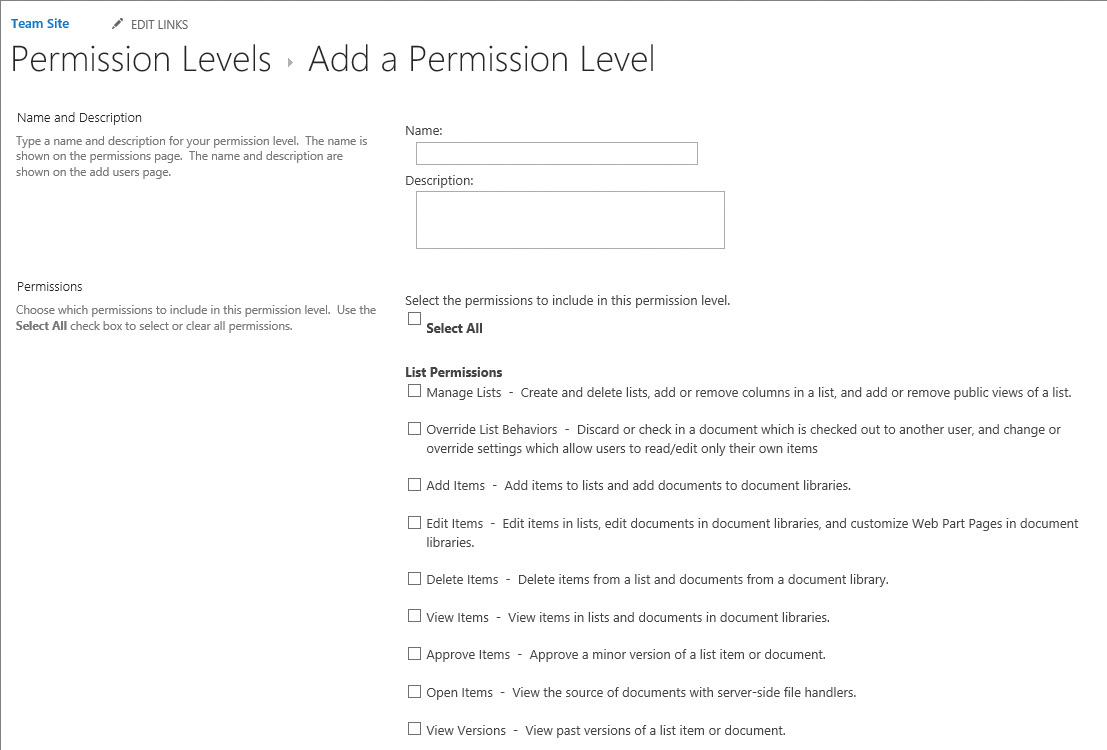
5. On the Add a Permission Level page, in the Name and Description section, provide the name and the optional description for your new permission level.
6. In the Permissions section, select the check boxes next to the list, site, and personal permissions that you want your new permission level to include.
7. When you’re done, select Create.
To make changes to a permission level
1. Display the Permissions page for the top-level site in the site collection in which you want to make changes to a permission level.
2. On the Permissions tab, select Permission Levels.
3. On the Permission Levels page, click or tap the name of the permission level you want to edit.
![]() Tip
Tip
Be sure to click or tap the link; do not select the check box next to the name.
4. On the Edit Permission Level page, do any of the following:
• In the Name and Description section, change the name or the optional description for this permission level.
• In the Permissions section, add or remove permissions for the permission level by selecting or clearing the check boxes next to the list, site, and personal permissions.
![]() Tip
Tip
You can’t make changes to the Full Control and Limited Access default permission levels.
5. When you’re done, select Submit.
1. Display the Permissions page for the top-level site in the site collection in which you want to delete a permission level.
2. On the Permissions tab, select Permission levels.
3. On the Permission Levels page, select the check box next to the permission level that you want to delete.
4. Select Delete Selected Permission Levels, and if a confirmation box appears, select OK.
To make a copy of a permission level
1. Display the Permissions page for the top-level site in the site collection that contains the permission level you want to make a copy of.
2. On the Permissions tab, select Permission Levels.
3. On the Permission Levels page, click or tap the name of the permission level you want to copy.
![]() Tip
Tip
Be sure to click or tap the link; do not select the check box next to the name.
4. On the Edit Permission Level page, scroll down to the bottom of the page and select Copy Permission Level.
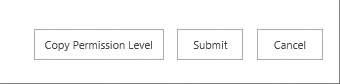
Copy Permission Level
5. On the Copy Permission Level page, do any of the following:
• In the Name and Description section, change the name or the optional description for your new permission level.
• In the Permissions section, add or remove permissions for the permission level by selecting or clearing the check boxes next to the list, site, and personal permissions.
6. When you’re done, select Create.
Share sites
After you’ve created a site, you can give other people access to this site by using the Share command from any page on the site. If email has been turned on for your SharePoint deployment, you also have the option of sending a message to let people know that they have access to your site.
Sharing a site means granting access permissions to the users and groups you want to use your site. You can assign different levels of access to different people. For example, when you share your site with users who have the Edit permission level, they can create and modify the site content, including lists and libraries.
![]() See Also
See Also
For more information about sharing individual documents and folders, see Chapter 4, “Make lists and libraries work for you.”
![]() Important
Important
If you want to share your site with external users outside of your organization—for example, in a hybrid environment—before you can share the site, your global administrator must turn on external sharing and set the appropriate permissions in SharePoint Online. You need to be a site owner or have Full Control permissions to share a site with external users.
When you share your site by using the Share command, the Share dialog is displayed. In the Share dialog, you can add a user to the SharePoint group that has the permission level that you are assigning to the user. For example, you can assign the Edit level to the user, which will add the user to the Members group.
If your site inherits permissions from its parent site, when you add users to your new site, they will also have access to the parent site and the sites that share permissions with it. Because of this, you will need to be an owner of the parent site to be able to share the new child site with other people. If you are not the site owner, you can still use the Share command to invite people to the site, but your request will be sent to the site owner for approval.
If you are the site owner, you can allow the users in the Members group to share the site, and the individual files and folders. You can also can set up the mail address where the access requests are sent for approval. You can manage these settings by using Access Requests Settings in the Permissions page of the site.

The Share command can also be used to see the list of people a site has been shared with.
If a site has been shared with a user and you want to revoke access to the site for this user, you can do so by removing the permissions for the site from this user by using Remove User Permissions in the Permissions page of the site.
1. Go to a page in the site, and in the upper-right of the page, select Share.
2. In the Share dialog, make sure that Invite people is selected, and then in the Enter names or email addresses box, enter the names or email addresses of the people or groups to whom you want to grant access.
3. Select Show options, and in the Select a permission level list, select the permission level you want to grant to the people and groups defined in step 2.
![]() Tip
Tip
The default permission level in the Select A Permission Level list is Edit.
4. Do one of the following:
• In the Include a personal message box, add text for an optional email message that will be sent to everyone in the Invite People box.
• If you don’t want to send the email, clear the Send an email invitation check box.
5. Select Share to apply your changes and return to the site.
To see who has access to a site
1. Go to any page in the site, and in the upper-right of the page, select Share.
2. In the Share dialog, select Shared with.

3. In the Share dialog, view the list of people who have access to the site, then do either of the following:
• Select Advanced to go to the site Permissions page to manage site access.
• Select Close to return to the site.
Change site themes
The look and feel of the default blue SharePoint sites are all right initially, but eventually you might find that your sites start to look too similar to each other. You might want to differentiate your sites by the way they are presented to the user. In SharePoint, you can apply themes to your sites. Themes can radically affect display items such as colors, text, background images, banners, and borders. There are many built-in themes available from which to choose. You can set up a theme for a site by using the Change The Look link on the Site Settings page.
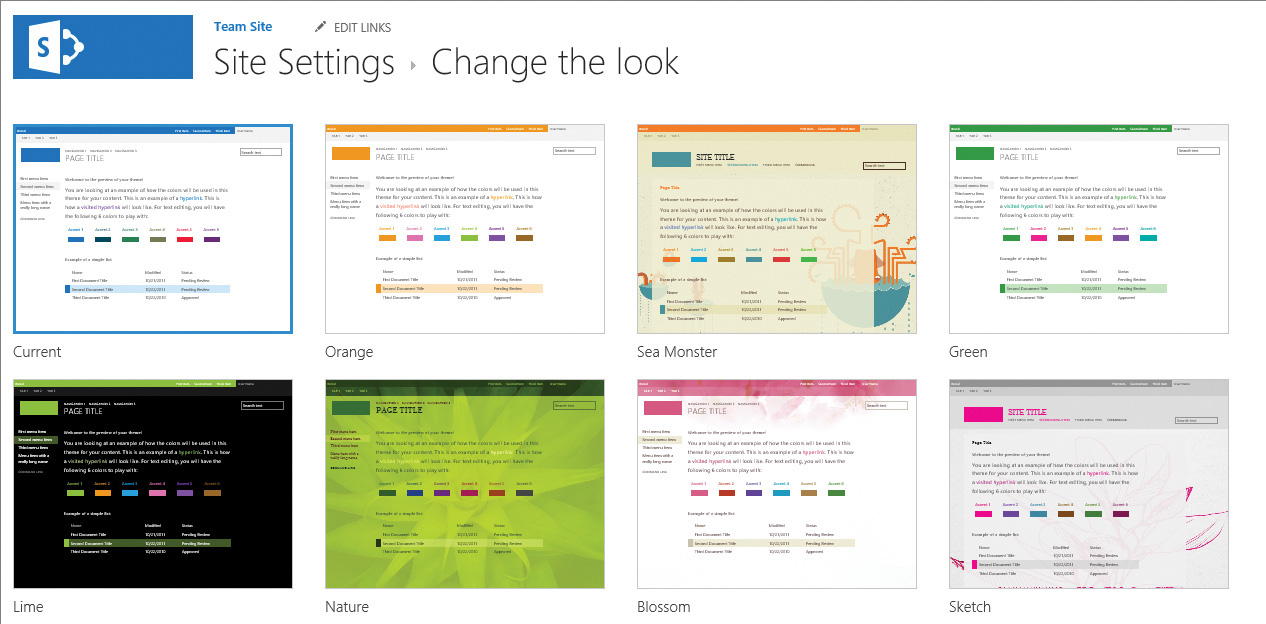
Select a theme design
Each SharePoint site can have its own theme, or you can set several sites so that they all have a common theme and are related visually. For the built-in themes, you can change the background graphics, the color scheme, the site layout, and the fonts.
1. On the Site Settings page for the site, select Change the look.
2. On the Change the look page, select the theme you want to use.
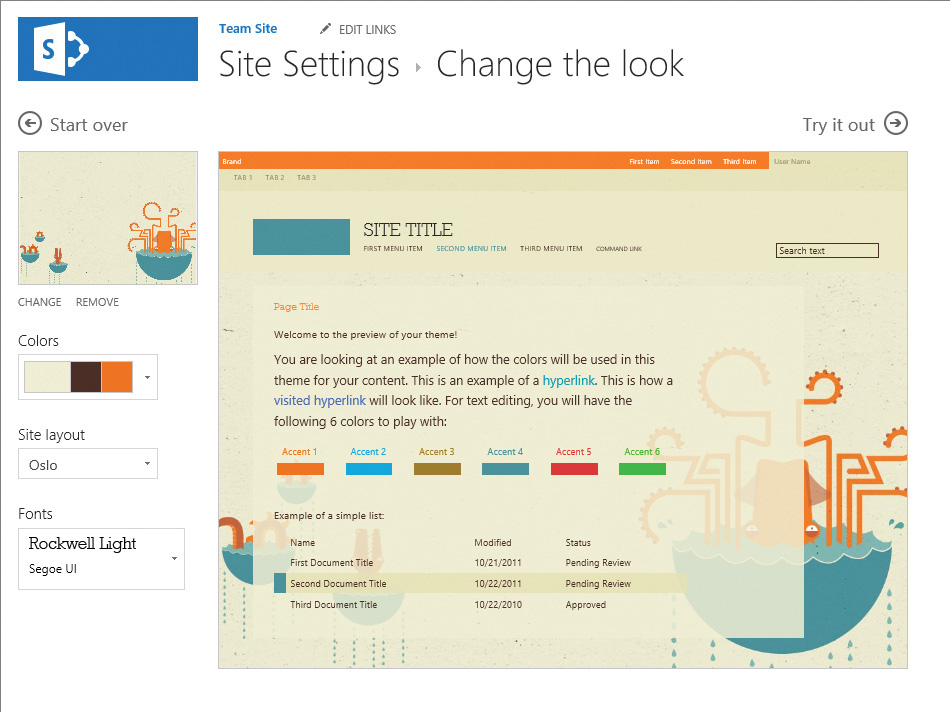
Customize the theme design
3. In the left panel of the theme design page, you can customize the theme design by doing any of the following:
• To change the background, select Change and browse to the new image you want to use. To remove the background image, select Remove.
• To change the colors used in the design, in the Colors list, scroll through the color schemes, and select the one you want to use.
• To change the layout of the site, in the Site layout list, select a new layout.
![]() Tip
Tip
The site layouts for themes are based on the available master pages for your site. For example, the Seattle site layout displays the Quick Launch, whereas the Oslo site layout does not. In the Oslo layout, the links from the Quick Launch replace the links in the top link bar.
• To change the font, in the Fonts list, select a new font.
4. When you’re done, select Try it out to display a preview of your site with its new theme.
5. In the preview screen, do either of the following:
• If you like the look, select Yes, keep it to apply the changes and return to the Site Settings page.
• If you don’t like the design, select No, not quite there to return the theme design page, and then repeat steps 3 through 5.
Create and use custom site templates
After working with a site, you might want to save it just the way it is so that it can be re-created over and over again. SharePoint facilitates this by allowing anyone with a Design permission level or higher to save a site as a custom site template. Custom site templates provide a way of packaging up a set of changes to an underlying built-in site template and making that package available as a template for new sites. Custom site templates behave in much the same way as built-in templates, in that they provision lists, document libraries, and webpages prepopulated with web parts that are best suited for the purpose of the template. In fact, nearly everything you can set up in a site except security-related information is saved in a custom site template, including its theme and navigation. The contents of all lists and libraries can also be included.
There are a few site capabilities that are not supported and that can’t be saved in site templates. The following list distinguishes the supported and non-supported capabilities:
![]() Supported Lists, libraries, external lists, data source connections, list views and data views, custom forms, workflows, content types, custom actions, navigation, site pages, master pages, modules, and web templates
Supported Lists, libraries, external lists, data source connections, list views and data views, custom forms, workflows, content types, custom actions, navigation, site pages, master pages, modules, and web templates
![]() Unsupported Customized permissions, running workflow instances, list item version history, workflow tasks associated with running workflows, people or group field values, taxonomy field values, publishing sites and pages, and stapled features
Unsupported Customized permissions, running workflow instances, list item version history, workflow tasks associated with running workflows, people or group field values, taxonomy field values, publishing sites and pages, and stapled features
A custom site template allows you to create a solution and then share that solution with your peers, the broader organization, or outside organizations. Custom site templates are used to deploy solutions in other sites or to provide site consistency within an organization. A custom site template is saved as a Web Solution Package file with a .wsp extension in the Solutions Gallery of the site collection. Only the current site is saved as the template; the subsites below the site are not saved.
![]() Important
Important
A site template file is limited to 50 megabytes (MB).
A user with sufficient permissions to create a child site can select the custom site template from the Custom tab in the Template Selection section on the New SharePoint Site page.
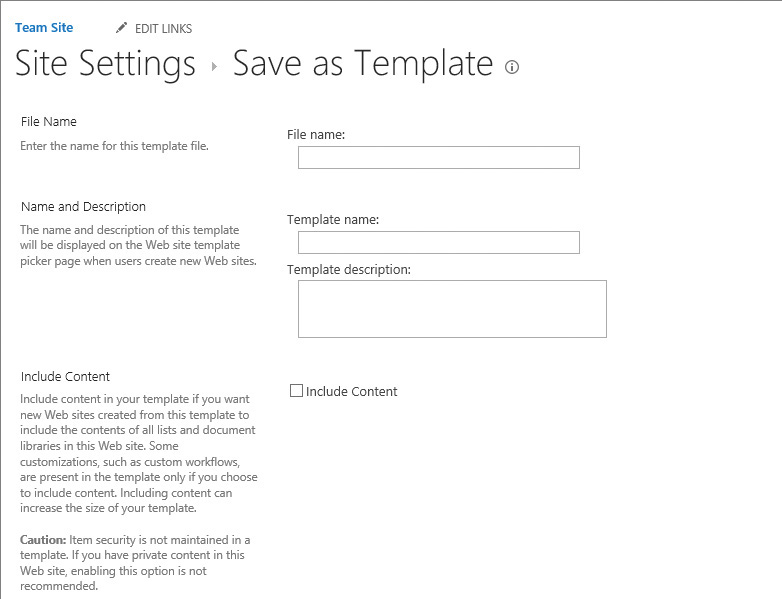
You can save a site as a template by using the Save As Template page that is accessible via the Save Site As Template link on the Site Settings page.
Save a site as a template
![]() Important
Important
Saving sites as templates is not supported on publishing sites. If your site has the publishing infrastructure turned on, you can’t use the site template feature. The Site Settings page does not display the Save Site As Template link for publishing sites.
After it has been saved, a custom site template is made immediately available throughout the entire site collection in which it is saved. The site template file can be downloaded from the Solutions Gallery of the current site collection and redeployed to other site collections.
To make a custom site template available for site creation in a site collection, you must ensure that the file containing the template is available and activated in the Solutions Gallery of the site collection.
The steps to save and redeploy your site template in another site collection are as follows:
1. Save the site as a template in the solution gallery of its site collection.
2. Download the template .wsp file from the solution gallery of its site collection.
3. Upload the template .wsp file to a solution gallery of a site collection you want to redeploy it to.
![]() Tip
Tip
You can upload a .wsp file to the same site collection or to different site collections in the same or different SharePoint environments.
4. Activate the site template in the new site collection. After the template has been activated, it becomes available for site creation within the new site collection and is displayed on the Custom tab in the Template Selection section of the New SharePoint Site page.
You can also download a .wsp file from the Solutions Gallery and then open it in another environment or program such as Microsoft Visual Studio, and further customize it there.
![]() Tip
Tip
The .wsp files used to create the sites for the practice tasks for this book are custom site templates saved to files.
1. On the site’s Site Settings page, in the Site Actions section, select Save site as template.
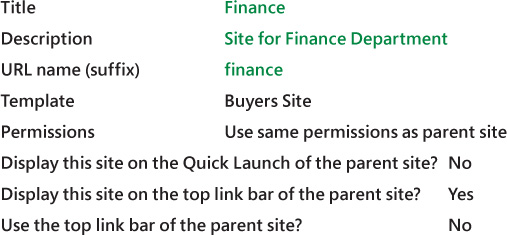
2. On the Save as Template page, do the following:
• In the File Name section, in the File name box, enter a name for the template file.
• In the Name and Description section, in the Template name and Template description boxes, enter a name and optional description for the template.
• In the Include Content section, select the Include Content check box to include the content of the site in the site template.
3. Select OK to save the template. If all of the components on the site are valid, the template is created, and a confirmation page is displayed.
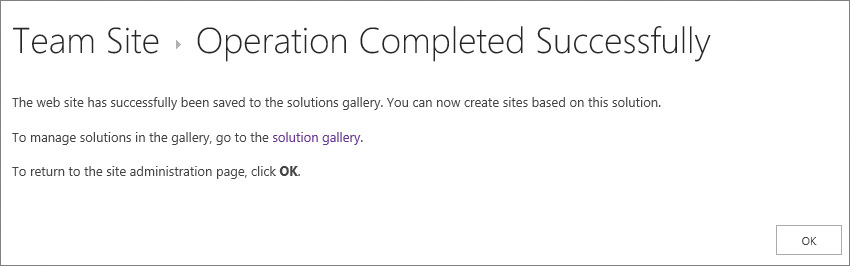
A site template has been created
4. On the confirmation page, do one of the following:
• Select OK to return to your site.
• Select solution gallery to go to the saved site template in the Solution Gallery.
![]() Tip
Tip
When a custom site template is created and saved in the Solutions Gallery, it is activated within the site collection.
To download a site template file
1. On the top-level site of the site collection that contains the site template, display the Site Settings page, and in the Web Designer Galleries section, select Solutions to open the Solution Gallery.
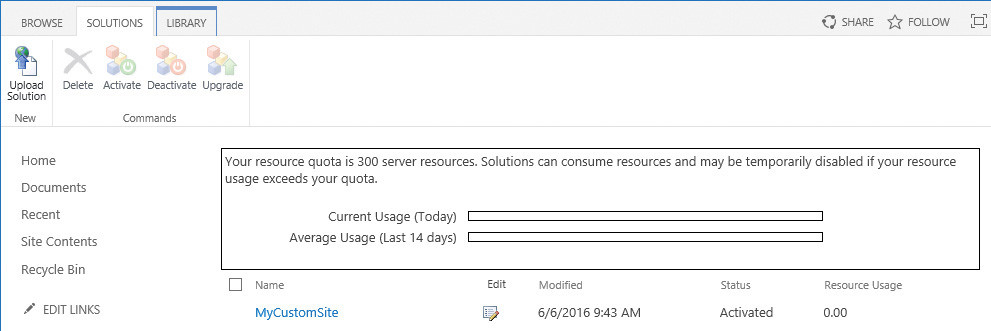
Click or tap the template you want to download
2. On the Solution Gallery page, click or tap the site template name, and then in the Do you want to save template file? bar that appears, display the Save menu and select Save As.
3. In the Save As dialog, browse to the location where you want to save the template .wsp file, select Save, and then close the message box that confirms the file download.
To upload a site template to a site collection
1. On the top-level site of the site collection, display the Site Settings page, and in the Web Designer Galleries section, select Solutions.
2. On the Solution Gallery page, on the Solutions tab of the ribbon, select Upload Solution, and then, in the Add a document dialog, select Browse.
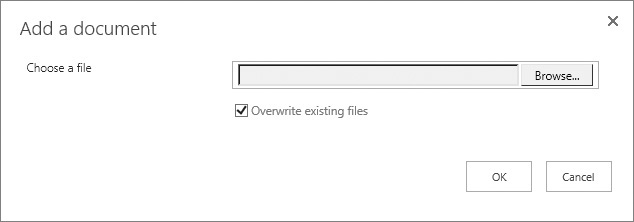
Browse to the site template file you want to upload
3. In the Choose File to Upload dialog box, select the site template file you want to upload, select Open, and then, in the Add a document dialog, select OK to perform the upload.
1. On the top-level site of your site collection, display the Site Settings page, and in the Web Designer Galleries section, select Solutions.
2. On the Solution Gallery page, select the template you want to activate by clicking or tapping in its leftmost column.
3. On the Solutions tab of the ribbon, in the Commands group, select Activate.
4. In the Activate Solution dialog, on the View tab, in the Commands group, select Activate.
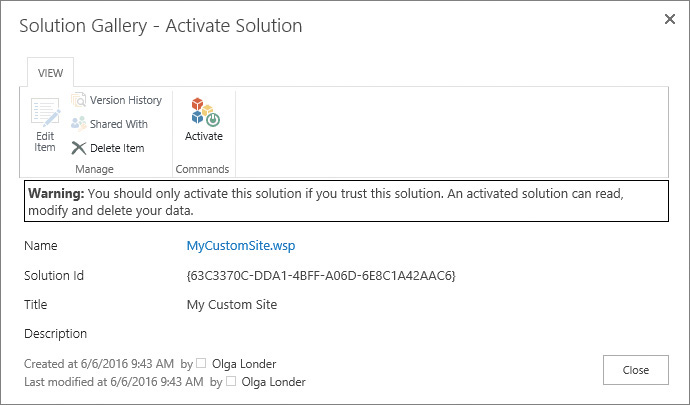
1. On the top-level site of your site collection, display the Site Settings page, and in the Web Designer Galleries section, select Solutions.
2. On the Solution Gallery page, select the template you want to deactivate by clicking or tapping in its leftmost column.
3. On the Solutions tab of the ribbon, in the Commands group, select Deactivate.
4. In the Deactivate Solution dialog, on the View tab, in the Commands group, select Deactivate.
To remove a site template from a site collection
1. On the top-level site of the site collection, display the Site Settings page, and in the Web Designer Galleries section, select Solutions.
2. On the Solution Gallery page, deactivate the template you want to delete.
3. On the Solutions tab of the ribbon, in the Commands group, select Delete. Select OK in the dialog that appears, to confirm that you want to remove the template.
![]() Tip
Tip
When a site template is deleted from the Solution Gallery, it is moved into the Recycle Bin. It can be restored from the Recycle Bin within the time period that is set for keeping items in the Recycle Bin. The default time period is 30 days for SharePoint 2016 and 93 days for SharePoint Online.
Manage site features
SharePoint features provide site capabilities by grouping together chunks of functionality that developers and administrators can activate to make the combined functionality available. This can be done at one of four scope levels, as follows:
![]() Farm level These features are activated for all sites in the entire SharePoint Foundation farm and are managed by the farm’s central administrators.
Farm level These features are activated for all sites in the entire SharePoint Foundation farm and are managed by the farm’s central administrators.
![]() Web application level These features are activated for all sites where the web address is the same. For instance, all sites that start with http://wideworldimporters would be managed under the same web application. These features are also managed by the farm’s central administrators.
Web application level These features are activated for all sites where the web address is the same. For instance, all sites that start with http://wideworldimporters would be managed under the same web application. These features are also managed by the farm’s central administrators.
![]() Site collection level These features are activated only for sites within a specified site collection. Management of these features is accomplished from the top-level site of the site collection and is typically distributed to the site collection administrators.
Site collection level These features are activated only for sites within a specified site collection. Management of these features is accomplished from the top-level site of the site collection and is typically distributed to the site collection administrators.
![]() Site level These features are activated only for the site in which the activation is performed. Management of these features can be done by anyone with the Full Control permission level on the site.
Site level These features are activated only for the site in which the activation is performed. Management of these features can be done by anyone with the Full Control permission level on the site.
A feature needs to be installed and activated in order to provide its functionality. For example, there are several built-in features that are installed and activated by default in a site collection in which the top-level site is a team site. These features include a Team Collaboration Lists feature that provides collaboration capabilities for a team site by making document libraries and several lists available, a Site Feed feature that provides the site with newsfeed capability, and others. Each SharePoint feature is identified by a numeric, globally unique identifier (GUID).
![]() See Also
See Also
For a complete list of built-in SharePoint 2016 site features with corresponding GUIDs, see https://gallery.technet.microsoft.com/office/SharePoint-2016-Features-8b181fec.
The site features are managed from the Site Features page, which you can navigate to via the Manage Site Features link on the Site Settings page.
A feature must be installed and activated in scope on your SharePoint server farm before you can begin working with it. For example, when a custom site template is deployed in a site collection, the Web Template feature that provides its functionality is created and activated in the site collection. It is this feature that allows the new template to appear on the Custom tab in the Template Selection section of the New SharePoint Site page.
![]() Tip
Tip
A custom site template includes a list of activated features from the originating site. If these features are not activated at the intended parent site when the creation of a new site is attempted, SharePoint 2016 will not create a site and will generate an error message that includes the GUID of the missing feature.
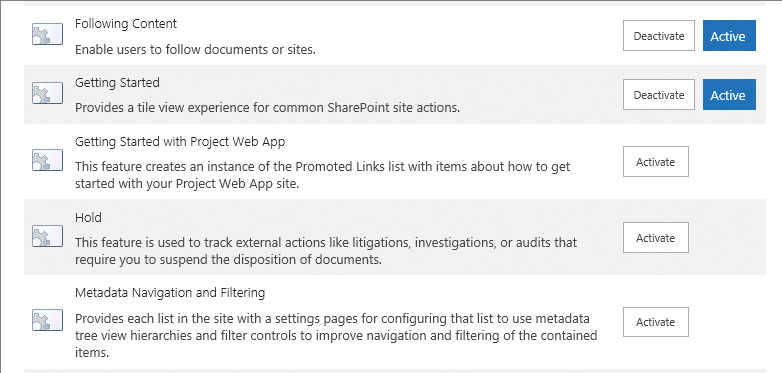
To activate or deactivate a feature for a site
1. Display the site’s Site Settings page.
2. In the Site Actions section, select Manage site features.
3. On the Site Features page, scroll to the feature, and do one of the following:
• To activate the site feature, select Activate to the right of the feature.
• To deactivate the site feature, select Deactivate to the right of the feature, and then on the confirmation page, select Deactivate this feature to confirm your action.
Manage site content syndication
Really Simple Syndication (RSS) is a standard way to make new or modified content available to readers of a SharePoint list or document library. After you subscribe to an RSS feed (the XML emitted from a web request), you can use an RSS aggregator, also known as a reader, to check for new or modified content as often as you want.
![]() Tip
Tip
There are different types of RSS readers, including standalone readers, browsers such as Internet Explorer, and email programs. Outlook 2010, Outlook 2013, and Outlook 2016 can be used as RSS aggregators.
RSS feeds come at periodic intervals and appear in an RSS reader. You can use RSS to receive updates in a standardized format from several sites at the same time. The reader gathers all updates into a common pool of data that can be searched, sorted, filtered, and grouped by the aggregator as directed. This can be a useful way to roll up data entered into a SharePoint list. By default, every web application in SharePoint is configured to allow RSS feeds for all site collections that they contain.
Site collection administrators can specify whether RSS feeds are allowed on lists and libraries in the sites within the site collection by using the RSS page available via the RSS link in the Site Settings page. By default, RSS feeds are allowed. Each site can then subsequently specify whether RSS feeds are allowed on lists and libraries in the site; they are also allowed by default. If RSS feeds are turned off for a site, no lists in this site are allowed to provide their data in the form of an RSS feed.

Set up RSS feeds for a site
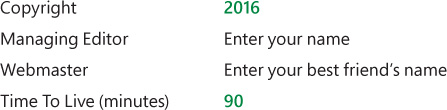
If sites do allow feeds, several attributes can be defined that will be included in every feed, as follows: copyright, managing editor, webmaster, and time to live. The time to live defines a period in minutes that instructs the RSS reader to wait at least this long before checking for updates. A shorter period increases the frequency of requests from RSS readers to a site. A longer duration can help reduce the number of RSS reader requests.
To configure RSS feed for a site
1. On the site’s Site Settings page, in the Site Administration section, select RSS.
2. On the RSS page, in the Enable RSS section, do either of the following:
• To enable RSS, select the Allow RSS Feeds In This Site check box, and then in the Advanced Settings section, enter the attributes for the feed in the following boxes:
• Copyright
• Managing Editor
• Webmaster
• Time To Live (minutes)
• To disable RSS, clear the Allow RSS Feeds In This Site check box.
3. When you are done, select OK to apply the changes and return to the Site Settings page.
Delete sites
There will be times when you want to remove a site that you either created in error or no longer need. SharePoint automatically generates all the necessary user interface elements to create, review, update, manage, and delete your sites.
![]() Important
Important
You need to have Full Control permissions to delete a site or subsite.
When you delete a site, you’re also deleting all content and user information that is part of the site, including documents, document libraries, lists, and list data. When you delete a top-level site, you delete all subsites within the site collection and all of the content within those subsites.
When a site is deleted, it is sent to the site collection’s Recycle Bin. The site can be restored from the site collection’s Recycle Bin to its original location only by an administrator of the site collection.
1. On the site’s Site Settings page, in the Site Actions section, select Delete this site.
2. On the Delete This Site page, select Delete to confirm the deletion request, and then in the confirmation box that appears, select OK.
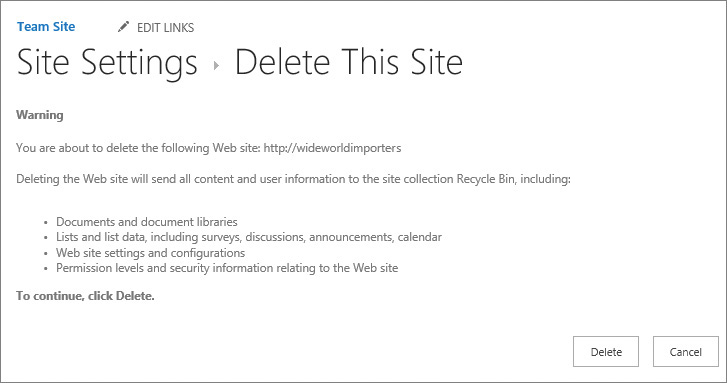
Delete a site when you no longer need it
3. On the confirmation page, select Go Back To Site to return to the parent site.
Skills review
In this chapter, you learned how to:
![]() Manage site users and permissions
Manage site users and permissions
![]() Create and use custom site templates
Create and use custom site templates
![]() Manage site content syndication
Manage site content syndication

![]() Important
Important
You must have sufficient permissions to perform the operations involved in each practice task to complete that practice task. For more information, see Appendix A, “SharePoint 2016 user permissions and permission levels.”
Create sites
Go to your SharePoint site and perform the following tasks:
1. Create a subsite that uses the following settings:
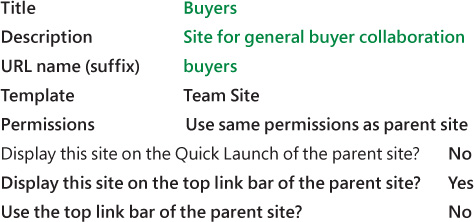
2. Confirm that you can navigate to your new site by selecting a link on the top link bar of the parent site.
3. Create a personal site with the name Vendors.
4. Go to the Sites page and validate that your new site has been added to the list of sites you are following.
Manage site users and permissions
Continuing on your SharePoint deployment, perform the following tasks:
1. Go to the Buyers site.
2. Turn on unique permissions for the Buyers site and set up the following groups:
3. Remove site permissions from all users and groups inherited from the parent site, so that only your new groups, Buyers Members and Buyers Owners, have permissions to the site.
4. Grant Design permissions to a user.
5. Check permissions for the user you granted permissions to in step 4.
Share sites
Continuing on your SharePoint deployment, perform the following tasks:
1. Go to the Vendors site.
2. Share the site with a user or a group you want to invite to your site with Read permissions, such as:
• The Everyone group for on-premises deployment.
• The Everyone except external users group for SharePoint Online.
![]() Tip
Tip
Turn off email notifications when sharing your new site.
Change site themes
Continuing on your SharePoint deployment, perform the following tasks:
1. Go to the Buyers site.
2. Change the site theme to Sea Monster. Select the design choices that you like most for the background graphics, color scheme, site layout, and fonts.
Create and use custom site templates
Continuing on your SharePoint deployment, perform the following tasks:
1. On the Buyers site, save the site as a template with the following settings:

2. Go to the parent site for the Buyers site.
3. Create a new subsite with the following settings:
4. Confirm that the new Finance site is identical to the Buyers site, with the Sea Monster theme applied.
Manage site features
Continuing on your SharePoint deployment, perform the following tasks:
1. Go to the Finance site.
2. Verify the feed functionality by positioning your cursor in the newsfeed box, entering Hello World!, and then selecting Post.

Verify the site newsfeed functionality
3. Deactivate the Site Feed site feature for the Finance site.
4. Go to the home page of the Finance site. Confirm that the newsfeed box and the Post button are no longer available, and that your post has also been removed.
5. Activate the Site Feed site feature.
6. Go to the home page of the site and confirm that the newsfeed box is displayed and that site feed functionality is available.
Manage site content syndication
Continuing on your SharePoint deployment, perform the following tasks:
1. Go to the Vendor site.
2. Set up RSS feed with the following settings:
Delete sites
Continuing on your SharePoint deployment, perform the following tasks:
1. Delete the Finance site.
2. Confirm that the link to the Finance site is no longer available in the top link bar of the parent site.