14. Manage and monitor content
In this chapter
Practice files
For this chapter, use the practice files from the SP2016SBSCh14 folder. For practice file download instructions, see the introduction.
Much of this book has concentrated on organizing content in lists, libraries, sites, and site collections, where access to content is secured by using permissions. This chapter looks at other ways to manage and monitor content, including retaining and expiring content; using sites such as the Document Center, Records Center, In-Place Hold Policy Center, eDiscovery Center, and Compliance Center; and using features such as document IDs, document sets, the Content Organizer, information management policies, and auditing.
This chapter guides you through procedures related to managing documents, storing and managing records, and protecting data.
Manage documents
SharePoint Server is an Enterprise Content Management (ECM) system that can store millions of documents that can be retrieved at a high rate. In earlier chapters of this book, many of the basic ECM components were described, such as multiple file uploads; opening with Explorer; major and minor versioning; checking in and checking out; durable URLs; content approval; the synchronization of offline files; the ability to define data (metadata) at the site, site collection, and enterprise levels by using site columns; content types and enterprise content types; keywords and term sets; and the authoring, branding, and controlled publishing of web content known as Web Content Management (WCM).
Create enterprise content management sites
SharePoint Server provides many site templates that can be used to create sites targeted to managing enterprise-wide content, such as:
![]() Document Center A site to centrally manage documents.
Document Center A site to centrally manage documents.
![]() Records Center A site designed for records management. Records managers can configure the routing table to direct incoming files to specific locations.
Records Center A site designed for records management. Records managers can configure the routing table to direct incoming files to specific locations.
![]() In-Place Hold Policy Center A site to manage policies to preserve content for a fixed period of time.
In-Place Hold Policy Center A site to manage policies to preserve content for a fixed period of time.
![]() eDiscovery Center A site to manage the preservation, search, and export of content for legal matters and investigations.
eDiscovery Center A site to manage the preservation, search, and export of content for legal matters and investigations.
![]() Tip
Tip
You can search and locate files by using the Records Center’s eDiscovery features or by creating sites from the eDiscovery Center site template.
![]() Compliance Policy Center A site that allows you to manage policies that can delete documents after a specified period of time.
Compliance Policy Center A site that allows you to manage policies that can delete documents after a specified period of time.
![]() Tip
Tip
These five site templates can be used to create top-level sites of a site collection. Only the Document Center and Records Center can be used to create subsites.
Many of the features available in these sites, such as document IDs, document sets, and the Content Organizer, can be made available in any library.
To create a Document Center or a Records Center as a subsite
1. Go to the Site Contents page of the site where you want to create the subsite.
2. At the bottom of the Site Contents page, under Subsites, select new subsite.
3. On the New SharePoint Site page, in the Title box, enter the name of the site, and in the URL name box, enter the website address.
4. In the Template Selection section, select the Enterprise tab, if it is not already active, and then select Document Center or Records Center.
5. Select Create.
To activate or deactivate a site collection feature
1. Go to the top-level site of your site collection.
2. On the Settings menu, select Site Settings, and then under Site Collection Administration, select Site collection features.
![]() Tip
Tip
If you do not see the Site Collection Administration section, you are not a Site Collection Administrator. If you see Go To Top Level Site Settings, you are not at the top-level site of the site collection.
3. On the Site Collection Features page, scroll to the feature and do either of the following:
• To activate a feature, select Activate to the right of the feature.
• To deactivate a feature, select Deactivate to the left of the feature, and then select Deactivate this feature to confirm your action.
Work with document IDs
The web address of a file stored in a library consists of the library’s URL and the file name. When you move a file to different library, the file’s web address is now the new library’s URL and the file name; therefore, if you created links to the file when it was stored in the first location, they no longer work when the file is moved. Also, if you submit content to, for example, a records center, the file is given a new web address and you will not be able to find the file by using the original URL. In these scenarios, you might consider using the site collection Document ID feature or consider the file’s durable URLs, as described in the “Navigate lists and libraries” topic of Chapter 2, “Navigate SharePoint sites.”
![]() Important
Important
When you activate the Document ID Service feature, existing documents in your site collection might not be assigned document IDs immediately, because by default the SharePoint document ID–related jobs are configured to run nightly.
After the Document ID Service feature is activated, new hidden site columns are added to the Document and Document Set content types, and then the changes to those content types are sent to the sites within the site collection, so that the columns are added to all libraries that use those content types. Each document in those libraries receives a unique ID known as the document ID.
![]() Tip
Tip
When the Document ID Service feature is activated, the Find By Document ID web part is made available in the Search category in the Web Part pane. Use this web part on a page when you want to display the properties of the document by referencing its document ID.
A document ID consists of two parts:
![]() A prefix, which can be randomly generated or can be specified on the Document ID settings page. You should ensure that every site collection that uses the document ID feature has a unique prefix; otherwise, duplicate document IDs could exist.
A prefix, which can be randomly generated or can be specified on the Document ID settings page. You should ensure that every site collection that uses the document ID feature has a unique prefix; otherwise, duplicate document IDs could exist.
![]() Two numbers—the ID of the library where the document was created, and the item ID of the file in the library.
Two numbers—the ID of the library where the document was created, and the item ID of the file in the library.
An example of a document ID is SP2016SBS-3-9. The library Document ID column contains a URL to the file that uses the document ID and has a format similar to http://wideworldimporters/_layouts/DocIdRedir.aspx?ID=SP2016SBS-3-9. When you select this URL, the SharePoint search functionality is used to find the file; therefore, the URL might not work until the file has been added to the search index. The default search scope used to find files is All Sites, which you can change if additional search scopes have been created.
If you deactivate the Document ID Service feature, you will no longer see the Document ID Settings link on the Site Settings page. Document IDs will not be created for new files. In libraries, the Document ID column is not deleted, so that the document IDs for existing files are preserved even after deactivation; however, if you try to look up a file by its document ID, you will get the error message, “This Site Collection is not configured to use document IDs.”
To turn document IDs on or off for a site collection
![]() Important
Important
An automated process, which by default is scheduled to run daily, completes the document ID configuration.
1. On the Site Settings page for the site collection, under Site Collection Administration, select Document ID settings.
![]() Tip
Tip
If the Document ID Settings link is not displayed, verify that the Document ID Service site collection feature is activated. See the “To activate or deactivate a site collection feature” procedure earlier in this topic.
2. Do either of the following, and then select OK:
• Select the Assign Document IDs check box to turn on the use of document IDs.
• Clear the Assign Document IDs check box to turn off the use of document IDs.

On the Document ID Settings page, you can turn on or off the use of Document IDs in every document library in the site collection
To configure the document ID settings
![]() Important
Important
You do not have to complete any of the tasks unless you want to change the defaults.
1. Open the Document ID Settings page for the site collection.
![]() Tip
Tip
If the Document ID Settings link is not available on the Site Settings page, verify that the Document ID Service site collection feature is activated. See the “To activate or deactivate a site collection feature” procedure earlier in this topic.
2. Turn on the use of document IDs as described earlier in this topic, if necessary.
3. Make any of the following changes, and then select OK:
• In the Begin IDs box, enter a minimum of 4 and a maximum of 12 characters for the document ID prefix.
• In the Use this search scope for ID lookup box, select the search scope to be used to look up documents.
• If you have changed the document ID prefix and want all document IDs in the site collection to begin with the prefix characters, select the Reset all Document IDs in this Site Collection to begin with these characters check box.
![]() Important
Important
This will impact the integrity of any previously documented document ID URLs such as those for files, emails, and webpages.
To find the document ID of a file
1. In the library where the file is stored, click or tap to the left of the file.
2. On the Files tab, select View Properties. SharePoint displays the document’s properties, including the document ID.
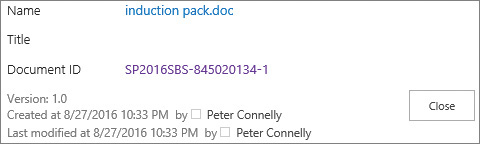
View the properties of a file to find its document ID and the link to the file
![]() Tip
Tip
To easily see the document ID assigned to any file in a library, display the Document ID column for any view.
Create and modify document sets
As you perform a business process, you might find that you always work with three or four related files, such as a product sheet, a product proposal PowerPoint presentation, and an Excel workbook with supporting financial information. To group those files together, you could categorize the files by using metadata in a column or store them in a folder; alternatively, you could group the files together as one item or set by using the Document Set feature.

Use a document set to group related files, which can be created at the same time and managed as a single entity
After you group files as a document set, you can specify the column values—that is, metadata—on each item within the set or, alternatively, just once, in which case the metadata is then shared across the items, making it easier to tag and manage content.
You can run workflows on each item of a set or on the document set as a whole; for example, you could use an approval workflow to specify that a document set that represents a legal case must be signed off before it can be used in court.
![]() See Also
See Also
For information about how to integrate document sets with your SharePoint Server document management solutions, go to “Plan document sets in SharePoint Server 2013” at https://technet.microsoft.com/en-us/library/ff603637.aspx. For information about adding or modifying site columns on a document set content type, see the “To add an existing site column to a content type,” “To add a new site column to a content type,” and “To associate a document template with a content type” procedures in the “Work with content types” section in Chapter 4, “Make lists and libraries work for you.” For information about adding a document set content type to a library, see the “To add a content type to a list or library” procedure in the same section.
To create a document set content type
1. On the Site Settings page for the site where you want to create the document set content type, under Web Designer Galleries, select site content types to display the Site Content Types page, and then select Create.
2. On the New Site Content Types page, in the Name box, enter a name for your document set. You can also enter a description, which will be used as the description on the New button.
3. In the Select parent content type from list, select Document Set Content Types, and in the Parent Content Type list, select Document Set, if it is not already selected.
4. Do either of the following:
• Select Existing group, if it is not already selected, and then select a group from the list.
• Select New group, and then enter the name of the new group.
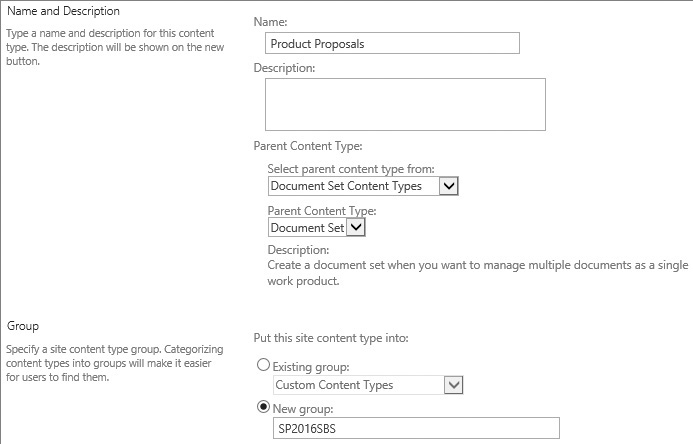
Use the New Site Content Type page to create a document set content type
5. Select OK. The Site Content Types page for your document set content type is displayed.
To display the document set settings page for a document set content type
1. Go to the Site Settings page for the site where the document set content type was created, and then under Web Designer Galleries, select Site content types.
2. On the Site Content Types page, select the document set you want to modify, and then under Settings, select Document Set settings.

On the Site Content Types page, select Document Set Settings to go to the Document Set Settings page, where you can modify or add new site columns to the document set
To configure the content types that are allowed for a document set
1. On the Document Set Settings page for the document set you want to configure, in the Allowed Content Types section, under Available Site Content Types, select the content types you want to allow, and then select Add.

Add site content types from the list of available site content types
2. At the bottom of the page, select OK.
To add default files to a document set
![]() Important
Important
Any modifications you make to the Default Content section only affect new document sets. Existing document sets are not affected.
1. On the Document Set Settings page for the document set you want to configure, in the Default Content section, select a content type, and in the Folder box, enter a folder name.
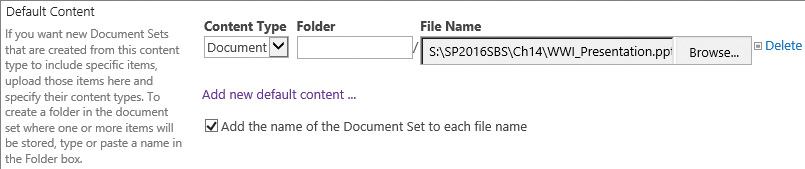
In the Default Content section, you can configure settings to have new Document Sets you create automatically contain specific files
2. Select Browse to open the Choose File To Upload dialog box, navigate to the file you want to use, and then select Open.
3. To add another default file, select Add new default content, and repeat the two previous steps.
![]() Tip
Tip
To remove a file, select Delete to the right of the Browse button.
4. Select or clear the Add the name of the Document Set to each file name check box.
5. At the bottom of the page, select OK.
To select a document set’s columns whose values are to be used by all files in the document set
1. On the Document Set Settings page for the document set you want to configure, in the Shared Columns section, select the check box to the left of each column whose values you want to automatically synchronize to all files contained in the document set.
2. At the bottom of the page, select OK.
To select which column to show on the Welcome Page
1. On the Document Set Settings page for the document set you want to configure, in the Welcome Page Columns section, under Available columns, select one or more columns you want to show, selected in the order you want them to appear on the welcome page, and then select Add.
2. At the bottom of the page, select OK.
To customize the Welcome Page for a document set
1. On the Document Set Settings page for the document set you want to configure, in the Welcome Page section, select Customize the Welcome Page to open the Welcome Page web part page in a new browser tab.
2. On the Page tab, select Edit Page.
3. To modify and save the document set Welcome Page, use the procedures in Chapter 7, “Work with webpages.”
4. When you have completed all your changes to the Welcome Page, return to the Document Sets Settings page, and select the Update the Welcome Page of Document Sets inheriting from this content type check box.

You will not see the changes you have made to your Welcome Page until you select the check box
5. At the bottom of the page, select OK.
To force updates to all content types that inherit from your document set content type
1. On the Document Set Settings page for the document set you want to configure, in the Update List and Site Content Types section, select Yes.
2. At the bottom of the page, select OK.
1. Go to a library where a document set content type has been added.
2. On the Files tab, select the New Document arrow, and then select the document set content type you want to use.

Select the New Documents command on the Files tab to add new files and document sets
Set up the Content Organizer
The Content Organizer is very useful when you have users who are confused about where to store files. It also helps you manage library and folder sizes and resolve duplicate file names.
You can use the Content Organizer to automatically move documents by using rules based on content type site columns. The content types must be based on the Document content type; that is, this functionality affects files and not list items. The target location can be a library or a folder in a library, which can be in the site where the rule is defined, in another site, or in a different site collection.
![]() Tip
Tip
Document sets can be routed after the content type is added to the target location. To facilitate the move, the organizer zips (compresses) the document sets. Documents cannot be routed to a document set, nor can pages be redirected.
As with document IDs and documents sets, you need to activate a feature to use this functionality; however, the Content Organizer is a site feature and is activated at the site level. It is automatically activated on a Records Center; therefore, you can use this feature to route records.
You can configure the Content Organizer so that when a user uploads files to a target library, the files are redirected and stored in the Drop Off Library, which is created when the Content Organizer site feature is activated. The files then enter the submission process. The user who uploads the file does not have to have contributor access to the target location; however, the user’s ID is used for the Modified By property on the file in the target location. Any files that do not match a rule or that are missing metadata will remain in the Drop Off Library.
![]() Tip
Tip
You can upload files directly into the Drop Off library; alternatively, you can email files to the library or use the Custom Send To Destination option, as described in the “Work with advanced settings” topic in Chapter 4, “Make lists and libraries work for you.”
To configure the Content Organizer
1. On the Settings menu, select Site Settings, and then under Site Administration, select Content Organizer Settings.
![]() Tip
Tip
If the Content Organizer Settings link is not displayed, verify that the Content Organizer site feature is activated. For information about how to activate or deactivate the Content Organizer site feature, see the “To active or deactivate a feature for a site” procedure in the “Manage site features” topic in Chapter 8, “Create and manage sites.”
2. On the Content Organizer Settings page, do any of the following:
• In the Redirect Users to the Drop Off Library section, select the check box if you want files that are uploaded to target locations to be moved to the Drop Off Library, where they will be tested against the criteria specified in one or more Content Organizer rules.
![]() Tip
Tip
Users must use the Upload command in the target library. Files that are created in the library or that are uploaded by being dragged to the library will not be submitted to the organizer. Also, when there are no rules pointing to a library, files uploaded to that library will be directly stored in that library and not sent to the drop-off library.
• In the Sending to Another Site section, select the check box to allow rules to route files to another site or site collection.
• In the Folder Partitioning section, do the following:
• Select the check box to automatically create subfolders when the target location has too many items.
• In the Number of items in a single folder box, enter the number of items you want to allow.
• In the Format of folder name box, enter the name of the folder, which should include %1, where %1 will be replaced by the date and time the folder is created.
• In the Duplicate Submissions section, to specify what should occur when a file with the same name already exists in a target location, select either Use SharePoint versioning or Append unique characters to the end of duplicate file.
![]() Tip
Tip
If versioning is not enabled in the target library, duplicate files will have unique characters appended to the end of their names, regardless of the setting selected in this section.
• In the Preserving Context section, select the check box to save the original audit log and properties, if they are included with the submissions.
• In the Rule Managers section, specify rule managers and select or clear the check boxes to email rule managers when submissions do not match a rule or when content has been left in the Drop Off Library.

In the Rules Managers section, specify users who manage the rules and who can respond
3. At the bottom of the page, select OK.
To create Content Organizer rules
1. On the Settings menu, select Site Settings, and then under Site Administration, select Content Organizer Rules to display the Content Organizer Rules list.
![]() Tip
Tip
The Content Organizer Rules list has three views: Group By Content Type, All Items, and Group By Target Library. It is a hidden list, and therefore it is not displayed on the Site Contents page. You can go to the list only from the link on the Site Settings page. If the link is not displayed, verify that the Content Organizer site feature is activated.
2. Select new item, and then in the Rule Name section, in the Name box, enter the name of the rule.
3. In the Rule Status And Priority section, do one of the following:
• Select Active and then select the rule’s priority.
• Select Inactive if you think you might need the rule again in the future.
![]() Tip
Tip
If a submission matches multiple rules, the rule with the higher priority is used. Priorities range from 1 (Highest) to 9 (Lowest).
4. In the Submission’s Content Type section do the following:
• Select the content type group and content type to determine the properties that can be used in the conditions of the rule you are creating.
• Optionally, select the This content type has alternate names in other sites check box, enter the alternate name in the Add alternate name box, and select Add.

In this section, you select a content type to determine the properties that you use in conditions
![]() Tip
Tip
When you use an asterisk (*) as the alternate name, any document whose content type is unknown will be organized by this rule.
5. In the Conditions section, do the following:
a. In the Property list, select a property.
b. In the Operator list, select an operation.
c. In the Value list, enter a value.
d. Optionally, select Add another condition and repeat steps a through c.
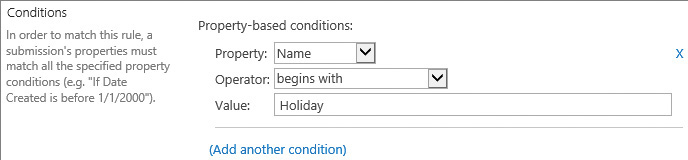
A submission must match all the specified property conditions to match a rule
6. In the Target Location section, either enter the URL for a library or select Browse and navigate to the library you want to route files to.
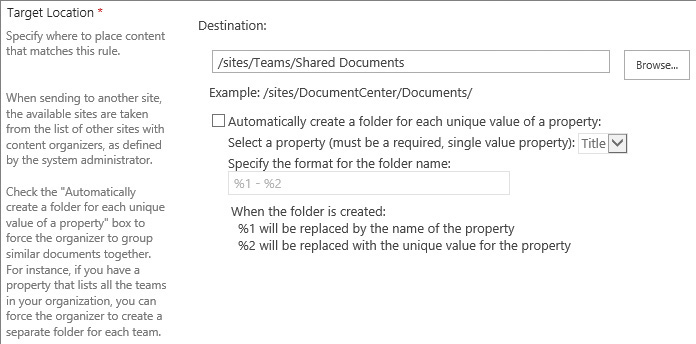
In the Target Location section, you specify where to place content that matches the rule and force the organizer to group similar documents together
![]() Tip
Tip
If a message box opens stating that the content type you chose (in step 4 in this procedure) is not added to the library, select OK, add the content type to the recipient library, and then repeat step 4.
7. Optionally, select the Automatically create a folder for each unique value of a property check box, select a property, and then specify the format of the folder name.
8. Select OK.
Store and manage records
SharePoint provides a variety of records management mechanisms that you can use to enforce legislation and regulations dictated by external organizations such as auditors, and to satisfy data protection and legal processes. You can place records on hold, associate retention and expiration information management policies with content, and search and locate files, all by using the eDiscovery features, in a Records Center or in a site created from the eDiscovery Center site template.
![]() See Also
See Also
For more information about the eDiscovery Center, see the “Protect data in SharePoint” topic later in this chapter.
One way an organization can manage records is to create a Records Center, which is the organization’s central repository for document retention and record declarations. Site owners can also configure in-place records management for libraries within their sites. When a library is configured to allow the manual declaration of records, records can be stored alongside active files, which is not the case in the Records Center. This way you can store and manage records across multiple sites in many site collections without moving them to a Records Center, thereby avoiding the need for you and other users to learn a new location for the files.
Any file in a library can be declared as a record. This can be done manually, via a workflow, or as part of an information management retention policy. The file is then protected from changes or deletion, and the library where the file is stored cannot be deleted.
To configure in-place records management, you first need to activate the feature at the site collection level. You can then configure record declaration at the site collection level or at a list or library level to make the Declare/Undeclared Record command visible on the ribbon.
![]() Tip
Tip
The implementation of records management in an organization is not a trivial activity; it needs careful planning and the creation of a file plan.
![]() Tip
Tip
To activate the In Place Records Management feature for a library, use the “To activate or deactivate a site collection feature” procedure earlier in this chapter.
To configure in-place records management at the site collection level
1. On the Site Settings page, under Site Collection Administration, select Record declaration settings.
2. On the Record Declaration Settings page, do the following:
a. In the Record Restrictions section, select the restriction to place on the item or file after it has been declared as a record.

Selecting Block Edit And Delete restriction locks the item; a padlock icon is associated with the item to visually show that it is locked
b. In the Record Declaration Availability section, select whether all lists and libraries in this site collection should allow manual declaration of records.
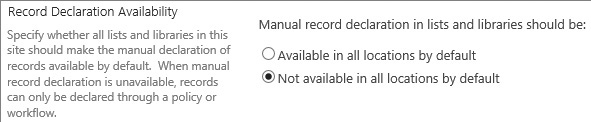
When manual record declaration is not available, only a policy or a workflow can declare items and files as records
c. In the Declaration Roles section, select which user roles can manually declare and undeclare an item or a file as a record.

Specify which user roles can manually declare or undeclare records
3. Select OK.
To configure in-place records management for a list or library
1. Go to the List Settings or Library Settings page for the list or library.
2. In the Permissions and Management section, select Record declaration settings.
3. In the Manual Record Declaration Availability section, select one of the options to set the list or library to allow or prevent the manual declaration of records.

At a list or library level, you can allow or prevent the creation of records
4. In the Automatic Declaration section, select or clear the check box to configure whether items or files should be declared as records when they are added to the list or library.
5. Select OK.
1. Click or tap to the left of the item or file, and then on the Files tab, in the Manage group, select Declare Record.
2. Select OK to confirm that you want to declare the selected item or file as a record.
1. Right-click the item or file, select Advanced, and then select Compliance Details to open the Compliance Details dialog box.
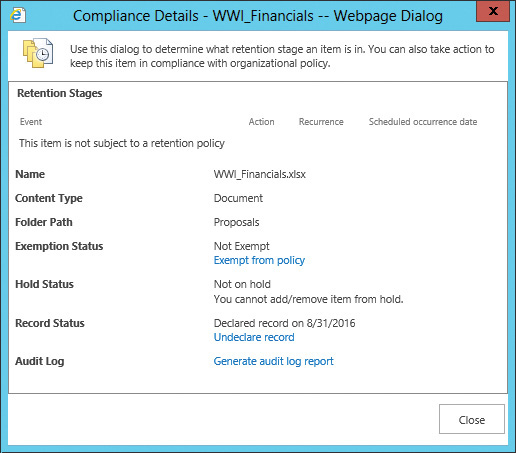
The Compliance Details dialog box displays the retention stage of an item or file, information about its hold or record status, and more
![]() Tip
Tip
In the Compliance Details dialog box, you can exempt an item or file from having a policy applied.
Protect data in SharePoint
SharePoint 2016 contains features similar to those in Microsoft Office 365. Your organization can create an eDiscovery Center to identify content, a Compliance Center in which deletion polices and Data Loss Protection (DLP) polices can be managed, and an In-Place Hold Policy Center in which you can create and manage time-based in-place hold policies.
The core component for protecting data in SharePoint is policies, some of which you can create at a site collection, site, list, or library level; others are created on the top-level site of a site collection and are used on some or all of the SharePoint content in your organization.
The policies you can use in SharePoint are detailed in the following table.

eDiscovery Center
Usually organizations have only one eDiscovery Center. The eDiscovery Center is where legal teams create eDiscovery cases and Data Loss Protection (DLP) queries. A case is a set of sources, queries, and perhaps in-place holds. When your organization identifies content it is interested in, you can create a case to discover that content, and then configure an eDiscovery in-place hold, which lasts until it is removed.
![]() Tip
Tip
The results of the query can be exported in the industry-standard Electronic Data Reference Model (EDRM) XML data format, which can then be imported into EDRM review tools.
![]() See Also
See Also
For more information about eDiscovery cases, go to https://support.office.com/article/Plan-and-manage-eDiscovery-cases-d955aeb8-0d48-4291-a8e2-f3b84f17943f.
Data loss protection queries
DLP was rolled out first in Microsoft Exchange 2013 and Exchange Online, later to SharePoint Online, and now to SharePoint 2016. A DLP query works the same as an eDiscovery case query, except that the DLP query can be configured to find content with a minimum amount of sensitive information. For example, a DLP query can return content that is stored anywhere in SharePoint content that contains at least one US bank account number. You can export the results of your query as a .csv file, which you could analyze by using Excel.

Microsoft Exchange uses 80 built-in sensitive information types, also known as templates; SharePoint Online uses 51, and SharePoint 2016 uses 10 templates
DLP queries use the search index to find sensitive data; therefore, the effectiveness of DLP is dependent on the content’s inclusion in the search index and on the accuracy of the content crawling process.
![]() See Also
See Also
For more information about data loss prevention in SharePoint 2016, go to https://support.office.com/en-gb/article/Overview-of-data-loss-prevention-in-SharePoint-Server-2016-80f907bb-b944-448d-b83d-8fec4abcc24c.
Document deletion policies
Document deletion policies are created in the Compliance Policy Center and can contain one or more delete rules. A delete rule can specify the time period until deletion (which can be calculated by using the Created or Modified properties) and whether the document should be permanently deleted or moved to the Recycle Bin.

Use the Compliance Policy Center to create policies to help you prevent the deletion of SharePoint content and delete content that you do not want
After a deletion policy is created, it can be assigned to:
![]() A site collection template, which means that it will be applied to sites already created from that site template and sites that will be created in the future.
A site collection template, which means that it will be applied to sites already created from that site template and sites that will be created in the future.
![]() A specific site collection, thereby overriding any polices assigned to the site template.
A specific site collection, thereby overriding any polices assigned to the site template.
Similar to permissions, navigation, and other site features, deletion policies are inherited. When a site owner selects a document deletion policy, all the sites below that site inherit the policy; however, if a subsite owner selects a different policy, the inheritance will be broken from that point down in the site hierarchy, and the new policy will apply to the subsite and all its subsites.
Use document deletion policies when your organization needs to automatically delete unstructured content, such as OneDrive for Business and team sites; in this way, deletion policies work together with records management or information management policies, which are best suited to structured data and content types.
![]() See Also
See Also
For more information about document deletion policies in SharePoint 2016, go to https://support.office.com/en-gb/article/Overview-of-document-deletion-policies-in-SharePoint-Server-2016-cbbb1a8b-9f30-41cb-8110-36f33f90a1e6.
Data loss protection policies
DLP allows your organization to define rules and policies to protect sensitive data, such as national insurance (NI) or credit card numbers. Documents that breach a policy rule are blocked so that users cannot view them, and an email is sent to the author informing him or her of the issue.

A no-entry icon is associated with a file or item that is blocked
Time-based in-place hold polices
Time-based in-place hold policies are created in the In-Place Hold Policy Center site; you can use them to preserve SharePoint content for a fixed period of time, based on the date it was created or modified. Content that is placed on hold is preserved; however, you can continue to edit it.
![]() See Also
See Also
For more information on in-place hold in SharePoint 2016, go to https://support.office.com/en-gb/article/Overview-of-in-place-hold-in-SharePoint-Server-2016-5e400d68-cd51-444a-8fe6-e4df1d20aa95.
Define and apply a site policy
Site closure and deletion are the concepts upon which site policies are based. A closed site does not appear on pages that include aggregated content; however, you can still modify the content if you have taken note of its URL. The primary purpose of closing a site is to eventually delete the site after a planned amount of time, thereby defining the lifecycle of the site and helping reduce site proliferation. Closed sites are particularly useful when self-service site creation is in use.
Site policies are created at the site collection level, by the site collection owner, and can be applied by site owners at the site level.
![]() Tip
Tip
When you define site policies in a content type hub, you can publish policies across site collections.
1. Activate the Site Policy site collection feature, if it is not already active.
2. On the Site Settings page, under Site Collection Administration, select Site Policies.
3. On the Site Policies page, select Create.
4. In the Name and Description section, enter a name for the policy, and enter a description to help site owners understand the purpose of the policy.
5. In the Site Closure and Deletion section, do one of the following:
• Select Do not close or delete site automatically. If you select this option, when the policy is applied to a site, the site owner must delete the site manually.
• Select Delete sites automatically and then, in the Deletion Event section, do the following:
• Select either Site created date or Site closed date.
• Enter the amount of time in days, months, or years after the deletion event to specify when the site will be deleted.
• Optionally, select the check box to send a notification to the site owner, enter the amount of time to send the notification before the site is due to be deleted. You can also set options for follow-up notifications.
• Optionally, select the check box to allow site owners to postpone the deletion for a specified amount of time.
• Select Close and delete sites automatically, enter the Close Event and the amount of time to wait after the site was created before closing the site, and then complete the Deletion Event section.
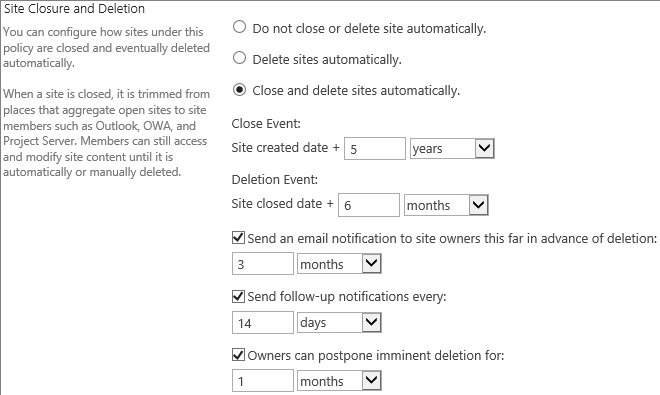
A site policy specifies the conditions for automatically closing and deleting sites
6. If you want the top-level site and all subsites to be set as read-only when the top-level site of the site collection is closed, in the Site Collection Closure section, select The site collection will be read-only when it is closed.
7. Select OK.
To apply a site policy to a site
1. On the Site Settings page for the site where you want to use the site policy, under Site Administration, select Site Closure and Deletion.
2. On the Site Closure and Deletion page, select a site policy, and then select OK.
1. On the Site Closure and Deletion page for the site, select Close this site now, and then select OK.

The site closure and deletion dates on the page are approximations, because a SharePoint time job, that, by default runs weekly, closes or deletes them
To postpone the deletion of a site
1. On the Site Closure and Deletion page for the site, select Postpone deletion of this site, and then select OK.
1. On the Site Closure and Deletion page for the site, select Open this site, and then select OK.
Work with information management policies
Organizations use information management policies to control and track things like how long content is retained or what actions users can take with that content.
![]() Tip
Tip
You cannot specify an information management policy for a core content type. Core content types are installed when a site collection is created. You must create a content type that is derived from a core content type and apply an information management policy to the derived content type.
An information management policy is a set of rules that can be set on the following SharePoint components:
![]() A site collection An information policy set on a site collection applies to all documents of a specific type on all sites within the site collection. You first create a content type policy template, also known as a site collection policy, and then apply the template to content types. The templates can be exported and then imported to other site collections.
A site collection An information policy set on a site collection applies to all documents of a specific type on all sites within the site collection. You first create a content type policy template, also known as a site collection policy, and then apply the template to content types. The templates can be exported and then imported to other site collections.
![]() Tip
Tip
You can centrally create a policy on a content type that is saved in a site known as the content type hub. The policy can then be published across site collections by using the Managed Metadata Service.
![]() A site content type When the content type is created at the site collection level, an information management policy set on that content type affects all items and files created from that content type, in all lists and libraries, on all sites in the site collection. When the content type is created in a subsite, the information management policy affects all items or files created from that content type, in all lists and libraries on the subsite and any subsites below that site.
A site content type When the content type is created at the site collection level, an information management policy set on that content type affects all items and files created from that content type, in all lists and libraries, on all sites in the site collection. When the content type is created in a subsite, the information management policy affects all items or files created from that content type, in all lists and libraries on the subsite and any subsites below that site.
![]() A content type added to a specific list or library Lists and libraries inherit the content type information management policies from the site where the content types were created. You can edit these content type information management policies in a list or library, and then only your modified information management policies affect those items or files created from that content type in that list or library.
A content type added to a specific list or library Lists and libraries inherit the content type information management policies from the site where the content types were created. You can edit these content type information management policies in a list or library, and then only your modified information management policies affect those items or files created from that content type in that list or library.
![]() A list or library This type of policy is known as a location-based retention policy or a list-based or library-based retention schedule. When you create an information policy for a list or library, all items or files in the list, library, or folder, regardless of which content type they were created from, are affected by the policy.
A list or library This type of policy is known as a location-based retention policy or a list-based or library-based retention schedule. When you create an information policy for a list or library, all items or files in the list, library, or folder, regardless of which content type they were created from, are affected by the policy.
![]() Tip
Tip
By default, when you create a content type, an empty information management policy is created. You do not have to create one; you only need to edit the one that was created when the content type was created. To create a list-based or library-based retention schedule, you need to switch from using site content types to a location-based retention policy, also known as Library And Folder.
To display the Information Management Policy Settings page for a list or library
1. On the List Settings or Library Settings page for the list or library, under Permissions and Management, select Information management policy settings to open the Information Management Policy Settings page.

On the Information Management Policy Settings page, you can edit content type policies, stop enforcing content type schedules, and define your own schedules
To turn on or off a location-based retention policy
1. Activate the Library and Folder Based site collection feature, if it is not already activated.
2. On the Information Management Policy Settings page for the list or library, to the right of Source of retention, select Change source.
![]() Tip
Tip
When a location-based retention policy is turned on, Or Configure List (or Library) Schedule will be appended to the link.
3. In the Source of Retention section, on the Edit Policy page, do the following:
a. To turn on location-based retention, select Library and Folders.

Use the Source Of Retention section to configure how items receive a retention schedule
b. Select OK in the message box that opens, confirming that you want to ignore all content type retention schedules, and by doing so you might be overwriting policies defined by your site administrator.
c. Complete the “To create or modify a retention policy” procedure later in this topic.
Or
a. To turn off location-based retention, select Content Types.
b. Select OK in the message box that opens, stating that when content type–based retention schedules are used, any existing library-based or folder-based schedules are ignored.
4. Select Apply, and then select OK to return to the Information Management Policy Settings page.
To display the Edit Policy page
1. Do the following:
a. For a content type template, activate the Site Policy site collection feature, if it is not already active.
b. On the Site Settings page, under Site Collection administration, select Content Type Policy Templates.
c. Select Create or select Define A Policy.
Or
a. For a site content type policy, go to the Site Settings page, and under Web Designer Galleries, select Site content types. Then select the content type for which you want to display the edit policy page.
b. On the Site Content Types page, select Information management policy settings.
Or
a. For a content type policy for a list or library, go to the Information Management Policy Settings page.
b. In the Content Type Policies section, select the content type.
2. In the Administrative Description box and the Policy Statement box, enter the description and statement you want.
![]() Tip
Tip
The administrative description is displayed to list managers when they are configuring policies on a list or content type. The policy statement is displayed to users when they open items subject to the policy. The policy statement should explain which policies apply, and any special information that users need to be aware of.
3. Turn on one or more retention, auditing, barcodes, or labels policies as described in the following procedures.
4. Select OK.
To turn on retention for a content type
![]() Important
Important
If the Library And Folder Based Retention feature is active, list administrators can override content type policies with their own retention schedules. To prevent this, deactivate the Library And Folder Based Retention site collection feature.
1. Display the Edit Policy page for the content type or content type template.
2. In the Retention section, select Enable Retention.
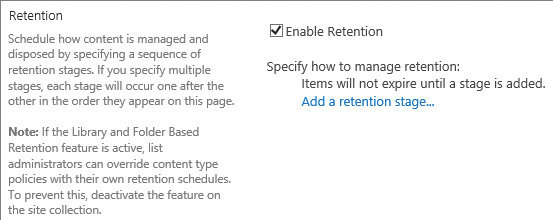
Use a retention policy to define how long to retain content
3. Complete the following procedure.
To create or modify a retention policy
1. In the Retention or Retention Schedule section of the Edit Policy page for the content type for which you want to create or modify a policy, do one of the following to open the Stage properties dialog box:
• To add a new stage, select Add a retention stage.
• To add a stage above another stage, point to the stage, select the arrow that appears, and then select Add Stage Above.
• To edit a stage, point to the stage, select the arrow that appears, and select Edit.
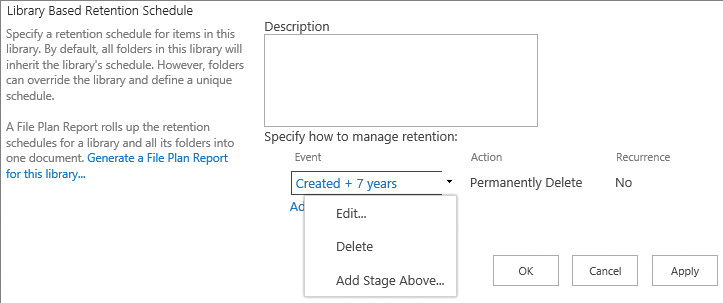
2. In the Stage properties dialog box, in the Event section, do one of the following:
• Select This stage is based off a date property on the item. In the Time Period list, select a Time Date field, such as, Created, Modified, or Declared Record. In the box to the right of the Time Period list, enter a value. In the right list, select a unit of time, such as, days, months, or years.
• Select Set by a custom retention formula installed on this server. (This option is only available when a custom retention formula has been installed.)
3. In the Action section, do one of the following:
• In the list, select one of the following actions: Move to Recycle Bin, Permanently Delete, Transfer to another location, Start a workflow, Skip to next stage, Declare a record, Delete previous drafts, or Delete all previous versions.
![]() Tip
Tip
You cannot create a retention policy that uses a Start A Workflow action if no workflows are associated with the content type, list, or library, nor can you use the Transfer To Another Location action when the Send To connection has not been configured by your SharePoint server administrator. Additionally, when the In-Place Records Management site collection feature is not activated, you will not be able to use the Declare Record option.

Specify an event that activates the stage and an action that should occur if the event condition is met
4. In the Recurrence section, select Repeat this stage’s action. In the Recurrence period box, enter a value, and in the list to the right of the box, select a unit of time, such as days, months, or years.
![]() Tip
Tip
The Repeat This Stage’s Action option is available only when the selected action is repeatable. For example, you cannot repeat the Move To Recycle Bin action.
5. Select OK to close the Stage Properties dialog box.
6. Repeat the steps in this procedure to create additional retention stages.
![]() Tip
Tip
Specify a sequence of retention stages to manage and dispose of content. When you specify multiple stages, each stage will occur sequentially in the order they appear on the page.
To configure events to audit for a content type
1. Display the Edit Policy page for the content type at the site, list, or library level.
2. In the Auditing section, select Enable Auditing.

Policy usage reports help identify the content being used and assist with regulatory compliance
3. Select the events you want to audit.
To turn on barcodes for a content type
1. Display the Edit Policy page for the content type at the site, list, or library level.
2. In the Barcodes section, select Enable Barcodes.

Turning on barcodes adds a barcode to the properties of the document and displays the barcode in the header area of the document
3. If you want users to insert barcodes into their documents, select Prompt users to insert a barcode before saving or printing.
To turn on labels for a content type
![]() Important
Important
The label policy feature has been deprecated and should not be used in SharePoint Server 2013 or SharePoint 2016. Follow these steps only if you have migrated from previous versions of SharePoint and need to maintain previously configured content types.
1. Display the Edit Policy page for the content type at the site, list, or library level.
2. In the Labels section, select Enable labels.
3. If you want users to add a label to their documents, select Prompt users to insert a label before saving or printing.
4. If you want to lock the labels, select Prevent changes to labels after they are added.
5. In the Label format box, enter the text for the label. You can refer to up to 10 column values, and you can add a line break by entering /n.

Use the Labels section to add labels to documents
Do not lock a label when the label refers to a column value if you want the label to be updated when the column value is updated.
6. Select the font, font size, font style, and justification for the label.
7. Select the label’s height and width. Both can range from 0.25 through 20 inches.

The font size can affect the amount of text displayed on the label
8. Select Refresh to preview the label.
To generate a file plan report to a list or library
1. Do one of the following:
• On the List Settings or Library Settings page, under Permissions and Management, select Generate file plan report.
• On the Information Management Policy Settings page, in the Library Based Retention Schedule section, select Generate a File Plan Report for this library.
Audit user actions
Policies and permission control who can access specific content, what they can do, and how long content is retained; however, you might still need to track user actions on SharePoint content. Knowing which users have performed certain actions is as important as controlling who can perform certain actions; therefore, the auditing feature in SharePoint is just as critical.
You can configure events to audit for the site collection, or you can create an information management policy to specify audit events for a content type.
![]() See Also
See Also
For information about creating an information management policy for a content type, see the “To configure events to audit for a content type” procedure in the previous section.
To configure events to audit for a site collection
1. On the Site Settings page, under Site Collection Administration, select Site collection audit settings.
2. On the Configure Audit Settings page, in the Documents and Items and List, Libraries, and Sites sections, select the events you want to audit, and then select OK.
To view an audit log report for a site collection
1. Do one of the following to open the View Auditing Reports page:
• On the Site Settings page, under Site Collection Administration, select Audit log reports.
• Display the Compliance Details dialog box as described earlier in this chapter, and then select Generate audit log report.
2. Select the report you want to view, to display the Customize Report page.

The nine audit reports are grouped in four categories
3. Enter the URL or browse to the library where you want to store the report, and then select OK.
4. On the Operation completed successfully page, select click here to view this report.
![]() Tip
Tip
If the report contains no data, a Sorry, Something Went Wrong page is displayed. Select Go Back To Site to return to the site.
Skills review
In this chapter, you learned how to:

![]() Important
Important
You must have sufficient permissions to perform the operations involved in each practice task to complete that practice task. For more information, see Appendix A, “SharePoint 2016 user permissions and permission levels.”
Manage documents
Go to your SharePoint team site, and then perform the following tasks:
1. Create a records center named WWI Records Center, with the description Use this site as Wide World Importers’ records repository and a URL of WWI_RecordsCenter.
2. Activate the document IDs and document sets features for your site collection, if they are not already activated.
3. Turn on document IDs, if they are not already enabled.
4. Go to your SharePoint team site, upload the WWI_Financials Excel workbook from the practice file folder to your Documents library, and view the document ID of the file.
![]() Tip
Tip
If document IDs were not previously activated or enabled, you might have to come back later to complete this task.
5. Create a site document set content type named Product Proposals, with the description Create a document set for product proposals, and add the WWI_ProductSheet Word document and the WWI_Presentation PowerPoint presentation from the practice file folder as default content.
6. Add the Product Proposals document set content type to the Documents library, and then create a new Product Proposals document set named 2016 Oslo Bedroom Furniture.
7. Activate the Content Organizer, and create a rule named Holidays, to route all Document content types whose file name begins with Holiday to your Documents library.
8. In your Drop Off Library, upload the WWI_HolidayPlanner and HolidayPlanner Excel workbooks from the practice file folder.
![]() Tip
Tip
If you upload and submit files individually, they will be automatically processed by the Content Organizer. If you upload more than one file at a time, they are checked out and will not be processed. You will need to edit the properties of the files and check them in before they are processed by the Content Organizer.
The WWI_HolidayPlanner workbook should remain in the Drop Off Library, and the HolidayPlanner file should be moved to your Documents library.
![]() Tip
Tip
If you activated any site collection or site features in this practice task, you might want to deactivate them.
Store and manage records
Go to the WWI Records Center you created in the previous set of practice tasks, and then perform the following tasks:
1. Create a document library named Proposals.
![]() Tip
Tip
If you need a refresher on creating a library, see the “To create a library” procedure in Chapter 3, “Work with content in lists and libraries.”
2. In the Proposals library, create a library and folder-based retention, with the description When proposals are finalized, declare them as records, so that they are permanently deleted 7 years from the created date.
3. Activate in-place records management.
4. Go to the Documents library in your SharePoint team site, and allow the manual declaration of records.
5. Declare the WWI_Financials workbook as a record, and view the compliance details of the file.
Protect data in SharePoint
Go to the top-level site of your site collection, and then perform the following tasks:
1. Activate the site policy site collection feature, if it is not already activated.
2. Create a site policy named WWI site policy that closes sites automatically after 1 year and deletes sites 6 months after they have been closed. Set the site collection to be read-only when closed.
3. Delete the WWI site policy, and deactivate the site policy site collection feature, if you activated it in these practice tasks.