
Chapter 4
Configuring User Accounts
IN THIS CHAPTER
![]() Understanding user accounts
Understanding user accounts
![]() Creating user accounts
Creating user accounts
![]() Setting account options
Setting account options
![]() Working with groups
Working with groups
![]() Creating a roaming profile
Creating a roaming profile
Every user who accesses a network must have a user account. User accounts let you control who can access the network and who can’t. In addition, user accounts let you specify what network resources each user can use. Without user accounts, all your resources would be open to anyone who casually dropped by your network.
Understanding Windows User Accounts
User accounts are among the basic tools for managing a Windows server. As a network administrator, you’ll spend a large percentage of your time dealing with user accounts — creating new ones, deleting expired ones, resetting passwords for forgetful users, granting new access rights, and so on. Before I get into the specific procedures of creating and managing user accounts, this section presents an overview of user accounts and how they work.
Local accounts versus domain accounts
A local account is a user account that’s stored on a particular computer and applies only to that computer. Typically, each computer on your network will have a local account for each person who uses that computer.
By contrast, a domain account is a user account that’s stored by Active Directory and can be accessed from any computer that’s a part of the domain. Domain accounts are centrally managed. This chapter deals primarily with setting up and maintaining domain accounts.
User account properties
Every user account has several important account properties that specify the characteristics of the account. The three most important account properties are
- Username: A unique name that identifies the account. The user must enter the username when logging on to the network. The username is public information. In other words, other network users can (and often should) find out your username.
- Password: A secret word that must be entered to gain access to the account. You can set up Windows so that it enforces password policies, such as the minimum length of the password, whether the password must contain a mixture of letters and numerals, and how long the password remains current before the user must change it.
- Group membership: The group or groups to which the user account belongs. Group memberships are the key to granting access rights to users so that they can access various network resources, such as file shares or printers, or perform certain network tasks, such as creating new user accounts or backing up the server.
Many other account properties record information about the user, such as the user’s contact information, whether the user is allowed to access the system only at certain times or from certain computers, and so on. I describe these features in later sections of this chapter.
Creating a New User
To create a new domain user account in Windows Server 2019, follow these steps:
Choose Start⇒ Windows Administrative Tools⇒ Active Directory Users and Computers.
This command fires up the Active Directory Users and Computers management console, as shown in Figure 4-1.
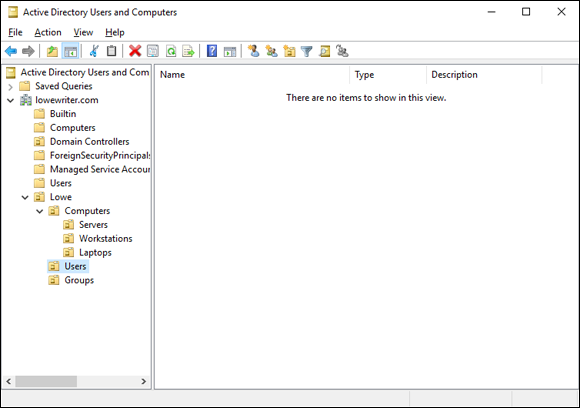
FIGURE 4-1: The Active Directory Users and Computers management console.
Right-click the organizational unit that you want to add the user to and then choose New⇒ User.
This command summons the New Object – User Wizard, as shown in Figure 4-2.
Type the user’s first name, middle initial, and last name.
As you type the name, the New Object Wizard automatically fills in the Full Name field.
Change the Full Name field if you want it to appear different from what the wizard proposes.
You may want to reverse the first and last names so the last name appears first, for example.
Type the user logon name.
This name must be unique within the domain.
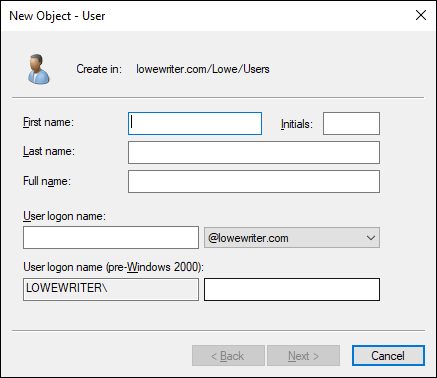
FIGURE 4-2: Creating a new user.
 Pick a naming scheme to follow when creating user logon names. You can use the first letter of the first name followed by the complete last name, the complete first name followed by the first letter of the last name, or any other scheme that suits your fancy.
Click Next.
The second page of the New Object – User Wizard appears, as shown in Figure 4-3.
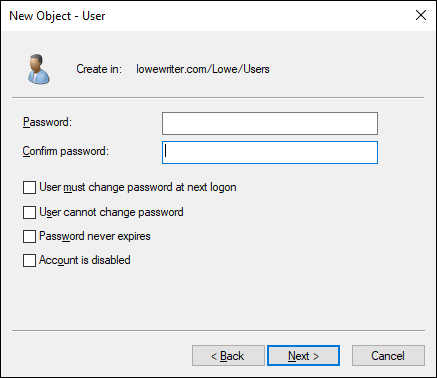
FIGURE 4-3: Setting the user’s password.
Type the password twice.
You’re asked to type the password twice, so type it correctly. If you don’t type it identically in both boxes, you’re asked to correct your mistake.
Specify the password options that you want to apply.
The following password options are available:
- User Must Change Password at Next Logon.
- User Cannot Change Password.
- Password Never Expires.
- Account Is Disabled.
For more information about these options, see the section “Setting account options,” later in this chapter.
Click Next.
You’re taken to the final page of the New Object – User Wizard, as shown in Figure 4-4.
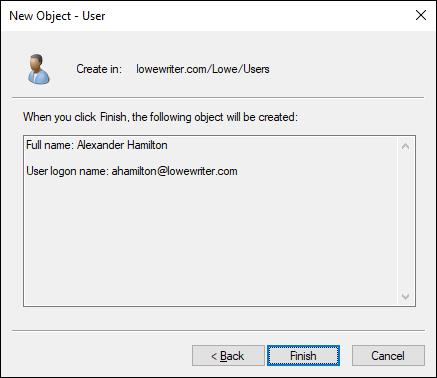
FIGURE 4-4: Verifying the user account information.
Verify that the information is correct and then click Finish to create the account.
If the account information isn’t correct, click the Back button, and correct the error.
You’re done! Now you can customize the user’s account settings. At minimum, you’ll probably want to add the user to one or more groups. You may also want to add contact information for the user or set up other account options.
An alternate way to create a new user is to simply copy an existing user. When you copy an existing user, you provide a new username and password and Windows copies all the other property settings from the existing user to the new user.
Setting User Properties
After you’ve created a user account, you can set additional properties for the user by right-clicking the new user and choosing Properties from the contextual menu. This command brings up the User Properties dialog box, which has about a million tabs that you can use to set various properties for the user. Figure 4-5 shows the General tab, which lists basic information about the user, such as the user’s name, office location, and phone number.
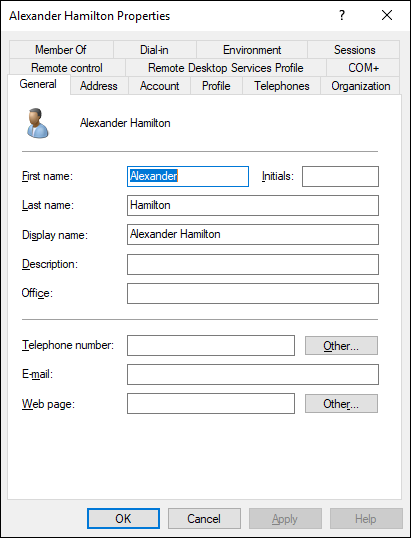
FIGURE 4-5: The General tab.
The following sections describe some of the administrative tasks that you can perform via the various tabs of the User Properties dialog box.
Changing the user’s contact information
Several tabs of the User Properties dialog box contain contact information for the user:
- Address: Lets you change the user’s street address, post office box, city, state, zip code, and so on
- Telephones: Lets you specify the user’s phone numbers
- Organization: Lets you record the user’s job title and the name of his or her boss
Setting account options
The Account tab of the User Properties dialog box, shown in Figure 4-6, features a variety of interesting options that you can set for the user. From this dialog box, you can change the user’s logon name. In addition, you can change the password options that you set when you created the account, and you can set an expiration date for the account.
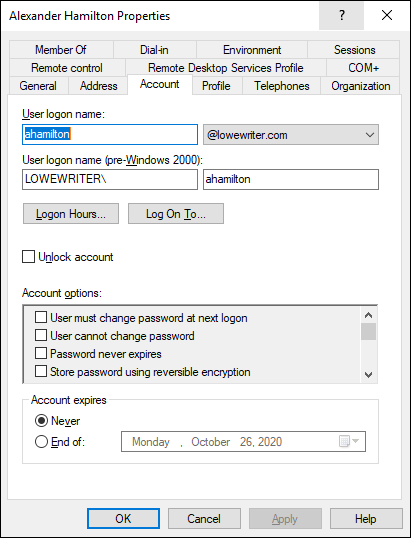
FIGURE 4-6: The Account tab.
The following account options are available in the Account Options list box:
- User Must Change Password at Next Logon: This option, which is selected by default, allows you to create a one-time-only password that can get the user started with the network. The first time the user logs on to the network, he or she is asked to change the password.
- User Cannot Change Password: Use this option if you don’t want to allow users to change their passwords. (Obviously, you can’t use this option and the preceding one at the same time.)
- Password Never Expires: Use this option if you want to bypass the password-expiration policy for this user so that the user will never have to change his or her password.
- Store Password Using Reversible Encryption: This option stores passwords by using an encryption scheme that hackers can easily break, so you should avoid it like the plague.
- Account Is Disabled: This option allows you to create an account that you don’t yet need. As long as the account remains disabled, the user won’t be able to log on. See the section “Disabling and Enabling User Accounts,” later in this chapter, to find out how to enable a disabled account.
- Smart Card Is Required for Interactive Logon: If the user’s computer has a smart card reader to read security cards automatically, check this option to require the user to use it.
- Account Is Trusted for Delegation: This option indicates that the account is trustworthy and can set up delegations. This advanced feature usually is reserved for Administrator accounts.
- Account Is Sensitive and Cannot Be Delegated: This option prevents other users from impersonating this account.
- Use DES Encryption Types for This Account: This option beefs up the encryption for applications that require extra security.
- Do Not Require Kerberos Preauthentication: Select this option if you use a different implementation of the Kerberos protocol.
Specifying logon hours
You can restrict the hours during which the user is allowed to log on to the system by clicking the Logon Hours button on the Account tab of the User Properties dialog box. This button brings up the Logon Hours for [User] dialog box, shown in Figure 4-7.
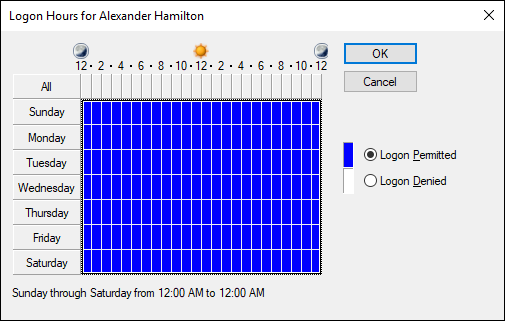
FIGURE 4-7: Restricting the user’s logon hours.
Initially, the Logon Hours dialog box is set to allow the user to log on at any time of day or night. To change the hours that you want the user to have access, click a day and time or a range of days and times; choose either Logon Permitted or Logon Denied; and click OK.
Restricting access to certain computers
Normally, a user can use his or her user account to log on to any computer that’s part of the user’s domain. You can restrict a user to certain computers, however, by clicking the Log On To button on the Account tab of the User Properties dialog box. This button brings up the Logon Workstations dialog box, as shown in Figure 4-8.
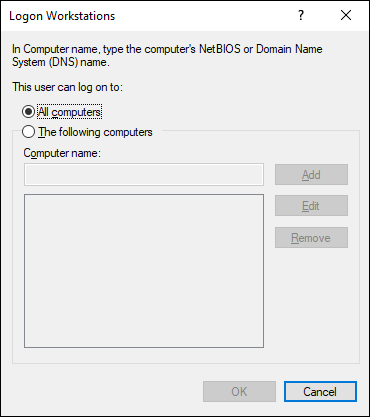
FIGURE 4-8: Restricting the user to certain computers.
To restrict the user to certain computers, select the radio button labeled The Following Computers. Then, for each computer you want to allow the user to log on from, type the computer’s name in the text box, and click Add.
If you make a mistake, you can select the incorrect computer name and then click Edit to change the name or Remove to delete the name.
Setting the user’s profile information
The Profile tab, shown in Figure 4-9, lets you configure the user’s profile information. This dialog box lets you configure three bits of information related to the user’s profile:
- Profile Path: This field specifies the location of the user’s roaming profile. For more information, see the section “Working with User Profiles,” later in this chapter.
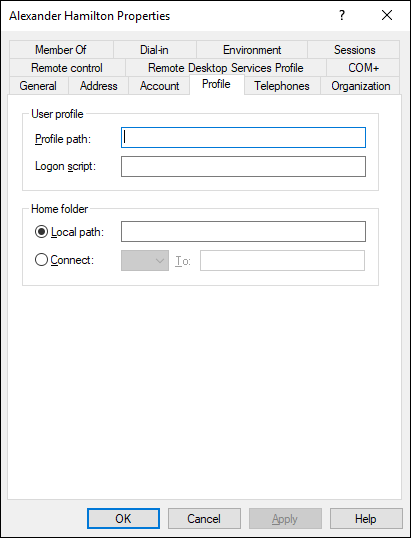
FIGURE 4-9: The Profile tab.
- Logon Script: This field is the name of the user’s logon script. A logon script is a batch file that’s run whenever the user logs on. The main purpose of the logon script is to map the network shares that the user requires access to. Logon scripts are carryovers from early versions of Windows NT Server. In Windows Server 2019, profiles are the preferred way to configure the user’s computer when the user logs on, including setting up network shares. Many administrators still like the simplicity of logon scripts, however. For more information, see the section “Creating a Logon Script,” later in this chapter.
- Home Folder: This section is where you specify the default storage location for the user.
The Profile tab lets you specify the location of an existing profile for the user, but it doesn’t actually let you set up the profile. For more information about setting up a profile, see the section “Working with User Profiles,” later in this chapter.
Resetting User Passwords
By some estimates, the single most time-consuming task of most network administrators is resetting user passwords. It’s easy to think that users are forgetful idiots, but put yourself in their shoes. Administrators insist that they set their passwords to something incomprehensible, such as 94kD82leL384K; that they change it a week later to something more unmemorable, such as dJUQ63DWd8331; and that they don’t write it down. Then administrators get mad when they forget their passwords.
So when a user calls and says that he or she forgot his or her password, the least the administrator can do is be cheerful when resetting it. After all, the user probably spent 15 minutes trying to remember it before finally giving up and admitting failure.
Here’s the procedure to reset the password for a user domain account:
Log on as an administrator.
You must have administrator privileges to perform this procedure.
In Server Manager, choose Tools⇒ Active Directory Users and Computers.
The Active Directory Users and Computers management console appears.
- Drill down to the organizational unit that contains the user’s Active Directory object.
- In the Details pane, right-click the user who forgot his or her password, and choose Reset Password from the contextual menu.
Type the new password in both password boxes.
You have to type the password twice to ensure that you type it correctly.
If desired, select the User Must Change Password at Next Logon option.
If you select this option, the password that you assign will work for only one logon. As soon as the user logs on, he or she will be required to change the password.
Click OK.
That’s all there is to it! The user’s password is reset.
Disabling and Enabling User Accounts
If you want to temporarily prevent a user from accessing the network, you can disable his or her account. Then you can enable the account later, when you’re ready to restore the user to full access. Here’s the procedure:
Log on as an administrator.
You must have administrator privileges to perform this procedure.
From Server Manager, choose Tools⇒ Active Directory Users and Computers.
The Active Directory Users and Computers management console appears.
- Drill down to the organizational unit that contains the user’s Active Directory object.
- In the Details pane, right-click the user that you want to enable or disable; then choose either Enable Account or Disable Account from the contextual menu to enable or disable the user.
Deleting a User
Deleting a user account is surprisingly easy. Just follow these steps:
Log on as an administrator.
You must have administrator privileges to perform this procedure.
Choose Start⇒ Administrative Tools⇒ Active Directory Users and Computers.
The Active Directory Users and Computers management console appears.
- Drill down to the organizational unit that contains the user’s Active Directory object.
In the Details pane, right-click the user that you want to delete and then choose Delete from the contextual menu.
Windows asks whether you really want to delete the user, just in case you’re kidding.
Click Yes.
Poof! The user account is deleted.
 Deleting a user account is a permanent, nonreversible action. Do it only if you’re absolutely sure that you’ll never want to restore the user’s account. If there’s any possibility of restoring the account later, you should disable the account rather than delete it.
Working with Groups
A group is a special type of account that represents a set of users who have common network access needs. Groups can dramatically simplify the task of assigning network access rights to users. Rather than assign access rights to each user individually, you can assign rights to the group itself. Then those rights automatically extend to any user you add to the group.
The following sections describe some of the key concepts that you need to understand to use groups, along with some of the most common procedures you’ll employ when setting up groups for your server.
Group types
Two distinct types of groups exist:
- Security groups: Most groups are security groups, which extend access rights to members of the group. If you want to allow a group of users to access your high-speed color laser printer, for example, you can create a group called ColorPrintUsers. Then you can grant permission to use the printer to the ColorPrintUsers group. Finally, you can add individual users to the ColorPrintUsers group.
- Distribution groups: Distribution groups aren’t used as much as security groups are. They’re designed as a way to send email to a group of users by specifying the group as the recipient.
Group scope
A group can have any of three distinct scopes, which determine what domains the group’s members can belong to:
- Domain local: A group with domain local scope can have members from any domain. The group can be granted permissions only from the domain in which the group is defined, however.
- Global: A group with global scope can have members only from the domain in which the group is defined. The group can be granted permissions in any domain in the forest, however. (For more information about forests, refer to Book 6, Chapter 3.)
- Universal scope: Groups with universal scope are available in all domains that belong to the same forest.
As you can probably guess, universal scope groups are usually used only on very large networks.
One common way you can use domain local and global groups is as follows:
Use domain local groups to assign access rights for network resources.
To control access to a high-speed color printer, for example, create a domain local group for the printer. Grant the group access to the printer, but don’t add any users to the group.
Use global groups to associate users with common network access needs.
Create a global group for users who need to access color printers, for example. Then add each user who needs access to a color printer membership to the group.
Finally, add the global group to the domain local group.
That way, access to the printer is extended to all members of the global group.
This technique gives you the most flexibility when your network grows.
Default groups
Windows Server 2019 comes with several predefined groups that you can use. Although you shouldn’t be afraid to create your own groups when you need them, there’s no reason to create your own group if you find a default group that meets your needs.
Some of these groups are listed in the Builtin container in the Active Directory Users and Computers management console. Others are listed in the Users container. Table 4-1 lists the most useful default groups in Builtin, and Table 4-2 lists the default groups in the Users container.
TABLE 4-1 Default Groups Located in the Builtin Container
Group |
Description |
|---|---|
Account Operators |
This group is for users who should be allowed to create, edit, or delete user accounts but shouldn’t be granted full administrator status. |
Administrators |
This group is for the system administrators who have full control of the domain. The Administrator account is a default member of this group. You should create only a limited number of accounts that belong to this group. |
Backup Operators |
This group is for users who need to perform backup operations. Because this group must have access to the files that are backed up, it presents a security risk, so you should limit the number of users that you add to this group. |
Guests |
This group allows members to log on but little else. The default Guest account is a member of this group. |
Network Configuration |
This group is allowed to twiddle with network configuration settings, including releasing and renewing DHCP leases. |
Print Operators |
This group grants users access to printers, including the ability to create and share new printers and to manage print queues. |
Remote Desktop Users |
This group can remotely log on to domain controllers in the domain. |
Replicator |
This group is required to support directory replication. Don’t add users to this group. |
Server Operators |
These users can log on locally to a domain controller. |
Users |
These users can perform common tasks, such as running applications and using local and network printers. |
TABLE 4-2 Default Groups Located in the Users Container
Group |
Description |
|---|---|
Cert Publishers |
These users can publish security certificates for users and computers. |
DnsAdmins |
This group is installed if you install DNS. It grants administrative access to the DNS Server service. |
DnsUpdateProxy |
This group is installed if you install DNS. It allows DNS clients to perform dynamic updates on behalf of other clients, such as DHCP servers. |
Domain Admins |
These users have complete control of the domain. By default, this group is a member of the Administrators group on all domain controllers, and the Administrator account is a member of this group. |
Domain Computers |
This group contains all computers that belong to the domain. Any computer account created becomes a member of this group automatically. |
Domain Controllers |
This group contains all domain controllers in the domain. |
Domain Guests |
This group contains all domain guests. |
Domain Users |
This group contains all domain users. Any user account created in the domain is added to this group automatically. |
Group Policy |
These users can modify group policy for the domain. |
IIS_WPG |
This group is created if you install IIS. It’s required for IIS to operate properly. |
RAS and IAS Servers |
This group is required for RAS and IAS servers to work properly. |
Creating a group
If none of the built-in groups meets your needs, you can create your own group by following these steps:
Log on as an administrator.
You must have administrator privileges to perform this procedure.
From Server Manager, choose Tools⇒ Active Directory Users and Computers.
The Active Directory Users and Computers management console appears.
Right-click the domain to which you want to add the group and then choose New⇒ Group from the contextual menu.
The New Object – Group dialog box appears, as shown in Figure 4-10.
Type the name for the new group.
Enter the name in both text boxes.
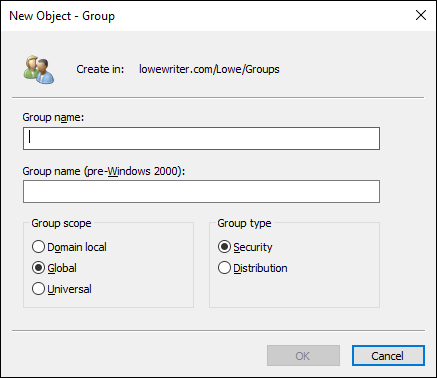
FIGURE 4-10: Creating a new group.
Choose the group scope.
The choices are Domain Local, Global, and Universal. For groups that will be granted access rights to network resources, choose Domain Local. Use Global for groups to which you’ll add users and Domain Local groups. Use Universal groups only if you have a large network with multiple domains.
Choose the group type.
The choices are Security and Distribution. In most cases, choose Security.
Click OK.
The group is created.
Adding a member to a group
Groups are collections of objects, called members. The members of a group can be user accounts or other groups. When you create a group, it has no members. As a result, the group isn’t useful until you add at least one member.
Follow these steps to add a member to a group:
Log on as an administrator.
You must have administrator privileges to perform this procedure.
Choose Start⇒ Administrative Tools⇒ Active Directory Users and Computers.
The Active Directory Users and Computers management console appears.
Open the folder that contains the group to which you want to add members and then double-click the group.
The Group Properties dialog box appears.
Click the Members tab.
The members of the group are displayed, as shown in Figure 4-11.
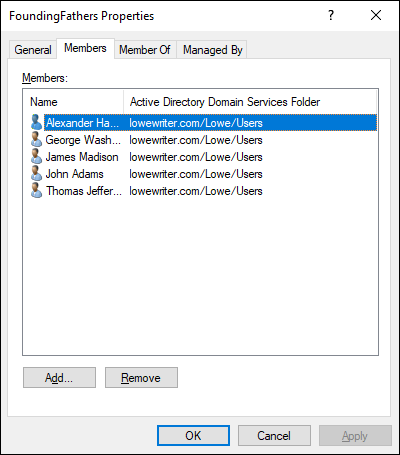
FIGURE 4-11: Adding members to a group.
Click Add, type the name of a user or another group that you want to add to this group, and click OK.
The member is added to the list.
Repeat Step 5 for each user or group that you want to add.
Keep going until you’ve added everyone!
- Click OK.
That’s all there is to it.
The Group Properties dialog box also has a Member Of tab that lists each group that the current group is a member of.
Adding members to a group is only half the process of making a group useful. The other half is adding access rights to the group so that the members of the group can actually do something. The procedures for doing that are covered in Chapter 5 of this minibook.
Working with User Profiles
User profiles automatically maintain desktop settings for Windows users. By default, a user profile is stored on the user’s local computer. The following items are just some of the settings that are stored as part of the user profile:
- Desktop settings in the Display Properties dialog box, including wallpaper, screen savers, and color schemes
- Start-menu programs and Windows toolbar options
- Favorites, which provide easy access to the files and folders that the user accesses frequently
- Application Data, such as option settings, custom dictionaries, and so on
- Cookies, used for Internet browsing
- Recent Documents, which keeps shortcuts to the documents most recently accessed by the user
- Templates, which stores user templates
- Network, which keeps shortcuts to the user’s network locations
- Send To, which keeps shortcuts to document-handling utilities
- Local Settings, such as history and temporary files
- Printers, which keeps shortcuts to the user’s printers
- Documents, which stores the user’s local documents
Types of user profiles
Four types of user profiles exist:
- Local user profile: A local user profile is stored on the user’s local computer and is applied only when the user logs on to that computer. A local user profile is created automatically when a new user logs on.
- Roaming user profile: A roaming user profile is created on a network share. That way, the user can access the roaming profile when he or she logs on to any computer on the network.
- Mandatory user profile: A mandatory user profile is a roaming user profile that the user is not allowed to change. One benefit of mandatory user profiles is that users can’t mess up their desktop settings. Another benefit is that you can create a single mandatory profile that can be used by multiple users.
- Temporary user profile: If a roaming or mandatory profile isn’t available for some reason, a temporary user profile is automatically created for the user. The temporary profile is deleted when the user logs off, so any changes that the user makes while using a temporary profile are lost at the end of the session.
Roaming profiles
A roaming user profile is simply a user profile that has been copied to a network share so that it can be accessed from any computer on the network.
Before you can create roaming user profiles, you should create a shared folder on the server to hold the profiles. You can name the shared folder anything you like, but most administrators call it Users. For information on the procedure to create a shared folder, see Chapter 5 of this minibook.
After you’ve created the shared Users folder, you can copy the profile to the server by following these steps at the user’s local computer:
Log on to the computer by using an account other than the one you want to make a user account.
Windows won’t let you copy the profile that you’re logged on with.
Open File Explorer, right-click This PC, choose Properties, click Advanced System Settings, and then click Settings in the User Profile section.
This step brings up the User Profiles dialog box, shown in Figure 4-12.
Select the profile that you want to copy and then click Copy To.
A Copy To dialog box appears.
Type the path and name for the roaming profile in the Copy Profile To box.
To copy a profile named Doug to the Users share on a server named Server01, for example, type \Server01UsersDoug.
Click OK.
The profile is copied.

FIGURE 4-12: The User Profiles dialog box.
Now you can go back to the server, log on as an administrator, and follow these steps to designate a roaming profile for the user’s domain account:
From the Server Manager, choose Tools⇒ Active Directory Users and Computers.
The Active Directory Users and Computers management console appears.
Right-click the user account, and choose Properties from the contextual menu.
The User Properties dialog box appears.
Click the Profile tab.
The Profile tab appears. (This tab is shown in Figure 4-9, earlier in this chapter, so I won’t repeat it here.)
Type the path and name of the profile in the Profile Path text box.
The path and name that you type here should be the same path and name that you used to copy the profile to the server.
- Click OK.
Creating a Logon Script
A logon script is a batch file that’s run automatically whenever a user logs on. The most common reason for using a logon script is to map the network shares that the user needs access to. Here’s a simple logon script that maps three network shares:
echo off
net use m: \server1sharesadmin
net use n: \server1sharesmktg
net use o: \server2archives
Here, two shares on server1 are mapped to drives M and N, and a share on server2 is mapped as drive O.
If you want, you can use the special variable %username% to get the user's username. This variable is useful if you’ve created a folder for each user, and you want to map a drive to each user’s folder, as follows:
net use u: \server1users\%username%
If a user logs on with the username dlowe, for example, drive U is mapped to \server1usersdlowe.
Scripts should be saved in the Scripts folder, which is buried deep in the bowels of the SYSVOL folder — typically, c:WindowsSYSVOLSysvoldomainnameScripts, where domainname is your domain name. Because you need to access this folder frequently, I suggest creating a shortcut to it on your desktop.
After you’ve created a logon script, you can assign it to a user by using the Profile tab of the User Properties dialog box. For more information, see the section “Setting the user’s profile information,” earlier in this chapter.