
As you know it is deployable on almost all the popularly available commercial as well as freely available open source web containers. Refer to the first table in this chapter for more information on this. To be more open source friendly, all the hands-on examples are devised and performed on Apache Tomcat and Linux Operating systems unless the underlying feature requires other Operating Environments.
The product can be configured in many ways based on the deployment use cases; not all the specific deployment options are exercised in this book, only the frequently used meaningful cases are used, and the rest of the cases are left as an exercise to the readers.
In order to deploy the application, we should prepare the web container that will host the OpenSSO web application. We are planning to use the popular Apache Tomcat servlet container which can be downloaded from the URL: http://tomcat.apache.org/download-60.cgi#6.0.20.
OpenSSO does not impose any special privileges in order to be deployed and configured. For this example, let us use a separate user ssouser who belongs to the group ssogroup with a valid home directory location. On the Windows Operating System, you can use a normal user since OpenSSO does not write anything into the Windows Registry. In general, the OpenSSO configurator writes all the information in a directory of the user's choice except the bootstrap file locator that is placed in the web container's runtime user's home directory. In this example it will be placed in the ssouser's home directory.
The following sequence of commands invoked in the bash shell environment downloads, unzips, and configures the Tomcat Server 6.0.20 version:
ssouser@opensso[1] > id
uid=54951(ssouser) gid=54031(ssogroup) groups=54031(ssogroup) context=user_u:system_r:unconfined_t
ssouser@opensso[2] > pwd
/export/ssouser
ssouser@opensso[3] > wget -q http://www.poolsaboveground.com/apache/tomcat/tomcat-6/v6.0.20/bin/apache-tomcat-6.0.20.zip
ssouser@opensso[4] > export JAVA_HOME=/usr/jdk/linux-i586/
ssouser@opensso[5] > $JAVA_HOME/bin/java -version
java version "1.6.0_14"
Java(TM) SE Runtime Environment (build 1.6.0_14-b08)
Java HotSpot(TM) Server VM (build 14.0-b16, mixed mode)
ssouser@opensso[6]> ls -l apache-tomcat-6.0.20.zip
-rw-r--r-- 1 ssouser ssogroup 6379115 May 29 2009 apache-tomcat-6.0.20.zip
ssouser@opensso[7] > unzip -q apache-tomcat-6.0.20.zip
ssouser@opensso[8] > ls -F apache-tomcat-6.0.20
bin/ lib/ logs/ RELEASE-NOTES temp/ work/
conf/ LICENSE NOTICE RUNNING.txt webapps/
ssouser@opensso[9] > cd apache-tomcat-6.0.20/bin
ssouser@opensso[10] > chmod +x *.sh
ssouser@opensso[11] > export JAVA_OPTS="-Dcom.iplanet.am.cookie.c66Encode=true" ; export CATALINA_OPTS="-Xmx1024m"
ssouser@opensso[12] > ./startup.sh
Using CATALINA_BASE: /export/ssouser/apache-tomcat-6.0.20
Using CATALINA_HOME: /export/ssouser/apache-tomcat-6.0.20
Using CATALINA_TMPDIR: /export/ssouser/apache-tomcat-6.0.20/temp
Using JRE_HOME: /usr/jdk/linux-i586/
Here is a simple explanation of each command:
- It prints the current logged in user's login name and group.
- Shows the current working directory, which happened to be the ssouser's home directory in this case.
- In this step, we download the Tomcat server binary from the URL mentioned there.
- Setting the
JAVA_HOMEenvironment variable that points to a valid JDK 1.6 location. - Making sure the JDK is the required version 1.6+.
- Make sure the Apache Tomcat binary is available in the current directory.
- Unzip the binary to the local directory. This will create a new directory with the version name in it.
- Display the contents of the unzipped directory.
- Change directory to the Tomcat bin where the start and stop scripts are located.
- Enable execute permissions for the scripts in this directory.
- You need to set these options to start the OpenSSO application successfully after deployment. It is recommended you make these changes to the
catalina.shto avoid typing this every time. - This command starts up the Tomcat server, here we assume that the default ports are available in the localhost, where you perform these steps. The default service port for http traffic is 8080.
Note
In a production level deployments OpenSSO server and policy agents will be deployed in different physical hosts. For simplicity, we use the same physical host to deploy multiple instances of OpenSSO and agents. We can achieve this by using the /etc/hosts aliases. Make sure that your naming resolver in the /etc/nsswitch.conf looks for files first. You do not need to worry about naming resolution if you are using a standalone system.
We are going to call our OpenSSO as http://opensso.packt-services.net:8080. To make this happen, add the following in your /etc/hosts:
192.168.1.10 opensso.packt-services.net
If you are using a standalone host, such as a laptop, just add the virtual host alias against the loop back interface. After adding the previous alias, you can access the Tomcat server:
http://opensso.packt-services.net:8080/index.jsp
If you are accessing the server from another client computer, then you need to add the IP address of the OpenSSO server followed by the alias in your local client as well.
Here's an example:
192.168.1.10 opensso.packt-services.net
Now we are all set to start the OpenSSO deployment.
In the next section, you can find the various configuration types and their use case scenarios. To get started right away with OpenSSO, use the one click configuration feature. It does not ask for any information except two non-unique passwords. This is the best way for the newbies to get started on OpenSSO.
Copy the opensso.war from the<unzip_root>/opensso/deployable-war directory to the Tomcat webapps directory (Refer to Downloading OpenSSO binary discussed earlier in this chapter):
cp <unzip_dir>/opensso/deployable-war/opensso.war /export/ssouser/apache-tomcat-6.0.20/webapps
This process will automatically deploy the OpenSSO web application. Now you can access the configurator by using the URL: http://opensso.packt-services.net:8080/opensso/config/options.htm.
Upon invoking the configurator, the browser will render a page similar to the one shown in the following screenshot if the deployment of the web application is successful.
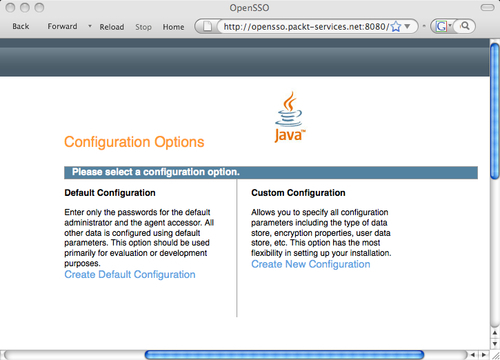
In this page there are two options for the administrator who would like to configure the server.
Default Configuration is the simplest option to bring up the OpenSSO server for a novice user; it does not ask too many questions. As you can see in the following screenshot, it asks only two questions that are password-related. However, the next option Custom Configuration is meant for advanced deployment use cases where one can configure multiple server instances, with a custom configuration data store.

Now you select the Default Configuration link and provide the password for the Default User (Default User is amadmin), as shown in the preceding screenshot. This is the top level administrative user for the whole OpenSSO server. This is similar to the Unix root or Windows Administrator user, so make sure you secure and remember the password that you have entered in this screen. Also note that the configurator will not let you use the same password for both of these users for security reasons.
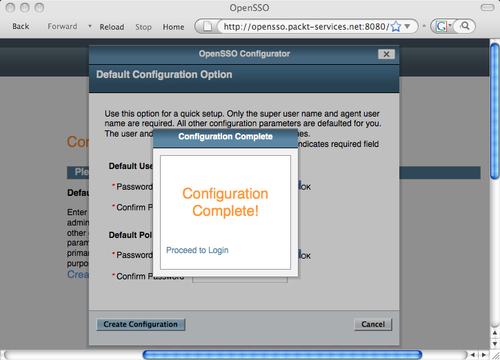
When you click on the Create Configuration button, a progress window will show you the actions of the configurator including creating the embedded configuration store and loading the OpenSSO service schema among others. Once the configuration is successful, a pop-up dialog (as previously shown) will notify that the server is ready to use.
This completes the configuration of the OpenSSO server with all default settings except the passwords for the administrative users.
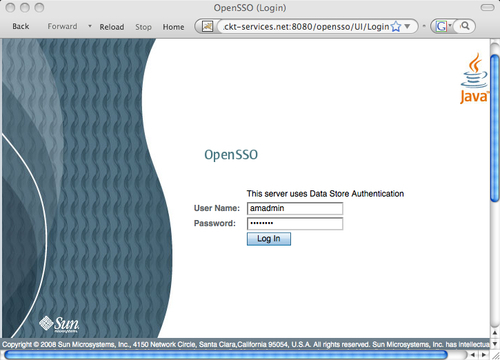
There is more than one way to verify the sanity of the server. From the browser, you can access the login page by entering this URL:
http://opensso.packt-services.net:8080/opensso/UI/Login
You can also verify the server sanity by using the REST interfaces. Just enter:
This will return an SSO token if the server is up and running, and here secret12 is my password for the amadmin user. The server will respond back with a default authentication module where you can enter the amadmin user and its password to get into the system. Upon successful authentication, you will be taken to the default landing page. From here you can start your OpenSSO administrative activities (Refer to Chapter 3 for more details on how to administrate the OpenSSO server).

If you have reached this stage without any issue then give yourself a pat on the back. It is a great milestone to achieve.
The OpenSSO server is configured into a location under the web container runtime user's home directory. A directory with the name of the deploy URI (in this case it is opensso) will be created under the user's home directory. It means all the configuration information will be placed under /export/ssouser/opensso. There will also be a directory named .openssocfg created under /export/ssouser (this is the $HOME of ssouser):
[ssouser@opensso]:/export/ssouser> ls -F
apache-tomcat-6.0.20/ opensso/
[ssouser@opensso]:/export/ssouser> ls -F opensso
amAuthSafeWord.xml am_sm_ds_schema.ldif install.log
amAuthUnix.xml bootstrap opends/
am_remote_opends_schema.ldif config/ opensso/
am_sm_ad_schema.ldif fam_sds_schema.ldif template/
[ssouser@opensso]:/export/ssouser> ls .openssocfg/
AMConfig_export_ssouser_apache-tomcat-6.0.20_webapps_opensso_
[ssouser@opensso]:/export/ssouser> more .openssocfg/AMConfig_export_ssouser_apache-tomcat-6.0.20_webapps_opensso_
/export/ssouser/opensso
As you can see, this file (called bootstrap locator) has the location of the configuration directory which contains the file called bootstrap. This file provides the critical information to bring up the OpenSSO server. If this file does not exist or is not readable by the web container process, then OpenSSO assumes the web application is not configured. Subsequently, it will show the configuration page as if the product has not been configured. When the OpenSSO web application initializes, it locates the configuration information (if already configured) from the bootstrap locator file available in the $HOME/.openssocfg directory. Note that this type of configuration will create an embedded user identity store by default. You can delete and recreate a supported external identity store. Configurator does load the user identity schema as part of the configuration process. We can see a more detailed description of the content of these directories in a later section of this chapter.