In production-level deployments, often it is required to customize the product to adapt to the organization's specifications, its look and feel, and business logo, among other things. OpenSSO does offer console customization flexibilities to enable customers to have their own look and feel. There are a lot of documentations about the Login page customizations available in the OpenSSO public documents. So it does not add any value to duplicate those instructions here. Rather, let us focus on how one can extend the user identity schema (which is stored in a supported LDAP server, to add more attributes the LDAP schema must be extended) to add more attributes to the users, which are created and managed from the OpenSSO console. Once you customize the user schema, all users created by the OpenSSO interfaces including the CLI and administrative console would use the custom schema. As part of this process, you will be able learn how the end user profile page can have more attributes upon logging into the server.
In the default configuration, the server does support extensive user attributes that are part of the inetorgperson LDAP object class. It should address most of the business use cases. However, it may be required to add some legacy attributes as part of the user object. To make this happen OpenSSO user schema must be customized. In order to customize the user schema follow these simple steps:
- Design and extend the LDAP schema
- Extend the OpenSSO user schema
- Verify the customizations
Let us explore these topics in detail in a short while. The attributes, object classes, and schema Object Identifiers (OID) used in this section are for example illustration purposes only. You need to obtain proper OIDs for your own organization, if you want to customize your schema.
For the sake of simplicity let us assume that three attributes packt-servicesuser-status, packt-services-user -location, and packt-services-userblog are defined using a single object class named packt-services-user-class. The deployment use case that we are trying to achieve here is to make all of the three attributes mentioned above editable for the administrative users and make packt-services-user -location, and packt-services-userblog attributes editable by the non-admin users. In this example, OpenDS is used as the user store that stores all the user identity information. The first part of the customization is to extend the LDAP schema as these attributes are not part of the generic LDAP schema. The following listing contains the LDAP schema definition that can be added to the OpenDS server by using the ldapmodify utility. For readability the lines are folded, so when you cut and paste, make sure the lines that start with attributeTypes: and objectclasses: are not folded:
dn: cn=schema
changetype: modify
add: attributeTypes
attributeTypes: ( 1.2.840.113556.1.2.192 NAME 'packt-services-user-location' DES
C 'Packt Services User Service Location ' SYNTAX 1.3.6.1.4.1.1466.115.121.1.12 X
-ORIGIN 'OpenSSO Packt Services Deployment' )
attributeTypes: ( 2.16.840.1.113730.3.1.602 NAME 'packt-services-user-status' DE
SC '"active", "inactive" status of a user' EQUALITY caseIgnoreMatch SINGLE-VALUE
SYNTAX 1.3.6.1.4.1.1466.115.121.1.15 X-ORIGIN 'OpenSSO Packt Services Deployment
' )
attributeTypes: ( 2.16.840.1.113730.3.1.603 NAME 'packt-services-user-blog' DESC
'A users blog Web addresses' SYNTAX 1.3.6.1.4.1.1466.115.121.1.26 X-ORIGIN 'Ope
nSSO Packt Services Deployment ' )
-
add: objectClasses
objectClasses: ( 1.3.6.1.4.1.42.2.27.9.2.96 NAME 'packt-services-user-class' DES
C 'Packt Services user object class' SUP top AUXILIARY MAY ( packt-services-use
r-location $ packt-services-user-status $ packt-services-user-blog) X-ORIGIN 'Op
enSSO Packt Services Deployment' )
If you have loaded the schema to OpenDS, then it is ready to store the new attributes that we are planning to use in the OpenSSO user schema. At this point we can proceed to the next section to extend the User Service.
All the OpenSSO services are defined using the XML services schema that conforms with sms.dtd. Any changes that you would like to make in the services should be made in the service schema. All the services schema are stored in the configuration store of the server as an XML blob. The original XML schema files are stored in the file system under the configuration directory of the OpenSSO server. You can locate them under<conf-dir>/config/xml. To extend the user schema defined using the service name iPlanetAMUserService (amUser.xml) carry out the following sequence of steps:
- Add the custom attributes to
amUser.xml - Remove User Service schema from the configuration store
- Add extended User Service schema
- Add the label names for the new properties
- Update the privileges
- Restart and test the OpenSSO server
Before editing the<conf-dir>/config/xml/amUser.xml file make sure you make a copy of this original file. In case you mess up the customization process you can revert back to the original configuration using this original schema file. Using your favorite editor add packt-services-user-status, packt-services-user-location, and packt-services-user-blog attributes at the end of the file just before the</User> element. You will notice in the following code listing here that there are some attribute schema element properties that need to be defined for each attribute schema. These properties determine what kind of values an attribute can accept, whether to display for the end user and a value can be null for that attribute.
The following code must be compliant with the jar://com/sun/identity/sm/sms.dtd. Make sure you appropriately close the tags to arrive at a well-formed XML document:
<AttributeSchema name="packt-services-user-status"
type="single_choice"
syntax="string"
any="required|filter|adminDisplay"
validator="RequiredValueValidator"
i18nKey="cust100">
<ChoiceValues>
<ChoiceValue i18nKey="cust200">Active</ChoiceValue>
<ChoiceValue i18nKey="cust201">Inactive</ChoiceValue>
</ChoiceValues>
<DefaultValues>
<Value>Inactive</Value>
</DefaultValues>
</AttributeSchema>
<AttributeSchema name="packt-services-user-location"
type="single"
syntax="string"
any="display|filter"
OpenSSO services, customizingattributes, adding to amUser.xmli18nKey="cust101">
</AttributeSchema>
<AttributeSchema name="packt-services-user-blog"
type="single"
syntax="string"
any="display"
i18nKey="cust102">
</AttributeSchema>
Updating the XML schema file alone is not sufficient to make the new attributes a part of the OpenSSO User Service. At this point the OpenSSO server still uses the old schema that exists in the configuration store. Unless the configuration store is updated with the new values, your custom attributes will not show up in the console. So the existing service schema must be removed first. It can be removed by using the ssoadm.jsp or ssoadm CLI tool. There is no provision in the administrative console to remove the service. You can use the delete-svc subcommand to remove any existing service from the server. Invoke the following command to remove the User Service:
./ssoadm delete-svc -s iPlanetAMUserService -u amadmin -f /tmp/.passwd_of_amadmin
This will remove the existing User Service schema from the server.
The updated user schema must be loaded now. It can be accomplished by using the create-svc sub command of the ssoadm utility. To add the updated User Service schema that contains the custom attributes, execute the updated user schema file. It is located in /export/ssouser/opensso/config/xml/amUser.xml file. This process will update the configuration store with that latest schema for the User Service. In the multiple OpenSSO servers that share the same replicated configuration, you just perform the above step once. There is no need to execute in all of the servers as the configuration information is automatically replicated to all the servers. Here is an example:
./ssoadm create-svc -X /export/ssouser/opensso/config/xml/amUser.xml -u amadmin -f /tmp/.passwd_of_amadmin
The new attributes that have been added to the User Service require a human readable label to be shown in the console. This label is a localizable string (i18nKey) which is stored in a property file stored as part of the OpenSSO web application. This property file name is amUser_locale.properties where locale is the current localized environment. For the English locale, it would be amUser_en.properties. An appropriate label should be added for each property that is added to the amUser.xml. If the value is empty then that attribute will not be displayed on the console. It is very important to match the i18nKey values that you supplied in the amUser.xml. For instance, the following screenshot has the i18nKey property. cust101 value is supplied for the property packt-services-user-location, so you should supply a meaningful string that will relate to this property. In this case, it is aptly labeled as Packt Services User Location. This file can be located under the WEB-INF/classes directory. Some of the application servers may not let you modify directly under the web application deployment directory. In such scenarios, you can generate a new opensso.war after making the customizations:
cust100=Packt Services User Status
cust101=Packt Services User Location
cust102=Packt Services User Blog Entry
cust200=Status Active
cust201=Status Inactive
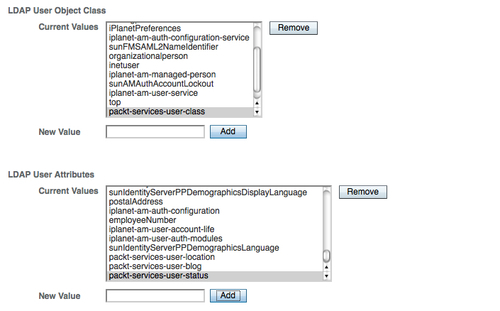
Even though the user schema is updated with latest schema changes, the custom user attributes will not be available to the newly created users until the custom attributes and object classes are added to the specific realm's data store configuration properties as shown in the following screenshot. You need to manually edit the existing data store configuration properties. This will instruct the IdRepo sub system that the new attributes need to be added whenever a new user is created or their attributes are to be retrieved along with these custom attributes.
The use case requires the packt-services-user-location and packt-services-user-blog to be self-modifiable for the users who possess these attributes as part of their profile. As a security precaution only certain attributes are writable by the end user of the OpenSSO server. The administrator can override these, based on the privileges assigned to the administrator. If there is a need to permanently make certain profile attributes writable by the normal user, the administrator must update the default delegation policies. This can be accomplished by editing the appropriate policies. Follow these simple steps in sequence:
- Export the specific policy named
SelfWriteAttributesunder/sunamhiddenrealmdelegationservicepermissions:./ssoadm list-policies -u amadmin -f /tmp/.passwd_of_amadmin -e /sunamhiddenrealmdelegationservicepermissions -p SelfWriteAttributes -o /tmp/exported_delegation_policy.xml - Append the new attributes
packt-services-user-locationandpackt-services-user-blogunderUserSelfCheckConditionin the exported file/tmp/exported_delegation_policy.xml. - Delete the policy named
SelfWriteAttributesunder/sunamhiddenrealmdelegationservicepermissions:./ssoadm delete-policies -u amadmin -f /tmp/.passwd_of_amadmin -e /sunamhiddenrealmdelegationservicepermissions -p SelfWriteAttributes - Add the updated policy from
/tmp/exported_delegation_policy.xml:
./ssoadm create-policies -u amadmin -f /tmp/.passwd_of_amadmin -X /tmp/exported_delegation_policy.xml -e /sunamhiddenrealmdelegationservicepermissions
That is all. Now the user's location and blog entry attributes can be written by the end user from their profile page.
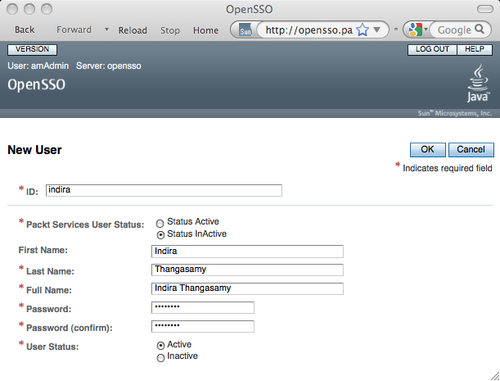
After completing the customization steps as previously discussed above, if you did not see any errors in the process, then you are successful in completing the customization process. Now restart the OpenSSO server. Once the server is up and running, log in as a top level administrator and try to create a new user identity from the Subjects | User tab. In the New User creation page you should see the Packt Services User Status attribute with a default value Active (set as the default value by the amUser.xml) as shown in the following screenshot. The other two attributes will also show up in the console, but those will not mandate a value to be set at the time of the user creation. It is because they are not required as per the schema definition.
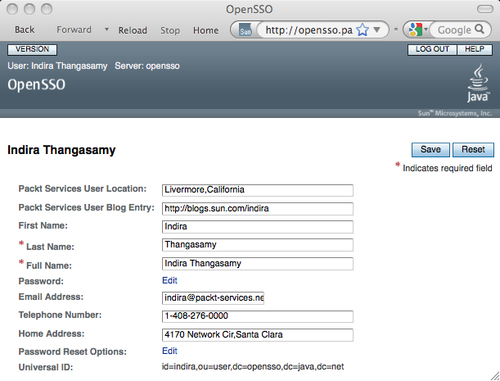
Let us test as a normal user. Log out from the server and log back in as a normal user, Indira Thangasamy with password secret12. When you inspect the end user profile page, two new attributes Packt Services User Location and Packt Services User Blog Entry are displayed, and it is an editable text box as shown in the following screenshot: