
Every customer who deploys a software product knows the importance of testing their software in a pre-production environment, because there's always that slight chance that something may be different from the development environment. This is why typically the companies who develop and deploy enterprise software have a development environment, a staging environment, and a production environment. The development environment, as you might expect, is where things are developed and unit tested. However, staging is where things become different. This is where your environment should replicate, as closely as possible, your production environment. Although it's not always entirely possible to completely reproduce it, the closer, the better. Production is your live environment.
Once they test out the product in a pre-production (staging) environment, they would like to move this configuration to the production environment. In the production environment only the physical host names, IP addresses, and domain name systems will be different. The rest of the OpenSSO configuration parameters such as the policy, authentication, and identity store configurations would be likely to be the same. Customers should be able to export the configuration in the staging area and import it into a production environment by just replacing the host and IP address-specific information. By the way OpenSSO does not store any IP addresses on the server in the configuration store or flat file. This process is called migrating or converting from test to production. OpenSSO can be deployed in a staging environment and after proper validations its configuration can be imported to a production server with minimal efforts.
To move the OpenSSO configuration from test configuration to production environment, or if you simply need to change the deployment URI, server hostname, or the configuration root suffix all you need to do is to execute the following simple steps:
- Export the configuration data from the test server
- Configure the OpenSSO on the production server
- Import the tested configuration data after adapting it to the production system
For this exercise let us consider two OpenSSO systems, one deployed in the test environment and the other deployed on the production system. As we discussed earlier, the test server is meant to validate the configurations before deploying it to a production system. Once the customer validates the use cases and perhaps the performance of the server, they will roll out into the production. Typically the production systems would be in a separate network and likely in a different domain. As it has already been tested in a different host, all the customers need to do is to replace the host name in the configuration and load the configuration into the production system, then everything should work without any service interruption or extensive configuration changes. Well, how would one perform this? Let us consider the two servers with corresponding deployment data given in the following table:
|
Deployment Data |
Test Server |
Production Server |
|---|---|---|
|
amadmin password |
tEstSecre1 |
tEstSecre1 |
|
Amldapuser password |
TesTAgen1 |
TesTAgen1 |
|
Deployment URI |
/olduri |
/newuri |
|
Server Name |
oldhost.packt-services.net |
newhost.new-services.com |
|
Server Port |
8080 |
9090 |
|
Configuration Directory Location |
/export/ssouser/config-olduri |
/export/ssouser/config-newuri |
|
Bootstrap File Path |
/export/ssouser/.openssocfg/AMConfig_export_ssouser_tomcat-8080_apache-tomcat-6.0.20_webapps_olduri_ |
/export/ssouser/.openssocfg/AMConfig_export_ssouser_tomcat-9090_apache-tomcat-6.0.20_webapps_newuri_ |
|
Configuration Root Suffix |
o=oldsuffix.com |
o=newsuffix.com |
|
Cookie Domain |
.packt-services.net |
.new-services.com |
|
Encryption Key (am.encryption.pwd) |
OpenSSOEncryptionKey |
OpenSSOEncryptionKey |
Log on to the test server oldhost.packt-services.net as the OpenSSO runtime user (in this case ssouser) assuming the ssoadm tool is already configured. Invoke the following command to export the configuration of the test server:
./ssoadm export-svc-cfg -e thisisthesecretkey -u amadmin -f /tmp/passwd_of_amadmin -o /tmp/TestServerConfig.xml
This will export the test server's configuration data into an XML file called TestServerConfig.xml. Later this file will be edited to change server hostname, service port, configuration suffix, deployment URI, and cookie domain values to match with the production environment.
On the production server make sure that the following tasks are completed:
Once the preceding tasks are completed, log in to the administrative console and verify it is accessible.
The data obtained from the test server still contains the host name, service port, and other configuration data related to the test server. We need to change these test environment-specific data to match the production environment. Note that we are changing the data that are pertaining to the server configuration not the identity or authentication server details. If you have used a RADIUS server that was pointing to the test environment, you need to change this from the production server administration console. This kind of data will not be changed by this procedure, as the data only stores configuration details.
The data is very sensitive to any typo as this could cause the server to fail. So let us take extreme caution while editing the file TestServerConfig.xml. To make things simpler I have created a sed script that would replace the appropriate values in the TestServerConfig.xml, so it can be imported to the production server using the ssoadm tool. Run the following command:
sed -f test2prodn.sed /tmp/TestServerConfig.xml > /tmp/ProductionConfiguration.xml
This will perform the necessary changes in the output file that can be loaded into the production system.
The content of test2prodn.sed is the key to accomplish the test to production configuration conversion. The following is the content of the file with comments that explain what each one does. Due to formatting some lines are wrapped but when you make the script make sure each line is entered as complete instead of wrapping. Each uncommented line should start with a letter s (stands for string substitute):
#change the old suffix to newsuffix s/o=oldsuffix.com/o=newsuffix.com/g s/oldsuffix.com/newsuffix.com/g #change the server port to new port s/com.iplanet.am.server.port=8080/com.iplanet.am.server.port=9090/g #changing the hostname:port pair to new value s/oldhost.packt-services.net:8080/newhost.new-services.com:9090/g s/oldhost.packt-services.net/newhost.new-services.com/g #change the domain cookie value/org alias s/packt-services.net/new-services.com/g #change the deploy uri to new s//olduri//newuri/g s/"olduri/"newuri/g #changing the configuration directory test configuration dataadaptings//export/ssouser/config-olduri//export/ssouser/config-newuri/g #changing the bootstrap locations/bootstrap.file=/.*/bootstrap.file=/export/ssouser/.openssocfg/AMConfig_export_ssouser_tomcat-9090_apache-tomcat-6.0.20_webapps_newuri_</Value>/g
After successfully completing the foregoing section, the data has been modified to suit the production environment. Move the modified configuration data stored in the file /tmp/ProductionConfiguration.xml to the production server (newhost.new-services.com) and perform the following step to load into the production system:
./ssoadm import-svc-cfg -e thisisthesecretkey -X /tmp/ProductionConfiguration.xml -u amadmin -f /tmp/pass
Directory Service contains existing data. Do you want to delete it? [y|N] y
Please wait while we import the service configuration...
Service Configuration was imported.
Restart the server now and verify whether you are able to log in to the administration console. This completes the process of moving OpenSSO configuration from a test configuration to a production system. In each phase make sure that you take backups periodically. In case you fail at some point you will be able to go back to the previous step instead of starting all over. Remember that the passwords for the administrative users are kept identical in both test and production servers for simplicity.
In any enterprise, the product that is deployed in an IT environment to protect the resources must perform audit logging, so that at any given point an action can be traced back to the individual account that initiated that event. With more compliance standards evolution, and government agencies enforcement, vendors are forced to employ different mechanisms to collect data from the deployed system. These data will then be fed to industry standard tools to generate periodic reports for the security office. The importance of audit event logging has increased with recent new US and worldwide legislation mandating corporate and enterprise auditing requirements. Open source projects such as OpenXDAS, a Bandit project identity component, have begun to take their place in software security reviews as not only an improvement, but a requirement.
Audit trails maintain a record of system activity by system or application processes and by user activity. In conjunction with appropriate tools and procedures, audit trails can provide a means to help accomplish several security-related objectives, including individual accountability, reconstruction of events, intrusion detection, and problem identification.
It is important to distinguish between the audit logging that records the security actions performed by the user or system to accomplish a certain business case as opposed to the trace or debug logging that merely dumps the software execution code path along with associated data elements used at the runtime. The former is a requirement for the product to be deployed in the security realm where as the latter is only an optional feature to troubleshoot the system when a problem arises.
In the OpenSSO server both types of logging are supported. Nevertheless audit logging has more advanced options to store even the records in a relational database system, such as MySQL. This facility is not available for the debug or trace logging.
In the out-of-the-box configuration, OpenSSO does not enable the trace level logging for obvious reasons including the system performance. Remember when you enable trace level logging, the system performance will degrade. An administrator can configure the server to output the trace level logging by simply setting the following property:
./ssoadm update-server-cfg -s http://newhost.new-services.com:9090/newuri -u amadmin -f /tmp/.passwd_of_amadmin -a com.iplanet.services.debug.level=message
It is a hot swappable property that enables the OpenSSO server to recognize this change right away, without requiring to restart the web container. The valid values for this property are error (default), warning, and message. In the order of verbose level, there is another value off that disables the debug logging completely. The debug files will be placed under<config-dir>/<deploy-uri>/debug. In this example, it will be under /export/ssouser/config-newuri/newuri/debug.
The debug files can quickly grow huge, so please make sure that you disable the debug option as soon as you are done with the troubleshooting task. Typically the customer might want to enable debug logging for the following reasons:
- Troubleshooting complex problems especially after a customization
- While debugging there are SSL/TLS or signing encryption issues
- One of the OpenSSO service returns an incorrect status
For instance, if you are troubleshooting an authentication issue, it is wise to redirect all the debug events to a single file for tracing the sequence of steps in a logical manner. To achieve this, you should enable the property com.sun.services.debug.mergeall to ON, now all the debug events will be stored in a file named debug.out:
./ssoadm update-server-cfg -s http://newhost.new-services.com:9090/newuri -u amadmin -f /tmp/.passwd_of_amadmin -a com.sun.services.debug.mergeall=ON
Unlike the audit log files, there is no log file rotation available for these debug files. The effect of above command can be achieved using the Admin console by navigating to Configuration | Servers and Sites | http://newhost.new-services.com:9090/newuri | Debugging.
As you can see, it is a server instance-specific configuration, so you have to make this change in all the server instances. In the next chapter, you can learn more about troubleshooting and diagnostics.
The purpose of the audit logging is to provide a means for recording events that may be used to assign responsibility to actions occurring through the OpenSSO server. The audit log records allow the reconstruction of individuals' activities for assessment and auditing purposes. Any attempt to compromise the security of the system can easily be monitored.
OpenSSO provides a well-defined log record format that can easily be interpreted and customized based on customer needs. Nevertheless, some of the physical security aspects of the log files or tables are expected to be provided by the system administrator utilizing features of the operating system (file permissions for file-based logging) or the RDBMS (for DB logging) of the system that the OpenSSO leverages for storing the log records. For instance, restricting the logging directory access permissions to 0700 (chmod), where the owner is the system user id owning the web container process on which OpenSSO is deployed. If you are logging on to a database, then access to the DB's tables are expected to be restricted as prescribed by the underlying DB system's guidelines (MySQL/Oracle).
As I mentioned earlier, all the OpenSSO services are defined by the sms.dtd compliant service called iPlanetAMLoggingService (amLogging.xml). This logging service fundamentally is an extension of the java.util.logging classes. Therefore, the OpenSSO logging service depends upon the facilities, provided those classes are interfacing with the operating system. Besides it also depends on the Service Management Service (SMS) for configuration information and the Policy Service to enforce access privileges to the logging services. This authorization enforces that only authorized principals have access to the audit records. When configured for database logging, the logging service relies on JDBC-compliant access to an Oracle or MySQL database server. In the case of flat file logging with intrusion detection enabled (also known as secure logging), it depends on a Java Key Store (JKS).
In an out of the box configuration, the audit logging is enabled to use the file-based logging. The audit log records will be written in the<config-dir>/deploy-uri>/log, for example, /export/ssouser/config-newuri/newuri/log. For some reason if you want to disable the audit logging, you can set the logging to INACTIVE by using the administration console interface (Configuration | System | Logging) or CLI:
./ssoadm set-attr-defs -s iPlanetAMLoggingService -t global -u amadmin -f /tmp/.passwd_of_amadmin -a logstatus=INACTIVE
When the logstatus property is set to INACTIVE, the logging level for all log files are set to level OFF. It is also possible to obtain a finer level of logging from the server by setting an appropriate value to the specific component for which you need a finer logging level. For example, amSSO.access contains all the session-related events. To get the finest level of logging, one can set iplanet-am-logging.amSSO.access.level=FINEST in the respective server configuration:
./ssoadm update-server-cfg -s http://opensso.packt-services.net:8080/opensso -u amadmin -f /tmp/.passwd_of_amadmin -a iplanet-am-logging.amSSO.access.level=FINEST
This property format is for setting the logging level of individual log files, primarily in order to get more detailed logging information from a particular service or component.
If the logstatus is ACTIVE and there are no individual log file logging level properties set in the server configuration, then the logging level set in the global logging (iPlanetAMLoggingService) service configuration is applied to all the log files. The individual log file's level will take precedence over the global logging settings. Changing the logging service's log level through the administration console or CLI takes effect immediately, hence you do not need to bounce the container.
OpenSSO logging can be stored in the local or NFS file systems. When the server is configured by default, it assumes that the flat file logging and the log files are written into the<conf-dir>/deploy-uri>/log directory. The administrator can customize the location after configuring the server. The log files are named after the functional components with a suffix of .access or .error, the former containing all the access (read, write, and update) events and the latter containing the erroneous cases, such as failing events. You can look at the sample of the log directory contents that I have generated in a simple SSO scenario. There are more audit files that are not shown here. Those files will be generated based on the functionality being invoked, for example amSAML.access is not shown in the following screenshot:
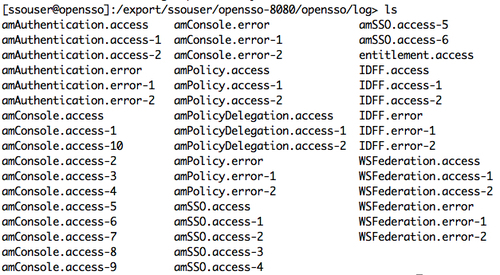
As you might have noticed there are files that are indexed with numbers, for example amConsole.access-10. These indexes are created by the server due to a log rotation. The log rotation is the capability of the OpenSSO logging service where the administrator may configure the size of the each log file, when this pre-configured size is reached the log rotation happens. As each record is written to the log file, the total number of bytes written is checked against the configured maximum file size (iplanet-am-logging-max-file-size). If the maximum is met or exceeded, then file rotation occurs.
During file rotation, the history files are pushed down by putting the contents of<logfile>-(n-2) into<logfile>-(n-1), and so on, until the contents of<logfile> are written to<logfile>-1, where n is the number of history files (iplanet-am-logging-num-hist-file). The oldest history file,<logfile>-(n-1) is deleted, and a new<logfile> is opened for writing the latest log records.
Logging location can easily be changed by using the administration console or the command line utility ssoadm. The following is the quickest way to change the logging location from default to /tmp/mylog:
./ssoadm set-attr-defs -s iPlanetAMLoggingService -t global -u amadmin -f /tmp/.passwd_of_amadmin -a iplanet-am-logging-location=/tmp/mylog
Again there is no need to restart the container, it takes effect right away.
Flat file logging serves are good for the deployments where the number of users are relatively small in number. For the applications that are mission critical and require the highest level of security and availability, flat files may not be scalable for storage as well as data mining. There are log data analysis tools that are optimized to work with databases rather than flat files. OpenSSO does support database-based logging. This means the log events can be written to a pre-configured Oracle or MySQL database. At the time of writing OpenSSO did not support any other DB for logging.
To configure the logging to a database, the administrator just needs to change the log location iplanet-am-logging-location to a valid database URL of the form jdbc:mysql://mysql.packt-services.net:3306/packtpub_opensso?autoReconnect=true, if you are writing to a MySQL database.
You can use the ssoadm tool to make the following configuration change in the server configuration:
./ssoadm set-attr-defs -s iPlanetAMLoggingService -t global -u amadmin -f /tmp/.passwd_of_amadmin -D /tmp/logging.txt
where the file /tmp/logging.txt contains the following:
iplanet-am-logging-location=jdbc:mysql://mysql.packt-services.net:3306/packtpub_opensso
?autoReconnect=true
iplanet-am-logging-db-user=dbuser
iplanet-am-logging-db-password=dbsecret12
iplanet-am-logging-db-driver=com.mysql.jdbc.Driver
iplanet-am-logging-type=DB
The autoReconnect=true is required for automatic reconnection after an idle timeout.
The preceding procedure will enable the OpenSSO to log the events into the MySQL database. The administrator must make sure that the MySQL JDBC drivers are properly copied (mysql-connector-java-5.1.10-bin.jar) into the WEB-INF/lib directory of the opensso.war application, otherwise the logging service will throw unable to load DB driver exceptions. For the command line tool to log the events into the database, the driver location must be added into the ssoadm script after removing the property -Dcom.sun.identity.log.dir. This property needs to be removed to enable the logging for ssoadm to occur at the server side into the database.
When database logging is specified, the com.sun.identity.log.handlers.DBHandler and com.sun.identity.log.handlers.DBFormatter classes are employed.
Upon instantiation, if logging is enabled the DBHandler uses the database's URL (iplanet-am-logging-location), database user (iplanet-am-logging-db-user), password (iplanet-am-logging-db-password), and JDBC driver (iplanet-am-logging-db-driver) to establish a connection to the database server. The supported JDBC driver names are distinctive enough to determine whether the target database server is Oracle (contains "oracle") or MySQL (contains "mysql").
With the connection to the database established, the table (equivalent to log file) is created, if it does not already exist. Unlike the filenames in flat file logging, the periods (.) are not valid characters for table names in database logging. The periods are converted into underscores (_). Also, the Oracle database uses table names in all uppercase characters.
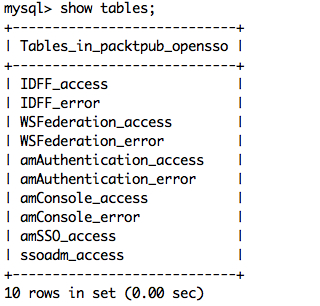
The following is a screenshot of the tables that are created after setting the logging configuration to MySQL. This is only a part, there are more tables for each functional components that will be created when the functionality is exercised.
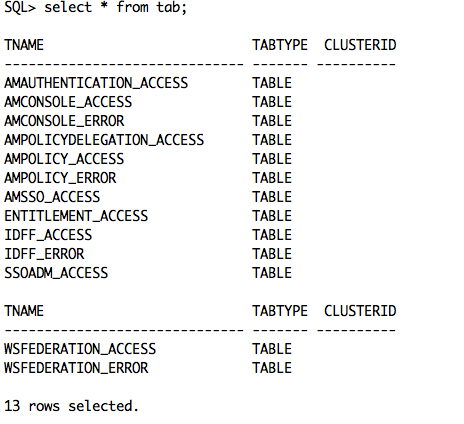
Two other differences between flat file and DB logging concern the log record columns (DB equivalent for the log record "fields"). While the entire log record is text in flat file logging, the individual columns in DB logging can be created with different data types. In particular, the "time" column is created as a data type native to the DB ("datetime" for MySQL, "date" for Oracle), and the "Data" column is created as data types with large capacities ("LONGTEXT" for MySQL, "CLOB" for Oracle). The remainder of the log record columns are short in length, so they are created as "varchar" (or "varchar2" for Oracle) types with maximum lengths of 255 characters. New tables are created with all the possible columns. If the table exists and is missing any columns, the table is altered to add the missing columns. The following screenshot shows the typical names of the log database tables for OpenSSO when configured to log in to Oracle DB:
The following command configures the OpenSSO server to write its log events to a pre configured Oracle DB:
./ssoadm set-attr-defs -s iPlanetAMLoggingService -t global -u amadmin -f /tmp/.passwd_of_amadmin -D /tmp/orcl.logg.txt
The file contents of /tmp/orcl.logg.txt contains the following attribute value pairs. As you might have guessed the string orcl denotes the DB instance name. Like the MySQL logging, you need to make sure that the JDBC drivers (ojdbc5.jar) are copied into the OpenSSO application and the ssoadm script is updated to include the database drivers:
iplanet-am-logging-location=jdbc:oracle:thin:@oracledb.packt-services.net:1521:orcl
iplanet-am-logging-db-user=dbuser
iplanet-am-logging-db-password=dbsecret12
iplanet-am-logging-db-driver=oracle.jdbc.driver.OracleDriver
iplanet-am-logging-type=DB
The OpenSSO server supports remote logging. This allows a remote client application using the OpenSSO client SDK such as the policy agents, or another OpenSSO server (in the same deployment) to use an OpenSSO server's logging services. The logging service is available only to trusted servers and authorized users. An arbitrary user or server cannot write into the logging service. If the OpenSSO server wishes to use another OpenSSO server as its logging service server, then the following two conditions must be met:
- The source server must be trusted by the target OpenSSO server that provides logging service
- The source server's logging service URL must point to the target server's logging service URL
Typically, a policy agent can be configured to perform remote logging to the server.
Secure logging is a powerful feature that helps to prevent the intrusion and tampering of files that hold the logged security events. This works in association with the flat file logging. In the security arena the accountability for any action is determined from the trace log and audit events. If someone can change the events file, for example remove a malicious event without proper authorization, then it should be considered as a security breach. Customers can deploy a secure logging feature to prevent these kinds of unauthorized malicious activities.
This optional feature adds additional security to the logging function. Secure logging is accomplished by using a pre-registered certificate configured by the system administrator. A Manifest Analysis and Certification (MAC) is generated and stored for every log record. A special signature log record is periodically inserted that represents the signature of the contents of the log written to that point. The combination of the two records ensures that the logs have not been tampered with. There are two methods to enable secure logging, namely, through a Java Cryptography Extension (JCE) provider and through a Java Security Server (JSS) provider.
Enabling secure logging in the OpenSSO server is a three step process, which is as follows:
- Create the keystore to sign the logs
- Configure the logging service to turn ON the secure logging
- Verify the log archives
Before employing the secure logging feature, you should first create a keystore that will sign the log archives. You can use the keytool that is bundled with Java SDK:
$JAVA_HOME/bin/keytool -genkey -alias Logger -keyalg DSA -sigalg SHA1withDSA -keysize 1024 -dname "cn=Logger,ou=identity,o=packt-services,c=us" -storetype jks -keystore OpenSSOLogger.jks -storepass secret12
Note
The keystore password for the secure logging certificate store must be the same as of the top level administrator user amadmin.
The preceding command will create the keystore named OpenSSOLogger.jks. This file can be used while configuring the secure logging service. The keystore creation process is not complete unless the following steps are completed.
Let's generate a certificate signing request (CSR) that can be signed by a Certificate Authority (CA):
$JAVA_HOME/bin/keytool -certreq -alias Logger -storetype jks -keystore OpenSSOLogger.jks -storepass secret12 -file /tmp/certreq.txt
The certificate request is available in the file /tmp/certreq.txt. This file can be submitted to a valid CA to obtain the certificate.
The new certificate that you get from the CA should be added into the key store to complete the keystore creation process. Your CA will issue two certificates, namely, a trusted CA certificate and a certificate in response to your CSR. First load the CA certificate followed by the signed certificate:
$JAVA_HOME/bin/keytool -import -keystore OpenSSOLogger.jks -storepass secret12 -trustcacerts -file /tmp/cacert.txt
$JAVA_HOME/bin/keytool -import -keystore OpenSSOLogger.jks -storepass secret12 -alias Logger -file cert.txt
Once the preceding steps are completed without any errors, then you can go ahead and configure the logging service to enable the secure logging as follows:
./ssoadm set-attr-defs -s iPlanetAMLoggingService -t global -u amadmin -f /tmp/.passwd_of_amadmin -D /tmp/secure.logging
The file /tmp/secure.logging contains the following:
iplanet-am-logging-secure-certificate-store=/export/ssouser/opensso-8080/OpenSSO/Logger.jks
iplanet-am-logging-security-status=ON
iplanet-am-logging-type=File
iplanet-am-logging-location=/export/ssouser/opensso-8080/securelog
iplanet-am-logging-secure-signing-algorithm=SHA1withDSA
Once the server is configured for secure logging, you can use the amverifyarchive utility to verify the integrity of the log archives:
./amverifyarchive -l WSFederation.access -p /export/ssouser/opensso-8080/securelog -u amadmin -w secret12
Archive Verification : no files to verify, keyFiles.length == 1
Verification of Log Archive for WSFederation.access passed Successfully.
Now let us open amSSO.access, add some characters, and save it. Then run the following:
./amverifyarchive -l amSSO.access -p /export/ssouser/opensso-8080/securelog -u amadmin -w secret12
File being verified : _secure.amSSO.access.20052010215433
Signature Verification Failed in file :_secure.amSSO.access.20052010215433=at record no : 1
Verification of Log Archive for amSSO.access failed. Intrusion Detected.
As you can see the verification of the archive failed due to a signature mismatch.