
For the top level administrator user, the console page would look like the one shown in following screenshot. This is the default console that is used to manage all the features except the entitlements.
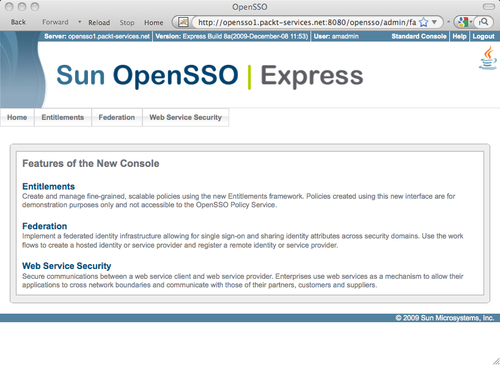
To access the entitlements management console, you can use the URL of the form<protocol>://servername:port/<deploy_uri>/admin.
After being authenticated as the top level administrator user amadmin, you can view the console as shown in the following screenshot:
Administrative users get different views based on their access privileges. Multiple levels of privileges can be set to an identity which we will see in a short while. Now let us look at how the normal (non-administrator) user console appears in the browser. Normal users access the login page specific to the realm where they belong. If the login page is accessed with no URL query parameters (these parameters are detailed in the next chapter), then the server assumes the root (/) realm for authentication and other purposes. As you are aware, OpenSSO comes with a default user demo with no administrative privileges. We can use this user to demonstrate the console page for the end users. Access the login page of the server<protocol>://servername:port/<deploy_uri>/UI/Login?realm=/. Remember the query parameter ?realm=/ is optional for the root realm, whereas for the sub realms under the root, you need to specifically supply this query parameter to address that particular realm. Anyway, on the login prompt, enter demo as the user and changeit as password. All this is with the assumption that you have the default OpenSSO configuration as described in Chapter 2, in the OpenSSO one click configuration section. Upon successful authentication, the resulting page would appear something like the one shown in the following screenshot:

Note that there is no tabbed console for the non-administrator users such as the demo user. Tabbed pages will appear only if the authenticated user has one or more administrative privileges. These privileges can be applied to a user identity through a role or group. Authenticated identities inherit the privilege by inheriting the specified role or group to which a privilege is assigned.
An administrator logged into the administrative console can manage the system configuration based on the privileges assigned to the user. For example, a policy administrator can only manage the policies and the Policy Service configuration. This person cannot manage the authentication service or the identities under the subject tab. The console itself hides those views from the Policy Administrator. When both the realm and Policy Administrator privileges are assigned, the effective privilege of this user would be the aggregation of both administrative privileges.
Let us defer certain administrative operations to a later chapter as it would be easier to understand them at a later stage. The goal of this chapter is to introduce the console, and how to navigate through the console features.
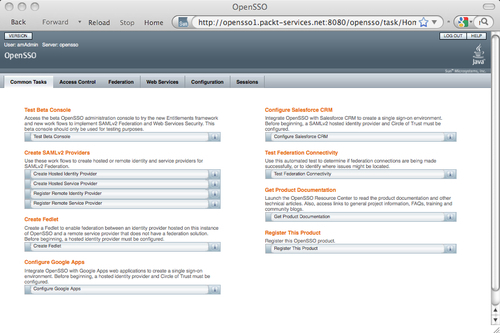
As soon as the users log in to the console, they will be presented with an administrative user interface or a normal user interface based on the effective privilege. In the administrator login case, upon successful authentication a default landing page will be rendered. This page includes all the workflow wizard - like tasks that can be invoked to configure certain OpenSSO configuration steps. These work-flows are spread across both new and old consoles. At the time of writing, the following workflows were available from the default landing page:
- Configuration of SAMLv2-based Identity Provider and Service Provider configurations
- Integration of OpenSSO with Google Apps
- Integration of OpenSSO with Salesforce
- Creation of Fedlet
- Testing federation connectivity
We will revisit some of these workflows in the later chapters. There are many easy-to-configure tasks rendered like a workflow wizard for the security token service. WebEx integration with OpenSSO is available from the entitlements management console.
In OpenSSO a realm is a collection of configuration information that solves a specific business use case. A realm can be envisaged as a unit that OpenSSO uses to organize configuration information. Authentication properties, authorization policies, data stores, identities, and other services such as session service data can be defined within the realm. Typically a realm includes the following type of information:
- One or more data store's configurations to store identities' data.
- List of authentication types and modes supported by the realm. An OpenSSO server can support any number of authentication types, the realm configuration enables only specific authentication modules. By default, not all the authentication types are available to the end user.
- Policy information that will be used to determine which resources are protected by OpenSSO and which identities can access what.
- Delegation privileges that are available.
- Administration data for realm management.
- Web Service Clients and agents configuration.
When the server is configured, the top level realm called root realm is created. Root realm is denoted using / (front slash). Any subsequent realms created under root (/) are called sub realms. These are addressed in a Unix - like directory naming convention. For example /sales/support is representing third level sub realm sales created under support which is a sub realm of the top level root realm. From the console it can be viewed from the Access Control tab. A new realm can be created from this page as well.
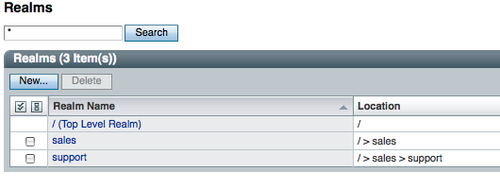
To manage a specific realm, select the realm by clicking on the realm name. It will bring up another tabbed page containing the following sub tabbed pages:

You will find eight tabs. Each lets you edit specific configurations for the selected realm. The CLI tool ssoadm also offers create-realm, list-realms, delete-realm sub commands to manage the realms though the command line interface.
Realm-specific properties such as the DNS alias names can be set from this page. These values are used in the authentication process and while evaluating policies with dynamic realm aliases enabled. It is possible to set a realm as inactive from this page, so that the identities from that realm cannot perform any authentication and authorization activities.
Authentication is the process of determining if an application or identity is actually what it claims to be. In OpenSSO, there are multiple ways to achieve this using various industry standard authentication types and protocols. The administrative console provides ways to define multiple levels of authentication by leveraging the authentication chain feature. From this tab the administrator should be able to configure the account lockout feature, post authentication plugin customization. If profile data is required for an authenticated identity to obtain a Single Sign-On token, it can also be configured from this location. OpenSSO requires a valid authenticated user to perform any modification action on its configuration data. A user profile or profile is a collection of user identity attributes stored in the underlying identity store. Typically, the authorization for protected resources is carried out based on these user profile attribute values.
Chapter 4 takes us deep into authentication and session service, including the options for managing the authentication configuration, using the command line interface.
In the OpenSSO server, a set of related attributes are defined as a service. It is an XML document formulated according to the document type definition provided by the OpenSSO sms.dtd. This DTD can be located in the amserver.jar or in the WEB-INF directory of the OpenSSO web application archive. Each feature in the OpenSSO is exposed as a service that has a well-defined XML schema. These schema files will be added to the configuration store when the server is configured. For your reference, the XML files are available under the OpenSSO configuration directory in the file system. To create new services, the service developer should create a new service schema by following the syntax dictated by sms.dtd.
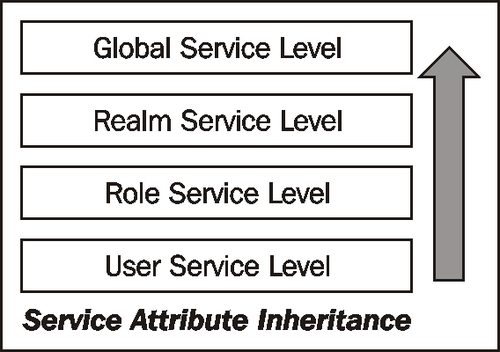
Services can be defined as Global, Realm, and User level. This granularity makes the service flexible to be inherited at different levels, if one is not defined at the current level. Only certain services are assignable at different levels. For example, the global services provide one single service value that is common across the server, irrespective of the realm that the user belongs to. The OpenSSO logging service is one such global service. Typically four possible levels are available in the server: User, Role, Realm, and Global.
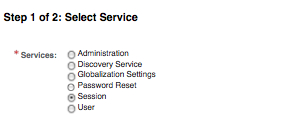
Global services are automatically added, and they cannot be manually added or removed from the console. Services with realm and user-level attributes can be added to and removed from a user or realm. The Service tab helps to add or remove the realm-based services. If there is no service added to a realm, then the service values are inherited from the global configuration and not from any peer or sub realm configuration (refer to following diagram). Role-level services are available only with Access Manager Repository data store configuration.
To add new services to a realm just click on the Add button. All the existing realm-level services that are available to be added will show up as a selectable radio button, and you can add one service at a time as shown in following screenshot:
It is also possible to manage the services from the ssoadm command. For instance, the following sequence of commands assign, update, and remove the Session service for the root realm:
./ssoadm add-svc-realm -u amadmin -f /tmp/.passwd_of_amadmin -e / -s iPlanetAMSessionService -a iplanet-am-session-quota-limit=5 iplanet-am-session-max-session-time=1200 iplanet-am-session-max-caching-time=3
./ssoadm set-realm-svc-attrs -u amadmin -f /tmp/.passwd_of_amadmin -e / -s iPlanetAMSessionService -a iplanet-am-session-quota-limit=5 iplanet-am-session-max-session-time=189 iplanet-am-session-max-caching-time=30
./ssoadm remove-svc-realm -e / -u amadmin -f /tmp/.passwd_of_amadmin -s iPlanetAMSessionService
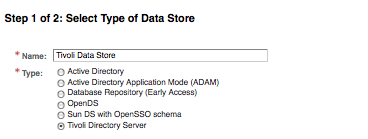
Data stores refer to the identity repository store, where a realm stores all of its identity subjects including the user, role, and group information. A realm can have more than one data store. Each realm should have at least one data store configured to store and retrieve the identity information for that realm. Out-of-the-box OpenSSO can be configured to use five different LDAP servers including the Oracle Directory Server Enterprise Edition. There is also a MySQL-based identity repository implementation which is available as an early access feature. Before using the LDAP-based identity repository data stores in OpenSSO, customers should have the respective LDAP server in their environment configured. A supported data repository can be created by just providing the LDAP server host name, port, and a distinguished name associated with a password. Creating these stores adds the OpenSSO identity schema to the directory server and makes some configuration changes to tune the indexes.
Chapter 8 is devoted to the identity data stores and their management, and you can find more details on how to create various types of user stores and manage them.
OpenSSO allows the users to have different levels of privileges so the administration activities can be delegated to more than one person to ease the administration duties. In fact it is a requirement in some business cases where each realm (in an ISP scenario) must be administrated by a different administrator. This can be achieved by using the default privileges provided by OpenSSO. The privileges are assigned to the end user identity by means of a role or group membership. In simple terms a privilege is an action that can be performed on a resource; for example, a READ operation on a log. Privileges can be dynamically assigned to users deemed administrators by creating a group or role, assigning to it the appropriate privilege, and adding the specific user as a member of the group or role.
The default privileges that are available in a default OpenSSO (as shown in the following screenshot) server configuration covers most use cases. It is also possible to create more custom privileges. Refer to the OpenSSO customization guide for more details on this. A write privilege subsumes update and delete access rights as well.
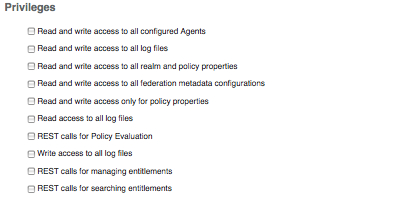
With reference to the preceding screenshot, let us see what are these privileges are:
- Read and write access to all configured Agents (
AgentAdmin): Identities that inherit this privilege can read, write, delete, and update the agent identities configuration including the web services, STS agent profiles, and agents groups. Users with this privilege cannot create a policy or an identity. - Read and write access to all log files (
LogAdmin): Users who acquire this effective privilege are allowed to read and write to the OpenSSO logging, irrespective of the logging repository. - Read and write access to all realm and policy properties (
RealmAdmin): It is a privilege which provides a realm-level administration capability including policy, service, data store, agents, and identities create and delete rights. When logged on to the console, only the Access Control tab will be shown. The rest of the tabs will not appear. - Read and write access to all federation metadata configurations (
FederationAdmin): As it says from the description, users with this privilege can only manipulate the metadata information of the federation protocols such as SAMLv2. Administrators with this privilege cannot create a realm or any kind of identity entity. - Read and write access only for policy properties (
PolicyAdmin): Users with this privilege can only read and write to policy configuration and policies themselves. When logged on to the console, only the Access Control tab will be shown and the rest of the tabs will not appear. - Read access to all log files (
LogRead): It provides read access only to all the log records of the OpenSSO server. This will ensure that the log administrators can only read the data and cannot tamper with access log records. - Write access to all log files (
LogWrite): This privilege provides only write access (no read access) to the OpenSSO logging repository. You may wonder why provide read access. The remote clients of OpenSSO are only required to remotely log the entries. There is no reason for those clients to read the log records that is why no read access is required for those remote clients. - REST calls for Policy evaluation (
PrivilegeRestAccess): A privilege that allows the clients to perform Policy Evaluation by making REST calls. - REST calls for managing entitlements (
PrivilegeRestAccess): Identities with this privilege can manage (read and write) the entitlements defined in the OpenSSO server. - REST calls for searching entitlements (
PrivilegeRestReadAccess): Identities with this privilege can only read and search the entitlements defined in the OpenSSO server.
All these privileges can be assigned to user identities by means of associating the user identities with a corresponding group or a role (a role is supported only with the Sun Java Enterprise System Directory Server). It is wise to use group for its wide support by all of the data repositories. From the administrative console, a top level administrator or a realm administrator can perform the assignment of these privileges. This process is self-explanatory from the console. The text in brackets mentioned in the preceding list are to be used when you invoke ssoadm to add or remove privileges. There is an example included in this section that explains how ssoadm can be used to assign privileges.
When multiple privileges are assigned to an identity, the effective access rights would be the aggregation of all of the assigned privileges. For instance, if a group has both PolicyAdmin and RealmAdmin privileges, then the effective privilege of the user who is a member of this group would be a realm administrator.
The use case here is to create a user identity who can perform the Policy Administrator activities. To make this happen, carry out the following simple steps:
- Create the user identity
jdoe:./ssoadm create-identity -u amadmin -f /tmp/.passwd_of_amadmin -i jdoe -t User -a cn=JohnDoe sn=Doe userpassword=secret123 -e / - Create a group called
Policy Administrator:./ssoadm create-identity -u amadmin -f /tmp/.passwd_of_amadmin -i "Policy Administrator" -t Group -e / - Assign the
PolicyAdminprivilege to the groupPolicy Administrator:./ssoadm add-privileges -u amadmin -f /tmp/.passwd_of_amadmin -e / -i "Policy Administrator" -t Group -g PolicyAdmin - Add the user
jdoeas the member of the groupPolicy Administrator:
./ssoadm add-member -u amadmin -f /tmp/.passwd_of_amadmin -m jdoe -y User -i "Policy Administrator" -t Group -e /
That is it, now user jdoe can log in and perform the activities of a Policy Administrator. In the same manner, privileges can be removed from the group by using the remove-privileges subcommand. Multiple privileges can be added or removed by separating them with a white space after the -g command option.
Access Management is one of the core services provided by the OpenSSO server. Policies play a key role in making this happen. Access to resources are controlled by means of defining proper policies for the resources managed by the OpenSSO server. In Chapter 6, policies and authorization will be dealt with at length. Let us focus on. Let us focus on the management of policies in this section. Like any other configuration, policies can also be managed using the ssoadm command line tool.
There are two types of policies that can be created using the OpenSSO Policy Service, normal policy (or simply policy), and referral policy. A normal policy controls access to a protected resource and consists of rules, subjects, conditions, and response provider's values. Whereas a referral policy delegates policy creation and evaluation to another realm. Like, the normal polices, referral policies can have one or more subjects, conditions, and response providers. Typically a policy irrespective of its type should have a rule and subject defined in order to be applicable to an identity.
A referral policy must be defined in the parent realm in order to create a policy in the sub realm. Each realm should add the Policy Service to configure specific types of conditions, subjects, and response providers. If there is no Policy Service defined for the realm, then the values will be inherited from the global Policy Service configuration. From the console you can create policies by clicking on the specific type of the policy.
To create policies from the ssoadm tool, you need to supply the policy definition in a well-formed XML document defined according to policyAdmin.dtd. This can be found in amservices.jar as well as in the WEB-INF directory of the OpenSSO web application archive. The easiest way to create policies from a command line is to create the policy from the console and then export it as an XML document. Once you have this XML document, it can be customized to meet your requirements. It may be possible to create a template so you can use it for bulk loading of policies by just changing the resource names and subjects.
A simple policy exported using the ssoadm command looks like this:
./ssoadm list-policies -u amadmin -f /tmp/.passwd_of_amadmin -p "test policy" -e /
<?xml version="1.0" encoding="ISO-8859-1"?>OR from command line
<!DOCTYPE Policies
PUBLIC "-//OpenSSO Policy Administration DTD//EN"
"jar://com/sun/identity/policy/policyAdmin.dtd">
<!-- extracted from realm, / -->
<Policies>
<Policy name="test policy" createdby="id=amadmin,ou=user,dc=opensso,dc=java,dc=net" lastmodifiedby="id=amadmin,ou=user,dc=opensso,dc=java,dc=net" creationdate="1261612018898" lastmodifieddate="1261612018898" referralPolicy="false" active="true" >
<Rule name="rule1">
<ServiceName name="iPlanetAMWebAgentService" />
<ResourceName name="http://www.sun.com:8080/hr/index.html" />
<AttributeValuePair>
<Attribute name="POST" />
<Value>deny</Value>
</AttributeValuePair>
<AttributeValuePair>
<Attribute name="GET" />
<Value>allow</Value>
</AttributeValuePair>
</Rule>
<Subjects name="Subjects:1261611921003K9IEnZ8=" description="">
<Subject name="jsmith" type="AMIdentitySubject" includeType="inclusive">
<AttributeValuePair><Attribute name="Values"/><Value>id=jsmith,ou=user,dc=opensso,dc=java,dc=net</Value>
</AttributeValuePair>
</Subject>
</Subjects>
<Conditions name="null" description="null">
<Condition name="all" type="LDAPFilterCondition">
<AttributeValuePair><Attribute name="ldapFilter"/><Value>(objectclass=*)</Value>
</AttributeValuePair>
</Condition>
</Conditions>
</Policy>
</Policies>
The resource name, subject, and condition highlighted in the XML file, referralPolicy="false" indicates it is a normal policy. According to this policy, OpenSSO will send an allow decision for GET action and deny for POST action when the authenticated user's principal matches with jsmith, and the LDAP filter yields the distinguished name of the principal matched in the subject (that is, jsmith).
To create a policy from ssoadm, create the definition of the policy in the XML format and use the subcommand create-policies:
./ssoadm create-policies -u amadmin -f /tmp/.passwd_of_amadmin -e / -X /tmp/policy.def.xml
Any kind of policy can be created in this way. To update the policies using the command line, export the concerned policy, edit it in the XML document, and delete and add the updated policy back to the system. To delete use the sub command delete-policies, for example to delete the policy named test policy, invoke the ssoadm with subcommand delete-policies:
./ssoadm delete-policies -u amadmin -f /tmp/.passwd_of_amadmin -e / --policynames "test policy"
The Subjects interface enables basic identity management within a realm. In the console any change initiated from this tab will not impact the configuration store, because all the identities that are managed from this place are stored in the identity store that you have created during the configuration of OpenSSO or after configuration. One exception you should be aware of here is that of agents identity. Agents are stored in the configuration store even though they appear as part of the subjects. Agents are clubbed with other identities for their logical relevance, and historically (in the Sun Access Manager days) agents were stored as part of the user identity store.
Depending on the type of identity store you would be presented with different interfaces when you access the Subjects tab. Filtered Role and Role tabs will be visible only if you have created an identity store of type Sun DS with OpenSSO or Access Manager Repository. These tabs will not be present for the other type of identity data stores. With the Sun Java Enterprise System Directory Server, you will receive the display as shown in the following screenshot for the Subjects tab:
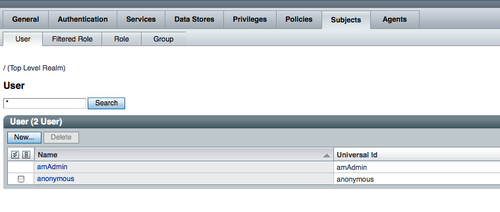
For all other identity data store types the Subjects tab view will be same, as shown in the following screenshot:

As you can see in the preceding screenshot, the Role and Filtered Role tabs are not available for other data stores, because those LDAP servers do not have the role entity concept. This is due to the fact that it is not a part of the LDAPv3 specification.
Creating and managing the subjects from the console is a pretty straightforward task. In the next few sub sections let us see how to create and manage the users, roles, and groups using the ssoadm command line tool.
Let us quickly see how the ssoadm command line tool can be used to perform the CRUD operation for the identity objects. Following set of ssoadm sub commands represent the user identity CRUD (create, list, update, read, and delete) operations. Certain non-essential messages emitted by the ssoadm tool have been removed for brevity. All these examples operate on the root realm, you can replace / with any realm of your interest. The intent here is to introduce these sub commands to you and not to explore every possible option of these commands:
./ssoadm create-identity -i bjensen -t User -u amadmin -f /tmp/.passwd_of_amadmin -a cn=Ben.Jenson sn=Jenson userpassword=secret123 -e /
./ssoadm list-identities -u amadmin -f /tmp/.passwd_of_amadmin -e / -t User -x "bj*"
./ssoadm set-identity-attrs -i bjensen -t User -u amadmin -f /tmp/.passwd_of_amadmin -a cn=MyBenson telephonenumber=408-276-5044 -e /
./ssoadm get-identity -i bjensen -t User -u amadmin -f /tmp/.passwd_of_amadmin -e /
./ssoadm delete-identities -u amadmin -f /tmp/.passwd_of_amadmin -t User -i bjensen -e /
In the same manner as of the user identities, groups can also be managed from the ssoadm tool. Let us continue from the user identity example described in the Managing users from command line tool section. Now we want to create a new group called Administrator and add the user bjensen as a member of this new group. After that the group will be removed from the system. When the group is removed, the underlying directory server's referential integrity feature automatically removes the memberships from the respective user entries if applicable:
- Creating a group named
Administratorat the root realm:
./ssoadm create-identity -i Administrator -t Group -u amadmin -f /tmp/.passwd_of_amadmin -e /
- Listing all the groups that start with string
adin the root realm:
./ssoadm list-identities -t Group -u amadmin -f /tmp/.passwd_of_amadmin -e / -x "ad*"
- This command adds user bjensen as a member of the group Administrator (you need to make sure the user
bjensenis already created in the user store):
./ssoadm add-member -m bjensen -y User -i Administrator -t Group -u amadmin -f /tmp/.passwd_of_amadmin -e /
- To display the attributes of the group
Administrator, use theget-identitysub command:
./ssoadm get-identity -i Administrator -t Group -u amadmin -f /tmp/.passwd_of_amadmin -e /
- To delete the group identity, use the
delete-identitiessub command:
./ssoadm delete-identities -u amadmin -f /tmp/.passwd_of_amadmin -t Group -i Administrator -e /
To manage the roles using the command line, use the above sub commands with identity type Role. Just supply Role for the -t options.
In OpenSSO terminology, an agent could represent any of the supported Policy Enforcement Points (such as Java or Web Server agents) profiles, the web service, or Security Token Service client profiles. In order to configure any of these agents, a profile that represents the properties of the specific agent must be created using this interface. All the OpenSSO policy agents 3.0 configurations are centralized in the OpenSSO configuration store, as opposed to the local flat file configuration. To maintain the compatibility, local file-based configuration is still supported by OpenSSO policy agents.
There are different types of agent profiles, as shown in the following screenshot. They can be created using this interface. An in-depth coverage of these profiles is beyond the scope of this book. You need to be aware of the fact that the configurations of the agents is stored as part of the OpenSSO configuration store. Any changes to these agents' profiles are instantly communicated to the clients. These instant notifications make most of the agent profile properties hot swappable. If this feature had not been there, any profile change would have required agent application container restart.
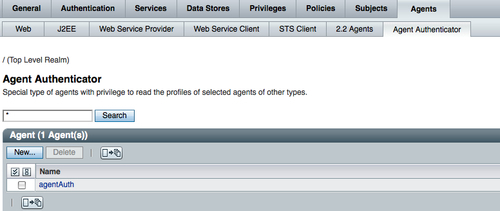
Agent authenticator agentAuth is a default profile that will be available in the freshly configured OpenSSO server. The password for this profile will be the same as that of UrlAccessAgent, which you have provided at the time of the server configuration. This profile can be used as the application user when your client application needs to read the properties of more than one agent profile. There are three profiles wsc, wsp, and SecurityTokenService created and added to the agentAuth profile in a typical server configuration.
Agent profiles can be created from the ssoadm command line tool as well. You can find the types of agents supported by your server using the show-agent-types sub command. To create a Java agent profile from the command line, invoke:
./ssoadm create-agent -u amadmin -f /tmp/.passwd_of_amadmin -s http://opensso.packt-services.net:8080/opensso -g http://paycheck.packt-services.net:4343/agentapp -t J2EEAgent -a userpassword=agentsecret -e / -b paycheck
This will create a Java agent profile at the root realm with the name paycheck on the OpenSSO server running at the URL http://opensso.packt-services.net:8080/opensso and the paycheck application is deployed on http://paycheck.packt-services.net:4343. To verify the agent profile, you can try to authenticate to the OpenSSO server with the profile you just created.
Use the login URL of the OpenSSO with the query parameter ?module=Application&IDToken0=paycheck&IDToken1=agentsecret. After a successful authentication, you will be shown the properties of the agent profile. For example, to verify the profile paycheck, use http://opensso.packt-services.net:8080/opensso/UI/Login?module=Application&IDToken0=paycheck&IDToken1=agentsecret.
So far all the configurations that we dealt with are specific to a realm. There are some global services and properties available in the OpenSSO server that are configurable by the administrator. Any changes in these global properties affect the whole server. Hence any global change has to be carefully planned and executed. This tab in the console is accessible only to top level and realm administrators. As you can see from the console, Authentication, Console, System, Global, and Servers and Sites are available. In the previous section, you have been introduced to the services and the inheritance of service attribute values from the next level. If no services are defined at the current level where the attribute value is being requested, then the value for that service will be fetched from the global area, if that service has defined a global value. Such global values can be defined using this Configuration tab.
There are certain properties that can only be defined at the global level, such as enabling the session quota and setting monitoring service ports. The part that is of our interest would be Servers and Sites. If you are familiar with the predecessor of OpenSSO that is the Sun Java System Access Manager, it stored most of its configuration properties in a file named AMConfig.properties. In the multiple server deployment scenario, each server contains its own AMConfig.properties. If a value in the file has to be modified, then that change has to happen in all of the Access Manager servers. Evidently, it is a painful error-prone task to perform on all servers. One of the major improvements in OpenSSO is eliminating the AMConfig.properties by consolidating all the configurations into a centralized configuration store. Over 200 properties are consolidated and appropriately categorized under this tab in the administrative console. Many of the properties are hot swappable, which means any change in these properties will be automatically pushed to the servers that share this centralized configuration store. In an external configuration store case, a persistent search thread runs to propagate the changes to the OpenSSO.
To learn more about the properties which are hot swappable, read the OpenSSO Administration Guide. Certain properties show up as non-editable labels. If you want to provide different values for these properties, click on the Inheritance Settings that you see in the following screenshot. Uncheck the property that you want to make editable on the server configuration page.
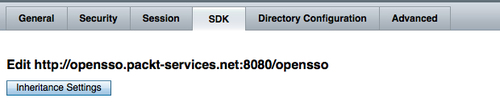
All right, let us get back to our ssoadm way of configuring the OpenSSO server properties. Even though the console shows different tabs, General, Security, Session, SDK, Directory Configuration, and Advanced, internally all these properties are stored under one single node. It is a very simple process to read, update, and delete the values using the command line interface tool ssoadm.
All the server instance properties can be retrieved by using the sub command list-server-cfg, invoking this with the corresponding server instance will dump all the properties that you configure through the console:
./ssoadm list-server-cfg -u amadmin -f /tmp/.passwd_of_amadmin --servername http://opensso.packt-services.net:8080/opensso
The preceding command returns all the properties set for the instance http://opensso.packt-services.net:8080/opensso with the exception of the inherited values from the default configuration. To include the inherited value in the output, use the -w option along with the preceding command.
In the same manner ssoadm can be used to update the property value of any OpenSSO server instance. All you need to know is the property name that can be obtained by executing the list-server-cfg subcommand. If you do not see the property name, use the -w option to obtain all the property names. In the following example, the SMTP server name and port are being updated for the server instance http://opensso.packt-services.net:8080/opensso:
./ssoadm update-server-cfg --servername http://opensso.packt-services.net:8080/opensso -u amadmin -f /tmp/.passwd_of_amadmin -a com.iplanet.am.smtphost=mailhost.packt-services.net com.iplanet.am.smtpport=25
There may be a requirement to add some custom properties that are not already in the default configuration. These properties will be added using the Advanced tab from the console. For some reason, if this property needs to be removed, you can accomplish that by using remove-server-cfg subcommand. For instance, the following command removes the property opensso.protocol.handler.pkgs from the server instance http://opensso.packt-services.net:8080/opensso:
./ssoadm remove-server-cfg -u amadmin -f /tmp/.passwd_of_amadmin -s http://opensso.packt-services.net:8080/opensso -a opensso.protocol.handler.pkgs
This interface from the console is available only to the top level and root realm administrator. All the sessions across the site can be managed from here. It provides information about the active sessions on specific servers. The administrator can select the server from the pull down on the top right corner to view the sessions count hosted by that server. In the default configuration, an administrator is configured to view only 120 sessions. This value is set to minimize the resources required to display the sessions on the browser. It is likely that the browser will run out of memory if you try to display a large number of sessions from the server. You can use the filter that is located with a search button on the left side of the page to restrict to particular identities' sessions.
To terminate a particular user's session, type the username in the search filter area. If there is a session for that user, then it will be displayed. Select the user session and click on Invalidate Session. Instantly, the session will be destroyed and notifications will be sent to clients who had registered for notifications.
The OpenSSO sessions can also be managed using the ssoadm tool. To list the sessions on a server, list-sessions subcommand can be invoked. Note that the ssoadm.jsp will not support this option. To terminate a session, just enter the index number associated with the user sessions. You can also list the sessions based on the filter using the -x option. A filter -x "sam*" would yield all the sessions which principally start with the string sam. There is also an option that will be useful to count the number of sessions the session table subsumes. The -q command line option can be used to list the sessions. When this option is supplied, the ssoadm tool will not enter into the interactive mode. Together with this option, the administrator can script to list the number of sessions in the server to monitor server load. Remember to tune the property in the global session service that allows only 120 sessions by default to be displayed on the console or ssoadm tool:
./ssoadm list-sessions -u amadmin -f /tmp/.passwd_of_amadmin -t http://opensso.packt-services.net:8080/opensso -x "sam*"