
The software-as-a-service (SaaS) vendors are growing at a steady pace, which shows that customers are relying more and more on the hosted services than building in-house applications. SaaS differentiates itself from the "On Premise" software by avoiding the need to purchase and maintain the computer hardware and related infrastructure to run an application. The only infrastructure required is a personal computer to run the software and sufficient network connectivity to access the Internet. The SaaS-based applications are proven to be highly available and scalable; specifically Salesforce, as they proved to be a leader in selling their applications hosted on their data centers. Likewise, Google is also providing hosted mail services for small business owners and educational institutions.
For all of these applications the consumer is from the end user organizations. The users connect to the Internet to access these on-demand applications. The identity information of these users must be protected appropriately. This can be done by the organization itself by securing and storing the data or delegating them as they do not host any services, except the user identity storage.
In this chapter, let us discuss how the OpenSSO can be configured as the identity provider to provide authentication services for the following SaaS-based hosted applications:
Salesforce.com- Google Apps
Configuration of the metadata details for these applications are made very intuitive by means of a workflow-like interface in OpenSSO that will be discussed in the next few sections. This chapter will not address the concepts of federation or the protocols such as SAML. If you are interested in learning more about them, please point your browser to http://docs.sun.com/app/docs/doc/820-5986?l=en.
Now, it is simple to use OpenSSO as an identity provider for SSO with Salesforce.com applications using the SAMLv2 protocol. Out-of-the-box OpenSSO supports an easy-to-use workflow feature that enables the customers to integrate Salesforce.com applications to their existing authentication infrastructure.
There are multiple ways to achieve the SSO with Salesforce.com. The IDP users' attributes can be sent to the Service Provider (SP) in one of the following ways:
- As an attribute statement in the SAML assertion
- As a nameID element in the SAML assertion subject statement
In the same manner, service provider at salesforce.com can use any of these two options for its local attribute that is used to perform the SSO. It can be one of these:
Salesforce.comuser's Federation ID attributeSalesforce.comuser's user ID
In this chapter, let us discuss the steps for configuring the identity provider to send the attribute value as an attribute statement in the SAML assertion. The service provider at Salesforce.com is configured to use the Federation ID attribute to match the identity provider user's attribute.
Integrating the Salesforce CRM application with the OpenSSO authentication SSO infrastructure involves a certain metadata exchange between the two entities. The following several subsections are devoted to explaining in detail this procedure. Please follow them closely in order to avoid any errors while performing SSO.
As the OpenSSO acts as the identity provider, one has to configure the OpenSSO as the hosted identity provider and create the circle of trust to which the remote service provider, that is the CRM application hosted by Salesforce.com , will belong. To perform this step log in as the top level admin to the OpenSSO and access the Common Tasks | Create Hosted Identity Provider link.
In the subsequent page you will see a couple of text boxes that need to be filled in. Fill in those details as shown in the following screenshot:
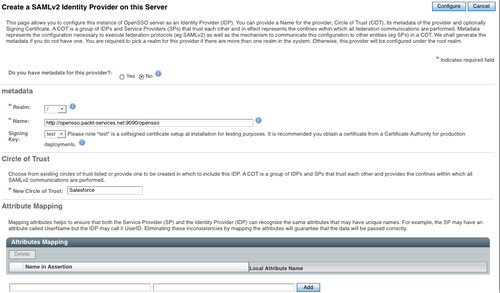
Once you complete this process, you will be shown a page to configure the Salesforce.com CRM. For the signing and encryption, the default test certificate keystore is used. You can create custom keystores using the keytool command as described in Chapter 2.
Once you click on the Configure Salesforce CRM application link, then you will be guided to create an attribute mapping between the identity provider account (in this case it is OpenSSO) and the service provider's account (in this case Salesforce application). In the Salesforce.com account there is a special attribute called Federation ID, this attribute will be consulted while performing the SSO with the OpenSSO account. In this example, we are planning to send the identity provider account's telephoneNumber as part of the assertion, so that the users at the Salesforce.com could use this information to perform the SSO. Essentially SAMLv2 SSO will be successful if the authenticated (at the OpenSSO) identity's telephoneNumber matches uniquely with a user's Federation ID attribute at the Salesforce.com application domain.
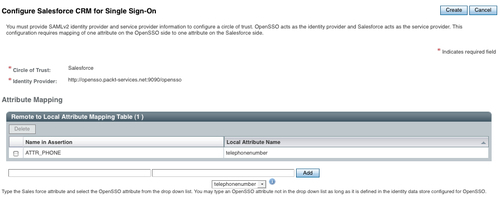
In this case the attribute telephoneNumber is passed on to SP (Salesforce.com) in the assertion statement as ATTR_PHONE. The value of this attribute will be picked up and matched with one of the Salesforce.com user's Federation ID attribute. A match would trigger a successful SSO.
At this point you will be shown a certificate value which needs to be exported to the Salesforce.com domain. In turn a login URL that would be provided by the Salesforce.com domain would have to be loaded into the OpenSSO.
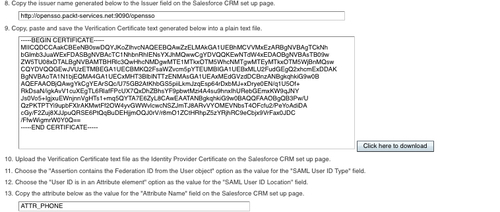
There will be a sequence of steps that need to be followed. In short this is what you need to do:
- Click the Salesforce CRM link to open the application's Single Sign-On set up page in a new browser window.
- Log in with your administrator username and password. Only the application administrators can perform this step not the end user. The end user cannot choose this option unless the Salesforce application admin enable SSO between OpenSSO and Salesforce.
- Click on the Setup link at the top of the Salesforce landing page.
- Click on Single Sign-On Settings, under Administration Setup | Security Controls on the left side of the Salesforce page.
- Click on the Edit button under Single Sign-On Settings.
- Check the SAML Enabled box.
- Choose SAML Version as 2.0.
You can fill in the rest of the details as shown in the following screenshot:
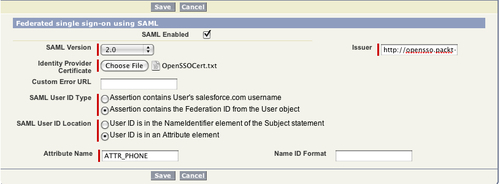
As you can see the attribute ATTR_PHONE is being mapped to the local Salesforce.com users attribute. After completing this configuration you can save the changes. After saving, a summary page will be rendered as shown in the following screenshot:
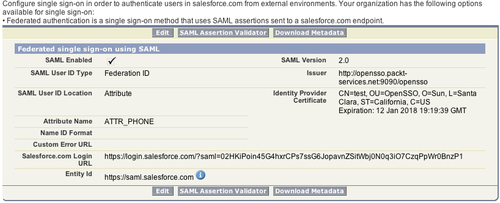
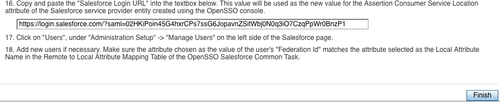
As you can see it contains the salesforce login URL, which is critical information that has to be copied to the OpenSSO salesforce CRM configuration page (refer to step 16 in the following screenshot) to finish the configuration procedure. This completes all the metadata configuration part of the SSO process. In order to successfully SSO, one should have a user name in both OpenSSO and in Salesforce side. The next section will add the users in OpenSSO (identity provider) and Salesforce (service provider):
In order to successfully verify the SAMLv2 SSO, you need to configure at least one user in each provider side. In a typical customer deployment, user identity provisioning could be done using a very well defined workflow process. There are many commercial tools available to achieve these kinds of provisioning tasks.
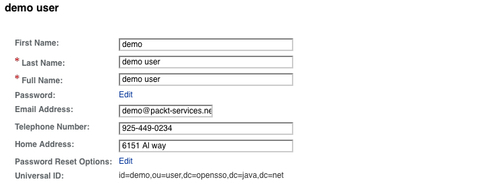
In OpenSSO, which is the identity provider, we are planning to use the identity named demo. One of the key requirements for SSO to be successful is that the attribute value of telephoneNumber should match with one of the Salesforce.com user's Federation ID attribute.
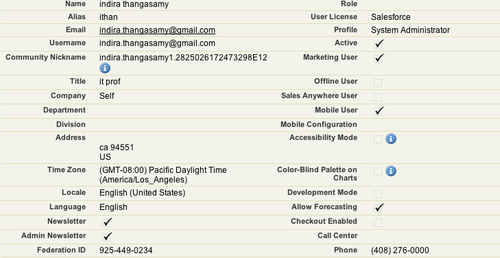
At the Salesforce service provider, create an account with an appropriate value for the Federation ID attribute so that it could be used for SSO with the OpenSSO account. Let us now log in to the CRM application at the saleforce.com (SP) side to configure the user so that both can SSO using the SAMLv2 protocol. At the service provider side, let's use [email protected] as the user account name. Again let us remember the fact that the IdP-side user's telephoneNumber is mapped to the Federation ID attribute of the SP-side user account. As you can view in the following screenshot, the Federation ID attribute value is matching with the IDP-side user account demo's telephone number, 925-449-0234.
Now we are all set to verify the SSO between the identity provider, which is hosted by OpenSSO and the CRM application hosted by the service provider Salesforce.com. This can be achieved by using the following URL:
When you access the previous URL (often termed as IdP initiated SSO), you will be asked for authentication at the OpenSSO side. Use demo as the username with its password changeit . Upon successful authentication it will redirect to the Salesforce.com CRM application logged on as [email protected]. This confirms the SSO integration as you were not asked to enter the password for the user indira.thangasamy at the Salesforce.com .
The following is the excerpt from the actual SAMLv2 response:
<saml:NameID Format="urn:oasis:names:tc:SAML:2.0:nameid-format:transient" NameQualifier="http://opensso.packt-services.net:9090/opensso" SPNameQualifier="https://saml.salesforce.com">c1ROyFp+7k3YsQETdF9UasuP8fzk</saml:NameID><saml:SubjectConfirmation Method="urn:oasis:names:tc:SAML:2.0:cm:bearer"> <saml:SubjectConfirmationData NotOnOrAfter="2010-08-22T21:27:35Z" Recipient="https://login.salesforce.com/?saml=02HKiPoin45G4hxrCPs7ssG6JopavnZSitWbj0N0q3iO7CzqPpWr0BnzP1"/></saml:SubjectConfirmation> </saml:Subject><saml:Conditions NotBefore="2010-08-22T21:07:35Z" NotOnOrAfter="2010-08-22T21:27:35Z">
<saml:AudienceRestriction> <saml:Audience>https://saml.salesforce.com</saml:Audience> </saml:AudienceRestriction> </saml:Conditions> <saml:AuthnStatement AuthnInstant="2010-08-22T21:17:35Z" SessionIndex="s22a2c28691cff2d404b5dab5658bbbb50adf29c01"><saml:AuthnContext><saml:AuthnContextClassRef>urn:oasis:names:tc:SAML:2.0:ac:classes:PasswordProtectedTransport</saml:AuthnContextClassRef></saml:AuthnContext></saml:AuthnStatement><saml:AttributeStatement><saml:Attribute Name="ATTR_PHONE"> <saml:AttributeValue xmlns:xs="http://www.w3.org/2001/XMLSchema" xmlns:xsi="http://www.w3.org/2001/XMLSchema-instance" xsi:type="xs:string">925-449-0234 </saml:AttributeValue></saml:Attribute></saml:AttributeStatement></saml:Assertion></samlp:Response>
In the SAML assertion just given the attribute is a statement that contains the demo user's telephoneNumber attribute (mapped to ATTR_PHONE) value. This value will be matched with the Federation ID attribute of the Salesforce.com account< [email protected]> to establish the Single Sign-On session.