National Geographic is famous for its intimate photos of wild animals. Often, in the magazine's pages, the animals seem larger than life, as if they belong to the same "geographic" scale as the landscapes behind them. This enlargement effect can be achieved by capturing the subject at a very close distance with a wide-angle lens. For example, one memorable photograph by Steve Winter shows a snarling tiger reaching out to strike the lens!
Let's consider the possible methods behind such a photo. The photographer could try to stalk a wild tiger in person, but for safety, this approach would require some distance and a long lens. A close encounter is likely to endanger the human, the tiger, or both. Alternatively, the photographer could use a remote-controlled rover or drone to approach and photograph the tiger. This would be safer but like the first technique it is laborious, only covers one site at a time, and may spoil opportunities for candid or natural photos because it attracts the animal's attention. Finally, the photographer could deploy concealed and automated cameras, called camera traps, in multiple locations that the tiger is likely to visit.
This chapter will explore techniques for programming a camera trap. Maybe we will not capture any tigers, but something will wander into our trap!
Despite the name, a camera trap does not physically "trap" anything. It just captures photos when a trigger is tripped. Different camera traps may use different triggers but in our case, the trigger will be a computer vision system that is sensitive to motion, color, or certain classes of objects. Our system's software components will include OpenCV 3, Python scripts, shell scripts, and a camera control tool called gPhoto2. While building our system, we will address the following questions:
- How can we configure and trigger a photo camera from a host computer?
- How can we detect the presence of a photogenic subject?
- How can we capture and process multiple photos of a subject to create an effective composite image or video?
Note
All the scripts and data for this chapter's project can be found in the book's GitHub repository at https://github.com/OpenCVBlueprints/OpenCVBlueprints/tree/master/chapter_2/CameraTrap.
This chapter will focus on techniques for Unix-like systems, including Linux and Mac. We assume that users will ultimately deploy our camera trap on low-cost, low-powered, single-board computers (SBCs), which will typically run Linux. A good example is the Raspberry Pi 2 hardware, which typically runs the Raspbian distribution of Linux.
Let's begin with an outline of a few simple tasks that our software will perform before, during, and after image capture.
Our camera trap will use a computer with two attached cameras. One camera will continuously capture low-resolution images. For example, this first camera may be an ordinary webcam. Our software will analyze the low-resolution images to detect the presence of a subject. We will explore three basic detection techniques based on motion, color, and object classification. When a subject is detected, the second camera will activate to capture and save a finite series of high-resolution images. This second camera will be a dedicated photo camera, with its own battery and storage. We will not necessarily analyze and record images at the fastest possible rate; rather, we will take care to conserve the host computer's resources as well as the photo camera's battery power and storage so that our photo trap can function for a long time.
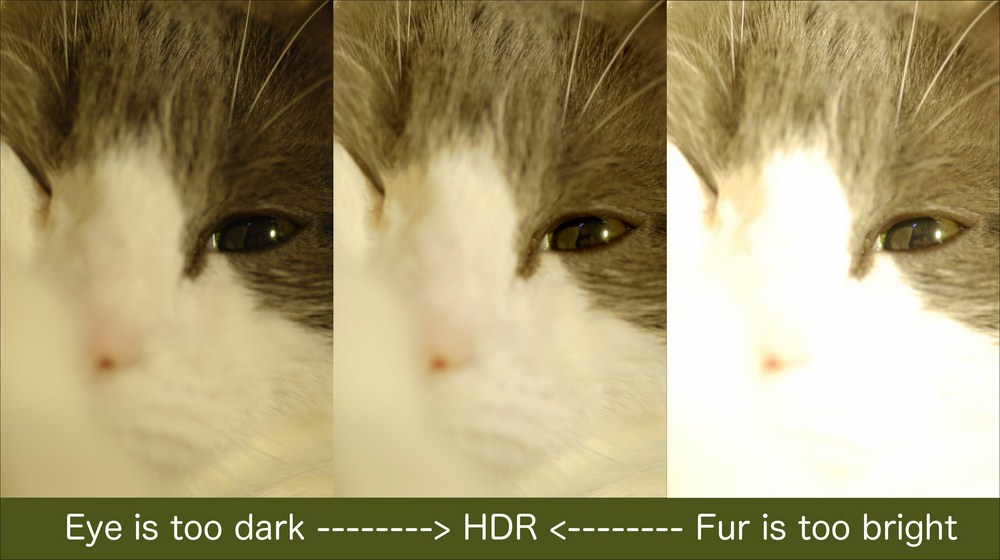
Optionally, our software will configure the photo camera for exposure bracketing. This means that some photos in a series will be deliberately underexposed while others will be overexposed. Later, we will upload photos from the camera to the host computer, and merge the exposures to produce high dynamic range (HDR) images. This means that the merged photo will exhibit fine details and saturated colors throughout a broader range of shadows, midtones, and highlights than any one exposure could capture. For example, the following lineup illustrates underexposure (left), overexposure (right), and a merged HDR photo (center):
HDR imaging is especially important in landscape photography. Typically, the sky is much brighter than the land, yet we want to tame this contrast in order to obtain saturated midtone colors in both these regions, rather than white, featureless sky or black, featureless land. We will also explore techniques for turning a series of images into a time-lapse video.
Note that the two cameras in this project fulfill different requirements. The webcam provides a stream of images for real-time processing, and the photo camera stores images for high-quality processing later. Consider the following comparison table:
|
Feature |
Typical webcam |
Typical photo camera |
High-end industrial camera |
|---|---|---|---|
|
Price |
Low |
Medium |
High |
|
Power consumption |
Low |
High (but has its own battery) |
Medium |
|
Configuration options |
Few |
Many |
Many |
|
Latency |
Low |
High |
Low |
|
Resolution |
Low |
Very high |
High |
|
Ruggedness |
Poor |
Good |
Fair |
Potentially, a high-end industrial camera could serve both purposes—real-time imaging and high-quality imaging. However, the combination of a webcam and a photo camera is likely to be cheaper. Consider the following examples:
|
Name |
Purpose |
Sensor Format |
Highest Res Mode |
Interface |
Price |
|---|---|---|---|---|---|
|
Point Grey Research Grasshopper 3 GS3-U3-120S6M-C |
Industrial camera |
1" |
4242x2830 @ 7 FPS |
USB 3.0 |
$3,700 (new) |
|
Carl Zeiss Jena DDR Tevidon 10mm f/2 lens |
Lens for industrial camera |
Covers 1" |
Sharp, suitable for high res |
$300 (used) | |
|
Nikon 1 J5 with 10-30mm PD-ZOOM lens |
Photo camera and lens |
1" |
5568x3712 @ 20 FPS |
USB 2.0 |
$500 (new) |
|
Odroid USB-Cam 720p |
Webcam |
1/4" |
1280x720 @ 30 FPS |
USB 2.0 |
$20 (new) |
Here, the industrial camera and lens cost eight times as much as the photo camera, lens, and webcam, yet the photo camera should offer the best image quality. Although the photo camera has a capture mode of 5568x3712 @ 20 FPS, note that its USB 2.0 interface is much too slow to support this as a transfer mode. At the listed resolution and rate, the photo camera can just record the images to its local storage.
For our purposes, a photo camera's main weakness is its high latency. The latency pertains to not only the electronics, but also the moving mechanical parts. To mitigate the problem, we can take the following steps:
- Use a webcam with a slightly wider angle of view than the photo camera. This way, the camera trap may detect the subject early, and provide the photo camera with more lead time to take the first shot.
- Put the photo camera in the manual focus mode, and set the focus to the distance where you plan to photograph a subject. Manual focus is quicker and quieter because the autofocus motor does not run.
- If you are using a digital single-lens reflex (DSLR) camera, put it in mirror lock-up (MLU) mode (if it supports MLU). Without MLU, the reflex mirror (which deflects light into the optical viewfinder) must move out of the optical path before each shot. With MLU, the mirror is already out of the way (but the optical viewfinder is disabled). MLU is quicker, quieter, and has less vibration because the mirror does not move. On some cameras, MLU is called live view because the digital ("live") viewfinder may be activated when the optical viewfinder is disabled.
Controlling a photo camera is a big part of this project. Once you learn to write scripts of photographic commands, perhaps you will begin to think about photography in new ways—for it is a process, not just a final moment when the shutter falls. Let's turn our attention to this scripting topic now.