By now, you have probably captured some exposure-bracketed photos and time-lapse photos. Upload them onto your computer using a photo management application, a file browser, or the following gPhoto2 command:
$ gphoto2 --get-all-files
The latter command will upload the files to the current working directory.
We will merge exposure-bracketed photos to create HDR images, which will improve color rendition in shadows and highlights. Similarly, we will merge time-lapse photos to create time-lapse videos, which will show gradual motion on an accelerated scale. We will start by processing some of the sample photos from the book's GitHub repository at https://github.com/OpenCVBlueprints/OpenCVBlueprints/tree/master/chapter_2/CameraTrap/media, and then you will be able to adapt the code to use your photos instead.
OpenCV 3 has a new module called "photo". Two of its classes, MergeDebevec and MergeMertens, create an HDR image by merging exposure-bracketed photos. Regardless of which class is used, the resulting HDR image has channel values in the range [0.0, 1.0]. MergeDebevec produces an HDR image that requires gamma correction before it can be displayed or printed. The photo module provides several tone mapping functions that are capable of performing the correction.
On the other hand, the HDR image from MergeMertens does not require gamma correction. Its channel values just need to be scaled up to the range [0, 255]. We will use MergeMertens because it is simpler and tends to be better at preserving color saturation.
Note
For more information about HDR imaging and tone mapping in OpenCV 3, see the official documentation at http://docs.opencv.org/3.0-beta/modules/photo/doc/hdr_imaging.html. Also, see the official tutorial at http://docs.opencv.org/3.0-beta/doc/tutorials/photo/hdr_imaging/hdr_imaging.html.
The MergeDebevec and MergeMertens classes are based on the following papers, respectively:
P. Debevec, and J. Malik, Recovering High Dynamic Range Radiance Maps from Photographs, Proceedings OF ACM SIGGRAPH, 1997, 369 - 378.
T. Mertens, J. Kautz, and F. Van Reeth, Exposure Fusion, Proceedings of the 15th Pacific Conference on Computer Graphics and Applications, 2007, 382 - 390.
For demonstration purposes, the GitHub repository contains a pair of exposure-bracketed photos of a cat named Plasma. (Her photos and the HDR merged version appear earlier in this chapter, in the section Planning the camera trap.) Let's create a script, test_hdr_merge.py, to merge the unprocessed photos, media/PlasmaWink_0.jpg and media/PlasmaWink_1.jpg. Here is the implementation:
#!/usr/bin/env python

import cv2

def main():

  ldr_images = [
    cv2.imread('media/PlasmaWink_0.jpg'),
    cv2.imread('media/PlasmaWink_1.jpg')]

  hdr_processor = cv2.createMergeMertens()
  hdr_image = hdr_processor.process(ldr_images) * 255
  cv2.imwrite('media/PlasmaWink_HDR.jpg', hdr_image)

if __name__ == '__main__':
  main()
Obtain the script and media from the repository, run the script, and view the resulting HDR image. Then, adapt the script to process your own exposure-bracketed photos. HDR can produce dramatic results for any scene that has intense light and deep shadows. Landscapes and sunlit rooms are good examples.
With HDR imaging, we have compressed differences in exposure. Next, with time-lapse videography, we will compress differences in time.
Previously, in the section Supercharging the PlayStation Eye in Chapter 1, Getting the Most out of Your Camera System, we created a slow-motion video. Remember that we simply captured images at a high speed (187 FPS) and put them in a video that was configured to play at a normal speed (60 FPS). Similarly, to create a time-lapse video, we will read image files that were captured at a low speed (less than 1 FPS) and put them in a video that is configured to play at a normal speed (60 FPS).
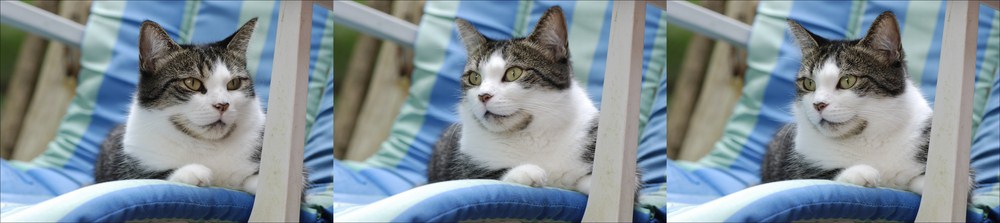
For demonstration purposes, the book's GitHub repository contains a set of time-lapse photographs of a cat named Josephine. When we make a time-lapse video of Josephine, we will see that she is very dynamic, even when she is sitting in a chair! As a preview, here are three consecutive frames of the time lapse:
The series spans 56 photos with names ranging from media/JosephineChair_00.jpg to media/JosephineChair_55.jpg. The following script, which we will call test_time_lapse_merge.py, will read the photos and produce a one-second time-lapse video named media/JosephineChair_TimeLapse.avi:
#!/usr/bin/env python

import cv2

def main():

  num_input_files = 56
  input_filename_pattern = 'media/JosephineChair_%02d.jpg'
  output_filename = 'media/JosephineChair_TimeLapse.avi'
  fourcc = cv2.VideoWriter_fourcc('M', 'J', 'P', 'G')
  fps = 60.0
  writer = None

  for i in range(num_input_files):
    input_filename = input_filename_pattern % i
    image = cv2.imread(input_filename)
    if writer is None:
      is_color = (len(image.shape) > 2)
      h, w = image.shape[:2]
      writer = cv2.VideoWriter(
        output_filename, fourcc, fps, (w, h), is_color)
    writer.write(image)

if __name__ == '__main__':
    main()
Obtain the script and media from the repository, run the script, and view the resulting video of Josephine watching the world from her chair. Then, adapt the script to process some of your own images. Perhaps you will capture the motion of other slow animals, flowers as they bloom, or sunlight and clouds as they cross a landscape.
As a further project, you may wish to create HDR time-lapse videos. You could start by modifying our capture_exposure_bracket.sh script to capture multiple batches of exposure-bracketed images, with a time delay between each batch. (For example, the command sleep 3 could be used to delay for 3 seconds.) After uploading the captured images onto your computer, you can merge each batch into an HDR image, and then merge the HDR images into a time-lapse video.
Explore other photographic techniques, and then try to automate them!