In the previous section, we discussed the use of the first biometric, which is the face of the person trying to log in to the system. However, since we mentioned that using a single biometric is risky, it is better to add secondary biometric checks to the system, like a fingerprint. There are several off-the-shelf fingerprint scanners that are quite cheap and return you a scanned image. However, you will still have to write your own registration software for these scanners, and this can be done with OpenCV. Examples of such fingerprint images can be found below:
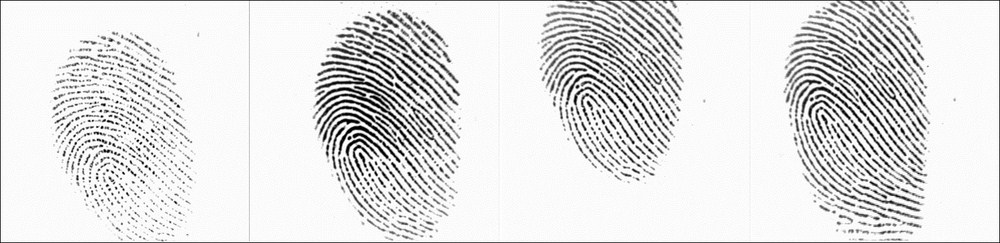
Examples of single individual thumbprints from different scanners
This dataset can be downloaded from the FVC2002 competition website released by the University of Bologna. The website (http://bias.csr.unibo.it/fvc2002/databases.asp) contains four databases of fingerprints available for public download in the following format:
- Four fingerprint capturing devices, DB1 - DB4
- For each device, the prints of 10 individuals are available
- For each person, eight different positions of prints were recorded
We will use this publicly available dataset to build our system. We will focus on the first capturing device, using up to four fingerprints from each individual for training the system and making an average descriptor of the fingerprint. Then, we will use the other four fingerprints to evaluate our system and make sure that the person is still recognized by our system.
You can apply the same approach to the data grabbed from the other devices if you want to investigate the difference between a system that captures binary images and one that captures grayscale images. However, we will provide techniques for doing the binarization yourself.
In this subsection, we will describe how you can implement this approach in the OpenCV interface. We start by grabbing the image from the fingerprint system and applying binarization. This enables us to remove any noise from the image, as well as helping us to make the contrast better between the skin and the wrinkled surface of the finger:
// Start by reading in an image
Mat input = imread("/data/fingerprints/image1.png", IMREAD_GRAYSCALE);
// Binarize the image, through local thresholding
Mat input_binary;
threshold(input, input_binary, 0, 255, THRESH_BINARY | THRESH_OTSU);
The Otsu thresholding will automatically choose the best generic threshold for the image to obtain a good contrast between foreground and background information. This is because the image contains a bimodal distribution (which means that we have an image with two peak histograms) of pixel values. For that image, we can take an approximate value in the middle of those peaks as the threshold value (for images that are not bimodal, binarization won't be accurate). Otsu allows us to avoid using a fixed threshold value, making the system more compatible with capturing devices. However, we do acknowledge that, if you only have one capturing device, then playing around with a fixed threshold value may result in a better image for that specific setup. The result of the thresholding can be seen below.
In order to make the thinning from the next skeletization step as effective as possible, we need to invert the binary image.
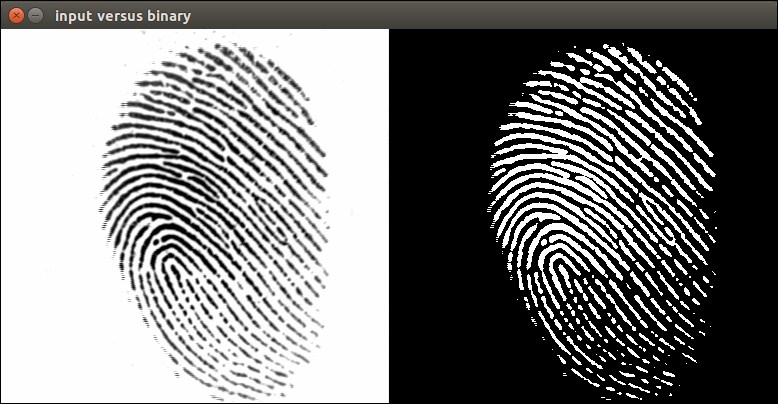
Comparison of grayscale and binarized fingerprint images
Once we have a binary image, we are ready to calculate our feature points and feature point descriptors. However, in order to improve the process a bit more, it is better to skeletize the image. This will create more unique and stronger interest points. The following piece of code can apply the skeletization on top of the binary image. The skeletization is based on the Zhang-Suen line-thinning approach.
#include <opencv2/imgproc.hpp>
#include <opencv2/highgui.hpp>

using namespace std;
using namespace cv;

// Perform a single thinning iteration, which is repeated until the skeletization is finalized
void thinningIteration(Mat& im, int iter)
{
    Mat marker = Mat::zeros(im.size(), CV_8UC1);
    for (int i = 1; i < im.rows-1; i++)
    {
        for (int j = 1; j < im.cols-1; j++)
        {
            uchar p2 = im.at<uchar>(i-1, j);
            uchar p3 = im.at<uchar>(i-1, j+1);
            uchar p4 = im.at<uchar>(i, j+1);
            uchar p5 = im.at<uchar>(i+1, j+1);
            uchar p6 = im.at<uchar>(i+1, j);
            uchar p7 = im.at<uchar>(i+1, j-1);
            uchar p8 = im.at<uchar>(i, j-1);
            uchar p9 = im.at<uchar>(i-1, j-1);

            int A  = (p2 == 0 && p3 == 1) + (p3 == 0 && p4 == 1) +
                     (p4 == 0 && p5 == 1) + (p5 == 0 && p6 == 1) +
                     (p6 == 0 && p7 == 1) + (p7 == 0 && p8 == 1) +
                     (p8 == 0 && p9 == 1) + (p9 == 0 && p2 == 1);
            int B  = p2 + p3 + p4 + p5 + p6 + p7 + p8 + p9;
            int m1 = iter == 0 ? (p2 * p4 * p6) : (p2 * p4 * p8);
            int m2 = iter == 0 ? (p4 * p6 * p8) : (p2 * p6 * p8);

            if (A == 1 && (B >= 2 && B <= 6) && m1 == 0 && m2 == 0)
                marker.at<uchar>(i,j) = 1;
        }
    }

    im &= ~marker;
}

// Function for thinning any given binary image within the range of 0-255. If not you should first make sure that your image has this range preset and configured!
void thinning(Mat& im)
{
    // Enforce the range to be in between 0 - 255
    im /= 255;

    Mat prev = Mat::zeros(im.size(), CV_8UC1);
    Mat diff;

    do {
        thinningIteration(im, 0);
        thinningIteration(im, 1);
        absdiff(im, prev, diff);
        im.copyTo(prev);
    }
    while (countNonZero(diff) > 0);

    im *= 255;
}
The code above can then simply be applied to our previous steps by calling the thinning function on top of our previous binary-generated image. The code for this is:
// Apply thinning algorithm
Mat input_thinned = input_binary.clone();
thinning(input_thinned);
This will result in the following output:

Comparison of binarized and thinned fingerprint images using skeletization techniques
When we get this skeleton image, the next step is to look for crossing points on the ridges of the fingerprint, called minutiae points. We can do this with a keypoint detector that looks for large changes in local contrast, like the Harris corner detector. Since the Harris corner detector is able to detect strong corners and edges, it is ideal for the fingerprint problem, where the most important minutiae are short edges and bifurcations—the positions where edges come together.
Note
More information about minutiae points and Harris corner detection can be found in the following publications:
Ross Arun A., Jidnya Shah, and Anil K. Jain, Toward reconstructing fingerprints from minutiae points, Defense and Security. International Society for Optics and Photonics, 2005.
Harris Chris and Mike Stephens, A combined corner and edge detector, Alvey vision conference, Vol. 15, 1988.
Calling the Harris Corner operation on a skeletonized and binarized image in OpenCV is quite straightforward. The Harris corners are stored as positions corresponding with their cornerness response value in the image. If we want to detect points with a certain cornerness, then we should simply threshold the image.
Mat harris_corners, harris_normalised;
harris_corners = Mat::zeros(input_thinned.size(), CV_32FC1);
cornerHarris(input_thinned, harris_corners, 2, 3, 0.04, BORDER_DEFAULT);
normalize(harris_corners, harris_normalised, 0, 255, NORM_MINMAX, CV_32FC1, Mat());
We now have a map with all the available corner responses rescaled to the range of [0 255] and stored as float values. We can now manually define a threshold which will generate a good number of keypoints for our application. Playing around with this parameter could improve performance in other cases. This can be done by using the following code snippet:
float threshold = 125.0;
vector<KeyPoint> keypoints;
Mat rescaled;
convertScaleAbs(harris_normalised, rescaled);
Mat harris_c(rescaled.rows, rescaled.cols, CV_8UC3);
Mat in[] = { rescaled, rescaled, rescaled };
int from_to[] = { 0,0, 1,1, 2,2 };
mixChannels( in, 3, &harris_c, 1, from_to, 3 );
for(int x=0; x<harris_normalised.cols; x++){
   for(int y=0; y<harris_normalised.rows; y++){
          if ( (int)harris_normalised.at<float>(y, x) > threshold ){
             // Draw or store the keypoint location here, just like
             //you decide. In our case we will store the location of
             // the keypoint
             circle(harris_c, Point(x, y), 5, Scalar(0,255,0), 1);
             circle(harris_c, Point(x, y), 1, Scalar(0,0,255), 1);
             keypoints.push_back( KeyPoint (x, y, 1) );
          }
       }
    }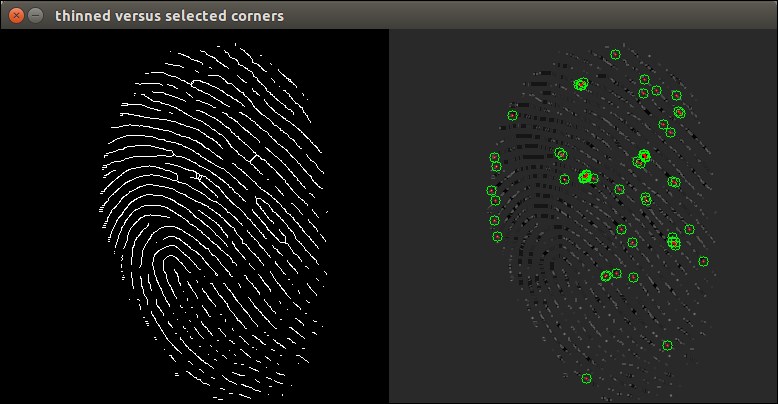
Comparison of thinned fingerprints and the Harris corner response, as well as the selected Harris corners
Now that we have a list of keypoints, we need to create some sort of formal descriptor of the local region around each keypoint to be able to uniquely identify it from other keypoints.
Note
Chapter 3, Recognizing Facial Expressions with Machine Learning, discusses in more detail the wide range of keypoints out there. In this chapter, we will mainly focus on the process. Feel free to adapt the interface to other keypoint detectors and descriptors out there, for better or for worse performance.
Since we have an application where the orientation of the thumb can differ (since it is not in a fixed position), we want a keypoint descriptor that is good at handling these slight differences. One of the most common descriptors for this is the SIFT descriptor, which stands for scale invariant feature transform. However, SIFT is not under a BSD license, which can pose problems when used in commercial software. A good alternative in OpenCV is the ORB descriptor. You can implement it in the following way:
Ptr<Feature2D> orb_descriptor = ORB::create();
Mat descriptors;
orb_descriptor->compute(input_thinned, keypoints, descriptors);
This enables us to calculate only the descriptors using the ORB approach, since we already retrieved the location of the keypoints using the Harris corner approach.
At this point, we can retrieve a descriptor for each detected keypoint of any given fingerprint. The descriptors matrix contains a row for each keypoint containing the representation.
Let's start with the example in which we have just one reference image for each fingerprint. We then have a database containing a set of feature descriptors for the training persons in the database. We have a single new entry, consisting of multiple descriptors for the keypoints found at registration time. We now have to match these descriptors to the descriptors stored in the database, to see which one has the best match.
The simplest way to do this is to perform brute-force matching using the hamming distance criteria between descriptors of different keypoints.
// Imagine we have a vector of single entry descriptors as a database
// We will still need to fill those once we compare everything, by using the code snippets above
vector<Mat> database_descriptors;
Mat current_descriptors;
// Create the matcher interface
Ptr<DescriptorMatcher> matcher = DescriptorMatcher::create("BruteForce-Hamming");
// Now loop over the database and start the matching
vector< vector< DMatch > > all_matches;
for(int entry=0; i<database_descriptors.size();entry++){
   vector< DMatch > matches;
   matcheràmatch(database_descriptors[entry], current_descriptors, matches);
   all_matches.push_back(matches);
}
We now have all the matches stored as DMatch objects. This means that, for each matching couple, we will have the original keypoint, the matched keypoint, and a floating point score between both matches, representing the distance between the matched points.
This seems pretty straightforward. We take a look at the number of matches that have been returned by the matching process and weigh them by their Euclidean distance in order to add some certainty. We then look for the matching process that yielded the biggest score. This will be our best match, and the match we want to return as the selected one from the database.
If you want to avoid an imposter getting assigned to the best matching score, you can add a manual threshold on top of the scoring to avoid matches and ignore those that are not good enough. However, it is possible that, if you increase the score too much, people with little change will be rejected from the system, if, for example, someone cuts their finger and thus changes their pattern drastically.
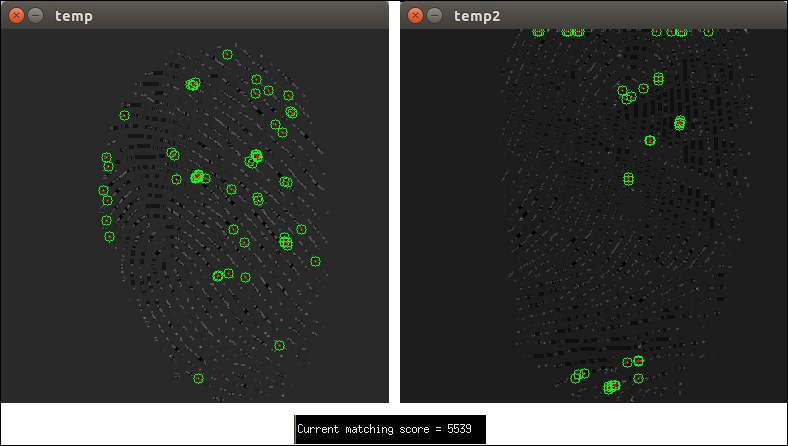
The fingerprint matching process visualized