Who doesn't agree that the output of the depth sensor is the most important output of OpenNI and compatible devices? In this recipe, we will show you how to use OpenGL and OpenNI to show OpenNI's depth sensor output to the user.
We highly recommend reading the previous recipe of this chapter, Reading and showing a frame from the image sensor (color/IR), to have a background about how we can use OpenGL to show a picture to the user and how we can copy a picture from OpenNI to our texture buffer with resizing on-the-fly; especially the How it works… section, as we are not going to cover all the lines in detail in this recipe (as we did in the previous recipe). But don't worry. This recipe is simpler than the last one—at least at first glance!
Create a project in Visual Studio 2010, prepare it for working with OpenNI using the Create a project in Visual Studio 2010 recipe of Chapter 2, Open NI and C++, and then configure Visual Studio 2010 to use OpenGL using the Configuring Visual Studio 2010 to use OpenGL recipe of this chapter.
- Add the following lines above your source code (just below the
#includelines):int window_w = 640; int window_h = 480; OniRGB888Pixel* gl_texture; VideoStream depthSensor; Device device; char ReadLastCharOfLine() { int newChar = 0; int lastChar; fflush(stdout); do { lastChar = newChar; newChar = getchar(); } while ((newChar != ' ') && (newChar != EOF)); return (char)lastChar; } bool HandleStatus(Status status) { if (status == STATUS_OK) return true; printf("ERROR: #%d, %s", status, OpenNI::getExtendedError()); ReadLastCharOfLine(); return false; } void gl_KeyboardCallback(unsigned char key, int x, int y) { if (key == 27) // ESC Key { depthSensor.destroy(); OpenNI::shutdown(); exit(0); } } void gl_IdleCallback() { glutPostRedisplay(); } void gl_DisplayCallback() { if (depthSensor.isValid()) { Status status = STATUS_OK; VideoStream* streamPointer = &depthSensor; int streamReadyIndex; status = OpenNI::waitForAnyStream(&streamPointer, 1, &streamReadyIndex, 500); if (status == STATUS_OK && streamReadyIndex == 0) { VideoFrameRef newFrame; status = depthSensor.readFrame(&newFrame); if (status == STATUS_OK && newFrame.isValid()) { // Clear the OpenGL buffers glClear ( GL_COLOR_BUFFER_BIT | GL_DEPTH_BUFFER_BIT); // Setup the OpenGL viewpoint glMatrixMode(GL_PROJECTION); glPushMatrix(); glLoadIdentity(); glOrtho(0, window_w, window_h, 0, -1.0, 1.0); // UPDATING TEXTURE (DEPTH 1MM TO RGB888) unsigned short maxDepth = 0; for (int y = 0; y < newFrame.getHeight(); ++y) { DepthPixel* depthCell = (DepthPixel*)( (char*)newFrame.getData() + (y * newFrame.getStrideInBytes()) ); for (int x = 0; x < newFrame.getWidth(); ++x, ++depthCell) { if (maxDepth < *depthCell){ maxDepth = *depthCell; } } } double resizeFactor = min( (window_w / (double)newFrame.getWidth()), (window_h / (double)newFrame.getHeight())); unsigned int texture_x = (unsigned int)(window_w - (resizeFactor * newFrame.getWidth())) / 2; unsigned int texture_y = (unsigned int)(window_h - (resizeFactor * newFrame.getHeight())) / 2; for (unsigned int y = 0; y < (window_h - 2 * texture_y); ++y) { OniRGB888Pixel* texturePixel = gl_texture + ((y + texture_y) * window_w) + texture_x; for (unsigned int x = 0; x < (window_w - 2 * texture_x); ++x) { DepthPixel* streamPixel = (DepthPixel*)( (char*)newFrame.getData() + ((int)(y / resizeFactor) * newFrame.getStrideInBytes()) ) + (int)(x / resizeFactor); if (*streamPixel != 0){ char depthValue = ((float)*streamPixel / maxDepth) * 255; texturePixel->b = 255 - depthValue; texturePixel->g = 255 - depthValue; texturePixel->r = 255 - depthValue; } else { texturePixel->b = 0; texturePixel->g = 0; texturePixel->r = 0; } texturePixel += 1; // Moves variable by 3 bytes } } // Create the OpenGL texture map glTexParameteri(GL_TEXTURE_2D, 0x8191, GL_TRUE); glTexImage2D(GL_TEXTURE_2D, 0, GL_RGB, window_w, window_h, 0, GL_RGB, GL_UNSIGNED_BYTE, gl_texture); glBegin(GL_QUADS); glTexCoord2f(0.0f, 0.0f); glVertex3f(0.0f, 0.0f, 0.0f); glTexCoord2f(0.0f, 1.0f); glVertex3f(0.0f, (float)window_h, 0.0f); glTexCoord2f(1.0f, 1.0f); glVertex3f((float)window_w, (float)window_h, 0.0f); glTexCoord2f(1.0f, 0.0f); glVertex3f((float)window_w, 0.0f, 0.0f); glEnd(); glutSwapBuffers(); } } } } - Then locate the following lines of code:
int _tmain(int argc, _TCHAR* argv[]) { - Write the following lines of code below the preceding lines of code:
  Status status = STATUS_OK;
  printf("Scanning machine for devices and loading "
      "modules/drivers ...
");

  status = OpenNI::initialize();
  if (!HandleStatus(status)) return 1;
  printf("Completed.
");

  printf("Opening first device ...
");
  status = device.open(ANY_DEVICE);
  if (!HandleStatus(status)) return 1;
  printf("%s Opened, Completed.
",
    device.getDeviceInfo().getName());

  printf("Checking if stream is supported ...
");
  if (!device.hasSensor(SENSOR_DEPTH))
  {
    printf("Stream not supported by this device.
");
    return 1;
  }

  printf("Asking device to create a depth stream ...
");
  status = depthSensor.create(device, SENSOR_DEPTH);
  if (!HandleStatus(status)) return 1;

  printf("Setting video mode to 640x480x30 Depth 1MM..
");
  VideoMode vmod;
  vmod.setFps(30);
  vmod.setPixelFormat(PIXEL_FORMAT_DEPTH_1_MM);
  vmod.setResolution(640, 480);
  status = depthSensor.setVideoMode(vmod);
  if (!HandleStatus(status)) return 1;
  printf("Done.
");

  printf("Starting stream ...
");
  status = depthSensor.start();
  if (!HandleStatus(status)) return 1;
  printf("Done.
");
  printf("Initializing OpenGL ...
");
  gl_texture = (OniRGB888Pixel*)malloc(
    window_w * window_h * sizeof(OniRGB888Pixel));
  glutInit(&argc, (char**)argv);
  glutInitDisplayMode(GLUT_RGB | GLUT_DOUBLE | GLUT_DEPTH);
  glutInitWindowSize(window_w, window_h);
  glutCreateWindow ("OpenGL | OpenNI 2.x CookBook Sample");
  glutKeyboardFunc(gl_KeyboardCallback);
  glutDisplayFunc(gl_DisplayCallback);
  glutIdleFunc(gl_IdleCallback);
  glDisable(GL_DEPTH_TEST);
  glEnable(GL_TEXTURE_2D);
  printf("Starting OpenGL rendering process ...
");
  glutMainLoop();
Lets start with step one.
Just as in the previous recipe, we used the first step to define our required variables and functions, including window_w and window_h for setting OpenGL's window size and gl_texture to hold our texture buffer in memory, along with an openni::VideoStream variable named depthSensor and an openni::Device variable named device to let us access the depth sensor's data and the device from different functions.
Functions are almost the same too. You know about ReadLastCharOfLine() and HandleStatus() from the previous recipe and even before that, we have seen gl_KeyboardCallback(), gl_IdleCallback(), and gl_DisplayCallback(), but there is no SetActiveSensor() anymore because we merged it with the main function.
It is clear at first glance that gl_KeyboardCallback() and gl_DisplayCallback() changed when compared to the previous recipe. Let's start with the changes in gl_KeyboardCallback(). As you can see, there is no check for the C or I key anymore, as we don't need to change the active sensor output stream. This function now supports only the Esc key for exiting.
  if (key == 27) // ESC Key
  {
    depthSensor.destroy();
    OpenNI::shutdown();
    exit(0);
  }
In the function that was last defined in step 1, gl_DisplayCallback, we will fill the texture buffer and ask OpenGL to show this buffer, just as we did in the previous recipe, but this time for the depth sensor.
You know what we are going to do if you have read the previous recipe's How it works… section. The only change between these two is the part about converting and filling the texture buffer. This part starts at line 24 of the function, after the UPDATING TEXTURE line. In this line, you can see that, instead of starting the copying process, we decided to loop through the output frame data because we wanted to find out the upper bound of data in order to normalize the range of colors later. As you can see, there is nothing special here. We defined a variable named maxDepth to store the upper bound of data and then looped through the data to find out which is a bigger value.
        unsigned short maxDepth = 0;
        for  (int y = 0; y < newFrame.getHeight(); ++y)
        {
          DepthPixel* depthCell = (DepthPixel*)(
            (char*)newFrame.getData() +
            (y * newFrame.getStrideInBytes())
          );
          for  (int x = 0; x < newFrame.getWidth();
                ++x, ++depthCell)
          {
            if (maxDepth < *depthCell){
              maxDepth = *depthCell;
            }
          }
        }
The only notable line in this code is the one about defining the depthCell variable. In this code, we converted newFrame.getData() to char (originally it is in type openni::DepthPixel) because we can then increase the value of the pointer by bytes. After that, we added the number of bytes required to move the pointer to the first pixel of the next row and converted the entire line into the openni::DepthPixel type pointer again and finally stored it in depthCell variable.
DepthPixel* depthCell = (DepthPixel*)(
            (char*)newFrame.getData() +
            (y * newFrame.getStrideInBytes())
            );
Then, just as we did in the previous recipe, we try to calculate the resizeFactor value and pad the frame data before copying it to the texture buffer.
        double resizeFactor = min(
          (window_w / (double)newFrame.getWidth()),
          (window_h / (double)newFrame.getHeight()));
        unsigned int texture_x = (unsigned int)(window_w -
          (resizeFactor * newFrame.getWidth())) / 2;
        unsigned int texture_y = (unsigned int)(window_h -
          (resizeFactor * newFrame.getHeight())) / 2;
Next, we start to loop through the height of the texture and calculate the position of each row's first pixel.
        for  (unsigned int y = 0;
          y < (window_h - 2 * texture_y); ++y)
        {
          OniRGB888Pixel* texturePixel = gl_texture +
            ((y + texture_y) * window_w) + texture_x;
gl_texture is the first pixel of the texture buffer that we added the ((y + texture_y) * window_w) pixels to (representing the number of pixels from the first row to the current row) and then added texture_x, which represents horizontal padding.
Next we need to loop through the width of the image using another loop and increase texturePixel by one pixel, calculate the related pixel's position in the frame data, and then convert and copy data from there.
          for  (unsigned int x = 0;
            x < (window_w - 2 * texture_x);
            ++x)
          {
            DepthPixel* streamPixel =
              (DepthPixel*)(
                  (char*)newFrame.getData() +
                  ((int)(y / resizeFactor) *
                    newFrame.getStrideInBytes())
              ) + (int)(x / resizeFactor);
            if (*streamPixel != 0){
              char depthValue = ((float)*streamPixel /
                maxDepth) * 255;
              texturePixel->b = 255 - depthValue;
              texturePixel->g = 255 - depthValue;
              texturePixel->r = 255 - depthValue;
            }
            else
            {
              texturePixel->b = 0;
              texturePixel->g = 0;
              texturePixel->r = 0;
            }
              texturePixel += 1; // Moves variable by 3 bytes
          }
As you can see, increasing the value of texturePixel is done before the end of the for body; inside its body, we have a variable named streamPixel with the openni::DepthPixel pointer type, which is going to be the related pixel in the depth frame data. As earlier, where we converted newFrame.getData() (the address of the first pixel of frame data) to a pointer of type char, here too, we can increase its pointer by (y / resizeFactor) * newFrame.getStrideInBytes() bytes and again convert it into a pointer of openni::DepthPixel type to increase it by pixels, and finally increase it by (x / resizeFactor) pixels.
            DepthPixel* streamPixel =
              (DepthPixel*)(
                  (char*)newFrame.getData() +
                  ((int)(y / resizeFactor) *
                    newFrame.getStrideInBytes())
              ) + (int)(x / resizeFactor);
Now we have both pixels but they are in two different formats. One is the depth pixel and the other is the RGB pixel. We need to find a way to convert each depth pixel into a reasonable RGB value.
A pixel depth can have a range of 0-65535 (it is actually an unsigned short data type), but an RGB value (one among red, green, or blue) can be in the range of 0-255; so we can't fit our data completely in an RGB color space. This means we are going to lose 256 levels of detail.

Note
You may ask why we said the range of each RGB pixel is 0-255. Actually, an RGB pixel has 3 bytes, which means it has a range of 0-16777215. But a lot of these colors are the darker and lighter versions of each other. We want to show our output in grayscale, which means all the bytes will have the same value. Therefore, we have a maximum range of 0-255.
But don't forget that the openni::VideoStream::getMaxPixelValue() method returns 10000 for the depth sensor. If we consider this value as the maximum possible value of a depth pixel, we need to fit 0-10000 in our limited 0-255 RGB range. This means we need to lose almost 40 levels of detail, which is better than the previous one but still not a very good option.
In our search for finding the real range of data, we found that the PixelFormat::PIXEL_FORMAT_DEPTH_1_MM pixel format actually has 11 bits of data, which means it has a maximum of 2048 different values. But again, this number is not too reliable either. This is because, firstly, PixelFormat::PIXEL_FORMAT_DEPTH_100_UM has 12 bits of data, which means it can have up to 4096 different values; and secondly, it seems that OpenNI changes these values a little (actually, we know that PixelFormat::PIXEL_FORMAT_SHIFT_9_2 and PixelFormat::PIXEL_FORMAT_SHIFT_9_3 are the only unchanged raw data of the device and so we expect that). From our experiments, it seems that we can expect data in the range of 300-4000 when using PixelFormat::PIXEL_FORMAT_DEPTH_1_MM as the pixel format.
As you can see, all the values are unreliable and we need to calculate the upper bound of data in each frame manually (that's what we did earlier too; read the preceding lines of this part) and then fit our data in the 0-255 range for showing it as RGB. As we had said earlier, the upper bound of data was normally under 4000 in our experiments, and so on average we were going to lose more than 15 levels of detail. If you need to see other methods of conversion and better outputs, check the There's more part of this recipe. We didn't want to make it difficult in the main code.
Using the previously given information and the upper bound of data (we knew this), we tried to convert (or, in other words, fit) our data into the texture buffer.
              char depthValue = ((float)*streamPixel /
                maxDepth) * 255;
              texturePixel->b = 255 - depthValue;
              texturePixel->g = 255 - depthValue;
              texturePixel->r = 255 - depthValue;
As you can see, it is a simple calculation for changing the range of data. Then we inverse the output by writing 255 – depthValue. We do this because data is actually in the form of near-black and far-white and we need to change it to near-white and far-black before displaying to the user.
You may notice that, before writing the previous code snippet, we used a condition to see if *streamPixel is equal to 0. If it is, we skipped our code and put a 0 in all the bytes of our pixel in the texture buffer. This is because, in depth frame data, 0 means there is no data to show; if so, we want to fill these pixels with black in the end result too.
The other parts of the code are like the previous recipes.
Now let's talk about step 3. You know the main function. This function will be executed when our application starts. So we need to put our initializing code of OpenNI and OpenGL here.
As always, we first need to initialize OpenNI and then open a device.
  status = OpenNI::initialize();
  if (!HandleStatus(status)) return 1;
...
  status = device.open(ANY_DEVICE);
  if (!HandleStatus(status)) return 1;
Then create openni::VideoStream for the depth sensor and request the desired openni::VideoMode object. At last, start the newly created openni::VideoStream class:
  printf("Asking device to create a depth stream ...
");
  status = depthSensor.create(device, SENSOR_DEPTH);
  if (!HandleStatus(status)) return 1;

  printf("Setting video mode to 640x480x30 Depth 1MM..
");
  VideoMode vmod;
  vmod.setFps(30);
  vmod.setPixelFormat(PIXEL_FORMAT_DEPTH_1_MM);
  vmod.setResolution(640, 480);
  status = depthSensor.setVideoMode(vmod);
  if (!HandleStatus(status)) return 1;
  printf("Done.
");

  printf("Starting stream ...
");
  status = depthSensor.start();
  if (!HandleStatus(status)) return 1;
  printf("Done.
");
Our next task is to initialize OpenGL and allocate the required space in memory for the texture buffer:
  gl_texture = (OniRGB888Pixel*)malloc(
    window_w * window_h * sizeof(OniRGB888Pixel));
Then initialize the OpenGL windows with GLUT and configure the required settings:
  glutInit(&argc, (char**)argv);
  glutInitDisplayMode(GLUT_RGB | GLUT_DOUBLE | GLUT_DEPTH);
  glutInitWindowSize(window_w, window_h);
  glutCreateWindow ("OpenGL | OpenNI 2.x CookBook Sample");
  glutKeyboardFunc(gl_KeyboardCallback);
  glutDisplayFunc(gl_DisplayCallback);
  glutIdleFunc(gl_IdleCallback);
  glDisable(GL_DEPTH_TEST);
  glEnable(GL_TEXTURE_2D);
Now we start OpenGL's main rendering loop.
glutMainLoop();
After that, gl_KeyboardCallback and mainly the gl_DisplayCallback function will control our application behavior.
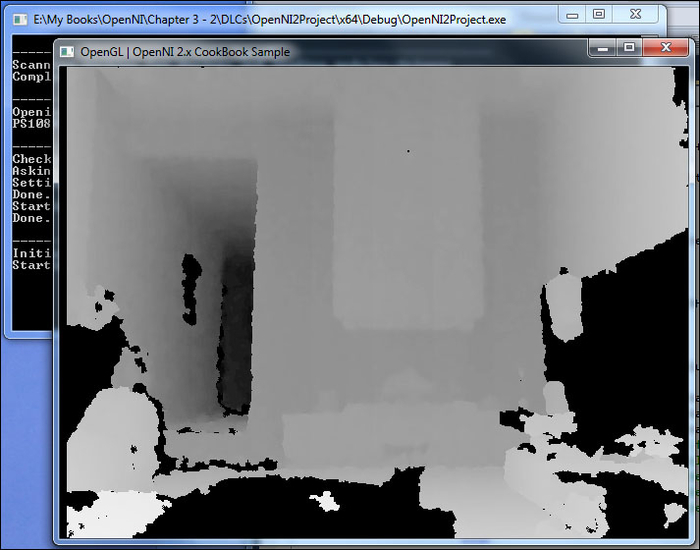
The output of our application is shown in the following screenshot:
There are some enhancements for this output that we will cover in this section.
Using the main code, we tried to show data directly from the sensor without many changes (except fitting it into our color space) but now we are going to use a few lines of code to improve the result without adding more colors or changing color space. We will use a simple histogram-equalization method.
Let's say we have an image with different colors of grayscale color space; that is, we have different colors between white and black. But, for example, in the previous picture you can see that a lot of these colors are similar to each other and there are a lot of other colors that are rarely used. Using histogram equalization, we can use all of our color space by dynamically changing the contrast of the image to show more important data with much more detail.
Let's talk about histograms. Histograms are 2D graphs for showing the distribution of colors in an image. You can read more about image histograms on Wikipedia at:
http://en.wikipedia.org/wiki/Image_histogram
For example, for our previous image (the output of our program in the previous code), we have the following histogram:
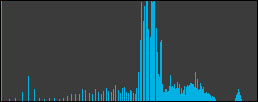
As you can clearly see, the majority of the colors used are in a specific range and most of the color space is never really used. Using histogram equalization, we can change that somewhat, to use all parts of the color space. The following is the same histogram after correction:
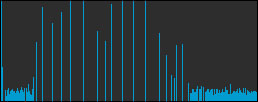
Histogram equalization is a good way to increase the contrast of important parts of an image that use very limited parts of a color space. But its main advantage reveals itself when you are going to fit an image with a bigger color palette into a smaller one, because in addition to showing important parts of an image more clearly, it will add more detail to the image by converting only the useful parts of color palette into a new color space.
This is our case here too. Our depth frame data is using 16 bits for each pixel but our texture buffer has a smaller color palette of 8 bits per pixel (as we said before, RGB is 24-bit but we need to use only 8 bits of it for grayscale). So we can expect a huge difference.
Read more about histogram equalization on Wikipedia at:
http://en.wikipedia.org/wiki/Histogram_equalization
Enough talk; let's check it out in code now. For doing so, you need to use the same code as in this recipe but replace the entire
gl_DisplayCallback function with the following lines of code:
void gl_DisplayCallback()
{
  if (depthSensor.isValid())
  {
    Status status = STATUS_OK;
    VideoStream* streamPointer = &depthSensor;
    int streamReadyIndex;
    status = OpenNI::waitForAnyStream(&streamPointer, 1,
      &streamReadyIndex, 500);
    if (status == STATUS_OK && streamReadyIndex == 0)
    {
      VideoFrameRef newFrame;
      status = depthSensor.readFrame(&newFrame);
      if (status == STATUS_OK && newFrame.isValid())
      {
        // Clear the OpenGL buffers
        glClear (
          GL_COLOR_BUFFER_BIT | GL_DEPTH_BUFFER_BIT);

        // Setup the OpenGL viewpoint
        glMatrixMode(GL_PROJECTION);
        glPushMatrix();
        glLoadIdentity();
        glOrtho(0, window_w, window_h, 0, -1.0, 1.0);

        // UPDATING TEXTURE (DEPTH 1MM TO RGB888)
        int depthHistogram[65536];
        int numberOfPoints = 0;
        memset(depthHistogram, 0,
          sizeof(depthHistogram));
        for  (int y = 0;
              y < newFrame.getHeight(); ++y)
        {
          DepthPixel* depthCell = (DepthPixel*)(
            (char*)newFrame.getData() +
            (y * newFrame.getStrideInBytes())
            );
          for  (int x = 0; x < newFrame.getWidth();
                ++x, ++depthCell)
          {
            if (*depthCell != 0)
              {
              depthHistogram[*depthCell]++;
              numberOfPoints++;
            }
          }
        }

        for (int nIndex=1;
        nIndex < sizeof(depthHistogram) / sizeof(int);
        nIndex++)
        {
          depthHistogram[nIndex] +=
            depthHistogram[nIndex-1];
        }

        double resizeFactor = min(
          (window_w / (double)newFrame.getWidth()),
          (window_h / (double)newFrame.getHeight()));
        unsigned int texture_x = (unsigned int)(window_w -
          (resizeFactor * newFrame.getWidth())) / 2;
        unsigned int texture_y = (unsigned int)(window_h -
          (resizeFactor * newFrame.getHeight())) / 2;

        for  (unsigned int y = 0;
          y < (window_h - 2 * texture_y); ++y)
        {
          OniRGB888Pixel* texturePixel = gl_texture +
            ((y + texture_y) * window_w) + texture_x;
          for  (unsigned int x = 0;
            x < (window_w - 2 * texture_x);
            ++x, ++texturePixel)
          {
            DepthPixel* streamPixel =
              (DepthPixel*)(
                (char*)newFrame.getData() +
                ((int)(y / resizeFactor) *
                  newFrame.getStrideInBytes())
              )  +  (int)(x / resizeFactor);
            if (*streamPixel != 0)
            {
              char depthValue =
              ((float)depthHistogram[*streamPixel] /
              numberOfPoints) * 255;
              texturePixel->b = 255 - depthValue;
              texturePixel->g = 255 - depthValue;
              texturePixel->r = 255 - depthValue;
            }
            else
            {
              texturePixel->b = 0;
              texturePixel->g = 0;
              texturePixel->r = 0;
            }
          }
        }


        // Create the OpenGL texture map
        glTexParameteri(GL_TEXTURE_2D,
          0x8191, GL_TRUE);
        glTexImage2D(GL_TEXTURE_2D, 0, GL_RGB,
          window_w, window_h, 0, GL_RGB,
          GL_UNSIGNED_BYTE, gl_texture);

        glBegin(GL_QUADS);
        glTexCoord2f(0.0f, 0.0f);
        glVertex3f(0.0f, 0.0f, 0.0f);
        glTexCoord2f(0.0f, 1.0f);
        glVertex3f(0.0f, (float)window_h, 0.0f);
        glTexCoord2f(1.0f, 1.0f);
        glVertex3f((float)window_w,
          (float)window_h, 0.0f);
        glTexCoord2f(1.0f, 0.0f);
        glVertex3f((float)window_w, 0.0f, 0.0f);
        glEnd();
        glutSwapBuffers();
      }
    }
  }
}
As you can see, a lot of the parts are similar. We put in conditions to check if openni::VideoStream is valid, waited for a new frame, then checked whether the new frame is valid, and so on. After that, we cleared the OpenGL buffer, set some options, filled texture data, provided the texture buffer to OpenGL, and swapped the buffers.
The only change here is in the filling part (as always), which starts after the UPDATING TEXTURE (DEPTH 1MM TO RGB888) line and ends before // Create the OpenGL texture map line.
Here, we first tried to create a histogram of 16-bit depth data using the following code snippet:
        int depthHistogram[65536];
        int numberOfPoints = 0;
        memset(depthHistogram, 0,
          sizeof(depthHistogram));
        for  (int y = 0;
              y < newFrame.getHeight(); ++y)
        {
          DepthPixel* depthCell = (DepthPixel*)(
            (char*)newFrame.getData() +
            (y * newFrame.getStrideInBytes())
            );
          for  (int x = 0; x < newFrame.getWidth();
                ++x, ++depthCell)
          {
            if (*depthCell != 0)
              {
              depthHistogram[*depthCell]++;
              numberOfPoints++;
            }
          }
        }
In this code, we first declared a variable of type int and an array named depthHistogram to store our histogram. Then we declared another variable named numberOfPoints to keep the number of all valid pixels (pixels with data) of the entire data.
Our main process starts with the first loop through the height of our depth frame data and then we calculate the position of each row's first pixel in the next line.
          DepthPixel* depthCell = (DepthPixel*)(
            (char*)newFrame.getData() +
            (y * newFrame.getStrideInBytes())
            );
Again, we converted newFrame.getData() to the char pointer and increased it by (y * newFrame.getStrideInBytes()) bytes, then converted it back to the openni::DepthPixel pointer, and stored it in the depthCell variable. In the next for loop, we looped through each pixel of that row by increasing depthCell and checked whether the value of the current pixel is greater than 0. If so, we will add 1 to the number of points and to its position in the histogram array.
Using these 2 loops, we will analyze the whole picture and extract the distribution of colors; in other words, we will create the image's histogram.
For histogram equalization, we need to perform two operations. First, we need to change our histogram to a cumulative histogram and then calculate the new pixel value from that histogram. Currently, we need to convert our histogram to a cumulative histogram (also known as an accumulated histogram).
        for (int nIndex=1;
        nIndex < sizeof(depthHistogram) / sizeof(int);
        nIndex++)
        {
          depthHistogram[nIndex] +=
            depthHistogram[nIndex-1];
        }
Tip
Read more about cumulative histograms at:
http://en.wikipedia.org/wiki/Histogram#Cumulative_histogram
And why we need to use it at:
http://en.wikipedia.org/wiki/Histogram_equalization#Implementation
Now we are almost done. In the last step, we need an alternate copying process too. Just as we did earlier, here too we have codes for the calculation of resizeFactor and paddings, and right after that we have two loops.
        for  (unsigned int y = 0;
          y < (window_h - 2 * texture_y); ++y)
        {
          OniRGB888Pixel* texturePixel = gl_texture +
            ((y + texture_y) * window_w) + texture_x;
          for  (unsigned int x = 0;
            x < (window_w - 2 * texture_x);
            ++x, ++texturePixel)
          {
In the second loop, we need to calculate the position of the related pixel in the depth frame data and convert and copy it to our texture frame data. But now we want to change this process a little.
            DepthPixel* streamPixel =
              (DepthPixel*)(
                (char*)newFrame.getData() +
                ((int)(y / resizeFactor) *
                  newFrame.getStrideInBytes())
              ) + (int)(x / resizeFactor);
            if (*streamPixel != 0)
            {
              char depthValue =
              ((float)depthHistogram[*streamPixel] /
                numberOfPoints) * 255;
              texturePixel->b = 255 - depthValue;
              texturePixel->g = 255 - depthValue;
              texturePixel->r = 255 - depthValue;
            }
            else
            {
              texturePixel->b = 0;
              texturePixel->g = 0;
              texturePixel->r = 0;
            }
As you can see, instead of using *streamPixel in the texture buffer directly, this time we decided to use it in the bigger formula and calculate a better value depending on the image's histogram:
              char depthValue =
              ((float)depthHistogram[*streamPixel] /
                numberOfPoints) * 255;
This was the last step. The other parts are the same as in the main recipe's code.
Let's take a look at the output of this new method and a comparison with the native data:
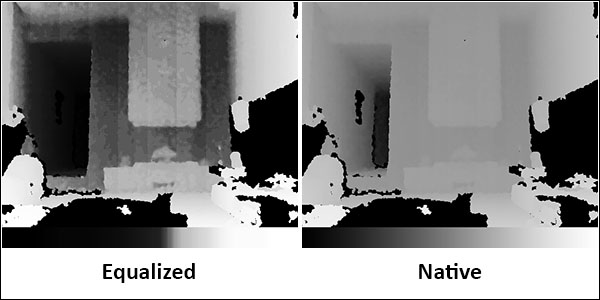
Please note the changes in the grayscale line below the images. It clearly shows you how the image changed.
Be informed that all we try to show to you here and in the last part is about how to show data; not the data itself. We try to introduce new ways of showing data to make more details visible. Data is always the same and contains the same details and information.
In the main code, we tried to explain to you how to show a depth frame in grayscale color space using 256 colors. Now we want to expand our color space. There are a lot of options for expanding a wider color space than grayscale; one of the most famous ones is using the colors of the rainbow. This is a good option and can give us about 1536 colors, which means we can show data with less than two times loss in detail. But it is a little complicated because we need to work with HSV and then convert it back to RGB, but we don't want to make it that complicated. So we use another range of colors with a lesser number of colors.

This color space can give us 1024 different colors that can show four times more detail than a simple grayscale while still being easy to implement.
Lets take a look at the following code snippet:
void gl_DisplayCallback()
{
  if (depthSensor.isValid())
  {
    Status status = STATUS_OK;
    VideoStream* streamPointer = &depthSensor;
    int streamReadyIndex;
    status = OpenNI::waitForAnyStream(&streamPointer, 1,
      &streamReadyIndex, 500);
    if (status == STATUS_OK && streamReadyIndex == 0)
    {
      VideoFrameRef newFrame;
      status = depthSensor.readFrame(&newFrame);
      if (status == STATUS_OK && newFrame.isValid())
      {
        // Clear the OpenGL buffers
        glClear (
          GL_COLOR_BUFFER_BIT | GL_DEPTH_BUFFER_BIT);

        // Setup the OpenGL viewpoint
        glMatrixMode(GL_PROJECTION);
        glPushMatrix();
        glLoadIdentity();
        glOrtho(0, window_w, window_h, 0, -1.0, 1.0);

        // UPDATING TEXTURE (DEPTH 1MM TO RGB888)
        unsigned short maxDepth =
          depthSensor.getMinPixelValue();
        unsigned short minDepth =
          depthSensor.getMaxPixelValue();
        for  (int y = 0; y < newFrame.getHeight(); ++y)
        {
          DepthPixel* depthCell = (DepthPixel*)(
            (char*)newFrame.getData() +
            (y * newFrame.getStrideInBytes())
            );
          for  (int x = 0; x < newFrame.getWidth();
              ++x, ++depthCell)
          {
            if (maxDepth < *depthCell)
            {
              maxDepth = *depthCell;
            }
            if (*depthCell != 0 &&
              minDepth > *depthCell)
            {
              minDepth = *depthCell;
            }
          }
        }

        double resizeFactor = min(
          (window_w / (double)newFrame.getWidth()),
          (window_h / (double)newFrame.getHeight()));
        unsigned int texture_x = (unsigned int)(window_w -
          (resizeFactor * newFrame.getWidth())) / 2;
        unsigned int texture_y = (unsigned int)(window_h -
          (resizeFactor * newFrame.getHeight())) / 2;

        for  (unsigned int y = 0;
          y < (window_h - 2 * texture_y); ++y)
        {
          OniRGB888Pixel* texturePixel = gl_texture +
            ((y + texture_y) * window_w) + texture_x;
          for  (unsigned int x = 0;
            x < (window_w - 2 * texture_x);
            ++x, ++texturePixel)
          {
            DepthPixel* streamPixel =
              (DepthPixel*)(
                (char*)newFrame.getData() +
                ((int)(y / resizeFactor) *
                  newFrame.getStrideInBytes())
              ) + (int)(x / resizeFactor);

            if (*streamPixel != 0)
            {
              float colorPaletteFactor =
                (float)1024 / maxDepth;
              int colorCode =
              (*streamPixel - minDepth) *
                colorPaletteFactor;
              texturePixel->b = (
                (colorCode > 0 && colorCode < 512)
                  ? abs(colorCode - 256) : 255);
              texturePixel->g = (
                (colorCode > 128 && colorCode < 640)
                  ? abs(colorCode - 384) : 255);
              texturePixel->r = (
                (colorCode > 512 && colorCode < 1024)
                  ? abs(colorCode - 768) : 255);
            }
            else
            {
              texturePixel->b = 0;
              texturePixel->g = 0;
              texturePixel->r = 0;
            }
          }
        }


        // Create the OpenGL texture map
        glTexParameteri(GL_TEXTURE_2D,
          0x8191, GL_TRUE);
        glTexImage2D(GL_TEXTURE_2D, 0, GL_RGB,
          window_w, window_h, 0, GL_RGB,
          GL_UNSIGNED_BYTE, gl_texture);

        glBegin(GL_QUADS);
        glTexCoord2f(0.0f, 0.0f);
        glVertex3f(0.0f, 0.0f, 0.0f);
        glTexCoord2f(0.0f, 1.0f);
        glVertex3f(0.0f, (float)window_h, 0.0f);
        glTexCoord2f(1.0f, 1.0f);
        glVertex3f((float)window_w,
          (float)window_h, 0.0f);
         glTexCoord2f(1.0f, 0.0f);
         glVertex3f((float)window_w, 0.0f, 0.0f);
         glEnd();

        glutSwapBuffers();
      }
    }
  }
}
As you can see, there are slight changes here. The first change is in the line where we defined a variable named minDepth and then another named maxDepth. Later, we looped through all the pixels of data and extracted max and min values. We did the same thing in the recipe's main code, but this time we calculated minDepth too because we wanted to use all the parts of our color space without missing out a single color!
The next important change is in the main loop of the copying and converting process. Instead of using values directly from the data frame, we tried to convert it in a different way for each color of pixel (R, G, and B).
              float colorPaletteFactor =
                (float)1024 / maxDepth;
              int colorCode =
              (*streamPixel - minDepth) *
                colorPaletteFactor;
              texturePixel->b = (
                (colorCode > 0 && colorCode < 512)
                  ? abs(colorCode - 256) : 255);
              texturePixel->g = (
                (colorCode > 128 && colorCode < 640)
                  ? abs(colorCode - 384) : 255);
              texturePixel->r = (
                (colorCode > 512 && colorCode < 1024)
                  ? abs(colorCode - 768) : 255);
In the first line, we defined a variable to calculate the color palette factor, showing how we need to reform colors. In the second line, we tried to fit this value within our range of 0-1024 and kept it in a variable named colorCode to be used in the next lines. Now that we have converted the value in this range, we can show it. But for showing it, we need to break it apart into three colors (RGB) before updating the texture buffer. The next three lines are all about converting this value into color. These lines are easy to understand and there is no need to describe them line by line. Just keep in mind that we used the inline if statement here ((statement) ? true : false) and the abs() function, which return the absolute value of a number regardless of its sign.
Let's take a look at the output of this new function and a comparison with the native data:
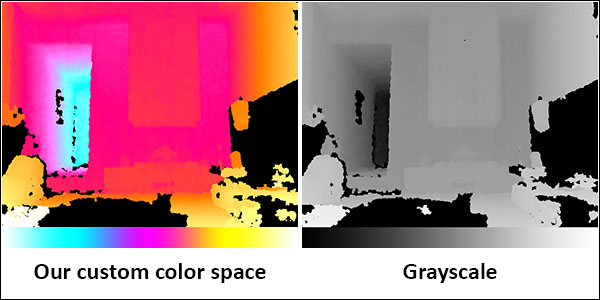
As you can see, this way we can provide more details rather than by using native data or equalizing its histogram. Check out this screenshot to know more:
It is also possible to combine the histogram-equalization method with this method for more details, but that's your choice.
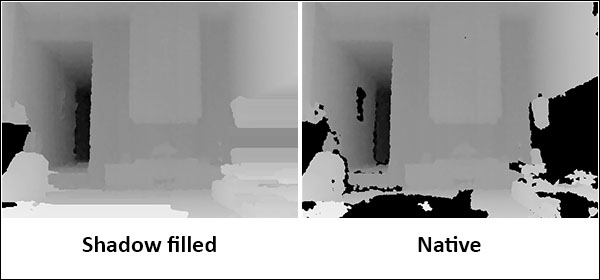
First of all, there is no way to fill shadows with exact values, because the Kinect, Asus Xtion, and PrimeSense sensors all use structured light to scan the depth of the 3D world; in this method, the projector and receiver are at different angles. So, we always get shadows.
There are different algorithms to fill these shadows. Frameworks such as OpenCV can do it with very good quality. But in many cases, we can simply fill shadow pixels with their left pixel's value. This is exactly what we are going to do here.
For saving space, we decided to show you only those parts that need to change in the main code, instead of repeating the entire gl_DisplayCallback() function.
for (unsigned int y = 0;
y < (window_h - 2 * texture_y); ++y)
{
OniRGB888Pixel* texturePixel = gl_texture +
((y + texture_y) * window_w) + texture_x;
DepthPixel lastPixel = 0;
for (unsigned int x = 0;
x < (window_w - 2 * texture_x);
++x, ++texturePixel)
{
DepthPixel* streamPixel =
(DepthPixel*)(
(char*)newFrame.getData() +
((int)(y / resizeFactor) *
newFrame.getStrideInBytes())
) + (int)(x / resizeFactor);
if (*streamPixel != 0){
lastPixel = *streamPixel;
}
char depthValue = ((float)lastPixel /
maxDepth) * 255;
texturePixel->b = 255 - depthValue;
texturePixel->g = 255 - depthValue;
texturePixel->r = 255 - depthValue;
}
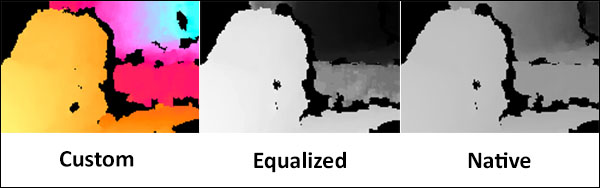
}You need to replace two copying for loops in the main code (lines 50 to 80) with the preceding lines of code.
The difference is shown in the following screenshot: