
In OpenNI 2 there is only one class that is responsible for giving us access to the output of all video-based sensors (depth/IR/RGB) that have made our work very simple compared to the OpenNI 1.x era, where we needed to use three different classes to access sensors. In this recipe we will show you how to access the depth sensor and initialize it. For accessing the IR sensor and RGB sensor we need to follow the same procedure that we will discuss more in the How It Works… section of this recipe. We will show you how to select an output video mode for a sensor too. Also we will show you how to ask a device to see if an output is supported or not.
We will not cover other configurable properties of the openni::VideoStream class including cropping and mirroring in this recipe; read Chapter 4, More about Low-level Outputs about this topic.
Create a project in Visual Studio 2010 and prepare it for working with OpenNI using the Creating a project in Visual Studio 2010 recipe in this chapter.
Have a look at the following steps:
- Open your project and then the project's main source code file. Locate this line:
int _tmain(int argc, _TCHAR* argv[]) { - Write the following code snippet above the preceding line of code:
char ReadLastCharOfLine() { int newChar = 0; int lastChar; fflush(stdout); do { lastChar = newChar; newChar = getchar(); } while ((newChar != ' ') && (newChar != EOF)); return (char)lastChar; } bool HandleStatus(Status status) { if (status == STATUS_OK) return true; printf("ERROR: #%d, %s", status, OpenNI::getExtendedError()); ReadLastCharOfLine(); return false; } - Locate this line again:
int _tmain(int argc, _TCHAR* argv[]) { - Write the following code snippet below the preceding line of code:
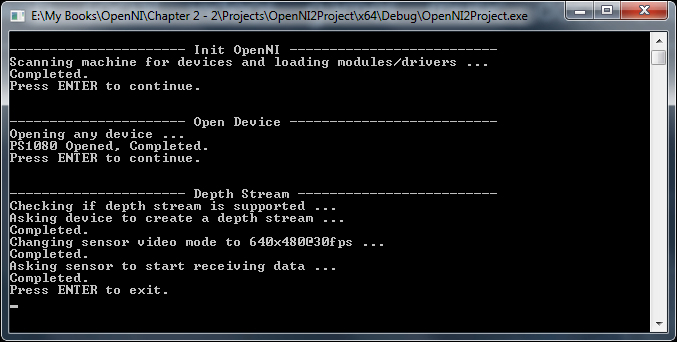
  Status status = STATUS_OK;
  printf("Scanning machine for devices and loading "
      "modules/drivers ...
");
  status = OpenNI::initialize();
  if (!HandleStatus(status)) return 1;
  printf("Completed.
");

  printf("Press ENTER to continue.
");
  ReadLastCharOfLine();

  printf("Opening any device ...
");
  Device device;
  status = device.open(ANY_DEVICE);
  if (!HandleStatus(status)) return 1;
  printf("%s Opened, Completed.
",
    device.getDeviceInfo().getName());

  printf("Press ENTER to continue.
");
  ReadLastCharOfLine();

  printf("Checking if depth stream is supported ...
");
  if (!device.hasSensor(SENSOR_DEPTH))
  {
    printf("Depth stream not supported by this device. "
        "Press ENTER to exit.
");
    ReadLastCharOfLine();
    return 1;
  }

  printf("Asking device to create a depth stream ...
");
  VideoStream sensor;
  status = sensor.create(device, SENSOR_DEPTH);
  if (!HandleStatus(status)) return 1;
  printf("Completed.
");

  printf("Changing sensor video mode to 640x480@30fps.
");
  VideoMode depthVM;
  depthVM.setFps(30);
  depthVM.setResolution(640,480);
  depthVM.setPixelFormat(PIXEL_FORMAT_DEPTH_1_MM);
  status = sensor.setVideoMode(depthVM);
  if (!HandleStatus(status)) return 1;
  printf("Completed.
");

  printf("Asking sensor to start receiving data ...
");
  status = sensor.start();
  if (!HandleStatus(status)) return 1;
  printf("Completed.
");

  printf("Press ENTER to exit.
");
  ReadLastCharOfLine();
  sensor.destroy();
  device.close();
  OpenNI::shutdown();
  return 0;
First we defined our ReadLastCharOfLine() and HandleStatus() methods just like we did previously; read the previous recipe about that.
Then in the first line of the second step we used the openni::OpenNI::initialize() method to initialize OpenNI and load modules and drivers. Again you can read the previous recipe for more information.
Our main code actually started when we defined a variable of type openni:Device. Then, using this variable we opened access to the first driver in the list of OpenNI's connected devices. We also checked (with the HandleStatus() function) to see if this process ended without any error message so as to continue or write the error to the console and return 1 if there was any error.
  Device device;
  status = device.open(ANY_DEVICE);
  if (!HandleStatus(status)) return 1;
From now, using the device variable we can request access to a depth sensor (or any other type we want), but before that it is a good idea to check if this type of sensor is even supported by this device or not.
  if (!device.hasSensor(SENSOR_DEPTH))
  {
    printf("Depth stream not supported by this device. "
        "Press ENTER to exit.
");
    ReadLastCharOfLine();
    return 1;
  }
Note SensorType enum in the code; currently there are three types of video sensors that we can use or send a request for:
openni::SensorType::SENSOR_COLOR: RGB cameraopenni::SensorType::SENSOR_DEPTH: Depth dataopenni::SensorType::SENSOR_IR: IR output from IR camera
Any line after the previous condition will run only if our desired sensor type is supported by the device. And if the sensor is supported by the device, we can request an access to this sensor; for doing so we need to create a variable from openni::VideoStream type, ask it to initialize for our device's depth stream, and of course if any error happens we need to handle that.
  VideoStream sensor;
  status = sensor.create(device, SENSOR_DEPTH);
  if (!HandleStatus(status)) return 1;
This will give us access to the depth sensor with default settings; but we want to use a specific video mode for the output of this sensor so we need to change this configuration.
For doing so we need to create a variable of type openni::VideoMode, change it the way we want, and then pass it to our sensor. Again we must take care of any error in this process.
  VideoMode depthVM;
  depthVM.setFps(30);
  depthVM.setResolution(640,480);
  depthVM.setPixelFormat(PIXEL_FORMAT_DEPTH_1_MM);
  status = sensor.setVideoMode(depthVM);
  if (!HandleStatus(status)) return 1;
The code will request the output with a resolution of (640,480) at 30 frames per second and with PIXEL_FORMAT_DEPTH_1_MM pixel format. Read more about pixel formats in the There's more… section.
When we are done with configuring our sensor, we can ask it to start receiving data. This process includes requesting the device to start the sensor and send the required data to the machine. We didn't have any real communication with the physical device before this part of our code.
  status = sensor.start();
  if (!HandleStatus(status)) return 1;
Then we need to read data from the sensor so as to use or display it. We don't cover this topic here; we simply wait for the user input and then we will end our application. And of course, we would ask sensor and device to release resources and then openni:OpenNI to shutdown() before ending.
  ReadLastCharOfLine();
  sensor.destroy();
  device.close();
  OpenNI::shutdown();
  return 0;
Read the How it works... section of this recipe about how to use openni::SensorType enum to select the desired sensor when creating the openni::VideoSensor object. You also need to select a supported openni::PixelFormat for the type of sensor you selected; for example, you can't request for openni::PixelFormat::PIXEL_FORMAT_DEPTH_1_MM as the format for receiving data from the color sensor. Read the next topic for more information.
You can also define different variables of type openni::VideoSensor and use more than one sensor at a time. But you must keep in mind that creating (or in other words, requesting) the same sensor twice will result in having the same underlying object with two wrappers; that means any change to one will mirror to the other one.
Also it is impossible to have both IR and color stream active; you must stop one before using another one. It seems that this limitation comes from limited USB 2 bandwidth. Also it is important to know that depth output is based on IR CMOS sensor so you can't have both IR and depth active with different resolutions. You must always keep their resolutions same. There is only one exception when using IR with 1280x1024 resolution; in this case, depth must be in 640x480 with 30 fps. The exception is only correct when we use Asus Xtion or PrimeSense sensors.
In the current version of OpenNI (V2.2) there are ten types of pixel formats that can be used to read data from video streams; we will describe some of them more specifically in the later chapters (when we really need them to read data from streams), but now you can get an idea from the following table:
The following is a list of known supported resolutions of each sensor along with their fps in different devices:
|
Device |
Sensor |
Resolution |
Frames per second |
|
Asus Xtion PrimeSense Sensor |
Depth |
320x240 |
25/30/60 |
|
640x480 |
25/30 | ||
|
Image IR |
320x240 |
25/30/60 | |
|
640x480 |
25/30 | ||
|
1280x1024 |
30 | ||
|
Kinect Kinect for Windows |
Depth |
80x60 |
30 |
|
320x240 |
30 | ||
|
640x480 |
30 | ||
|
Image IR |
640x480 |
30 | |
|
1280x960 |
12 |