
In this recipe, we are going to expand on the preceding recipe by showing the bounding box and the center of visual mass (COM) of a user. The bounding box of a user shows the size and location of a user in screen and, for any user, the center of the visual mass is the center of distribution of the pixels.
More precisely, its x position is equal to the average of all the users' pixels x position, and its y position is equal to the average of all the users' pixels y position.
Almost the same is true about its z position, which is equal to the average of all the depth values of users' pixels.
Create a project in Visual Studio and prepare it for working with OpenNI and NiTE using the Create a project in Visual Studio 2010 recipe in Chapter 2, OpenNI and C++, and then configure Visual Studio to use OpenGL using the Configuring Visual Studio 2010 to use OpenGL recipe in the previous chapter.
Then copy the code from the Identifying and coloring users' pixels in the depth map recipe from this chapter to this project.
- Locate the ensuing line in the
gl_DisplayCallback()function:glEnd();
- And add the following code next to it:
glBegin(GL_POINTS); glColor3f( 1.f, 0.f, 0.f ); const nite::Array<nite::UserData>& users = usersFrame.getUsers(); for (int i = 0; i < users.getSize(); ++i) { float posX, posY; niStatus = uTracker.convertJointCoordinatesToDepth( users[i].getCenterOfMass().x, users[i].getCenterOfMass().y, users[i].getCenterOfMass().z, &posX, &posY); if (HandleStatus(niStatus)){ glVertex2f( (posX * resizeFactor) + texture_x, (posY * resizeFactor) + texture_y); } } glEnd(); for (int i = 0; i < users.getSize(); ++i) { nite::BoundingBox userbb = users[i].getBoundingBox(); float minPosX = (userbb.min.x * resizeFactor) + texture_x; float maxPosX = (userbb.max.x * resizeFactor) + texture_x; float minPosY = (userbb.min.y * resizeFactor) + texture_y; float maxPosY = (userbb.max.y * resizeFactor) + texture_y; glBegin(GL_LINE_LOOP); glVertex2f(minPosX, minPosY); glVertex2f(maxPosX, minPosY); glVertex2f(maxPosX, maxPosY); glVertex2f(minPosX, maxPosY); glEnd(); } glColor3f( 1.f, 1.f, 1.f ); - Then locate the ensuing line in the
_tmain()function:glutMainLoop();
- And add the following line above the preceding line:
glPointSize(10.0);
In the second step, we added some lines of code to show COM of all the users in screen. This operation happens after adding the texture to the OpenGL output (we added it after glEnd()).
As we want to draw a point for the users' COM position, we need to call glBegin(GL_POINTS) before doing anything. And then the process is to simply loop though all the users and convert their COM position to the depth pixel's position, and then draw a point in that position using OpenGL:
      glBegin(GL_POINTS);
      glColor3f( 1.f, 0.f, 0.f );
      for (int i = 0; i < users.getSize(); ++i)
      {
        float posX, posY;
        niStatus =
          uTracker.convertJointCoordinatesToDepth(
          users[i].getCenterOfMass().x,
          users[i].getCenterOfMass().y,
          users[i].getCenterOfMass().z,
          &posX, &posY);
          if (HandleStatus(niStatus)){
          glVertex2f(
            (posX * resizeFactor) + texture_x,
            (posY * resizeFactor) + texture_y);
        }
      }
      glEnd();
Here, we have used the glColor3f() function from OpenGL to change the active color to red.
nite::UserTracker::convertJointCoordinatesToDepth() is responsible for converting the COM position to the depth pixel's values, which is something similar to what the openni::CoordinateConverter::convertWorldToDepth() method does. If the returned value of this function is nite::STATUS_OK, the conversion process is completed without any problem, and we are able to use the posX and posY variables as the position of COM related to the depth frame. The next step is to use glVertex2f() from OpenGL to draw a point there:
        niStatus =
          uTracker.convertJointCoordinatesToDepth(
          users[i].getCenterOfMass().x,
          users[i].getCenterOfMass().y,
          users[i].getCenterOfMass().z,
          &posX, &posY);
Note that these two values (coordinates of COM point) are relative to the depth frame, and we need to calculate their position relative to the OpenGL window and its texture size:
          glVertex2f(
            (posX * resizeFactor) + texture_x,
            (posY * resizeFactor) + texture_y);
Now that we have placed all the COM points, we can start drawing rectangles for the users' bounding boxes. Of course, we do this after calling the glEnd() function to show that we are not interested in drawing points any more:
        glEnd();
        for (int i = 0; i < users.getSize(); ++i)
      {
Lopping over all users and extracting their bounding boxes' start and end points, and then converting these numbers relative to our OpenGL window and its texture size, is what we are doing here:
        nite::BoundingBox userbb =
        users[i].getBoundingBox();
        float minPosX = (userbb.min.x * resizeFactor) +
          texture_x;
        float maxPosX = (userbb.max.x * resizeFactor) +
          texture_x;
        float minPosY = (userbb.min.y * resizeFactor) +
          texture_y;
        float maxPosY = (userbb.max.y * resizeFactor) +
          texture_y;
Then we asked OpenGL to let us draw some closed lines and also requested four points for our rectangle:
        glBegin(GL_LINE_LOOP);
          glVertex2f(minPosX, minPosY);
          glVertex2f(maxPosX, minPosY);
          glVertex2f(maxPosX, maxPosY);
          glVertex2f(minPosX, maxPosY);
glEnd();And the last line is where we changed the active color to white again:
glColor3f( 1.f, 1.f, 1.f );
This is all we did in the first two steps.
In the next two steps, we only added one line of code:
glPointSize(10.0);
This line of code tells OpenGL to draw each point with a width and height having 10 pixels. Note that points in OpenGL are filled rectangles.
Here is the output of our application:
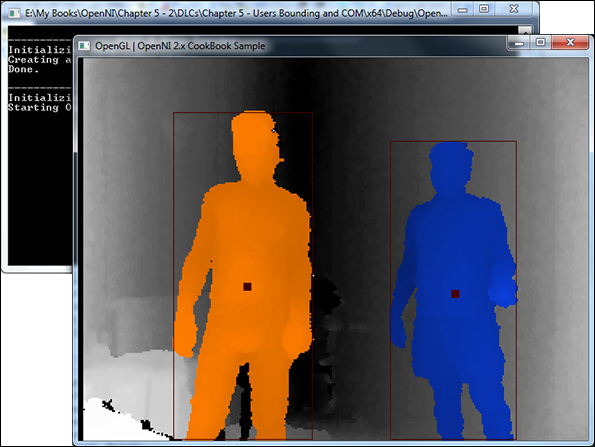
Here we learn about nite::UserTracker::convertJointCoordinatesToDepth(), which is capable of converting any coordinates returned by the nite::UserTracker methods (or its child classes' methods) to coordinate the related pixel in the depth frame. Apart from this method, there is another method named nite::UserTracker::convertDepthCoordinatesToJoint() that does the same thing but in a reverse direction. Both of them accept five parameters and fill the last two parameters with calculated coordinates from the first three parameters.