In this recipe, we are going to show you how to request calibration for a user's skeleton and for tracking a user's skeleton joints; we will then show these joints on a screen overlaying the depth stream.
Create a project in Visual Studio and prepare it for working with OpenNI and NiTE using the Create a project in Visual Studio 2010 recipe in Chapter 2, OpenNI and C++; then, configure Visual Studio to use OpenGL using the Configuring Visual Studio 2010 to use OpenGL recipe in Chapter 3, Using Low-level Data.
Then copy the code from the Identifying and coloring users' pixels in depth map recipe of Chapter 5, NiTE and User Tracking to this project.
- Locate the following line in the
gl_DisplayCallback()function:glEnd();
- Add the following lines of code relative to the preceding line:
glBegin( GL_POINTS ); glColor3f( 1.f, 0.f, 0.f ); const nite::Array<nite::UserData>&users = usersFrame.getUsers(); for (int i = 0; i < users.getSize(); ++i) { if (users[i].isNew()) { uTracker.startSkeletonTracking( users[i].getId()); } nite::Skeleton user_skel = users[i].getSkeleton(); if (user_skel.getState() == nite::SKELETON_TRACKED) { for (int joint_Id = 0; joint_Id < 15; ++joint_Id) { float posX, posY; niStatus = uTracker.convertJointCoordinatesToDepth( user_skel.getJoint((nite::JointType) joint_Id).getPosition().x, user_skel.getJoint((nite::JointType) joint_Id).getPosition().y, user_skel.getJoint((nite::JointType) joint_Id).getPosition().z, &posX, &posY); if (HandleStatus(niStatus){ glVertex2f( (posX * resizeFactor) + texture_x, (posY * resizeFactor) + texture_y); } } } } glEnd(); glColor3f( 1.f, 1.f, 1.f ); - Then locate this line in the
_tmain()function:glutMainLoop();
- Add the following line above the preceding line of code:
glPointSize(10.0);
In the first step, after placing the texture in OpenGL, we informed OpenGL that we want to draw some points with the color red:
      glBegin( GL_POINTS );
      glColor3f( 1.f, 0.f, 0.f );
Then we used an already defined variable containing a list of all the users to loop through them:
      for (int i = 0; i < users.getSize(); ++i)
      {
Now we can request the position of each recognized skeleton joint of the user and show them to the user. But before doing so, we need to request skeleton tracking of users because skeleton information is not available by default. If we don't request this for each user, we won't have any data about their skeleton and skeleton joints. So we add a condition when a user is recognized for the first time and then request skeleton tracking for that user:
        if (users[i].isNew())
        {
          uTracker.startSkeletonTracking(
            users[i].getId());
        }
Now is the time to check the user's skeleton state. To do so, we need to have access to the related nite::Skeleton object of the user, so we used the nite::UserData::getSkeleton() method first:
nite::Skeleton user_skel = users[i].getSkeleton();
The first step before trying to read the position of each joint is to check whether there is any data to show, whether the calibration process ended successfully, and whether the user is in the tracking state now. To do this, we need to check the return value of nite::Skeleton::getState():
        if (user_skel.getState() ==
          nite::SKELETON_TRACKED)
        {
The return value of this method is of the type nite::SkeletonState, which we talked about before in the introduction of this chapter. You can read about the possible states there. But here we used nite::SKELETON_TRACKED because it means the calibration process has been completed successfully and the skeleton data is available for this user.
Please note that, if the user goes out of FOV, if NiTE fails to see the entire part of a user's body, or if there is any other internal problem, we shouldn't expect nite::SKELETON_TRACKED as the status.
The next step is to request each of the 15 joints from nite::JointType enum and ask for the corresponding nite::SkeletonJoint objects that represent them. But this means lots of coding, so we decided to place a for loop that is counting from 0 to 14 (these are values of the nite::JointType enum members) to save some space:
          for (int joint_Id = 0; joint_Id < 15;
            ++joint_Id)
          {
Then we can access each of these 15 joints using the nite::Skeleton::getJoint() method and using their positions with the nite::SkeletonJoint::getPosition() method. But the returned value is not in the unit that we need to display these points in the depth stream, so we need to first convert them using the nite::UserTracker::convertJointCoordinatesToDepth() method:
            float posX, posY;
            status =
            uTracker.convertJointCoordinatesToDepth(
              user_skel.getJoint((nite::JointType)
                joint_Id).getPosition().x,
              user_skel.getJoint((nite::JointType)
                joint_Id).getPosition().y,
              user_skel.getJoint((nite::JointType)
                joint_Id).getPosition().z,
              &posX, &posY);
As you can see, we got access to the nite::SkeletonJoint object and its position by calling the following method:
user_skel.getJoint((nite::JointType)joint_Id).getPosition()
Then we calculated the coordinates relative to the depth stream's frame size. And in the next step, we checked if this conversation was completed without any error. If so, we'll ask OpenGL to draw a point there:
            if (HandleStatus(status)){
              glVertex2f(
                (posX * resizeFactor) + texture_x,
                (posY * resizeFactor) + texture_y);
            }
There is one thing that you can see in the preceding code, and that is the conversion of posX and posY again. We did this to find out the coordinates of the points relative to the OpenGL window.
This was the end of our code in this step. In the next two lines, we inform OpenGL that we don't have any more points to draw and inform it to again set the active color to white:
      glEnd();
      glColor3f( 1.f, 1.f, 1.f );
In the next steps, we only defined the size of each point and nothing more:
glPointSize(10.0);
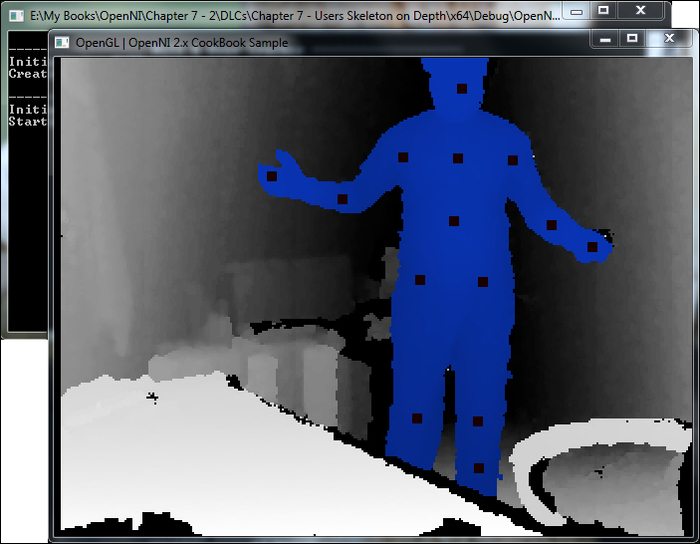
The output of our application is as follows: