
Adobe is famous for its art-producing and creative product line. We have Photoshop for pixel-based images, Illustrator for vector images, and applications like Premiere and AfterEffects for motion graphics and special video effects. Photoshop's tools and features have certainly grown over the last few versions, and some "overlap" has resulted between what people can use Photoshop to do and what would typically have been solely the domain of Illustrator or AfterEffects.
How's that? Well, consider, if we stick just to the topics relevant to this chapter, Photoshop's shape tools (all six of them). With the addition, back in version CS, of the ability to draw crisp, sharp shapes and lines and have them appear as separate shape layers (rather than the user just filling selections to achieve similar, yet more limited results), Photoshop enables you to create totally original artwork. No longer is photo editing the sum total of what you can do, and much of the artwork you can create in Photoshop finds its way into print, onto the Web, and in video and animation.
In addition to these shapes, you'll find that layer styles, which promise (among other things) quick and easy drop shadows and glows, help make Photoshop even more of an artist's tool. Of course, to purists, or those who simply believe that quick and simple can't possibly be good, this sort of "just add water" approach might sound like a cheap trick. However, nothing could be farther from the truth.
Layer styles, whether used for quick effects such as shadows and glows or for loftier artistic goals, have proven to be an invaluable addition. Layer styles give you painstaking control over drop shadows, glows, and bevels, and you can coat layers with gradients, patterns, and contoured wave patterns, as well as trace outlines around layers. When combined with the advanced blending options introduced in Chapter 14, layer styles blossom into a powerful special-effects laboratory, one of the most far-reaching and flexible Adobe has ever delivered. Furthermore, you can save the effects and reapply them to future layers.
These features may not be the reason you set out to learn Photoshop in the first place, and there's no question that they'll take time and patience to fully understand. But you'll be rewarded with greater proficiency and versatility in the long run — and you'll be that much farther down the road to mastery when Adobe finally releases the application that does absolutely everything for absolutely everyone.
Photoshop provides six shape tools that allow you to draw geometric and predefined shapes and lines. By default, the shapes are separated into independent shape layers, which are a mix of objects and pixels. The vector-based outlines of the shapes print at the maximum resolution of your printer, while the interiors may consist of solid colors, gradients, or pixel-based patterns and images — all based on your choices either before or after the shape has been drawn.
Why should you love shapes? Let us count the ways:
Shapes are editable. Unlike the shapes you create by filling a selection, you can change a shape by moving points and control handles. Likewise, you can scale, rotate, skew, or distort shapes, or even transform specific points and segments inside shapes. Nothing is ever set in stone, and nothing weird happens when you resize or reshape. This cannot be said of the pixels that make up a filled selection.
Shapes help to disguise low-resolution images. Sharply defined edges can add clarity to a printed image, and those sharply defined edges are achieved through the use of vector-based outlines. You get the line-art look without having to use a program like Illustrator or CorelDraw to get it.
You can color a shape with a layer style. As shown later in this chapter, layer effects such as drop shadows and beveled edges, are equally applicable to shape layers as they are to standard image layers.
You can preview clipping paths directly in Photoshop. Before object-oriented shapes, you were never quite sure if you traced an image properly with a clipping path until you imported it into InDesign, QuarkXPress, or some other application. Now you can preview exactly what your clipping path will look like directly in Photoshop.
Shapes expand with an image. In Chapter 3, you were advised against using Image

Now, of course this list of vector-based delights begs the question: If vectors are so great, why not forsake pixels and start drawing entirely with shape layers instead? Well, a shape can clip a continuous-tone photograph, but it can't replace one. Although there have been all kinds of experiments using objects and fractals, pixels are still the most viable medium for representing digital photographs. Because Photoshop's primary job is photo editing, pixels are (for the foreseeable future) the program's primary commodity.
Warning
One downside to shape layers is compatibility. Photoshop has stretched TIFF and PDF files to accommodate any kind of layer — shape layers included, but that doesn't mean other programs have any idea what Photoshop is doing. Of all the formats, PDF is the most likely to work with other programs. Just be sure to proof the document on a laser printer before taking it to a commercial printer.
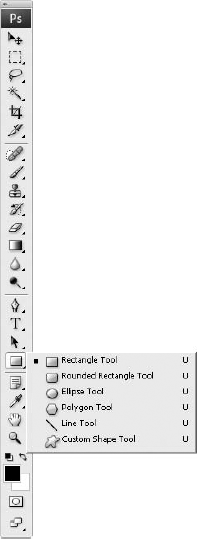
There's much to know and love about the shape tools. Now that you've read the list of Shape tool affirmations, it's time to get to know the tools and begin the getting-acquainted process. We'll start by looking at the Shape tool and its flyout of alternate tools shown in Figure 15.2. You can click and hold the default Rectangle tool so that the flyout of six shape tools displays, or you can press U to select the Rectangle tool and then press U again (or Shift+U) to switch from one tool to the next. Each of the tools, no matter how you access it, works as follows:
Rectangle tool: At one time, you had to draw a rectangular marquee and then fill it with color or a pattern in order to create a filled rectangle. This wasn't difficult, but it certainly wasn't very efficient or flexible. With the advent of the Shape tool, however, this antiquated method of shape creation has been replaced (although you can still use this method, if you so desire), and all you have to do to draw a rectangle is activate the Rectangle tool and then from one corner of the desired area (the area you'd like to see containing a shape) to the other, Shift-drag to draw a square, or Alt-drag (Win) or Option-drag (Mac) to draw the shape outward from the center. Oh, and if you want to set the fill color beforehand, set can your foreground color with the Color Picker, or use the Color box on the options bar to the color you want filling your shape. That's it.
Tip
While drawing a rectangle or any other shape, press the spacebar to reposition the shape. Then release the spacebar and continue dragging to resize the shape as you normally do.
Rounded Rectangle tool: When you select the Rounded Rectangle tool, a Radius value becomes available in the Options bar. If you think of each rounded corner as a quarter of a circle, the Radius value is the radius (half the diameter) of that circle. Bigger values result in more roundness.
Ellipse tool: The Ellipse tool draws ellipses (big surprise there!). Shift-drag to draw circles; Alt-drag (Win) or Option-drag (Mac) to draw the ellipse outward from the center.
Polygon tool: This tool draws regular polygons, which are straight-sided shapes with radial symmetry. Examples include equilateral triangles (3 sides), squares (4 sides), pentagons (5 sides), hexagons (6 sides), heptagons (7 sides), octagons (8 sides), decagons (10 sides), dodecagons (12 sides), and a bunch of other shapes with so many sides that they're virtually indistinguishable from circles. Type a Sides value in the Options bar to set the number of sides in the next polygon you draw. Or better yet, press the bracket keys, [ and ], to decrease or increase the Sides value from the keyboard. You also can draw stars and rounded shapes, as explained in the next section.
Line tool: Wait a minute; how is a line a shape? Well, technically, the lines created with the Line tool are shapes — they're just very skinny rectangles, drawn at whatever angle you drag them. When you activate the Line tool, you get the chance to type a Weight value into the Options bar, which defines the thickness of the so-called "line." Next, just drag from point A to point B (assuming the line is intended to point to something or span a particular distance). The Options bar also allows you to apply arrowheads (true pointing jobs, or other shapes created by adjusting the width, length, and concavity of the heads) to one or both ends of your line. Snazzy.
Custom Shape tool: The Custom Shape tool makes up for the fact that it's very hard (if not impossible) to do more than draw simple polygons with the other shape tools. If you opt to see all the available Custom Shape tool shapes, you're presented with more than 250 shapes — everything from stars to paw prints to flowers to things that look like the symbols in the Zapf Dingbats or Monotype Sorts font libraries.
The act of drawing a shape can be as simple as clicking and dragging with a tool. How that shape manifests itself, however, depends primarily on which of the first three Options bar buttons pictured in Figure 15.3 is clicked. The first option creates a new shape layer when you draw with the Shape tool. The second option creates a work path, available for inspection in the Paths palette. And the final option creates a pixel-based shape. In this latter scenario, Photoshop doesn't add a new layer; it merely recolors the pixels on the active layer. Although simple in theory, the program offers you a wealth of additional controls.
First, you want to select the shape tool you want to use. Remember, U is the keyboard shortcut for the shape tools, and you can use it or simply click one of the shape tools buttons when you display the flyout of all six buttons. You also can pick a different shape from the Shape tool Options bar, changing from, say, the Rectangle to the Custom Shape tool.
Next, you can specify the color. This is done from the Options bar, by clicking the Color button on the Options bar, which opens the Color picker. If you want to fill the shape with a gradient, a pattern, or an image, you can do that after you finish drawing the shape, as explained in the section entitled "Beauty on the inside," later in this chapter.
With the type of shape and color out of the way, you can specify how you want to draw the shape. Pictured in Figure 15.3, the first three buttons in the Options bar determine what the Shape tool draws. Remember that to draw shape layer, you'll want to make sure that the first button is selected; otherwise, you'll be drawing a path or just some filled pixels, the same thing you'd get by clicking with the Paint Bucket inside a Marquee or Lasso selection.
Before you draw the shape, if you want to control the geometric aspects of the shape — such as drawing the shape in a fixed size, changing the number of sides in a polygon, determining the thickness of your line — you need to click the Geometry Options button labeled in Figure 15.3.
Click the down-pointing triangle to the right of the tool buttons in the Options bar (to see a pop-up palette of options geared to the selected shape tool), and make your changes and selections.
Note
When you're drawing rectangles and rounded-corner rectangles, the one unusual option in the Geometry Options palette is Snap to Pixels. Object-oriented shapes don't have any resolution, so their sides and corners can land in the middle of pixels. To prevent potential anti-aliasing in rectangles, select the Snap to Pixels option to precisely align them with the pixels in the image.
Tip
When drawing a custom shape, click the Shape button to display a pop-up palette of presets, as shown in Figure 15.3. You can load more shapes by choosing the Load Shapes command or by choosing a predefined presets (.csh) file from the presets palette menu. (The triangle that opens this menu is labeled in Figure 15.3, too.)
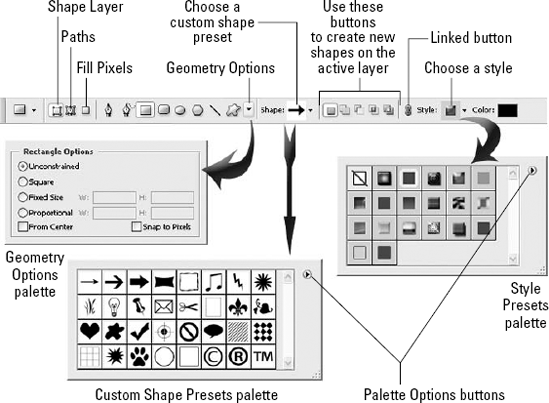
Figure 15.3. Use the options in the Options bar to specify the appearance of a shape before you draw it.
The last thing you'll do before drawing the shape is to choose a layer style. This can be none, if you want a solid color fill based on what's chosen in the Color button, or you can pick from a seemingly endless selection of styles. The palette is shown in Figure 15.3.
Tip
When drawing a shape layer, you can assign a layer style to your shape before drawing it or after the fact — which is sometimes the better approach, because some fills don't translate very well in certain shapes. The Layer Style pop-up palette (refer to Figure 15.3) offers all presets available in the Styles palette, as discussed at the end of this chapter.
Finally, you're ready to draw the shape. Because you've already chosen a shape (by clicking the appropriate button, as shown in Figure 15.3) to draw a shape layer, Photoshop automatically creates a new layer as soon as you draw the shape and release the mouse. As shown in Figure 15.4, the Layers palette shows a colored fill (labeled "Layer contents" in the figure) with a clipping path — or vector mask in Photoshop parlance — to the right of it, masking the fill. If you assigned a layer style, a list of one or more effects appears under the layer name.
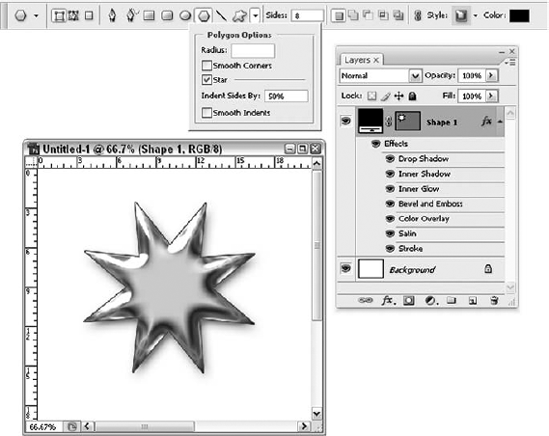
Figure 15.4. A shape layer is actually a vector mask that masks a color or other contents directly in Photoshop. Here you also see the polygon's options and the settings for drawing a star.
By default, Photoshop creates a new shape layer for each new shape that you draw. This can have lots of benefits, and at other times, you'll find that having a layer for each and every shape is a little confusing. The choice as to whether to have them all on their own layers or sharing a single layer is up to you, and the decision will vary by the image. If you prefer to keep adding to the same shape layer so that all shapes share the same fill, click the Add to Shape Area button in the Options bar (labeled in Figures 15.3 and 15.5). Then draw a new shape.
Note
If you press Enter, Return, or Esc, the current shape layer is deactivated, signifying that you no longer want to add shapes to that layer. This change is visible in the Layers palette; notice that the vector mask thumbnail no longer has a selection border around it. To reactivate the layer, simply click the thumbnail.
You now have one or more shape layers that you can use as you please. From this point, it's a matter of editing the shape, as explained in the following sections.
So you've drawn your shape. Now what? Well, if you don't like a segment, you can change it. Don't like a point? Move it. Hate the entire shape? Delete it. Here's how:
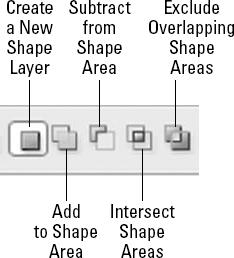
Using compound path options: As explained in the preceding section, you can draw multiple shapes on a single layer. Because they all share a single fill, Photoshop thinks of the shapes as being bits and pieces of a single, complex path. In drawing parlance, such a path is called a compound path. This presents Photoshop with a dilemma when the bits and pieces overlap. Because the pieces of the compound path share a fill, they could just merge together. Or perhaps you'd rather use one shape to cut a hole in the other. Or maybe you'd like the intersection to be transparent. You have to tell Photoshop which of these possible outcomes you prefer.
You specify your preference by selecting one of the last four compound path buttons, shown in Figure 15.5. (As mentioned previously, the first button, which is on by default, makes Photoshop create every shape on its own shape layer.) Click the second button or press the plus key (+) to add the new shape to the others, or press Shift as you draw shape after shape, adding each one to the active shape layer. Click the third button or press the minus key (−) to subtract the new shape from the others. The fourth button retains the intersection, while the fifth makes the intersection transparent.
Selecting shapes: You have access to all but the first compound path button when selecting shapes with the arrow tool. Press A to get the black arrow tool — if you get the white arrow instead, press A again (or Shift+A if the Use Shift Key for Tool Switch option is selected) — and then click a shape to select it. Or Ctrl-click (

Moving and transforming: Click and drag a selected shape to move it. Select the Show Bounding Box option in the Options bar to access the transformation controls. Or press Ctrl+T (
Arranging and combining shapes: After selecting a shape with the arrow tool, you can apply any of the four available compound path buttons. As you do, bear in mind that the topmost shape takes precedence, and the stacking order is entirely dependent on the order in which you draw the shapes — with more recent shapes in front. (The Layer
Warning
Technically, you can combine multiple shapes that don't overlap, but it's not advisable. At first, the shapes behave as if they're grouped together. But try to combine other paths with them, and your results may not be what you expected.
Selecting points and segments: Press A (or Shift+A) to get the white arrow tool, which selects individual points and segments. Move individually selected points by dragging them; transform such points by pressing Ctrl+T (Win) or
Adding and deleting points: The best tool for reshaping a shape is the Pen tool. First select part of the shape with one of the arrow tools. Then click a segment to insert a point; drag on a segment to add a smooth point; click a point to remove it. You also can use the Convert Point tool, as well as any other technique that's applicable to paths.
Disabling a vector mask: Shift-click the vector mask thumbnail in the Layers palette to turn it off (a red X appears on the thumbnail) and make visible the entire contents of the layer. Shift-click the thumbnail again to turn the vector mask on.
Duplicating a vector mask: As far as Photoshop is concerned, shapes are just another kind of path. So it's not surprising that you can access the paths in an active shape layer from the Paths palette. Drag the Vector Mask item onto the tiny page icon at the bottom of the Paths palette to duplicate the shapes so you can use them elsewhere as standard paths (as discussed in Chapter 8).
Deleting a vector mask: Click the vector mask thumbnail and then click the trash can icon at the bottom of the Layers palette to delete the shapes from the layer. You also can just drag the thumbnail to the trash can icon. To add a new shape to the layer, first choose Layer
Defining your own custom shape: If you create a shape that you think you might want to repeat in the future, select the shape with either arrow tool and choose Edit
The moral of the story is this: Shapes work much like paths, bearing many of the accuracy-maintaining and change-supporting attributes that you may have grown to love. If you're forgetting exactly what it is that you're supposed to love about paths, go back to Chapter 8 and get reacquainted.
When it comes to shapes, all they have is their insides. Of course, you can apply a stroke to a shape, but that's discussed later, and it's only a veneer anyway. So with the knowledge that a shape is only as good as what's inside it, here are a few ways to modify the color and general appearance of shape layers:
Change the color: To change the color of a shape layer, double-click the layer contents thumbnail in the Layers palette. Then select a new color from the Color Picker dialog box. Or better yet, change the foreground color and then press Alt+Backspace (Option+Delete on the Mac).
Change the blending options: You can change the blend mode and Opacity value for a shape layer using the standard controls in the Layers palette. Or double-click anywhere on the layer (except the layer name, layer contents thumbnail, vector mask thumbnail, or the link icon) to display the Blending Options section of the Layer Style dialog box. As discussed in Chapter 13, these options work the same for shape layers as they do for normal layers. You also can apply or modify layer effects, as is explained later in this chapter.
Change the layer style: Another way to apply or switch out layer effects is to apply a predefined style from the Styles palette. Just click a preset in the Styles palette and Photoshop automatically applies it to the active layer. After that, you can edit an effect by double-clicking its name in the Layers palette.
The Linked button, labeled back in Figure 15.3, comes into play when you make a change to the layer style or color of a shape layer. If the button is selected, changes you make to the style or color are applied, or "linked," to the currently active shape layer. If the button isn't selected, the style or color change applies to the next shape layers you create.
Rename the shape layer: Double-click the name of a shape layer to rename it. This works for renaming any kind of layer.
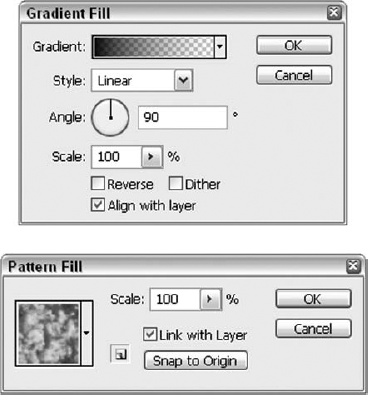
Fill with a gradient or repeating pattern: Is a solid color fill too boring for you? Don't limit yourself. To fill the active shape layer with a gradient, choose Layer
After applying a gradient or pattern, you can edit it just by double-clicking the layer contents thumbnail in the Layers palette. Photoshop calls these kinds of editable contents dynamic fills.
Make a color adjustment shape: Where layer content is concerned, shape layers have unlimited potential. You can even fill a shape with a color adjustment. Just choose Levels, Curves, Hue/Saturation, or any of the other color-correction classics from the Layer
Paint inside a shape layer: Wish you could paint or edit the contents of a shape layer? Well, thanks to subtle genetic alterations to Photoshop's core subroutines, you can. Assuming the shape is filled with a solid color, gradient, or pattern (this technique is not applicable to adjustment layers), choose Layer
Fill a vector mask with an image: Applying a vector mask to an image is a more delicate operation. Draw a shape — not as a new shape layer but rather as a working path (see coverage of the shape drawing process earlier in this chapter). Then select the layer that you want to mask (it must be a floating layer, not the background) and choose Layer
Tip
After establishing a work path, Ctrl-click (Win) or
Go from clipping mask to vector mask: What if you've already made a shape layer, and you want to fill that shape with an image? Again, you can use several approaches, but the easiest is to paste the image onto a layer in front of the shape layer. Then press Ctrl+G (Win) or
Fuse image and shape layer: That's enough to create the same visual effect as a shape masking an image, but it involves two layers instead of one. If, for any reason, you want to fuse the two layers together, you have to take a special approach. First, select the shape layer and choose Layer
Have a (Masked) Ball
Still not dazzled by all these ways to perform near feats of magic with shape layers? Jeez — how jaded are you? Don't answer that. Instead, consider that you also can add a layer mask to a shape layer. Dazzled yet? That's right; Photoshop lets you combine pixel masking and vector masking on one layer, as shown in this figure.
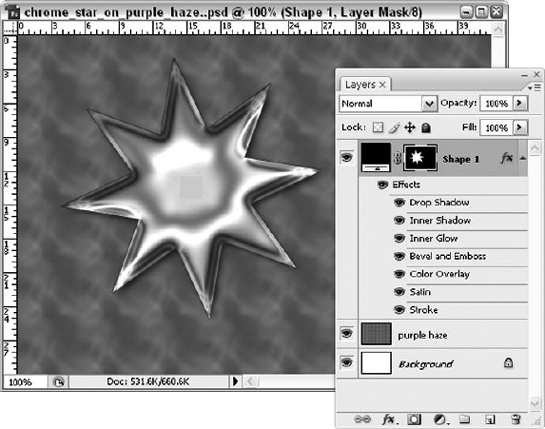
Why would you do such a thing? The combination permits you to have soft and razor-sharp edges all in the same layer. For example, to achieve the results shown in the figure, you would Ctrl-click (
Way back in Photoshop 5, Adobe introduced a series of layer effects that automated the creation of shadows, glows, and beveled edges, applicable to individual layers in an image. Version 6 took those rudimentary tools several steps further, dramatically improving the quality of the existing effects and adding effects that overlay colors, stroke outlines, and create textures and contours. It also let you define exactly how effects are blended with background layers and permitted you to save them as preset layer styles for later use. Not much has changed since then, but why mess with a good thing, right? Photoshop's layer styles save you tons of time, make it easy to apply consistent effects throughout one or more images, and allow you to customize effects for a totally unique look.
To apply a layer effect, start with content on an independent layer, such as shown in the image in Figure 15.7. You can use any kind of layer, including a text layer (see Chapter 16) or a shape layer. After activating the layer in question, click the add layer style icon at the bottom of the Layers palette — the one that looks like a florin (cursive f) — and choose any of the commands following Blending Options. Or double-click anywhere on the layer other than the layer name to display the Layer Style dialog box, and then select an effect from the left-hand list. Or you can right-click (Control-click on the Mac) and choose Blending Options from the resulting pop-up menu. In the resulting dialog box, select or deselect the check box to turn the effect on and off; you also can highlight the effect name to edit its settings. Figures 15.8 and 15.9 show inner shadows and inner and outer glows. You can select from the following effects to apply similar effects to your images:
Drop Shadow: The Drop Shadow command applies a common, everyday drop shadow, as seen in the first example of Figure 15.8. You can go with the default setting for the size, shape, and color of the shadow, or you can tweak it, specifying your own color, opacity, blend mode, position, size, and contour for the shadow. Photoshop makes it pretty — and pretty easy.
Inner Shadow: This command applies a drop shadow inside the layer, as demonstrated in the second example in Figure 15.8. The command simulates the kind of shadow you'd get if you were looking through a piece of fabric that was cut through — casting a shadow through the cutout onto the paper beneath it.
Outer Glow: The Outer Glow command creates a traditional halo, as seen in the first example in Figure 15.9. You can adjust the color, size, and other aspects of the glow, to meet your illumination needs.
Inner Glow: This command creates a glow from within — applying the effect inside the layer rather than outside, as demonstrated in the second example in Figure 15.9.
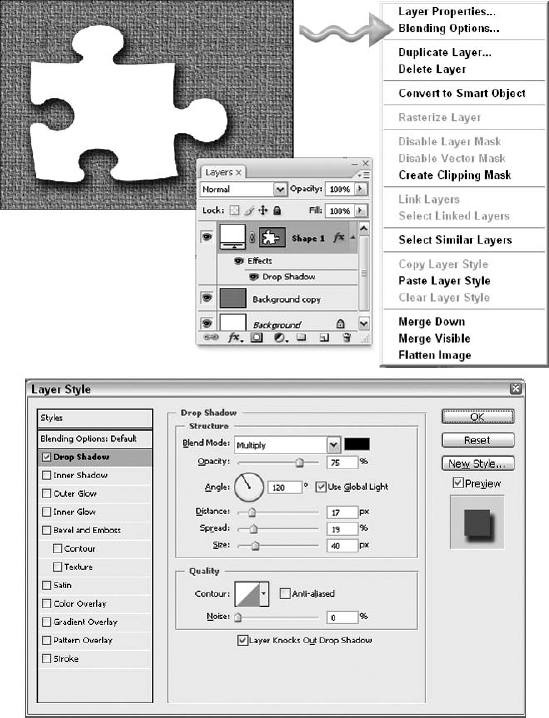
Figure 15.7. Select a layer (here a Shape layer — a puzzle piece), click the add layer style icon at the bottom of the Layers palette, and choose an effect from the menu shown at the top here. Then, as needed, adjust the settings in the very comprehensive Layer Style dialog box.

Figure 15.8. A 3D look, with a shadow cast beneath the layer (top) or simulating a shadow seen through the layer (bottom) can be created easily with the Drop Shadow or Inner Shadow effects.
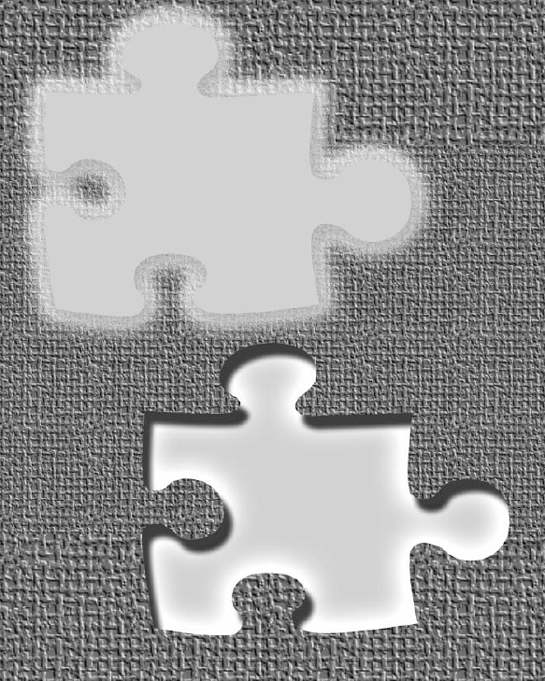
Figure 15.9. Choose an Inner Glow or Outer Glow, or both; these effects can be applied in combination, too. Here, an Outer Glow emanates from the edges of the content (top), and an Inner Glow shows a light within (bottom).
To create a glow around the perimeter of a layer, apply both the Outer Glow and Inner Glow commands. Figure 15.10 shows an example of this (top right), as well as other effects that you can obtain by mixing and matching shadows and glows.
Bevel and Emboss: The Bevel and Emboss option produces one of five distinct edge effects, as defined using the Style pop-up menu. The first four appear in Figure 15.11; the fifth one is exclusively applicable to stroked layers and requires the Stroke effect to be turned on. You can add a three-dimensional beveled edge around the outside of the layer, as in the first example in the figure. The Inner Bevel effect produces a beveled edge inside the layer. The Emboss effect combines inner and outer bevels. The Pillow Emboss effect reverses the inner bevel so the image appears to sink in and then rise back up along the edge of the layer. By tweaking the settings for a bevel, you can achieve a soft effect or a hard, chiseled look. The depth and intensity of the beveled effect is also adjustable.
Contour and Texture: The Contour and Texture options aren't actual effects unto themselves. Instead, you use them to modify the Bevel and Emboss effect. The Contour settings create waves in the surface of the layer that result in rippling lighting effects. Texture stamps a pattern into the surface of the layer, creating a texture effect. Figure 15.12 illustrates these two options. On the top is an example of an Inner Bevel with the Contour set to Ring and a Range of 30 percent. On the bottom is another example of Inner Bevel, this time with the Contour set to Ring, a Range of 30 percent, and Texture set to Pattern (River Rocks Inverted).
Satin: This option creates waves of color, as in Figure 15.13. You define the appearance of the waves using the Contour options. One of the stranger effects, Satin can be difficult to predict. As long as you keep the Preview option selected, though, you can experiment and play with settings for all the styles you're applying until you see a desirable result.
Color Overlay, Gradient Overlay, and Pattern Overlay: These three options fill the layer with a coating of solid color, gradient, or repeating pattern, respectively. They work almost identically to the three dynamic fills available to shape layers, as discussed earlier in this chapter. All three can be quite useful when defining your own style presets. Figure 15.14 shows the Gradient Overlay and Pattern Overlay effects, applied with a drop shadow, too.
Stroke: Use this option to trace a colored outline around a layer, as shown in Figure 15.15. The default stroke is rarely, if ever, useful: It's red and quite thick. You can change the color and thin it out as needed, and you also can choose to apply it to the inside or outside of the layer's edge. The Stroke effect is often preferable to Edit
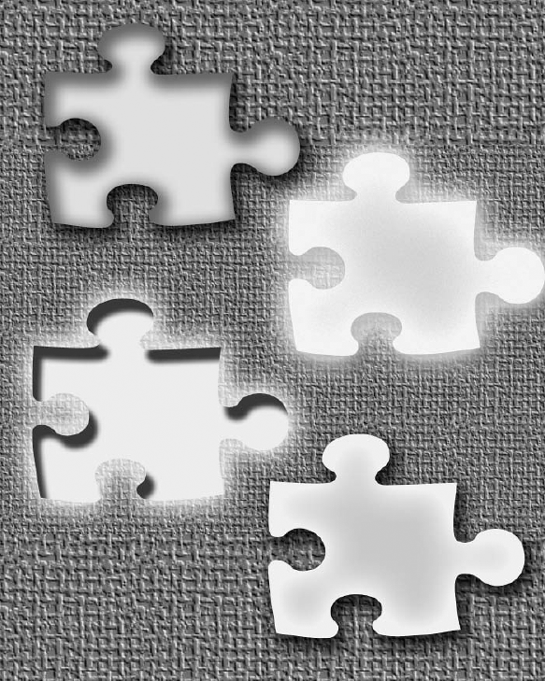
Figure 15.10. Combining two or more layer styles gives you virtually unlimited options — especially when you factor in all the options for each style. Clockwise from the upper left, these are: Drop Shadow and Inner Shadow, Outer Glow and Inner Glow, Inner Shadow and Outer Glow, and Drop Shadow and Inner Glow.
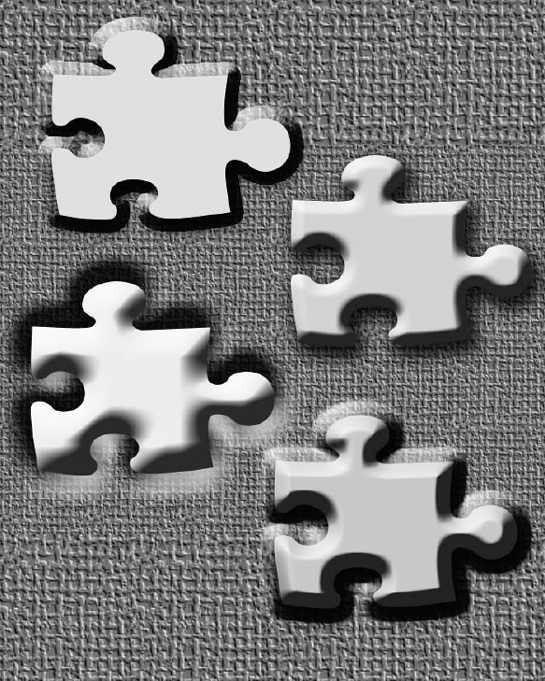
Figure 15.11. Choose Layer
Layer StyleBevel and Emboss to select one of several beveling options. Here, all four types of bevels are applied, clockwise from the upper left: Outer Bevel, Inner Bevel, Pillow Emboss, and Emboss.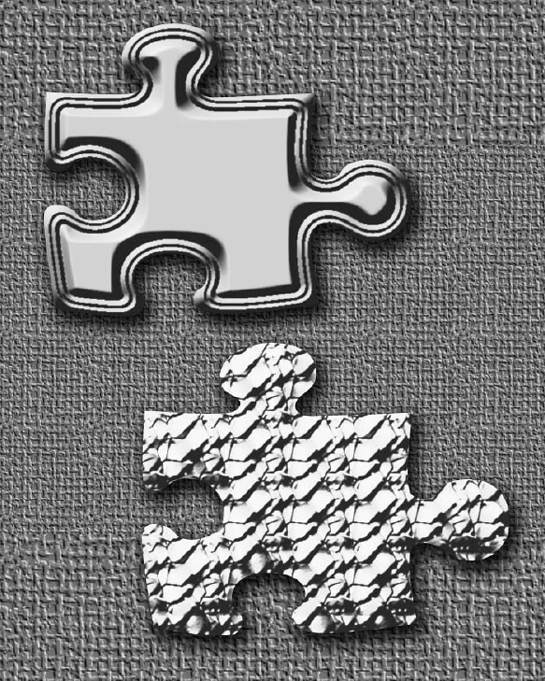
Figure 15.12. Create even more interesting effects by adding Contour and/or Texture options to your beveled layer.

Figure 15.13. Satin, all by itself (top), looks ... satiny ... but may not create a very distinct effect without a bevel to go with it. On the bottom, the satin effect is confined and its edges sharpened by adding a contoured Inner Bevel.
To apply a blending option and see its options at the same time, click the name of the effect: For example, click the words "Drop Shadow" and you see the settings for the shadow in place. If you only wanted to see the options and not apply the style, this might seem like a problem, but it's no big deal to turn the style off (deselect the check box to the left of the style name) if you don't want it and just wanted to look at the settings.
If you prefer keyboard shortcuts, try some of these to help you navigate the Layer Style dialog box, which truly is a vast labyrinth of options: To switch between effects without turning them on or off, press Ctrl (
The quick and automatic, almost "canned," nature of the layer styles may cause some more advanced designers and photographers to turn up their noses. It seems so amateur, after all, to just click a button and have a drop shadow appear, or to create a glow or beveled edge without having to go through countless steps and use several tools — expertly, craftily, with great skill and creativity. Of course, new Photoshop users and people who don't consider themselves expert designers will love layer styles, and we can all learn from those users and their very reasonable response. Why sniff at something just because it's fast or easy? It would be harder and require more effort to push your car to the store than to drive it, but we all hop in and hit the gas rather than hoofing it to the mall. Why? Because the car was meant to make it fast and easy to get from place to place.
So hop in, hit the accelerator, and make use of layer styles with no guilt, no sense of taking the easy way out. Still feeling like a cheater? Consider these real benefits to using layer styles:
They stick to the layer. Move or transform the layer and the effect tags along with it.
The effect is temporary. As long as you save the image in one of the three layered formats — native Photoshop (PSD), TIFF, or PDF — you can edit the shadows, glows, bevels, overlays, and strokes long into the future.
Layer effects are equally applicable to standard layers, shape layers, and editable text. This is unusual because both shape layers and editable text prohibit many kinds of changes.
Thanks to the Contour presets, layer effects enable you to create effects that would prove otherwise exceedingly difficult or even impossible.
You can combine multiple effects on a single layer.
You can copy an effect from one layer and paste it onto another.
You can save groups of effects for later use in the Styles palette.
The effects show up as items in the Layers palette. You can expand and collapse a list of effects, as well as temporarily disable and enable effects by clicking the familiar eyeball icons.
Layer effect strokes print as vector output, so they're guaranteed to be smooth.
That's it. How many good reasons do you need? Just accept that layer styles are great, use them, and just get over it.
The Layer Style dialog box offers 13 panels containing more than 100 options. The first panel, Blending Options, was discussed in Chapter 14. The remaining 12 panels are devoted to layer effects. Select the desired effect from the list on the left; use the check box to turn the effect on and off.
Although there are tons of options, most are self-explanatory. For example, you select a blend mode from the Blend Mode pop-up menu. (For explanations of these, see Chapter 14.) Next, you make the effect translucent by typing a value in the Opacity option box. Easy enough?
Other options appear multiple times throughout the dialog box. All the options that appear in the Inner Shadow panel also appear in the Drop Shadow panel; the options in the Outer Glow panel appear in the Inner Glow panel; and so on. After you've played with the settings for an Outer Glow or a Drop Shadow, tweaking the settings for the Bevel or Stroke styles won't present any mystery. Figure 15.16 shows the Bevel and Emboss settings, which include most of the settings you'll encounter for any of the other effects — adjusting angles, contours, depth, size, spread, and opacity, as well as choosing where in the layer to place the effect in question.

Figure 15.16. The Bevel and Emboss settings are pretty representative of the other effects' settings. Master these and you're ready to tackle anything the Layer Style dialog box throws at you.
This list explains the options in the order in which they appear throughout the panels. Each option is explained only once, so if an option appears in multiple panels (or versions of the dialog box, for different styles, to put it another way), check this list for more information or clarification:
Blend Mode: This pop-up menu controls the blend mode. So much for the obvious. But did you know that the Blend Mode menu can let you turn an effect upside-down, select a light color and apply the Screen mode to change a drop shadow into a directional halo, or use a dark color with Multiply to change an outer glow into a shadow that evenly traces the edge of the layer? Don't be constrained by the traditional or allegedly intended uses of shadows and glows. Layer effects can be anything.
Color swatch: To change the color of the shadow, glow, or beveled edge, click the color swatch. When the Color Picker is open, click with the eyedropper cursor in the image window to select a color from the layered composition. When editing a glow, you can apply a gradient in place of a solid color. Click the gradient preview to create a custom gradation or select a preset from the pop-up palette.
Opacity: Use this option to make the effect translucent. Remember, a little bit of effect goes a long way. When in doubt, reduce the Opacity value for more subtle results.
Angle: Associated with shadows, bevels, the Satin effect, and gradients, this value controls the direction of the effect. In the case of shadows and bevels, the option controls the angle of the perceived light source. With Satin, it controls the angle at which contour patterns overlap. And with a gradient, the Angle value represents the direction of the gradient.
Tip
You can avoid the numerical Angle option by clicking and dragging inside the little compass or clock-looking device in the dialog box or simply by dragging inside the image window. When the Drop Shadow or Inner Shadow panel is visible, click and drag inside the image window to move the shadow with respect to the layer. You also can drag the Contour effect when working in the Satin panel. Other draggable effects include Gradient Overlay and Pattern Overlay, although dragging affects positioning, not angle.
Use Global Light: In the real world, the sun casts all shadows in the same direction. By selecting the Use Global Light option, you tell Photoshop to cast all direction-dependent effects — drop shadows, inner shadows, and the five kinds of bevels — in the same direction. If you change the angle of a drop shadow applied to Layer 1, Photoshop rotates the sun in its digital heaven and so changes the angle of the pillow emboss applied to Layer 9, thus preventing you from applying conflicting shadows and other light-direction-dependent effects to different parts of the image.
Conversely, if you deselect the option, you tell Photoshop that physics and the laws of nature be damned, and you're going to dictate where the sun is on each layer and there may be conflicts, but who cares? You can change an Angle value in any which way you like, and none of the other layers will care — or at least they won't let on if they do.
Tip
If you have established a consistent universe, you can edit the angle of the sun by choosing Layer
Distance: The Drop Shadow, Inner Shadow, and Satin panels feature a Distance value that determines the distance between the farthest edge of the effect and the corresponding edge of the layer. Like Angle, this value is affected when you click and drag in the image window.
Spread and Choke: Associated with the Drop Shadow and Outer Glow panels, the Spread option expands the point at which the effect begins outward from the perimeter of the layer. If you were creating the effect manually (as discussed in Chapter 14), this would be similar to applying Select
Size: One of the most ubiquitous settings, the Size value determines how far an effect expands or contracts from the perimeter of the layer. In the case of shadows and glows, the portion of the Size that is not devoted to Spread or Choke is given over to blurring. For example, if you set the Spread for Drop Shadow to 0 percent and the Size to 30 pixels, Photoshop blurs the shadow across 100 percent of the 30-pixel size. If you set the Spread to 100 percent, 0 percent is left for blurring. The shadow expands 30 pixels out from the perimeter of the layer and has a sharp edge. This makes the effect seem larger, but only the opaque portion of the effect has grown.
Size and Depth observe a similar relationship in the Bevel and Emboss panel, with Depth taking the place of Spread or Choke. When adjusting a Satin effect, Size affects the length of the contoured wave pattern. And in Stroke, Size controls the thickness of the outline.
Contour: Photoshop creates most effects — namely shadows, glows, bevel, and the Satin effect — by fading a color from a specified Opacity value to transparent. The rate at which the fade occurs is determined by the Contour option. Click the down-pointing arrowhead to select from a palette of preset Contours; click the Contour preview to design your own. If you think of the Contour preview as a graph, the top of the graph represents opacity and the bottom represents transparency. So a straight line from top to bottom shows a consistent fade. A spike in the graph shows the color hitting opacity and then fading away again. Figure 15.17 shows two examples applied to individual layers.
The most challenging contours are associated with Bevel and Emboss. The Gloss Contour option controls how colors fade in and out inside the beveled edge, as if the edge were reflecting other colors around it. The indented Contour effect — below Bevel and Emboss in the Layer Style list — wrinkles the edge of the layer so that it casts different highlights and shadows.
Tip
You can make your own Contours, too. Instead of clicking the drop-list to choose from preset Contours, click the Contour icon itself. A Mapping graph displays, with a curved line and nodes along its length, representing the current contour's effects. You can drag the line and nodes to change the impact of that contour on the image, and watch the impact of your changes in the image, just as you watch any other style preview. You can save new presets, using the New button, which gives you dialog box through which you can name your new Contour for future use.
Anti-aliased: If a Contour setting consists of sharp corners, you can soften them by selecting this option. Most presets have rounded corners, making anti-aliasing unnecessary.
Noise: Associated strictly with shadows and glows, the Noise value randomizes the transparency of pixels. It's like using the Dissolve blend mode, except that you have control over how much randomization to apply. The Noise value does not change the color of pixels; that is the job of an option called Jitter.
Layer Knocks Out Drop Shadow: In the real world, if an object is translucent, you can see through it to its own shadow. However, this turns out to be an unpopular law of nature with most image editors. So when creating a drop shadow, Photoshop gives us the Layer Knocks Out Drop Shadow option, which when selected makes the drop shadow invisible directly behind the layer. Deselect the option for a more natural effect.
Technique: Moving out of the Shadow panels and into Outer Glow, the first unique option is the Technique pop-up menu. Also available when creating bevel effects, Technique controls how the contours of the effect are calculated. When a glow is set to Softer, Photoshop applies a modified Gaussian Blur to ensure optimal transitions between the glow and background elements. Your other option is Precise, which calculates the effect without the Gaussian adjustment. Of course, the effect may remain blurry, but strictly as a function of the Spread and Contour settings. Precise may work better in tight corners, common around type and shape layers. Otherwise, stick with Softer.
The Bevel and Emboss panel doesn't provide the same kind of blurring functions that you get with shadow and glow effects, so the Technique option works a bit differently. The default setting, Smooth, averages and blurs pixels to achieve soft, rounded edges. The two Chisel settings remove the averaging to create sawtooth abrasions into the sides of the layer. Chisel Hard results in thick cut marks; Chisel Soft averages the perimeter of the layer to create finer cuts. Increase the Soften value (described shortly) to blur the abrasions.
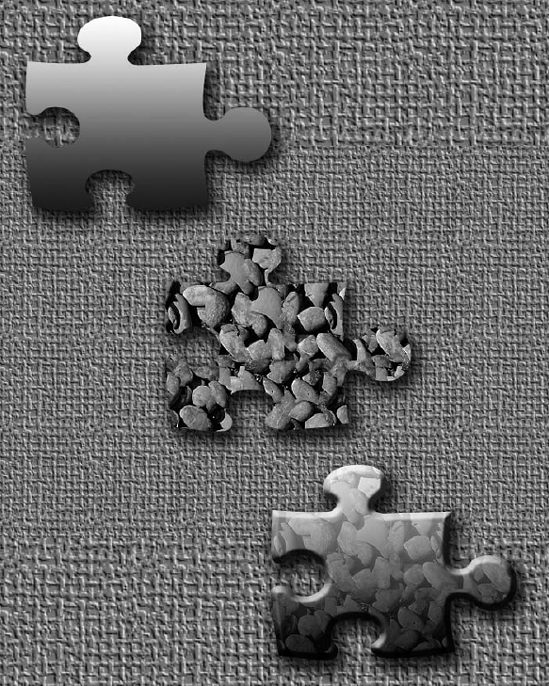
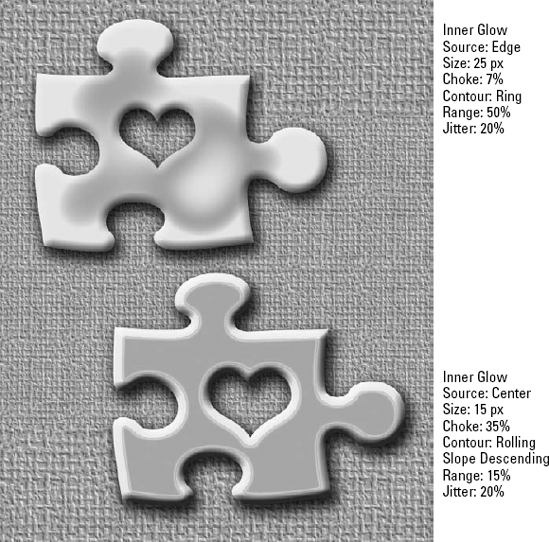
Source: When working in the Inner Glow panel, Photoshop wants to know where the glow starts. It can glow inward from the perimeter of the layer (Edge, as seen in the top-most example in Figure 15.18) or outward from the middle (Center, as seen on the bottom in Figure 15.18).
Figure 15.17. Two different Contour presets (Ring at the top, Double Ring at the bottom). Both are set to 90% Opacity, with a 60% Spread. The Noise is set to 65%, and the glow is set to 30 pixels in Size. The Range for the Contour is 70%. When used with an Outer Glow style, the Contour setting controls how the halo drops from opacity to transparency and back again (as in the case of ring and other peaked contours).
Range: The two Glow panels and the Contour panel (subordinate to Bevel and Emboss) use Range values to modify the Contour settings. This value sets the midpoint of the contour with respect to the middle of the size. Figure 15.19 shows the two extremes — values less than 50 percent and greater than 50 percent — and their impact on the results.
Jitter: Where the Noise value randomizes the transparency of pixels, Jitter randomizes the colors. This option is operable only when creating gradient glows in which the gradation contains two or more colors (not a color and transparency).
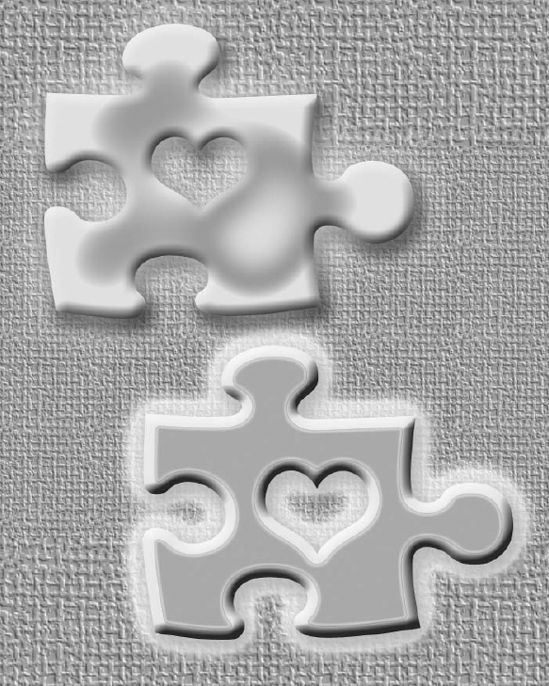
Figure 15.19. Here an Outer Glow is added to the shapes from Figure 15.18, with a Linear Contour and the Size set to 70 pixels in both shapes; the only difference is Range — 75% at the top and just 15% on the bottom. Less really is more!
Depth: The first unique Bevel and Emboss setting is Depth, which makes the sides of a bevel steeper or shallower. In most cases, this translates to increased contrast between highlights and shadows as you raise the Depth value.
The Texture panel includes its own Depth setting. Here, Photoshop renders the pattern as a texture map, lighting the white areas of the pattern as high and the black areas as low. The Depth value determines the depth of the texture. The difference is that you can type a negative value, which inverts the texture. Meanwhile, you also have an additional Invert option, which, when selected, reverses the lights and darks in the pattern. So a positive Depth value with Invert selected produces the same effect as a negative Depth value with Invert deselected.
Direction: When working in the Bevel and Emboss panel, you see two radio buttons: Up and Down. If the Angle value indicates the direction of the sun, Up, when selected, positions the highlight along the edge near the sun and the shadow along the opposite edge. Down, when selected, reverses things, so the shadow is near the light source. Presumably, this means the layer sinks into its background rather than protrudes from it. But, in practice, the layer usually appears merely as though it's lit differently.
Soften: This value sets the amount of blur applied to the beveled highlights and shadows. Small changes make a big difference when Technique is set to one of the Chisel options.
Altitude: The Bevel and Emboss panel includes two lighting controls, Angle and Altitude. The Angle value is just that: the angle of the sun with respect to the layer. Altitude measures the height in the "sky" of the light source. A maximum value of 90 degrees puts the sun directly overhead (noon); 0 degrees puts it on the horizon (sunrise). Values in the medium range — 30 to 60 degrees — generally produce the best results. If you find the effect to be too sharp, you can temper it with the Soften setting.
Scale: The Texture and Pattern Overlay panels include Scale values, which scale the pattern tiles inside the layer. Values greater than 100 percent swell the pattern; values lower than 100 percent shrink it.
Link/Align with Layer: When selected, this option centers a gradient inside a layer. If you want to draw a gradient across many layers, deselect the option to center the gradient inside the canvas. When editing a pattern, this option links the pattern to the layer so the two move together.
Position: The final Layer Style option appears in the Stroke panel. The Position pop-up menu defines how the width of the stroke aligns with the perimeter of the layer. Photoshop can draw the stroke outside the edge of the layer, draw the stroke inside the edge, or center the stroke exactly on the edge.
After you apply a layer effect, Photoshop stamps the layer with a florin symbol (f), accompanied by a small x, as shown in Figure 15.20. Clicking a triangular toggle switch lets you expand and collapse the displayed list of applied effects to permit more room for layers in the palette. If the triangle points up, it indicates the effects are displayed; if the triangle points down, the effects are hidden. From that point on, you can edit an effect by double-clicking its name in the Layers palette. Or double-click the florin symbol to display the Blending Options panel of the Layer Style dialog box.
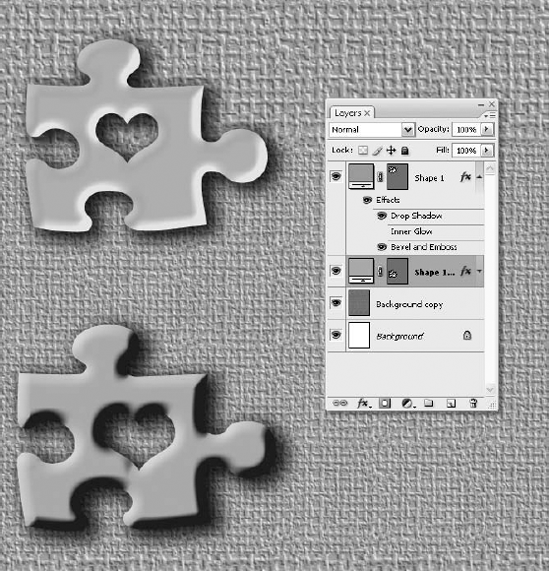
Figure 15.20. The florin symbol (f) with a small x indicates that one or more layer effects have been applied to the layer. Here one layer's effects are collapsed, and the others are expanded.
To temporarily disable all effects applied to a layer, choose Layer
To permanently delete an effect, click and drag it to the trash icon at the bottom of the Layers palette. To delete all effects, drag the word "Effects" to the trash.
Tip
Right-click (Control-click on the Mac) the florin symbol (or anywhere other than the layer thumbnails, or the link and eye icons) to display a pop-up menu from which you can choose Clear Layer Style. This deletes all effects on the layer in question.
After you apply an effect to a layer, the effect becomes an element that you can copy and apply to other layers. Select the layer with the effects you want to duplicate, and choose Layer
Note
The Copy and Paste Layer Style commands bypass the Clipboard. This means that you can copy an image and then copy an effect without displacing the image.
Tip
The Paste Layer Style command duplicates all effects associated with one layer onto another. But what if you want to duplicate only a single effect? Just click and drag the effect name from one layer, and drop it below another in the Layers palette. Be sure that you see a bar below the layer name when dropping the effect; otherwise, it won't take.
When you apply an effect, Photoshop is actually doing all the manual layer work for you in the background. But if Photoshop doesn't seem to be generating the precise effect you want, you can take over and edit the layers to your satisfaction. Choose Layer
Warning
After choosing Create Layers, you're on your own. From that point on, you lose the ability to edit the effects from the Layer Style dialog box (unless, of course, you decide to go back in time with the History palette).
Note
If you like layer effects (and you should, you really should), there's no doubt you'll eventually find yourself experiencing a curious phenomenon. After you've gone and applied a bunch of different effects — particularly Color Overlays, Gradient Overlays, and Pattern Overlays — your layer may no longer respond to blend modes.
Photoshop lets you save layer effects and blending options for later use by creating layer styles, which appear as items in the Styles palette. You can create a style in the following ways:
Click the new style icon. When working in the Styles palette, click the new style icon to display the options shown at the bottom of Figure 15.21. Name your style, and then select the check boxes to decide which settings in the Layer Style dialog box are preserved. The first check box saves the effects covered in this chapter; the second saves the blending options discussed in the previous chapter.
Click in the Styles palette. Choose Window
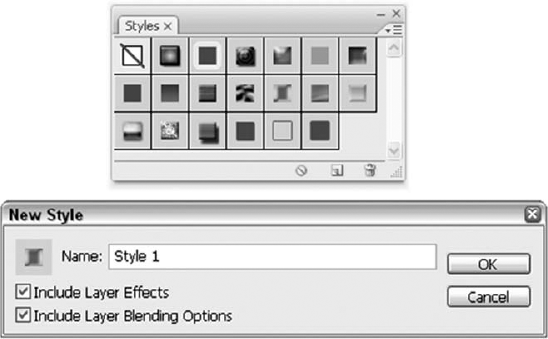
After you press Enter or Return, Photoshop saves the style as a new preset. As with any preset, you can apply it to future images during future Photoshop sessions if you use the Preset Manager to save it — otherwise, it will only live on during the current session. In any case, just click a style to apply it to the active layer, or drag the style and drop it on any layer name (active or not) in the Layers palette. Have you forgotten how to access and use the Preset Manager? See Chapter 2.
Don't forget that Photoshop ships with a big bunch of preset styles that you can explore at your leisure. Load a set of styles from the Styles palette menu, apply one to your favorite layer, and take a look at how it's put together in the Layer Style dialog box. This sort of play — testing, trying things on for size — is a really effective way to get a feel for the amazing variety of effects that are possible in Photoshop.
Tip
A style may include blending options, layer effects, or both. Applying a new style to a layer replaces all blending options and effects associated with that style. If you would rather add the blending options and effects from a style to the existing blending options and effects associated with a layer, Shift-click an item in the Styles palette.
Note
Sadly, there is no way to update a style — and even if you could, the style and layer are not linked, so updating the style would have no effect on the layer. Photoshop lets you create new styles, rename existing styles, and delete old ones — but that's about it.
In this chapter, you learned about object-oriented shapes and how to create them. Tricks for setting up your polygon, line, and custom shape options were covered, along with techniques for combining shapes into compound paths. You also learned about defining custom shapes and filling shapes with gradients, patterns, and images.
Because shapes reside on their own layers, you also learned about creating and modifying automatic layer effects and how to apply layer-based styles through the Layer Style dialog box. This included must-have information on duplicating effects and saving effects and blending options as styles for future use.