
By now, assuming you're reading this book from cover to cover, you understand an extensive set of editing tools and methods — smearing and sponging, filling and stroking, and the art of painting. If you're not reading the chapters serially, which is fine, you can refer back to the chapters that precede this one for coverage of any unfamiliar tools referred to in this chapter.
The tools covered in this chapter — the stamps, healing and patching tools, Erasers, History Brushes, and red-eye removal tools — all enable you to repair damaged images, erase mistakes, and restore operations from your recent past. In short, they make it possible for you to perform the sorts of miracles that simply weren't possible in the days before computer imaging.
These sorts of miracles can be performed on both new, but poorly composed or developed photos and vintage photos showing decades of wear and tear. With Photoshop's restoration tools, you can bring new life to all your photos and scanned documents, all without the slightest fear of damaging the originals, whether they are electronic or printed. And, by scanning your originals — photos, documents, clippings, or even original artwork — you're helping to preserve those originals from further wear and exposure to sun and other damaging light sources. Put the originals away in a safe place, and enjoy the scanned versions without fear.
With these promises in mind, let's look at the tools we're talking about with this very brief but incisive tour:
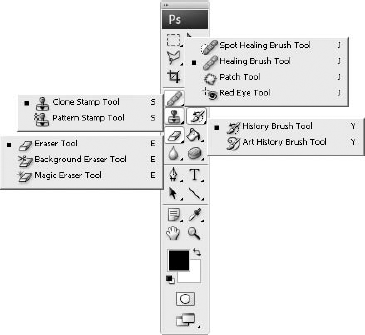
Clone Stamp: With its significant improvements in CS3, you can use the Clone Stamp tool to replicate pixels from up to five areas in an image to another. The added Clone Source palette (in conjunction with the tool's Options bar) makes it possible to clone from these multiple sources, as well as enabling you to fine-tune the clone source location, size, and opacity. The Clone Stamp, even before the beefing-up it received in this latest release of Photoshop, is ideally suited to removing dust, repairing minor defects, and eliminating distracting background elements. To fire up this tool, you can click the Clone Stamp icon on the Toolbox or press S. To open the Clone Source palette, choose Window

Pattern Stamp: Sharing a button on the Toolbox with the Clone Stamp, you can activate the Pattern Stamp by Alt-clicking (Option-clicking on the Mac) the Clone Stamp icon in the Toolbox or pressing S or Shift+S to switch to the Pattern Stamp tool. This tool paints with a repeating image tile selected from Photoshop's library of predefined patterns or defined using Edit
Healing Brush, Spot Healing Brush, and Patch tools: These three tools are in many ways variations on the Clone Stamp tool in that they take texture detail from one portion of an image and merge it with color and brightness values from another. This permits you more flexibility when retouching imperfections, particularly when repairing tricky defects, such as scratches and wrinkles. The Healing Brush uses a similar technique to that of the Clone Stamp, requiring you to establish a source point and then paint that source content over the rip, tear, or other defect. Unlike the Clone Stamp, however, the healing source content melds with the surrounding pixels to match the color, light, and textures in its new location. The Spot Healing Brush doesn't require sampling or setting a source first — instead, you just paint over the defect, and based on the surrounding pixels, Photoshop fixes the offending spot. Press J or Shift+J to switch to the Patch tool, which allows you to repair entire selections at a time.
Red Eye tool: This tool, which shares a button with the Healing and Spot Healing Brushes and the Patch tool, removes red eye (or any unwanted glow in the eyes of the photo's subjects) through the use of two settings — Pupil Size and Darken Amount. Almost scarily simply, you can click a glowing pupil and darken it without creating that glass-eyed doll look that can often result from manually darkening a pupil or painting out the glow with the Brush tool or by using the Burn tool, the latter of which often results in a strangely colored pupil. Of course, for some red-eye situations, the manual approach with brush tools is the only way to get a flawless result — and this approach also is covered later in this chapter.
Eraser: When used in a single-layer image or on the background layer, the Eraser tool paints in the background color. When applied to a layer, it erases pixels to reveal the layers below. The Eraser has three modes: Brush, Pencil, and Block. The former two offer the same brush options (on the Options bar) as the tools of the same name. In Block mode, a static-sized square "brush" is used to erase a single block of pixels (if you click) or a choppy, angular stroke of pixels (if you drag).
Note
The Eraser tool also includes two tool variations — the Background Eraser tool and Magic Eraser tool, shown in Figure 7.1 — which automatically extract background details from a layer. Because their specific purpose is to extract and they work only with layered images, they're discussed independently of the standard Eraser tool in Chapter 9.
History Brush and Art History Brush: The History Brush tool allows you to selectively revert to any of several states listed in the History palette. To select the source state that you want to paint with, click in the first column of the History palette, next to the state to which you'd like to go back. A brush icon identifies the source state, as illustrated by the Lasso item in Figure 7.1. If Photoshop displays a little "not-allowed" cursor when you try to use the History Brush tool, it means you can't paint from the selected state. Click another state in the History palette, and try again.
Alt-click (Option-click on the Mac) the History Brush icon or press Y or Shift+Y to switch to the art History Brush tool, which lets you apply impressionistic effects based on the active source state in the History palette. It's not a terribly useful tool, but it can be lots of fun, allowing you to choose from different brush Style options, for long, short, or medium strokes.
Now, obviously, these are the very simplified introductions to Photoshop's restoring and retouching tools, but the goal at this point is to provide you with a general idea of how the tools work and why you'd use them — not to describe their use in complete detail. With this accomplished, you're ready to learn about the individual tools and how they work, how to get interesting effects from them, and how to manage their options for customized results.
The Clone Stamp tool, which has been improved in Photoshop CS3, works by duplicating specified portions of an image and placing those cloned portions on top of existing content. Unlike a copy and paste that creates a new layer with the obscuring content, the Clone Stamp covers up things you don't want and places the obscuring content on the active layer. The process of using this tool is very simple (even with the new improvements) and has just a few options to keep in mind. The basic steps include selecting the tool — which you can do by pressing S and then Alt (Option on the Mac) — and Alt-click (Option-click on the Mac) in the image window to specify the portion of the image you want to clone. This is termed the source point. After sampling the source point, you can paint the cloned content onto any other part of the image — or even another image that's open at the same time. Read on to learn that you can control the Clone Stamp tool's effects by choosing a brush preset and Mode, and choosing how the cloned content is sampled as you drag your mouse to paint the clone over the image. You also can set up to five clone sources, on separate layers, and control their exact positions through the new Clone Source palette, which we discuss shortly.
Closely related to the Clone Stamp tool is the Healing Brush tool, which clones multiple attributes of an image at a time. Press J to select the tool, and then, as with the Clone Stamp, Alt-click (Option-click on the Mac) in the image to set the source of the clone. Note that the Clone Stamp and Healing Brush share a common source point, so setting the source for one tool sets it for both. To use the Healing Brush, drag with the tool to mix the texture from the source point with the highlights, shadows, and colors of pixels that are found adjacent to the brushstroke, and see them applied to the target location. This works differently than the Clone Stamp, which deposits the cloned material with its source lighting and color intact. The Healing Brush actually updates the cloned material so that it blends in with its new surroundings.
Of course, you can probably think of a few ways to use this. That pesky kid who makes faces in all family photos can now be replaced with whatever was behind him in the photo (or his smirk replaced with a normal expression, borrowed from a more mature sibling), that mud puddle in front of your house can be filled in with nice green grass, and those scratches, tears, and stains in your old and/or improperly stored photos can now be repaired, using clean content from elsewhere in the same image or from an image with compatible content. You also can use these tools artistically — not just as a repair mechanism — to improve by cloning and healing all sorts of interesting content from one place or image to another.
Although easy to use, there are a few options that you can use to control the tool and achieve different results — and these require a little practice. CS3 also has a whole new palette, but you don't have to use the palette at all. If you've used the Clone Stamp in previous versions of Photoshop, you can continue to use it the "old way," ignoring the new capabilities. So, let's start with the basics, dealing only with the tool and its Options bar. We'll get to the new palette later.
First, if you just click the Clone Stamp and start dragging, Photoshop balks and throws a prompt in your face warning you that you must first define a source point. Do this by pressing Alt (Windows) or Option (Mac) and clicking the desired source point in the image. Of course, you'll want to have picked out your source point (and activated the layer on which the content resides) before clicking.
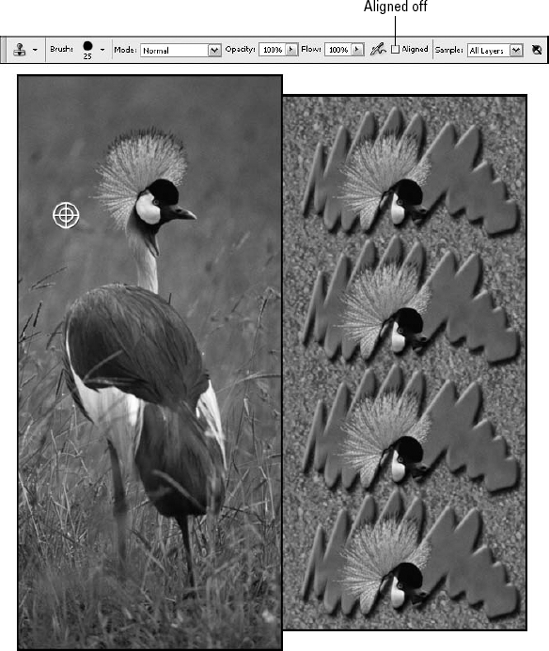
After you've established your source point, click or drag with the tool in some other region of the image to paint a cloned spot or line. Click if you want to place a single clone of the source point on some other place in the image, or drag if you want to create a series of clones in one continuous stretch. In Figure 7.2, for example, the bird was clicked with the Alt (Option) key pressed, and then the curved line shown to the right was painted. The stamp brush cursor shows the end of the drag: The clone source cross hair indicates the corresponding point in the original image.

Figure 7.2. The Clone Stamp tool is being dragged to paint with the image. To make things easier to see, the cloned content was applied to a white area.
It's worth noting that the Clone Stamp tool clones the image as it existed before you began using the tool and continues cloning for as long as you hold down the mouse button. Even when you drag over an area that contains a clone, the tool references the original appearance of the image. This means there may be a visual disconnect between what the Clone Stamp tool seems to be sourcing and what it paints. This is actually a good thing, however, because it avoids repetition of detail, a dead giveaway of poor retouching. This is illustrated in Figure 7.3, where the source cross hair is currently over a clone of the bird, yet the Stamp brush cursor is actually laying down more of the grass from the original image that the cloned bird is now concealing.
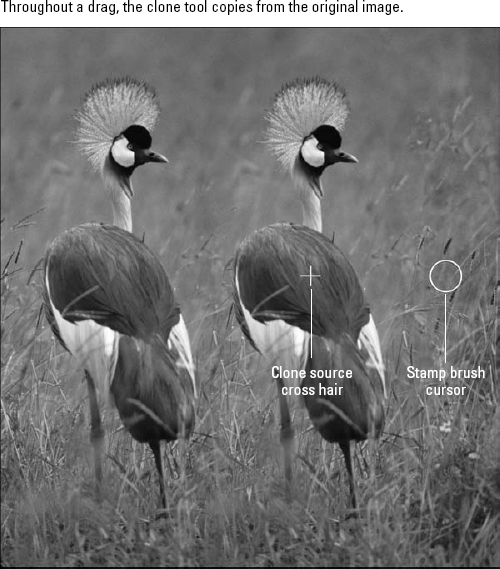
Figure 7.3. So that you don't end up creating more than a single clone in one drag, the Clone Stamp tool continues to clone from the image as it appears prior to your initial painting.
Tip
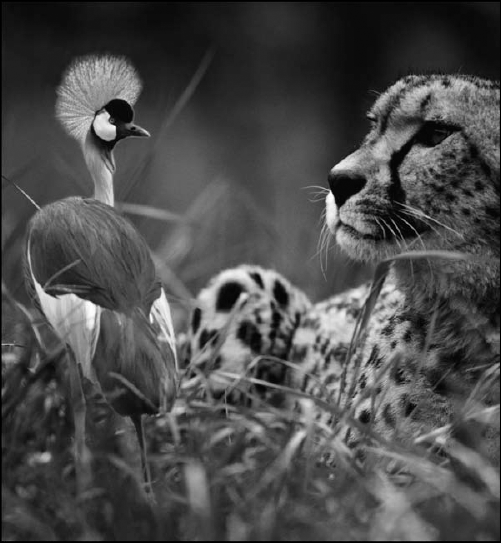
Photoshop lets you clone not only within the image in which you're working but from a separate image window as well. This technique makes it possible to merge two different images, as demonstrated in Figure 7.4. To achieve this effect, Alt-click (Option-click) to set a source point in one image, bring a second image to the foreground, and then drag with the Clone Stamp tool to copy from the first image. You also can clone between layers, assuming the layers are unlocked. Just Alt-click (Option-click) one layer and then switch to a different layer and drag.
When the Clone Stamp tool is active, the Options bar gives you access to the standard Brush, Mode, and Opacity settings that you get when using the Brush tool. These options enable you to mix the cloned image with the original to get different effects, as explained in Chapter 5. You also get the Flow value and Airbrush icon, which make it possible for you to build up brushstrokes where they overlap and at points where you click without moving the cursor.
You'll also find the Sample option, which lets you clone from the Current Layer, the Current Layer and Below (the layer/s beneath the current layer), and All Layers. This sort of control is essential to using this tool effectively, especially when working with composite images where you may need to keep content on separate layers but want repairs to grab from all content, or where you want to clone only what's on one particular layer.
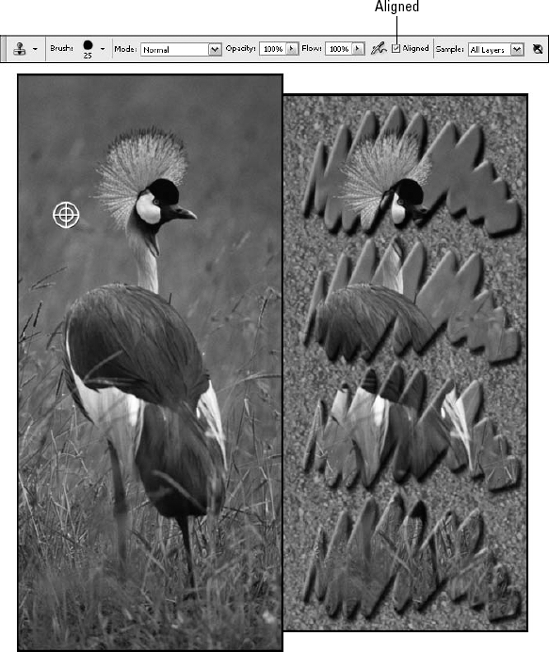
An option that you haven't seen before presents both a wrinkle and a real opportunity to get some interesting effects with the Clone Stamp tool. It's the Aligned option, which locks the relative source of a clone from one Alt-click or Option-click to the next. Huh? OK, try this. Think of the locations where you Alt-click (Option-click on the Mac) and begin dragging with the Clone Stamp tool to opposite ends of an imaginary straight line, as illustrated in Figure 7.5. When Aligned is selected, the length and angle of this imaginary line remains fixed until the next time you Alt-click. As you drag, Photoshop moves the line, cloning pixels from one end of the line and laying them down at the other. The benefit is that regardless of how many times you start and stop dragging with the stamp tool, all brushstrokes match up as seamlessly as pieces in a puzzle.
Note
The glow around the cloned areas is added through blending modes (see Chapter 13) and was applied only to make it clearer to you where the cloning was applied.
If you want to clone from a single portion of an image repeatedly, deselect the Aligned option — note that this option was off in Figure 7.3, where the repeated pattern of feathers was desirable, yet total uniformity in terms of what was cloned was not desirable, as no two feathers are the same, even if they're growing in a uniform pattern. Figure 7.6 shows how, with the Aligned option selected, Photoshop clones from the same point every time you paint a new line with the Clone Stamp tool. As a result, each of the brushstrokes brings in some of the photo of the bird, but the strokes don't line up with each other as they did in Figure 7.4.
Tip
If your image has adjustment layers (discussed in Chapter 18), you can ignore those layers by turning on the last option on the Clone Stamp's Options bar — whose screentip aptly states "Turn On to Ignore Adjustment Layers When Cloning." Told you this stuff was easy.
New to Photoshop CS3, the Clone Source palette, which you can display by choosing Window
The palette, shown in Figure 7.7, contains four sections, each giving you different powers over different aspects of the Clone Stamp tool:
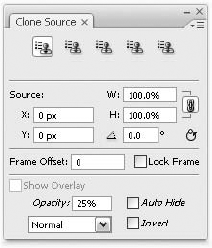
Clone Source: The five icons in the top section each represent a source point in an image, on a particular layer. If you want to use them — if you plan to clone several parts of the image and want to establish them ahead of time — you can click the first Clone Source icon and then Alt-click (Option-click on the Mac) to set the source point. The icon then displays the name of the image and the active layer when the source point was established, below the icon itself. To set a second source, click the second button and set your source point. You can do this up to five times, and of course, you can replace any of the set sources with a new one, simply by clicking the button and using the Alt-click (or Option-click) method to resample a source point.
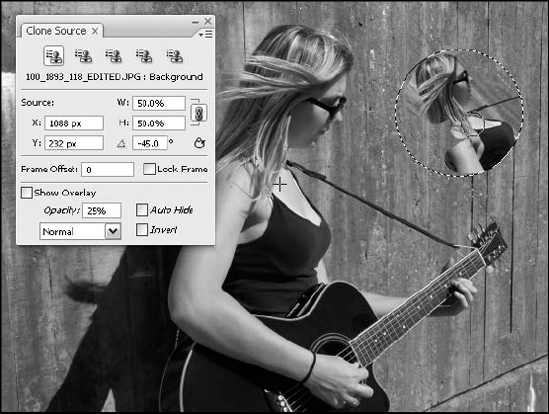
Transform: The second set of options relate to the offset, or position, within the image for a clone source, as well as the scale of the source point and its rotation. You can use the first of these fields (X and Y) to determine the location of the cloned content, and then to the right of this are the W and H fields (for Width and Height), which you can use to set the horizontal (W) and vertical (H) scale of the clone you create. For example, you can set an offset of 50 pixels and a scale of 50 percent, and create a duplicate of the clone source content that's half the size of, and 50 pixels away from, the original content, as shown in Figure 7.8. If you create the clone on a new layer (by creating and switching to that layer before using the Clone Stamp and source), you can create duplicate content in varying sizes and positions for a variety of uses. Of course, you also can rotate the source point (enter a value in the field next to the rotation symbol) and reset the Transform information by clicking the last button in the lower left of this section of the palette.
Tip
When setting the scale, you can constrain the proportions so that any change to the W setting is reflected in the H setting, and vice versa. This setting is on by default (see the chain icon to the right of the fields), and clicking the chain turns it off — which you might choose to do if you want to adjust one scale setting without affecting the other at all.
Frame: Here you're dealing with the Frame Offset, which is used with video frames. This is discussed in Chapter 19. The Lock Frame option, also found in this section of the Clone Source palette, is discussed there, too.
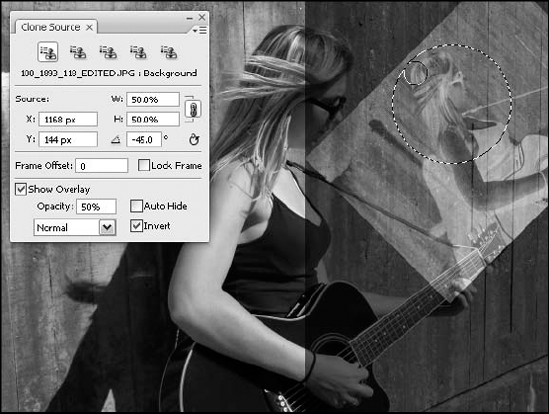
Overlay: In this last section of the Clone Source palette, you can display an overlay of your clone source layer — that is, all content from the layer from which you're cloning is displayed while you clone the content to another layer or elsewhere on the same layer. This option, which is particularly helpful if your clone source is not visible while you're cloning, is shown in Figure 7.9. If you turn on the Auto Hide option, the overlay is hidden while you're dragging the tool, but it appears while the Clone Stamp is active. The Invert option simply inverts the overlay color so that it's more visible if you're working in an image with lots of like colors. You can set the Opacity and choose a mode (Normal, Darken, Lighten, or Difference) for the overlay's visual quality. None of the overlay options affect the final image — they're just there to assist you in using your clone source.
Tip
Keyboard shortcut fans will enjoy using Alt+Shift+Arrow (Option+Shift+Arrow for the Mac) to nudge the clone source when doing aligned cloning. You can use Alt+Shift+[ or ] to rotate the clone source (Option+Shift+[ or ] on the Mac) and use Alt+Shift+< or > (Option+Shift+< or > for the Mac) to scale the clone source.
So, for non-video-related cloning, how would you use the Clone Source palette? The biggest new feature, and the feature to be of most use, is the ability to create those additional clone sources, and to use the buttons in the dialog box to go back to them as you're working in an image. You can click the buttons to tell Photoshop which source you're cloning from now, and use the Options bar to control how the cloning is applied. Then just click and/or drag the Clone Stamp tool to apply the cloned content to whichever open image (and layer within that image) you want. To switch to a different clone source from those you've already set in the palette, go to the palette, click the source (view the text underneath the button to make sure it's the one you want), return to the image, and begin cloning.
Of course, the ability to establish offset and scale options is great, too — with these settings, you can create exact duplicates of content, at the exact size you need, in the exact spot you need them. The Overlay option can help show you exactly what's being cloned, by referencing the source content, and with these three features in use, some of the "surprise" aspects of the Clone Stamp's effects are virtually eliminated.
Tip
Like any other palette with fields into which you can enter values, you can establish your settings by typing numbers into the boxes, or select the current setting and use your up and down arrows to increase or decrease the values in small increments.
Way back in Photoshop 7, the nearly magical Healing Brush tool was presented to a grateful world of Photoshop users in need of help. Even now, its powers seem amazing, and almost too good to be true.
If you thought the Clone Stamp tool was the bee's knees (and you were right), get ready for the cat's pajamas. Open a photo that needs some work. For the example shown in Figure 7.10, a vintage photo with some serious scars on it is a great subject on which to demonstrate the tool. Because there are places that are unmarked, we can use them to cover the scars — but unlike the Clone Stamp, which can be used to take the clean content and duplicate it on top of the scars, the Healing Brush not only clones that clean content but also relights and colors it to meet the needs of its new surroundings. The Spot Healing Brush tool, which we discuss shortly, does the same thing, but with small troubled areas — thus the tool's name including the word "Spot."
Anyway, in Figure 7.10, see the before (left) and after (right) versions, wherein large scars — scuffs and scrapes with decades of dirt ground into them — are repaired with the Healing Brush tool.
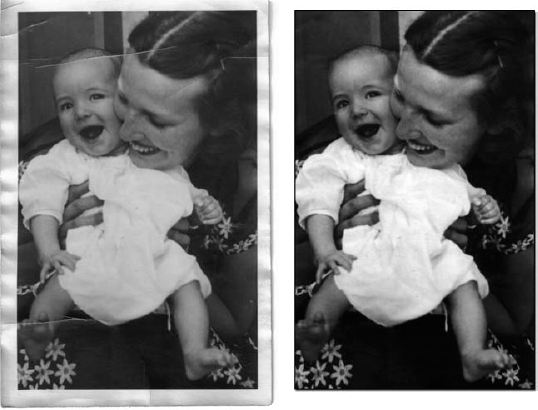
Figure 7.10. Set the "way-back machine" to a time before this photo had been scuffed, scraped, and generally abused by storing it loose in a drawer full of other photos, pencils, rubber bands, and other bits and pieces that have no business bumping into a precious glimpse of relatives past.
To make the changes seen in Figure 7.10, select the Healing Brush tool by pressing J, which you can remember because it's the only letter missing from the words heal, patch, mend, fix, knit, remedy, salvage, cobble, and requite. Or, just click the tool with your mouse — it may be easier that way. Next, press Alt (Option) and click in the image to identify the texture that you want to match. Then paint over a spot, scratch, scar, or wrinkle, and watch as the Healing Brush lives up to its name.
In getting to know the Healing Brush tool, you quickly discover two things. When it works, it works incredibly well, better than any other retouching technique available in Photoshop. But when it doesn't work, it fails completely, in that it can bring in colors and shades that don't match their surroundings at all. What is the best way to avoid such a scenario and only have the Healing Brush make you happy? Take a little time to learn how the Healing Brush really works, and you'll learn not only how best to use it, but when to use the Clone Stamp tool instead.
Assuming that you're on board for the whole "take a little time" idea, let's take a moment and reveal some of the magic. The Healing Brush tool blends the pixels from the source point with the original pixels of your stroke made with the Healing Brush. In that respect, it works a little bit like the Clone Stamp tool combined with a brush mode — applying content from the source point, but at the same time changing colors and lighting as you paint. Instead of the rather simplistic technique of blending two pixels at a time as a brush mode does, the Healing Brush blends cloned pixels with those just outside the brushstroke, drawing information from those pixels to determine how to adjust the cloned content. The idea is that the pixels you're painting over are messed up, but the pixels just beyond the brushstroke are in good shape and should be emulated.
Figure 7.11 acts as a gross illustration of this concept. The Healing Brush tool has been used to clone portions of a photo onto a fabric background. The smooth image from the left is cloned onto the fabric, and the fabric's texture is smoothed away by the photo content applied by the Healing Brush. The lighting also is adjusted, achieved by Photoshop burning and dodging the healed content based on the source point. Bear in mind that it does all this according to the colors, highlights, and shadows that it encounters in tracing the very outer perimeter of the brushstroke, which is highlighted by the line drawn on the right side of Figure 7.11.
What can we deduce from this?
First, the Healing Brush tool replaces the texture as you paint just as surely as if you were using the Clone Stamp tool. If you want to mix textures, you need to employ a brush mode, as explained in the next section.
Second, the manner in which the color and shading are mixed is directly linked to the size and hardness of your brush. Bear in mind that Photoshop is looking at the outside edge of the brushstroke. As illustrated in Chapter 5 (on painting), the outer edge of the brush grows as the Hardness value shrinks. Therefore, you can count on soft brushes to cause the Healing Brush to factor in more surrounding colors and shading than hard brushes do.
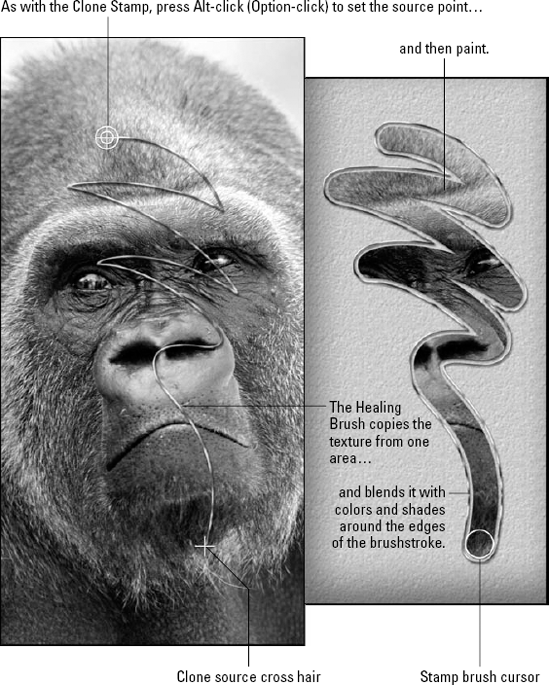
Figure 7.11. The Healing Brush clones the content on the left side onto a textured background on the right. The line running down the ape's face on the left shows the path of the source point throughout the brushstroke. The line surrounding the brushstroke on the right shows that brushstroke's outer edge.
So what if it all goes wrong and undesirable results appear where healing was expected? Just click Undo, or use the History palette to go back to before the healing began. Then tinker with your brush settings, changing the size and softness, until you get the results you are looking for. If all else fails, try the Clone Stamp tool — you may like the results. It could just be that the extra magic applied by the Healing Brush tool wasn't what was needed after all.
Despite its powers and the intuitive way it applies content, you cannot customize the behavior of the Healing Brush tool in many ways. It permits you neither to use custom brushes nor to apply any of the settings in the Brushes palette. To modify a brush, click the Brush icon in the Options bar. This gives you access to Photoshop 6-style brush-tip settings along with a single dynamic that lets you link brush size to pen pressure or airbrush wheel.
You also have no control over Opacity or Flow. While this is a surprising omission, you can work around this problem by choosing Edit
The exception is Replace. Unique to the Healing Brush tool, the Replace mode clones pixels without any blending, just as if you were painting with the Clone Stamp tool set to Normal. The question is, why in the world would you want to do this, particularly when the Healing Brush set to Replace offers far fewer options than the highly customizable Clone Stamp tool? The answer is to test effects. Thanks to its blending routine, the Healing Brush sometimes takes several seconds to apply. But when set to Replace, it takes no time at all. You can test a brushstroke, make sure it's cloning the right area, undo it, switch back to Normal, and paint the real thing. Replace is so useful that it's worth remembering its shortcut, Shift+Alt+Z (Shift+Option+Z on the Mac). Press Shift+Alt+N (Shift+Option+N) to return to Normal.
Other options include the Source buttons, which determine whether the Healing Brush tool clones pixels (Sampled) or paints with a predefined texture (Pattern). You also have the Aligned option, which aligns multiple brushstrokes to a fixed source point, as described in the section "Cloning options." The Aligned options for the Healing Brush and Clone Stamp tools are linked, so selecting one selects the other as well.
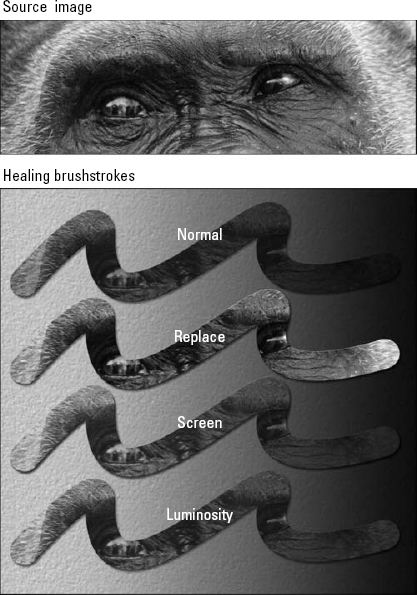
Figure 7.12. Here are examples of the Healing Brush combined with four different Healing Brush modes across the same textured fabric as seen in Figure 7.10, with a light-to-dark gradient.
Tip
Don't forget the Healing Brush tool's Sample setting in the Options bar. Much like the similarly named option available to the Clone Stamp and Smudge tools (discussed in Chapter 5), selecting All Layers factors in information from every visible layer during the healing process. This can be a great asset because it allows you to create a new layer and perform all your pixel manipulation on it while retaining the original pixels on the layers below. Your other options, Current Layer and Current & Below, allow you to confine the healing effects to the active layer (Current) or that layer and those beneath it. Of course, you can shuffle layers before activating the tool if doing so facilitates the results you need — without bizarrely affecting the appearance of a composite image, that is.
The Spot Healing Brush, which was introduced with Photoshop CS2, works very much like the Healing Brush tool in terms of its results, but the mechanism is a bit different when it comes to your role in the process. Instead of having to sample content and set a source point, all you have to do is click the tool on top of the offending spot — a small scratch, stain, blemish, or any other small area of unwanted content. If you attempt to sample by pressing Alt (Windows) or Option (Mac), you're prompted that if you want to manually set a source point, you should use the Healing Brush tool.
There are some drawbacks. As shown in Figure 7.13, Photoshop guesses which content to use in repairing the problem, and it can guess wrong. In the figure, you can see that the Proximity Match created a repair that is too light, and Create Texture created an unwanted texture (inset).
Of course, with a quick Undo, the bad results are reversed, and a click with the Spot Healing Brush tool on the other end of the scratch solves the problem, because there were more appropriate pixels nearby. Two more clicks along the scratch, and it is gone (see the "After" version on the right where the scratch is gone, although a problem created by the healing process remains). It's a great tool for a quick fix, but it does have its shortcomings. You also can try using a larger brush to do the repair in a single click, but you risk the area considered "proximity" including content that you don't want used in the healing process.
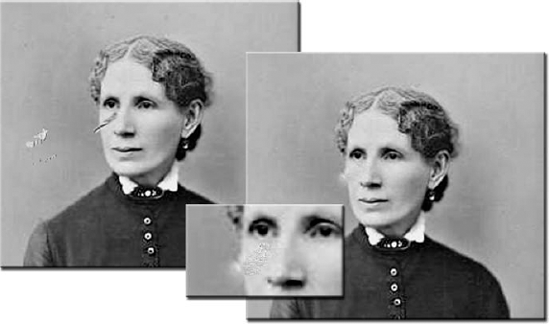
Figure 7.13. The Spot Healing Brush in Proximity Match mode works great when there is nothing but clear sailing next to the spot you're trying to heal. Here you can see its two healing types — Proximity Match and Create Texture — at work, and you also can see how the tool can sometimes go wrong.
Note
This simple tool has options: You can go with the default Proximity Match, which heals the spot you click on using neighboring pixels; or you can click the Create Texture option, which heals and creates a texture based on nearby pixels. This can work well, or it can be a problem if the texture that Photoshop creates is visually effective. As shown in Figure 7.13, a texture on the face isn't a good thing — and its source is difficult to anticipate. The other option, Sample All Layers, enables Photoshop to draw its healing information from pixels on...well, you guessed it — all layers.
If you prefer to heal a selected area all at once, choose the Patch tool from the Healing Brush flyout menu in the Toolbox. You also can press J — or if you did not deselect the Use Shift Key for Tool Switch option in the Preferences dialog box, press Shift+J instead.
You can use the Patch tool in two ways:
Define destination, drag onto source: Assuming the Source option is selected in the Options bar, as it is by default, use the Patch tool to draw an outline around the portion of the image you want to heal. This creates a selection outline. In Figure 7.14, for example, the selection is shown in the top panel. Next, click and drag the selection outline to move it to a new location (the middle panel in Figure 7.14). The spot where you release the mouse button determines the source for the clone. When the selection is dropped (the bottom panel), Photoshop heals the content.
Define source, drag onto destination: The former method seems a bit counterintuitive, or backward, to some people. If it seems backward to drag the offending content onto good content, then just swap things around. Choose Destination as the Patch method on the Options bar, and select an area to use as the patch. Then drag that onto the stuff you want to obscure. Of course, this requires that you either guess the shape of the patch by looking at the target area as you drag to select within the source area (where the good content is), or you can make the selection first, in the bad area, then move it to the good area, and then activate the Patch tool.
Tip
You can make a selection before using the Patch tool (in either Source or Destination mode) by using the Lasso or Marquee selection tools to draw the outline for the future patch. Then, activate the Patch tool and drag — either taking the selection to the place that needs healing or bringing healing content to the selection.
If you're wondering how the Patch tool's selection process works, it's just like the standard Lasso tool. You can add to a selection by Shift-dragging or delete by Alt-dragging (Option-dragging on the Mac), and you can soften a patch by using Select
The Patch tool lacks Opacity and brush mode controls, and you can't use it between layers or between different images. All work has to be performed on a single layer, which ultimately limits its potential. On the plus side, you can patch a selection with a predefined pattern by clicking the Use Pattern button in the Options bar.
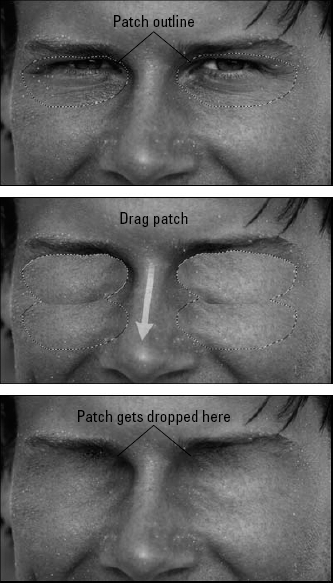
Figure 7.14. Like cutting a swatch of fabric that's just a bit larger than the hole in your jeans, you can patch trouble spots with content from a clean spot on the photo. You can drag the patch to the problem, or drag the problem to the patch.
Note
The Patch tool also gives you a preview of unaltered source pixels in your selected area while you're still dragging it around. This gives you a better idea of how the size and shape of the area from which you're pulling texture will fit when it combines with your original destination. You also have a Transparent option in the Options bar, which when selected enables the Patch tool to pull the texture but none of the color information from wherever you drag.
Allegedly because of their large pupils, animals, especially those with some nocturnal vision capabilities, tend to become the most frequent victims of red eye in photos. Children are often victims, too, but that's often because one of them is either the adored subject and the photographer (mom or dad) gets too darn close when taking the picture, or the little darling moves in closer to the camera just as the picture's taken. The proximity of the lens and the flash also is a potential culprit, but with many cameras, you can't adjust this distance — the flash is atop the camera, and the lens is in a fixed position, too. Whatever the cause and whomever the victim, red eye is one of the most common problems faced by amateur photographers, especially the "home user" of cameras with a flash. As shown in Figure 7.15, you can get rid of it quickly with the Red Eye tool, a simple, fast tool for darkening and washing the glow right out of the demonically glowing pupil.
Note
Red isn't always the color of the glow — sometimes, as shown in Figure 7.15, the glow is yellow (well, it appears light gray here, but take my word for it). In fact, rarely is the glow a single color — as you also see in this figure, where the glow is brightest in the center of the very large pupil. In the color version of this photo, it goes from canary yellow in the center to a burnt orange around the edges.
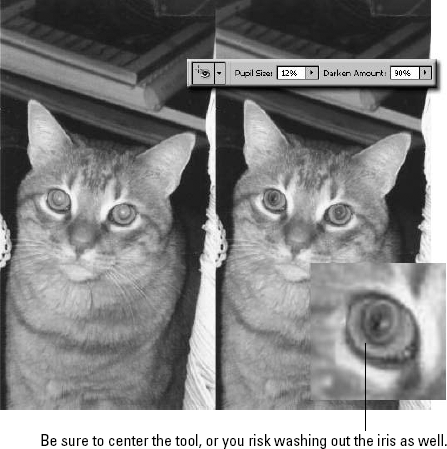
The Red Eye tool is bizarrely simple to use, and it's quite effective — to a point. It has two options — Pupil Size and Darken Amount, both set to 50% by default. You can drag the options' sliders to accommodate larger or smaller pupils and more or less of a glow in the subject's eyes. Remember to use different settings for each of the eyes if the subject was not facing the camera head-on — if the subject was at an angle, the eye farthest from the camera has a smaller pupil and may have less of a glow going on.
Now about that "to a point" comment: The tool works by washing out the color (as though you've used the Sponge tool in Desaturate mode), and it also darkens it (as if the Burn tool was used). In color photos, or in close-ups where the eye is quite visible in detail, this may not be a good thing, because having black or dark gray pupils in a color photo looks, well, weird. You may prefer to use the Burn tool yourself and use other color-adjustment tools to get rid of the red or yellow, essentially going back to one of the many manual methods of getting rid of red eye used in the past when this tool was not available. Figure 7.14 shows the almost grayscale-looking pupils, and as noted in the figure, shows the downside of not quite centering the tool when clicking the pupil — some of the iris has been relieved of its color as well, as seen in the left eye and shown in the zoomed inset.
Having seen how the Clone Stamp, Healing Brush, Spot Healing Brush, Patch, and Red Eye tools work, the following sections examine a few sample uses for the tools. For example, say you have a snapshot lying around, one that's really a good picture of someone you love, but it's in terrible shape, like the scanned photo shown in Figure 7.16. The problems are many — there are nicks and scratches in the photo's surface (damage from improper storage and rough handling of the print), and the photo is faded (age) and blurry (poor photographic and/or development). You probably don't need to imagine such a photo — you probably have many of them lying around the house, or if you're a professional photographer, your non-photographer relatives are creating these horrors on every holiday and vacation.
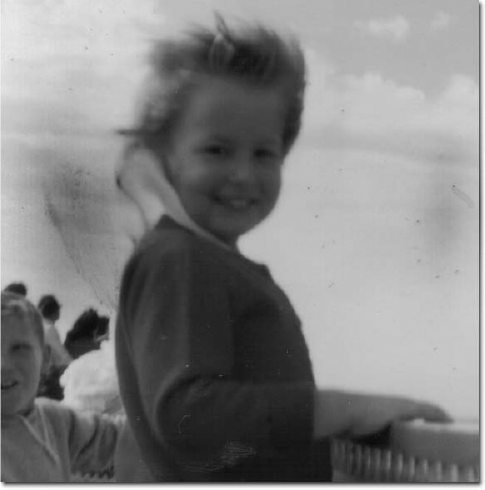
Figure 7.16. This is a very lovable shot of a child on a boat in 1965 at Cape Cod. The many problems shown in this zoomed-in view of the photo have Photoshop solutions.
Now, of course, there are some non-Photoshop solutions that you can try first. If you're scanning a printed photo, try cleaning your scanner's glass. Try tinkering with the scanner's settings for contrast and sharpness a bit (don't go wild, because these can cause more problems than they solve, depending on the scanner's software), and try increasing the resolution of your scan if lack of detail and color is a problem. Beyond that, you have what you have, and Photoshop is really your only solution.
So let's look at the solutions, some or all of which may be used depending on the photo, or perhaps only one of them will work — it really depends on the photo in question:
Dust & Scratches filter: Try this if your image is sharp and clear but has lots of dust and scuffs on it — tiny, minor ones. This filter won't get rid of major scratches, but it will remove some of the "white noise" that can accumulate on a poorly stored or roughly handled photo.
Clone Stamp, Healing Brush, Spot Healing Brush, and Patch tools: Yes, one or more of these, used to fix small and large problems, can be your salvation. They also can lead to backaches and headaches, because the more problems you have, the longer you'll spend fixing the photo flaws, bent over the monitor at a high, eye-scorching zoom. Figure 7.17 shows an "after" version of the photo in 7.16, where the Spot Healing Brush and Clone Stamp tools were used to clean up the bigger flaws, and the aforementioned Dust & Scratches filter was used on portions of the image — the sky, any place that didn't have too much detail to worry about losing — to do a general cleanup.
As you discover in Chapter 10, the Dust & Scratches filter has one big downside — along with the dust, scratches, and tiny flaws that it miraculously removes, it also removes lots of your detail. Of course, you can tinker with the filter's settings to mitigate this a bit, or use it in selected areas only, perhaps restricting its use to the areas that are the most damaged, but if you let the filter work hard enough to really rid the photo of the tiny flaws, you lose the tiny details, too. Oh, well — Photoshop giveth, and Photoshop taketh away.
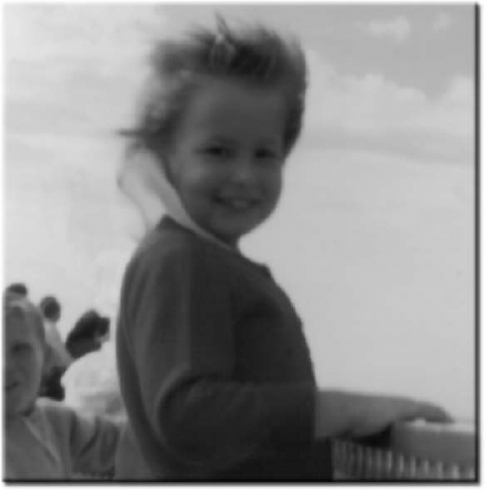
Because I don't like the loss of detail, in Figure 7.18, you can see the results of a final touch-up with the Smart Sharpen filter. This filter, also discussed in Chapter 10, goes over the image and adds back some of the detail lost to the Dust & Scratches filter. Of course, it can't re-create lost details, but it does add to the differences between adjacent pixels, eliminating that fuzzy, blurry look.
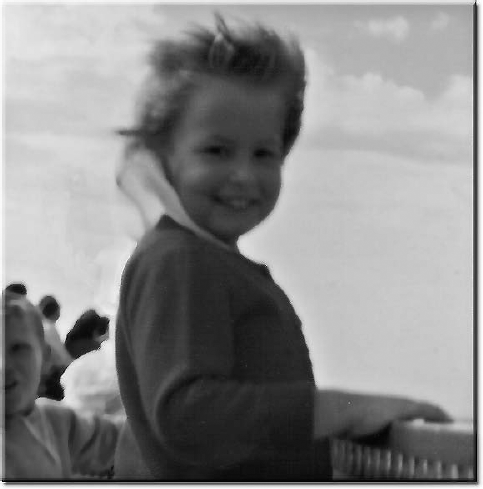
Figure 7.18. The final touch is to sharpen the image using the Smart Sharpen filter. The result is by no means perfect — Photoshop can't produce detail out of thin air — but the photo, one that I really love, is really suitable for framing now.
The lesson to draw from all this is that the Dust & Scratches filter may suffice for purging fibers and defects from a low-quality photo like this one, but it's hardly a professional-level tool. In most cases, the better alternative is to roll up your sleeves, get real with your image, and fix its flaws manually — not to mention lovingly — with the Healing Brush and Clone Stamp tools. You'll be glad you did.
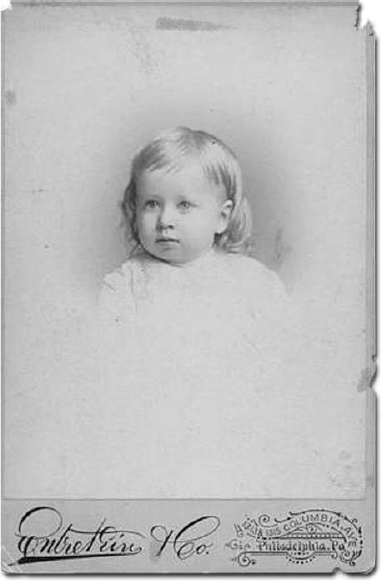
Old photos present some unique problems. First, depending on their age, they may have been around for decades — maybe even a century — and even the most carefully stored photo of that vintage is going to show signs of its age. Add to that the fact that in the late nineteenth and early twentieth centuries, photos were printed on paper that doesn't hold up well: It was often textured, which can affect your scan adversely, and the paper dried out and crumbled, making what might have been an easily fixable fold or scrape into a huge scar that requires major restoration.
Figure 7.19 shows an old photo, one that was treated relatively well, but not stored in an environmentally controlled place. It was in a photo album since the 1960s, and before that, it was kept in a box. The photo was taken in 1887, and was scanned at 300 dpi as a color photo — despite it not really being "in color." Scanning it as a color photo brings in more information and allows the photo to be brought back to its sepia-tone glory with less loss of detail.
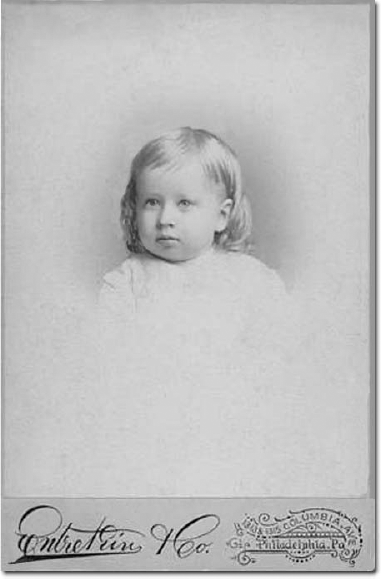
Despite the photo's rough condition, Photoshop's many restoration tools were able to restore it, as evidenced in Figure 7.20. After about an hour and a few hundred brushstrokes, the image was nearly back to its original state. If an hour sounds like a long time to fix a few rips and scrapes, bear in mind that photographic restoration is a labor-intensive activity that relies heavily on your talents and your mastery of Photoshop. The job of Photoshop's restoration tools is to make your edits believable, but they do little to automate the process. Retouching calls for a human touch, and that's where you come in.
The main trick in all this is to Alt-click (Option-click on the Mac) with the Clone Stamp or Healing Brush tools in an area that looks like it'd do a good job of covering up a blemish and then click or drag over the blemishes. For tiny spots where you aren't sure where to grab the cover-up material, use the Spot Healing Brush tool — just restrict its use to where there are clean pixels all around the spot — because that's where Photoshop will derive its content to cover the blemish you click on. Rather than take you back through a boring description of every click and drag we used to fix this image, here are some tips for ways to restore even the most damaged, faded, beat-up photo:
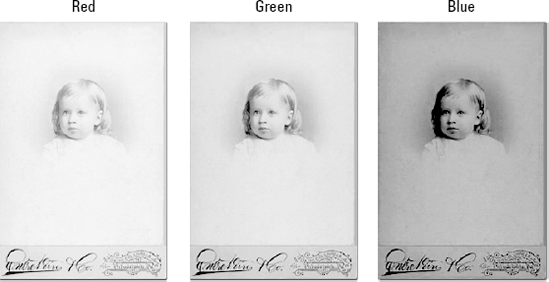
Toss the bad channels: Most images in this kind of condition are in black and white. Scan them in color, and then look at the individual color channels, as shown in Figure 7.21, to see which grayscale version of the image looks best.
View actual pixels: When possible, work at 100 percent view size or larger. It's difficult to judge scratches and other defects accurately at smaller zoom ratios, but if you must, stick with the "smooth views" — 50 percent and 25 percent.
Keep an eye on the source: Keep the original photo next to you as you work. What looks like a scratch onscreen may actually be a photographic element, and what looks like an element may be a scratch. Only by referring to the original image can you be sure.
Tip
Don't crop until you're finished retouching the image. You'd be surprised how useful that extra garbage around the perimeter is when it comes to covering up really big tears.
Vary the brush hardness: Use hard brush shapes against sharp edges. But when working in general areas such as the shadow, the ground, and the wall, mix it up between soft and hard brushes using the shortcuts Shift+[ and Shift+]. Staying random is the best way to avoid harsh transitions, repeating patterns, and other digital giveaways.
Keep it short: Paint in short strokes. This helps keep things random, but it also means that you don't have to redraw a big, long brushstroke if you make a mistake.
Tip
Use your History when you make a mistake. Don't automatically press Ctrl+Z (

Deselect the Aligned option: Another way to stay random is to change the source of your clone frequently. That means Alt-clicking (Option-clicking on the Mac) after every second or third brushstroke. And keep the Aligned option deselected. An aligned clone is not a random one.
Try out brush modes: Feel free to experiment with the brush modes and, when using the Clone Stamp tool, the Opacity setting. You also can tinker with Mode settings for the Healing Brush tool, experimenting with lightening and darkening modes to see which one gives you the best results — of course, each picture and its individual flaws will dictate which one of the tools and which settings for it work best.
Tip
You also can try applying Edit
Keep the grain: Don't attempt to smooth out the general appearance of grain in the image. Grain is integral to an old photo, and hiding it usually makes the image look faked. If your image gets too smooth, or if your cloning results in irregular patterns, select the problem area and apply Filter
Photoshop's History Brush gives you the sort of "do-over" freedom that you'll wish you had in real life. If you make a few mistakes in your restoration, let them go — and then go back and fix them all at once. After activating the History Brush, just click to the left of the state in the History palette that directly precedes the first state where things went wrong, and then drag with the History Brush. It's almost too easy. Of course, watch your History palette, and make sure you have enough states left to go back to — if the mistakes were made a long time ago in your current session with the image in question, you may have lost your window of opportunity.
Anyway, to paint back to the original scanned image, click in front of the very top item in the History palette — this brings things back to how they were before you did anything beyond opening or importing (scanning) the image. Again, there's more info to come on using the History palette, so stay tuned to this chapter.
One of the most annoying things about Photoshop — and there aren't that many truly annoying things, so given that this merits mentioning, you know it's really annoying — is that you can't undo more than your last step using the Edit
With the release of Photoshop 5, the software gods at Adobe gave us the History palette, which is a great and powerful tool for going back in time and undoing many steps either serially or as a group. You learn a great deal more about it in the ensuing paragraphs, but it still is not as convenient as pressing Ctrl/
No matter. The History palette is great, and this is the spot in the book where you're gonna learn all about it. Here are just a few of the marvelous things you can do with the History palette:
Undo-independent stepping: Step backward by pressing Ctrl+Alt+Z (
Before and after: Revert to a point in history to see a "before" view of your image and then fly forward to see the "after" view. From then on, Ctrl+Z (
Real time travel: If before and after aren't enough, how about animated history? You can drag a control to slide dynamically forward and backward through operations. It's as if you recorded the operations to videotape, and now you're rewinding and fast-forwarding through them.
Sweeping away mistakes: Select a point in the history of your image and paint back to it using the History Brush. You can let the mistakes pile up and then brush them away. This brush isn't a paintbrush; it's a hand broom. Want even more variety? Use the Art History Brush to paint back to the image using various artistic styles.
Take a picture, it'll last longer: You can save any point in the History palette as a snapshot. That way, even several hundred operations after that point in history are long gone, you can revisit the snapshot.
It was a very good year: Each and every image has its own history. After performing a few hundred operations on Image A, you can still go back to Image B and backstep through operations you performed hours ago. The caveat is that the history remains available only as long as an image is open. Close the image, and its history goes away.
Undo the Revert command: Back in the days before Photoshop 5.5, you couldn't undo the Revert command. Now, the History palette tracks Revert. So if you don't like the image that was last saved to disk, you can undo the reversion and get back to where you were. Also notice that when you choose File
The only thing you can't do through the History palette is travel forward into the future — say, to about three days from now when you've finished your grueling project, submitted it to your client, and received your big fat paycheck. Believe it or not, that's actually good news. The day Adobe can figure out how to do your work for you, your clients will hire Photoshop and stop hiring you.
Before going any further with the History palette, let's make sure you're totally familiar with Photoshop's more traditional reversion functions. If you already know about this stuff, leaf ahead to the next section.
Undo: To restore an image to the way it looked before the last operation, choose Edit
Revert: Choose File
Tip
To restore the image to the way it looked when you originally opened it — which may precede the last-saved state — scroll to the top of the History palette and click the topmost item. (This assumes that you haven't deselected the Automatically Create First Snapshot option in the History Options dialog box.)
Selective reversion: To revert a selected area to the way it appeared when it was first opened — or some other source state identified in the History palette — choose Edit
Tip
Better yet, just press Ctrl+Alt+Backspace (
The Erasers: Click and drag in the background layer with the Eraser tool to paint in the background color. You're essentially erasing the image back to bare canvas. Or apply the Eraser to a layer to delete pixels and expose underlying layers.
Tip
You also can Alt-drag (Option-drag on the Mac) with the Eraser tool to revert to the targeted state in the History palette. Or select Erase to History in the Options bar, and just drag. But you're better off using the History Brush for this purpose. The History Brush offers more capabilities, including most notably brush modes.
Where warranted, these functions are explained in greater detail in the following sections. But first, the next few paragraphs look at the main office for reversion in Photoshop, the History palette.
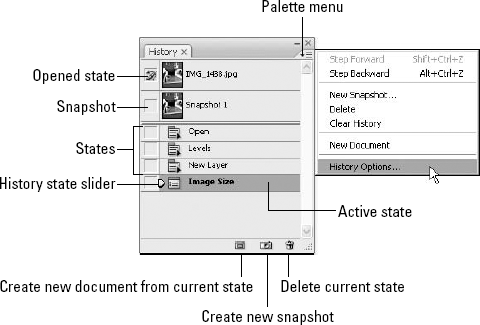
First, you want to actually see the History palette; if it's not onscreen now, choose Window
Each item in the list is called a state. Each item in the palette represents a step taken by you in the building and/or editing of the image, creating a condition at a moment in time — in other words, a state. Although it is similar in usage, don't confuse this type of state with the states in the Layer Comps palette. You learn all about the Layer Comps palette in Chapter 12.
Photoshop automatically names each item according to the tool, command, or operation used to arrive at the state — the nomenclature is pretty obvious, so it won't leave you wondering what was going on at a given point in time as displayed in the palette. The icon next to the name helps to identify the state further. But the best way to find out what a state is like is to click it. Photoshop instantaneously undoes all operations performed after that state and returns you to the state so that you can inspect it in detail. To redo all the operations you just undid in one fell swoop, press Ctrl+Z (
That one action — clicking a state — is really the core of what you need to know to travel forward and backward through time in Photoshop. If that's all you ever learn, you'll find yourself working with greater speed, freedom, and security than is possible in virtually any other graphics application. But this represents only the first in a long list of the History palette's capabilities. Here's the rest of what you may want to know:
Changing the number of undos: By default, Photoshop records the last 20 operations in the History palette. When you perform the 21st operation, the first state is shoved off the list. To change this behavior, choose Edit
Undone states: When you revert to a state by clicking it, every subsequent state is dimmed to show that it's been undone. You can redo a dimmed state simply by clicking it. But if you perform a new operation, all dimmed states disappear. You have one (count it, one) opportunity to bring them back by pressing Ctrl+Z (
Working with nonsequential states: If you don't like the idea of losing your undone states — every state is sacred, after all — choose the History Options command in the palette menu and select the Allow Non-Linear History option, as shown in Figure 7.23. Undone states no longer drop off the list when you perform a new operation. They remain available on the chance that you may want to revisit them. It's like having multiple possible time trails.
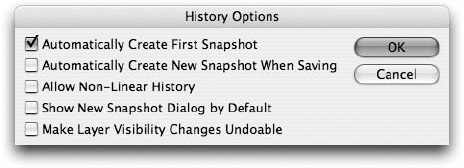
Figure 7.23. Choose History Options from the History palette menu, and select the Allow Non-Linear History option to permit Photoshop to keep states that you have undone.
Note
Selecting the Allow Non-Linear History option does not permit you to undo a single state without affecting subsequent states. For example, let's say you paint with the Airbrush, smear with the Smudge tool, and then clone with the Clone Stamp tool. You can revert to the airbrush state and then apply other operations without losing the option of restoring the smudge and clone. But you can't undo the smudge and leave the clone intact. Operations can occur only in the sequence they were applied.
Stepping through states: You can press Ctrl+Alt+Z (
Flying through states: Click and drag the right-pointing History State Slider (labeled in Figure 7.22) up and down the list to rewind and fast-forward, respectively, through time. If the screen image doesn't appear to change as you fly by certain states, it most likely means those states involve small brushstrokes or changes to selection outlines. Otherwise, the changes are quite apparent.
Taking a snapshot: Every once in a while, a state comes along that's so great, you don't want it to fall by the wayside 20 operations from now. To set a state aside, choose New Snapshot or click the little camera icon at the bottom of the History palette (labeled in Figure 7.22). To rename a snapshot after you create it, just double-click its name at the top of the History palette and type a new one. Or you can name a snapshot as you create it by pressing Alt (Option on the Mac), clicking the little camera icon, and typing a name in the dialog box.
Photoshop lets you store as many snapshots as your computer's RAM permits. Also worth noting, the program automatically creates a snapshot of the image as it appears when it's first opened. If you don't like this opening snapshot, you can change this behavior by deselecting the Automatically Create First Snapshot option in the History Options dialog box — but this may not be wise, because having an opening state to go back to can really be a great thing if everything goes horribly awry and you just want to go back to square one. It doesn't really hurt anything to keep this one initial state hanging around, like it now or not.
Creating a snapshot upon saving the image: Select the Automatically Create New Snapshot When Saving option in the History Options dialog box to create a new snapshot every time you save your image. This is useful if you find yourself venturing down uncertain roads from one save to the next and you want the ability to backstep not only to the last saved state (which you can do by choosing File
Saving the state permanently: The problem with snapshots is that they last only as long as the current session. If you quit Photoshop or the program crashes, you lose the entire history list, snapshots included. To save a state so you can refer to it several days from now, choose the New Document command or click the leftmost icon at the bottom of the History palette. You also can drag and drop a state onto the icon. Either way, Photoshop duplicates the state to a new image window. Then you can save the state to the format of your choice.
Setting the source: Click to the left of a state to identify it as the source state. The History Brush icon appears where you click. The source state affects the performance of the History Brush, Art History Brush, Fill command, and Eraser if you select Erase to History. The keystroke Ctrl+Alt+Backspace (
Trashing states: If your machine is equipped with little RAM or you're working on a particularly large image, Photoshop may slow down as the states accumulate. If it gets too slow, you may want to purge the History palette. To delete any state as well as those before it, drag the state to the trash icon at the bottom of the palette. Your image updates accordingly. If the Allow Non-Linear History option is selected, clicking the trash can deletes just the active state.
Tip
To clear all states from the History palette, choose the Clear History command from the palette menu. This doesn't immediately empty RAM, just in case you change your mind and decide you want to undo. Photoshop purges memory for real only after you perform another operation. If you want the memory emptied right away — and you're positive that you have no desire whatsoever to undo — press Alt (Option on the Mac) and choose the Clear History command. And if you're really hankering to purge, choose Edit
The History palette gives you a very simple, yet powerful way to step backward and forward in time. It's very linear (despite that Allow Non-Linear option), and it's very simple and reliable. But what if you want to step a little to the left or right? What if simply going back to before you selected and deleted something isn't enough for you?
As luck would have it, Photoshop offers three more liberating alternatives to the linear world of the History palette: the Eraser tool, the History Brush tool, and the Art History Brush tool. The Eraser tool washes away pixels to reveal underlying pixels or exposed canvas. The History Brush tool takes you back to a kinder, simpler state; the Art History Brush tool does the same but enables you to paint using special artistic effects. Although the functions of these tools overlap slightly, they each have a specific purpose, as becomes clear in the following sections.
Note
As you work with any of these tools, remember that you can use the Edit
When you work with the Eraser tool, you can select from three Eraser styles, all available from the Mode pop-up menu in the Options bar pictured in Figure 7.24. These are Brush, Pencil, and Block. Block is the ancient 16×16-pixel square Eraser that's great for hard-edged touch-ups. The other options work exactly like the tools for which they're named.
In addition to the Mode settings, the Options bar provides access to the Brush option, the Opacity and Flow values, and the Airbrush icon, all of which work as described in Chapter 5. All options are available when using the Brush-style Eraser, none is applicable to the Block style, and Flow and airbrush dim when painting with a Pencil-style Eraser.

Figure 7.24. When the Eraser tool is selected, the Mode pop-up menu offers a choice of Eraser styles rather than the brush modes available to the painting and editing tools.
Although the Eraser tool is pretty straightforward, there's no sense in leaving any stone unturned. So here's everything you ever wanted to know about the art of erasing:
Erasing on a layer: When you're working on the Background layer, the Eraser merely paints in the background color. Not very exciting. What distinguishes the Eraser tool from the other brushes, though, is layers. If you click and drag on a layer and deselect the Lock buttons for transparency and image pixels in the Layers palette, the Eraser tool removes paint and exposes portions of the underlying image. The Eraser tool suddenly performs like that pink thing at the end of your pencil.
Note
If you select the transparency Lock button in the Layers palette, Photoshop won't let the Eraser bore holes in the layer or alter areas that are already transparent. Instead, the Eraser paints opaque pixels in the background color. If you select the option for locking image pixels, you can't erase or paint any part of the layer. For more information on locking layers, see Chapter 13.
Erasing lightly: Change the Opacity setting in the Options bar to make portions of a layer translucent in inverse proportion to the Opacity value. For example, if you set the Opacity to 90 percent, you remove 90 percent of the opacity from the layer and, therefore, leave 10 percent of the opacity behind. The result is a nearly transparent stroke through the layer.
Erasing versus using layer masks: As described in Chapter 13, you also can erase holes in a layer using a layer mask. But unlike the Eraser — which eliminates pixels for good — a layer mask doesn't do any permanent damage. On the other hand, using the Eraser tool doesn't increase the size of your image as much as a layer mask does. Of course, you can argue that any operation — even a deletion — increases the size of the image in RAM because the History palette has to track it. But even so, the Eraser remains more memory-efficient than a layer mask. With the speed and power of most modern computers, this is hardly the issue that it once was.
Erasing with the Pencil tool: When you work with the Pencil tool — not the Eraser's Pencil mode but the actual Pencil tool — Photoshop presents you with an Auto Erase option in the Options bar. Turn it on to draw in the background color anytime you click or drag on a pixel that is already colored in the foreground color. This technique can be useful when you're drawing a line against a plain background. Set the foreground color to the color of the line; set the background color to the color of the background. Then use the Pencil tool to draw and erase the line until you get it just right.
Note
Unlike the Eraser tool, the Pencil tool always draws either in the foreground or background color, even when used on a layer.
Erasing to history: Press Alt (Option on the Mac) as you drag with the Eraser to paint with the source state identified by the History Brush icon in the History palette. It's like scraping away the paint laid down by the operations following the source state. Also, instead of pressing Alt, you can select the Erase to History option in the Options bar. In this case, dragging with the Eraser tool reverts and Alt-dragging (Option-dragging on the Mac) paints in the background color or erases the active layer.
Note
In the old days, people used the term "Magic Eraser" to mean the Eraser tool set to the Revert mode. But when Photoshop 5.5 introduced the official Magic Eraser tool, which deletes a range of similarly colored pixels each time you click in the image window (see Chapter 9), this use of the term disappeared. So the old Magic Eraser is the modern History Eraser. Confused yet?
Painting with the History Brush tool — which you can select from the keyboard by pressing Y — is like painting with the Eraser tool when Erase to History is selected. Just click and drag with the History Brush to selectively revert to the source state targeted in the History palette. You also can vary the translucency of your strokes using the Opacity setting in the Options bar. But that's where the similarities end. Unlike the part-time history Eraser, the dedicated History Brush tool lets you take advantage of brush modes. By choosing a different brush mode from the Mode pop-up menu in the Options bar, you can mix pixels from the changed and saved images to achieve interesting, and sometimes surprising, effects.
Tip
Using the History Brush tool instead of using the Eraser's Erase to History function is a good idea. Of course, with Pencil and Block, the Eraser offers more styles. But when weighed against brush modes, these styles aren't much of an advantage. The History Brush also is more intuitive because its icon matches the source state icon in the History palette.
As you play with the History Brush tool, keep in mind that you don't have to limit yourself to painting into the past. Just as the History palette lets you skip back and forth through time, the History Brush lets you paint to any point in time.
The Art History Brush tool lets you create impressionistic effects with the aid of the History palette. To get a sense of how it works, open any image, such as the one shown in Figure 7.25. Press D to get the default foreground and background colors, select the standard Brush tool, and paint wildly all over your image, as shown in Figure 7.26.
Select the Art History Brush tool, which shares a flyout menu and keyboard shortcut (Y) with the History Brush tool. Bring up the History palette, and make sure the first snapshot is identified as the source state (assuming that you haven't made any unauthorized changes to the image since you opened it). Now paint inside your black image. Each stroke reveals a bit of your original photograph in painterly detail, as illustrated in Figure 7.26.
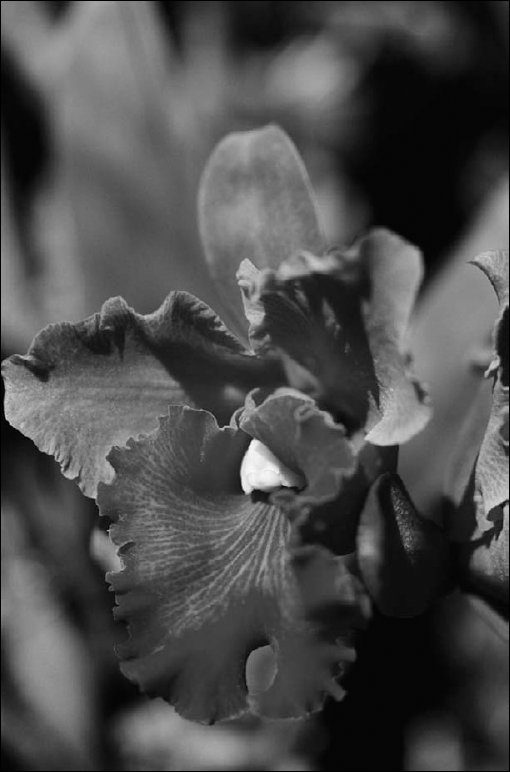
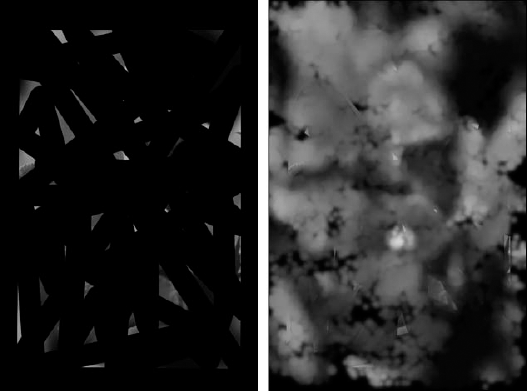
Figure 7.26. After painting a random series of black brushstrokes all over the image (left), the Art History Brush is selected and used to paint in a rough translation of the original (right). Cool, no?
If you want to go even wilder, try applying various filters, maybe even an Artistic filter, so that you are painting with a painted or drawn filter — sort of trippy in terms of the irony. Anyway, you may end up with something like the now artistically filtered photo shown on the right in Figure 7.27.
Like the History Brush tool, the Art History Brush tool paints from the source state specified in the History palette. But it does so by painting tens or even hundreds of tiny brushstrokes at a time, swirling and gyrating according to settings you select in the Options bar. Many of these settings you've seen several times before. As shown in Figure 7.28, you have the standard Brush controls, a reduced Mode option, and the tried-and-true Opacity value. But starting with the Style option, the Art History Brush tool goes its own way:
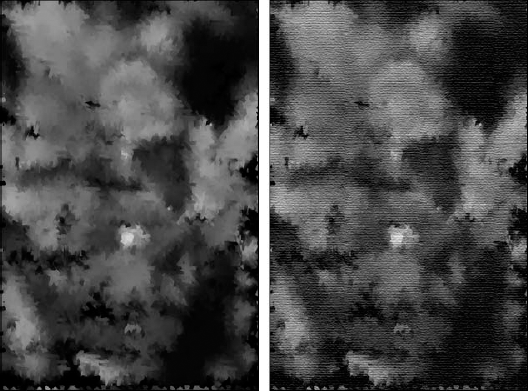
Figure 7.27. The Displace filter is applied (left), and a texture added with the Texturizer filter (right). Now we have something suitable for any dentist's office waiting room!
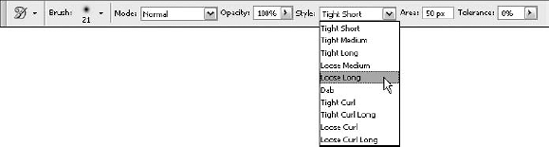
Figure 7.28. Choose an option from the Style menu to change the type of strokes the Art History brush applies.
Style: The Art History Brush tool paints with randomly generated worms and corkscrews of color. You can decide the basic shapes of the creepy crawlies by selecting an option from the Style pop-up menu, displayed in Figure 7.28. Combine these options with different brush sizes to vary the detail conveyed by the impressionistic image. Tight styles and small brushes give you better detail; loose styles and big brushes produce less detail.
Area: This value defines the area covered by a single spot of corkscrews. Larger values generally mean more corkscrews are laid down at a time, reducing the value for a sparser look. You can get some very interesting effects by raising the Area value to its maximum, 500 pixels, and clicking inside the image without moving the cursor. Watch those worms writhe.
Tolerance: This value limits where the Art History Brush can paint. A value of 0 lets the brush paint anywhere; higher values let the brush paint only in areas where the current state and source state differ dramatically in color.
Photoshop displays the Cancel cursor if you try to paint with the History Brush or Art History Brush using a source state that's a different width or height than the current image. One pixel of difference, and the source state is a dead issue. This same restriction applies to Edit
You also may see the Cancel cursor if the layer is locked or the source state lacks an equivalent layer. To find out exactly what the problem is, click the image with the Cancel cursor to display an explanatory alert message. If the problem relates to the source state, move the source state icon in the History palette to a point after you modified the width or the height of the image. The crop tool and the Image
This chapter provided an overview of Photoshop's image restoration tools and showed you how to touch-up dust, hair, and other scanning artifacts, removing them from your images. You also learned to use the Healing Brush, Spot Healing Brush, and Patch tools, and to use these and other tools to restore damaged photographs.
In addition, this chapter showed you how to eliminate background elements from an image and to move backward through time with the History palette. You also learned to paint away mistakes with the Eraser and History Brush tools and how to get rid of red eye.