
Layers started out as little more than their name implies — sheets of pixels that you could edit and transform independently of each other. But since the feature was introduced in version 3, layers have become increasingly more sophisticated and complicated. Photoshop 4 introduced floating adjustment layers that let you correct colors without permanently affecting a single pixel (see Chapter 18). Photoshop 5 gave us layer effects, which included editable drop shadows, glows, and edge bevels (see Chapter 15). Photoshop 6 permitted you to bundle and color-code layers into logical clusters (this chapter), blend color channels independently of each other (see Chapter 14), and even add vector-based lines and shapes (see Chapter 15) and object-oriented text (see Chapter 16). Photoshop 7 gave you the ability to adjust the fill opacity and allowed for easier renaming of layers, but otherwise maintained the status quo. Photoshop CS dramatically improved the way you work with layers by introducing layer comps (covered later in this chapter).
With Photoshop CS2, to conclude our History of Photoshop Layers, we saw the biggest changes since version 4. Not necessarily improved so much as changed, the Layers Palette received a slight overhaul, as did the methods of linking, grouping, and merging layers. With CS3, these changes remain part of the palette, and we see the Layers palette on the dock (in the default workspace view, as described in Chapter 2). But not much else changed. Of course, the addition of Smart Filters, which you can read about in Chapter 10, has added something to the Layers palette, in that when Smart Filters are applied (to a Smart Object layer), the layer's status, along with all the filters applied to it as Smart Filters, are displayed as such in the palette.
For those of you who are new to Photoshop or for whom layers are something of a conceptual enigma, let's back up and talk about what they are, what they do, and why you love them (you really do, you know).
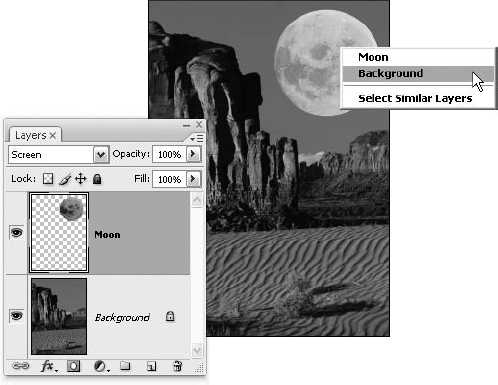
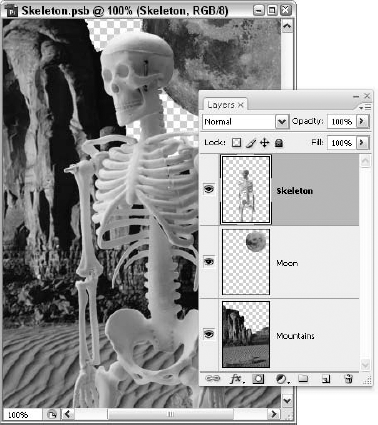
The first and foremost benefit of layers is that they add versatility. Because each layer in a composition is completely independent, you can change your mind at a moment's notice. Consider Figure 13.1. This photo started out as a picture of the desert. The moon came from an entirely different image, and the two together are the result of layering.
Without layers you'd be hard-pressed to easily (just forget quickly) rearrange, resize, or remove anything from a photo. Because working with Photoshop means everything from the background to the smallest item in an image can be on its own layer, every aspect of an image is ultimately fluid and changeable.
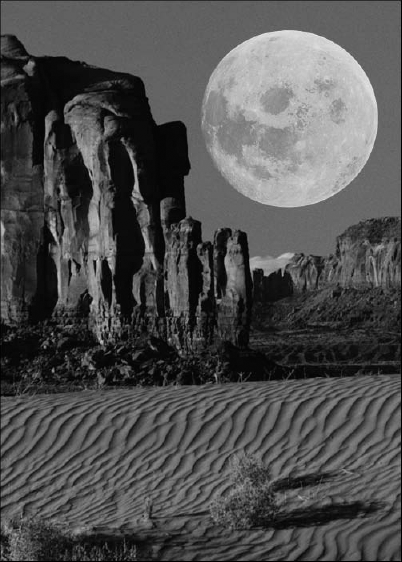
Figure 13.1. Ah, the desert moon! Thanks to the inherent flexibility of layers, you can rearrange your image components, keeping them separate for easy editing, transformation, and removal.
Layering gives you freedom to try new things, make mistakes, make changes, and just generally expand your range of options. More than anything else, they permit you to restructure a composition and examine how it was put together after you assemble it. Layers can be very challenging or relatively simple to use: It depends on what you're doing with them and whether you've taken the time to get to know them, which is what you're about to do right now.
To its credit, Photoshop lets you establish a new layer in roughly a billion ways. If you want to add a selected portion of one image to another image, the easiest method is to Ctrl-drag (Win) or
Warning
Be sure to Ctrl-drag (
When you drop the selection, the selection outline disappears. Not to worry, though. Now that the image resides on an independent layer, the selection outline is no longer needed. You can move the layer using the move tool, as you would move a selection. You can even paint inside what was once the selection by selecting the first of the Lock buttons in the Layers palette. Both the Move tool and the Lock buttons are covered in greater detail throughout this chapter.
If you want to clone a selection to a new layer inside the same image window — useful when performing complex filter routines and color corrections — choose Layer
Those are only two of many ways to create a new layer in Photoshop. Here are a few others:
Copy a selection (Ctrl+C or

If you want to relegate a selection exclusively to a new layer, choose Layer

To convert a floating selection to a new layer, press Ctrl+Shift+J (
To create an empty layer — to house, for example, a few brushstrokes without harming the original image — choose Layer
When you create a new layer, Photoshop positions it in front of the active layer. To create a new layer behind the active layer, Ctrl-click (Win) or
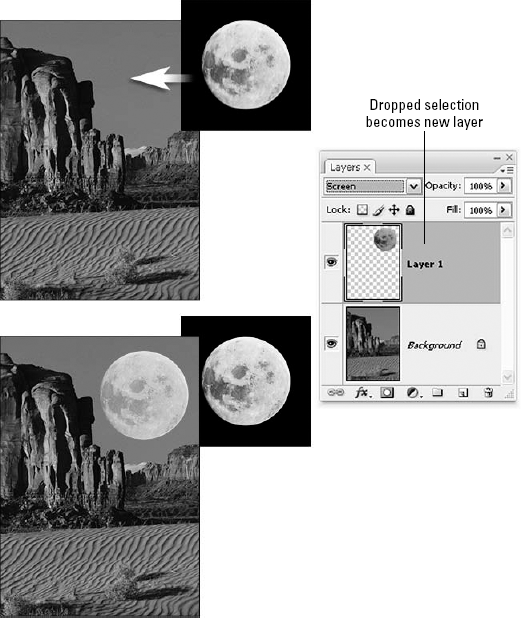
Figure 13.2. Ctrl-drag (
Incidentally, you also can create a new layer by choosing New Layer from the Layers palette menu or the Layer menu's New submenu (choose Layer
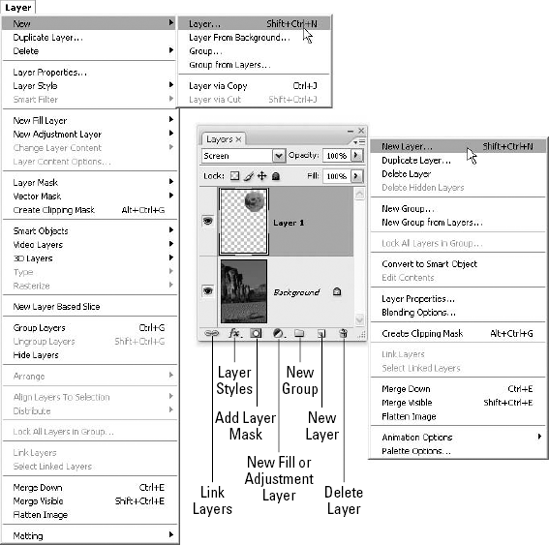
Figure 13.3. Nearly all the commands in the Layers palette menu are duplicated in the Layer menu — and supported by buttons at the bottom of the Layers palette itself.
Tip
When you choose the Layer Via Copy or Layer Via Cut command or click the new layer icon, Photoshop automatically names the new layer for you. Unfortunately, the automatic names — Layer 1, Layer 2, and so on — are fairly meaningless and don't help to convey the contents of the layer.
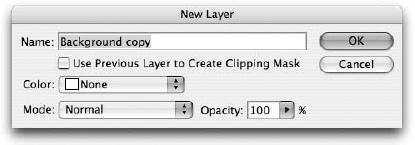
If you want to specify a more meaningful name, add the Alt (Win) or Option (Mac) key. Press Ctrl+Alt+J (
When creating a new layer from the keyboard, press Ctrl+Shift+Alt+N (
To clone the active layer, you can choose Layer
To specify a name for the cloned layer or to copy the layer into another image, Alt-drag (Option-drag on the Mac) the layer onto the new layer icon. Always the thoughtful program, Photoshop displays the dialog box shown in Figure 13.5. You can name the cloned layer by typing something in the As option box. To apply the layer to some other open image, choose the image name from the Document pop-up menu. Or choose New, and type the name for an entirely different image in the Name option box, as the figure shows.
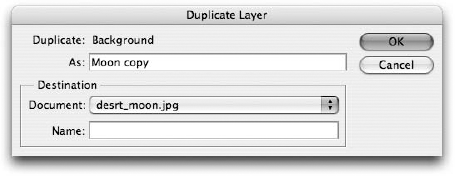
Figure 13.5. You can duplicate the layer into an entirely different image by Alt-dragging (Option-dragging on the Mac) the layer onto the new layer icon in the Layers palette. This dialog box helps you complete the process.
Tip
You can clone a layer by simply Ctrl+Alt-dragging (
Regardless of how you create a new layer, Photoshop lists the layer along with a little thumbnail of its contents in the Layers palette. The new layer appears highlighted to show that it's active, and the layer's name appears in bold.
Tip
If the thumbnails aren't big enough for you, click the palette's option menu button. If you can't spot this menu button, look for the down-pointing triangle next to a stack of lines (which visually represents the menu you'e about to display), just above the Opacity setting. Once you've found it, click the button and choose Palette Options. In the resulting dialog box, you can choose from three sizes for the thumbnails (small is the default) and also choose to see either just the content of the layer (Layer Bounds) or Entire Document in the thumbnail.
Back in the Layers palette, to the left of the thumbnails is a column of eyeballs. These symbols invite you to hide and display layers temporarily. Click an eyeball to hide the layer; the eyeball disappears, and so does the layer's content within the image. Click where the eyeball previously was to bring it back and redisplay the layer. Whether hidden or displayed, all layers remain intact and ready for action, although some layer quality adjustments — such as the blending mode and Opacity — are dimmed if you click a hidden layer. To make such adjustments to the layer, redisplay it, tweak the desired settings, and then rehide the layer if you still don't need to see it in the image.
Tip
To view a single layer by itself, Alt-click (Win) or Option-click (Mac) the eyeball icon to hide all other layers. Alt-click (Win) or Option-click (Mac) the eyeball again to bring all the layers back into view.
You can select a different layer by clicking its name in the Layers palette. The layer you click becomes active, enabling you to edit it. Here are some other layers palette tricks:
Click and activate multiple layers: Just click the first layer you want to select, and then press and hold Shift to select additional consecutive layers (next to each other in the Layers palette, not necessarily in the image) or Ctrl (
Link multiple layers and combine them into groups, as is explained later: After they're linked, you have the same ability to move and transform the layers (press Ctrl+T [
Ctrl (
on the Mac) gets you the Move tool: If the Move tool is already selected, you don't have to press Ctrl orRight-clicking (Control-clicking on the Mac) alone brings up a shortcut menu: When you right-click or Control-click with the Move tool — or Ctrl-right-click (
Tip
If you'd prefer Photoshop to always go directly to the layer on which you click and avoid all these messy keyboard tricks, press V to select the Move tool. The first option in the Options bar is called Auto Select, and it's accompanied by a list. Select Layer, and then whenever you click a layer with the Move tool — or Ctrl-click (
Tip
There also is an Auto Select: Groups option (using that Auto Select list again), which you may want to deselect — so that when you select a layer simply by clicking it, you don't necessarily select the entire group of which that layer may be a member. More about groups can be found later in this chapter.
You also can ascend and descend the layer stack from the keyboard:
Alt+] (Option+] on the Mac): Press Alt+right bracket (Win) or Option+right bracket (Mac) to go to the next layer up in the stack. If you're already at the top layer, Photoshop takes you back around to the lowest one.
Alt+[ (Option+[ on the Mac): Press Alt+left bracket (Win) or Option+left bracket (Mac) to go down a layer. If the Background layer is active (or the bottom-most layer in the image if there's no Background layer) Alt+[ or Option+[ takes you to the top layer.
Shift+Alt+] (Shift+Option+] on the Mac): This takes you to the top layer in the image.
Shift+Alt+[ (Shift+Option+[ on the Mac): This activates the background layer (or the lowest layer if no background exists).
Note
These shortcuts work only with visible layers. Hidden layers are skipped.
Note
While we haven't gotten into Layer Groups yet, it's important to note that Photoshop treats a closed group (a group whose layers are collapsed within the palette) in the Layers palette (a layer group) as if it were a layer unto itself. So every one of these tricks skips to or over the group in a single bound. For the complete lowdown on layer groups including support for nested layer groups, see the section on grouping layers found later in this chapter.
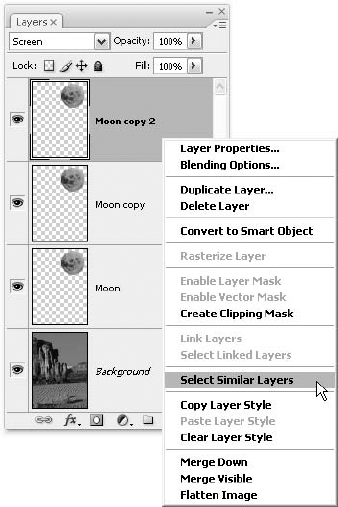
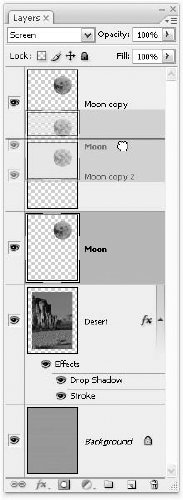
If you right-click (Control-click on the Mac) any layer in the Layers palette, a pop-up menu (shown in Figure 13.7) appears. Among the pop-up menu's commands is an option called "Select Similar Layers." Similar? What does that mean? It means layers that have similar content in terms of size, shape, color, modes, and styles, so referring again to Figure 13-7, if the command were to be chosen in the image shown (with the "Moon copy 2" layer active), the Moon and Moon copy layers would also be selected automatically.
The Select Similar Layers command can be a great way to select several duplicate layers at once without having to hunt through (and possibly scroll through, if you have lots of layers) a long list of layers in the palette to find the ones you want to select for moving, resizing, linking, or dragging to another image in the workspace.
Although the selection outline disappears when you convert a selection to a layer, no information is lost. Photoshop retains every nuance of the original selection outline — whether it's a jagged border, a little bit of anti-aliasing, or a feathered edge. Anything that wasn't selected is now transparent. The data that defines the opacity and transparency of a layer is called the transparency mask.
To see this transparency in action, click the eyeball icon in front of the background item in the Layers palette. This hides the background layer and enables you to view the new layer by itself. In Figure 13.8, the background (the desert) is hidden (note the missing eyeball icon next to that layer) and only the moon layer is visible — and all of that layer except for the moon is transparent and filled with a checkerboard pattern. Opaque areas look like the standard image, and translucent areas, where they exist, appear as a mix of image and checkerboard — the visibility of the checkerboard, of course, dictated by the opacity of the content.
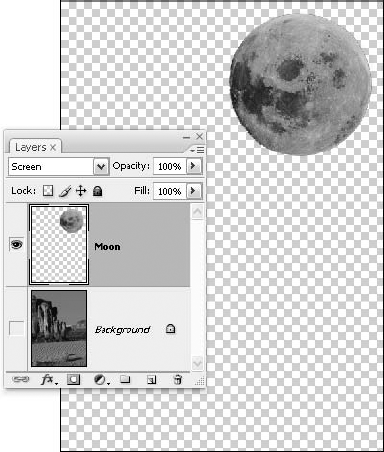
Figure 13.8. When you hide the background layer, you see a checkerboard pattern that represents the transparent portions of the layer.
Tip
If the checkerboard pattern is hard to distinguish from the image, you can change the appearance of the pattern. Press Ctrl+K and then Ctrl+6 (
If you apply an effect to the layer while no portion of the layer is selected, Photoshop changes the opaque and translucent portions of the image but leaves the transparent region intact. For example, if you press Ctrl+I (
Only a few operations affect the transparent areas of a layer, and most of these are limited to tools. You can paint on transparent pixels to make them opaque. You can clone with the Clone Stamp or smear pixels with the edit tools. To send pixels back to transparency, paint with the Eraser. All these operations change both the contents of the layer and the composition of the transparency mask.
Tip
You also can fill all pixels by pressing Alt+Backspace (Option+Delete on the Mac) for the foreground color and Ctrl+Backspace (
When a portion of the layer is selected, pressing plain old Backspace (Win) or Delete (Mac) eliminates the selected pixels and makes them transparent, revealing the layers below. Note that this is not some display trick; you're actually clearing the pixels within the selection, so to get them back, you'll have to use Undo or use the History palette to go back in time to the pre-Clear state.
Note
Transparent pixels take up next to no space in memory, but opaque and translucent pixels do consume memory space. Thus, a layer containing 25 percent as many pixels as the background layer takes up roughly 25 percent as much space. Mind you, you shouldn't let this influence how you work in Photoshop, but it is something to keep in mind.
At the bottom of the layer stack is the Background layer, the fully opaque layer that represents the base image. The background image is as low as you go. Nothing can be slipped under the background layer, and pixels in the background layer cannot be made transparent, unless you first convert the background to a floating layer. Blend modes and styles cannot be applied to the layer, nor can the background be changed in terms of its Opacity or Fill; these options become dimmed while the background layer is active.
To convert your Background layer to a floating layer, double-click the layer labeled Background in the Layers palette. A dialog box appears. Type a name for the new layer — Photoshop suggests Layer 0 — and press Enter or Return. You can now change the order of the layer or erase down to transparency.
Tip
To skip the dialog box and accept Layer 0 as the new layer name, press and hold Alt (Win) or Option (Mac) and double-click the Background item in the Layers palette.
In Figure 13.9, the background image has been converted to a layer. Had this particular image included a path that encircled the background layer's subject, or had the background content not completely filled the Background layer, you could Ctrl-click (
Note
Although InDesign CS3 easily can handle layered Photoshop files complete with transparency, QuarkXPress 6.0 (and earlier versions) can't. As mentioned in Chapter 8, if you want to export transparency to Quark, you must use a clipping path.
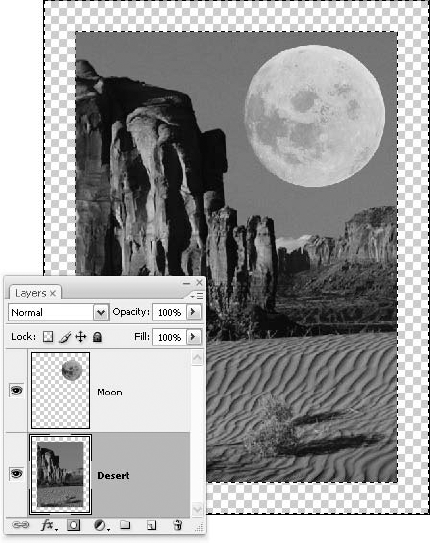
Figure 13.9. After converting the Background layer to a floating layer, the white space around the content (canvas area) was selected and deleted, leaving transparency in its wake.
Tip
To convert the active layer to a background layer when there is currently no background layer, choose Layer
To establish a blank background, create an empty layer by pressing Ctrl+Shift+N (
Note
Drop shadows and other layer styles are discussed in Chapter 15.
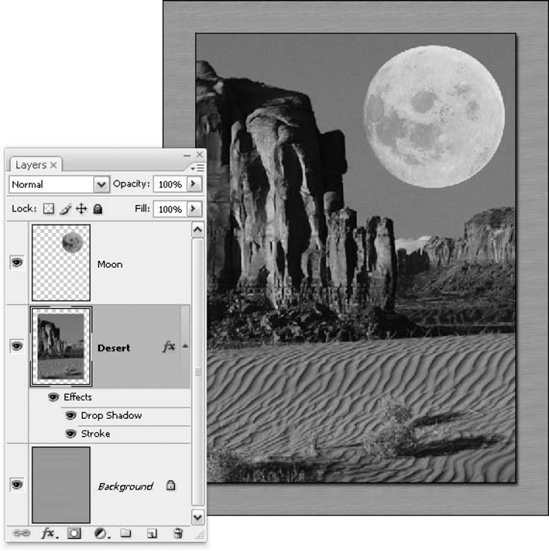
Figure 13.10. A new background layer is added below the main image layer (the former background) and a wood texture is added. Stroke and Drop Shadow layer styles were then added to the desert layer to give the composition a little false depth.
Photoshop permits only one background layer per image. If an image already contains a background layer, the command Layer
Layers would be rather limited in terms of enabling you to rearrange your image content if you couldn't change their stacking order. Luckily, Photoshop makes it easy to move layers up and down in the stack, making things overlap when they didn't before, preventing overlaps where you don't want them, and placing content behind other content so you can either see it (by reducing the opacity of the uppermost layer) or so you can't see some or all of the underlying layer. Rearranging the order of your layers also can have interesting effects on any blending modes previously applied to your layers.
You can reorder layers in two ways. First, you can click and drag a layer name up or down in the scrolling list to move it forward or backward in layering order (your mouse pointer turns from a pointing hand to a little determined fist while you're dragging). The only trick is to make sure that the black bar appears at the point where you want to move the layer before you release the mouse button, as illustrated in Figure 13.11.
The second way to reorder layers is to choose a command from the Layer
You can move faster if you remember the following keyboard shortcuts:
Ctrl+Shift+] (
+Shift+] on the Mac): Press Ctrl+Shift+right bracket (Win) orCtrl+Shift+[ (
+Shift+[ on the Mac): This shortcut moves the active layer to the bottom of the stack, just above the background layer.Ctrl+] (
+] on the Mac): This nudges the layer up one level.Ctrl+[ (
+[ on the Mac): This nudges the layer down one level.
When layer content is really tiny or is right next to, slightly behind, or mostly obscured by other content, it can be hard to spot and even harder to click it with your mouse to move it. To make your layers easier to see and click on, no matter how small, see-through, or camouflaged they may be, choose View
To use the Layer Edges command feature, click the layer you want to see highlighted by an edge (use the Layers palette to click it). Then issue the View
After you turn this option on, whichever layer you activate — be it by selecting the layer by clicking it in the Layers palette or by clicking the layer content directly with your mouse — is encompassed by the dark blue box. If you press Shift or Ctrl (

To stop seeing the boxes, you can either reselect the command to toggle it off or turn off the view of all Extras (guides, slice borders, and so on) with the View
When you convert an anti-aliased selection to a layer, you sometimes take with you a few pixels from the selection's previous background. These fringe pixels can result in an unrealistic outline around your layer that really makes the selection-based layer stand out in its new location. Figure 13.13 shows this very problem in magnified detail from an early attempt to add the skeleton to the desert image. Although the selection outline is accurate — it was done at a high zoom, with great care — a few dark pixels from around the skeleton (he used to be on a busy background) came along with him.
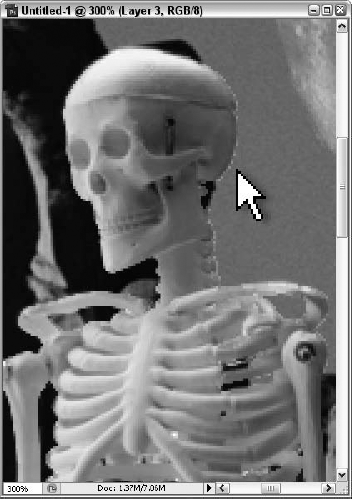
Figure 13.13. This enlarged detail of a newly inserted skeleton layer demonstrates the extra, unwanted pixels that can accompany gross selections like those made with the Lassos or the Magic Wand.
You can instruct Photoshop to replace the fringe pixels with colors from neighboring pixels by choosing Layer
It's not that Defringe never works; sometimes the results are satisfactory. But keep in mind that it's not available when a selection is active or when the layer has a layer mask or vector mask.
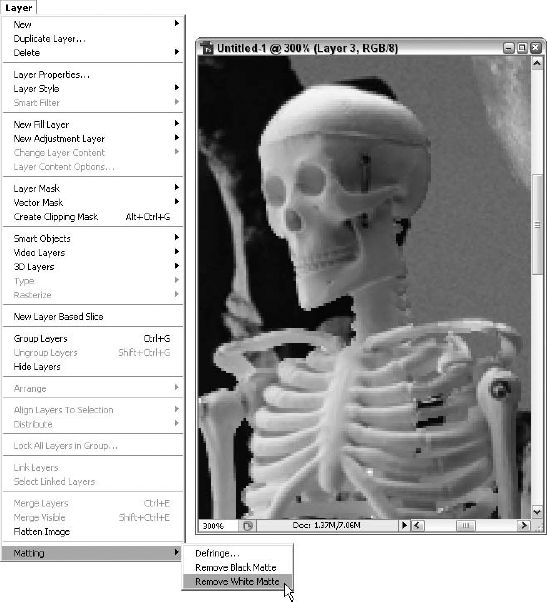
Figure 13.14. Here the Defringe command was set to a Width value of 1 to replace the pixels around the edges of the skeleton layer with colors borrowed from neighboring pixels.
Photoshop provides two additional commands under the Layer
Remove Black Matte: This command removes the residue around the perimeter of a layer that was lifted from a black background.
Remove White Matte: This command removes a white ring around a layer.
Adobe says that these commands were designed for compositing a scene rendered in a 3D drawing program against a black or white background. But for other purposes, they almost never work — unless your content did in fact come from a stark white or black background.
Tip
If you encounter unrealistic edge pixels and the automatic matting commands don't solve your problem, you may be able to achieve better results by fixing the edges manually. First, switch to the layer that's making you crazy and Ctrl-click (Win) or
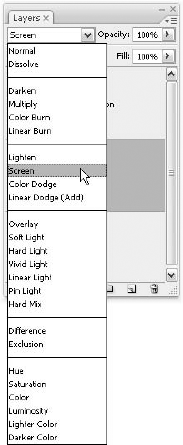
Photoshop lets you blend layers like no other program available. In fact, Photoshop does such a great job that it takes almost all of Chapter 14 to explain these options in detail. This section serves as an introduction so that you're at least aware of the basics. If you have bigger questions, Chapter 14 is waiting to tell you the whole story.
The Layers palette provides four basic ways to blend pixels between layers, as shown in Figure 13.15. None of these techniques permanently changes as much as a pixel in any layer, so you can always return and reblend the layers at a later date.
Opacity value: Type a value in the Opacity option box near the top of the Layers palette to change the opacity of the active layer or floating selection. If you reduce the Opacity value to 50 percent, for example, Photoshop makes the pixels on the active layer translucent, so the colors in the active layer mix evenly with the colors in the layers below.
Tip
If any tool other than a paint or edit tool is active — including the selection and navigation tools — you can press a number key to change the Opacity value. Press 1 for 10 percent, 2 for 20 percent, up to 0 for 100 percent. Or you can enter a specific Opacity value by quickly pressing two number keys in a row. For example, press 3 and then 7 for 37 percent.
Fill value: The Fill option lets you adjust the opacity of pixel information in the layer — anything painted, drawn, or typed — without affecting the opacity of any layer effects that might be applied. For example, if you have a text layer with the Drop Shadow layer effect applied, lowering the Fill slider to 0 fades out the text itself, leaving just the ghostly drop shadow behind. As with all other blending-related options, the Fill option is explained in excruciating detail in Chapter 14.
Blend mode pop-up menu: Choose an option from the blend mode pop-up menu — open in Figure 13.15 — to mix every pixel in the active layer with the pixels below it, according to one of several mathematical equations. For example, when you choose Multiply, Photoshop really does multiply the brightness values of the pixels and then divides the result by 255, the maximum brightness value. Blend modes use the same math as the brush modes covered in Chapter 5 (in fact, the two terms are sometimes used interchangeably). But you can accomplish much more with blend modes, which is why so much space is devoted to examining them in Chapter 14.
Tip
As with Opacity, you can select a blend mode from the keyboard when a selection or navigation tool is active. Press Shift+plus to advance incrementally down the list; press Shift+minus to inch back up. You also can press Shift+Alt (Win) or Shift+Option (Mac) and a letter key to select a specific mode. For example, Shift+Alt+M (Shift+Option+M on the Mac) selects the Multiply mode. Shift+Alt+N (Shift+Option+N on the Mac) restores the mode to Normal.
Blending Options: Choose Layer
Although layers are wonderful and extremely helpful devices, they have their drawbacks. Of course, none of these negative aspects outweigh their usefulness. Layers do expand the size of an image in RAM and ultimately lead to slower performance, and as noted in Chapter 3, only four formats — PDF, TIFF, the new PSB, and native PSD — permit you to save layered compositions. You can use layers in the construction of any image. It's just that when you go to save it in any format other than those four, your layers are combined into a single layer, and further editing on an individual layer basis is impossible. Of course, you can save a PSD or TIFF version of the artwork, too, and that way you'll retain an editable, layer-laden copy.
With the size and performance-eating problem in mind, you may want to put your image on a diet of sorts. To slim down your image, Photoshop provides the following methods for merging layers:
Layer
Merge Layers or Ctrl+E (+E on the Mac): Use this to merge two or more selected layers. This is a slight change from Photoshop CS, which had more merging options in terms of how the Merge commands appeared in the Layers menu. For example, if you had linked layers and went to the Layers menu, the command appeared as "Merge Linked." Now it appears as "Merge Layers," and Photoshop assumes you mean to merge the layers you have selected at the time.Merge Down: If you have only one layer selected, the Layers menu displays Merge Down instead of "Merge Layers." If you execute the merge, the selected layer merges with the layer directly beneath it. Note that the keyboard shortcut described above applies here, too — Ctrl + E (or
Merge Visible (Ctrl+Shift+E or
+Shift+E): Choose the Merge Visible command to merge all visible layers into a single layer. If the layer is not visible — that is, if no eyeball icon appears in front of the layer name — Photoshop doesn't eliminate it; the layer remains independent.Tip
To create a merged clone from two or more selected layers, press Alt when applying either the Layer
Tip
More useful is the ability to copy the merged contents of a selected area. To do so, choose Edit
Flatten Image: This command merges all visible layers and throws away the invisible ones. The result is a single, opaque background layer. Photoshop does not give this command a keyboard shortcut because it's so dangerous. To take a safer, more conservative route, you may want to flatten an image incrementally using the two Merge commands — whittling away at the number of layers until you're ready to merge them all into one.
Warning
Note that Photoshop asks whether you want to flatten an image when converting from one color mode to another. You can choose not to flatten the image (by pressing D or clicking Don't Flatten), but this may come at the expense of some of the brighter colors in your image. As discussed in Chapter 14, many of the blend modes perform differently in RGB than they do in CMYK.
You also can throw a layer away. Drag the layer name onto the trash can icon at the bottom of the Layers palette, click the trash can icon to delete the active layer, or right-click (Control-click on the Mac) the layer to be deleted and choose Delete Layer from the pop-up menu. So many choices.
Tip
When you click the trash can icon, Photoshop displays a message asking whether you really want to toss the layer. To give this message the slip in the future, Alt-click (Win) or Option-click (Mac) the trash can icon.
Tip
Here's a good one for you: If the active layer is linked to one or more other layers (see the upcoming section "Linking and unlinking"), you can delete all linked layers in one fell swoop by Ctrl-clicking (Win) or
As already mentioned, only four file formats — PDF, TIFF, PSB, and the native Photoshop format — save images with layers. If you want to save a flattened version of your image — that is, with all layers fused into a single image — in some other file format, choose File
The Save As command does not affect the image in memory. All layers remain intact. So if you select the As a Copy option with the Layers option deselected — which is a good idea, really — Photoshop doesn't even change the name of the image in the title bar. It merely creates a flattened version of the image on disk. Nevertheless, be sure to save a layered version of the composition as well, just in case you want to edit it in the future.
We mentioned a few sections back that every layer (except the background) includes a transparency mask. This mask tells Photoshop which pixels are opaque, which are translucent, and which are transparent. Like any mask, Photoshop lets you convert the transparency mask for any layer — active or not — to a selection outline. In fact, you use the same keyboard techniques you use to convert paths to selections (as explained in Chapter 8) and channels to selections (Chapter 9):
Ctrl-click (Win) or
To add the transparency mask to an existing selection outline, Ctrl+Shift-click (Win) or
To subtract the transparency mask, Ctrl+Alt-click (Win) or
To find the intersection of the transparency mask and the current selection outline, Ctrl+Shift+Alt-click (Win) or
If you think you can't remember all these keyboard shortcuts, don't worry — you can use Select
Selection outlines exist independently of layers, so you can use the transparency mask from one layer to select part of another layer. For example, to select the part of the background layer that exactly matches the contents of another layer, press Shift+Alt+[ (Shift+Option+[ on the Mac) to descend to the background layer and then Ctrl-click (Win) or
The most common reason to borrow a selection from one layer and apply it to another is to create manual shadow and lighting effects. After Ctrl-clicking (
Now, you might think that with Photoshop's extensive range of layer styles, manual drop shadows and the like would be a thing of the past. After all, you have only to choose Layer
On the other hand, the old ways aren't necessarily always better. A shadow created with the Drop Shadow command takes up less room in memory, it moves and rotates with a layer, and you can edit the softness of the shadow long after creating it. You also can set the shadow to employ Global Light, which means any other shadows in the image (drop shadows applied as Layer Styles, that is) will have the same angle, indicating light coming from the same direction. This can save time and effort if you have more than one item shadowed in an image.
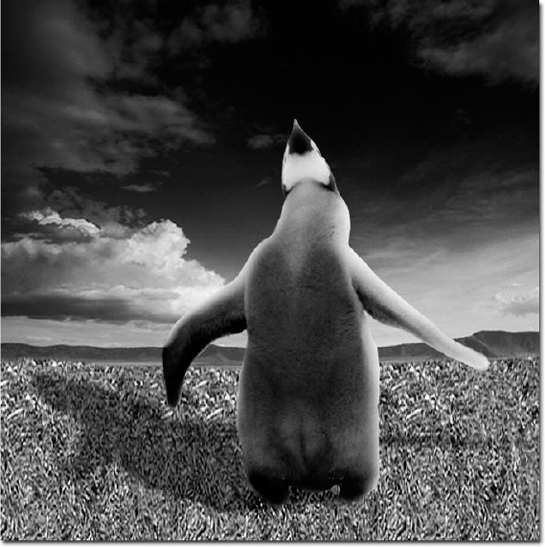
Figure 13.16. Here's a truly happy penguin — his toes in the grass, the sun on his feathers, and a shadow cast behind him.
What you have are two equally powerful solutions, each with its own characteristic pros and cons. Luckily, you can easily master both, and then you'll be ready for any situation.
Note
For everything you ever wanted to know about the Layer Styles commands, read Chapter 15.
You can move an entire layer or the selected portion of a layer by clicking and dragging in the image window with the Move tool. If you have a selection in place, drag inside the marching-ants outline to move only the selection; drag outside the selection to move the entire layer.
Warning
If you have selected the Auto Select Layer option (it's a Move tool option) and forget that it's on, you may create a few stressful moments for yourself when attempting to move a layer that partially or completely overlaps another. You'll select the layer using the Layers palette or by right-clicking (Control-clicking on the Mac) the layer you want, and then when you click and drag to move the layer you think is active, you'll really grab the top-most layer and move that one instead. If you find that this happens, just forgo the potential convenience of Auto Select Layer and turn the darn thing off.
Speaking of the Move tool, as mentioned in Chapter 8, you can temporarily access the Move tool when some other tool is active by pressing Ctrl (Win) or
If part of the layer disappears beyond the edge of the window, no problem. Photoshop saves even the hidden pixels in the layer, enabling you to drag the rest of the layer into view later.
Warning
If, while dragging a selection, you move your cursor outside the image window, Photoshop thinks you are trying to drag-and-drop pixels from one image to another and responds accordingly.
If you Ctrl-drag (
Tip
If you regularly work on huge images or your machine is old and kind of slow, Photoshop lets you speed the display of entire layers on the move. Press Ctrl+K and then Ctrl+3 (
With the release of Photoshop CS3, there were a few changes to the way you link and unlink layers. Of course, there's no big change in your overall capabilities in terms of layer linking and unlinking, but the procedure for linking layers (and then unlinking them later) has changed a bit for those of you whose most recent Photoshop experience was CS or version 7.
First, there is no longer any link check box or chain icon next to each layer. In Photoshop CS and its layer-supporting predecessors, in addition to the box where the eyeballs live, there was another column of boxes, which when clicked, would display a chain icon. This meant that the selected layers (you had to select them before clicking in the box) were linked. You could then unlink layers by clicking the chain icon and breaking the link.
Now, the Link Layers button is on the bottom of the palette, and you use it to link and unlink selected layers. Figure 13.17 shows two linked layers, and the Link Layers button is labeled.
Note
Dragging inside a selection outline moves the selection independently of any linked layers. Dragging outside the selection moves all linked layers at once.
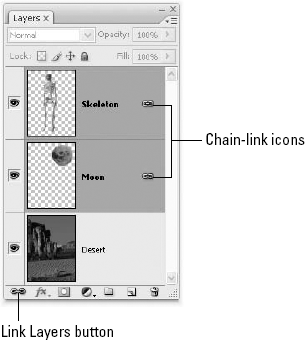
Figure 13.17. Select the layers you want to link, and then click the Link Layers button, found at the lower-left end of the Layers palette buttons.
You also can link layers with the shortcut menu. As you may recall from the section "Switching between layers" earlier in this chapter, you can bring up a pop-up menu listing the layers in an image by Ctrl-right-clicking (
When you drag-and-drop linked layers from one image window into another, all linked layers move together and the layers retain their original order. If you want to move just one layer without its linked buddies, drag the layer name from the Layers palette and drop it into another open image window.
Tip
If you press and hold Shift when dropping, Photoshop centers the layers in the document. If the document is exactly the same size as the one from which you dragged the layers, Shift-dropping lands the image elements in the same position they held in the original document. And finally, if something is selected in the document, the Shift-dropped layers are centered inside that selection.
When you have just two layers linked, unlinking is just as easy as previously stated: With the layers selected, click the Link Layers button and the link is broken. The chain icon leaves the layers, and the link is no more. But what if you have more than two layers linked? Is it an all-or-nothing proposition? Nope. If you have three, four, or more layers linked, to unlink them all, right-click (Control-click on the Mac) any one of the linked layers and choose Select Linked Layers from the pop-up menu. To unlink just one or two (or any number, just not all) of the linked layers, select just those that you want to unlink and click the Link Layers button. The layers you didn't select remain linked, but the selected layers are no longer part of the chain gang.
In versions of Photoshop prior to CS2, layers could be placed in sets: Using the Folder button at the foot of the Layers palette, you could create a set and click and drag layers into it, and you also could create nested sets by creating sets within sets and dragging layers into the nested sets. It all worked like file management in Windows (or even on the Mac), where you have folders and subfolders, and files can be stored in them to keep your work organized. Sets served the same purpose in Photoshop, enabling you to organize your layers and deal with them in large, well, groups. That may be why the name was changed, huh?
Anyway, now sets are called groups, and you call the process of creating them and placing layers in and taking layers out of them grouping and ungrouping layers. For those of you who are new to grouping layers, or if you're familiar with putting layers in the aforementioned sets, here's how the whole grouping/ungrouping thing works:
First, click the Create a New Group button (it's still a folder icon button) at the foot of the Layers palette. A generically named Group layer appears in the palette, called Group 1 (if it's your first in the current image). You also can Alt-click (Option-click on the Mac) the Create a New Group button and open the New Group dialog box shown in Figure 13.18. Through this dialog box, you can name your new group, choose a color for its display in the Layers palette, and choose a Mode and Opacity for it. You'll note that the default Mode is Pass Through, and that will be explained shortly.
Figure 13.18. Choose the Create a New Group command or Alt-click (Option-click on the Mac) the folder icon at the bottom of the Layers palette to create and name a new group.
Tip
The Pass Through Mode option tells Photoshop to respect the existing blend modes assigned to the individual layers in the group and keep them applied to those layers. By contrast, if you apply a different blend mode such as Multiply to the group, Photoshop overrides the existing blend modes of the layers in the group and applies Multiply to them all.
The group appears as a folder icon in the Layers palette scrolling list. There's also a little triangle next to the folder icon, which you'll use to display and collapse (not hide, as in not showing in the image) the list of grouped layers. The group's visibility as a whole is indicated by the eyeball icon to the left of the group's name.
To add a layer to the group, click and drag the layer name within the Layers palette and drop it on the folder icon. That little fist mouse pointer you saw in the coverage of restacking layers returns and follows you as you drag the layer up or down to the group in which it belongs. Figure 13.19 shows a new group in place (Lens Flare examples), with layers already in it, and an existing group (Callouts) with its layers collapsed.
Photoshop also lets you place groups inside of other groups, a process called nesting. Photoshop allows you to nest groups up to five levels deep. Nesting layer groups can be a great way to better organize your layers. To place one group inside another, simply drag-and-drop it onto the other group in the same manner you would a layer. As it does when you place a layer into a group, Photoshop applies the blend mode of the master group to every layer and nested group within it when the mode is not set to Pass Through.
Here are some other ways to create and modify groups:
Double-click a group name to rename it.
Drag a group name up or down the palette to move it.
When a group is expanded, you can drag a layer within the group, move a layer out of the group, or drop a layer into the group at a specific position.
To duplicate a group, drag it onto the folder icon at the bottom of the Layers palette.
Hate dragging all those layers into a group? Select the layers before creating the group and choose Layer
In case you're wondering, "Can I link layers in different groups?," yes, you can. If you're wondering, "Can I link groups together?," yes, it's possible not only to link groups, but also to link individual layers to entire groups. Pretty snazzy, huh?
You know that you can click the triangle next to a folder icon to open or close the group and show or hide the layers and nested groups it contains. Alt-click (Option-click on the Mac) the triangle next to a folder icon to show or hide every element contained in the group, including nested groups and layer styles.
Anytime a group name is active in the Layers palette, you can move or transform all layers in the group as a unit, much as if they were linked. To move or transform a single layer in the group, just select that layer and go about your business as you normally would.
Tip
Hang on. What if you don't want a group anymore? You want the layers, but don't want them grouped. What to do? Right-click (Control-click on the Mac) the Group layer, and choose Ungroup Layers from the pop-up menu. The group disappears, but the layers that were in it remain, in place, maintaining their original modes, opacity settings, and stacking order. If you want to delete an entire group, members (layers) and all, right-click (Control-click on the Mac) and choose Delete Group.
New in Photoshop CS3, the Auto-Align Layers command aligns selected layers in a single image, based on any similar content — common edges or corners or actual overlapping content, such as would occur if you took a series of images to create a panorama, or if you took two pictures of the same scene, but with a different person or other object in the foreground in each image.
Through the command's dialog box, shown in Figure 13-20, you can choose how the alignment takes place, choosing from different special perspective and positioning effects. Before you begin the Auto-Align process, however, you can lock one of your layers (one of the layers to be aligned) and make it a reference point for the other layers you want Photoshop to align for you. By locking the layer, you establish a position against which the other layers will be aligned, based on your subsequent selection in the Auto-Align Layers dialog box. If you choose not to lock a layer and make it a reference, Photoshop makes its own decisions and selects one of your layers as the reference for the alignment of the other selected layers.
Warning
When selecting layers to be automatically aligned, don't include any vector layers, adjustment layers, or Smart Objects. These layers won't be properly interpreted by Photoshop in terms of their content, and cannot be aligned with this command.
To use the Auto-Align Layers feature, start by placing the layers you want to align in the same image. This can be done by copying content from other images into the target image or creating layers from content within the image you want to align. Once you have the layers in place, select them within the Layers palette, and then choose Edit
Figure 13.20. The Auto-Align Layers dialog box lets you choose how your selected layers will line up.
Auto: Photoshop looks at the selected layers and chooses to apply Perspective or Cylindrical alignment, based on which method creates the best result in terms of aligning the most common or similar content within the selected layers.
Perspective: This method achieves alignment by establishing one of the selected layers (the one you locked, or if you didn't lock one, the middle layer) as the reference layer. The remaining layers are moved, resized, rotated, skewed — whatever's needed — to match up all overlapping edges across the selected layers.
Cylindrical: Here you end up with a sort of "bow-tie" effect, similar to the Perspective method, but with the outer layers stretched vertically at their outer edges. This method is most effective when you're piecing a series of images together to create a panorama, and again, unless you've locked a particular layer before starting the process, the middle layer becomes the reference for the rest.
Reposition Only: This is a safe method to use if you don't want any transformation (stretching, resizing, skewing) to occur. All that happens here is that overlapping or common content is matched up and aligned.
Note
Auto-Align Layers isn't perfect, and you may want to tweak a few things in your image once the alignment is completed. You can, of course, transform your layers in Free Transform mode (Ctrl+T for Windows or Cmd+T on the Mac) to move, resize, rotate, or skew content a bit to make the aligned final image exactly what you had in mind.
Tip
To build layers from multiple images, choose File
Why would you turn your layers into a Smart Object? If you want to edit the content outside of Photoshop and then bring it back seamlessly later, Smart Objects are the way to go. Of course, you could copy the layers to a new image, save the image in a vector-friendly format (such as EPS, for example) and then open the new image in Illustrator, edit it there, and then bring it back to Photoshop, open it, copy its contents and the paste them back into their original Photoshop image, but that would be really taking the long way home — lots of steps and a large margin for error.
Another reason is that Smart Objects can be scaled, rotated, skewed, or warped losslessly — meaning that no details are lost to the process of pixels being edited and created to fill in as the image content changes size, position, shape, and so on. Essentially, turning content into a Smart Object protects it and makes it easier to move it back and forth between images and applications without the problems of loss of detail and wasted time and effort required in the past.
Note
If you've already read Chapter 10, you read about another benefit of Smart Objects — the ability to use Smart Filters. If you haven't read Chapter 10 yet, what are you waiting for?
To turn content into a Smart Object, simply select the layer or layers from within any Photoshop image; it can be a PSD or TIFF file, or saved in any other format that supports the use of layers. With the layer(s) selected, right-click the layer names in the Layers palette (Control-click with a single button mouse on the Mac) and choose Convert to Smart Object. You also can choose Layer

Figure 13.21. Select three layers (left), and turn them into a Smart Object (right). The Smart Object layer keeps the name of the uppermost layer you selected, which is why you can see us changing that name to something more appropriate here.
Tip
You can use the Layers palette to create your Smart Objects, too. Select the layer(s) to be made into an object, and right-click (Control-click on the Mac) to display a pop-up menu. Choose Convert to Smart Object from the menu, and the object is created. The Layers
So you've made a Smart Object. Now what do you do with it? You can double-click the object layer in the Layers palette or choose Layers
Figure 13.22. Take this good advice to make sure your edited Smart Object can return to the image from whence it came.
After clicking OK to acknowledge this great advice, you're presented with a new image window, titled with the same name as the original uppermost layer in the Smart Object. The format for the new image is PSB (large document format), and the image consists of the layer(s) you grouped into the Smart Object. Figure 13.23 shows the resulting main .psb file and its Layers palette.
You can edit the new PSB file as you would any Photoshop file using virtually any of the tools, commands, filters, and so forth that you want. You can use the Transform tools to rotate, skew, scale, and even warp the content, too (but you'll find Distort and Perspective dimmed). Warping, which also can be applied to transform the PSB file content, is discussed later in this chapter.
Tip
Handling PSB files hogs lots of system resources. If you think you'll be creating and editing lots of Smart Objects, and you see that your system slows down to a crawl (or even gives you "scratch disks are full" prompts while you're editing them), consider increasing your RAM.
After you've finished your edits, you can use the File
To export a Smart Object, select Export Contents from the pop-up menu that appears when you right-click (Control-click) the object. A Save dialog box opens through which you can give your file a name (PSB is the default format, but you can pick another) and choose a location for the file. After you've saved the file, it can be opened in Illustrator as well as many other vector-based editing programs. You also can open it in Photoshop. After the edits are performed, you can save the image and reopen the original image in Photoshop — "original image" refers to the one from which the original layers that became the object came. The changes you made in the other program are reflected, and the content is rerasterized.
If you choose Replace Contents from the Layer
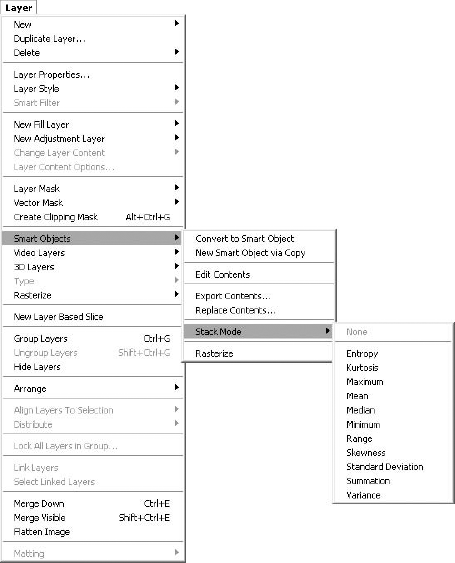
Speaking of stacking, another command you may have noticed in the Layer
So what is a stack, and what is Stack Mode? An image stack is a combination of images, represented by layers in an image file. It's created from multiple images and builds a single new image from the images in the stack. This is different from a simple composite image, where you manually drag content from multiple images into a target image, and it's different from blending (as discussed in Chapter 14), because the image your stack builds can be very different from the image/s used to build it. It might be in a different mode (set through the Image
To create an image stack, you take two or more images, convert them to layers in a single image file, and then convert those layers to a Smart Object (using techniques discussed previously in this chapter). You select all the layers and choose Layer
After the images have been combined into a new image as layers and those layers converted to a Smart Object, you can apply any one of 11 different Stack Modes to the image stack, or you can apply no specific mode and allow the combining of the image-based layers into a Smart Object stand on its own in terms of the impact the combined layers have on each other and their resulting single layer.
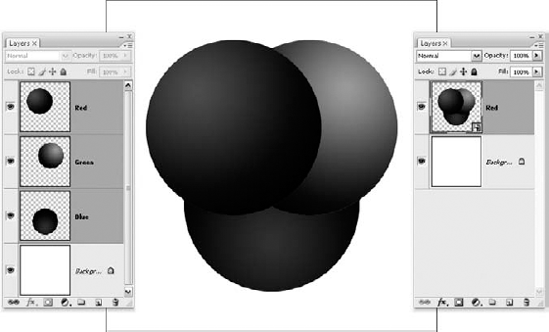
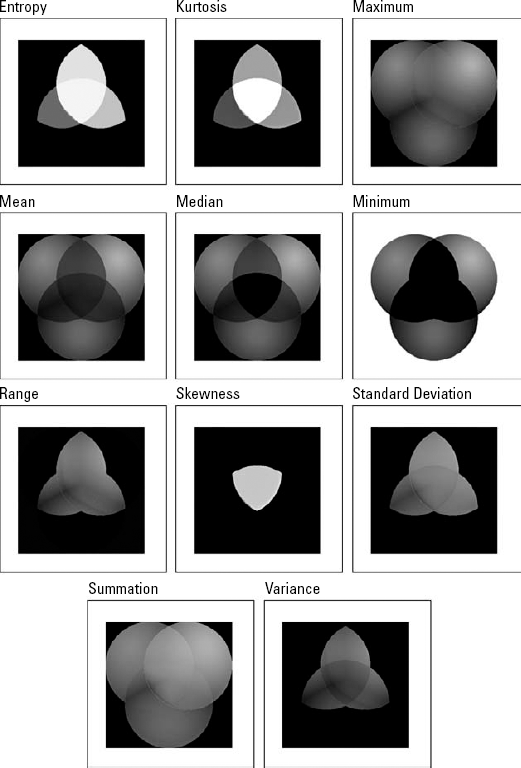
Figure 13.25 shows our sample figure of three spheres — red, green, and blue (yes, we KNOW it's grayscale, but check the color section!). Figure 13.26 shows the results of the 11 Stack Modes when applied to the image.
If you choose to apply a Stack Mode, here are your options: Be forewarned that if you found the Custom filter's math daunting (see Chapter 12), these would blow your mind if we got into all the calculations that go into the application and execution of these modes. Here's the list, though, and you can experiment with each one, using your own images or those you'll find on this book's CD.
The first options have some common elements: If there is only one layer in the stack, the size of the original image stack is maintained, and output depth is consistently 32 bits/channel. As a result, some image modes change, such as CMYK, LAB, and Multichannel — images in these modes become RGB images and maintain the same channel order.
Entropy: When this one is applied, the result is the binary entropy of the non-transparent pixel values, calculated per channel. There is a probability of value equal to the result of the number of occurrences of the value divided by the total number of non-transparent pixels.
Kurtosis: Here, the result is the statistical kurtosis of the non-transparent pixel values, on a per-channel basis. Kurtosis is a measure of peakedness or flatness compared to a normal distribution. The kurtosis for a standard normal distribution is 3.0, and a Kurtosis of more than 3 is present in a peaked distribution, and kurtosis less than 3 means you have a flat distribution.
Maximum: This one gives you the maximum of the non-transparent pixel values, on a per-channel basis. Figure 13.24 shows the results of this Stack Mode, with the original (unstacked) Smart Object shown on the left.
Mean: Where the input stack is 8 or 16 bits/channel, the resulting image is 16 bits/channel. If the input stack is 32 bits/channel, the resulting image is, too. This Stack Mode results in an average of the non-transparent pixel values, calculated on a per-channel basis.
Median: The median Stack Mode results in the median value of the non-transparent pixels, calculated per channel.
Minimum: Here, the result is the minimum of the non-transparent pixel values, per channel. Figure 13.26 shows the impact of this Stack Mode on a Smart Object. The original object appears on the left for comparison.
Range: This gives you the maximum, minus the minimum, of the non-transparent pixel values, per channel.
Skewness: In this case, the result is the statistical skewness of the non-transparent pixel values, again, on a per-channel basis. The skewness is a measure of symmetry or asymmetry around the statistical mean, relative to the non-transparent pixels. Positive skewness values are found when the distribution is skewed to the high side of the mean, and negative skewness values are found when the distribution is skewed to the low side of the mean.
Standard Deviation: This Stack Mode gives you the statistical variance of the non-transparent pixel values, on a per-channel basis. The standard deviation is equal to the Square Root multiplied by the variance.
Summation: Here, the stack displays the sum of the non-transparent pixel values, calculated on a per-channel basis.
Variance: In this case, the result is the statistical variance of the non-transparent pixel values, again calculated per-channel.
These options have some things in common, too. First, these Stack Modes preserve the pixel depth, image size and image mode of the original images in the stack, and when there is only one layer in the stack (if you selected all the layers before creating the Smart Object, resulting in a single layer), the result is a duplicate of the input.
Tip
If all the Stack Mode descriptions you just read have left your brain spinning or you gave up after the first few, don't despair. One of the ways you can use Stack Modes, without having to understand the math behind them, is to reduce noise in an image. Tinker with the modes — each one has a different impact on each different image you work with — to find the one that eliminates the pixels that are creating unpleasant blips of color, light, or darkness in your image.
As you may have discovered when trying to manipulate the style or fill of type, shape layers, vector masks, or Smart Objects, you can't use the Paint Brush or any Filter on layers that contain vector data. A prompt, such as the one shown in Figure 13.27, appears. What to do? Read on.
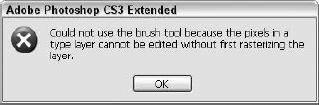
Figure 13.27. Stop right there. You can't apply many tools to vector-based image content, like type.
First, let's remind ourselves — what is vector data? Think (or refer directly) back to Chapter 1, where we talked about the difference between raster images and vector images. Vector images contain mathematical information, all of which combines to display content that's a certain size, filled with a certain color, bearing an outline of a certain width, and so on. Raster image are pixel-based, and the individual pixels can therefore be painted, filtered, and otherwise manipulated in ways that are impossible when the tool runs smack into a bunch of numbers and values.
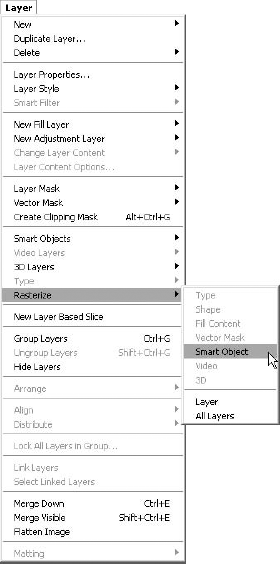
To rasterize a layer, any layer, simple right-click (Control-click on the Mac) the layer, and choose Rasterize Layer from the pop-up menu. You also can select the layer in the Layers palette, choose Layer
Just like a Smart Object can protect selected layers from loss of quality when transferred to and from an external editing program, the Layers palette can protect a layer from any kind of changes by allowing you to lock it. Photoshop also lets you lock only some attributes of a layer and leave other attributes unlocked, thus making this protection very flexible. Figure 13.29 labels the four Lock buttons available in the Layers palette. Here's how they work:
Lock transparency: This button protects the transparency of a layer. When selected, you can paint inside a layer without harming the transparent pixels. This option is so useful that there is an entire section devoted to it (see "Preserving transparency" later in this chapter).
Lock pixels: Select this button to prohibit further editing of the pixels in the active layer. Paint and edit tools will no longer function, nor will filters or other pixel-level commands. However, you'll still be able to move and transform the layer as you like. Note that selecting this button dims and selects the Lock Transparency button as well. After all, if you can't edit pixels, you can't edit pixels — whether they're opaque or transparent.
Lock position: Select this button to prevent the layer from being moved or transformed. You can, however, edit the pixels.
Lock all: To lock everything about a layer, select this button. You can't paint, edit, filter, move, transform, delete, or otherwise change a hair on the layer's head. About all you can do is duplicate the layer, move it up and down the stack, add it to a group, and merge it with one or more other layers. This button is applicable to layers and groups alike.
Photoshop shows you which layers are locked by displaying two kinds of lock icons in the Layers palette. As labeled in Figure 13.29, the hollow lock (white, as shown) means one attribute is locked; the filled lock (black) means all attributes are locked.
Photoshop's grids and guides allow you to move selections and layers into alignment. They're not the only tools that enable you to do this, of course, because you always have the Align and Distribute commands in the Layers menu, but when combined with the Move tool, guides and grids make it much easier to create rows and columns of image elements and even align layers by their centers. This capability, along with the enhanced alignment indicators known as Smart Guides (you'll read about them shortly), enables you to achieve a much greater control over your image elements, aligning and distributing your layers "by eye" with unexpected accuracy.
To create a guide, press Ctrl+R (
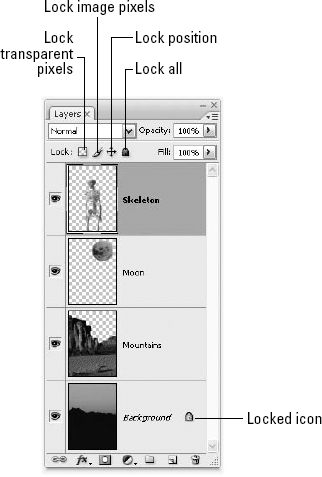
Figure 13.29. The Lock buttons at the top of the Layers palette let you protect certain layer attributes.
Tip
You also can place a guide at a specific location horizontally or vertically, using the View
After you've created your guide or guides (drag as many as you need onto the image), you can use them to align and distribute your layers — against the guides, and against each other, using the guides to establish common vertical and horizontal planes.
To make sure your layers adhere to the guides, Ctrl-drag (Win) or
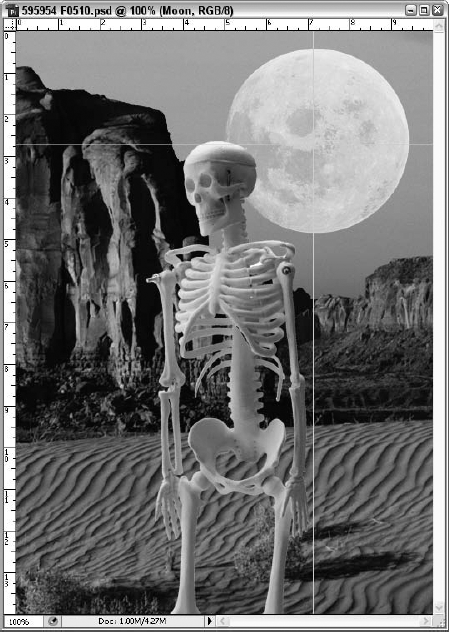
Figure 13.30. Click and drag from one of the rulers to create a guide, and then Ctrl-drag (
Note
Single-line text layers snap to horizontal guides a little differently than other kinds of layers. Rather than snapping by the top or bottom edge of the layer, Photoshop snaps a text guide by its baseline. It's just what you need when aligning type.

Guides are straightforward creatures. A few minutes with the text below is all you need to master them:
If you know the exact position where you want to put a guideline, choose View
You can show and hide all guides by choosing View
You can hide or show guides also by pressing Ctrl+H (
Tip
You can preselect which items are hidden and shown with the Show Extras command by selecting and deselecting the items in the View
You can turn a guide's snappiness on and off by choosing View
Tip
To turn off the snappiness in the middle of a brushstroke or layer movement, press Ctrl (Win) or
As with all image elements in Photoshop, you can move a guide with the Move tool. If some other tool is active, Ctrl-dragging (Win) or
To lock all guides so you can't accidentally move them while you're trying to Ctrl-drag or
Tip
When moving a guide, press Shift to snap the guide to the nearest ruler tick mark.
To convert a horizontal guide to a vertical guide, or vice versa, press Alt (Win) or Option (Mac) while pointing to or moving the guide.
If you rotate your document in exact multiples of 90 degrees or flip the image horizontally or vertically, your guides also rotate unless they are locked.
Tip
You can position a guide outside the image if you want. To do so, make the image window larger than the image. Now you can drag a guide into the empty canvas surrounding the image. You then can snap a layer or selection into alignment with the guide.
To edit the color of the guides, Ctrl-double-click (Win) or
On the Mac, guides are saved with any file format. But on the PC, the only formats that let you save guides are Photoshop (PSD), JPEG, TIFF, PDF, and EPS.
If you don't need your guides anymore, choose View
Smart Guides, shown in action back in Figure 13.31, flash on the image when your layer-in-motion is lined up against the items above, below, and beside it. Depending on the Smart Guides that appear — straight lines pointing toward the items against which the active layer is being aligned — you know if your layer is where you need it to be.
For more control over the placement of layers in your image, Photoshop offers a grid, which is a regular series of snapping increments. Think of it like a ton of guides, positioned in uniform increments, and you don't have to drag each of them onto the image, because they all arrive at once when you choose View
You edit the grid in the Guides, Grid, Slices & Count panel of the Preferences dialog box, which you can get to by pressing Ctrl+K and then Ctrl+6 (
Tip
Don't want to see the grid anymore? Choose View
The final method for controlling movements in Photoshop is the Ruler tool. To activate it (it shares a button with the Eyedropper, Color Sampler, and Count tools), Alt-click (Option-click on the Mac) the Eyedropper tool a couple of times to select it, or press Shift+I twice (if the Eyedropper is displayed) to activate the tool.
When the tool's active, all you have to do is click and drag from one point to another point in the image window, and Photoshop itemizes the distance and angle between the two points in the Info palette. The Ruler tool is even smart enough to automatically display the Info palette if it's hidden.
From that point on, anytime you select the Ruler tool in the current image, Photoshop displays the original measurement line. This way, you can measure a distance, edit the image, and press I to refer back to the measurement. If you've switched to the Eyedropper or Color Sampler tool at any point in the interim, Shift+I brings back the Ruler tool.
To measure the distance and angle between two other points, you can draw a new line with the Ruler tool, or drag the endpoints of the existing measurement line.
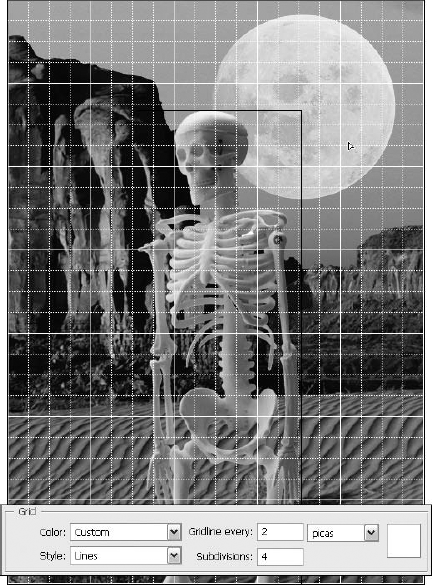
Figure 13.32. With the grid in place — set by tweaking the Grid Preferences — you have a customizable network of guides you can snap to or not snap to, positioning your layers along the vertical and horizontal lines.
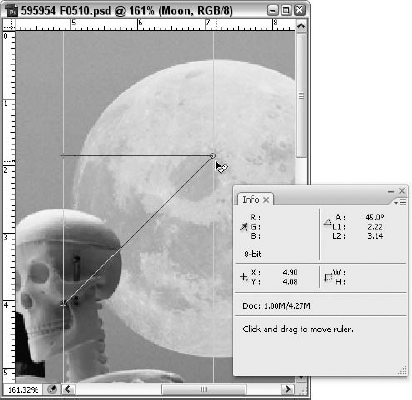
Photoshop accommodates only one measurement line per document. But you can break the line in two using what Adobe calls the "protractor" feature. Alt-drag (Win) or Option-drag (Mac) on one of the endpoints to draw forth a second segment. The Info palette then measures the angle between the two segments. As demonstrated in Figure 13.33, the L1 item in the Info palette lists the length of the first segment, L2 lists the length of the second segment, and A tells the angle between the segments.
Tip
The Ruler tool is great for straightening crooked layers. After drawing a line with the Ruler tool, choose Image
Photoshop treats some kinds of edits differently than others. Edits that affect the geometry of a selection or a layer are known collectively as transformations. These transformations include scaling (resizing), rotating, flipping, slanting, and distorting. Technically, moving is a transformation as well, but you just need to activate the Move tool to do that. Transformations are a special breed of edits in Photoshop because they can affect a selection, a layer, multiple layers, or an entire image at a time.
Photoshop has two varieties of transformations. Transformation commands that affect the entire image — including all layers, paths, channels, and so on — are listed in the Image menu. Those that affect layers and selected portions of layers are in the Edit menu or, in the case of selection outlines, in the Select menu.
The following list explains how to apply transformations to every pixel in an image, regardless of whether or not the image is selected:
Scale: To resize the image, choose Image
Rotate: To rotate the entire image, choose a command from the Image
Tip
To fix a crooked scanned image, for example, select the Ruler tool from the Eyedropper flyout in the Toolbox (press I or Shift+I, depending on your preference settings, three times). Drag along what should be a vertical or horizontal edge in the image. If you like, note the A value in the Info palette. Then choose Image
Whenever you apply the Arbitrary command, Photoshop has to expand the canvas size to avoid clipping any of your image. This results in background-colored wedges at each of the four corners of the image. You need to either clone with the Clone Stamp tool to fill in the wedges or clip them away with the Crop tool.
Flip: Choose Image
No command is specifically designed to slant or distort the entire image. In the unlikely event you're keen to do this, you'll have to link all layers and apply one of the commands under the Edit
To transform a selection, a layer, or a collection of linked layers, you can apply one of the commands in the Edit
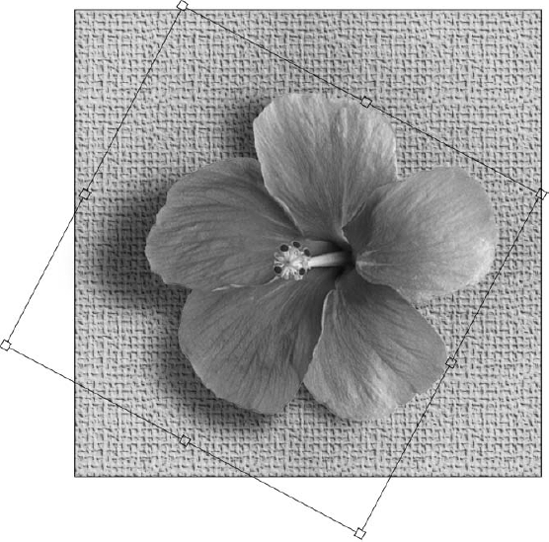
While you don't have the precision of entering specific measurements into the options bar that displays when you've picked one of the Transform submenu commands, with Free Transform, you can scale, flip, rotate, slant, distort, and move a selection or layer in one continuous operation. This one command lets you get all your transformations exactly right before pressing Enter or Return to apply the final changes. The command is demonstrated on the image shown in Figure 13.34. Each of the elements in this image resides on an independent layer. The blossom layer is active, and the shadow is linked to this layer. Therefore, both blossom and shadow will transform together.
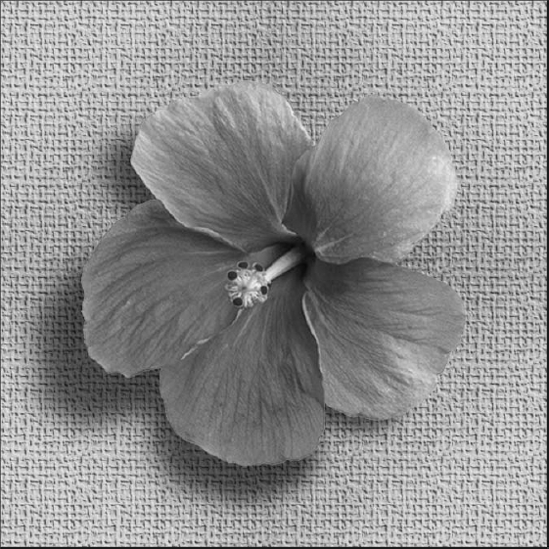
Figure 13.34. This blossom and its shadow reside on separate layers. But because they are linked together, they will transform as one.
Here's how it works: To initiate the command, press Ctrl+T (
Here's how to work in the Free Transform mode:
Scale: Drag one of the eight square handles to scale the image inside the marquee. To scale proportionally, Shift-drag a corner handle. To scale about the central transformation origin (labeled in Figure 13.35), Alt-drag (Option-drag) a corner handle.
Tip
By default, the origin is located in the center of the layer or selection. But you can move it to any place inside the image — even outside of the transformation box — by dragging it. The origin snaps to the grid and guides as well as to the center or any corner of the layer.
Flip: You can flip the image by dragging one handle past its opposite handle. For example, dragging the left side handle past the right side handle flips the image horizontally.
Tip
If you want to perform a simple flip, it's generally easier to choose Edit
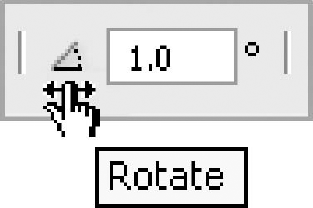
Rotate: To rotate the image, drag outside the marquee, as demonstrated in Figure 13.35. Shift-drag to rotate in 15-degree increments.
Skew: Ctrl-drag (
Distort: You can distort the image by Ctrl-dragging (
Perspective: For a one-point perspective effect, Ctrl+Shift-drag (
Move: Drag inside the marquee to move the image. This is useful when you're trying to align the selection or layer with a background image and you want to make sure the transformations match up properly.
Undo: To undo the last modification without leaving the Free Transform mode altogether, press Ctrl+Z (
Zoom: You can change the view size by choosing one of the commands in the View menu. You also can use the keyboard zoom shortcuts: Ctrl+spacebar-click, Alt+spacebar-click, Ctrl+plus, or Ctrl+minus (
Apply: Press Enter or Return to apply the final transformation and interpolate the new pixels. You also can double-click inside the marquee or click the check mark button in the Options bar.
Cancel: To cancel the Free Transform operation, press Escape, click the "no" symbol button in the Options bar, or press Ctrl+period (
To tug two opposite corner handles in symmetrical directions, Ctrl+Alt-drag (
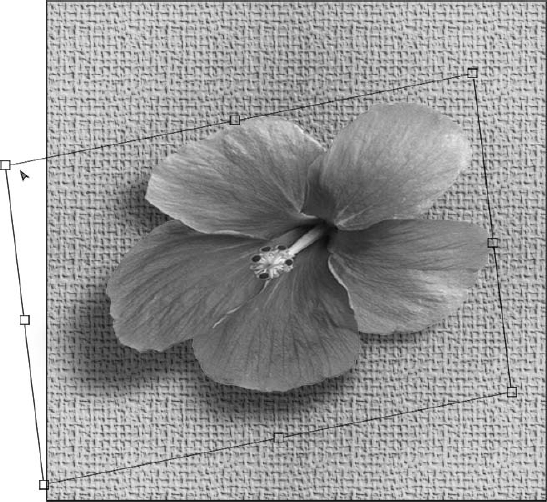
Figure 13.36. Press Ctrl and Alt (
Note
If the finished effect looks jagged after you've applied the transformation, it's probably because you selected Nearest Neighbor from the Image Interpolation pop-up menu in the Preferences dialog box. To correct this problem, press Ctrl+Z (
Tip
To transform a clone of a layer or selected area, press Alt (Option) when choosing the Free Transform command or press Ctrl+Alt+T (
If no part of the image is selected, you can transform multiple layers at a time by first linking them, as described in the "Linking and unlinking" section earlier in this chapter.
Tip
To replay the last transformation on any layer or selection, choose Edit
Note
Neither Free Transform nor any of the commands in the Edit
The Warp command allows you to totally disfigure (distort is too mild a term for what this feature does, and there's already a Transform
When you grab the edges where the gridlines meet the bounding box, dragging creates the sort of handles you see when drawing Bezier curves with the Pen tool. Also shown in Figure 13.37, these handles let you change the direction and curve of the stretched sides of the grid (and the layer within it, being dragged right along with the grid), pulling it up, down, in, and out.
After you've finished tormenting the layer, all you have to do is press Enter to commit to the transformation, or press Esc to abandon it and send the layer back to its pre-Warp state.
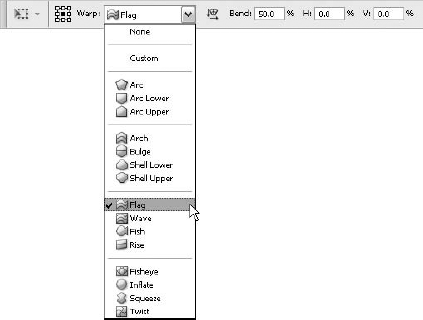
To really go to town on a layer and get some help in shaping the layer at the same time, you can click the Warp drop-down list, shown on the Options bar that appears when you activate the Warp command. Figure 13.38 shows the Options bar list. After a Warp preset has been applied, you can resize the Warp effect and click and drag from the single handle and flip the layer's content by dragging back through the layer itself.
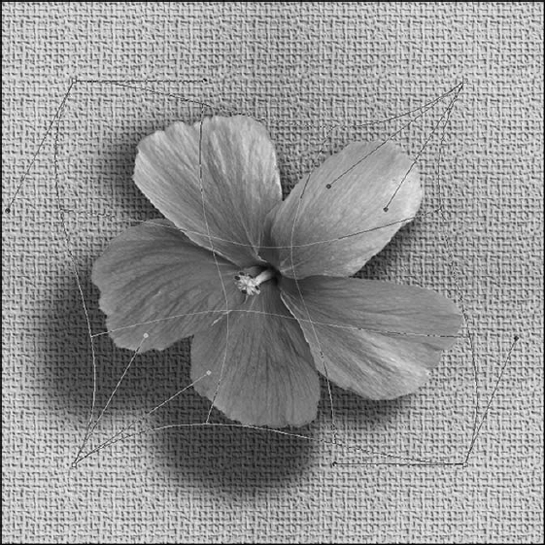
Figure 13.37. Grab any grid intersection, corner, or bounding box handle, and pull, stretch, twist, and generally abuse the selected layer.
The Warp command's Options bar also offers numerical fields into which you can type the Bend (a percentage increase or decrease in it) or a Horizontal or Vertical percentage change, which changes the perspective of the preset Warp. For more about using such numerical transformation tools, keep reading — that's what the next section is all about.
To track your transformations numerically, display the Info palette (F8) before you apply the Free Transform command. Even after you initiate Free Transform, you can access the Info palette by choosing Window

Figure 13.39. Normally, the options in the Options bar change only when you select a different tool, but choosing Free Transform adds a series of controls that permit you to transform a selection or layer numerically.
For the most part, the controls in the Options bar are straightforward. Click in the grid of nine squares to reposition the transformation origin. Use the X and Y values to change the location of the origin numerically. Click the triangular delta symbol to measure the movement relative to the transformation origin. Use the W and H values to scale the selection or layer. Click the link button to constrain the W and H values and resize the selection or layer proportionally. The angle value rotates; the H and V values skew.
Photoshop gives you the ability to control the values in the Options bar by "scrubbing," or dragging back and forth, over the icons or letters next to the editable values. When you see your mouse pointer turn to a two-headed arrow (at the tip of a pointing finger, labeled in Figure 13.40), you can drag over the position or scale values to increase or decrease them in increments of 1 pixel or 1 percentage point, respectively. Press and hold Alt (Option on the Mac) while scrubbing to change that to .1 pixel (or percentage point), and press and hold Shift to scrub the values in increments of 10. Scrubbing on the more sensitive angle and skew settings, however, raises or lowers them by .1 degree, and adding Shift changes the increment to 1 degree. By the way, at just about every location in Photoshop that you can find a numeric field, you can scrub.
Probably, most people use the Options bar strictly for scaling and rotating: It's easy to picture the change that your entries into the Width, Height, and Set Rotation fields will do to the layer in question. You'd need the spatial awareness of a NASA navigation system to predict a numerical slant.
Layers offer special masking options unto themselves. You can paint inside the confines of a layer as if it were a selection mask; you can add a special mask for a single layer; or you can group multiple layers and have the bottom layer in the group serve as the mask. Although they're fairly complicated to use — you must be on your toes when you start juggling layer masks — these functions provide all sorts of image-editing and enhancement opportunities.
As you may recall, further discussion of the Lock Transparency button was promised when first mentioned in the section on locking layers. That further discussion begins here. Now, if you don't remember this, to refresh your memory, the Layers palette, with the Lock Transparency button labeled, appears in Figure 13.41.
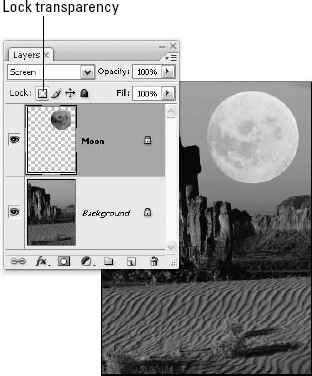
Figure 13.41. The Lock Transparency button enables you to paint inside the layer's transparency mask without harming the transparent pixels.
When selected, this button prevents you from painting inside the transparent portions of the layer. And although that may sound like a small thing, it is in fact the most useful Lock option of them all. Suppose you want to paint inside the moon shown in Figure 13.41. If this were a flat, non-layered image, you'd have to draw a selection outline carefully around the moon to isolate it from the other pixels in the image. With layers, however, there's no need to do this, because the moon lies on a different layer than its background, and a permanent selection outline exists because of this, telling Photoshop that there are both transparent and opaque pixels. Further, it tells Photoshop which pixels are which, and this creates the transparency mask.
The first example in Figure 13.42 shows the moon on its own with the background hidden. The transparent areas outside the mask appear in the checkerboard pattern. When the Lock Transparency button is deselected, you can paint anywhere you want inside the layer. Selecting the Lock Transparency button activates the transparency mask and places the checkerboard area off-limits.
The bottom image in Figure 13.42 shows what happens after the Lock Transparency button is selected and the Clone Stamp tool is used to paint in the other content. No matter how large the Clone Stamp was (it was much larger than the moon), the cloned content appears only within the moon's portion of the layer. The transparent areas are protected by the mask.
Some more useful information about Lock Transparency:
You can turn Lock Transparency on and off from the keyboard by pressing the standard slash character (/).
The Lock Transparency button is dimmed when the background layer is active because this layer is entirely opaque.
In addition to the transparency mask that accompanies every layer (except the background), you can add a mask to a layer to make certain pixels in the layer transparent. Now, you might wonder if simply erasing portions of a layer wouldn't make those portions transparent — and you'd be right, it would. When you erase, however, you delete pixels permanently. By creating a layer mask, you make pixels temporarily transparent instead. You can return at any time in the future and bring those pixels back to life again simply by adjusting the mask. So layer masks add yet another level of flexibility.
To create a layer mask, select the layer you want to mask and choose Layer
To edit the mask, simply paint in the image window. Paint with black to make pixels transparent. Because black represents deselected pixels in an image, it makes these pixels transparent in a layer. Paint with white to make pixels opaque.
Thankfully, Photoshop is smart enough to make the default foreground color in a layer mask white and the default background color black. This ensures that painting with the brush makes pixels opaque, whereas painting with the eraser makes them transparent, just as you would expect.
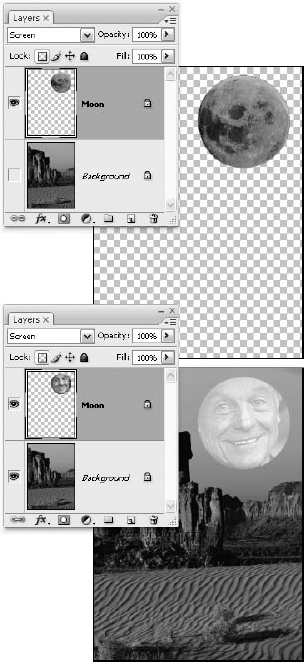
Figure 13.42. The layered moon as it appears on its own (top) and when content from another image has been clone stamped in with the Lock Transparency button turned on (bottom).
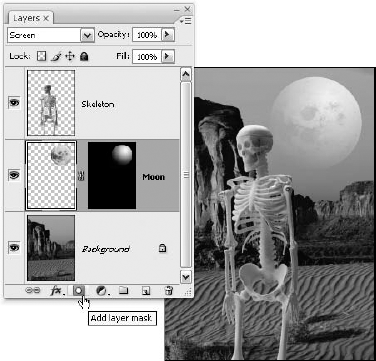
Figure 13.43. The layer mask thumbnail (to right of the moon's layer thumbnail) indicates the presence of a mask. The black areas in the mask translate to transparent pixels in the layer. The gradient to the moon selection makes it appear to fade out along its bottom-left side.
Photoshop offers lots of bells and whistles to make the function of layer masks both convenient and powerful. Here's everything you need to know:
Reveal the selection: If you select some portion of your layer, Photoshop automatically converts the selection to a layer mask when you click the layer mask icon at the bottom of the palette. The area outside the selection becomes transparent. (The corresponding command is Layer
Hide the selection: You also can choose to reverse the prospective mask, making the area inside the selection transparent and the area outside opaque. To do this, choose Layer
Hide everything: To begin with a black mask that hides everything, choose Layer
View the mask: Photoshop regards a layer mask as a layer-specific channel. You can actually see it listed in italics in the Channels palette. To view the mask on its own — as a black-and-white image — Alt-click (Win) or Option-click (Mac) the layer mask thumbnail in the Layers palette. Alt-click (Win) or Option-click (Mac) again to view the image instead.
Layer mask overlay: To view the mask as a red overlay, Shift+Alt-click (Win) or Shift+Option-click (Mac) the layer mask icon. Or simply press backslash ().
Change the overlay color: Double-click the layer mask thumbnail to access the Layer Mask Display Options dialog box, which enables you to change the color and opacity of the overlay color.
Turn off the mask: You can temporarily disable the mask by Shift-clicking the mask thumbnail. A red X covers the thumbnail when it's disabled, and all masked pixels in the layer appear opaque. Click the thumbnail to put the mask back in working order.
Switch between the layer and mask: As you become more familiar with layer masks, you'll switch back and forth between the layer and mask quite frequently, editing the layer one minute and editing the mask the next. You can switch between the layer and mask by clicking their respective thumbnails.
Tip
You also can switch between the layer and mask from the keyboard. Press Ctrl+tilde (Win) or
Link the layer and mask: A little link icon appears between the layer and mask thumbnails in the Layers palette. When the link icon is visible, you can move or transform the mask and layer as one. If you click the link icon to turn it off, the layer and mask move independently. (You can always move a selected region of the mask or layer independently of the other.)
Convert the mask to a selection: As with all masks, you can convert a layer mask to a selection. To do so, Ctrl-click (Win) or
Apply the mask to a group: You also can apply a mask to a group of layers. Just select the group, and click the layer mask icon. The mask affects all layers in the group. If a layer in the group contains its own mask, no worries; Photoshop's smart enough to figure out how to mix them together. For another method of masking multiple layers, see the section "Masking groups of layers."
When and if you finish using the mask — you can leave it in force as long as you like — you can choose Layer
One command, Edit
Tip
Once upon a time in Photoshop, there was a command that made it possible to paste a copied image in back of a selection. Although the command is gone, its spirit lives on in — you'll be shocked — a keyboard shortcut. Just press Alt (Win) or Option (Mac) when choosing Edit
About now, you may be getting a little tired of the topic of layer masking. There's one more important facet of this very broad topic left to discuss, and then we'll move on. The facet? You can group multiple layers into something called a clipping mask, in which the lowest layer in the group masks the others. Where the lowest layer, or base layer, is transparent, the other layers are hidden; where the lowest layer is opaque, the contents of the other layers are visible.
Note
Despite the similarities in name, a clipping mask bears no relation to a clipping path. That is, a clipping mask doesn't allow you to prepare transparent areas for import into other applications. Nope, a clipping mask is used purely for controlling the editable parts of its layer pals, all of which are sitting on top of it. Quite a sport, that clipping mask.
You can create a clipping mask in three ways:
Alt-click (Win) or Option-click (Mac) the horizontal line between any two layers to group them into a single unit. Your cursor changes to the mask cursor, labeled in Figure 13.44, when you press Alt (Win) or Option (Mac); the horizontal line becomes broken after you click. To break the layers apart again, Alt-click (Win) or Option-click (Mac) the dotted line to make it solid.
Select the higher of the two layers you want to combine into a clipping mask. Then choose Layer
Select the layers you'd like to be part of the mask, and then choose Layers
Note
If you're familiar with Illustrator, you may recognize Photoshop's clipping mask as a relative of Illustrator's clipping mask, in which one object in the illustration acts as a mask for a collection of additional objects. In Illustrator, however, the topmost object in the group is the mask, not the bottom one. So much for consistency.
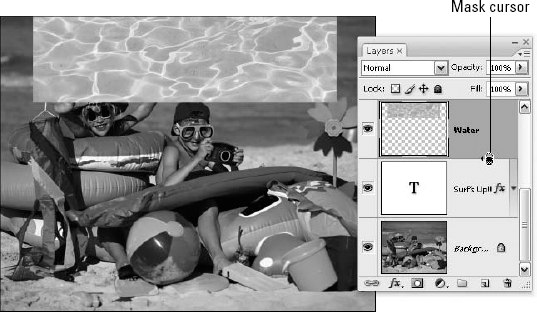
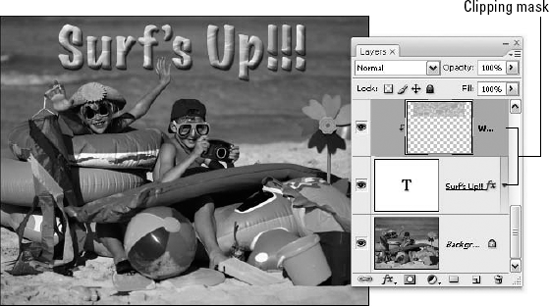
Photoshop's Layer Comps palette, shown in Figure 13.46, is designed to track certain aspects of an image and save their status at any given time. Essentially, it records snapshots of the Layers palette as individual states, or layer comps, which are saved with the image file on disk.
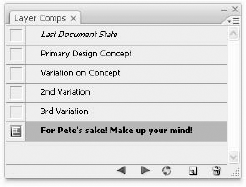
The key to successfully working with layer comps is to be extremely conscious of what they are and aren't capable of tracking. A saved layer comp can store and recall information about the visibility, opacity, and blend modes of the layers in an image, as well as the position of each layer. Layer comps also can record whether or not styles are applied to each layer and the settings of those styles. What you need to keep in mind, however, is that layer comps don't even attempt to track any pixel changes to your images. This applies to painting, creating gradients, using the Patch tool; any operation that alters the pixels (as well as text contents) of an image is not recorded in the Layer Comps palette. The palette turns the other way and pretends you've done nothing at all.
That said, layer comps can be a great and useful asset, especially when you're at the stage of assembling the final pieces into a composition. To save a layer comp, open the Layer Comps palette by choosing Window
Visibility: Select this option to track the visibility of layers and layer masks.
Position: This option tracks the position of each separate layer in relation to the others. Again, it's important to note that position changes within layers — say, if you marquee a section of a layer and drag it over to a corner — cannot be restored through layer comps.
Appearance (Layer Style): This option saves all layer style attributes, including knockouts and effects, as well as the Opacity value and blend mode assigned to each layer.
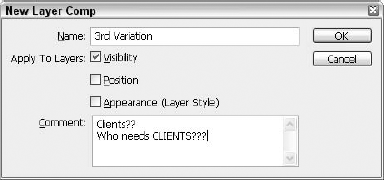
Click OK to confirm your settings and, presto, you've created a new layer comp. You can tell that you're looking at a saved state of your image because the little icon in the left column of the Layer Comps palette sits alongside your new layer comp, as shown in Figure 13.48. As soon as you make any layer-comp-friendly changes to your image, such as moving a layer or adjusting its opacity, the icon snaps back to the topmost layer comp, known as the Last Document State. This means that trackable changes have been made to the image since your last saved layer comp. You can save this new state as another layer comp, if you want, and continue working. To return to a saved state, simply click in the space to the left of the layer comp.
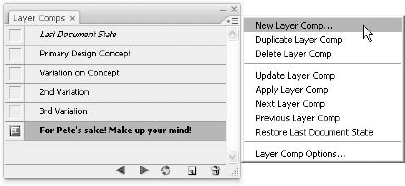
Figure 13.48. Nearly all the functions available to you in the Layer Comps palette menu can be accessed from icons in the palette.
Working with the Layer Comps palette is pretty easy after you get used to it, but there are a few things you should know:
Use the left- and right-pointing arrows at the bottom of the palette to cycle through your various layer comps. Click the right-pointing arrow to view the next saved layer comp down the list, and click the left-pointing arrow to view the previous layer comp. To cycle through only specific comps, Ctrl-click (
To the right of the arrow icons is the update layer comp icon (it's the one with two arrows that form a circle). Click this icon to assign changes to an existing selected layer comp. The icon in the left column of the palette leaps over to whatever layer comp you've selected, and the current state of the Layers palette is applied to this layer comp.
To delete a layer comp, simply select it and click the trash can icon, just as you would to delete a layer in the Layers palette. Here, you also have the added benefit of being able to select and drag multiple layer comps to the trash icon at once.
You can always return the image to its most recent unsaved layer state by clicking in the space next to the Last Document State item in the palette.
All these options also can be accessed from the Layer Comps palette menu, as shown in Figure 13.48. The palette menu also lets you duplicate any selected layer comp or access its options without having to double-click it.
Warning
Fragile creatures that they are, layer comps have a tendency to break down every once in a while. Luckily, though, they're pretty good at letting you know when they're unhappy. Whenever you make a change that will throw any of your layer comps out of whack — such as merging layers or converting a layer into a background — the affected comps display a little triangle with an exclamation point. You can either undo the destructive move or click one of the triangle icons, in which case you'll be presented with a warning explaining exactly how you've betrayed the layer comp. From this warning, you have the option of "clearing" the layer comp, which is a way of updating the comp to account for the changes you've made. Right-click (Control-click on the Mac) any of the triangles and choose Clear Layer Comp Warning to clear that particular layer comp, or choose Clear All Layer Comp Warnings to clear all the layer comps without having to wrangle with the warnings for each.
There's one last layer type to talk about — 3D layers. That's right, we said 3D (and no funny glasses are required). Okay, we're showing our age, and are sure anyone under the age of 21 who grew up on a steady diet of modern computer games probably isn't as blown away by this new set of features as we Baby Boomers are. More likely, the young 'uns are wondering what took so long — and now the wait is over.
In a nutshell, Photoshop now gives you the ability to import 3D models created in a vast array of formats, and manipulate the position, lighting, and rendering of these models. You also can edit any existing textures used in the model, as well as incorporate any and all of Photoshop's 2D features in your composites.
Photoshop CS3 supports the following 3D interchange formats:
3DS: The native file format of Autodesk's 3ds Max, perhaps the most popular 3D animation application available on the Windows platform.
OBJ: The open file format originally developed by Wavefront Technologies for its application, Advanced Visualizer. Many 3D graphics applications now have the ability to import and export to the OBJ format, including 3ds Max, Maya (another Autodesk application), and Lightwave, to name only a few.
U3D: The Universal 3D format is the creation of Intel and the 3D Industry Forum (3DIF). It isn't so much a 3D editing file type, like OBJ, as it is a means for sharing 3D drawings both online and in common business applications such as Microsoft Office and Adobe Acrobat.
KMZ: KMZ stands for Keyhole Markup Language-zipped. Keyhole was the original name of an application later bought out by Google and used in the creation of Google Earth files. You'd write the files in KML code (which is an XML application) and compress the files into .kmz zipped archive files. Don't panic — an understanding of KML is not required to open and work with these files in Photoshop (but obviously, it helps).
COLLADA: This format is predominantly used in the creation of video game content. It began as the official format for Sony's PlayStation 3 and PSP platforms, and its specification is now jointly held by the Kronos Group (a member-funded consortium that focuses on creating open standards) and Sony. Many of the programs listed previously support COLLADA (3D Studio Max, Maya, Blender, and Google Earth, for example).
When you open a 3D file in Photoshop (File
Figure 13.49. This figure shows an Image Size dialog box for importing an existing 3D image. Because we selected a .3ds file, the title bar for the dialog box repeats the type of content we're importing.
Once that's out of the way, the existing model is placed on its own layer within the file, as shown in Figure 13.50.
Note
When it comes to scaling, 3D file content is like vector art. You can scale it up or down without any loss of detail.

If you already have a file open and want to import a 3D file in to a new layer, just choose Layer
Okay — so you have a 3D layer in your file. Now what? You can't do a whole lot with it at this point — it's just another layer in the stack, and Photoshop's 3D tools are hidden from view. Not a problem — give the layer icon a double-click and the 3D Options bar comes to life. Figure 13.51 shows the results.
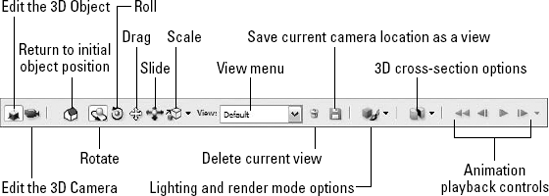
Warning
While you're working with Photoshop's 3D tools, you can't access any of Photoshop's other features until you commit to or cancel any changes you've made to the 3D content.
It's important at this stage to understand what you can and can't do to 3D content in Photoshop. You can't edit the physical 3D model itself. For example, you can't turn a model of a banana into a beach ball. And, you can't create new textures and attach them to a model. If you need to do that, then it's back to a 3D authoring application you go. This doesn't mean you can't change various properties of the model. For example, you can modify its position, rotation, lighting, camera properties, and render modes. You also can view the models in cross section, and edit any existing textures the model possesses. And, of course, you can add anything to the composite image Photoshop is capable of — combining multiple 3D objects into a single image, adding 2D layers to the composition, and so forth.
Tip
If your 3D model is animated, you can view the animation using the animation controls on the 3D Tools Options bar. These are the standard playback/fast-forward/rewind options we've been indoctrinated with since the days of the VCR. You can even scrub through an animated sequence by clicking the arrow next to the playback buttons. This opens a slider control you can drag to move forward or backward (called scrubbing in editing lingo) through the animation sequence.
Transforming a 3D model, for our purposes, means moving, rotating, or scaling. We're dealing with 3 dimensions as enacted within a 2-dimensional interface. There are the traditional left and right (the x-axis) and up and down (the y-axis), as well as a perceived front to back (the z-axis). It's the genius of 3D software that reconstructs the image each time we move something to create the illusion of looking out a window onto a 3-dimensional object, when in reality, we're just looking at colored pixels on the face of our monitor. These modifications are done using the six tools on the option bar to the left side of the View menu we showed in Figure 13.51. Simply double-click the 3D layer's icon in the Layers palette to activate the 3D tools Options bar, and then make sure the Edit 3D Object option button (the very first button on the Options bar) is selected. From here, it's just a matter of selecting a tool and modifying the object. Your options are:

Rotate: Dragging up or down rotates around the object's x-axis, while dragging side-to-side rotates around the y-axis.

Roll: Dragging side-to-side rotates the model around its z-axis.

Drag: This tool lives up to its name. Drag side-to-side to move the model horizontally, or up or down to move it vertically.

Slide: You typically use the Slide tool to position the object closer to you (dragging down) or farther away (by dragging up). If you drag left or right, the Slide tool simply mimics the Drag tool.

Scale: Drag up and the model gets bigger. Drag down and it gets smaller.

Return to Initial Object Position: This tool's icon looks like a house because when you click it you go back home — the initial position the object was in before you began the most recent round of transformations.
You also have a couple of toggles available when using these tools. Say, for example, you're rotating and want to roll the model a tad (or vice versa). Instead of swapping tools, just hold down your Options key (Mac) or Ctrl key (Win). You can use the same technique to toggle between Drag and Slide.
You also can use the Shift key to modify the way the Drag and Slide tools behave. Hold down the Shift key while dragging or sliding, and the tool moves only in the direction you're currently moving the cursor — left and right, or up and down.
If you need numeric accuracy in transforming an object, simply click the small drop arrow to the right of the Scale tool. This displays the Object Position pop-up, shown in Figure 13.52, where you can enter the desired values.
In the world of 3D imagery, you have the objects themselves, the "lights" that make them visible to us, and the "camera," which provides the view. When using the transformation tools discussed previously, the camera view remains fixed, but you can manipulate this imaginary camera just as you do the 3D objects. Just click the Edit the 3D Camera button on the Options bar to swap in the Camera Tools, and you're ready to go. The 3D Camera tools mirror the 3D Object tools, except now you're moving the camera around the object, as opposed to moving the object around in front of the camera. The tricky thing here is that everything looks pretty much the same — for example, what you see when you rotate the object is exactly what you see when you orbit the camera. It's up to you to pay attention to what tools you're using. With that said, your 3D Camera tools include:

Orbit: While the object stays fixed, you orbit the camera around the object's x (up or down) and y (left and right) axes.

Roll: Imagine the z-axis is shooting straight out the front of the lens (which it would be in a 3D universe). The Roll tool simply rotates the camera around that axis, as if you were pointing it at your subject and then flipping it around in your hand while your eye was pressed up to the view finder.

Pan: Panning simply means moving the camera left or right, up or down. Just drag in the direction you want to move the camera.

Walk: Walking means moving the camera closer to, or farther from the object. Drag up to walk toward the object, and down to walk back from the object. Side-to-side movement just pans.

Zoom: We're all familiar with zooming. Drag up to zoom in, and down to zoom out. The camera's maximum field of view is 180 degrees.

Return to Initial Camera Position: If you guessed that this button returns the camera to the position it was in before you began the most recent round of changes, you were right.
Just as shown earlier, you can set exact numeric values by clicking the small drop arrow, this time to the right of the Zoom tool. A similar pop-up appears (called 3D Camera Settings), and you can enter your desired values, as shown in Figure 13.53.
Figure 13.53. The 3D Camera Settings pop-up. The Orthographic View check box displays the 3D model in accurate scale view while removing perspective distortion.
Tip
The same toggling features exist for the camera tools as for the object tools. The Ctrl (Win) and Option (Mac) keys let you toggle between Orbit and Roll, and Pan and Walk. The Shift key has the same constraining effects here too.
What's a camera view? You simply move the camera into a new location/orientation with respect to the object, and save that position. The 3D Camera tools already have some preset camera views: Default (the original position of the camera set in the 3D authoring application), and the standard isometric views: Left, Right, Top, Bottom, Back, and Front.
Note
The same view options are available from the View drop menu when in Edit 3D Object mode, but of course those options move the object around in front of the camera instead of moving the camera around the object. And, you can't create and save 3D Object views.
To add a custom camera view, use the 3D Camera tools to position the camera where you'd like, and simply click the Save button (which uses a floppy disk for its icon) found to the right of the View drop menu. This opens the the New 3D View dialog box, where you can enter a name for your view, as shown in Figure 13.54.
Your new view option now appears at the bottom of the View drop menu, in both 3D Object and 3D Camera modes (Figure 13.55).
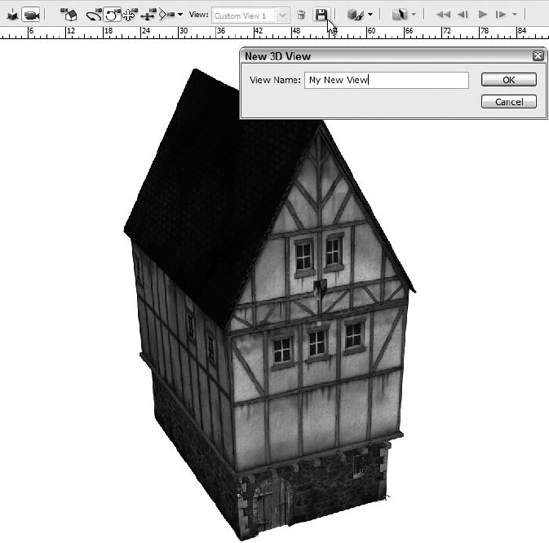
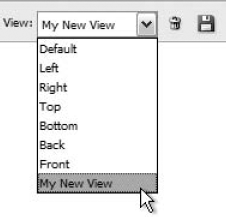
We mentioned lighting a little while back. In 3D authoring programs, it's the lighting that makes the objects visible. Otherwise, the camera view simply displays black silhouetted objects. Photoshop allows you to change the light settings for the object, giving you a choice of the default lighting created in the 3D authoring program, or a series of presets.
To change the current light settings, first click the Light and Render Mode Options button. This pops up the Light and Appearance settings. From here, click the drop menu under Lighting settings and choose from the list of available presets, as shown in Figure 13.56.
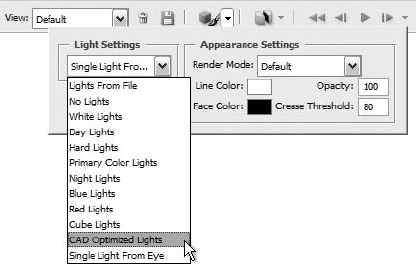
Figure 13.56. The Lights from File option use the lighting effects created in the original authoring program.
You can change the method by which the 3D model is rendered using the Appearance pop-up. When you import the 3D model, its default rendering is solid. To change the render mode, simply select a different option from the Render Mode drop menu. For example, in Figure 13.57 we've changed the rendering mode from Solid to Shaded Wireframe. You then can set Line Color, Face Color, Opacity, and Crease Threshold values, as applicable.
The 3D layer tools allow you to slice and dice models in your 3D layers along each of the three axes, as shown in Figure 13.58. With the 3D tools active on the Options bar, click the Cross Section Settings button to display the corresponding pop-up palette. From here, you need to select the Enable Cross Section check box to activate the rest of the tools there.
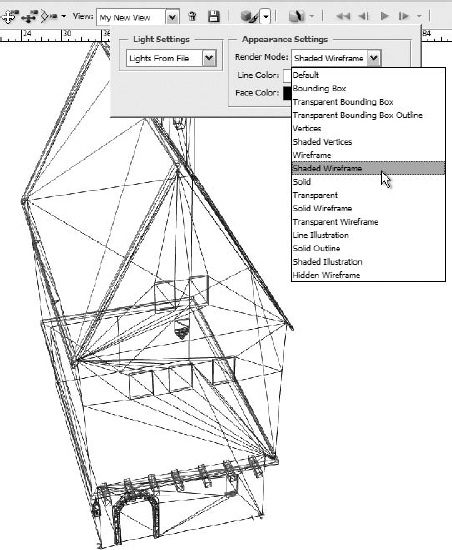
The following options are at your disposal:
Alignment: When you choose an axis, you're specifying which of the three axes (x, y, or z) perpendicular to which you want the intersecting plane aligned. For example, if you choose the y axis, the intersecting plane cuts across the x axis.
Position and Orientation: Here you have access to the Offset and two tilt settings. The Offset value moves the intersecting plane along the axis perpendicular to the axis you chose previously. For example, a value of zero places the intersecting plane in the middle of the object along the chosen axis. You can set positive or negative values to cut off more or less of the object. The tilt settings allow you to rotate the intersecting plane 360 degrees around the two axes not chosen in the Alignment settings. So, if you chose to align the intersecting plane perpendicular to the x axis, your Tilt 1 slider would rotate the plane around the y axis, and Tilt 2 would rotate it around the z axis.
Flip: Swaps the area of the model displayed on screen to the other side of your intersecting plane.
Many 3D objects are textured, meaning they've had 2D images applied to their surfaces to provide realism. When you import a 3D model that contains textures, those texture files are displayed in the Layers palette, indented beneath the 3D layer to which they are attached, as shown in Figure 13.59.
While you can't create and attach new textures to a 3D model, you certainly can use every tool in Photoshop's arsenal to edit the existing textures. Just double-click a texture layer in the Layers palette to open the associated text image in a separate document window. Now you can do anything you like to it. Once you've finished, simply save the file and the texture is updated in the 3D model.
In this chapter, you learned all about layers — from creating and cloning them to floating the background layer, to reordering layers, to merging layers and converting layers to selections. You also learned about combining layers using links, grouping layers, and moving, scaling, rotating, and aligning layers, too. You learned to rasterize layers with vector content, and the use of Smart Guides was also covered, making much of the other layer-related activity lots easier.
To make further use of layers, this chapter also showed you how to make drop shadows, halos, and spotlights, and to work with the new Smart Objects. You also learned to apply Stack Modes to your Smart Objects for some interesting, if mathematically enigmatic, results. You learned to use the Ruler tool, to select the Lock Transparency option, and to work with layer masks and the Layer Comps palette, and last but not least, you learned how Photoshop CS3 allows you to work with 3D content. You learned about importing and manipulating 3D models — their position, lighting, textures, and the use of Photoshop's 2D features in the resulting composites.