
Despite the sometimes enigmatic quality of computers and software, we can count on certain things in just about any computer application — toolbars, menus, keyboard shortcuts (some of them common to many applications), and dialog boxes that appear when the toolbar buttons and menu commands are used. All these common features do two things: They help us feel more comfortable with different applications, which shortens our overall learning curve, and they help us devote our time to the features that vary by application — the things that make each application unique.
You'll find all the aforementioned familiar features in Photoshop, which should put you at ease. At first glance, the workspace — the default arrangement of the Toolbox, menu bar, and a handful of palettes — looks simple enough, and in fact, Photoshop can be simple to use. Upon further inspection, of course, you'll find that Photoshop has much more going on than many applications. Photoshop has lots of palettes, some unique menus, and options bars. Photoshop CS3 also continues to offer the Bridge, which premiered in CS2, which provides a separate application workspace for file management. Add to that the fact that some of the dialog boxes can be a little intimidating to a new user, and you may wonder if you can really learn to use it all — but don't worry; you can.
For new users, the Photoshop workspace can seem like lots to absorb, but absorb it you will, and through this chapter, you get more comfortable with the program, its tools, menus, and the process of navigating it all. If you're not new to Photoshop, this chapter shows you some new features Adobe has added to the workspace, and you may even discover some things that aren't new to Photoshop but that are new to you.
The aforementioned Bridge — that name is a trifle dramatic, but fear not — is covered in Chapter 3, where its role as an image file management tool is thoroughly discussed. In Chapter 20, you see the Bridge used to print and publish various multiple-image creations. For now, though, let's fire up Photoshop CS3 and start poking around!
Shortly after you launch Photoshop, the splash screen appears. A splash screen is not a phenomenon unique to Photoshop — many applications have one. The splash screen's role is to announce the application's launch, maybe offer some marketing information (here, it's simply the name of the software and a cool graphic to assure you that you're in the right place to create cool graphics), and to explain the launching process by showing the names of plug-in modules as they load and listing the various initialization procedures. In Photoshop, the splash also lists the names of Photoshop's developers, going all the way back (note the first names in the list) to the beginning, when Photoshop 1.0 was just a baby.
Tip
If you're a Windows user, you can access the splash screen at any time by choosing Help
Note
If you've ever tried to launch Photoshop on a networked computer while another computer on the network is already running a copy of Photoshop using the same serial number, you're familiar with the message "Could not initialize Photoshop because So-and-So is already running a copy of Adobe Photoshop with this serial number." There are two important things to note here: One is that you can work around this by simply detaching the second computer from the network before you launch Photoshop. After the application is open, re-network the computer, and you'll be up and running. And the other important thing to note is that with Mac OS X, this network problem doesn't occur.
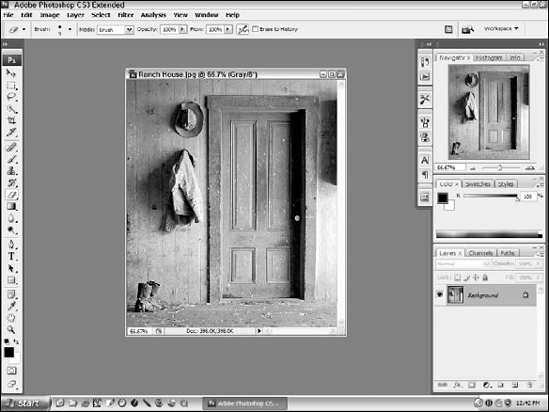
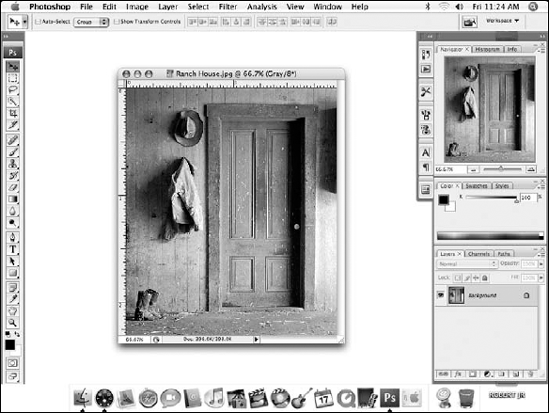
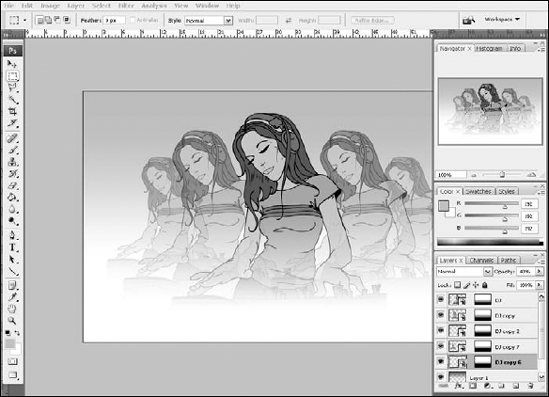
After the launch process is complete, the Photoshop workspace appears in the foreground. Figure 2.1 shows the Photoshop CS3 workspace as it appears for a Windows user when an image is open and the default palettes are visible. You'll use the Window menu to select additional palettes to view, or use the techniques discussed later in this chapter for displaying, minimizing, and closing palettes. Figure 2.2 shows the same scenario as it appears on a Mac running Mac OS X.
Many of the elements that make up the Photoshop workspace are familiar to people who are acquainted with the Windows or Macintosh operating system environments. For example, the menu bar lives at the top of the workspace (as it lives at the top of the window for virtually all applications) and provides access to menus and commands. Even the way the menus work should be comfortable to users of both operating systems. At the top of the window, you have a title bar, and you can drag the title bar to move the application window (assuming it's not already maximized). In either operating system, you have scroll bars in your windows if there's more to be seen than will fit in the window at its current size.
These other Photoshop workspace features may be less familiar:
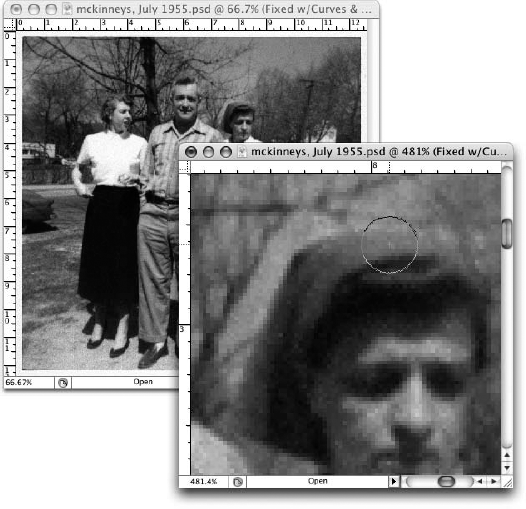
Image window: Photoshop lets you open multiple images at one time — you can open them simultaneously from the Open dialog box, or one at a time, over the course of a work session. The nice thing is that each open image resides in its own window. On the Mac, click the green zoom button in the upper-left corner of the title bar to resize the window to fit the image. Also worth noting are the special boxes in the lower-left corner of the image window (see Figure 2.2). The magnification box tells you the current view size, and the Info palette can tell you important things about image size and computer resources.
Status bar: In each image window, you find the Status bar, which provides running commentary on the active tool and image. (If your image is maximized, it appears above the Windows taskbar.) The left end of the Status bar features the magnification box (type a new number into the box and that becomes the zoom percentage), an Open icon, the current size of the image file, and a right-pointing triangle that displays a list of additional information you can choose to see in the Status bar. This list includes the default information about the document size, the document profile, dimensions, measurement scale, scratch sizes, efficiency, timing, the name of the active tool, and the option to preview an HDR (High Dynamic Range) image at 32-bit exposure. To access these options, click the aforementioned triangle and select Show from the resulting pop-up menu.
Note
For complete information on the magnification box, read the section "Navigating in Photoshop" later in this chapter.
Toolbox: The Toolbox, which is somewhat changed in CS3, gives you access to all of Photoshop's tools. Each tool is represented by an icon, and the icons are activated with a single click or the press of a keyboard shortcut (single characters, such as V for the Move tool, or B for the paintbrush). Some tools share a single spot in the Toolbox, and to access the "hidden" tools (as only one tool can be displayed in a spot at once), you can use keyboard shortcuts or your mouse to get at them. Once activated, you can use a tool by clicking or dragging with it inside the image window. When you click on any tool, observe the Options bar, across the top of the workspace, below the menus. The Options bar changes with each tool selected, offering choices for how the active tool operates.
The bottom five buttons on the Toolbox (at the bottom of the last section of tools) contain controls for changing your foreground and background paint colors, entering and exiting the quick mask mode, and changing the screen area available for image display. In CS2, there was also a button for launching ImageReady, but as we've discussed, that application is gone, its powers absorbed and assimilated into Photoshop, so there is no ImageReady button on the Toolbox anymore.
Palettes: Photoshop CS3 offers a total of 21 palettes, not including the Toolbox and the Options bar, which are technically palettes as well. Each palette is part of the larger palette dock, which is a fixed part of the workspace that resides on the right side of the workspace. You can separate palettes from the dock and make them float, which means that the palette becomes independent of the image window and of other palettes. Palettes can be grouped together or dragged apart to float separately according to your needs — you may want a specific palette or group of palettes on hand for a particular image and have no need for some of the default palettes at all. Photoshop makes it easy to customize the workspace, as you find later on in this chapter and as you work through the rest of the book. To see the whole list of palettes, click your Window menu.
The Info palette, one of the default palettes that are displayed when Photoshop is opened for the first time, is Photoshop's way of keeping you informed of important things. It provides one-stop shopping for all your image information needs. These important things include the size of the image, the tool that's in use, where your image is on the page (if it were to be printed), how much memory you're using — lots of stuff you may or may not want to know at any given time. You don't have to display the Info palette if you don't want to (it's displayed in Figure 2.3), or you may be thrilled that it's there and feel anxious when you can't see it — but it's there if you need it. The following sections explain all the useful things it can tell you.
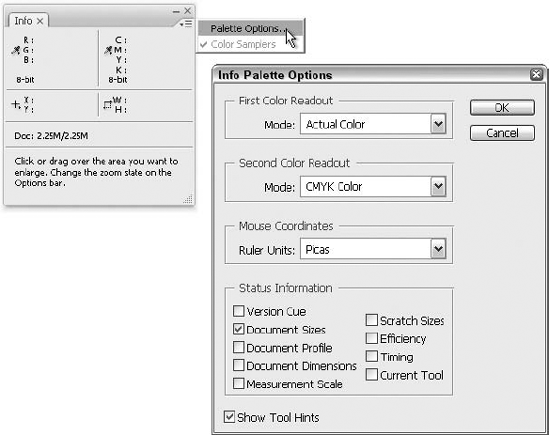
Figure 2.3. Click the palette menu button to display the Info Palette Options dialog box, which shows the info you can choose to see.
By default, the Info palette contains two numbers divided by a slash. The first number is the size of the base image in memory. The second number takes into account any additional layers in your image. If you're interested in how the values are calculated, here goes:
Photoshop calculates the first value by multiplying the height and width of the image (both in pixels) by the bit depth of the image, which is the size of each pixel in memory. Consider a typical, full-color, 640×480-pixel image. A full-color image takes up 24 bits of memory per pixel (which is why it's called a 24-bit image). There are 8 bits in a byte, so 24 bits translates to 3 bytes. Multiply that by the number of pixels, and you get 640×480×3 = 921,600 bytes. Because there are 1,024 bytes in a kilobyte, 921,600 bytes is exactly 900K. Try it yourself — open a 640×480-pixel RGB image, and you'll see that the first number in the Info palette reads 900K. Now you know why.
It's the second value — the one that factors in the layers — that represents the real amount of memory that Photoshop needs. If the image contains one layer only, the numbers before and after the slash are the same. Otherwise, Photoshop measures the opaque pixels in each layer and adds approximately 1 byte of overhead per pixel to calculate the transparency. The second number also grows to accommodate paths, masks, spot-color channels, undoable operations, and miscellaneous data required by the image cache.
Of course, it's not necessary that you be able to predict these values, which is a good thing, because predicting the second value is virtually impossible. Photoshop asks no help when calculating the values in the information, but you should know what's going on as you start adding layers to an image. The larger the preview numbers grow, the more work Photoshop has to do and the slower it's likely to perform, depending on your system configuration — memory, processor, available hard-drive space, and so on.
If you want to position a picture precisely on a page before printing, use the Print command in the File menu (see Chapter 20 for details). New to Photoshop CS3, the Print command contains not only options for determining how your image will print, but a preview of the print job as well. This combines the Print and Print with Preview commands from CS2 into a single command.
Tip
Speaking of "Info," for more information, you can Ctrl-click (
To see a pop-up menu of other information the Info palette can provide, click the Info palette's palette menu to display a pop-up menu of display options. The first option — Document Sizes — is selected by default. This option displays the image-size values described in the preceding section. You find out what information the other choices provide in the next few sections.
If you work regularly with many different color modes, you may find the Document Profile option quite useful. When you select this option, the name of the current color mode (such as "RGB 8bpc") appears in the Info palette.
Note
For more information on color profiles, see Chapter 16, where you can find everything you need to know about color profiles — how to apply them and what they do.
Choosing to view Document Dimensions gives you a quick readout of the width-by-height measurements of your document. The unit of measurement is set in the Units & Rulers panel of Photoshop's Preferences dialog box, and conveniently enough, you learn more about setting such preferences later on in this chapter.
When you select Scratch Sizes, Photoshop changes the values in the Info palette to represent memory consumption and availability. The first value is the amount of room required to hold the currently open images in RAM. The second value indicates the total amount of RAM that Photoshop has to work with. For the program to run at top efficiency, the first number must be smaller than the second.
In earlier versions of Photoshop, the number before the slash was generally equal to between three and five times the size of all open images, including layers. Since we have had the ability to undo multiple levels (going back multiple states through the History palette), however, this value can grow to more than 100 times as big as any one image. This is because Photoshop has to store each operation in memory on the off chance that you may want to undo to a previous point in time. For each and every action, Photoshop nudges the first value upward until you reach the ceiling of undoable operations.
The second value is simply equal to the amount of memory available to your images after the Photoshop application itself has loaded. For example, suppose Photoshop has 100MB of RAM at its disposal. The code that makes up the Photoshop application consumes about 15MB, so that leaves 85MB to hold and edit images.
If the second value is bigger than the first, all is happiness and Photoshop is running as fast as your particular brand of computer permits. But if the first value is larger, Photoshop has to dig into its supply of virtual memory, a disk-bound adjunct to RAM. Virtual memory makes Photoshop run more slowly because the program must swap portions of the image on and off your hard drive. The simple fact is, hard drives have moving parts and RAM does not. That means disk-bound virtual memory is slower than real memory.
To increase the size of the value after the slash, you have to get more RAM to your images in one of the following ways:
Purchase more RAM. Installing an adequate supply of memory is the single best way to make Photoshop run more quickly. Not sure how? Consult your manufacturer, or get help from the company from whom you buy the RAM.
Quit other applications so that only Photoshop is running.
Quit Photoshop, and remove any filters you don't need from the Plug-Ins folder (which resides in the same folder as the Photoshop application). But don't throw the filters away! Just move them to a location outside the Plug-Ins folder so they don't load into RAM when you launch Photoshop.
Choose Performance in the Preferences submenu, and increase the Memory Usage value as explained later in this chapter.
When you select the Efficiency option, Photoshop lists the amount of time it spends running operations in RAM compared with swapping data back and forth between the hard drive. A value of 100 percent is the best-case scenario. It means Photoshop never has to rely on scratch files. Low values indicate higher reliance on the hard drive and, as a result, slower operations. Adobe recommends that if the value falls below 75 percent, you should either assign more memory to Photoshop or purchase more RAM for your computer.
The Efficiency option is a reality check. If it seems Photoshop is dragging its feet, and you hear it writing to your hard drive a little too often, you can refer to the Efficiency rating to see whether performance is as bad as you suspect. Keep in mind that hearing Photoshop occasionally write to disk is not cause for concern. All versions of Photoshop since 3.0 automatically copy open images to a disk buffer in case using virtual memory is later warranted. In fact, this is the reason Adobe added the Efficiency option to Version 3.0.1 — to quash fears that a few sparks from your hard drive indicated anything less than peak performance.
If you select Timing, the Info palette tells how long Photoshop took to perform the last operation (including background tasks, such as transferring an image to the system Clipboard). Adobe may have added this option to help testing facilities run their Photoshop tests. But built-in timing helps you as well.
For example, suppose you're trying to decide whether to purchase a new computer. You read a magazine article detailing the newest super-fast system. You can run the same filters with the same settings on your computer and see how much slower your results are, all without picking up a stopwatch.
New to Photoshop CS3, the Measurement Scale option for the Info palette shows the status of the currently set Measurement Scale. You can set this using the Set Measurement Scale command in the Analysis menu. You learn more about this command and all the other ways the new Measurement Scale feature is used in Chapter 3. If you haven't set a custom scale for the open image, the Info palette doesn't display anything pertaining to this. After you have set a scale, however, the status of what you set appears in the next-to-last position.
Select the Current Tool option, and Photoshop displays the name of the active tool. Why do you need information on what seems to be so obvious? Of course you know which tool you're using, right? Adobe's intention is not to insult your intelligence or short-term memory with redundant information, but to remind you which tool is active, especially if something you've selected has changed the active tool. For example, if you choose Analysis
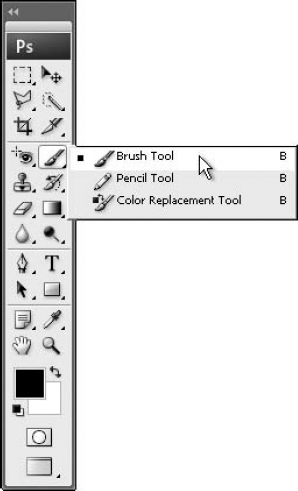
When multiple tools share a single Toolbox slot, you select the tool you want from a menu-style list, as shown in Figure 2.4. A tiny triangle in the lower-right corner of a Toolbox button indicates that multiple tools share that button. You can click the triangle and then click the name of the tool you want to use. Or, to do the job with one less click, just drag from the icon onto the name of the tool and then release the mouse button.
Tip
You can cycle between the tools in the pop-up menu by Alt-clicking (Win) or Option-clicking (Mac) a tool icon. Pressing the key that appears to the right of the tool names also does the trick — however, depending on a tool setting that you establish in the Preferences dialog box, you may need to press Shift (see the section "General preferences").
Also, when you position your cursor over a tool, Photoshop tells you the name of the tool and how to select it from the keyboard. If you find the tool tips irritating, see the section "General preferences" to find out how to turn them off.
Each tool has been cataloged in the following list, with tool icons, quick summaries, and the chapter (if any) to which you can refer for more information. There's no need to read the list word for word; instead, just use it as a reference to get acquainted with the program or specific tools with which you may be unfamiliar. Unless otherwise noted, each of the following descriptions tells how to use the tool in the image window. For example, if an item says drag, you click the tool's icon to select the tool, and then click and drag in the image window; you don't drag on the tool icon itself. Of course, you probably knew that!

Move (Chapter 8): Drag to move a selection or layer. In fact, the Move tool is the exclusive means for moving and cloning portions of an image. You also can Ctrl-drag (Win) or


Rectangular marquee (Chapter 8): Drag with this tool to enclose a portion of the image in a rectangular marquee, which is a pattern of moving dash marks indicating the boundary of a selection.
Shift-drag to add to a selection; Alt-drag (Win) or Option-drag (Mac) to delete from a selection. The same goes for the other marquee tools, as well as the lassos and the Magic Wand. As an alternative to using these time-honored shortcuts, you can click mode icons in the Options bar to change the behavior of the selection tools.

Elliptical Marquee (Chapter 8): Drag with the Elliptical Marquee tool to enclose a portion of the window in an elliptical marquee.

Single-Row Marquee (Chapter 8): Click with the Single-Row Marquee tool to select an entire horizontal row of pixels that stretches all the way across the image. You also can drag with the tool to position the selection. You rarely need the Single-Row Marquee, but when you do, here it is.

Single-Column Marquee (Chapter 8): Same as the Single-Row Marquee, except the Single-Column Marquee tool selects an entire vertical column of pixels. Again, not a particularly useful tool.

Lasso (Chapter 8): Drag with the Lasso tool to select a free-form portion of the image. You also can Alt-click (Win) or Option-click (Mac) with the Lasso to create a straight-sided selection outline.

Polygonal Lasso (Chapter 8): Click hither and yon with this tool to draw a straight-sided selection outline (just like Alt-clicking or Option-clicking with the standard lasso). Each click sets a corner point in the selection.

Magnetic Lasso (Chapter 8): As you drag with the Magnetic Lasso tool, the selection outline automatically sticks to the edge of the foreground image. Bear in mind, however, that Photoshop's idea of an edge may not jibe with yours. Like any automated tool, the Magnetic Lasso sometimes works wonders, and other times it's more trouble than it's worth.
Tip
The Magnetic Lasso automatically lays down points as you drag. If you don't like a point and want to get rid of it, press Backspace (Win) or Delete (Mac).

Quick Selection Tool (Chapter 8): This selection tool allows you to paint a selection, sampling pixels on one or all layers as you drag the mouse. It shares a spot in the Toolbox with the Magic Wand because it also works by sampling pixels, and that process is customized with the Options bar and the Refine Edge dialog box, which allows you to control the selection process as it pertains to the edges of the selection.
Note
The Quick Selection Tool is new in Photoshop CS3.

Magic Wand (Chapter 8): Click with the Magic Wand tool to select a contiguous area of similarly colored pixels. To select noncontiguous areas, click in one area and then Shift+click in another. Deselect the Contiguous tool option, and click once to select similar colors throughout the image.

Crop (Chapter 3): Drag with the Crop tool to enclose the portion of the image you want to retain in a rectangular boundary. Photoshop tints areas outside the boundary to help you better see which image areas will go and which will stay when you apply the crop. The crop boundary sports several square handles that you can drag to resize the cropped area. Drag outside the boundary to rotate it; drag inside to move it. Press Enter or Return to apply the crop or Esc to cancel.

Slice (Chapter 18): The Slice tool and its companion, the Slice Select tool, come into play when you're creating Web graphics. You can cut images into rectangular sections — known as slices — so you can apply Web effects, such as links, rollovers, and animations, to different areas of the same image. Drag with the Slice Tool to define the area that you want to turn into a slice.

Slice Select (Chapter 18): If you don't get the boundary of your slice right the first time, click the slice with this tool and drag one of the side or corner handles that appear. Or drag inside the boundary to relocate it.
Press Ctrl (Win) or

Spot Healing Brush (Chapter 7): This tool is new to Photoshop CS2 and works similarly to the Healing Brush — it clones other content over offending material and makes it match the new surroundings. It's different from the Healing Brush in that it is simpler to use, fixes one spot at a time, and is best used for small problems — small stains, cuts, scratches, or small items in the image itself that you want to eradicate.

Healing Brush (Chapter 7): The Clone Stamp tool (also known to longtime Photoshop users as the Rubber Stamp tool) has always seemed like a miracle worker when removing unwanted elements from images. Although excellent results were possible, you still had to be careful that the texture and shading of the cloned area matched the area you were replacing. Although the Healing Brush tool seems at first use just like the Clone Stamp tool, its special "healing" process lets you clone details from one area without obscuring the texture and shading of the other.

Patch (Chapter 7): Similar to the Healing Brush, the Patch tool lets you use the same "healing" technology by making selections and dragging them to new locations. It's generally useful for healing larger areas of the image.

Red Eye Removal (Chapter 7): Click the offending demonic pool of red, yellow, or green, and based on your Options bar settings, remove the glow in favor of a dark pupil. This isn't the cure-all for red-eye (or the yellow-eye or green-eye you get when photographing animals' eyes), and you may find that it still pays to remove red-eye manually, using one or more of Photoshop's other painting tools, but for a quick fix, this certainly lives up to its name.

Brush (Chapter 5): Drag with the Brush tool to paint soft lines. If you're thinking that sounds kind of dull, wait until you learn about the multitude of settings available to you in the Brushes palette.

Pencil (Chapter 5): Drag with the Pencil tool to paint jagged, hard-edged lines. Its main purpose is to clean up individual pixels when you want to zoom in and really tidy up an edge or create details to augment the existing pixels' impact on the image.

Color Replacement (Chapter 5): Hailing from Photoshop's younger sibling, Photoshop Elements, the Color Replacement tool lets you paint over an existing color in the image to replace it with the foreground color. Its main reason for existence is to make it easy to fix red-eye — but now that there is also a tool specifically for that purpose, you may have to find another reason to use it.

Clone Stamp (Chapter 7): Greatly enhanced in Photoshop CS3, this tool copies one portion of the image onto another. Alt-click (Win) or Option-click (Mac) the part of your image you want to clone, and then drag to clone that area to another portion of the image. The enhancement comes in the form of a new palette, called Clone Source, which allows you to set up to five clone sources and customize their size, position, and impact on the image.

Pattern Stamp (Chapter 6): The Pattern Stamp tool lets you paint with a pattern. Either choose a preset pattern (several come with Photoshop) or define your own pattern using Edit


History Brush (Chapter 7): The History Brush reverts portions of the image to any of a handful of previous states throughout the recent history of the image. To specify the state that you want to revert to, click in the first column of the History palette. It's like an undo brush but way, way better.

Art History Brush (Chapter 7): Like the History Brush, the Art History Brush paints with pixels from a previous image state. But with this brush, you get a variety of brush options that create different artistic effects.

Eraser (Chapter 7): Drag with the Eraser tool to paint in the background color or erase areas in a layer to reveal the layers below. Alt-drag (Win) or Option-drag (Mac) to switch to the Erase to History mode, which reverts the image to a previous state just as if you were using the History Brush.

Background Eraser (Chapter 9): The Background Eraser rubs away the background from an image as you drag along the border between the background and foreground. If you don't wield this tool carefully, though, you wind up erasing both background and foreground.

Magic Eraser (Chapter 9): The Magic Eraser came from the same gene pool that produced the Magic Wand. When you click with the Magic Wand, Photoshop selects a range of similarly colored pixels; click with the Magic Eraser, and you erase instead of select.

Gradient (Chapter 6): Drag with this tool to fill a selection with a gradual transition of colors, commonly called a gradient. You can click the gradient icon in the Toolbox and select a gradient style from the Options bar.

Paint Bucket (Chapter 6): Click with the Paint Bucket tool to fill a contiguous area of similarly colored pixels with the foreground color or a predefined pattern.

Blur (Chapter 5): Drag with the Blur tool to diffuse the contrast between neighboring pixels, which blurs the focus of the image. You also can Alt-drag (Win) or Option-drag (Mac) to sharpen the image.

Sharpen (Chapter 5): Drag with this tool to increase the contrast between pixels, which sharpens the focus. Alt-drag (Win) or Option-drag (Mac) when this tool is active to blur the image.

Smudge (Chapter 5): The Smudge tool works just as its name implies; drag with the tool to smear colors inside the image.

Dodge (Chapter 5): Drag with the Dodge tool to lighten pixels in the image. Alt-drag (Win) or Option-drag (Mac) to darken the image.

Burn (Chapter 5): Drag with the Burn tool to darken pixels. Press Alt (Win) or Option (Mac) to temporarily access the Dodge tool and lighten pixels.

Sponge (Chapter 5): Drag with the Sponge tool to decrease the amount of saturation in an image so the colors appear more drab and eventually gray. You also can increase color saturation by changing the Mode setting in the Options bar from Desaturate to Saturate.

Path Selection (Chapter 8): Click anywhere inside a path to select the entire path. If you click inside a path that contains multiple subpaths, Photoshop selects the subpath under the tool cursor. Shift+click to select additional paths or subpaths. You also use this tool and the Direct Selection tool, described next, to select and manipulate lines and shapes drawn with the shape tools.

Direct Selection (Chapter 8): To select and edit a segment in a selected path or shape, click it or drag over it with this tool. Press Shift while using the tool to select additional segments. Or Alt-click (Option-click on the Mac) inside a path or shape to select and edit the entire object.

Horizontal Type (Chapter 16): Also known simply as the Type tool, click with this tool to add vector text to your image.

Vertical Type (Chapter 16): The Vertical Type tool behaves just like the Horizontal Type tool, except that your text is oriented vertically in the image.

Horizontal Type Mask (Chapter 16): As you might expect, this tool creates horizontal type. The twist is that the type appears not directly in the image but rather as a mask, with an active selection around the shapes of the letters.

Vertical Type Mask (Chapter 16): Combine the verticality of the Vertical Type tool with the maskiness of the Horizontal Type Mask tool, and you have — what else? — the Vertical Type Mask tool. Use it to create an active selection of vertically oriented text.

Pen (Chapter 8): Click and drag with the Pen tool to set points in the image window. Photoshop draws an editable path outline — much like a path in Illustrator — that you can convert to a selection outline or stroke with color.

Freeform Pen (Chapter 8): Drag with this tool to draw freehand paths or vector masks. Photoshop automatically adds points along the path as it sees fit. If you select the Magnetic option in the Options bar, the Freeform Pen morphs into the Magnetic Pen. Deselect the option to return to the Freeform Pen.

Add Anchor Point (Chapter 8): To insert a point in a path, click a path segment with this tool.

Delete Anchor Point (Chapter 8): Click a point to remove it without interrupting the outline of the path. Photoshop automatically draws a new segment between the neighboring points.

Convert Point (Chapter 8): Points in a path come in different varieties, some indicating corners and others indicating smooth arcs. The Convert Point tool enables you to change one kind of point to another. Drag a point to convert it from a corner to an arc. Click a point to convert it from an arc to a sharp corner.

Rectangle (Chapter 15): One of the five vector drawing tools, this tool draws rectangles filled with the foreground color. Just click and drag to create a rectangle; Shift-drag to draw a square.

Rounded Rectangle (Chapter 15): Prefer your boxes with nice, curved corners instead of sharp, 90-degree angles? Drag or Shift-drag with the Rounded Rectangle tool.
Note
You can opt to create rasterized shapes and lines with the Rectangle, Rounded Rectangle, Ellipse, Polygon, Line, and Custom Shape tools. See Chapter 14 for details.

Ellipse (Chapter 15): You look pretty smart to me, so you probably already figured out that you drag with this tool to draw an ellipse and Shift-drag to draw a circle.

Polygon (Chapter 15): By default, dragging with this tool creates a five-sided polygon. Controls available in the Options bar enable you to change the number of sides or set the tool to create star shapes.

Line (Chapter 15): Drag with the Line tool to create a straight line. But before you do, travel to the Options bar to set the line thickness and specify whether you want arrowheads at the ends of the line.

Custom Shape (Chapter 15): Draw any of a vast array of custom shapes, from paw prints to cartoon bubbles, from arrows to starbursts.

Notes (Chapter 3): Use this tool to create a little sticky note on which you can jot down thoughts, ideas, and other pertinent info that you want to share with other people who work with the image — or that you simply want to remember the next time you open the image. After you create the note, Photoshop displays a note icon in the image window; double-click the icon to see what you had to say.

Audio Annotation (Chapter 3): If you prefer the spoken word to the written one, you can annotate your images with an audio clip, assuming that you have a microphone and sound card for your computer. As with the Notes tool, an audio icon appears in the image window after you record your message. Clicking the icon plays the audio clip.

Eyedropper (Chapter 4): Click with the Eyedropper tool on a color in the image window to make that color the foreground color. Alt-click (Win) or Option-click (Mac) a color to make that color the background color.

Color Sampler (Chapter 4): Click as many as four locations in an image to evaluate the colors of those pixels in the Info palette. After you set a point, you can move it by dragging it to a different pixel.

Ruler (Chapter 3): The Ruler tool lets you measure distances and directions inside the image window. Just drag from one point to another, and note the measurement data in the Info palette or the Options bar. You also can drag the endpoints of your line to take new measurements. And by Alt-dragging (Win) or Option-dragging (Mac) an endpoint, you can create a sort of virtual protractor that measures angles.

Count (Chapter 3): Use the Count tool to mark and number locations in your image, on any layer. As you use the Count tool, you can see the information about the exact location that you've clicked in the Info palette.

Hand (Chapter 2): Drag inside the image window with the Hand tool to scroll the window so you can see a different portion of the image. Double-click the Hand tool icon to magnify or reduce the image so it fits on the screen in its entirety. When the Hand tool is active, you can click buttons in the Options bar to display the image at the actual-pixels, fit-onscreen, or print-size view sizes.

Zoom (Chapter 2): Click with the Zoom tool to magnify the image so you can see individual pixels more clearly. Alt-click (Win) or Option-click (Mac) to step back from the image and take in a broader view. Drag to enclose the specific portion of the image you want to magnify. And finally, double-click the Zoom tool icon inside the Toolbox to restore the image to 100 percent view size.
You can modify the performance of any tool except the Ruler tool (the "options" shown for this tool simply note the measurements between the locations on which you've clicked the tool) by adjusting the settings in the Options bar. To change the unit of measurement used by the Ruler tool, double-click the ruler or choose Edit
So that's about it for the Photoshop CS3 tools — except for a few more tools that are actually known as controls. These controls are used for selecting colors, views of the workspace, and working in a masking mode.

Foreground color: Click the foreground color icon to bring up the Color Picker dialog box. Select a color and press Enter or Return to change the foreground color, which is used by the Pencil, Paintbrush, Airbrush, Gradient, and shape tools.

Background color: Click the background color icon to display the Color Picker and change the background color, which is used by the Eraser and Gradient tools. Photoshop also uses the background color to fill a selected area on the background layer when you press the Backspace or Delete key.

Switch colors: Click the switch colors icon to exchange the foreground and background colors.

Default colors: Click this icon to return to the default foreground and background colors — black and white, respectively.
Tip
At any time, you can quickly make the foreground color white by clicking the default colors icon and then clicking the switch colors icon. Or just press D (for default colors) and then X (for switch colors).

Quick Mask: Click here to enter the Quick Mask mode, which enables you to edit selection boundaries using painting tools. If you make a selection prior to entering this mode, the selection's "marching ants" (those flashing dashes that surround your selection) vanish and the image appears covered by a translucent layer of red, like a rubylith in traditional paste-up. The red layer covers the deselected — or masked — portions of the image. Paint with black to extend the masked areas, thereby subtracting from the selection. Paint with white to erase the mask, thereby adding to the selection.
Note
The Quick Mask mode is too complex a topic to sum up in a few sentences. If you can't wait to find out what it's all about, check out Chapter 9.
Regardless of the program in question, a workspace is all about getting work done. Photoshop gives you four screen modes to suite various workflows.

Standard Screen mode: This is the default display mode, as shown earlier in Figures 2.1 and 2.2. In this mode, your images appear in a standard window, and you have access to all title and menu bars.

Maximized Screen mode: Sometimes you just need a little more space. This mode explodes the standard window, losing its title bar, allowing it to fill all available space not occupied by the palettes.
Note
This is similar to the effect that you get when you click the Maximize button in the upper-right corner of the image window on a PC. However, you probably want to avoid maximizing images; use the Toolbox controls instead. Photoshop has a habit of resizing a maximized window whenever you zoom with the commands on the View menu. If you use the Toolbox controls, you don't have that problem.

Full Screen with Menu Bar mode: If Maximized Screen mode doesn't do it for you, perhaps this mode will. In Full Screen with Menu Bar mode, shown in Figure 2.5, the title bars and scroll bars disappear. Only the menu bar and palettes remain visible, and the image area also occupies space behind the palettes, whose dock becomes partially transparent. To access other open images, you simply choose their names from the Window menu.
Tip
In any of the screen modes, when the image doesn't consume the entire area devoted to its display, the empty portion of the window or screen appears gray. To change the gray area to a different color — such as black — select a color (using the Foreground color icon), then switch to the Paint Bucket tool, and finally Shift+click in the gray area surrounding the image. Bear in mind that the color you choose becomes the default for all image window backgrounds — so you'll have to reset it to gray (using the same procedure) if you want to go back to that.

Full Screen mode: Still need more space? Try Full Screen mode. This mode is just like Full Screen with Menu Bar, without — you guessed it — the menu bar. You even lose the Windows taskbar and the Mac's dock with this mode. Granted, this does limit your access to menu commands, but you still can access many commands using keyboard shortcuts.
As noted in the tool tips, pressing F lets you cycle through the different modes. If you need access to a menu command when working in Full Screen mode, press Shift+F to display the menu bar. Press Shift+F again to hide it.
Tip
If Photoshop's screen elements interfere with your view of an image, you can hide all palettes — including the Toolbox and Options bar — by pressing Tab. To bring the hidden palettes back into view, press Tab again.
You can hide the palettes but leave the Toolbox and Options bar onscreen by pressing Shift+Tab. Press Shift+Tab again to bring the palettes back. (Pressing Tab while the standard palettes are gone hides the Toolbox and Options bar.) If the rulers are turned on, they remain visible at all times. Press Ctrl+R (
Tip
If you don't want to hide the palettes, you can reposition an image in either Full Screen mode by dragging it with the Hand tool. Or press the spacebar and drag when any other tool is selected.
Tip
Here's one more workspace display tip: Shift+click the icon for Full Screen to switch the display mode for all open images. Then press Ctrl+Tab (Control-Tab on the Mac) to cycle through the open images. This same trick works for the Standard Screen and Full Screen with Menu Bar modes.
Spanning the width of the Photoshop window, and found just below the menu bar, the Options bar (refer to Figures 2.1 and 2.2) contains the major controls for the tools in the Toolbox. There's an Options bar for every tool, and through them, you establish settings for the active tool by selecting options, clicking icons, dragging sliders, and choosing options from pop-up menus in the bar. You can think of the Options bar as just another floating palette, albeit a long, skinny one. There is a difference, though — you use different tactics to hide, display, and relocate the Options bar than you do a regular palette:
Choose Window
By default, the Options bar is docked at the top of the program window. Drag the vertical handle at the left end of the bar to relocate it. If you drag the Options bar to the top or bottom of the window, the bar becomes docked again. It can be hard to re-dock the Options bar at the top of the window, so if you find that you can't get it to really return to the docked position, just choose Window
Unfortunately, you can't change the size or shape of the Options bar.
Tip
You also can get back to the default workspace — or view any of a series of preset workspaces, designed for specific types of projects and images — by clicking the Workspace button at the far-right end of the Options bar (to the right of the Go to Bridge button). If you click the drop-down list, you can choose Default Workspace (the first command in the menu) and watch as the default palettes appear (and any you've opened that aren't among the defaults disappear) and the Toolbox positions itself tight against the left side of the workspace. Check out some of the other available workspace options to see if any of them provide the perfect set of palettes and workspace element positions for your needs.
For tools that you use the same way every time you use them, you can establish presets that save you the time of resetting the tool to your favorite options each time you select the tool. For example, imagine that you often use a Brush set to a particular shape, size, and opacity. Rather than having to use the Options bar and Brushes palette every time you want to use those particular settings, you can call up a preset group of settings for the tool and know that the exact same settings are now in force, and you can save lots of time and be assured that your settings are consistent, enabling you to create identical effects with that brush.
To create a tool preset, select a tool and adjust the settings until they're perfect. You may want to choose an ideal gradient and direction settings for the Gradient tool, a frequently used tolerance for the Magic Wand, or a combination of font, size, and alignment options for the Type tool. After setting up your "dream" tool, use any of these techniques to make it a preset you can call upon at any time:
Choose Window
Click the current tool icon in the Options bar; then click the new tool preset icon below the flyout menu arrow in the upper-right corner of the drop-down palette.
Choose New Tool Preset from either the Tool Presets palette menu or the palette menu accessible from the drop-down palette in the Options bar (shown in Figure 2.6).
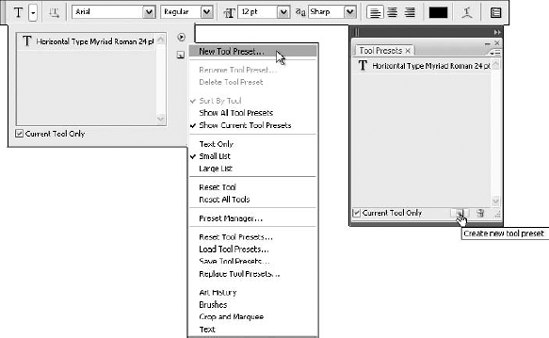
Figure 2.6. Click the current tool icon in the Options bar or choose Window
Any of these methods takes you to a small dialog box where you can type a descriptive name for your tool settings. When naming your preset, be sure to give it a name that reminds you what the goal or purpose for the preset is. You can give the preset a descriptive name, such as "complexion brush," a name that describes what the tool does ("softens skin"), or a name that associates the preset with a particular project, such as "ABC Company Type," for Type tool settings that you use for a particular client's artwork.
Some tools also have a check box where you can choose to include or exclude a particular setting from the preset, such as the color for the Brush tool or the pattern for the Pattern Stamp tool. Click OK (after making the choice to exclude a setting or not), and your newly named group of tool settings appears in the list. From here on out, clicking the preset loads that group of settings into the Options bar. If you're having a hard time finding a preset, make sure the Current Tool Only option is checked; this makes presets for only the current tool appear in the list.
Whether you access the Tool Presets menu from the Options bar or from the Tool Presets palette, you can choose from the following additional options:
Rename Tool Preset and Delete Tool Preset let you perform those functions on the currently selected tool preset. If you want to do this from the Options bar, right-click the preset you want to rename or delete and choose the command from the pop-up menu. You also can click the options menu button and make selections from that menu instead. The Tool Presets palette offers buttons at the bottom for these two activities.
Sort By Tool is active only if the Current Tool Only option is deselected; it groups the presets in the list by tool.
Show All Tool Presets and Show Current Tool Presets toggle off and on the Current Tool Only check box.
You have three options for viewing the list: Text Only, which lets you see the most options onscreen at one time; Small List, which adds a small icon; and Large List, which gives you the icon along with larger text.
Reset Tool and Reset All Tools are carryovers from Photoshop 6, letting you restore either the current tool or all tools to their default settings. This has no effect on your collection of tool presets.
Reset Tool Presets, Load Tool Presets, Save Tool Presets, and Replace Tool Presets all let you deal with groups of presets. Reset takes you back to the default set of tool presets, giving you the option to append the default set to the current set or to replace it entirely with the default set; Load gives you access to previously saved groups of presets; Save lets you save the group of presets to disk for future use; and Replace wipes out the current group of presets in favor of the pre-saved group of your choice.
Preset Manager takes you to Adobe's gift to the obsessively organized: the Preset Manager dialog box. Here you can store and manage all your preset collections, as explained in the next section.
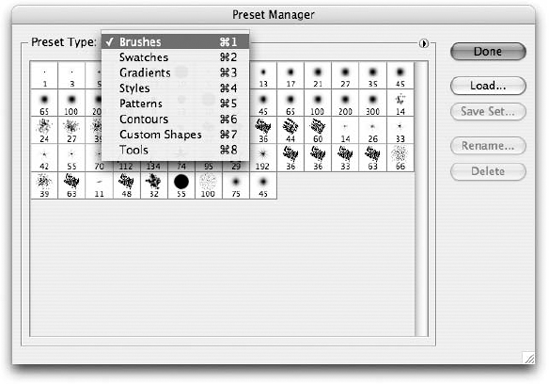
Tool presets are a recent addition to the Preset Manager, which was introduced in Photoshop 6. With the added ability to create presets for tools, you can organize and store presets in eight categories: Brushes, Swatches, Gradients, Styles, Patterns, Contours, Custom Shapes, and Tools. In addition to choosing Preset Manager from the palette menus of the Tool Presets, Brushes, Swatches, and Styles palettes, you can always access the Preset Manager dialog box, shown in Figure 2.7, by choosing Edit
If you click the right-pointing arrow to the left of the Done button, a pop-up menu appears with some of the same options found in the Tool Presets palette menu. For example, you can choose to replace the current preset collection with another or return to the default collection. To append a collection, click Load. Alternatively, click a collection name in the pop-up menu, in which case you have the choice of appending or replacing the current collection with the new one. In addition, you can click a preset and then click Delete to remove the preset or Rename to change the preset's name. If you want to delete or rename a series of presets, Shift+click them and then click Delete or Rename. Of course, you also can use the Ctrl key (
To select all presets, press Ctrl+A (
Tip
Probably the best reason for using the Preset Manager is to create a new preset collection out of presets from an existing set or sets. Load the collection that you want to use as a basis for the new set, and then Shift+click to select presets for the new set — or press Ctrl+A (
Note
To protect you from yourself, Photoshop has set it up so that you can't overwrite any existing preset files. Also, after you add a new preset, you must save it as part of a collection, either through the palette menu or the Preset Manager. Otherwise, Photoshop deletes the preset if you replace the current preset collection with another.
The first time you launch Photoshop CS3, all the default palettes are attached to the dock on the right side of the workspace. The default palettes are the Navigator, Histogram, Info, Color, Swatches, Styles, Layers, Channels, and Paths palettes. To see other palettes, and have them attach to the right-hand dock or to the left-hand dock from which the Toolbox hangs, you need to use the Window menu or press the appropriate keyboard shortcut (see the Appendix for a complete list of these handy items). The appearance of this dock and the way the palettes are connected to it is one of the big interface changes in Photoshop CS3. You can still make palettes float, dragging them from their groupings at the dock, but by default, none of them are floating when first selected, and none of the groups are free-floating either.
Unto themselves, the palettes look and behave just as they have in previous versions, except for how they're collapsed. You can collapse them all at once by clicking the dock (see the long, black bar at the top of the palettes in Figure 2.8), or you can right-click (
While they're expanded, each palette contains most or all elements labeled in Figure 2.9 (note that on the Mac, the Close button is positioned on the far left side of the title bar), but some palettes have a few kinks. For example, some palettes don't let you resize them, and some palettes have scroll bars while others don't. These aren't huge, glaring differences, but they're enough to keep things interesting. Sort of.

Figure 2.8. The dock's appearance and functioning, along with the palettes and their relationship to it, are a big change in CS3.
Whether floating (after you've dragged them from the dock) or still docked, palettes generally offer the following options for their display and use:
Palette options: Each palette offers its own collection of options. These options may include icons, pop-up menus, and sliders.
Palette menu: Click the button below the X in the upper-right corner of the palette (it's a stack of lines with a down-pointing arrow) to display a menu of commands specific to the palette. These commands enable you to manipulate the palette options and adjust preference settings.
Palette tabs: When palettes appear in groups, you can click a palette tab to move it to the front of that group. (You also can select the palette commands from the Window menu, but clicking a tab is more convenient.)
Close palette button: When a palette is active (in the front of the group), its tab bears an X or Close button. This is new to Photoshop CS3 and pretty handy. Click the X to close that palette entirely. To bring the palette back, re-select it from the Window menu.
Collapse box: Click the minimize button (an underscore) to reduce the palette to a title bar. Once clicked, this button changes to a maximize button (a small box), which, when clicked, redisplays the palette at full size.
Resize options: If a palette has a size icon (a set of diagonal lines in a triangle in the lower-right corner of the palette), and you mouse over that icon, you can resize that palette — within the dock or as a floating palette out on the workspace. Note that some palettes don't allow resizing at all (and no sizing icon appears in the lower-right corner if this is the case) and others only allow it in one direction — horizontally or vertically. You won't know until you mouse over the icon; if your pointer becomes a diagonal two-headed arrow, you can resize in either direction. If it becomes a vertical or horizontal two-headed arrow, the direction the arrows point tells you what sizing limitations you're faced with.
Note
If you previously enlarged a palette by dragging the size box, your first click reduces the palette back to its default size. After that, clicking the collapse box hides all but the most essential palette options.
Tip
Collapsing a palette hides all options and leaves only the tabs visible, as shown in Figure 2.10. You also can double-click one of the tabs or in the empty area to the right of the tabs — and either technique works like a toggle: Double-click once, and the palettes are hidden; double-click again, and they're redisplayed. And if your palette is located at the bottom edge of the screen, collapsing the palette makes it collapse downward, leaving the visible part of the collapsed palette hugging the bottom of the screen. These tricks work even if you've enlarged the palette by dragging the size box.
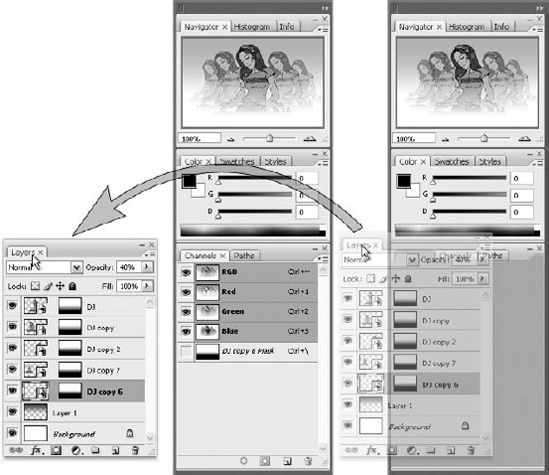
Despite the changes to the way palettes are automatically docked in Photoshop CS3, dragging them around and changing their groupings as a floating group of palettes or within the dock is still easy. This, of course, enables you to customize the workspace so it's the most efficient arrangement for your specific needs.
To undock a palette and make it a floating palette, grab the palette's tab within the dock and drag out onto the workspace, as shown in Figure 2.11. The palette comes with you, and wherever you release the mouse, there floats the palette. You can drag others out of the dock and group them with the first floating palette, or you can have one or more individual floating palettes on the workspace.
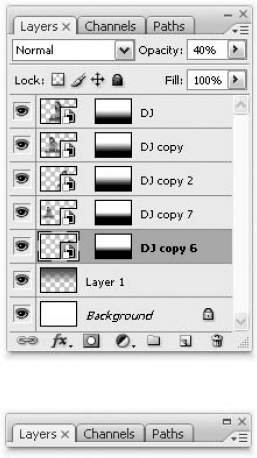
Figure 2.10. When collapsed, a palette (or group of palettes) shows only the tabs and the palette/group title bar.
If you want to make one of those custom groupings out on the workspace or within the dock, just drag a palette from its current location onto the other palette or palettes. When the target palette's title bar becomes highlighted, release the mouse. If you release before this happens, you've simply placed a palette on top of another and have not achieved an actual group.
If you want to go back to the default arrangement for your palettes — the way Photoshop CS3's workspace looks "out of the box," choose Window
Of course, in addition to restoring the workspace to its default arrangement, you can create your own custom workspace, an arrangement you can go to at any time, with a simple menu selection.
These workspace presets, created by you, allow you to easily create workspace arrangements that suit particular images, projects, or people. For example, if you're working on a series of images that require the use of a particular Action all the time, or in which you use the History palette often to save snapshots of your image (more about these features in Chapters 3 and 7), choose Window
Note
Wherever you initiate the command to select a workspace (or save one), you also can choose from a series of task-specific presets already built in to the software. Choose from presets like Color and Tonal Correction, Painting and Retouching, Web Design, Working with Type, and Video and Film — plus several others, from a group of eight presets. Simply choose Window
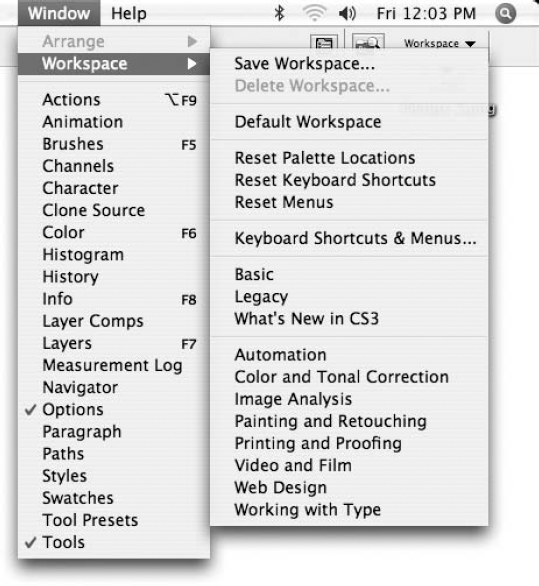
Figure 2.12. Not sure how to group your palettes and arrange your onscreen tools for a particular job? Let Photoshop take a whack at it, and choose one of the built-in workspace presets.
As mentioned earlier, you can hide the palettes by pressing Shift+Tab and you can hide the palettes, Toolbox, and Options bar by pressing Tab. This keyboard trick doesn't work, however, if one of the fields in the Options bar is active, or if the Type tool is in use (with an active text cursor in the image window).
For example, suppose you click in the R (Red) option box in the Color palette. This activates the option. Now press Tab. Rather than hiding the palettes, Photoshop advances you to the next option box in the palette, G. This function of the Tab key is common to virtually all Windows and Mac-based software, whenever you're working in a dialog box: The dialog box functions like a form (like those you might fill in at a Web site, for example), and the Tab key moves you from field to field. To move backward through the options, press Shift+Tab. This "trick" applies to the Options bar as well as to the standard palettes.
To apply an option box value and return focus to the image window, press Enter or Return. This deactivates the palette options. You also can simply click outside of the palette to refocus Photoshop on either an image window or on nothing specific, if you choose to click the gray background of the Photoshop desktop rather than on any particular workspace component. Either way, you want to refocus Photoshop's "attention" so that you can continue to work elsewhere and rely on keyboard shortcuts to work as expected. Otherwise, Photoshop assumes whatever keys you press relate to the active palette's options.
While you're working in the image window, you can return focus to the Options bar from the keyboard. When you press Enter or Return, Photoshop displays the Options bar, if it's not already visible. If the Options bar offers an option box for the active tool, Photoshop highlights the contents of the option box. You can then tab around to reach the option you want to change, type a new value, and press Enter or Return to get out.
Tip
You can see your open images side by side — for comparison, to drag layers from one to the other, or just to see all the images you have open without having to drag them around and resize them manually. This is done by choosing Window
All graphics and desktop publishing programs provide a variety of navigational tools and functions that enable you to move around the screen. You can jump from place to place, switching between open image windows, between tools and their options, and to change your view of the images themselves.
Using the Zoom tool's Options bar, the View menu's various Zoom commands (Zoom In, Zoom Out, Fit On Screen, Actual Pixels, and Print Size), or the Navigator palette's Zoom percentage field and slider, you can change the view size for your image. The view size is the size at which an image appears onscreen — so you can either step back to see more of an image or all of it at once or get in really close to concentrate on individual pixels. Each change in view size is expressed as a zoom ratio, which is the ratio between screen pixels and image pixels. Photoshop displays the zoom ratio as a percentage value in the title bar as well as in the magnification box — and in the lower-left corner of the image window. The 100 percent zoom ratio shows one image pixel for each screen pixel, a 200 percent zoom ratio doubles the size of the image pixels onscreen, and a 300 percent zoom triples the size, and so on.
Photoshop calls the 100 percent zoom ratio the actual-pixels view. This is the most accurate view size because you can see the image as it really is. Reduced view sizes drop pixels; magnified view sizes stretch pixels. Only the actual-pixels view displays each pixel without a trace of screen distortion — good to know if you think your image looks a bit choppy or noisy, and you're not sure if that's how it really looks or if it's just the screen size you're using at the time. A quick change to Actual Pixels view ends all doubt.
You can switch to this most accurate of view sizes at any time using one of the following techniques:
When you first open an image, Photoshop displays it at a zoom ratio that permits the entire image to fit onscreen. Assuming you don't change the size of the image, you can return to this "fit-onscreen" view size in one of the following ways:
Choose View
Press Ctrl+0 (or
Double-click the Hand tool icon in the Toolbox.
Select the Zoom tool, and then click the Fit on Screen button in the Options bar.
Strangely, any of these techniques may magnify the image beyond the 100 percent view size. When working on a very small image, for example, Photoshop enlarges the image to fill the screen, even if this means maxing out the zoom to 1,600 percent. Personally, I prefer to use the fit-onscreen view only when working on very large images, because it usually causes a good deal of distortion — not to the image in reality, but to its display in the image window.
You may not love Fit on Screen view because while Photoshop does the best job of previewing an image when you can see all pixels — that is, at 100 percent view size, in Fit on Screen view, the percentage you get is rather arbitrary. You never know what percentage you'll get when you choose this command; all you know is that the entire image is visible within the image window.
You can switch to yet another predefined view size by choosing View
In practice, "print-size" view isn't particularly reliable. Photoshop assumes that your monitor displays exactly 72 pixels per inch, even on the PC, where the accepted screen resolution is 96 pixels per inch. But it's all complete nonsense, whatever the assumption. Monitor resolutions vary all over the map. And high-end monitors let you change screen resolutions without Photoshop even noticing.
The long and the short of it is this: Don't expect to hold up your printed image and have it exactly match the print-size view onscreen. It's a rough approximation, designed to show you how the image will look when imported into InDesign, QuarkXPress, PageMaker, or some other publishing program — nothing more.
Obviously, the aforementioned zoom ratios aren't the only ones available to you. You can zoom in as close as 1,600 percent and zoom out to 0.2 percent.
The most straightforward way to zoom in and out of your image is to use the Zoom tool, and here are some techniques to try:
Click in the image window with the Zoom tool to magnify the image in preset increments — from 33.33 percent to 50 to 66.67 to 100 to 200 and so on. Photoshop centers the zoomed view at the point where you click (or comes as close as possible).
Go the other way, and Alt-click (Win) or Option-click (Mac) with the Zoom tool to reduce the image incrementally — 200 to 100 to 66.67 to 50 to 33.33 and so on. Again, Photoshop tries to center the new view on the click point.
Tip
Drag with the Zoom tool to draw a rectangular marquee around the portion of the image you want to magnify. Photoshop magnifies the image so the marqueed area fits just inside the image window. (If the horizontal and vertical proportions of the marquee do not match those of your screen — for example, if you draw a tall, thin marquee or a really short, wide one — Photoshop favors the smaller of the two possible zoom ratios to avoid hiding any detail inside the marquee.)
If you want Photoshop to resize the window when you click with the Zoom tool, select the Resize Windows to Fit option in the Options bar. The check box appears only when the Zoom tool is the active tool.
Turn off the Ignore Palettes check box in the Options bar if you want Photoshop to stop resizing the window when the window bumps up against a palette anchored against the side of the program window. Select the option to resize the window regardless of the palettes. The palettes then float over the resized window.
If you have multiple image windows open, you can control the zoom ratio on all of them at the same time. Simply Shift+click with the Zoom tool in any image window. Alternatively, you can eliminate the need for the Shift key by selecting the Zoom All Windows option in the Options bar.
Use the Window, Arrange, Match Zoom, Match Location, or Match Zoom and Location commands to control the zoom on two or more open images. Zoom in on (or out from) one of your open images, and maybe even pan the image to one side or another. Then choose Window, Arrange, Match Zoom and Location, and voila! Both images are zoomed to the same percentage, and the image content is placed in the same position within the image window.
Tip
To access the Zoom tool temporarily when some other tool is selected, press and hold Ctrl (
You can also zoom in and out using the following commands and keyboard shortcuts:
Choose View
Choose View
Tip
The General panel of the Preferences dialog box (Ctrl+K on the PC;
If Photoshop is unresponsive to these or any other keyboard shortcuts, it's probably because the image window has somehow become inactive. (It can happen in Windows if you so much as click the taskbar.) Just click the image window's title bar and try again; you also may want to momentarily minimize the window and then restore it, which can aid in refreshing the window to give you the view you want if it wasn't responding properly before.
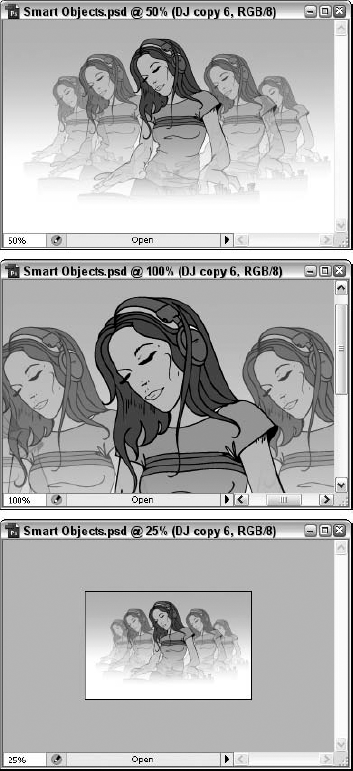
Another way to zoom in and out without changing the window size is to type a value into the magnification box, located in the lower-left corner of the image window. Select the magnification value, type a new one, and press Enter or Return. Photoshop zooms the view without zooming the window. (Neither the Resize Windows to Fit option in the Options bar nor the Zoom Resizes Windows option in the Preferences dialog box affect the magnification box.)
Figure 2.13 starts with a specially sized window at 50 percent. Two different percentages are typed in the magnification box — 100 percent and 25 percent — alternately enlarging and reducing the image in the confines of a static window.
You may like to know more about the magnification box:
You can type values in the magnification box as percentages, ratios, or "times" values. To switch to a zoom value of 250 percent, for example, you can type 250%, 5:2, or 2.5x.
You can specify a zoom value in increments as small as 0.01 percent. So if a zoom value of 250.01 doesn't quite suit your fancy, you can try 250.02. It's unlikely that you'll need this kind of precision, but isn't it great to know that it's there?
Tip
When you press Enter or Return after typing a magnification value, Photoshop changes the view size and returns focus to the image window. If you aren't exactly certain what zoom ratio you want to use, press Shift+Enter (Shift+Return on the Mac) instead. This changes the view size while keeping the magnification value active; this way, you can type a new value and try again.
In the past, paint programs provided a cropped view of your image at the actual-pixels view size to serve as a reference when you worked in a magnified view. Photoshop does not, but you can easily create a second view of your image by choosing Window
In the standard window mode, you have access to scroll bars, as you do in just about every other major application. But as you become more proficient with Photoshop, you'll use the scroll bars less and less. One way to bypass the scroll bars is to use the keyboard equivalents listed in Table 2.1.
Table 2.1. Scrolling from the Keyboard
Scrolling Action | Keystroke | Alternate Keystroke (Mac Standard Keyboard Only) |
|---|---|---|
Up one screen | Page Up | Control+K |
Up slightly | Shift+Page Up | Control+Shift+K |
Down one screen | Page Down | Control+L |
Down slightly | Shift+Page Down | Control-Shift+L |
Left one screen | Ctrl+Page Up ( | |
Left slightly | Ctrl+Shift+Page Up ( | |
Right one screen | Ctrl+Page Down ( | |
Right slightly | Ctrl+Shift+Page Down ( | |
To upper-left corner | Home | Control+A |
To lower-right corner | End | Control+D |
Tip
Try using the Page Up and Page Down shortcuts to comb through very large images at 100 percent view size. This way, you can make sure all the pixels are in order before going to print.
Tip
To access the Hand tool temporarily when some other tool is selected, press and hold the spacebar. Releasing the spacebar returns the cursor to its original appearance. This keyboard equivalent even works in many dialog boxes.
Tip
You can scroll multiple image windows at the same time by Shift-dragging in any one image with the Hand tool. If you don't want to use the Shift key, select the Scroll All Windows option in the Options bar. You also can use the spacebar+Shift-drag method if you want to scroll multiple image windows without first selecting the Hand tool.
As referenced earlier when we started the whole discussion of zooming in and out, the Navigator palette, shown in Figure 2.15, is the best thing to happen to zooming and scrolling since Photoshop was introduced. If you routinely work on large images that extend beyond the confines of your relatively tiny screen, you'll want to get up and running with this palette as soon as possible: It makes life so much easier that you won't know how you got along without it.
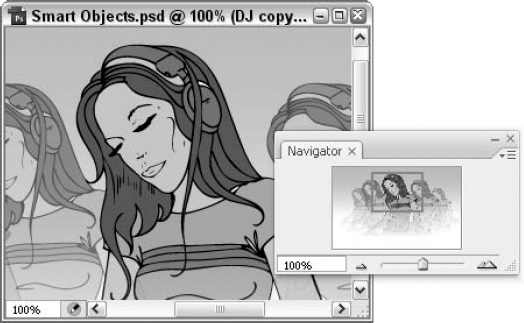
While the Navigator palette is one of Photoshop CS3's default palettes, you or another user may have closed it at some point, and it may not be showing. Or you may have invoked a saved workspace that doesn't include it. In any case, if the Navigator palette isn't visible, choose Window
View box: Drag the view box (see the red box encompassing some of the image thumbnail inside the palette) to reveal some hidden portion of the photograph. Of course, if the entire image is currently visible in the image window, the red view box border encompasses the entire thumbnail. If the entire image is not visible within the image window, you can drag the red bordered view box around inside the palette and watch the displayed portion of the image in the image window change to match your movements. Even fans of the Hand tool (for panning an image within the image window) will find this technique really helpful, despite having to leave the image window with your mouse to use it.
Tip
As if the View box and its panning powers weren't enough, try this: Press Ctrl (
Box color: You can change the color of the view box by choosing the Palette Options command from the palette menu. The default is red, but if your image has lots of red in it or if you just don't like red, try yellow or bright lime green — something that stands out against even a bright color image.
Magnification box: This value works like the one in the lower-left corner of the image window — just type a new zoom ratio, and press Enter or Return.
Zoom out: Click the zoom out button (it looks like a tiny set of mountains) to reduce the view size in the same predefined increments as the Zoom tool. This button doesn't alter the size of the image window, regardless of any window resizing options you set for the other zoom controls.
Zoom slider: Move the slider triangle, and watch what happens. Drag to the left to zoom out; drag right to zoom in. Again, Photoshop dynamically tracks your changes in the image window.
Zoom in: Click the big mountains to incrementally magnify the view of the image without altering the window size. Of course, the small mountains zoom out, and they, too, do not alter the window size.
Size box: If you have a large monitor, you don't have to settle for that teeny thumbnail of the image. While docked, the palette can be dragged only vertically, making it taller, but not wider. If you want to widen it as well, drag the palette away from its default group and release it as a floating palette on the workspace. Then drag the size box to enlarge both palette and thumbnail to a more appropriate size for your needs.
Just about every program gives you access to a few main settings — things you can modify about the way the program looks or works to make it more useful for your way of doing things. Typically, these settings are called preferences, and Photoshop is no exception. Photoshop ships with certain recommended preference settings already in force — settings known as factory defaults — that were put in place in the hopes of meeting the needs of the average user. Of course, the fact that these settings are the default doesn't mean they're right or appropriate for most people. If you find that some of Photoshop's settings aren't making your life easier, they're easy to change, and the following coverage shows you how to change them, what the change will do, and of course, how to restore the defaults if you decide your tinkering was a mistake.
You can modify preference settings in two ways. You can make environmental adjustments in Windows by using Edit
Tip
You can dump the preferences file using this trick: Close the program, and then relaunch it. Immediately after you launch the program, press and hold Ctrl+Shift+Alt (
Meanwhile, Back at the Factory...
To restore Photoshop's factory default settings, delete the Adobe Photoshop Prefs.psp (simply Prefs on the Mac) file when the application is not running. The next time you launch Photoshop, it creates a new preferences file automatically. On the PC, you can find the preferences file in the Application DataAdobeAdobe Photoshop CS3Adobe Photoshop CS3 Settings folder. Under Windows XP, the Application Data folder is located in the Documents and Settings/User Name folder. In earlier versions of Windows, the Application Data folder is in the Windows folder. In Mac OS X, follow this path: Home folder
Deleting the preferences file is also a good idea if Photoshop starts acting funny. Photoshop's preferences file has always been highly susceptible to corruption, possibly because the application writes to it so often. Whatever the reason, if Photoshop starts behaving erratically, trash the preferences file. You have to reset your preferences, but a smooth-running program is worth the few minutes of extra effort. It's a good thing that Photoshop saves actions, color settings, custom shapes, contours, and the like separately from the Prefs file. This means that you can delete your Prefs file without worrying about harming your scripts, color conversions, and other custom settings.
Tip
After you get your preferences set as you like them, you can prevent Photoshop from altering them further by locking the file. On the PC, right-click the Adobe Photoshop Prefs.psp file in Windows Explorer, and choose Properties from the pop-up menu. Then select the Read Only option in the Properties dialog box, and press Enter. On the Mac, go to the Finder, track down the Adobe Photoshop Prefs file, and choose File
That's a good tip, and it's included in the name of comprehensive coverage. But you may not want to lock your Prefs file because you may periodically want to modify your settings and want Photoshop to remember the latest and greatest. Instead, make a backup copy of your favorite settings. After a few weeks of working in the program and customizing it to a more or less acceptable level, copy the preferences file to a separate folder on your hard drive (someplace you'll remember!). Then if the preferences file becomes corrupt, you can replace it quickly with your backup.
Under Windows, the Preferences command appears on the Edit menu. In Mac OS X, it's found on the Photoshop menu. Choosing the command displays a long submenu of commands, but you needn't ever use them if you remember a simple keyboard shortcut: Ctrl+K (
This shortcut brings up the Preferences dialog box, which provides access to 10 panels of options representing every one of the Edit

Figure 2.16. Select a panel of options from the pop-up menu, or click the Prev and Next buttons to advance from one panel to the next.
Tip
Photoshop always displays the first panel, General, when you press Ctrl+K (or
To accept your settings and exit the Preferences dialog box, press Enter or Return. Or press Escape to cancel any changes you've made to your settings. Okay, so you already knew that, but here's one you may not know: Press and hold Alt (Option on the Mac) to change the Cancel button to Reset. Then click the button to restore the settings that were in force before you entered the dialog box.
The following sections examine the Preferences panels in the order in which they appear in the Figure 2.16 dialog box (see the left-hand panel). How each option works is explained, and what are considered the optimal settings are included in parentheses. (The figures, however, show the default settings.) Out of context like this, Photoshop's preference settings can be a bit confusing. In later chapters, some additional light is shed on the settings you may find most useful.
The General panel, shown in Figure 2.17, contains a miscellaneous supply of what are arguably the most important Preferences options. For those of you who worked with Photoshop CS2, you'll find some of the General panel's options have been moved to the new Interface panel, which is discussed later in this chapter.
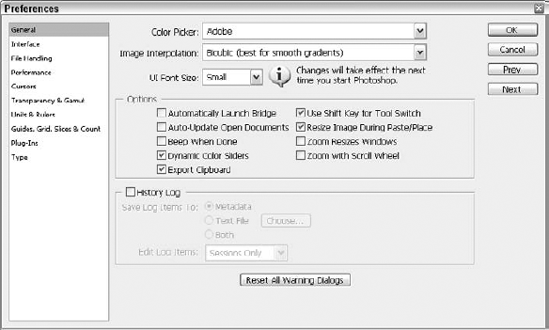
Figure 2.17. The General panel provides access to the most important environmental preference settings.
Color Picker (Adobe): When you click the foreground or background color control icon in the Toolbox, Photoshop displays any Color Picker plug-ins that you may have installed, plus one of two standard Color Pickers: the Adobe Color Picker or the one provided by the operating system. If you're familiar with other Windows graphics programs, the system's color picker may at first seem more familiar. But Photoshop's color picker is better suited to photographic work.
Image Interpolation (Bicubic): When you resize an image using Image
If you select Nearest Neighbor (Faster), Photoshop simply copies the next-door pixel when creating a new one. This is the fastest setting (hence the label "Faster"), but it invariably results in jagged effects.
The second option, Bilinear, smoothes the transitions between pixels by creating intermediate shades. Photoshop averages the color of each pixel with four neighbors — the pixel above, the one below, and the two to the left and right. Bilinear takes more time but, typically, the softened effect is worth it.
Still more time-intensive is the default setting, Bicubic, which averages the color of a pixel with its eight closest neighbors — one up, one down, two on the sides, and four in the corners. The Bicubic setting boosts the amount of contrast between pixels to offset the blurring effect that generally accompanies interpolation.
You also have two Image Interpolation settings: Bicubic Smoother and Bicubic Sharper. Based on the standard Bicubic option, these settings are further optimized for different sizing operations. Bicubic Smoother is designed to produce the smoothest possible transitions between pixels, ideal when resizing a grainy or noisy image. It is also the option of choice on those rare occasions when you decide to enlarge an image. Bicubic Sharper is designed to preserve the sharpness and detail of an image when you reduce it, eliminating the need to apply Unsharp Mask after downsampling. Although these new interpolation options can be useful, they're best used on a case-by-case basis from inside the Image Size dialog box (see Chapter 3).
Tip
The moral is this: Select Bicubic to turn Photoshop's interpolation capabilities on and select Nearest Neighbor to turn them off. The Bilinear setting is a poor compromise between the other options — too slow for roughing out effects and too remedial to be worth your time.
UI Font Size: This sets the font size to use for Small User Interface fonts, which are fonts used in small devices, such as handheld organizers, cell phones, and so forth. It's set to Small by default, and your alternates are Medium and Large. As the "i" ("!" on the Mac) balloon indicates, changes take effect the next time you start Photoshop.
Automatically Launch Bridge (off): The Bridge can be started automatically when Photoshop is launched; if you select this option, the Bridge opens and runs in the background. Because the very powerful Bridge saps much of the system resources, you may prefer to deselect this option and activate it only when you need it.
Note
The Bridge is discussed fully in Chapters 3 and 18.
Auto-Update Open Documents (off): This option creates and maintains a link between an open image and the image file on disk. Anytime the image on disk updates, Photoshop updates the image onscreen in kind. This feature is an amazing help when you're editing images with another artist over a network. Imagine that you and a coworker each have the same server file open in separate copies of Photoshop. Your coworker makes a change and saves it. Seconds later, your copy of Photoshop automatically updates the image on your screen. Then you make a change and save it, and Photoshop relays your modifications to your coworker's screen.
So what happens if you're both editing the image simultaneously? Whoever saves first gets the glory. If your coworker saves the image before you do, any changes that you haven't saved are overwritten by the other person's work.
Tip
However, you can snatch victory from the jaws of defeat simply by pressing Ctrl+Alt+Z (
Beep When Done (off): You can instruct Photoshop to beep at you whenever it finishes an operation that displays a Progress window. This option may be useful if you doze off during particularly time-consuming operations.
Dynamic Color Sliders (on): When selected, this option instructs Photoshop to preview color effects in the slider bars of the Color palette. When the option is turned off, the slider bars show the same colors regardless of your changes. Unless you're working on a slow computer, leave this option on. On a fast machine, Photoshop takes a billionth of a second longer to calculate the color effects and it's well worth it.
Export Clipboard (on): When selected, this option tells Photoshop to transfer a copied image from the program's internal Clipboard to the operating system's Clipboard whenever you switch applications. This enables you to paste the image into another running program. Turn this option off if you plan to use copied images only within Photoshop and want to reduce the lag time that occurs when you switch from Photoshop to another program. Even with this option off, you can paste images copied from other programs into Photoshop.
Use Shift Key for Tool Switch (on): When two or more tools share the same slot in the Toolbox, you can press the keyboard shortcut associated with the tools to cycle through the tools. This Preferences option determines whether you must press Shift along with the shortcut. I recommend that you turn this option off: One extra keystroke per function adds up over the course of a day, you know.
Note
In this book, it is assumed that you have deselected the Use Shift Key for Tool Switch option when tool shortcuts are presented.
Resize Image During Paste/Place (on): This option determines whether your image is resized when you paste content or place a layer from another image into the image window. I usually turn this option off, because I find that I don't remember it's on and am then surprised (rarely pleasantly so) when the image resizes.
Zoom Resizes Windows (off): Select this option to force Photoshop to resize the image window when you zoom in on or out from your image by choosing a Zoom command from the View menu or by using the keyboard shortcuts, Ctrl+plus (
Zoom with Scroll Wheel (off): Because this is off by default, you can use the scroll wheel (predominantly for Windows users) to move up and down in an image window that's not set to Fit on Screen or where whatever zoom you're using allows the entire image to be seen in the image window. If you turn this on, scrolling forward with the scroll wheel zooms in and scrolling backward zooms out. If you use the scroll wheel often in Photoshop and other applications, turning this on can be annoying, because you'll keep forgetting it's on and then wonder why the stupid image keeps growing whenever you scroll up.
History Log (your call): This option lets you save information about the list of edits and operations applied to your images. For starters, select the History Log option and select a radio button to specify whether you want to save the log along with the image's metadata, in a separate text file, or both. If you select the Metadata option, you can view the log information in the History panel of the File Info dialog box (Ctrl+Alt+I or
Use the Edit Log Items pop-up menu to specify the type of information you want to save to the log. The Sessions Only option simply keeps track of every time you launch and quit Photoshop and open and close files. Choose the Concise option to log the session information plus the data that's recorded in the History palette. Choose Detailed to log detailed information about every edit performed on an image, giving you a permanent record of the steps you took to achieve the final results.
Reset All Warning Dialogs: Every now and then, Photoshop displays a warning dialog box to let you know that the course you're on may have consequences you hadn't considered. Some dialog boxes include an option that you can select to tell Photoshop that you don't want to see the current warning anymore. This can be a good thing, if the prompt in question isn't one you typically listen to — so rather than having to acknowledge and then ignore it over and over, you won't be bothered again. On the other hand, sometimes that "Leave me alone!" response can be regrettable later — especially if the prompt you no longer choose to see was advice you really needed to heed. If you're afraid you've silenced some useful warnings, click the Reset All Warning Dialogs button in the Preferences dialog box. Photoshop clears all the Don't Show This Warning Again options so that you once again get all available warnings. Photoshop responds to your click of the reset button by displaying a warning dialog box telling you that all warning dialog boxes will be enabled if you go forward.
The Interface panel, as the name leads us to believe, pertains to the settings that control how Photoshop reveals itself to the user. You can press Ctrl+2 to access this panel while the Preferences dialog box is open (
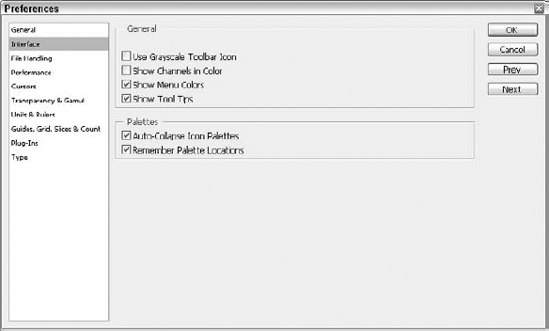
Figure 2.18. The Interface panel allows you to tweak the color of various workspace elements and whether Photoshop remembers where you left your palettes.
Divided into two sections, General and Palettes, you have the following options:
Show Background Drop Shadow (on): If you want to be able to see a drop shadow on the canvas in the document window, leave this Windows-only option on.
Use Grayscale Toolbar Icon (off): Here's a real dilemma: Do you want to see a color icon at the top of the Toolbox or a grayscale one? If you prefer grayscale for some reason, turn this option on. Otherwise, the gloom of a grayscale icon is replaced with the excitement of color.
Show Channels in Color (off): An individual color channel contains just 8 bits of data per pixel, which makes it equivalent to a grayscale image. Photoshop provides you with the option of colorizing the channel according to the primary color it represents. For example, when this option is selected, the Red color channel looks like a grayscale image viewed through red acetate. Most experts agree the effect isn't helpful, though, and it does more to obscure your image than to make it easier for you to see what's happening. Leave this option deselected, and read Chapter 4 for more information.
Show Menu Colors (on): This option, which was new in Photoshop CS2, allows you to take advantage of the ability to apply colors to menu commands (Edit
Show Tool Tips (on): When on, this option displays little labels and keyboard shortcuts when you hover your cursor over a tool or palette option. The tool tips don't impede Photoshop's performance, so there is no reason to turn off this option.
Auto-Collapse Icon Palettes (off): Given that the palettes are now docked and permanently attached to the dock, which now resides within the workspace (rather than above it, as it was in CS2), the ability to have the palettes respond to our activities is paramount. With this option on, palettes collapse to an icon if you click onto another image or another area of the workspace. In its OFF state, this option requires you to minimize a palette (collapsing it to an icon) if you no longer want to see it open. If you find that you're often hopping between palettes or using particular palettes for just a second and then you move on, you may want to turn this on. Otherwise, it may be a pain to keep re-opening a palette that you use frequently.
Remember Palette Locations (on): When this option is selected, Photoshop keeps track of the location of the Toolbox and palettes (open palettes in the dock and those you've chosen to make floating palettes) from one session to the next. If you deselect this option, Photoshop restores the default palette positions the next time you start the program.
When in the Preferences dialog box, press Ctrl+3 (
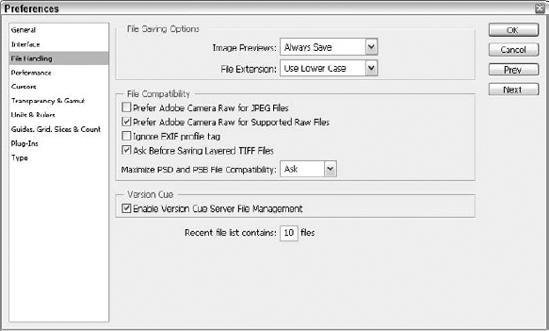
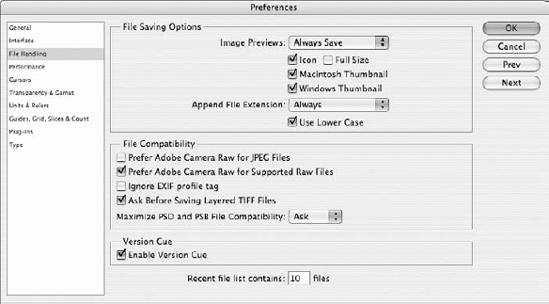
Every option in the File Handling panel affects how Photoshop saves images to disk. The following list explains how the options work and the recommended settings:
Image Previews (Ask When Saving): When Always Save is active (as by default), Photoshop saves a postage-stamp preview so that you can see what an image looks like before opening or importing it. On the Mac, you can select as many as four kinds of image previews, as follows:
The Icon option creates a preview icon that you can view from the Finder desktop. You may not find this to be worth the extra hard drive space that it takes up, and too many custom icons can cause problems with older versions of the system software.
When you select one of the Thumbnail options, Photoshop creates a postage-stamp preview that appears in the Open dialog box when you select a file. The Macintosh Thumbnail option saves the preview in a part of the file known as the resource fork, but Windows doesn't recognize resource forks. So if you ever plan on previewing the image on a PC, you should select the Windows Thumbnail option as well.
The fourth option, Full Size, creates a 72-dpi preview that can be used for placement in a page-layout program.
The problem with previews is that they slightly increase the size of the file. This is fine when doing print work — a thumbnail isn't going to add that much — but when creating Web graphics, every byte counts. That's why we recommend Ask When Saving from the Image Previews pop-up menu. This option makes the preview options available in the Save dialog box so that you can specify whether you want previews on a case-by-case basis when you save your images.
File Extension (Use Lower Case)/Use Lower Case (on): Called File Extension for Windows users (see the File Extension list) and Use Lower Case on the Mac (see checkbox beneath "Append File Extension"), this option decides whether the three-character extension at the end of a file name is uppercase or lowercase. Lowercase is the better choice because it ensures compatibility with other platforms, particularly UNIX, the primary operating system for Web servers. (UNIX is case-sensitive, so a file called Image.psd is different than Image.PSD. Lowercase extensions eliminate confusion.)
Append File Extension (Ask When Saving): Available only on the Mac, this option adds a three-character extension to the end of a file name to make your Mac images compatible with Windows and DOS programs. For example, a layered composition saved in the Photoshop format gets a .psd extension. You may want to set this option to Ask When Saving; that way, you can decide whether to include a PC-style extension from inside the Save dialog box on a file-by-file basis.
Tip
You can set the Append File Extension option to Never and still access extensions when saving images. Just press Option when selecting a file format, and Photoshop automatically slaps on an extension. Read more about this process in Chapter 3.
Prefer Adobe Camera Raw for JPEG Files (off): This option uses Adobe's Camera Raw settings for JPEG files.
Prefer Adobe Camera Raw for supported raw files (on): If you'd rather use Adobe's Camera Raw format for all RAW files you open, leave this option on. When RAW files are opened, the Photoshop Raw dialog box opens, which you can use to change the image settings for pixel dimensions, channels, bit depth, and header size. Read more about Camera RAW files in Chapter 18.
Ignore EXIF sRGB tag (off)/Ignore EXIF profile tag (off): This is a controversial feature, but I'm coming down on the side of the default. Virtually every modern digital camera embeds information about when and how a photo was captured (date, f-stop, flash setting, and so on) in the image file. Part of this so-called EXIF data (short for Exchangeable Image File) is a color profile, which is meant to convey the source of the photo so Photoshop knows how to handle its colors. It's a great idea, but there's a big problem. Most vendors make no attempt to profile their specific cameras, instead defaulting to sRGB (the color profile of last resort for just about every printer and scanner sold today). It's also been said that there is so little quality control that the profile is nearly meaningless. However, "nearly meaningless" is better than nothing. Better to have a vague sense of where your images come from than no sense at all. So it is recommended that you leave this option deselected.
Ask Before Saving Layered TIFF Files (on): If you add a layer to a TIFF file that formerly consisted of only a background layer and then try to save the file, having this option selected opens the TIFF Options dialog box. This dialog box lets you choose between JPEG, ZIP, and the traditional LZW compression for TIFFs, as well as other options discussed in Chapter 3. These are useful options, so I say leave this turned on. You also are prompted that saving a TIFF with layers may create a larger file, at which point you can accept that and move on, or stop the process and go back to merge your layers.
Maximize PSD File Compatibility (Ask): This option is pure evil, yet it is set to "Ask" by default, which means that you are prompted about maximizing file compatibility when saving a new PSD file. If you never change another preference setting, you should set this one to Never. Of course, this begs the question, "Why did Adobe set it to Ask by default if it's so evil?" The answer? Who knows, but this option should be named Double My File Sizes Just Because.
Even Adobe's designers would be hard-pressed to defend use of this option, but here's the tragic backstory: The option ensures backward compatibility between Photoshop CS2 and programs that support the Photoshop file format but don't recognize layers. It's a nice idea, but it comes at a very steep price. To ensure compatibility, Photoshop has to insert an additional flattened version of a layered image into every native Photoshop file. As you can imagine, this takes up a considerable amount of hard drive space, doubling the file size in the most extreme situations.
So set this option to Never. And when you want cross-application compatibility, save an extra TIFF version of your file (as explained in Chapter 3). It's worth the extra time, and it only has to be done when you want that cross-application compatibility, not every single time you save a PSD file.
Note
Actually, there is one situation where you may find the Maximize PSD File Compatibility option useful. It permits older versions of After Effects or Illustrator to open files that contain layer effects that were added to Photoshop after those products shipped. If this rare scenario applies to you, then Ask may be the appropriate setting for this otherwise evil option.
Enable Version Cue (on): This option invokes a spinoff of WebDAV technology, which is a means for multiple users to share and modify documents over a network. Although not currently widely implemented, Adobe and others hope to see WebDAV (or just DAV, as it's sometimes called) grow into a standard means of collaboration. We're not just talking about interoffice networks here; in the DAV world of the future, artists can collaborate with each other remotely from points around the globe.
Probably, most of you won't need this option, and those of you who do will be forced into it by some maniacal IT manager. For those in such a position, here's how it works. Selecting this option inserts a Version Cue icon in the Open dialog box. Clicking the Version Cue icon enables you to check out files and work on collaborative efforts. If, after clicking the Version Cue icon, you need to work on a local file, simply click the Local Files icon in the Open dialog box.
Recent file list contains (10) files (your call): This option determines how many file names appear when you choose the Open Recent command, which displays a list of the images that you worked on most recently. You can simply click an image name to open the image. The default number of file names is 10, but you can raise it to 30. Raising the value doesn't use resources that would otherwise be useful to Photoshop, so type whatever value makes you happy — the more images you tend to work with in a given day, the higher a value you may want to set for this option.
Displayed by pressing Ctrl+4 while the Preferences dialog box is open (
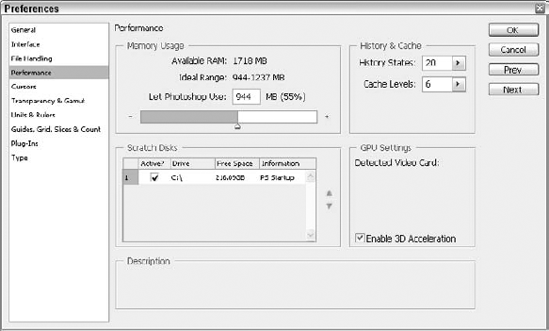
Figure 2.21. How memory is used, where and how big your scratch disks are, and your history and cache settings are all controlled through the Performance panel.
Mac OS X and Windows 2000 and XP offer dynamic memory allocation, which means that each application gets the memory it needs as it needs it. But Photoshop has a habit of using every spare bit of RAM it can get its hands on, which can cause problems in such an environment. Left to its own devices, it might gobble up all the RAM and bleed over into the operating system's virtual memory space, which is less efficient than Photoshop's own scratch disk scheme.
The Memory Usage option helps you place some limits on Photoshop's ravenous appetite. The option lists the amount of RAM available to all applications after the operating system loads into memory. You can then decide how much of that memory should go to Photoshop. If you like to run lots of applications at the same time — your word processor, Web browser, spreadsheet program, drawing program, and Photoshop, for example — set the Maximum Used by Photoshop value to 50 percent or lower. But if Photoshop is the only program running — and if you have less than 256MB of RAM — raise the value to 70 to 80 percent.
Warning
It is recommended that you not take the Maximum Used by Photoshop value any higher than 80 percent, particularly on a low-capacity machine (less than 1 GB). Doing so permits Photoshop to fill up RAM that the operating system may need, which makes for a less stable working environment. As noted earlier, if Photoshop is going too slow for you and hitting the scratch disk too often, buy more RAM — don't play dangerous games with the little RAM you do have.
Let Photoshop Use (367 MB (55%)): This option follows the stated Available RAM and Ideal Range settings, which are not editable directly in this dialog box. You also can use the slider beneath the option, to increase (drag to the right) or decrease (drag to the left) the amount of RAM you want Photoshop to use.
Here you can control how far back in time you can go with the History palette and how repeated saves of an image are stored. These are your options:
History States (your call): Located in the History & Cache section of the Performance panel, this value controls how many steps you can undo using the History palette. The right value depends on the amount of RAM you're willing to devote to Photoshop. If you're working with limited memory, I suggest that you lower the value to 5 or 10. Otherwise, raise the value as you see fit, remembering that the more states the program retains, the more you strain your system.
Cache Levels (6): Photoshop has been criticized for its lack of a "pyramid-style" file format capable of storing an image several times over at progressively smaller and smaller image sizes, called downsamplings. Photoshop's alternative is image caching. Rather than saving the downsamplings to disk, Photoshop generates the reduced images in RAM. The Cache Levels value determines the number of downsamplings, which permits the program to apply operations more quickly at reduced view sizes. For example, if you choose a color correction command at the 50 percent view size, it previews much faster than normal because Photoshop has to modify a quarter as many pixels onscreen.
However, Photoshop must cache downsamplings in RAM, which takes away memory that could be used to hold the image. If you have lots of RAM (say, 2 GB or more) and you frequently work on large images (20MB or larger), you'll probably want to raise the value to the maximum, 8. The lost memory is worth the speed boost. If you have little RAM (say 256MB or less) and you usually work on small images or Web graphics (4MB or smaller), you may want to reduce the Cache Levels value to 1 or 2. When files are small, RAM is better allocated to storing images rather than caching them.
By default, Photoshop assumes you have only one hard drive, so it stores its temporary virtual memory documents — called scratch files — on the same drive that contains your system software. If you have more than one drive available, though, you may want to tell Photoshop to look elsewhere. In fact, Photoshop can use up to four drives.
As the note at the bottom of the Performance panel states, "Changes will take effect the next time you start Photoshop." (Don't see it? Mouse over the Scratch Disks settings) This means that you have to exit and restart Photoshop in order to see your new settings here go into effect. Potentially annoying, yes, but necessary given that Photoshop has to reacquaint itself with your hardware if you're suddenly informing it of an additional drive or partition and want it to make use of it as a scratch disk or location for your plug-ins.
Tip
If you find restarting simply unacceptable, there is a workaround. To access the plug-ins and scratch disk settings during the launch cycle, after double-clicking the Photoshop application icon or choosing Photoshop from the Windows Start menu, press and hold Ctrl and Alt (
Enable 3D Acceleration (on): This option is on by default because it enhances your video display and rendering capabilities.
Press Ctrl+5 (
Painting Cursors (Brush Size): When you use a paint or edit tool, Photoshop can display one of four cursors — Standard, Precise, Normal Brush Tip, or Full Size Brush Tip. The Standard cursor looks like a paintbrush, a pencil, a finger (if you're smudging), or whatever tool you're using. These cursors are great if you have problems keeping track of what tool you selected, but otherwise they border on childish and make precision nearly impossible — imagine trying to erase a row of single pixels with a cursor that looks like a big picture of an eraser. Not easy.
The Precise and two Brush Size options are more functional. The Precise option displays a cross-shaped cursor — called a cross hair — regardless of which tool is active. The cross hair is great because it prevents the cursor from blocking your view as you edit, but it has a significant drawback — sometimes it's hard to see your cursor unless you're zoomed in very close to your image. On the other hand, the Normal Brush Size option displays a circle that's 50 percent of the size and shape of the active brush in the Brushes palette, and allows you to be precise as well as providing a sense of the effect the Brush tool in question will have, at least in terms of how wide a swath you'll be painting, smudging, blurring, sharpening, or erasing. The Full Size Brush Tip option is the default setting, and shows your brush tip in the actual size you have set. Most artists prefer this final setting to the others because it comes the closest to showing the cursor the way it really is, and because it's a circle (and you can see through it), it affords more accuracy in tight spots and where a high level of precision is required. You also can add to the precision by selecting the Show Crosshair in Brush Tip option, which does just that — it places a cross hair in the middle of the Normal or Full Size brush tip cursor.
Tip
When Standard or Brush Size is selected, you can access the cross-hair cursor by pressing the Caps Lock key. When Precise is selected from the Painting Cursors options, pressing Caps Lock displays the brush size.
Other Cursors (Standard): Again, you can select Standard to get the regular cursors or Precise to get cross hairs. You may want to leave this option set to Standard because you can always access the cross-hair cursor by pressing Caps Lock. The Precise option locks you into the cross hair whether you like it or not.
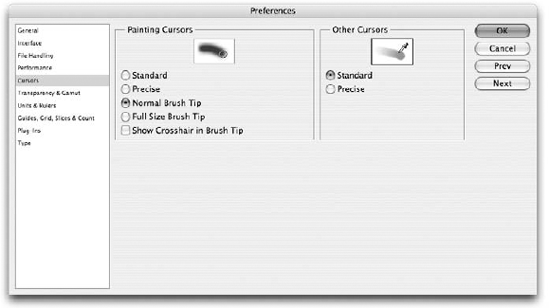
Press Ctrl+6 (
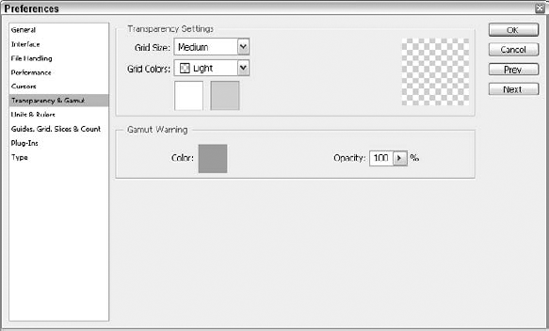
Figure 2.23. The options in this panel affect how Photoshop represents transparency and out-of-gamut colors. Try to select colors that you don't often see in your images, so you can tell Transparency from an actual pattern in your image.
The options are arranged into two groups — Transparency Settings and Gamut Warning — as explained in the following sections.
Photoshop images rest on a layer of absolute transparency, and by default, Photoshop represents this transparency as a gray checkerboard pattern. When you view a layer independently of others, Photoshop fills the see-through portions of the layer with the checkerboard, so having the checkerboard stand out from the layer itself is essential. You can customize the size of the checkers and the color of the squares using the Grid Size and Grid Colors pop-up menus, and you also can set the Opacity of the checkerboard (it's set to 100 percent by default). You also can click the color swatches to define your own colors: When you click either one, the Color Picker opens.
Tip
To lift colors from the image window (for use in your checkerboard, or anything else you're coloring, for that matter), move your cursor outside the Color Picker (if that dialog box is open) or the Preferences dialog box to get the Eyedropper. Click a color to change the color of the white checkers; Alt-click (or Option-click on the Mac) to change the gray ones.
If you own a 32-bit device that enables chroma keying, you can select the Use Video Alpha option to view a television signal in the transparent area behind a layer. Unless you work in video production, you needn't worry about this option.
The Units & Rulers panel is the seventh panel in the Preferences dialog box; as you might imagine, you reach the panel by pressing Ctrl+7 (
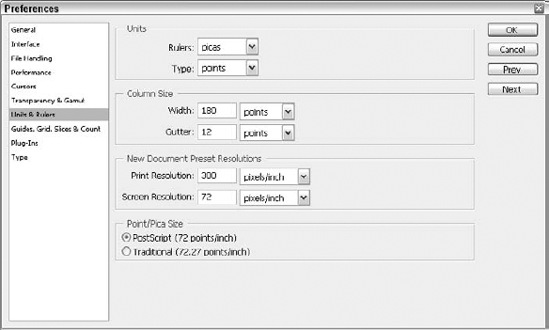
Figure 2.24. Go to the Units & Rulers panel to change the column and pica settings and set the unit of measurement.
Tip
Whenever the rulers are visible, the Units & Rulers panel is only a double-click away. Choose View
You can set the unit of measurement with the Units option in the Preferences dialog box. But there's an easier way: Just right-click (Control-click on the Mac) anywhere on the ruler to display a pop-up menu of unit options, and then click the unit you want to use. You can display the same pop-up menu by clicking the plus sign next to the X and Y coordinates that appear in the Info palette.
When you're first learning Photoshop, and if you're coming from the print design world, you may be tempted to go with inches or picas as your Unit of choice. Another option? Use pixels. Why? Because you can change the resolution of an image at any time and the only constant is pixels. An image measures a fixed number of pixels high by a fixed number of pixels wide — that's it. You can print those pixels as large or as small as you want, but the pixels are the one constant. Another reason? If your images might ever end up on the Web, you'll want to be thinking in pixels because that's how Web pages are measured, too.
Note
To learn more about resolution, read Chapter 3.
Photoshop enables you to set the unit of measure used for the Type tool independently of the ruler units. You can work in points, pixels, and millimeters; select your unit of choice from the Type pop-up menu.
Note
Check out Chapter 15 for more information and insights about type in Photoshop.
The Column Size options enable you to size images according to columns in a newsletter or magazine. Type the width of your columns and the size of the gutter in the Width and Gutter option boxes. Then use File
One nifty feature, first introduced in Photoshop 7, is the listing of preset sizes you get when you create a new document by choosing File
The last option in the Units & Rulers panel, Point/Pica Size, may be the most obscure of all Photoshop options. To interpret the information displayed here, you need to know that exactly 12 points are in a pica, and about 6.06 picas are in an inch.
Because picas are almost evenly divisible into inches, the people who came up with the PostScript printing language decided to throw out the difference and define a pica as exactly 1/6 inch. This makes a point exactly 1/72 inch.
But a few purists didn't take to it — you know those purists, they're always making trouble. They found their new electronic documents weren't quite matching their old paste-up documents, and apparently this was more than they could bear. So Adobe caved and had to go back and add the Traditional (72.27 points/inch) option to keep everyone happy.
You may find that you prefer the nontraditional PostScript definition of points. This way, a pixel onscreen translates to a point on paper when you print an image at 72 ppi (the standard screen resolution).
The Guides, Grid, Slices & Count version of the Preferences dialog box can be accessed by pressing Ctrl+8 (
Tip
You can display the Preferences dialog box and go directly to the Guides, Grid, Slices & Count panel by double-clicking a guide with the Move tool or Ctrl+double-clicking (
These options are explained in more detail in Chapter 12, but for the moment, here are some brief descriptions.
Select a color for horizontal and vertical ruler guides from the Color pop-up menu. To lift a color from the image, move your cursor outside the Preferences dialog box and click in the image window with the Eyedropper. You also can view guides as solid lines or dashes by selecting an option from the Style pop-up menu.
These snappy little guides appear when you have Smart Guides turned on through the View
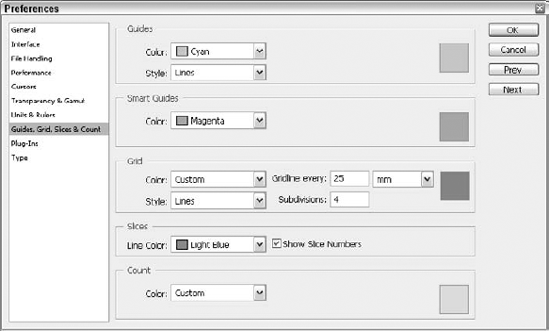
Choose a color for the grid from the Color menu, or Alt+click (Option-click on the Mac) in the image window to lift a color from the image. Then decide how the grid lines look by selecting a Style option. The Dots setting is the least intrusive.
The Gridline Every value determines the increments for the visible grid marks onscreen. But the Subdivisions value sets the real grid. For example, if you request a grid mark every 1 inch with four subdivisions, Photoshop snaps selections and layers in 1/4-inch increments (1 inch divided by 4).
Like setting the color for guides and the grid, the Slices preference lets you choose a color for the lines that illustrate exactly where you've sliced up your image for posting on the Web. You can turn on and off the visibility of the slice numbers here as well.
The color in which your numbers and tiny blocks appear when you use the Count tool to numerically label locations in your image is set here. The default is the same color as the Guides default, so if you use the Count feature often (see Chapter 3 for more information on this tool), you may want to choose an alternate color, should a guide and a count marker overlap.
Press Ctrl+9 (
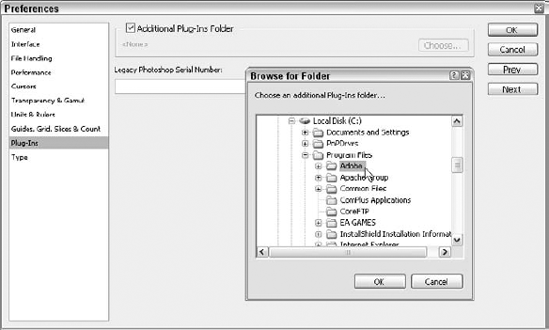
By default, the plug-ins are located in a folder cleverly disguised with the name Plug-Ins, which resides in the same folder as the Photoshop application. But you can tell Photoshop to also look for plug-ins in some other folder — a useful option if you install all your third-party plug-ins to some central location outside the Photoshop folders. To specify the second plug-ins location, select the option and then click Choose to select the folder.
As you may have noticed when you installed it, Photoshop CS3 continues the new era in Adobe serial numbers first introduced with Photoshop 7. No longer are they a mixture of numbers and letters; it's all just numbers and dashes now. Some third-party plug-ins, however, serialize themselves to the old-style Photoshop serial number format. So if you're upgrading to Photoshop CS3 and you have an old serial number from Photoshop 6 or earlier, you can type it here.
Housing just four simple options, the Type preferences dialog box, shown in Figure 2.27, lets you choose from the following:
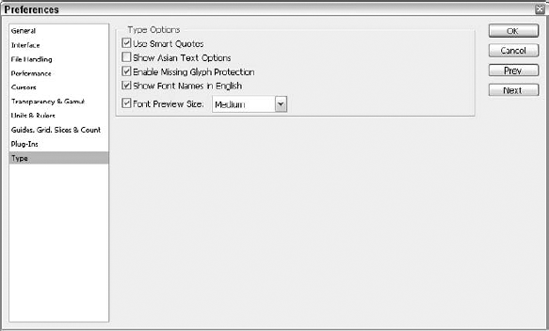
Use Smart Quotes: On by default, Smart Quotes that "know" they're at the beginning or end of a word or phrase curl accordingly. If you turn this off, you get straight quotes. Straight quotes can be useful if you're typing measurements, where a single straight quote means feet and two straight quotes mean inches.
Show Asian Text Options: Off by default, if you want to see Chinese, Japanese, and Korean type options in the Character and Paragraph palettes, turn this option on. If you don't, don't.
Enable Missing Glyph Protection: When this option is on, which it is by default, Photoshop makes font substitutions for any missing glyphs — especially useful if you type in various languages that employ non-English alphabets, such as Chinese, Japanese, Russian, Greek, or Arabic.
Show Font Names in English: This option, which is on by default, really pertains to non-Roman fonts and whether you want to see their Roman names. You do, for familiarity's sake, so leave this on.
Font Preview Size: This option lets you choose between Small, Medium (the default), and Large. The preview is found in the Type tool's Options bar, and certainly Small is going to be less visually effective than Medium, and Large is great for people with their monitors set to a high resolution — say 1024×768 or greater.
In this chapter, you received a friendly introduction to the Photoshop desktop, tools, palettes, and the interface in general. For the new user, this was hopefully a comfort-inducing experience where you found out how helpful Photoshop can be in helping you move around the interface and your images. If you're a more experienced user, you may have found out what some of the tools you've looked at but not explored can do for you — a common experience for the self-taught.
No matter what level user you are, you also learned about new tools and preference settings (and found out where in-depth coverage can be found elsewhere in the book) and discovered how to view your tool options and save presets for tools, presets, and the workspace.
Key to getting to know Photoshop is getting around in Photoshop, and toward that end you also learned about zooming in on your images, scrolling from the keyboard, and navigating the workspace. Finally, you learned how to use Photoshop's Preferences to make yourself at home — so hopefully by now, you have your feet up and are ready to move forward and find out about file management, covered in the next chapter.