
Our communications with readers, students, and many graphic artists tells us that most Photoshop users don't use masks. It may be that masks seem complicated, or they may strike you as being more trouble than they're worth. It's quite likely that you've played with the basic selection tools — namely the marquee tools, the lassos, and the Magic Wand — and felt that these were good enough. On occasion, you may even resort to the Pen tools, which let you draw precise curves and convert them to selections or clipping paths, and maybe you're more likely to use paths after you've read Chapter 8 (you did read Chapter 8, didn't you?) You may, in fact, be so confident and content with these tools that you wonder what more a skilled Photoshop craftsman could possibly need.
Quite a bit, as it turns out. Every one of the tools just mentioned is only moderately suited to the task of selecting images. The lasso tools let you create free-form selections, but none of the tools — not even the Magnetic Lasso — can account for differences in focus levels. The Magic Wand selects areas of color, but it usually leaves important colors behind, and the edges of its selection outlines often appear ragged and ugly. Then there's the Pen tool, which is extremely precise, but it results in mechanical outlines that may appear incongruous with the natural imagery they contain.
Masks offer all the benefits of the other tools, but they give you much more — even with the new Refine Edge dialog box (available through any selection tool's options bar or via the Select menu) and its ability to enhance a selection. With masks, you can create free-form selections, select areas of color, and generate incredibly precise selections. But masks also address all the deficiencies associated with the selection tools. They can account for different levels of focus, they give you absolute control over the look of the edges, and they create selections every bit as natural as the image itself.
In fact, a mask is the image itself. Masks use pixels to select pixels. Masks are your way to make Photoshop see what you see using the data inherent in the photograph. Masks enable you to devote every one of Photoshop's powerful capabilities to the task of creating a selection outline. Masks are, without a doubt, the most accurate selection mechanism available in Photoshop.
If you're not entirely clear about what term mask means, then just continue reading. You'll be pleasantly surprised.
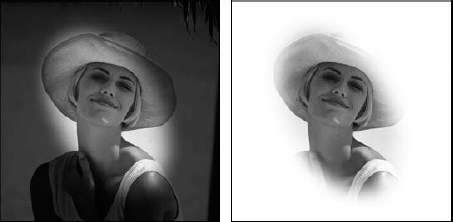
Technically, a mask is nothing more than a standard selection outline expressed as a grayscale image, and it has these properties:
Selected areas appear white.
Deselected areas appear black.
Partially selected parts of the image appear gray. Feathered edges also are expressed in shades of gray, from light gray near the selected area to dark gray near the deselected area.
Figure 9.1 shows a selection outline and its equivalent mask. The image to the left shows a selection outline delineated by Photoshop's traditional marching ants and softened with the feather command (Select
When you look at the Quick Mask view in Figure 9.1, you may wonder where the heck the image went. One of the wonderful things about masks is that you can view them independently of an image, as in Figure 9.1, or with an image, as in Figure 9.2. In the second figure, the mask is expressed as a color overlay. You can't tell here, but by default the color of the overlay is a translucent red, like a sheet of rubylith film used in printing. Areas covered with the rubylith are masked (deselected); areas that appear normal — without any red tint — are unmasked (selected). When you return to the standard marching ants mode, any changes you make to your image affect only the unmasked areas.
Now that you know roughly what masks are (the definition becomes progressively clearer throughout this chapter), the question remains, what good are they? Because a mask is essentially an independent grayscale image, you can edit the mask using paint and edit tools, filters, color-correction options, and almost every other Photoshop function. You can even use the selection tools, as discussed in Chapter 8. With all these features at your disposal, you can't help but create a more accurate selection outline in a shorter amount of time.

Before diving into masking techniques, let's start with a warm-up topic: selection masking. What's that? Well, think of it this way. When you were a kid with a coloring book, grownups may have nagged you to color within the lines. While that was probably pretty destructive to your natural creativity (and hopefully, you didn't listen), those grownups would just love selection masking and how it can be used to confine a painting and fills.
In Photoshop, all selection outlines act as masks — hence the term selection masking. Regardless of which tool you use to create the selection — Marquee, Lasso, Magic Wand, or Pen — Photoshop permits you to paint or edit only the selected area. The paint can't enter the deselected (or protected) portions of the image, so you can't help but paint inside the lines. If you dread painting inside an image because you're afraid you'll screw it up, selection masking is the answer.
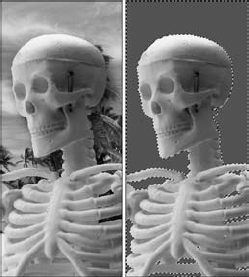
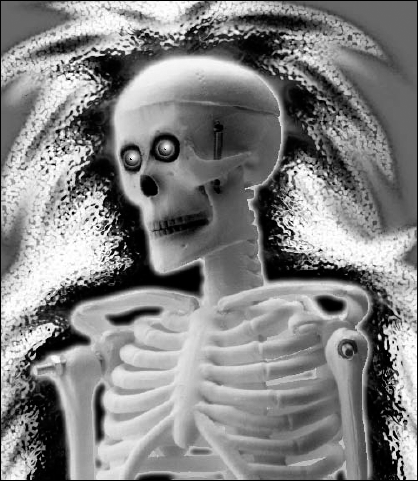
Figures 9.3 through 9.6 show a biology class skeleton subjected to some pretty free-and-easy use of the paint and edit tools. The following steps describe how these images were created using a selection mask.
STEPS: Painting and Editing Inside a Selection Mask
Select the skeleton. You can see the selection outline in the right example of Figure 9.3.
Reverse the selection with the Inverse command. You want to edit the area surrounding the head, so choose Select

Press Ctrl+Backspace (

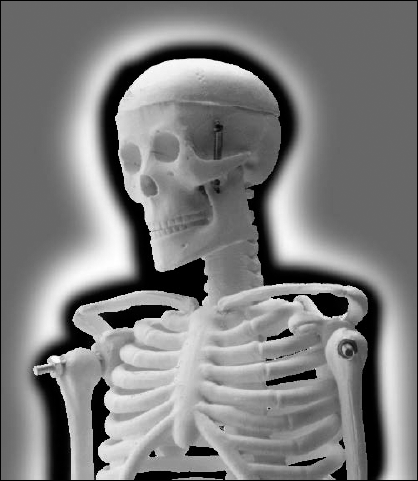
Paint inside the selection mask. But first choose View
Select the Brush tool, and express yourself. With the foreground color set to black, click and drag around the perimeter of the skeleton to set it apart from its gray background, and then rough in an outline around the black using white, as shown in Figure 9.4.
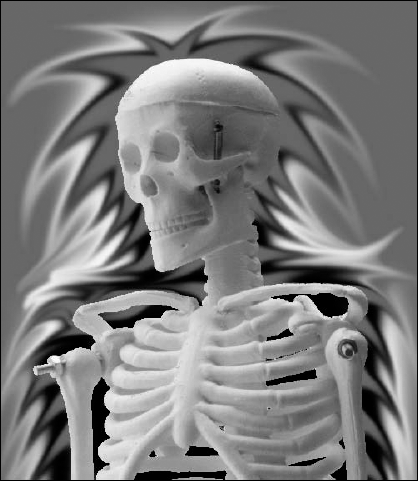
Put the Smudge tool to work. Set the tool's Strength value set to 80 percent by pressing 8. Then click and drag from inside the unselected area outward a few dozen times to create a series of curlicues. As shown in Figure 9.5, the Smudge tool can smear colors from inside the protected area, but it does not apply these colors until you go inside the selection. This is an important point to remember because it demonstrates that although the protected area is safe from all changes, the selected area may be influenced by colors from protected pixels.
Add some embellishments. As you can see in Figure 9.6, the selection mask comes in handy when using the Burn tool to darken around the eye sockets and teeth. Out of a desire to create fabulous hair, the new hair layer was duplicated a few times, a handful of filters (Filter
Note
Want to know more about the filters used in this demonstration? Check out Chapters 10 and 11.
Selection masks give you an idea of what masks are all about, but they only scrape the surface of all that's possible with masking. The rest of this chapter revolves around using masks to define complex selection outlines.
The most straightforward environment for creating a mask is the Quick Mask mode. In the Quick Mask mode, a selection is expressed as a rubylith overlay. All deselected areas appear coated with red, and selected areas appear without red coating. You then can edit the mask as desired and exit the Quick Mask mode to return to the standard selection outline. The Quick Mask mode is — as its name implies — expeditious and convenient, with none of the trappings or permanence of more conventional masks.
Tip
What the heck is a rubylith? It's a term from printing and photo processing. Here's one definition, which sums it up pretty well: A rubylith is a separable two-layer acetate film of red or amber emulsion on a clear base. The film would protect some or all of an image, just as it does in Photoshop. The slightly opaque red wash shows you that you're in Quick Mask Mode, and the mask created remains in that color — showing you which parts of the image are protected, or masked, from any subsequent painting or filling.
Typically, you'll at least want to rough out a selection with the standard selection tools before entering the Quick Mask mode. Then you can concentrate on refining and modifying your selection inside the quick mask, rather than having to create the selection from scratch. You may want to experiment, however, with starting out with no selections in place — it's entirely up to you.
To enter the Quick Mask mode, click the Quick Mask mode icon in the Toolbox, as shown in Figure 9.7, or press Q. Starting with the same selection method used on the skeleton in the previous section (the selection was inverted so that the background was selected), Q was pressed and the image shown in Figure 9.7 resulted, this time with a wolf's face. The face receives the mask because it is not selected. (In Figure 9.7, the mask appears as a light gray coating; on your color screen, the mask appears in red.) The area outside the face looks the same as it always did because it's selected and, therefore, not masked.
Notice that the selection outline disappears when you enter the Quick Mask mode. This happens because the outline temporarily ceases to exist. Any operations you apply affect the mask itself and leave the underlying image untouched. When you toggle the Quick Mask mode button or press Q, Photoshop converts the mask back to a selection outline and again enables you to edit the image.
Note
If you click the Quick Mask mode icon and nothing changes onscreen, your computer isn't broken; you simply didn't select anything before you entered the Quick Mask mode. When nothing is selected, Photoshop makes the entire image open for editing. In other words, everything's selected. (Only a smattering of commands under the Edit, Layer, and Select menus require something to be selected before they work.) If everything is selected, the mask is white; therefore, the quick mask overlay is transparent and you don't see any difference onscreen. This is another reason why it's better to select something before you enter the Quick Mask mode — you get an immediate sense that you're accomplishing something.
Also, Photoshop enables you to specify whether you want the red mask coating to cover selected areas or deselected areas. For information on how to change this setting, see the section "Changing the red coating."
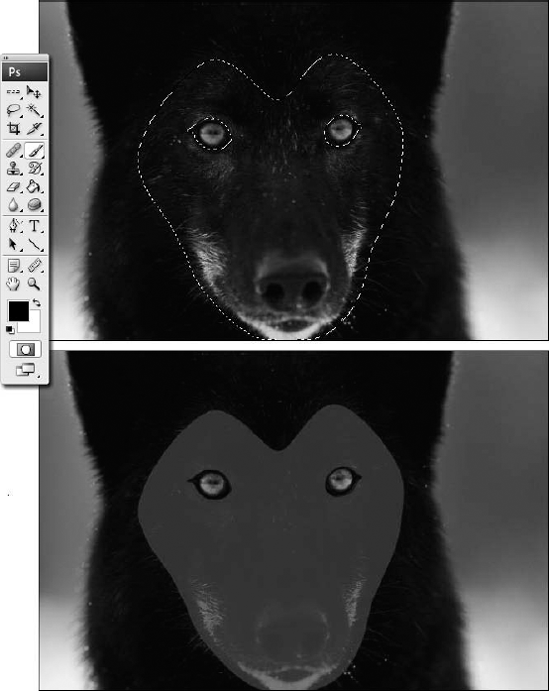
Figure 9.7. You can see the marching ants-style selection in the upper image, indicating that the eyes and most of the head are selected. Clicking the Quick Mask mode icon instructs Photoshop to express the selection temporarily as a rubylith overlay (bottom).
In the Quick Mask mode, you can edit the mask in these ways:
Subtracting from a selection: Paint with black to add a red coating and, thus, deselect areas of the image. This means you can selectively protect portions of your image by merely painting over them.
Adding to a selection: Paint with white to remove the red coating and, thus, add to the selection outline, as demonstrated in the top half of Figure 9.8. You can use the Eraser tool to whittle away at the masked area (assuming the background color is set to white). Or you can swap the foreground and background colors so you can paint in white with one of the painting tools.
Adding feathered selections: If you paint with a shade of gray, you add feathered selections. You also can feather an outline by painting with black or white with a soft brush shape, as shown in Figure 9.8. Here, a soft-edged brush is applying white paint, adding a nice feathered edge to the top of the selection. Then after reentering the world of the marching ants, a little more painting and smudging creates the image on the bottom of the figure.
Cloning selection outlines: If you have a selection outline that you want to repeat in several locations throughout the image, the Quick Mask is your friend. Select the transparent area with one of the standard selection tools, press and hold Ctrl+Alt (
Transforming selection outlines: You can scale or rotate a selection independently of the image, just as you can with the Transform Selection command (covered in Chapter 8). Enter the Quick Mask mode, select the mask using one of the standard selection tools, and choose Edit
These are only a few of the unique effects you can achieve by editing a selection in the Quick Mask mode. Others involve tools and capabilities not yet discussed, such as filters and color corrections.
When you finish editing your selection outlines, click the Quick Mask mode icon again or press Q again to return to the marching ants mode. Your selection outlines again appear flanked by marching ants, and all tools and commands return to their normal image-editing functions.
Tip
The Quick Mask mode offers a splendid environment for feathering one selection outline while leaving another hard-edged or anti-aliased. Granted, because most selection tools offer built-in feathering options, you can accomplish this task without resorting to the Quick Mask mode. But the Quick Mask mode enables you to change feathering selectively after drawing selection outlines — something you can't accomplish with Select
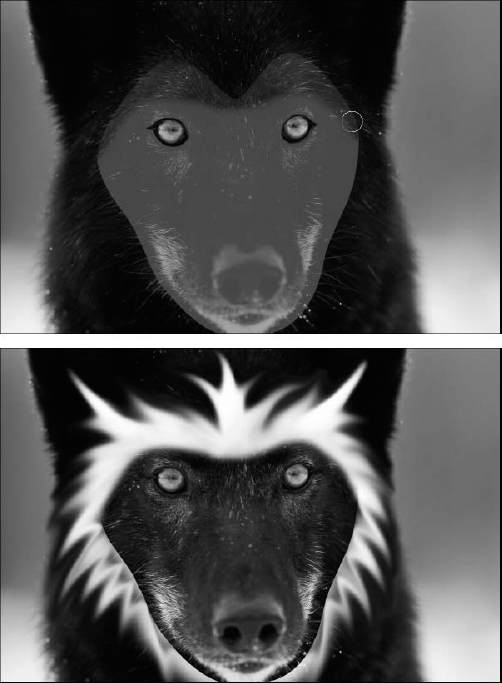
Figure 9.8. Painted in white with a soft-edged brush to enlarge the selected area (top). After switching out of the Quick Mask mode, the Brush and Smudge tools (bottom) have been used liberally.
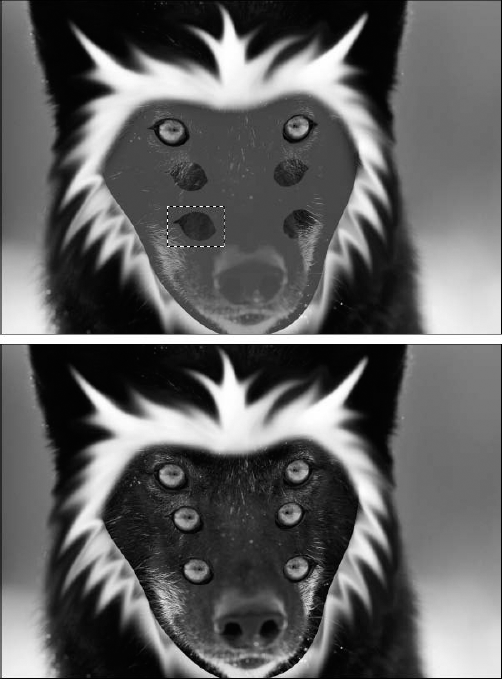
Figure 9.9. To clone the eye selections, marquee around them. Then press Ctrl+Alt (
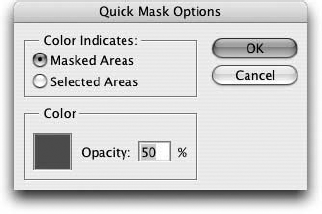
By default, the protected region of an image appears in translucent red in the Quick Mask mode, but if your image contains lots of red, the mask can be difficult to see. Luckily, you can change it to any color and any degree of opacity that you like. To do so, double-click the Quick Mask icon in the Toolbox (or double-click the Quick Mask item in the Channels palette) to display the dialog box shown in Figure 9.10.
Color Indicates: Choose Selected Areas to reverse the color coating so that the translucent red coating covers selected areas and deselected areas appear normally. Choose Masked Areas (the default setting) to cover deselected areas in color.
Tip
You can reverse the color coating without ever entering the Quick Mask Options dialog box. Simply Alt-click (Win) or Option-click (Mac) the Quick Mask icon in the Toolbox to toggle between coating the masked or selected portions of the image. The icon itself changes to reflect your choice.
Color: Click the Color icon to display the Color Picker dialog box and select a different color coating. (If you don't know how to use this dialog box, see Chapter 4.) You can lift a color with the Eyedropper after the Color Picker dialog box appears; just keep in mind that you probably want to use a color that isn't in the image so that you can see the mask better.
Opacity: Type a value to change the opacity of the translucent color that coats the image. A value of 100 percent makes the coating absolutely opaque, which means you can't see through it — which is pointed out not because we think you don't know what opaque means, but so you realize that this can make it harder to edit the mask relative to the image content.
In the end, just be sure that if you change your coating, you set up a color coating that achieves the most acceptable balance between being able to view and edit your selection and being able to view your image.
If you think that the Feather command is the bee's knees when it comes to creating softened selection outlines, wait until you see the gradations in the Quick Mask mode. There's no better way to create fading effects than selecting an image with the Gradient tool and turning that gradient into a mask.
In the following example, you create a gradient mask to fade part of an image into nothingness. Figure 9.11 brings the handy biology class skeleton in the left half fading in from the ground up onto the stormy plain over on the right.
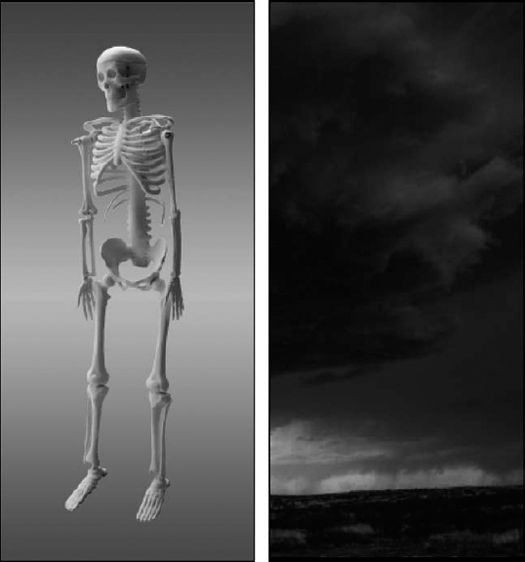
Figure 9.11. You can create a linear gradient in the Quick Mask mode to make the skeleton (left) rise from the stormy plain (right).
Here's how: Switch to the Quick Mask mode by pressing Q. Then use the Gradient tool to draw a linear gradation from black to white. (Chapter 6 explains exactly how to do so.) The white portion of the gradation represents the area you want to select. To select the top portion of the mask shown in Figure 9.12, draw the gradation as shown in the first example of the figure.
Banding can be a problem when you use a gradation as a mask. To eliminate the banding effect, apply the Add Noise filter at a low setting several times. To create the right example in Figure 9.12, apply Add Noise using an Amount value of 10 and the Uniform distribution option. To brush up on using filters, and specifically the Add Noise filter, check out Chapter 10.
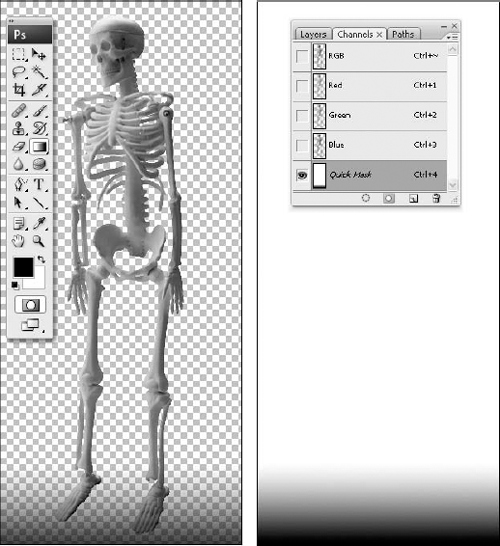
Figure 9.12. After drawing a linear gradation in the Quick Mask mode over the bottom of the image (left), the image was hidden and the Add Noise filter applied with an Amount of 10 (right).
Tip
In the right example of Figure 9.12, the image is hidden so that only the gradient mask is visible. As the figure shows, the Channels palette lists the Quick Mask item in italics. This is because Photoshop regards the Quick Mask as a temporary channel. You can hide the image and view the gradient mask in black and white by clicking the eyeball in front of the color composite view, in this case RGB. Or just press tilde (~) to hide the image. Press tilde again to view the gradient mask and image together.
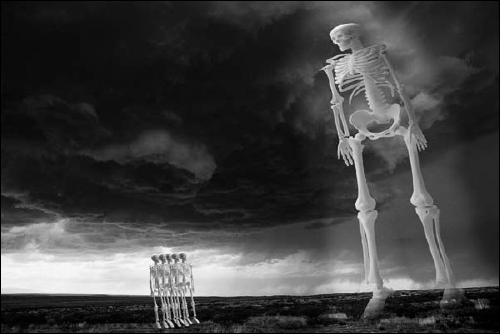
To apply the gradation as a selection, return to the marching ants mode by pressing Q. Then Ctrl-drag (
Tip
Outer glow? How'd we do that? See Chapter 14 for everything you need to know about Blending Options.
You also can use gradations in the Quick Mask mode to fade the outcomes of filters and other automated special effects. For example, you can apply a filter around the edges of the image that appears in Figure 9.14. Begin by deselecting everything in the image by pressing Ctrl+D (
Next, press D to make the foreground color black. Then drag with the Gradient tool from each of the four corners of the image inward to create a series of short gradations that trace around the focal point of the image, as shown in Figure 9.15. (The image is hidden here so that you see the mask in black and white.) Because the Foreground to Transparent option is selected, Photoshop adds each gradation to the previous gradation.
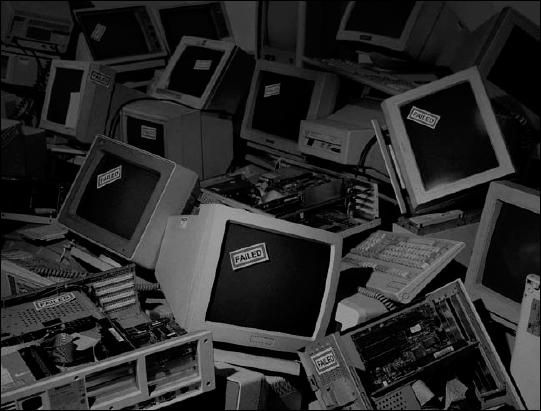
Figure 9.14. Surround the foreground image with a gradual filtering effect. Here, the darkness on the edges fades to light toward the lower center of the image.
To jumble the pixels in the mask (preventing banding), apply Filter
Tip
Of course, as stated previously, white is selected and black is deselected. So now you need the edges to appear white and the inside to appear black — the opposite of what you see in Figure 9.15. No problem. All you do is press Ctrl+I (
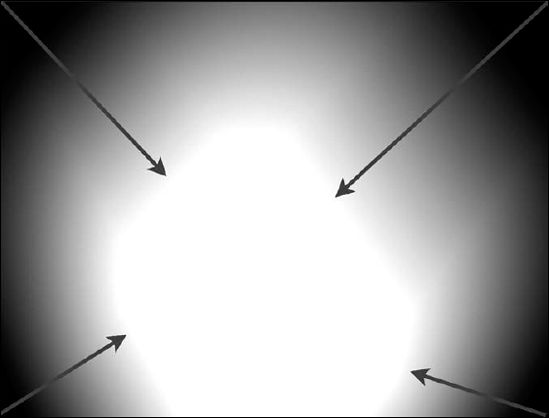
Figure 9.15. Inside the Quick Mask mode, each of the four corners has been dragged with the Gradient tool (as indicated by the arrows).
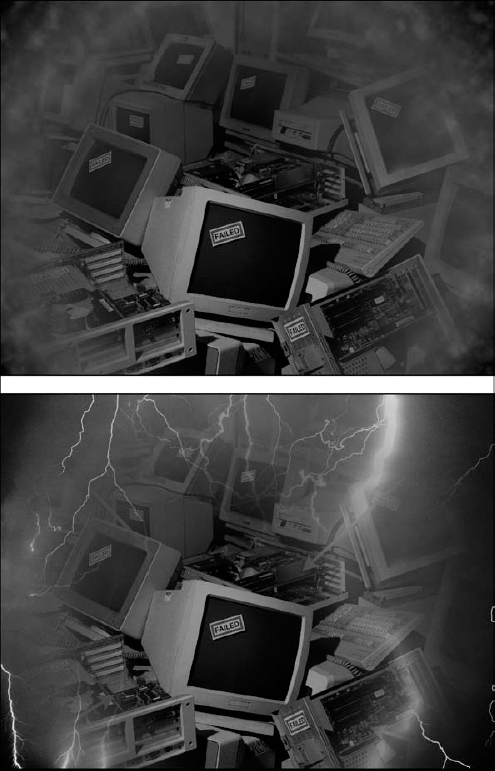
Finally, it's time to switch back to the marching ants mode by pressing Q. Apply Filter
Tip
The corners of the mask in Figure 9.15 are soft and rounded, but you can achieve all kinds of corner effects with the Gradient tool. For harsher corners, select the Foreground to Background gradient and select Lighten from the Mode pop-up menu in the Options bar. For some really unusual corner treatments, try the Difference and Exclusion brush modes.
In addition to the Quick Mask mode and selection masking, Photoshop offers a few tools that automate the masking process — well, some parts of the process. You still need to provide some input to tell the program exactly what you're trying to mask. These tools are the Magic Eraser, Background Eraser, and Extract command. The standard Eraser tool is covered in Chapter 7, but in case you're skipping around, here's the rundown: The Eraser paints in the background color when used on the background layer. When applied to a layer, it erases pixels to reveal the layers below. The Magic Eraser works like the Fill tool, but in reverse. When you click with the Magic Eraser, you delete a range of similarly colored pixels. The Background Eraser, as its name implies, erases the background from an image and leaves the foreground intact — or at least that's what happens if you use the tool correctly. Otherwise, it just erases everything.
Tip
You can cycle through the erasers by Alt-clicking (Option-clicking on the Mac) the eraser icon in the Toolbox or by pressing E (or Shift+E).
As recently mentioned, the Magic Eraser, found on the same flyout as the regular Eraser, erases similarly colored pixels. If you're familiar with the Magic Wand, covered in Chapter 8, using the Magic Eraser is a cinch. The two tools operate virtually identically, except the Wand selects and the Magic Eraser erases.
When you click a pixel with the Magic Eraser, Photoshop identifies a range of similarly colored pixels, just as it does with the Magic Wand. But instead of selecting the pixels, the Magic Eraser makes them transparent, as demonstrated in Figure 9.17. Bear in mind that in Photoshop, transparency requires a separate layer. So if the image consists of only the background, Photoshop automatically converts the background into a layer with nothing underneath. As a result, you get the checkerboard pattern shown in the second example in the figure — transparency with nothing underneath.
Note
The Lock buttons in the Layers palette affect the Magic Eraser. When you have no buttons selected, the Magic Eraser works as just described. But if you lock transparent pixels, the Magic Eraser paints opaque pixels in the background color and leaves transparent areas untouched. You can't use the Magic Eraser at all on a layer for which you've locked image pixels.

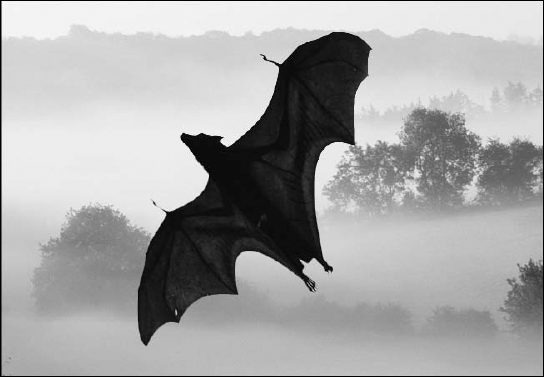
Figure 9.17. To delete a homogeneously colored background, such as the sky in this picture, click inside it with the Magic Eraser (bottom).
You can further alter the performance of the Magic Eraser through the controls in the Options bar, shown in Figure 9.18 and described in the following list. Except for the Opacity value, these options work the same way as the options for the Magic Wand:
Tolerance: Just like the Magic Wand's Tolerance value, this one determines how similar a neighboring color has to be to the clicked color to be made transparent. A higher value affects more colors; a lower value affects fewer colors. (Remember, any change to the Tolerance value affects the next click you make; it does not affect the existing transparent area.)
Anti-aliased: To create a soft fringe around the outline of your transparent area, leave this option selected. If you'd prefer a hard edge — as when using a very low Tolerance value, for example — deselect this option.
Contiguous: Select this option, and the Magic Eraser deletes contiguous colors only — that is, similar colors that touch each other. If you prefer to delete all pixels of a certain color — such as the background pixels in Figure 9.17 that are divided from the rest of the sky by the bat — deselect the Contiguous option.
Sample All Layers: When selected, this option tells Photoshop to factor in all visible layers when erasing pixels. The tool continues to erase pixels on only the active layer, but it erases them according to colors found across all layers.
Opacity: Lower this value to make the erased pixels translucent instead of transparent. Low values result in more subtle effects than high ones.
The Magic Eraser is as simple to use as a hammer, and every bit as indelicate. It pounds away pixels, but it leaves lots of color fringes and shredded edges in its wake. You might as well select an area with the Magic Wand and press Backspace (Win) or Delete (Mac). The effect is the same.
The more capable, more scrupulous tool is the Background Eraser. As demonstrated in Figure 9.19, the Background Eraser deletes background pixels as you drag over them. (Again, if the image consists only of a background, Photoshop converts the background into a new layer to accommodate the transparency.) The tool is intelligent enough to erase background pixels and retain foreground pixels provided that — and here's the clincher — you keep the cross in the center of the eraser cursor squarely centered on a background color pixel. Move the cross over a foreground pixel, and the background eraser deletes foreground pixels as well. As Figure 9.20 demonstrates, it's the position of the cross that counts.
Note
As is the case when you work with the Magic Eraser, the Lock buttons in the Layers palette affect the Background Eraser. In this case, locking image pixels prevents you from using the Background Eraser. Be aware that if you drag over a selection that's already partially transparent, locking transparent pixels does not protect the selection from the Background Eraser.
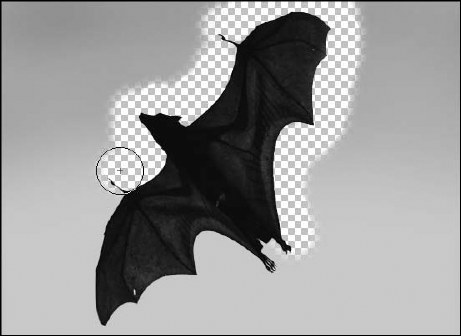
Figure 9.19. Click and drag around the edge of an image with the Background Eraser to erase the background but leave the foreground intact.
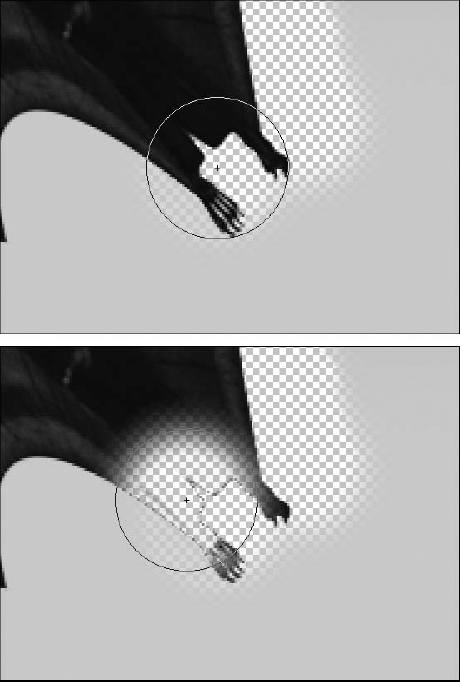
Figure 9.20. Keep the cross of the Background Eraser cursor over the background you want to erase (top). If you inadvertently move the cross over the foreground, the foreground gets erased (bottom).
You also can modify the performance of the Background Eraser using the Options bar controls pictured in Figure 9.21. These options are a bit intimidating at first, but they're actually pretty easy to use:
Sampling: Continuous: The first of three buttons (which replace the pop-up menu found in Photoshop CS2), lets you do just what the button's tool tip implies — continuously sample pixels as you drag. On by default, this first button tells the eraser to continuously reappraise which colors should be erased, which is quite handy, especially if your background is complex. Be careful, though, if the background has colors in it that are common to the parts of the image you're not trying to erase.
Sampling: Once: The second of three buttons, this one is useful if your background is pretty homogenous — like an actual solid color, a cloudless blue sky, or something like that. Sampling: Once samples the background color when you first click and erases only that color throughout the drag — no matter where or how far from that starting point you drag. If you re-click, however, to start a new drag in another area of the background, the one-time sampling is repeated with that second click.
Sampling: Background Swatch: Choose this third of three buttons to erase only the current background color (by default, white). Use the Color Picker to set a new Background Color, which then becomes the new color to erase.
Limits: Choose Contiguous (the default) from this pop-up menu, and the background eraser deletes colors inside the cursor as long as they are contiguous with the color immediately under the cross. To erase all similarly colored pixels, whether contiguous or not, select Discontiguous. The third option, Find Edges, searches for edges as you brush and emphasizes them. Although interesting, Find Edges has a habit of producing halos and may prove to be less than useful. Feel free to experiment, though — one person's "not really useful" is another person's "Wow, this is great!"
Tolerance: Raise the Tolerance value to erase more colors at a time; lower the value to erase fewer colors. Low Tolerance values are useful for erasing around tight and delicate details, such as hair.
Protect Foreground Color: Select this option to prevent the current foreground color (by default, black) from ever being erased. Of course, you can use the Color Picker to set a new Foreground Color to protect.
Sampling: This pop-up menu determines how the Background Eraser determines what it should and should not erase. The default setting, Continuous, tells the eraser to continuously reappraise which colors should be erased as you drag. If the background is pretty homogenous, you may prefer to use the Once option, which samples the background color when you first click and erases only that color throughout the drag. Select Background Swatch to erase only the current background color (by default, white).
Like the Magic Eraser and Background Eraser, the Extract command aims to separate — extract, if you will — an image element from its surroundings. After you draw a rough highlight around the subject you want to retain, Photoshop analyzes the situation and automatically deletes everything but the subject. Extract is only slightly more powerful than the background eraser and several times more complex. Some images respond very well to the command, others do not. That said, Extract can produce reasonably good results if you get the steps right. So take Extract for a test drive, as follows:
STEPS: Extracting Content from its Surroundings
Choose Filter
Select the Edge Highlighter tool. Most likely, this tool is already active, but if not, press B to select it.
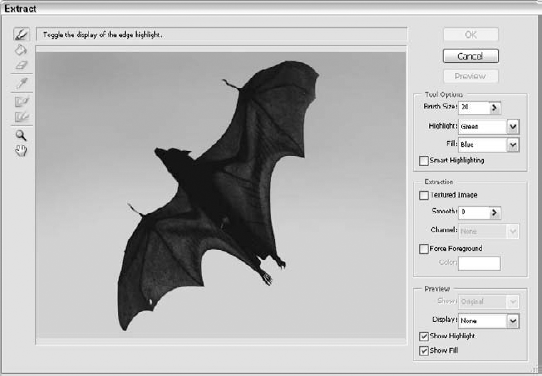
Outline the subject that you want to retain. In this case, it would be the bat, as shown in Figure 9.23. Be sure to either completely encircle the subject or, if the subject is partially cropped, trace all the way up against the outer boundaries of the photograph.
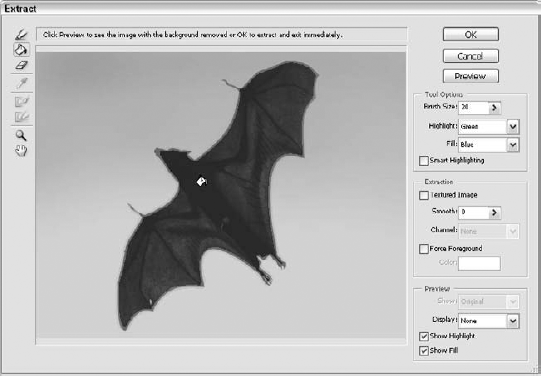
Figure 9.23. After tracing around the portion of the image you want to retain, click inside the outline with the Fill tool.
Tip
Often, Shift-clicking around the perimeter of an image is easier than dragging manually. Shift-clicking creates a straight highlight from one click point to the next. As long as you do a reasonably careful job, the performance of the Extract command won't be impaired.
Tip
Select the Smart Highlighting option in the Tool Options section of the Extract dialog box to get some assistance in drawing your outline. We used it in the example above. You can also just hold down your Ctrl key (
Tip
Ctrl-drag (Win) or
As you trace, use the bracket keys, [ and ], to make the brush larger or smaller. When you work with brushes from 1 to 9 pixels in diameter, each press of [ or ] changes the brush size by 1 pixel. The increment of change gets larger as you increase the brush size.
Tip
Small brush sizes result in sharper edges. Larger brush sizes are better for fragile, intricate detailing, such as hair, foliage, wispy fabric, bits of steel wool, thin pasta — you get the idea.
If you make a mistake, press Ctrl+Z (
If you want to erase more of the highlight, drag over the botched region with the Eraser tool (press E to access it from the keyboard) or press Alt (Option on the Mac) and drag with the Edge Highlighter tool. To delete the entire highlight and start over, press Alt+Backspace (Win) or Option+Delete (Mac).
Navigate as needed. If you can't see all of your image, you can access the Hand tool by pressing the spacebar or clicking the Hand tool icon. You also can zoom by pressing Ctrl+plus or Ctrl+minus (
Select the Fill tool. It's the one that looks like a paint bucket. To select the Fill tool from the keyboard, press G as you do to select the paint bucket in the regular Photoshop Toolbox.
Click inside the subject of the image. The highlighted outline should fill with color. If the fill color spills outside the outline, your outline probably has a break. Press Ctrl+Z (
Tip
You also can click inside a filled area with the Fill tool or Eraser to remove the fill.
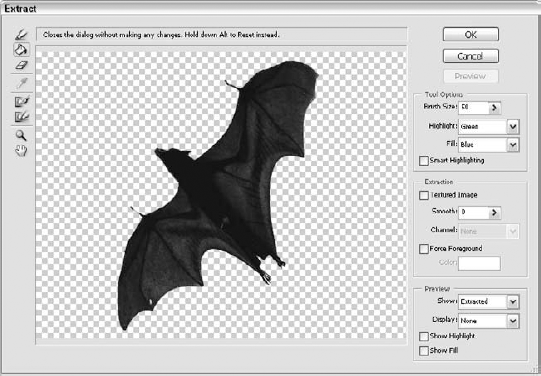
Click Preview. Before you can apply your prospective mask, you need to preview it so you can gauge the finished effect, as in Figure 9.24.
Tip
If you Shift-click with the Fill tool in Step 8, Photoshop fills the outline and processes the preview automatically, saving you the trouble of clicking Preview.
Edit the mask as needed. You have several tools at your disposal. These tools are labeled in Figure 9.24, and you can read about them in the list following these steps.
Click OK to delete the masked portion of the image. If the image consisted of only a background, Photoshop converts it into a separate layer. You then can use the Move tool to drag the layer against a different background. In Figure 9.25, the bat has been set against a New Zealand sky. The composite isn't perfect, but it's not half bad for 5 to 10 minutes of work.
After you exit the Extract window, fix any problems using the Background Eraser and History Brush. Use the Background Eraser to erase stray pixels that you wish the Extract command had deleted. Use the History Brush to restore details that you wish the Extract command hadn't deleted.
Back in Step 10, it was stated that you can refine the mask in the Extract dialog box. You can use the following techniques to touch up the mask before clicking OK to create it:
Drag with the cleanup tool (C) to change the opacity of the mask. Press the number keys to adjust the pressure of the tool and thus alter the amount of opacity that the tool subtracts. To erase to full transparency, press 0, as you do when working with the Eraser on a layer. Press 9 for 90 percent transparency, 8 for 80 percent, and so on. Alt-drag (Option-drag on the Mac) to add opacity.
Drag along the boundaries of the mask with the Edge Touchup tool (T) to sharpen the mask edges. If the boundary between mask and subject isn't well defined, dragging with this tool adds opacity to the subject and removes it from the mask. In other words, it turns soft, feathery edges into crisp, clearly defined edges. Again, you can press the number keys to adjust the impact of the tool.
Raise the Smooth value to remove stray pixels from the mask. A high value smoothes out the edges around the image and fills in holes. Basically, if your edges are a big mess, give this option a try.
Drag with the Edge Highlighter or Eraser Tool to edit the mask boundary. When you select either tool, the original mask highlight reappears, and the tools work as they do when you initially draw the highlight. After you adjust the highlight, Shift-click inside it to redraw and preview the adjusted mask.
Choose an option from the Show pop-up menu to toggle between the original highlight and the extracted image preview. You can press X to toggle between the two views without bothering with the pop-up menu.
That's 99 percent of what you need to know about the Extract command. For those of you who care to learn the other 1 percent, here's a quick rundown of the remaining options that appear along the right side of the Extract dialog box:
Highlight, Fill: Use these pop-up menus to change the highlighter and fill colors. It doesn't matter what colors you use, as long as they show up well against the image.
Textured Image: If your image is highly textured, try selecting this option. Much like the Smooth option, it helps smooth out jagged edges around the image.
Channel: Advanced users may prefer to prepare the highlighter work by tracing around the image inside an independent mask channel, which you can create in the Channels palette before choosing the Extract command. Then load the mask by selecting it from the Channel pop-up menu. You can further modify the highlight using the Edge Highlighter and Eraser tools. One weirdness: When loading a mask, black in the mask channel represents the highlighted area and white represents the non-highlighted area. Strikes me as upside-down, but that's how it goes.
Force Foreground: If the subject of your image is predominantly a single color, select Force Foreground and use the Eyedropper to sample the color in the image that you want to preserve. (Alternatively, you can define the color using the Color swatch, but it's much more work.) Then use the Edge Highlighter tool to paint over all occurrences of the foreground color. (Note that this option is an alternative to the Fill tool. When Force Foreground is selected, the Fill tool is dimmed.)
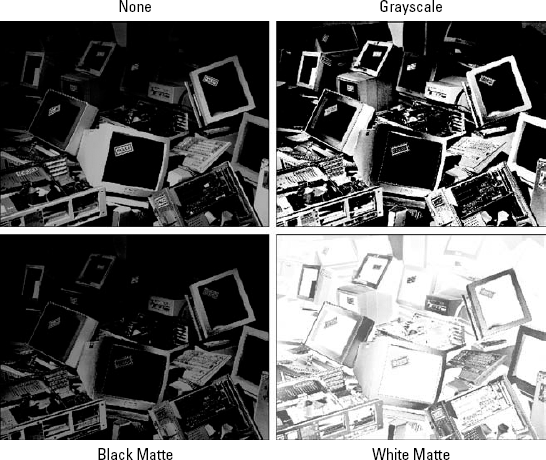
Display: You don't have to preview the image against the transparent checkerboard background. You also can view it against white (White Matte) or some other color. Or you can view it as a mask, where white represents the opaque area and black the transparent area. (Ironically, you can't export the extraction as a mask — go figure.)
Tip
Press F to select the next display mode in the menu; press Shift+F to switch to the previous mode in the menu.
Show Highlight, Show Fill: Use these options to hide and show the highlight and fill colors.
Tip
Before using the Extract command — or the Magic Eraser or Background eraser, for that matter — you may want to copy the image to a separate layer or take a snapshot of the image in the History palette. Either way, you have a backup in case things don't go exactly according to plan.
Another convenient method for creating a mask is the Color Range command in the Select menu. This command enables you to generate selections based on color ranges. Use the familiar eyedropper cursor (it becomes your mouse/pen pointer the minute you open the dialog box) to specify colors that should be considered for selection and colors that you want to rule out. The Color Range command is much like the Magic Wand tool, except it enables you to select colors with more precision and to change the tolerance of the selection on the fly.
When you choose Select
Note
So why didn't the people at Adobe merely enhance the functionality of the Magic Wand instead of adding this strange command? The Color Range dialog box offers a preview of the mask — something a selection tool can't really do within the limits of the interface — which is pretty essential for gauging the accuracy of your selection. And the Magic Wand is convenient, if nothing else. If Adobe were to combine the two functions, you would lose functionality and flexibility. And who'd want that?
When you move your cursor outside the Color Range dialog box, it changes to an eyedropper. Use it to click anywhere within your image to specify the color on which you want to base the selection, or click inside the preview, labeled in Figure 9.26. In either case, the preview updates to show the resulting mask.
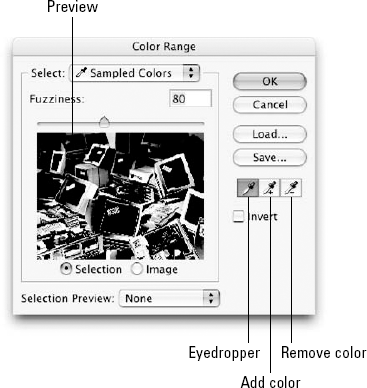
Figure 9.26. The Color Range dialog box enables you to generate a mask by clicking and dragging with the Eyedropper tool and adjusting the Fuzziness value.
You also can do the following:
Add colors to the selection. To add base colors to the selection, select the Add Color tool in the Color Range dialog box (in Figure 9.26, it's the little eyedropper with a plus sign next to it) and click inside the image window or preview. You also can access the tool while the standard Eyedropper is selected by Shift-clicking (just as you Shift-click with the Magic Wand to add colors to a selection). You can even Shift-drag with the Eyedropper to add multiple colors in a single pass, something you can't do with the Magic Wand.
Remove colors from the selection. To remove base colors from the selection, click with the Remove Color tool (the little eyedropper with a minus sign as shown in Figure 9.26) or Alt-click (Option-click on the Mac) with the Eyedropper. You also can drag or Alt-drag (Option-drag on the Mac) to remove many colors at a time.
Tip
The Undo command works in the Color Range dialog box as well as out of it. If adding or removing a color sends your selection careening in the wrong direction, press Ctrl+Z (
Adjust the Fuzziness value. While this option appears sooner in the dialog box than the Add and Remove colors eyedroppers, I mention after them here because you can use the slider to tweak the results of using those tools. The Fuzziness option resembles the Magic Wand's Tolerance value because it determines the range of colors to be selected beyond the ones you click. Increase the Fuzziness value to expand the selected area; decrease the value to contract the selection. A value of 0 selects only the clicked color. Unlike changes to Tolerance, however, changing the Fuzziness value adjusts the selection on the fly; no repeat clicking is required, as it is with the Wand tool.
Fuzziness and Tolerance also differ in the kind of selection outlines they generate. Tolerance entirely selects all colors within the specified range and adds anti-aliased edges. If the selection were a mask, most of it would be white with a few gray pixels around the perimeter. By contrast, Fuzziness entirely selects only the colors you click and Shift-click, and it partially selects the other colors in the range. That's why most of the mask is expressed in shades of gray. The light grays in the mask represent the most similar colors; the dark grays represent the least similar pixels that still fall within the Fuzziness range. The result is a tapering, gradual selection, much more likely to produce natural results.
Invert the selection. Sometimes isolating the area you don't want to select is easier than isolating the area you do want to select. In that case, just select the Invert option to reverse the selection, changing black to white and white to black.
Toggle the preview area. Use the two radio buttons below the preview area to control the preview's contents. If you select the first option, Selection, you see the mask that will be generated when you press Enter (Win) or Return (Mac). If you select Image, the preview shows the image. The latter option is a little less telling in terms of what you can expect to be extracted when you click OK — so Selection is really the more effective option here.
Tip
Press and hold Ctrl (Win) or
Control the contents of the image window. The Selection Preview pop-up menu at the bottom of the dialog box enables you to change what you see in the image window. Leave the option set to None — the default setting — to view the image normally in the image window. Select Grayscale to see the mask on its own. Select Quick Mask to see the mask and image together. Select Black Matte or White Matte to see what the selection would look like against a black or white background.
Although they may sound weird, the Matte options enable you to get an accurate picture of how the selected image will mesh with a different background. Figure 9.27 includes two Matte views to help you see how this particular selection looks against two backgrounds as different as night and day. Use the Fuzziness value in combination with Black Matte or White Matte to come up with a softness setting that will ensure a smooth transition.
Select by predefined colors. Choose an option from the Select pop-up menu at the top of the dialog box to specify the means of selecting a base color. If you choose any option besides Sampled Colors, the Fuzziness value and Eyedropper tools become dimmed to show that they are no longer operable. Instead, Photoshop selects colors based on their relationship to a predefined color. For example, if you select Red, the program entirely selects red and partially selects other colors based on the amount of red they contain. Colors composed exclusively of blue and green are not selected.
The most useful option in this pop-up menu is Out of Gamut, which selects all the colors in an RGB or Lab image that fall outside the CMYK color space. You can use this option to select and modify the out-of-gamut colors before converting an image to CMYK.
Load and save settings. Click Save to save the current settings to disk. Click Load to open a saved settings file. To use a settings file on a PC, it must end in the .axt extension.
After you define the mask to your satisfaction, click OK or press Enter or Return to generate the selection outline. Although the Color Range command is more flexible than the Magic Wand, you can no more expect it to generate perfect selections than any other automated tool. After Photoshop draws the selection outline, therefore, you'll probably want to switch to the Quick Mask mode and paint and edit the mask to taste.
Even if you don't master every component of the Color Range dialog box right now (or ever), you'll do well to learn to use the Fuzziness value and the Eyedropper tools. Basically, you can approach these options in two ways. If you want to create a diffused selection with gradual edges, set a Fuzziness value — 60 or more — and click and Shift-click two or three times with the Eyedropper. To create a more precise selection, type a Fuzziness value of 40 or lower and Shift-drag and Alt-drag (Option-drag on the Mac) with the Eyedropper until you get the exact colors you want.
You can add to or subtract from an existing selection using the Color Range command. Press Shift when choosing Select
Tip
You can limit the portion of an image that Select
If you get hopelessly lost when creating your selection and you can't figure out what to select and what to deselect, click with the Eyedropper tool to start over. This clears all the colors from the selection except the one you click. Or you can press Alt (Option on the Mac) to change the Cancel button to Reset, which returns the settings in the dialog box to those in force when you first chose Select
Masks generated through the Quick Mask mode and Color Range command are temporary. Once you let go of the selection, they're gone. Sometimes, this isn't a problem — you're only using the selection once, so what do you care? Other times, however, a selection is as much a work of art as the image you create with it is. You may need to work on it in stages; take a break, and come back to it when your brain isn't fried.
The simplest solution is to back up your selection, save your file, and then continue to work. In fact, anytime you spend 15 minutes or more on a selection, you should save it.
The following steps describe how to back up a selection to an independent mask channel, which is any channel above and beyond those required to represent a grayscale or color image. Mask channels are saved along with the image itself, making them a safe and sturdy solution.
First, you'll have to convert the selection to a mask channel. One way to do this is to choose Select
If you have an old channel that you want to replace, select the channel's name from the Channel pop-up menu, shown in Figure 9.28. The radio buttons at the bottom of the dialog box become available, permitting you to add the mask to the channel, subtract it, or intersect it. These radio buttons work like the equivalent options that appear when you make a path into a selection outline (as discussed in Chapter 8), but they blend the masks together instead. The result is the same as if you were adding, subtracting, or intersecting selection outlines, except it's expressed as a mask.
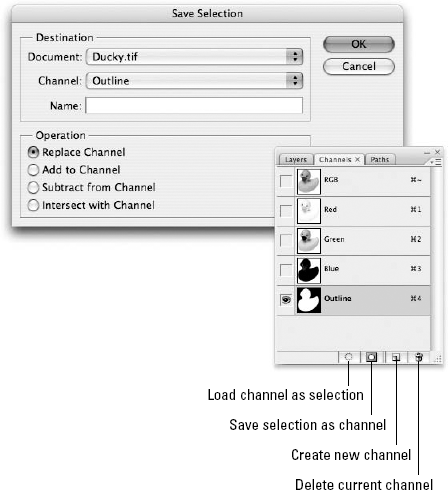
Figure 9.28. The Save Selection dialog box enables you to convert your selection outline to a mask and save it to a new or existing channel.
Alternatively, you can save the mask to a new multichannel document all its own. To do this, choose New from the Document pop-up menu and press Enter or Return.
Tip
If you want to simply save the selection to a new channel and be done with it, just click the make channel icon at the bottom of the Channels palette (labeled in Figure 9.28). Photoshop automatically creates a new channel, converts the selection to a mask, and places the mask in the channel.
Regardless of which of these many methods you choose, your selection outline remains intact.
Next, view the mask in the Channels palette. To do so, click the appropriate channel name in the Channels palette — automatically named Alpha 1 unless you assigned a name of your own. In Figure 9.28, the contents of a channel called Existing Selection have been replaced, so this is where the mask now resides. Of course, this step isn't the least bit mandatory. It just lets you see your mask and generally familiarize yourself with how masks look. Remember, white represents selection, black is the deselected area, and gray is a partial selection.
Tip
If you didn't name your mask in Step 1 and want to name it now, double-click the Alpha 1 name in the Channels palette and type a new name.
At this point, you'll return to the standard image-editing mode by clicking the first channel name in the Channels palette. Better yet, press Ctrl+1 (
Both the native Photoshop format and TIFF can compress masks so that they take up substantially less room on disk. The Photoshop format does this automatically. When saving a TIFF image, be sure to select the LZW Compression option. In both cases, this run-line compression is entirely safe. It does not change a single pixel in the image; it merely writes the code in a more efficient manner.
Tip
You also can save a quick mask to its own channel for later use. Here's how it works. When you enter the Quick Mask mode, the Channels palette displays an item called Quick Mask. The italic letters show that the channel is temporary and will not be saved with the image. (To clone it to a permanent channel, click and drag the Quick Mask item onto the page icon at the bottom of the Channels palette.) Now save the image to the TIFF or Photoshop format, and you're backed up.
To retrieve your selection later, choose Select
Want to avoid the Load Selection command? Ctrl-click (Win) or
But wait, there's more:
You can press Ctrl+Alt (
You also can select the channel and click the far-left mask selection icon at the bottom of the Channels palette. But you may find that's just too much effort.
To add a mask to the current selection outline, Ctrl+Shift-click (
Ctrl+Alt-click (
Ctrl+Shift+Alt-click (
You can convert color channels to selections, too. For example, if you want to select the black pixels in a piece of scanned line art in grayscale mode, Ctrl-click (Win) or
Photoshop lets you view any mask channel along with an image, just as you can view the mask and image together in the Quick Mask mode. To do this, click in the first column of the Channels palette to toggle the display of the eyeball icon. An eyeball in front of a channel name indicates that you can see that channel. If you are currently viewing the full-color image, for example, click in front of the mask channel name to view the mask as a translucent color coating, again as in the Quick Mask mode. Or if the contents of the mask channel appear by themselves onscreen, click in front of the composite name (RGB, CMYK, or LAB) to display the image as well.
Tip
When the mask is active, you can likewise toggle the display of the image by pressing tilde (~). Few people know about this shortcut, but it's a good one to assign to memory. It works whether the Channels palette is open or not, and it permits you to focus on the mask without moving your mouse all over the screen.
Using a mask channel is different than using the Quick Mask mode in that you can edit either the image or the mask channel when viewing the two together. You can even edit two or more masks at once. To specify which channel you want to edit, click the channel name in the palette. To edit two channels at once, click one and Shift-click another. All active channel names appear highlighted.
You can change the color and opacity of each mask independently of other mask channels and the Quick Mask mode. Double-click the mask channel thumbnail, or choose the Channel Options command from the Channels palette menu. (This command is dimmed when editing a standard color channel, such as Red, Green, Blue, Cyan, Magenta, Yellow, or Black.) A dialog box appears, containing a Name option box so you can change the name of the mask channel. You can then edit the color overlay as described in the section "Changing the red coating" earlier in this chapter.
Tip
If you ever need to edit a selection outline inside the mask channel using the paint and edit tools, click the Quick Mask mode icon in the Toolbox. It may sound a little like a play within a play, but you can access the Quick Mask mode even when working in a mask channel. Make sure that the mask channel color is different from the quick mask color so you can tell what's happening.
Note
If all this talk of channels is confusing you, you can go back and review coverage of the topic in Chapter 4.
In this chapter, you learned about creating and using masks to control which parts of the image can be edited, how to separate content from its surroundings, and how to use Quick Mask mode to mask content and create standard selections using tools other than the standard selection tools. These new skills will help you make more effective use of Photoshop's painting, fill, and retouching tools.