One of the Tinker Board’s most enticing features is its ability to play back 4K video. That combined with its SoC specs makes it a great candidate to act as a media player. Much as in our last project, where we set up the Tinker Board to be a dedicated game emulation system, we’re now going to try setting it up with Kodi, a popular open source media center application.
LibreELEC
We’re going to set up Kodi by using LibreELEC as the OS. LibreELEC is a lightweight Linux distribution that has the motto “just enough OS,” which is often shorthanded to JeOS. It’s open source, and it’s encouraged for the community to develop their own builds for niche or newer hardware that becomes available. LibreELEC also does extensive testing for its official releases and strives to keep everything bug-free.
Upon booting, LibreELEC boots directly to Kodi just like the way Lakka boots directly into RetroArch. Coincidentally, as mentioned briefly in the last chapter, Lakka is a fork of LibreELEC and as a result they both share a lot of the same architecture.
What Is Kodi?
The main star of the show is Kodi, with LibreELEC basically acting as a way to get Kodi to launch. As previously mentioned, Kodi is also open source and is media center software with a lot of options and customizability. Its focus is video and audio playback from files that are stored locally, either on the main OS disk or attached storage, or files that are available via a shared network drive. Kodi can access these network drives, whether they are independent NAS setups or a shared portion of a computer’s hard drive, to stream for playback.
This chapter isn’t going to be a walkthrough for using Kodi per se, since it has so many features available. This chapter is more to show you how to set up Kodi on the Tinker Board so that you can then use those tools to customize your installation of Kodi with LibreELEC to fit your preferences and needs. Just as with RetroArch, the use of many of Kodi’s features depends on user preference and use case scenario.
Legal Considerations for Kodi
Just as we’ve had to address legal concerns surrounding copyright with previous entries in this book, there are some things to touch on with Kodi. In the form that is built and distributed by the development team, Team Kodi, and the XMBC Foundation, Kodi is completely legal and free from piracy. This is the same version that is distributed in LibreELEC.
Third-party independent developers will sometimes create add-ons for Kodi that enable piracy or illegal torrenting, similar to issues with Android APKs online. This doesn’t mean that Kodi is bad, since it is not a problem unique to Kodi. The same types of software are constantly being built for basically every piece of software and operating system that allows an Internet connection. Team Kodi and the XMBC Foundation both denounce these illicit add-ons.
Basically, if you stick to accessing your own personal media library that you’ve obtained legally, then you are using Kodi for its intended purpose: to make personal media consumption and library organization hassle-free and convenient. With this public service announcement out of the way, let’s jump into some more background on LibreELEC for the Tinker Board and begin the setup process.
LibreELEC for the Tinker Board
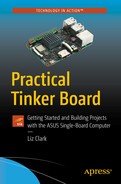
As we discussed previously when introducing LibreELEC, its developers encourage community builds for different pieces of hardware that may not be initially supported in the official build. As of writing this book, the Tinker Board is one of those boards that benefited from a community build and is now seeing an official build in development. You can check the progress of the build and file bugs and pull requests via the project page that is a branch of the full LibreELEC build on GitHub.1
The project features checklist on GitHub for the Tinker Board
CEC
One notable item not in the checklist is CEC (consumer electronics control) . This feature, in the form of a serial bus, along with HDMI allows you to control multiple devices with the same remote control. If you’ve ever had a remote for your television that can also control functions with a DVD player or cable box that was connected via HDMI, then you were using CEC.
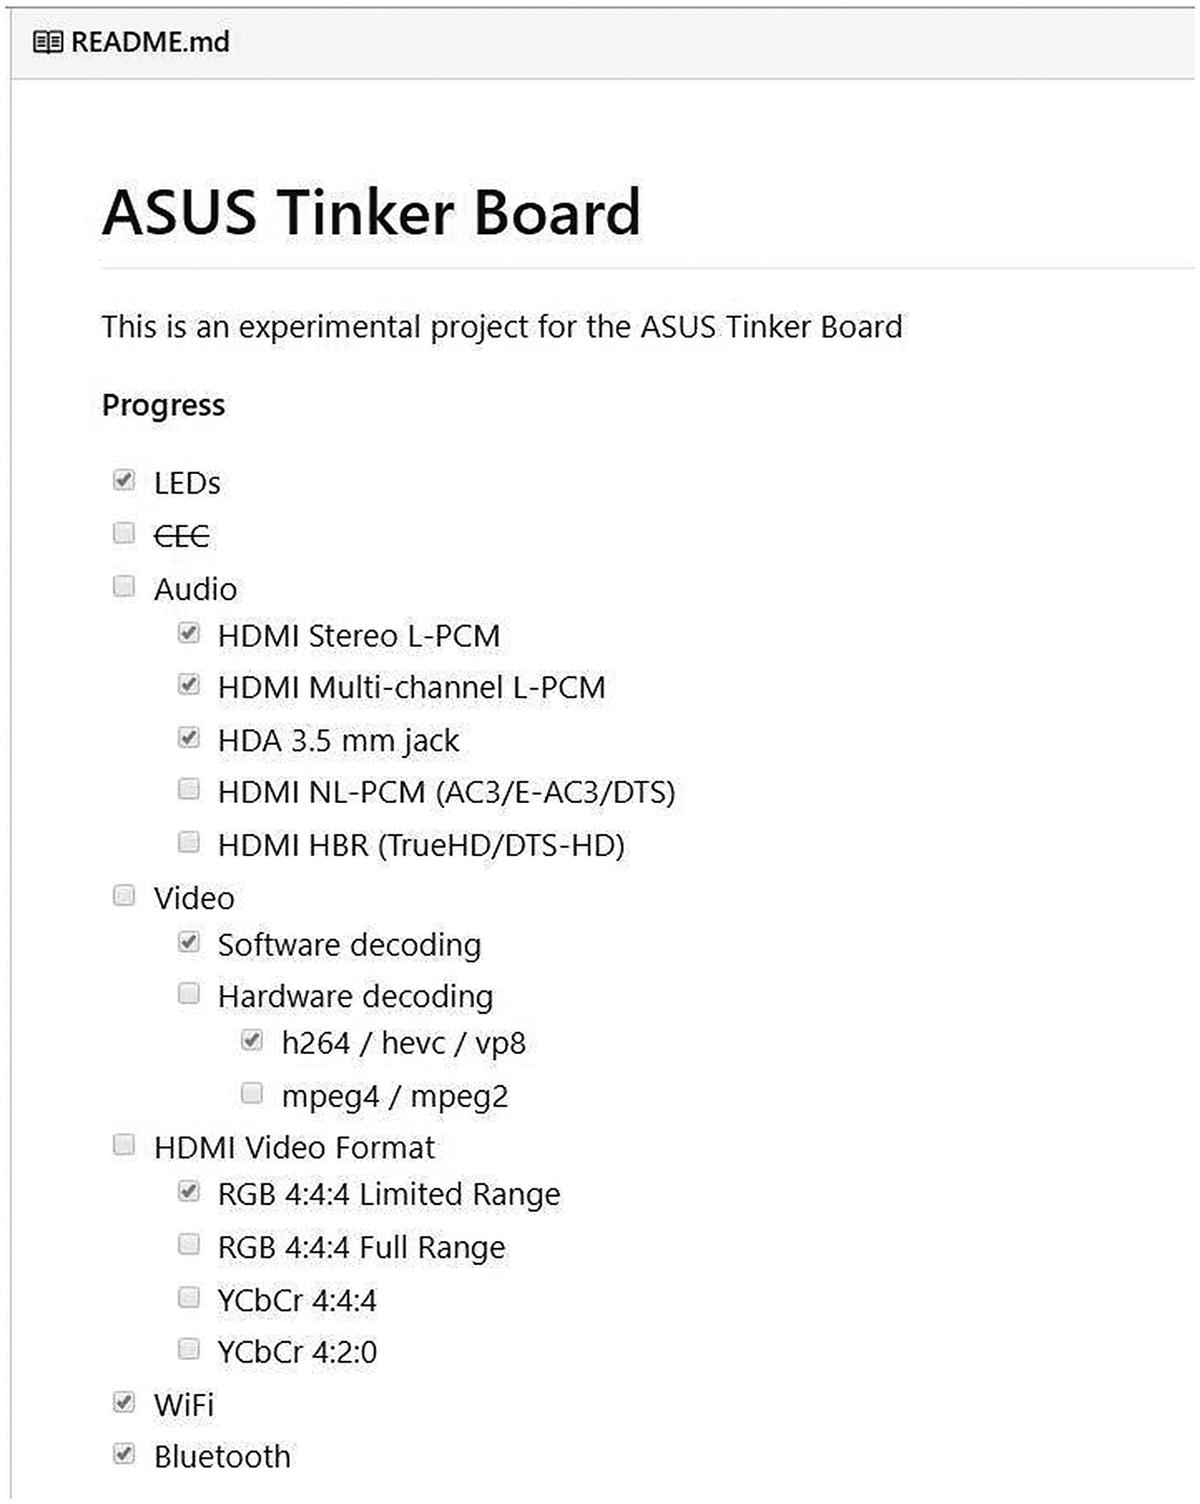
The Known Issues/Limitations in the project features checklist on GitHub for the Tinker Board. Notice specifically the note on CEC not being connected to the SoC.
This is true for the original Tinker Board. In fact, there was a post on the Tinker Board forum by a user who investigated whether CEC would be functional and discovered that it was not hooked up by tracing the signal on the board.2 For the Tinker Board S, however, CEC is connected and ready to use. If this feature is of interest to you, especially for something like Kodi, then the Tinker Board S is a better option than the original Tinker Board in this scenario.
LibreELEC ISO for the Tinker Board
You may have noticed in perusing the repo that there isn’t an ISO available for download; it’s all source files. This is on purpose. Since the community builds are not official releases from LibreELEC, often the developers working on side builds are posting their work as a proof of concept or for other developers to view and contribute with the intention that anyone interested at that time would compile their own build, or ISO, to test on the hardware. So how are we going to use LibreELEC?
So far in this book we’ve downloaded precompiled disk images to burn onto our preferred boot media for the Tinker Board. Before we downloaded those images, someone had to compile them or build from source code. For this LibreELEC build, you’re going to be that person. If you’ve never done this before, it may seem intimidating. But after everything we’ve done in this book so far with the terminal and Linux, you should be just fine running your own cross-compilation.
Note
If you are truly uncomfortable following the cross-compilation steps, you can find a hosted ISO for the LibreELEC build for the Tinker Board on a LibreELEC test image site, similar to the web site we used for Lakka.3 There will also be a link to an ISO on the GitHub repo associated with this book that was compiled following these instructions, but for best results, and a guarantee of being up to date, it’s recommended to perform an independent cross-compile. It will also be beneficial for your continuing Linux education and future Tinker Board projects. Eventually, as development continues, an official LibreELEC release image may become available for the Tinker Board.
What Is Cross-compiling?
Before we hop on a terminal we need to go over some basics. Cross-compilation is the process of compiling code for one platform on a different platform. For example, if you compiled an Android ISO on a PC running Windows 10, that would be considered a cross-compilation. This is quite common for developers to do since it’s convenient to compile where you do all your work, and a developer’s workstation probably has more power than the platform they’re developing for.
That is one consideration for compilation in general: it can be a slow process, especially for operating system ISOs. With a modern hardware setup, assuming a multi-core CPU, a minimum 8GB of RAM, and of course a solid-state hard drive, you can expect it to take at least two to three hours for this version of LibreELEC. Extreme cases can take more than eight hours. So do not expect to be launching Etcher with your newly compiled ISO immediately after launching the process from the terminal. That shouldn’t dissuade you from doing this, though; it’s just the nature of the process.
Ubuntu
Since this process for LibreELEC takes place in Linux, we’re going to need access to a Linux operating system to cross-compile. There are a few options for this, but for this tutorial, we’re going to use Ubuntu, a very popular desktop Linux distribution that many people use as their daily operating system. After using TinkerOS you’re guaranteed to be able to navigate Ubuntu comfortably.
There are a few options for how to run Ubuntu. You can run it from a bootable USB drive on your main computer. This is a very popular option for people who have only one computer and do not want to commit to using Ubuntu full time. The installation process allows Ubuntu to be run live from the USB without affecting your main system. Normally, it doesn’t matter too much what size USB drive you use for a live Ubuntu installation, but for cross-compiling you will want to use one that is at least 64GB in size.
You can also set up a virtual machine (VM) for those who utilize virtualization. Much as with the USB size consideration, you will want to make sure that you allocate enough processes for it. You can also, of course, run a full install of Ubuntu on a computer to have a dedicated Linux system. You can do this by buying or building a computer from scratch for this purpose or by installing Ubuntu onto an internal hard drive and then attaching it to your computer’s motherboard. It is recommended to detach your main system’s hard drives while utilizing this approach to avoid any storage issues. This is also only suggested for people who have experience with desktop computer hardware.
Finally, you could also run Ubuntu on a single-board computer. There are many builds available for different platforms. This avoids touching or affecting your main computer in any way; however, the cross compilation process will definitely be slower than the other options, and storage space could also be a concern in this configuration. There is also a chance that the SoC’s architecture could cause unexpected incompatibilities at points during the compilation and cause a failure.
Bootable USB for Ubuntu
For the purposes of this chapter, we’re going to use the bootable USB option for Ubuntu since it offers minimum risk to your hardware while also having a high chance of a successful compilation. We will go over the basics of creating a bootable USB for Ubuntu, but it is recommended to follow along directly with the resources provided by Canonical, the maintainers of Ubuntu, on the official Ubuntu web site ( https://www.ubuntu.com ) in case there are any changes.
The first step, no matter which operating system you’re working on, is to format your USB drive. You’ll want to format the drive as FAT or FAT32. After that, you’ll download the Ubuntu ISO from Ubuntu and using a disk imaging tool, either Etcher, Rufus, or a built-in program, you’ll write the ISO to your USB drive, the same way we’ve imaged all the operating systems so far for the Tinker Board.
After the USB is all set, you’ll reboot your computer and navigate to either the BIOS, for Windows and Linux, or the bootpicker, for macOS, to choose to boot into Ubuntu on the USB drive. Traditionally in Windows and Linux you’ll hold down F12 to access this. For macOS, hold down ALT to access the bootpicker.
Run the Cross-Compilation
After you finish setting up Ubuntu and feel comfortable with the GUI, we can get started with the cross-compilation process. We’ll be following the cross-compile instructions from LibreELEC.4 Check to make sure you have an Internet connection and then navigate to the terminal in Ubuntu. If you haven’t already, run sudo apt-get update followed by sudo apt-get upgrade. Then, to be on the safe side, reboot Ubuntu using sudo reboot.
After that, install the dependencies for the cross-compile by running sudo apt install gcc make git unzip wget xz-utils. Many of these come preconfigured on Ubuntu, but it’s always good to double-check. Next, we’re going to clone the GitHub repository for LibeELEC, just as we cloned the C and Python GPIO libraries in TinkerOS for the GPIO chapter. To do this, we’re going to run git clone https://github.com/LibreELEC/LibreELEC.tv.git .
Next, we’re going to move into the LibreELEC.tv folder by running cd ~/LibreELEC.tv. If you cloned the repo into a different folder than the Home folder, then you’ll of course have to change into that directory.

The build syntax specifications for the Tinker Board as listed on GitHub
into the terminal, and the process will begin. The terminal will have text scrolling by extremely fast and will also seem to suddenly pause and start-up again. This is all normal while all the scripts in the make file run. Do not exit the terminal window, and to be on the safe side don’t try to run any other tasks while the cross-compile is running. It’s best to let all the computer’s resources be dedicated to the build.
Note
If you want to know more about LibreELEC’s compilation process, see their wiki entry on the topic here: https://wiki.libreelec.tv/compile .
Burn the ISO
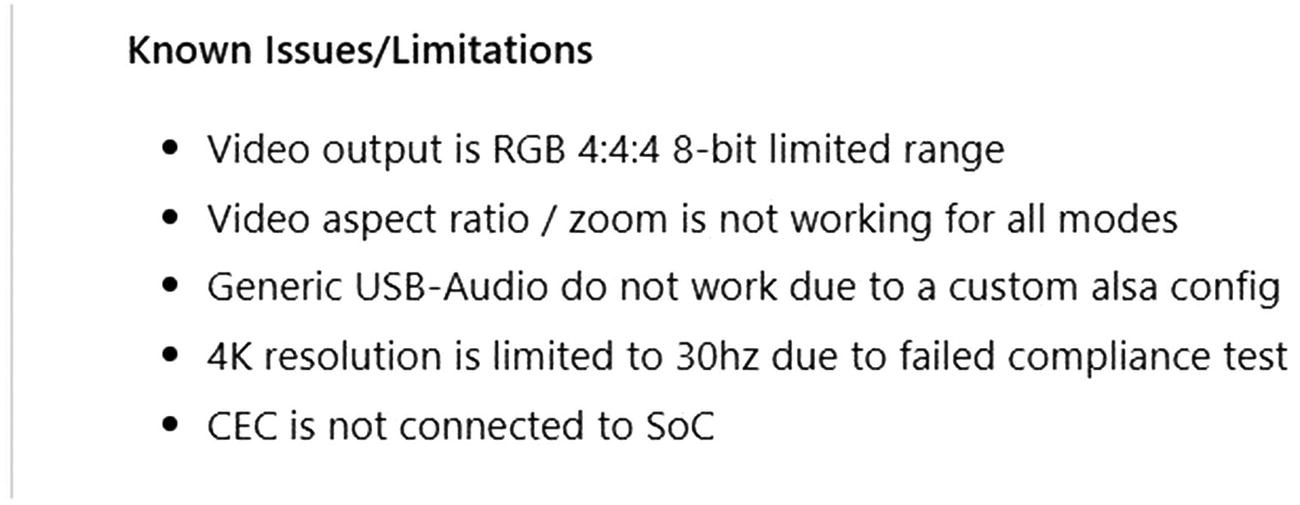
The compiled files for LibreELEC for the Tinker Board
If you remember the downloads available for Lakka (Figure 7-2 in Chapter 7) for the Tinker Board, you’ll notice that your freshly compiled LibreELEC files are identical file types. This is again related to the fact that Lakka is a fork of LibreELEC.
To make things simple, you can burn the ISO directly in Ubuntu to either an SD card or the eMMC on the Tinker Board S. Download Etcher from etcher.io and then launch the program. As discussed in Chapter 3, the GUI is identical in Etcher across platforms. Then, load the img.gz file, select your media, and then burn the ISO. After Etcher finishes, you’re ready to boot into LibreELEC on the Tinker Board.
First Boot
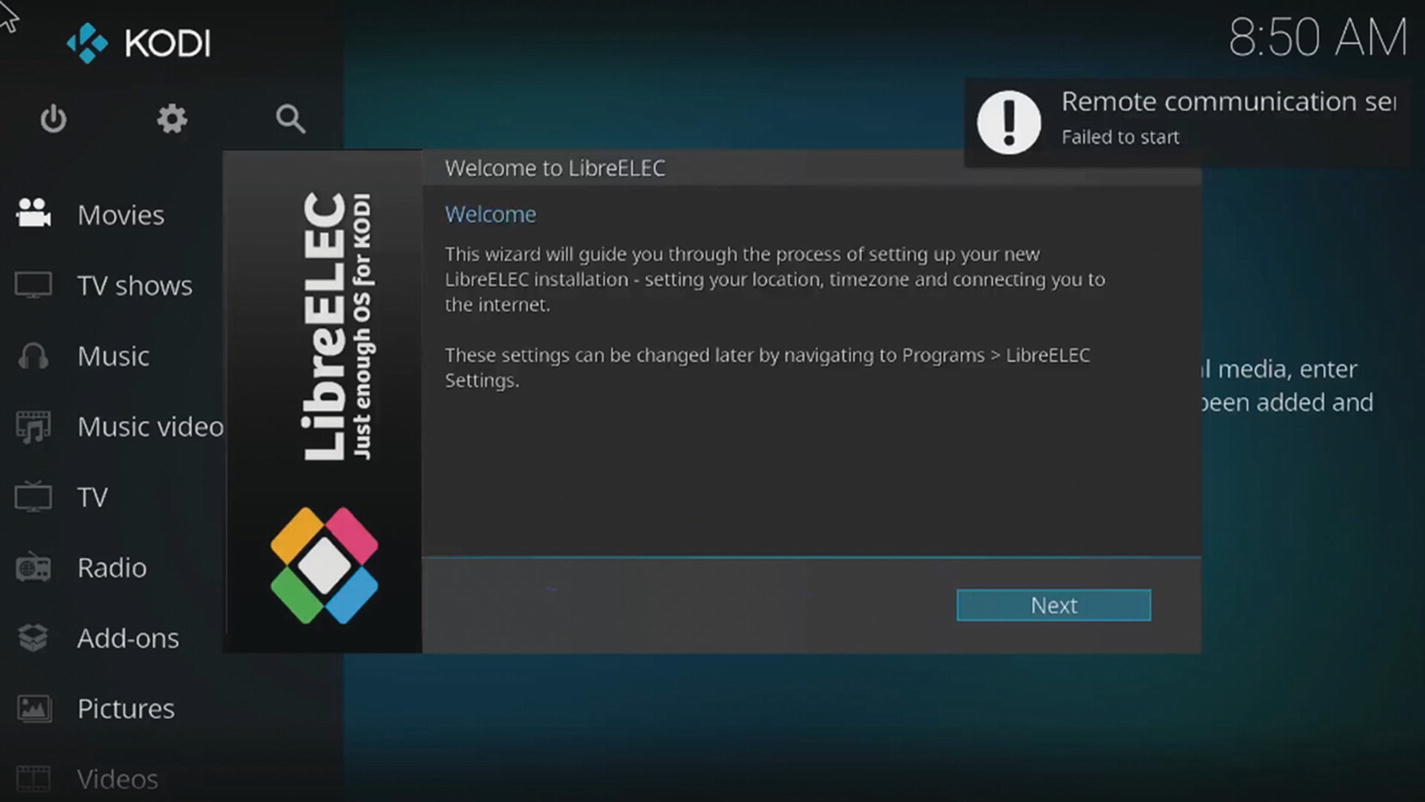
The LibreELEC setup wizard
In the first step, you’ll be asked if you want to change the hostname to reflect where the device is located. This is helpful if you have multiple devices running LibreELEC, since the default hostname is simply “LibreELEC.” For this chapter, we’re going to leave the default hostname.
Next, you’ll be prompted to connect to a Wi-Fi network. A list of available networks will appear at the bottom of the window. Select your network and enter your password to connect. After that, you’ll have the opportunity to turn SSH and Samba services on. If you don’t turn them on now, don’t worry—we’ll be going over all these important settings shortly; including SSH and Samba.
Finally, to close out the wizard, the final window acts as a thank you from LibreELEC for choosing to run LibreELEC. It also lists some information on the LibreELEC project that we also discussed at the beginning of this chapter.
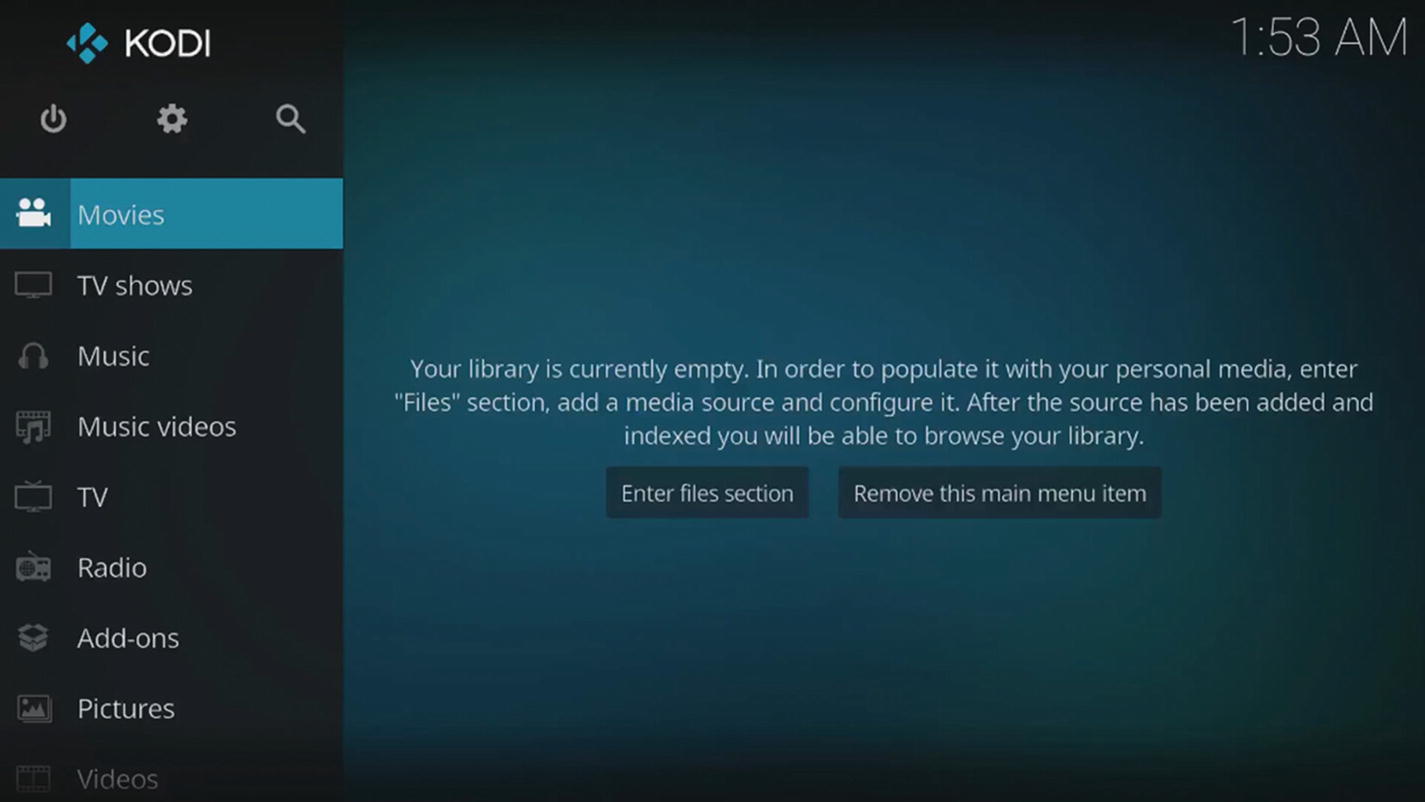
The Kodi landing page GUI. Notice the different media types on the left.
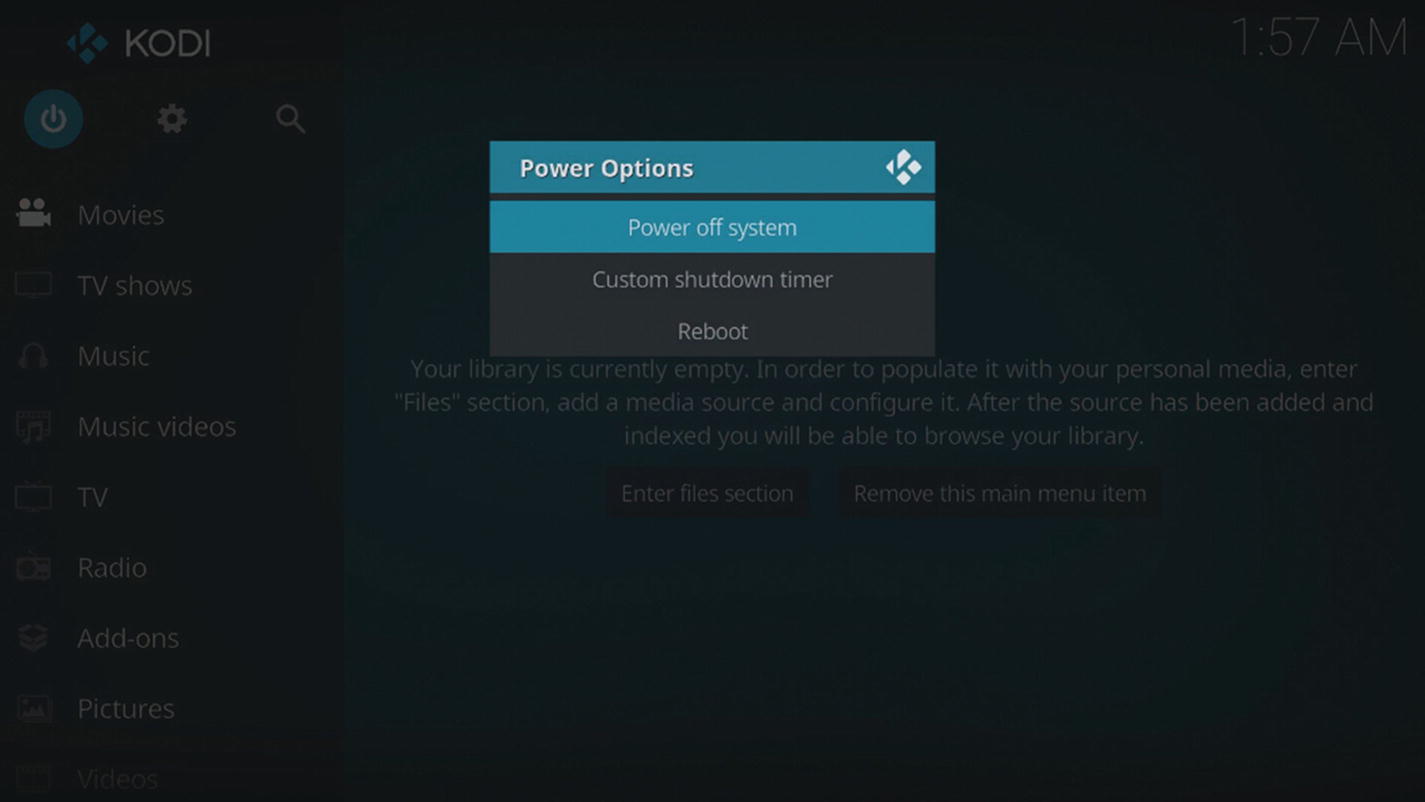
Kodi’s power options
System Settings
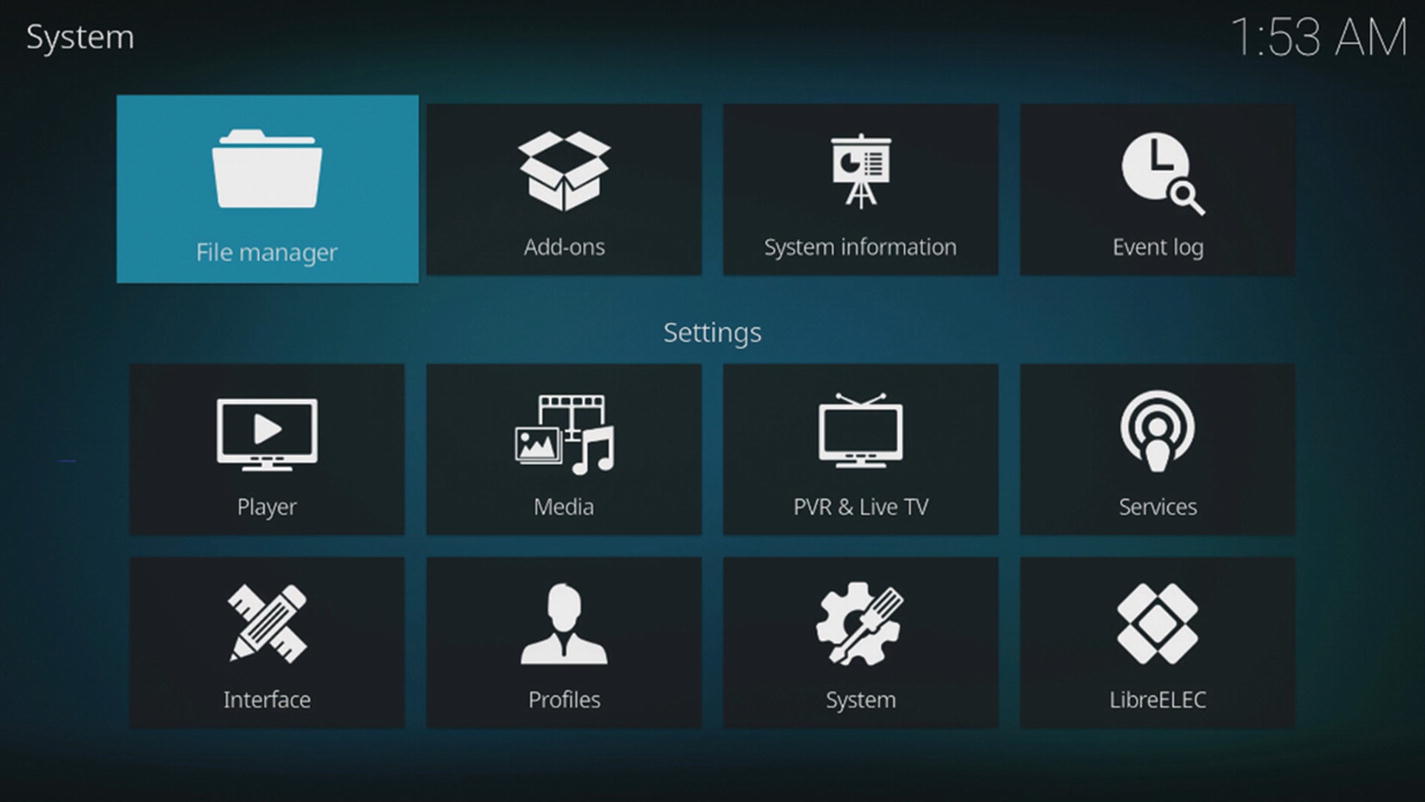
The System settings. Notice the different categories.
System Info

The live status bar in System Info for CPU and memory usage
Storage shows you the storage devices currently connected to the Tinker Board and their index address. Network shows you more detailed network information, including the MAC address. Video shows information on the GPU and OpenGL version. Finally, Hardware shows information on the CPU along with the current temperature of the CPU.
One important note about LibreELEC currently for the Tinker Board is that it causes the Tinker Board to run a bit hot, with an average temperature of 150° to 160°F or 65° to 71°C with the stock heatsink installed. If you’re planning to run this long-term, especially in an enclosed area, you may want to consider adding a fan or larger heat sink to the Tinker Board’s cooling solution.
System

The video resolution settings
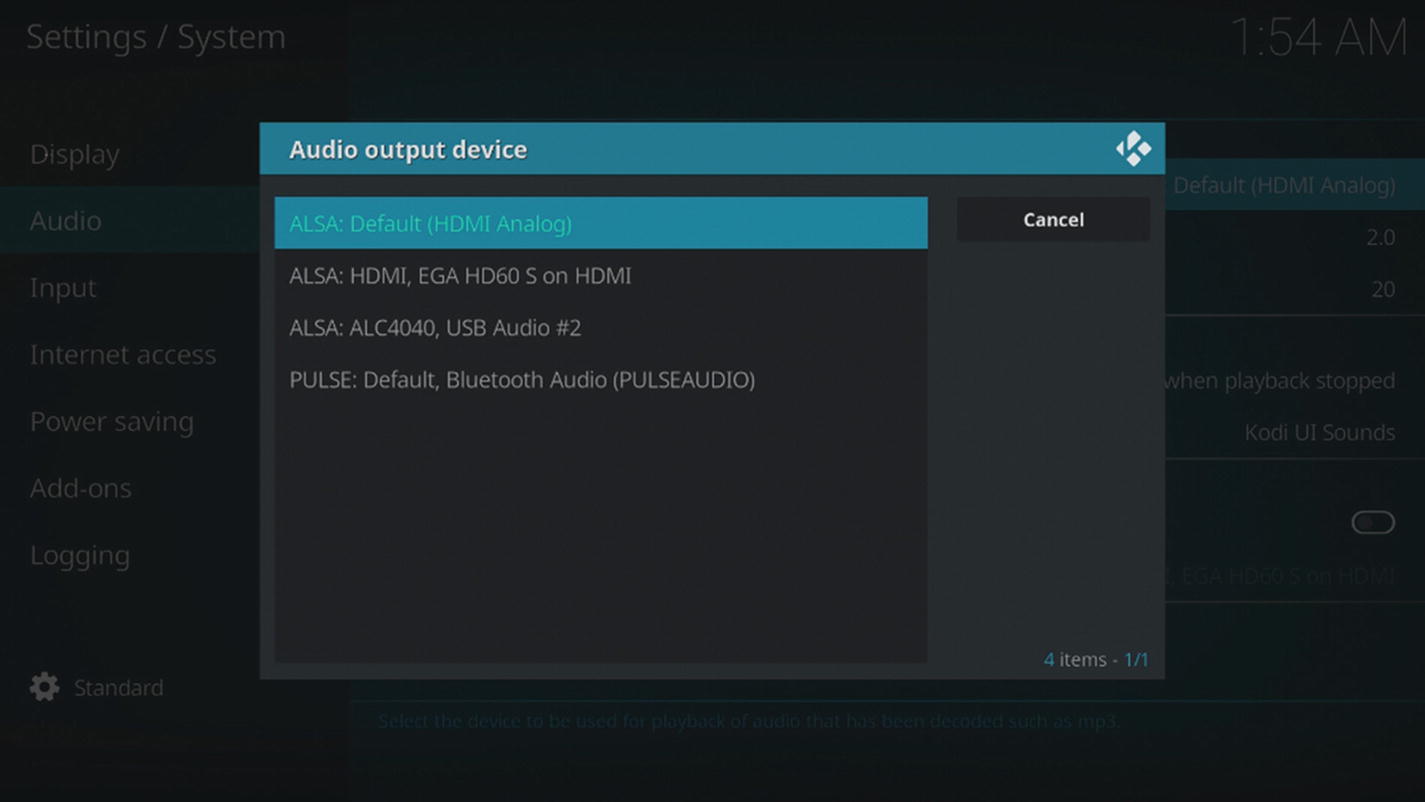
Available audio devices
The Input tab lets you change peripheral and control settings. Kodi supports the use of mouse and keyboard, gaming remotes, and traditional remote controls. Basically, if it can connect successfully, then you can use it. If you want to use a keyboard but not a mouse, you can use the arrow keys along with the Enter, backspace, and Esc keys to navigate.
Internet access allows you to further configure your connection settings for more advanced users. Power saving has settings for saving energy, such as putting the display to sleep when the device is not in use, Add-ons has options for updating any add-ons you have installed, and Logging has settings for debugging. If you’re interested in tracking event logs and other logs, you’ll want to take a closer look at these settings. These logs can be especially helpful if you’re planning to contribute to LibreELEC.
LibreELEC Settings
The LibreELEC icon in the bottom-right corner holds a lot of the main system settings. Under System, you can set up backups for Kodi and configure system updates. Network has more advanced Network settings beyond those available under System. Connections shows all the Internet connections available to the Tinker Board, as well as their IP addresses, states and connection types.
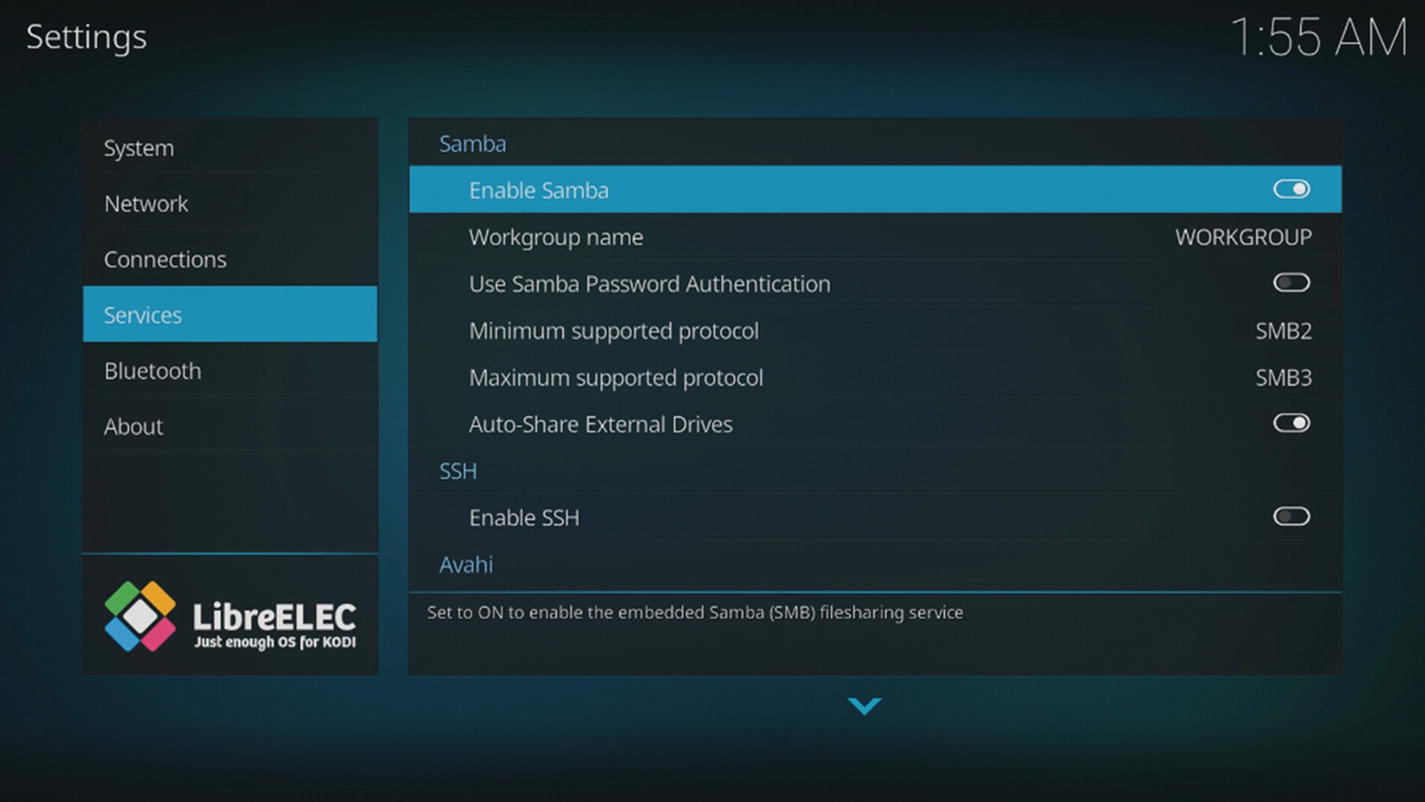
The LibreELEC Services menu
You’ll want to enable Samba, since we’ll be using it for sharing files over the network. You’ll want to make note of the minimum and maximum supported protocols. By default, the minimum is SMB2 and the maximum is SMB3. Depending on the system you’re trying to connect to, you may need to change the minimum support protocol to SMB1.
SSH, of course, allows us to access a terminal to communicate directly with LibreELEC. Be sure to enable this if you need to do that. You would follow the same instructions that we went over when accessing Lakka via SSH. And finally, if you have any Bluetooth devices that you want to use, you’ll need to enable Bluetooth at the very bottom of this menu. Otherwise you won’t be able to connect. After enabling Bluetooth you’ll be able to go to the Bluetooth tab directly underneath Settings to configure any devices, whether they be controllers, speakers, or other items.
Note
To use Bluetooth audio, you’ll need to configure it both here and under Audio in the System category that we just went over.
Services
The main feature found in Services that we’ll be utilizing is UPnP/DLNA. Under that section you can enable UPnP (Universal Plug and Play) support and affect settings associated with UPnP. We’ll be using UPnP to stream media from a Windows computer later, so if this is of interest to you then you should turn this service on; otherwise it will not work.
The settings for the File Manager, Add-ons, Player, Media, PVR & Live TV, Interface, and Profiles are all meant to customize Kodi to your preferences and needs. As a result, we won’t go in-depth for these menus. It’s recommended to reference documentation from Kodi to go fully in-depth on everything that is available.
Note
You’ve probably noticed that a lot of these category and settings names are a bit repetitive, which can be confusing. Once you get more familiar with Kodi, the navigation for settings will become more intuitive.
Loading Media
Now that we’ve finished going over the settings and getting familiar with the GUI, we can begin loading media into Kodi for playback. There are a few ways to access media with Kodi, with the main differences being that the media will be available either locally to the Tinker Board or remotely over a network connection.
USB Storage
Utilizing a USB drive, whether a flash drive or an external hard drive, is probably the easiest method for accessing media with Kodi. First, you’ll need to prepare your files. It’s recommended to label all of your media files in a cohesive way and organize them by folder where applicable; especially when separating video files from audio files. Once that’s all set, load your files onto your USB device and plug it into one of the Tinker Board’s USB ports.
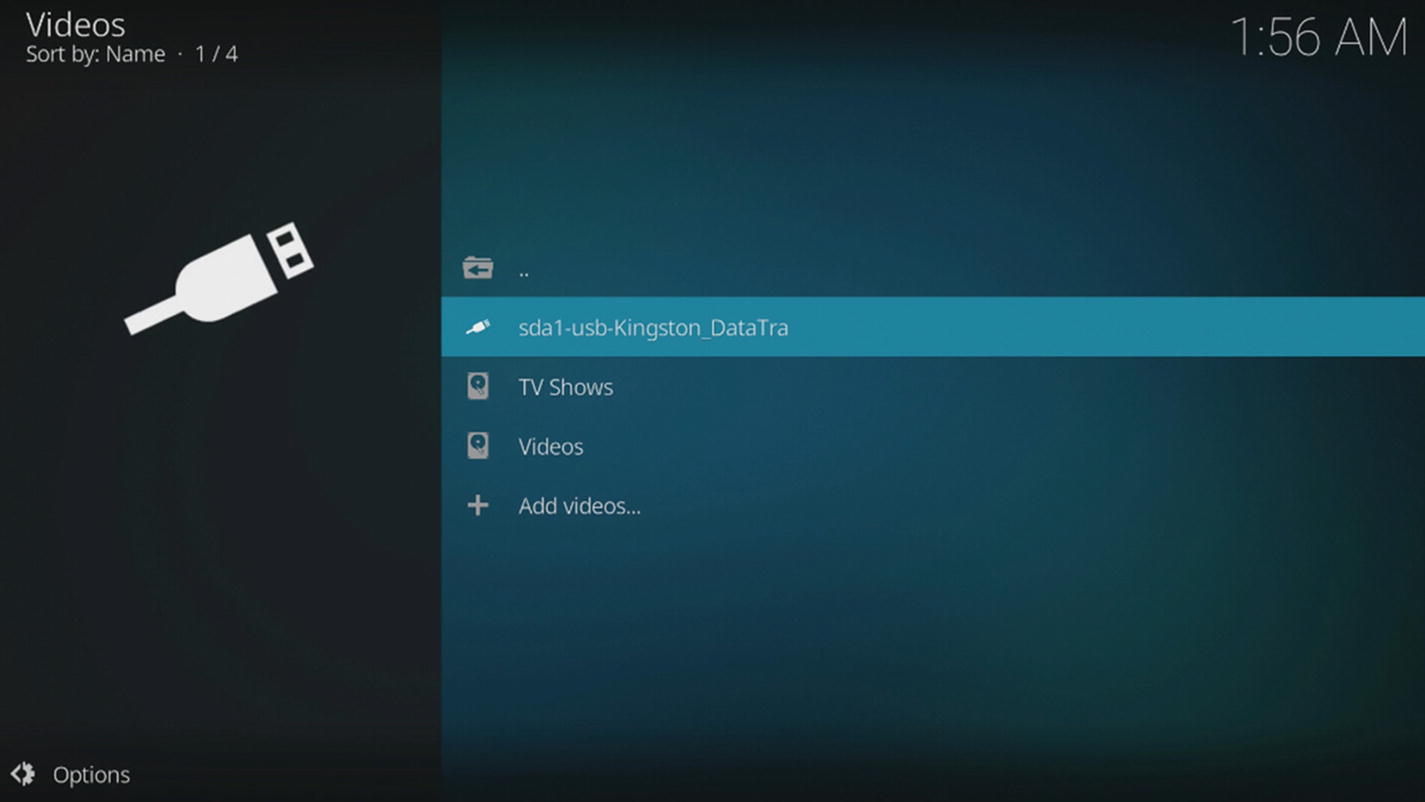
USB storage device connected to the Tinker Board and available as a media source
Loading Media to Local Storage over the Network
In the previous chapter, we loaded ROMs over the network from a computer to Lakka’s file directory. LibreELEC has that same ability using the same steps. First, find your Tinker Board’s IP address by navigating to Settings ➤ LibreELEC ➤ Connections or Settings ➤ System Info ➤ Summary. Then, if you haven’t already, make sure that Samba is enabled by checking Settings ➤ LibreELEC ➤ Services.
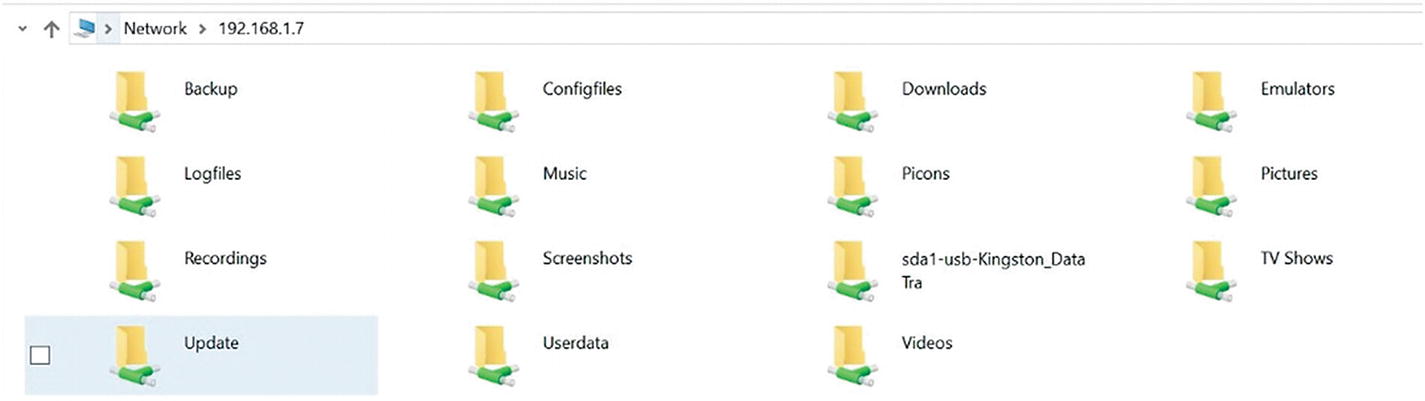
Kodi’s file directory accessed via Samba
Now you can drag and drop media files to be played locally in Kodi. If you have a USB device connected to the Tinker Board, that device will also show up in the file directory and will have read/write abilities so that you won’t have to worry about filling up your SD card or eMMC.
Network Streaming
Network media streaming is more complicated than our previous two methods. Successfully streaming media over the network depends on a variety of factors, including the platform you’re streaming from, whether it be Windows, macOS, Linux, or a third-party NAS box. However, network streaming is a big reason to use software like Kodi, especially running on the Tinker Board. When it’s running properly, you can have access to your entire media library from a device that fits in the palm of your hand.
There are a few available protocols to create a network connection within Kodi. You can use NFS, SMB, UPnP, or a dedicated server protocol such as FTP or a web server. Here we’re going to discuss NFS, SMB, and UPnP.
NFS
NFS stands for Network File System and is available natively in macOS and Linux operating systems. It’s also common among NAS setups as well. It is not available on non-server versions of Windows without third-party software. There is a third-party tool called haneWin that Kodi suggests in their documentation if you really want to use NFS on Windows.
macOS NFS Configuration
Here you’re selecting the file path for the folder you want to share and then listing the permissions. For this example, we’re using -ro, which is read only, -mapall=nobody, which allows all users to have the same clearance, and then -alldirs 111.111.1.1, which gives access to all the file directories within the specified path if you’re accessing it from that IP address; it should be the IP of the Tinker Board.
After you’ve finished editing /etc/exports, save and close the file. Return to the terminal and enter sudo nfsd restart to restart the NFS shared folder. Any time you edit /etc/exports, you’ll need to reboot the server so that the new settings go into effect.
Note
There is also a third-party application available for macOS called NFS Manager that allows you to configure NFS shares through a GUI interface rather than using the terminal.
Linux NFS Configuration
Here, much as in macOS, you’re listing the file path for the folder you want to share, followed by the Tinker Board’s IP address, and then in parentheses the parameters for the file share. We’re using some default options suggested by Kodi in their wiki for NFS that allow for read/write and all UIDs. The insecure parameter allows Kodi to access the folder without root privileges. Notice that there are no spaces between the parentheses or commas.
Save and exit the file by typing control+X, agreeing to save by entering Y. This will bring you back to the terminal. Next, reboot the server to have the changes go into effect by entering sudo service nfs-kernel-server restart. Now we can head back to the Tinker Board to connect to an NFS file share.
Note
If you have a dedicated branded NAS box, NFS should be a viable option for you as well. Check the manufacturer’s site for instructions on proper setup. For more common brands, you can also check the Kodi wiki.5
Connecting Kodi to an NFS Share

The Add a source window
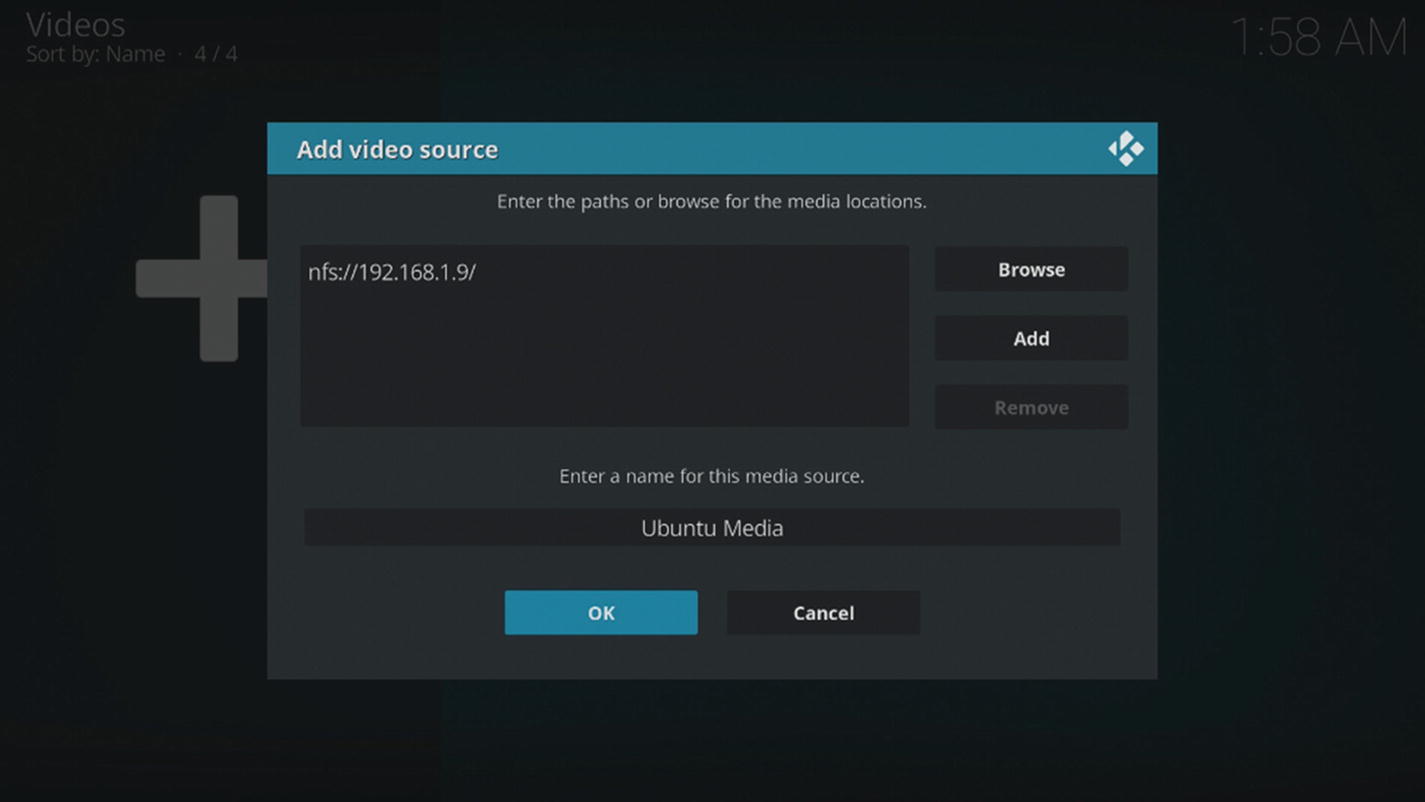
The selected NFS share

NFS file share available as a media source
Note
The NFS setting examples that were used for both macOS and Linux are not secure. For experimental use they are fine, but for long-term use you’ll want to research security settings that are right for your setup.
SMB
We’ve used Samba both for Lakka and Kodi successfully by easily accessing the file directories for each system from our computers on various operating systems. However, to reverse that process and access a computer from one of these operating systems by setting up a dedicated SMB share to stream media has gotten increasingly difficult in recent years, ever since security vulnerabilities were discovered and operating systems have put in varied security patches.
Additionally, with recent Windows 10 updates discontinuing the use and availability of HomeGroups, beginning with build 1803, it just isn’t a recommended option with Kodi. SMB is also slower than other solutions, such as NFS. So it’s recommended if you’re on macOS or Linux to run an NFS share for network streaming to Kodi. Of course, you can also use the third-party software, haneWin on Windows for NFS access as well. But what if you want to use a dedicated built-in Windows option?
UPnP
UPnP stands for Universal Plug and Play. It’s a protocol that’s been around for a long time and has its own security concerns, most notably when utilized on routers for port forwarding. The instance of UPnP used by Kodi, though, is a mix of UPnP A/V and DLNA, which is more secure and different from the notorious version seen in many security problems on routers. The solution is not ideal, but on Windows it does work without a lot of effort to set up. If you want to run this long-term, you’ll need to take security precautions for your network and check logs often for any abnormalities.
UPnP for Kodi basically prompts you to set up a media streaming server directly on your Windows PC by allowing media streaming services through your network connection. Once it’s set up, it’s basically the Windows Media Player broadcasting to your Tinker Board. It will automatically grab all your media files from your various folders, and your preexisting folder hierarchies will transfer over to Kodi via your network.
Windows Setup
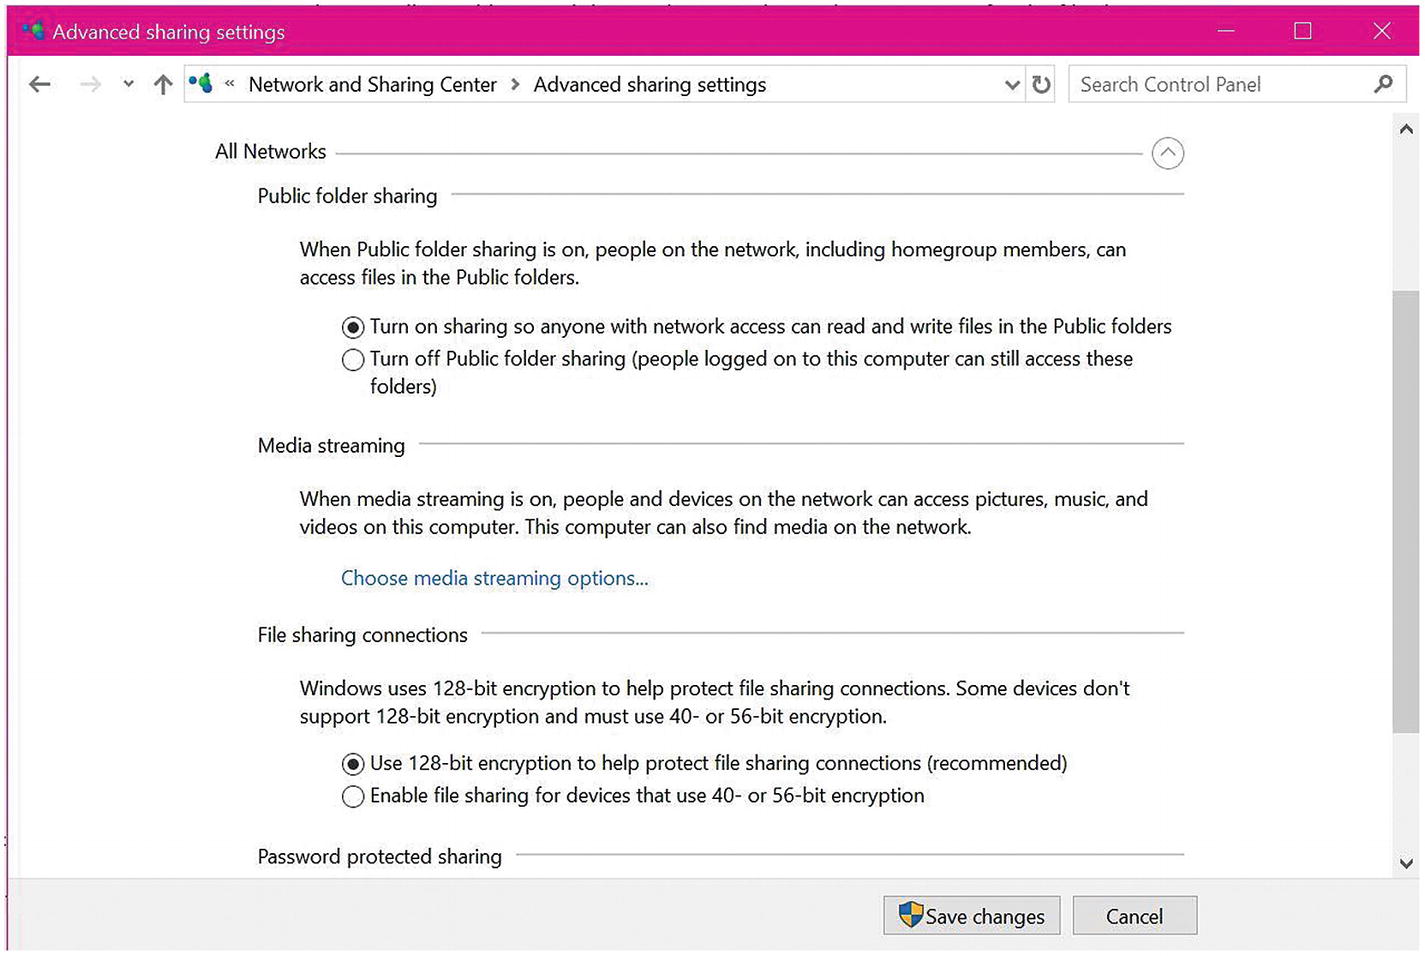
The All Networks settings area
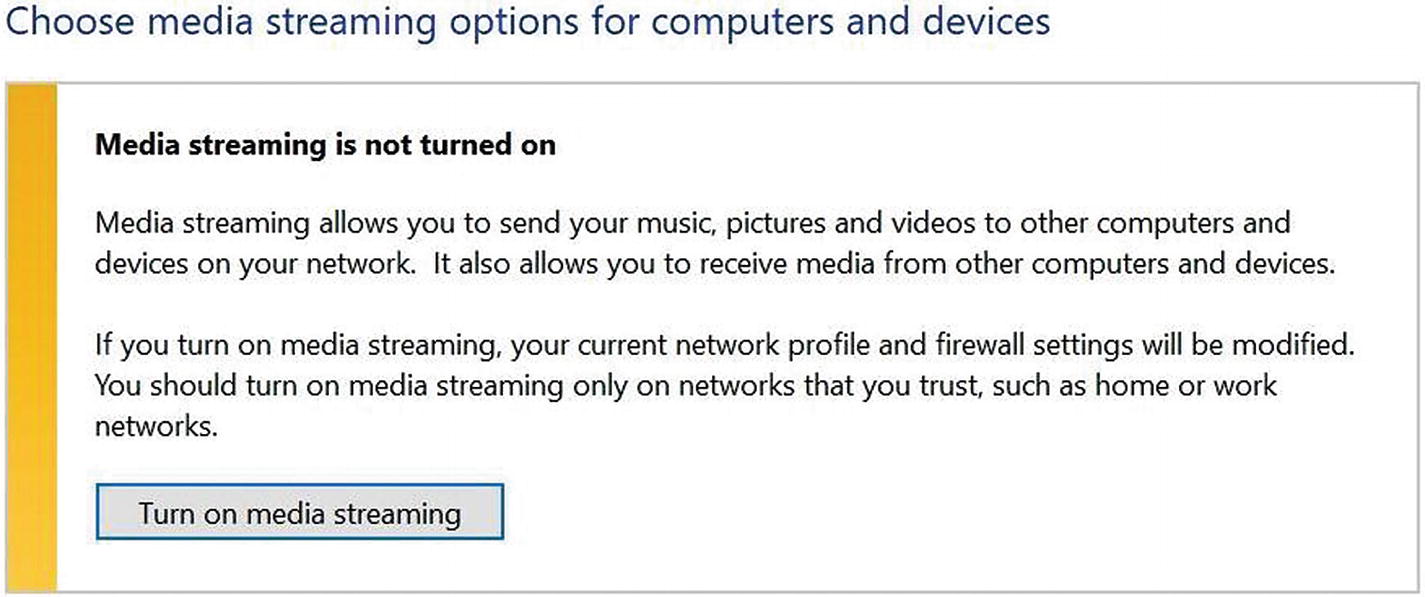
Turning on media streaming
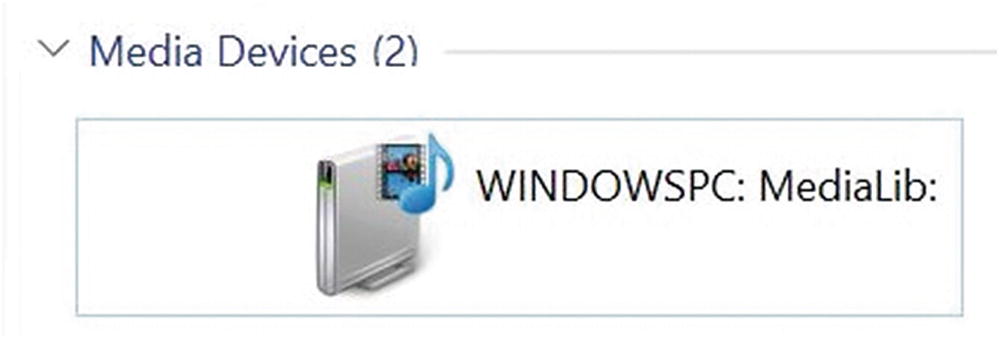
The Media Library listed under Network devices
Connecting UPnP Media Server in Kodi

The UPnP devices option under share options
Once you select the Media Library, you’ll be able to target specific folders. It’s recommended to map the Music folder to the Music category in Kodi and the Videos folder to the Movies or TV Shows category in Kodi. You can also target specific subfolders as well.

The Media Library configured and ready to be added as a UPnP device in Kodi
Note
If you don’t see your media library under UPnP devices in Kodi, ensure that your computer with the shared Media Library is turned on and connected to the network. Then ensure that the Tinker Board is connected to the network. If neither of those things are an issue, try rebooting the Tinker Board. If the Media Library doesn’t show up after that, navigate to Settings ➤ Services ➤ UPnP and toggle it off and then on. You should be able to select the Media Library now.
Conclusion
We’ve gone over a lot in this chapter, from cross-compiling to build an ISO, to taking a tour of Kodi and setting up multiple types of network shares on different operating systems. There is still a lot more that we could go over with Kodi, but this chapter should get you well on your way to building a dedicated media center with the Tinker Board. The Tinker Board’s hardware and specs make it a great choice for a dedicated media center, especially one with network capabilities. The added 4K capabilities will certainly be a great bonus for video enthusiasts.
We shouldn’t forget about the audiophiles among us either, though; and while Kodi certainly has great options for music, there is a dedicated audio playback Linux distro that we can integrate with high quality DACs that fit directly onto the GPIO pins. Let’s continue our specialized Linux distro tour with Volumio!