In addition to TinkerOS, ASUS has another official operating system for the Tinker Board: Android. It can be easy to forget that Android is actually an open source operating system based on Linux. As a result, anyone can build their own distribution of it, just as with desktop Linux distributions such as Debian.
At the time of writing, the version of Android that ASUS has released for the Tinker Board is based on Android version 7, known as Nougat. Although an older version, it is still supported and receives security updates, making it a safe operating system to use connected to the Internet.
Installation
To prep your SD card or eMMC to install and run Android, you’ll follow the instructions outlined in Chapter 3, with the only difference being that you will download the Android .img file from the ASUS Tinker Board website rather than TinkerOS. After you’ve followed the steps, you can try booting into Android. The first boot into Android takes longer than subsequent boots before you finally reach the desktop because of the file systems being built. Subsequent boots are much faster and only take between 10 to 20 seconds.
Note
If you get any errors on the first boot, such as a disk repair error, let it repair itself and see if it boots successfully afterward. If it doesn’t, try imaging your storage again or using a different SD card.
Navigation
Once you get to the Android landing page, you’ll notice that it looks similar to an Android tablet interface, complete with the message to “swipe up” to enter the homepage. If you’re using a screen with touch capabilities, you can plug the USB from your monitor into the Tinker Board and treat it like a tablet. If you prefer to use a keyboard and mouse, though, you can still do that.
Try to think of the mouse acting as a touch input. Every time you left-click, it’s like you’ve tapped the screen; and if you need to swipe in a certain direction, you’ll hold down the left button and move the mouse in the correct direction. You may experience some glitches using this method, though, as the mouse can become very sensitive compared to the inputs that the Android system is expecting from a touch input.
You can also use a remote, whether a traditional TV-style remote or gamepad, to navigate as well, like operating a Smart TV or other similar device. Since Android is set up to be a touchscreen operating system, a remote works very well for navigation. The remote can use a wireless dongle or Bluetooth (BLE) to communicate with the Tinker Board. These remotes are sold for home theater solutions or you can get adventurous and build your own using a development board that has BLE available onboard. We’ll be discussing remote control options with the Tinker Board during the project chapters as well, including how to build a quick and easy BLE DIY remote.
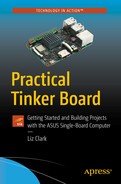
The Home Screen
The Android landing page on the Tinker Board
At the very bottom of the screen are navigation and utility controls. From left to right they are the Lower Volume, Back, Home, Overview, and Raise Volume buttons. For those unfamiliar with Android, the Back button will bring you back one page in an app, the Home button will usually bring you back to the home screen, and the Overview button will show you which apps are currently open. You can then quickly switch between apps or close apps out.
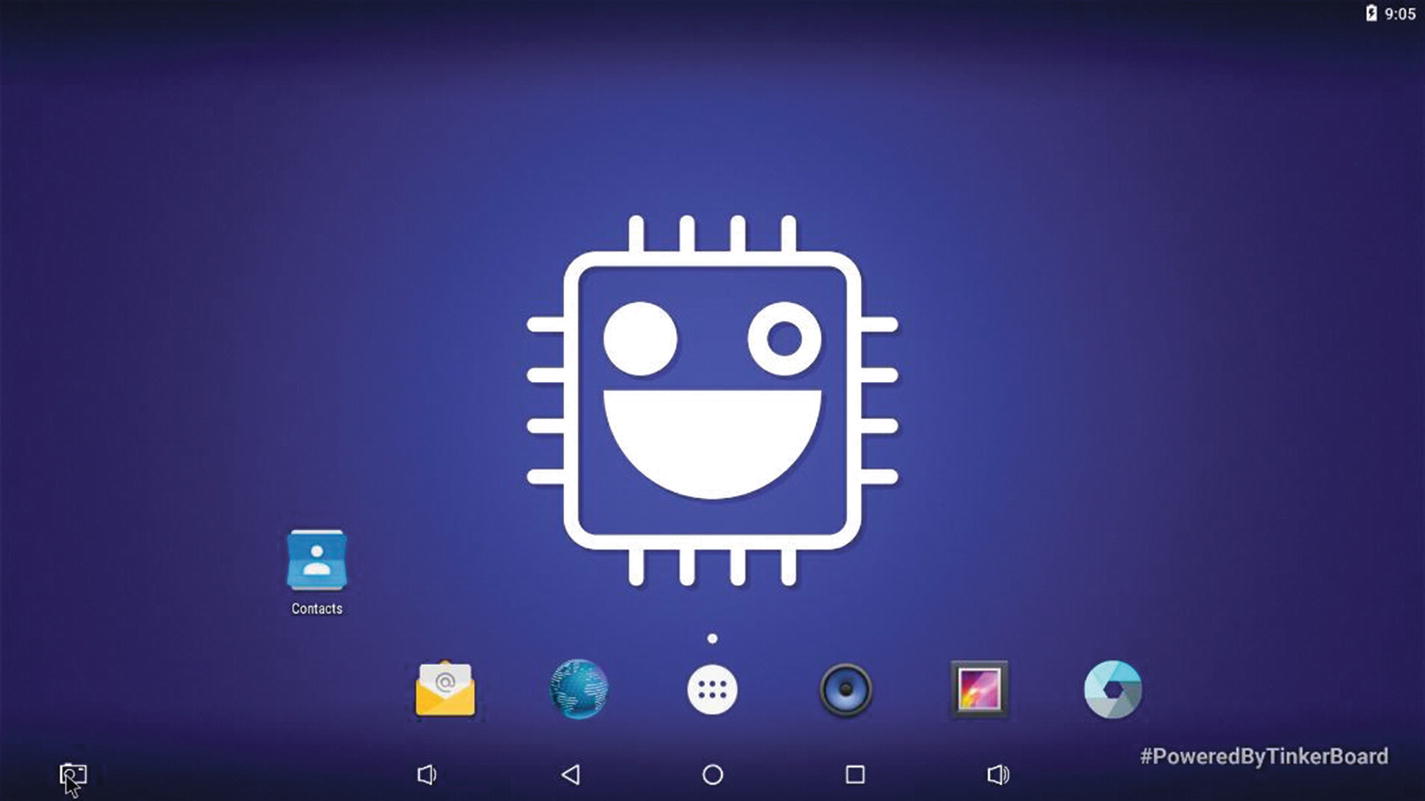
More Apps
The preinstalled apps for Android on the Tinker Board
Connecting to Wi-Fi
To have the full Android experience, it’s important to get your Tinker Board online, especially considering that Android usually runs on a device with data communication enabled. Since we discussed security in the TinkerOS chapter, you may be wondering about security for this Android distro, especially since it’s an older Android version. At the time of writing, Android Nougat is still supported by Android. It still gets security patches, and if you look in the release notes from ASUS they do note when they’ve implemented a security patch, so if you don’t do anything sketchy you’ll have a secure experience. With all this in mind, let’s navigate to Settings and connect to your network.
Note
You can, of course, use wired Internet via the Tinker Board’s onboard Ethernet port, but depending on your router’s location this may not be an option for you. If speed and stability are priorities for you when using Android for a project you have in mind, then of course use Ethernet.
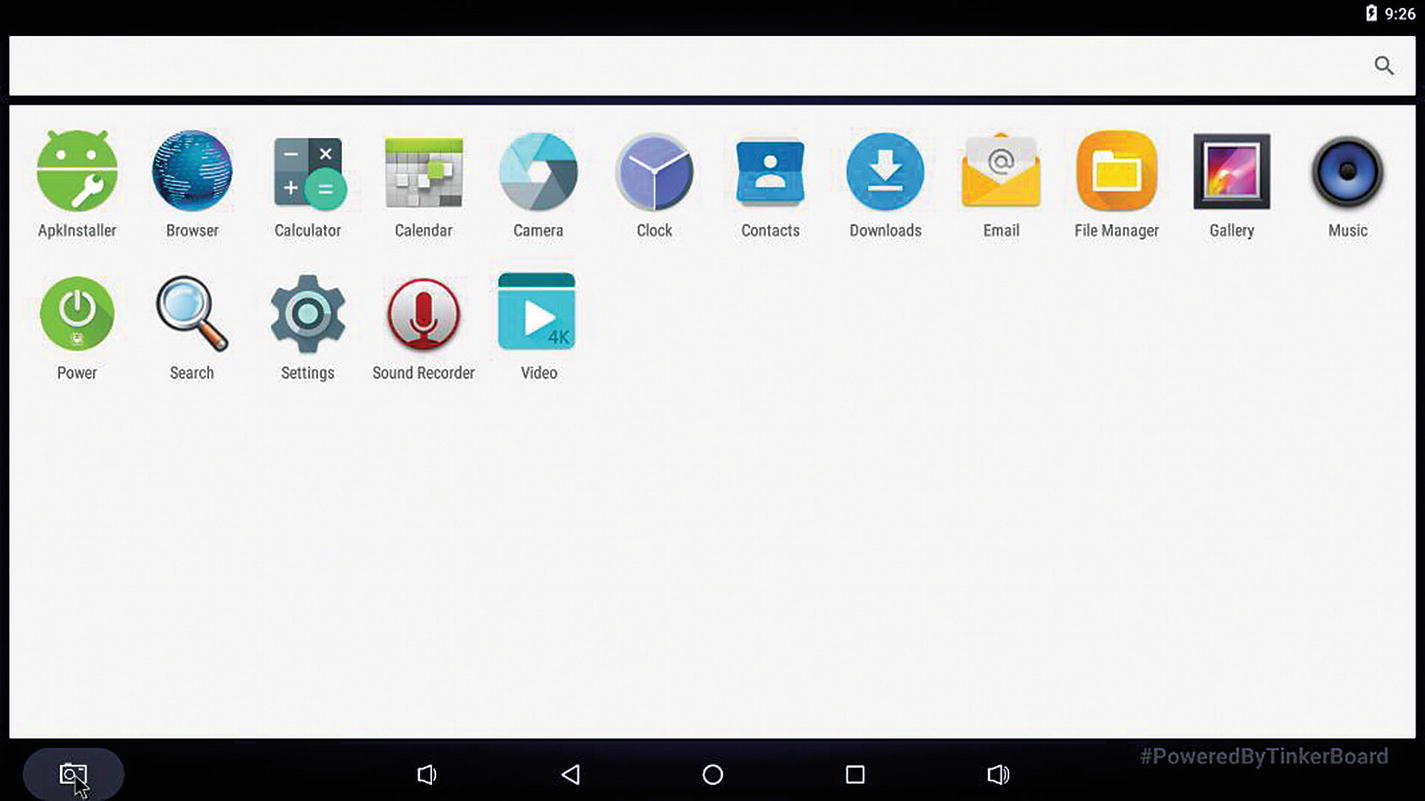
Wireless and networks settings
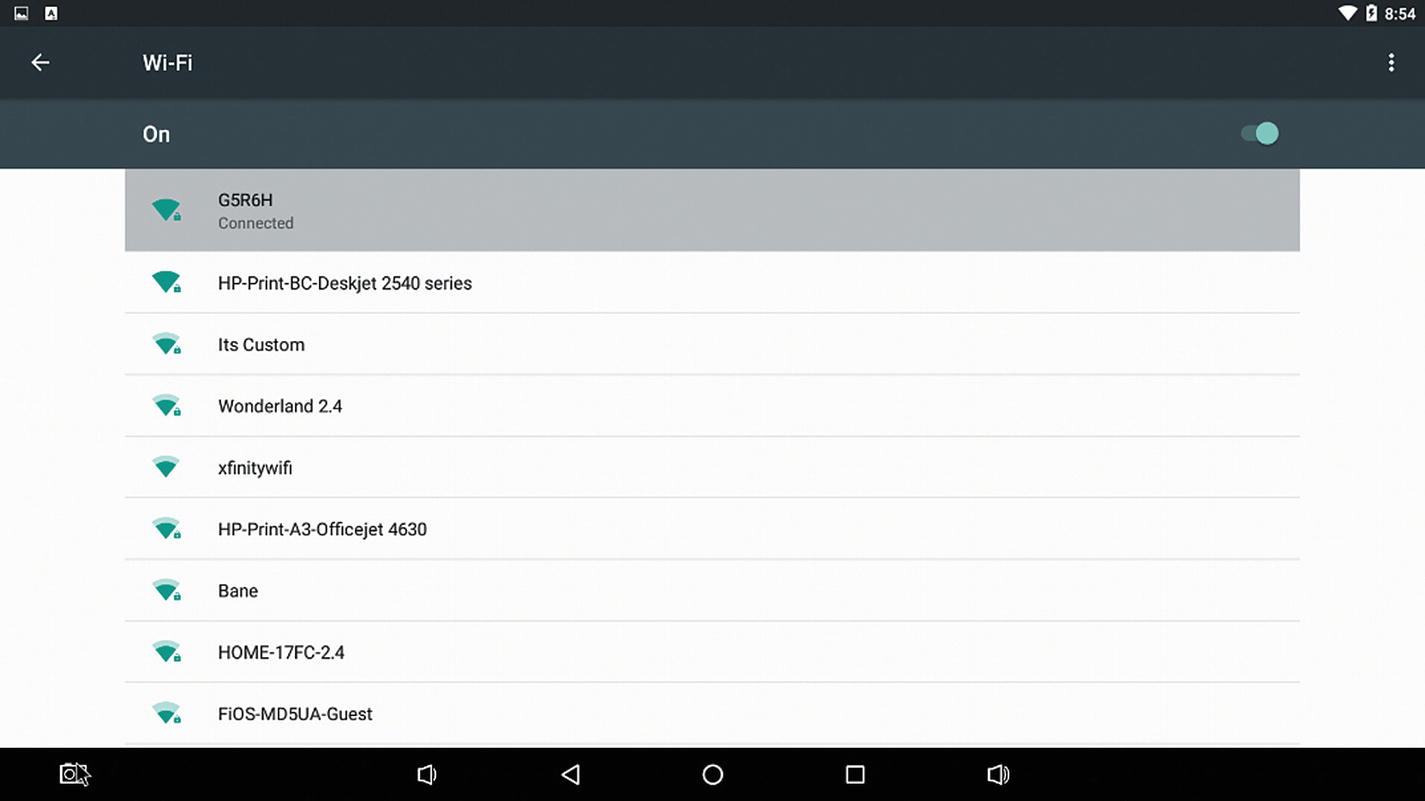
List of available wireless networks that appears after you toggle Wi-Fi on
More Settings
While we’re in Settings, we might as well explore a bit. After finishing up with Wi-Fi, choose Back at the bottom of your screen to go back one page to the main Settings menu. Similar to other Android devices and iOS devices, it has settings options for Bluetooth, display, notifications, and so on. Some items here are a bit different, though, since they are set up for the Tinker Board and not for a mobile device. For example, as seen in Figure 6-3, there are additional Internet settings beyond Wi-Fi if you need them. Under the More button in Wireless & Networks there is a VPN option, which has become more common now for mainstream devices, but there are also Ethernet settings to check and configure as well.
Battery?

The battery percentage screen
HDMI and Audio Source
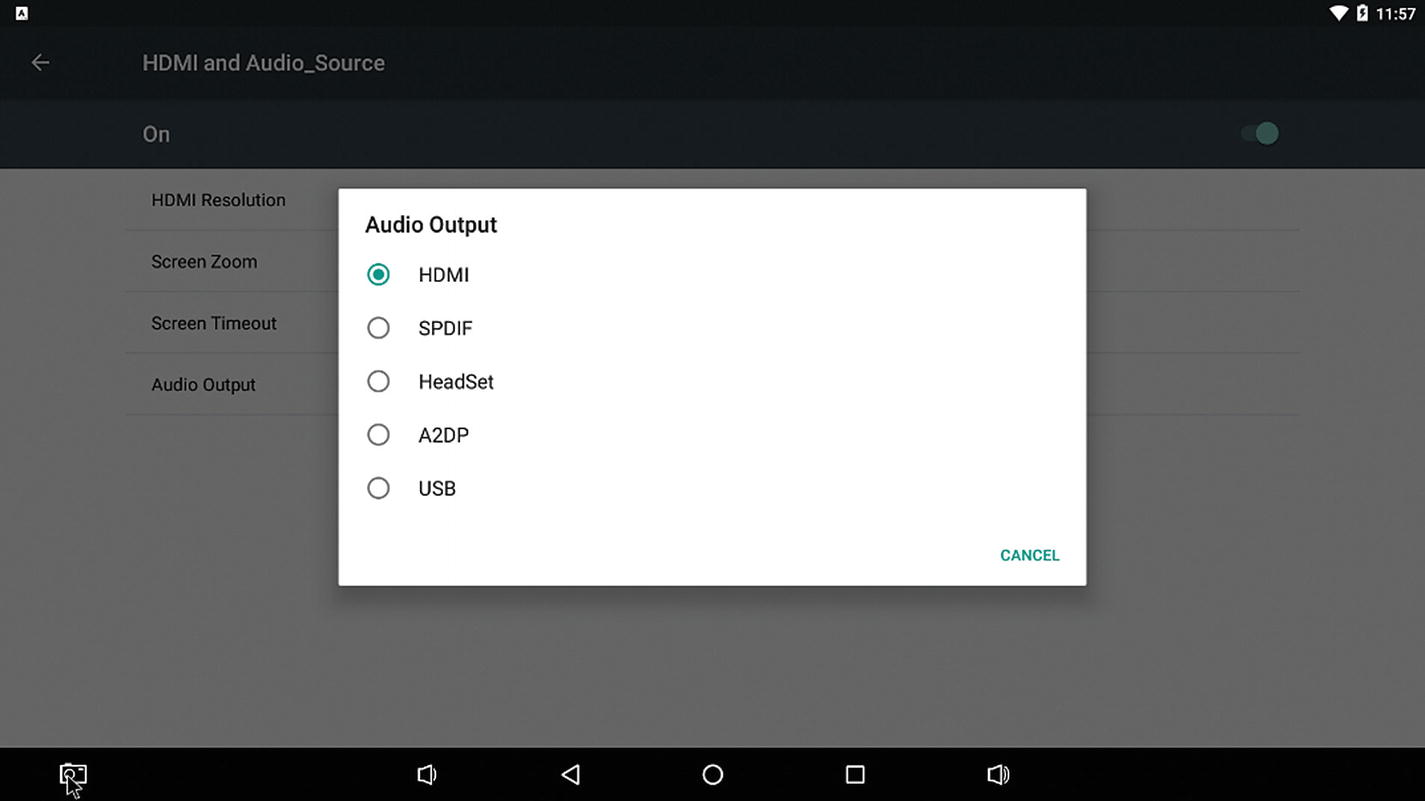
Audio output choices
Turning on Developer Options

“You are now a developer!”
Now go back to the main settings page and you’ll see a new option in System Settings, called Developer Options. Click it and you’ll see a lot of options that are a bit unusual to have access to. Most are for testing purposes for, you guessed it, Android developers. But a lot of them can be fun to play around with for more advanced users, such as enabling a Bluetooth snoop log, bug reports, and forcing GPU rendering to name a few. If you decide that you don’t want these settings enabled, you can toggle them off at the top of the page. Doing this doesn’t make the Developer Options entry in Settings disappear, though. After you enable it the first time, it will remain an option to toggle off and on in Settings going forward.
More to Explore
There are, of course, more settings available to you, but most users will more than likely find Wi-Fi and audio and video settings to be the most important, as well as Developer options for more advanced users (and hopefully you got a good chuckle out of the Battery setting’s readout). Feel free to explore and change any settings according to your preferences. We’re going to move on from Settings and go back to the apps.
Apps In-Depth
Now that you’re online and you have your other settings sorted out, let’s take a closer look at some of the applications available. We’ll look at how to use some of the more unique apps and the functionality available within them that can help you get the most out of Android on the Tinker Board.
Camera
The Camera app allows you to take photos with a ribbon cable camera module or USB webcam. The camera module can be connected to the onboard MIPI CSI camera connector, which is located next to the HDMI port. The USB webcam would of course be plugged into one of the USB ports. We’re going to explore connecting a camera module to the MIPI connector for the purpose of walking through the app’s functionality.
There are many different cameras available that will be compatible with the MIPI connector from a variety of companies. You can go the route of a basic camera module or one with special features, such as a night vision camera or one that has interchangeable lenses. The classic ribbon cable cameras from the Raspberry Pi Foundation are also compatible, so if you have been doing Raspberry Pi projects and have a camera module then you can use that hardware with the Tinker Board.
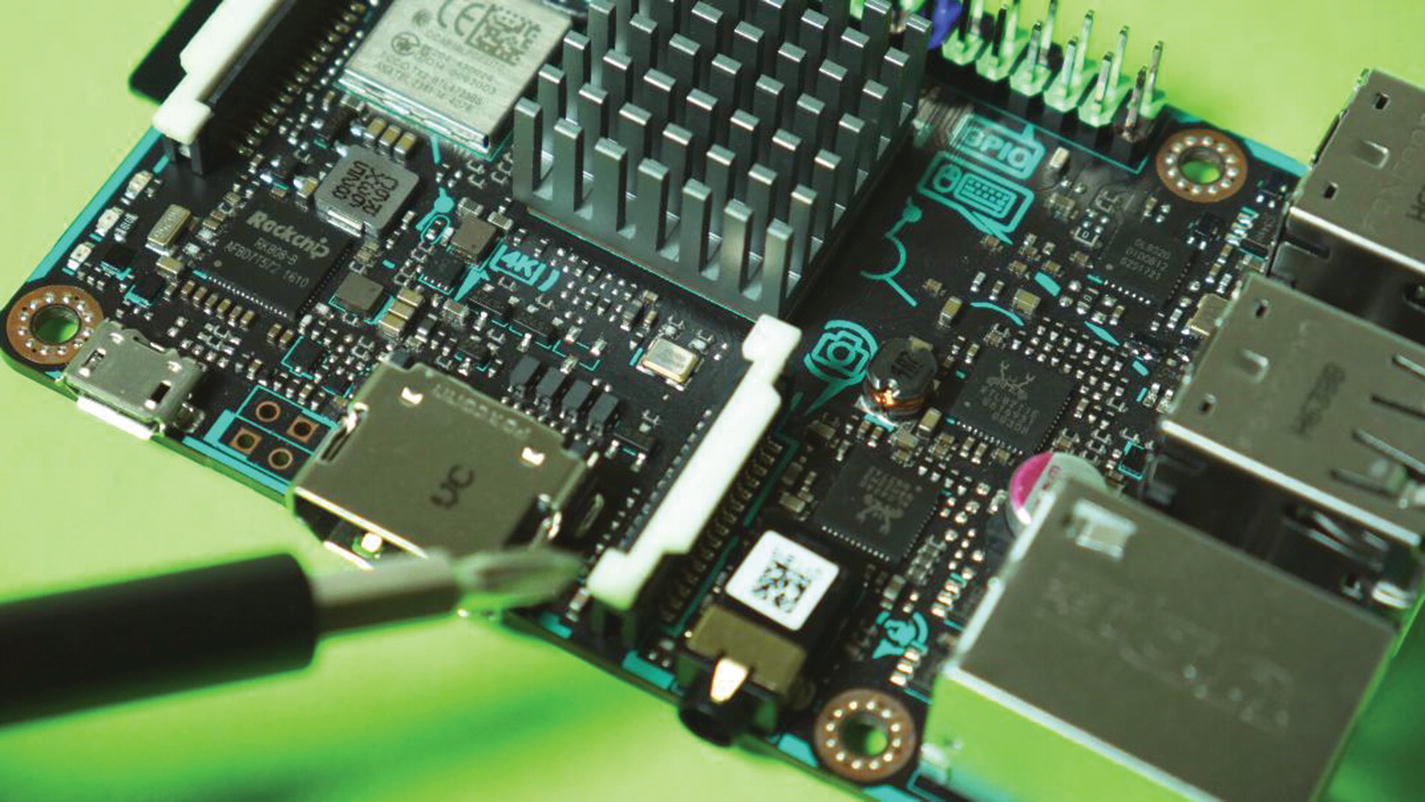
The camera module plug. Notice the camera icon directly above it on the Tinker Board’s PCB.
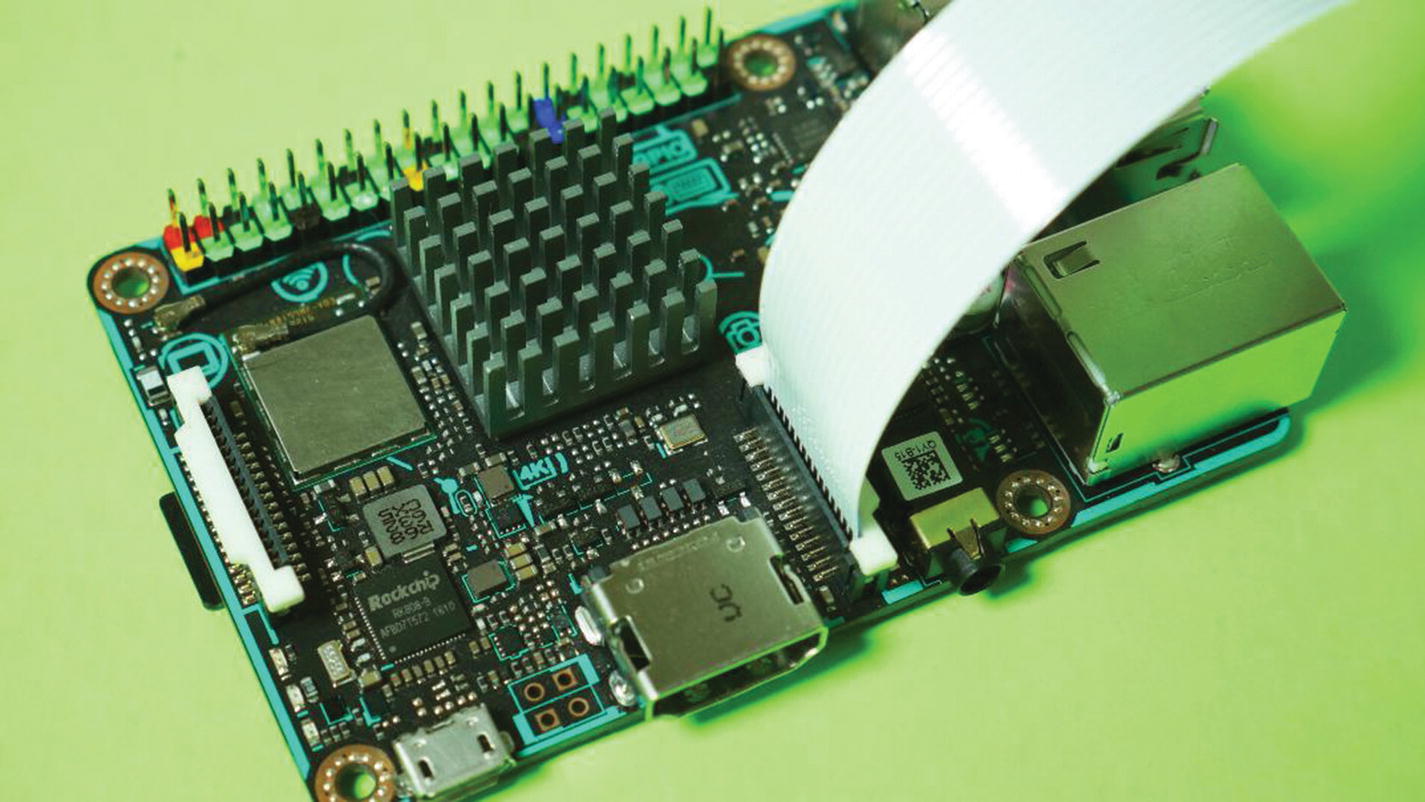
A camera module’s ribbon cable plugged into the Tinker Board. Notice that the cable’s contact pins are facing toward the HDMI port’s side of the camera connector.
Note
Both the ribbon cable connector and ribbon cable are fragile and need to be handled with care during installation and use. They also tend to be sensitive to static. Be aware of any strain that is placed on the ribbon cable while in use and consider a case or mount for the camera module and its cable for long term use.
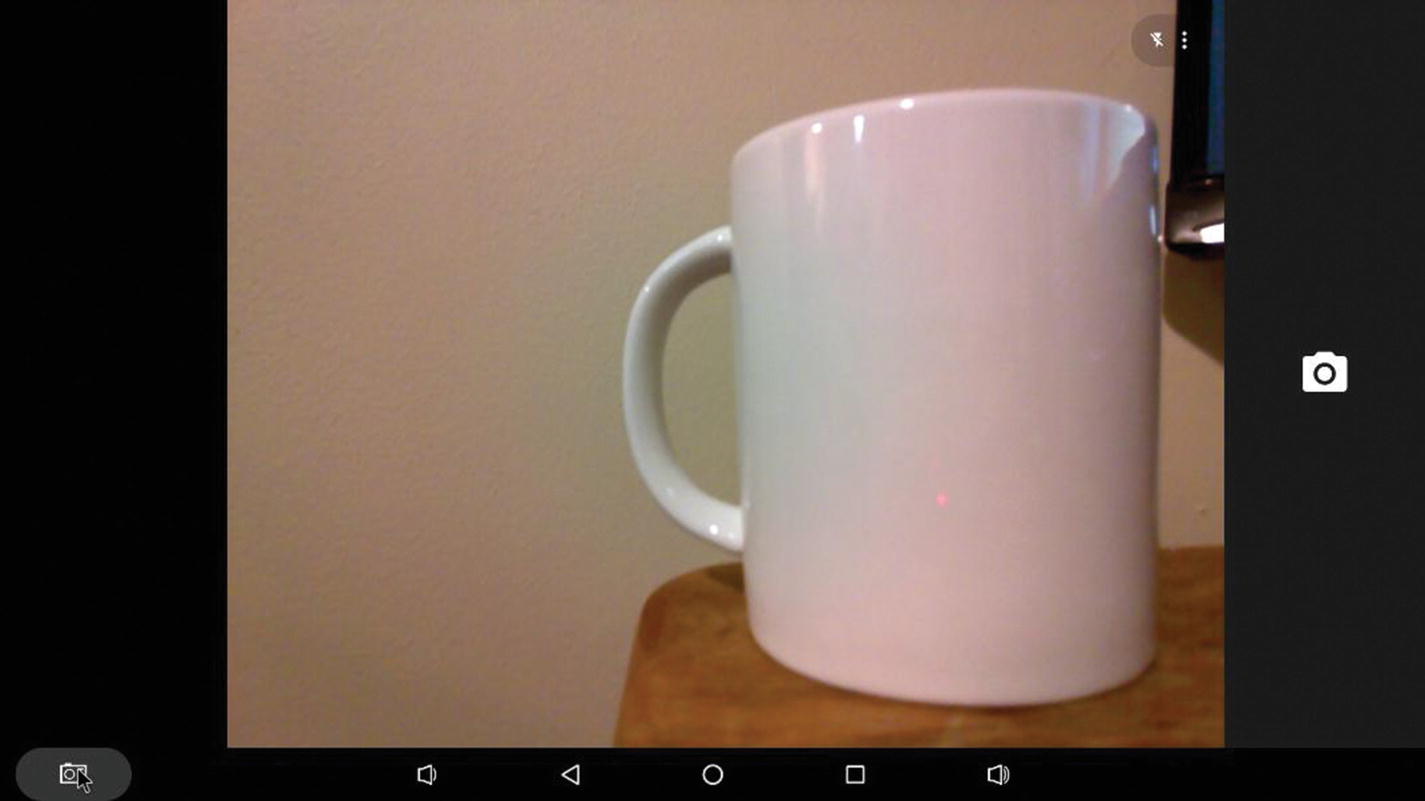
The default Camera app GUI
Note
If it says that the Camera app has stopped or that there is an error in connecting to the camera module, then the camera is not connected correctly. Try reseating the ribbon cable or checking that the ribbon cable is plugged into the socket in the correct orientation.
Camera App Functionality
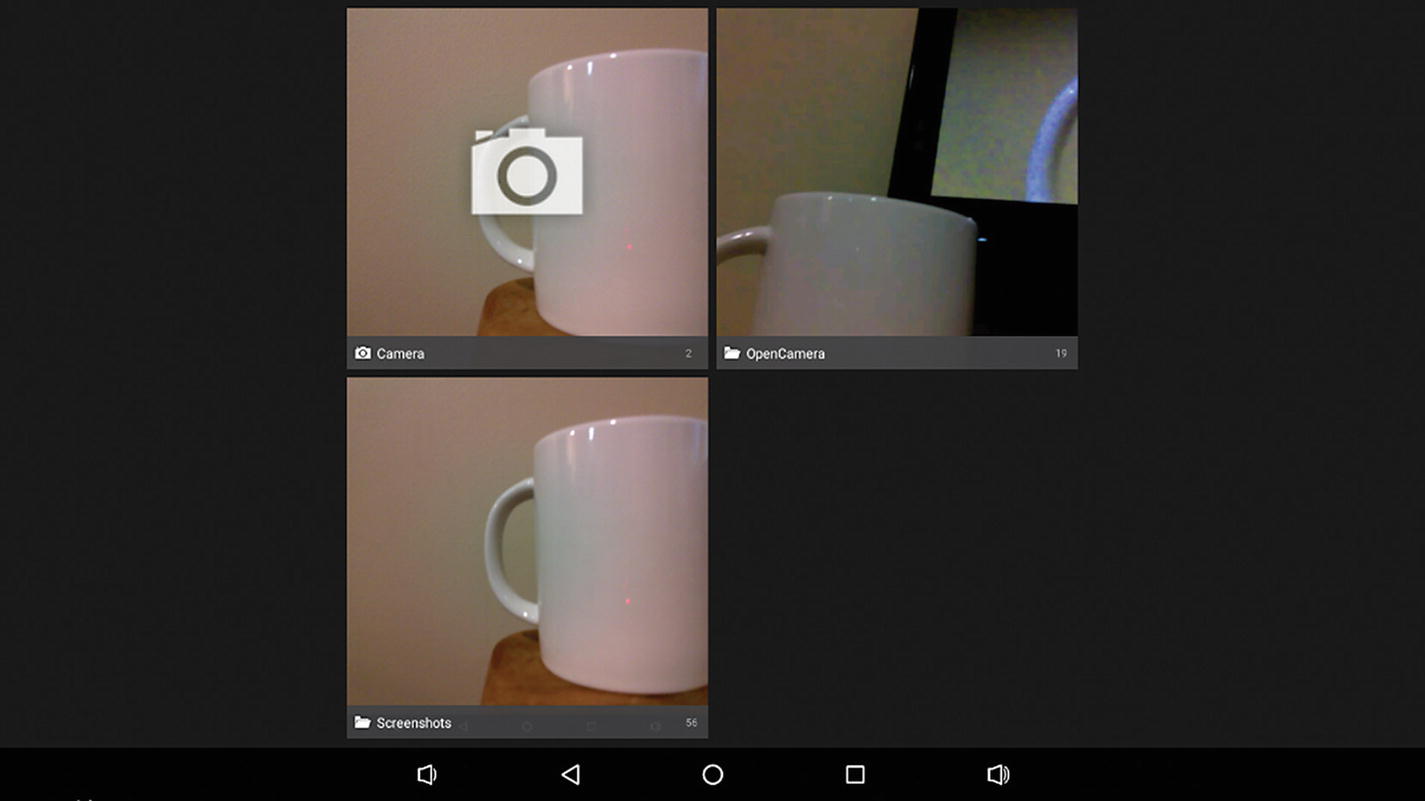
The Gallery app. All photos are sorted via the application they were taken with.
Music and Video
One of the appealing features of the Android operating system on the Tinker Board is the ability to be a small, compact media player for your video and audio files. Let’s take a look at the built-in apps that come preinstalled and some others that you may enjoy.
The Music App
The preinstalled Music app is a robust player with a straightforward and well-organized GUI. There are tabs for Artists, Albums, Songs, Playlists and Now Playing. Clicking the option button (...) in the bottom-right corner brings up the options Party shuffle and Shuffle all. The difference between the two is that Party shuffle creates a playlist of songs of the same genre so that you can see what is going to be played next and add songs in or take songs out of rotation, whereas Shuffle all is completely random.
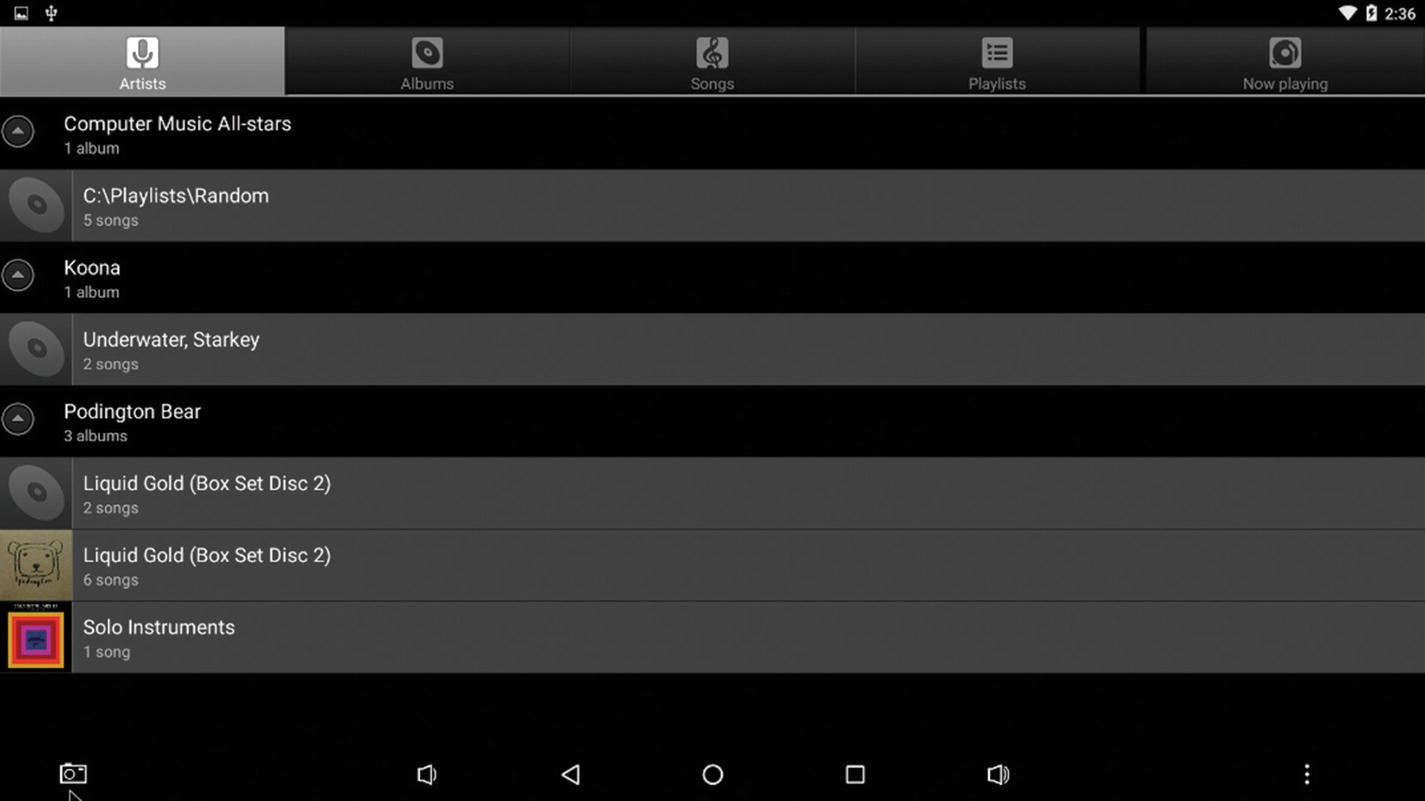
The Music app’s GUI for artists and albums
The Video App
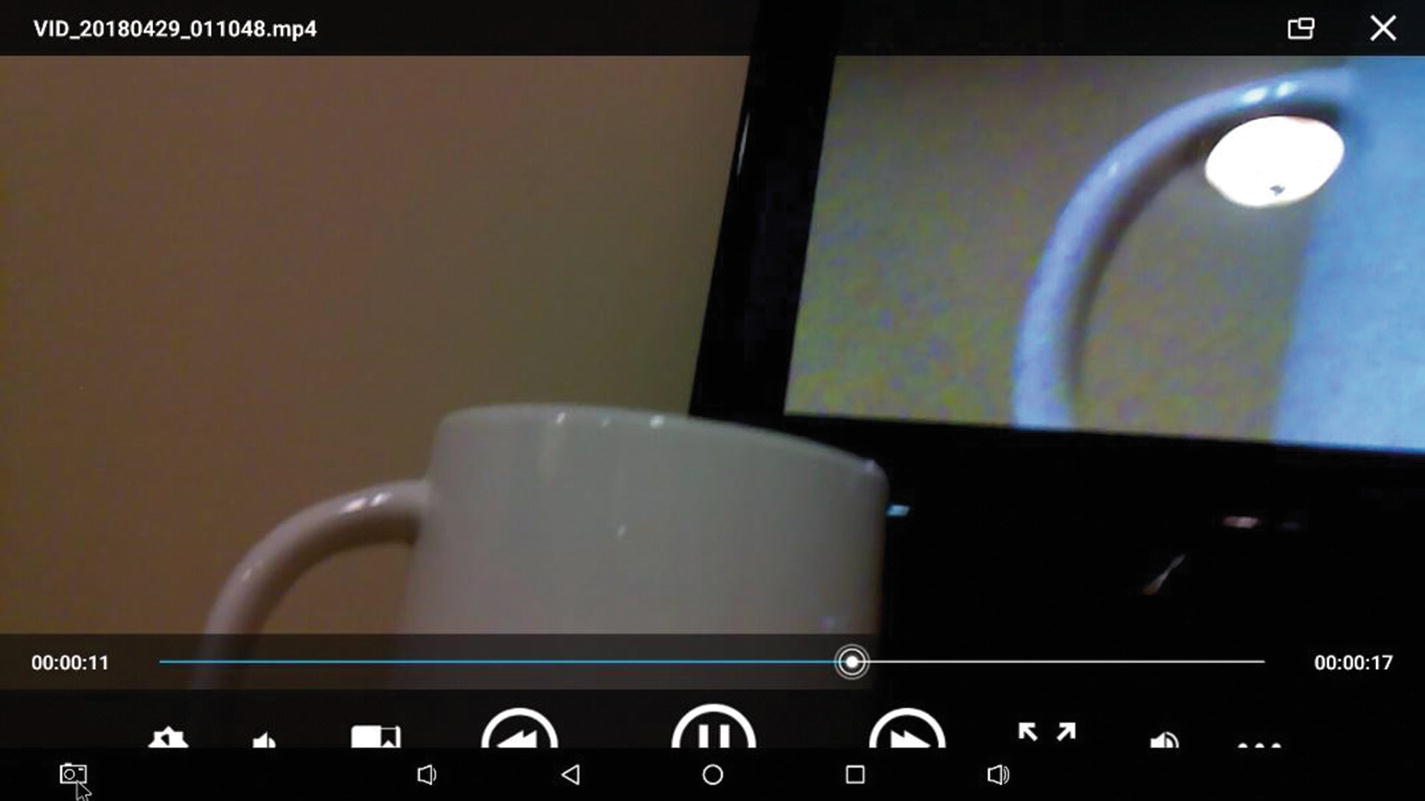
The preinstalled Video app’s playback screen
Installing VLC
You may remember that we installed VLC during the TinkerOS chapter. Again, it’s a great open source media player and it’s available for Android as a download directly from VLC.
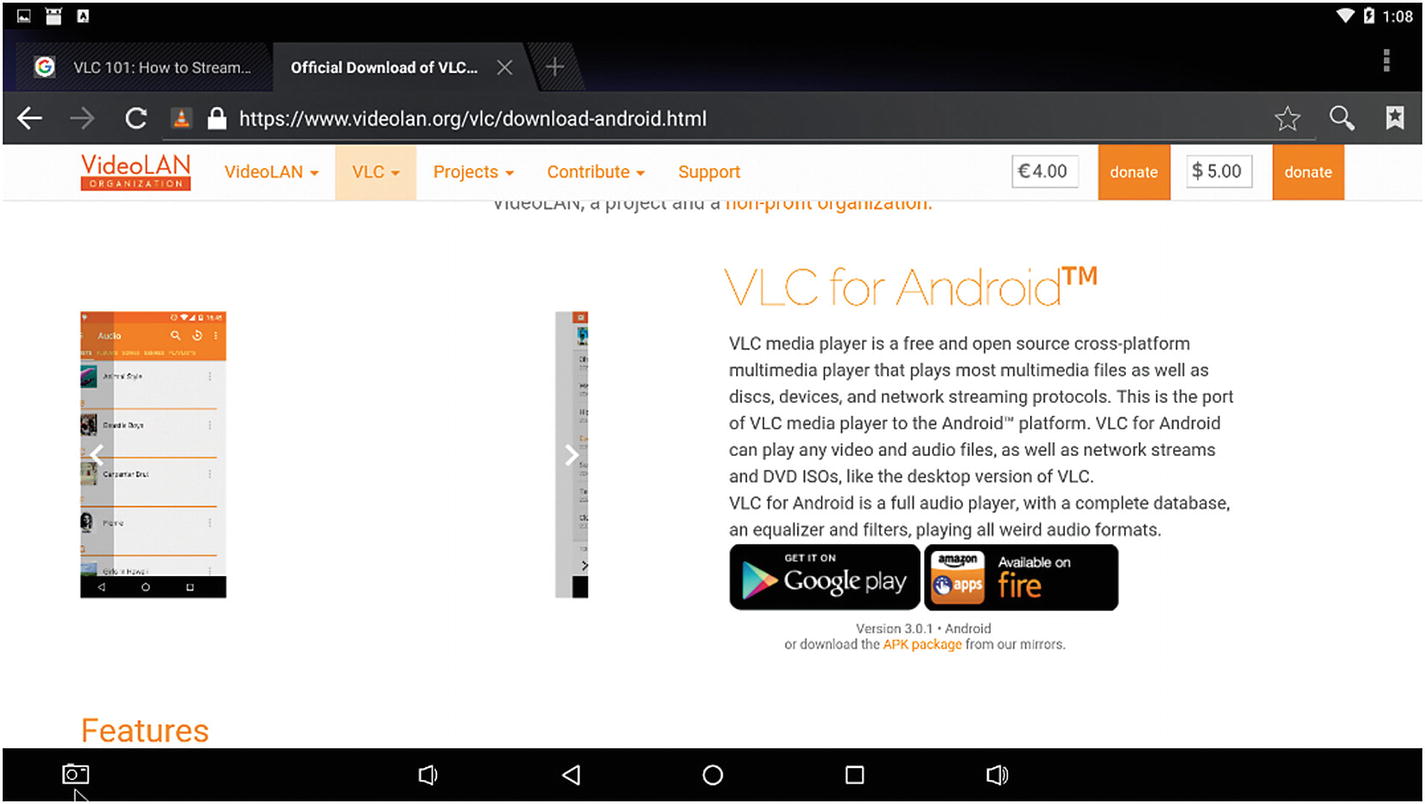
The VLC for Android webpage. Notice the direct download link below the Google Play and Amazon Fire icons.
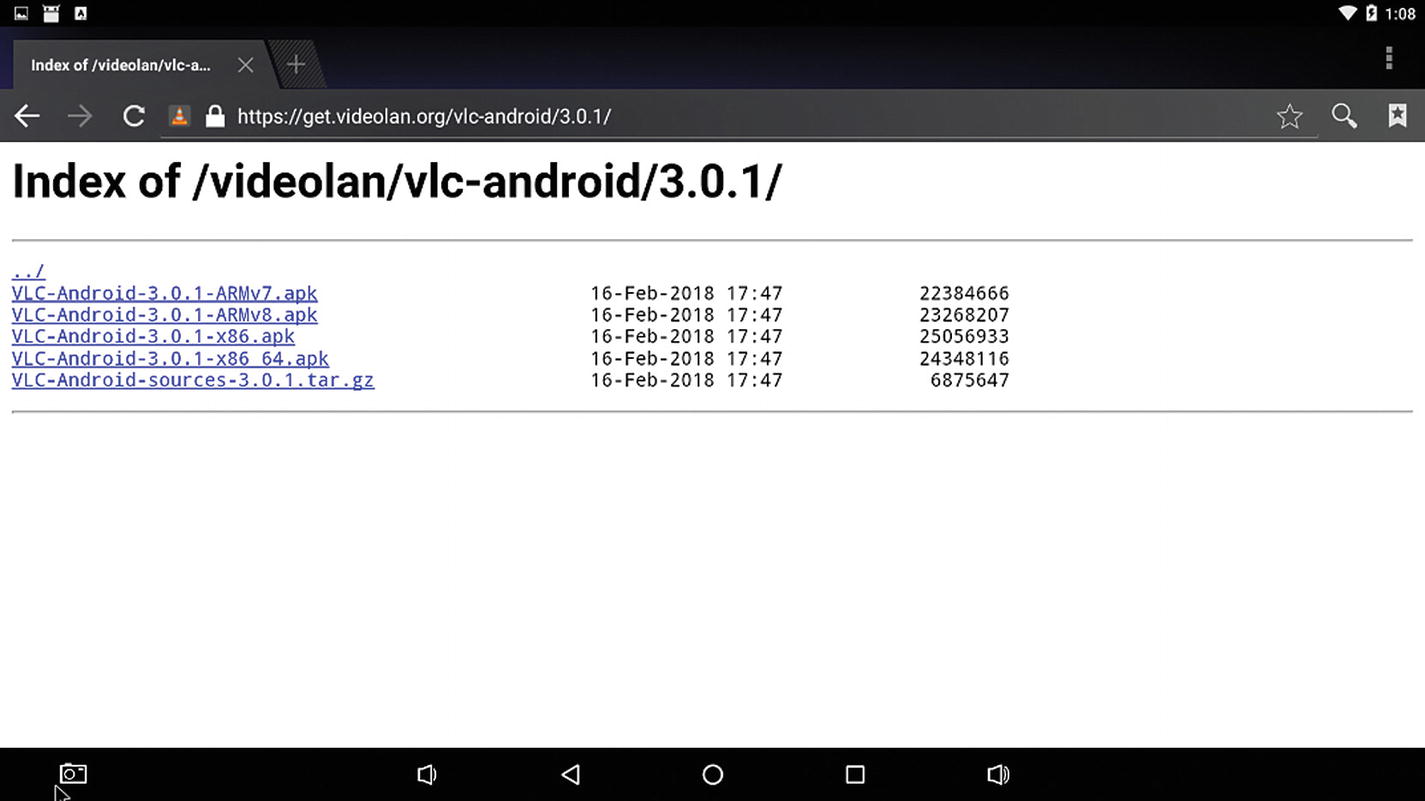
The available VLC downloads for Android. Be sure to select ARMv7.
Select and download the ARMv7 version; as you may remember from Chapter 1, that is the Rockchip architecture version on the Tinker Board. A few seconds after you click, VLC should begin downloading. Once it finishes, you’ll get a notification at the top of your screen. If you click that notification, you’ll be prompted to install VLC. Before you do this, though, you’ll need to ensure that you have enabled installations for apps from unknown sources. You can toggle this option on or off by going to Settings ➤ Security ➤ Unknown Sources in the Device administration section. After that, click Install on the VLC notification and after it finishes, an option to launch VLC will pop up on your screen. Click to launch and VLC will open.
After opening it the first time you’ll be asked to allow it permission to access photos, media, and other files on your device. Click Allow, especially since it is a media player.
Using VLC

Attaching external storage in VLC
All videos will play full screen; and if you’re using a mouse to navigate, mouse functionality will not be available during playback. This is an idiosyncrasy that pops up from time to time when using a keyboard and mouse with Android. You can pause and resume playback by hitting the space bar on your keyboard and exit playback to the main GUI by hitting Esc. After a video ends, you will be automatically brought back to the main GUI as well.
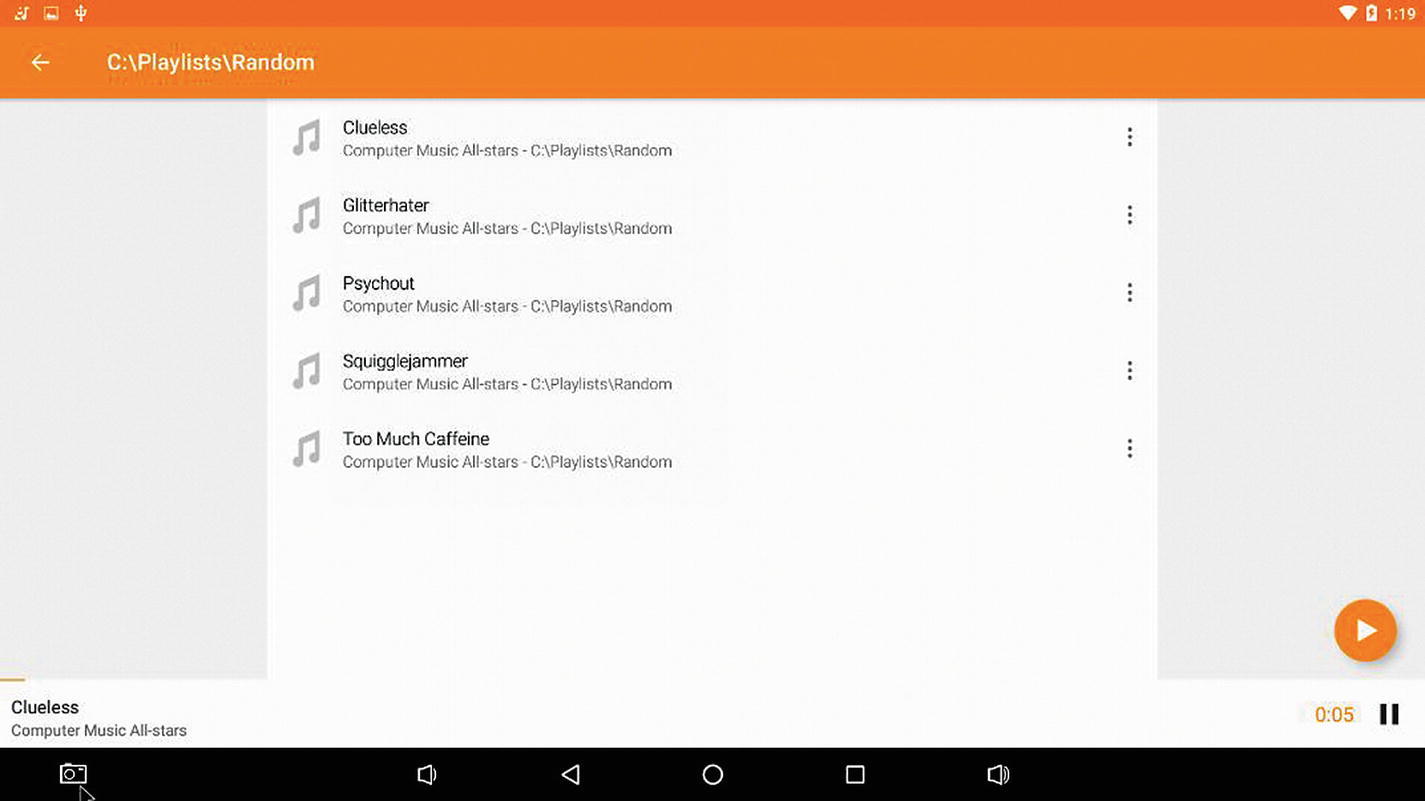
Now playing in VLC
An additional feature is that music will continue to play in the background when using other apps, as with desktop music players. With the functionality available for both video and audio, VLC can be a single solution for media playback in Android on the Tinker Board, just like it was for TinkerOS.
ApkInstaller
One app that comes preinstalled may be unfamiliar to you, especially if you are not an avid Android user, and that is ApkInstaller. If you have no idea what that means, you can probably at least infer that it is an application that installs something, that something being an APK. But what is an APK?
An APK is the installation file for an Android app, similar to .EXE files on desktop machines. If you’re following along with the examples, you actually just installed an APK for VLC. Traditionally, you would install an APK file, or app, through an app store; such as Google Play and as a result never even think about the fact that a file is being installed onto an operating system. ApkInstaller takes out that app store middle man and allows you to take an APK file and manually install it onto your Android operating system.
Legal Considerations
The idea of installing apps without an app store sounds very freeing and makes Android feel more like a desktop operating system. But if this is making you wonder if there are any piracy or legal concerns associated with this process, then you’re absolutely right. If you were to download an app’s APK from a third-party website, especially an app that would cost money if you were to download it from an app store, and install that APK and run it, that would certainly be considered piracy and could be subject to legal action. In general, it’s ill-advised to download an APK file from a third-party site since there are virus concerns associated with many of them. So, with all of these red flag concerns in mind, why is this application included?
An ApkInstaller doesn’t have to be used for technological evil. If you were to develop your own Android app and install its APK, that would be completely legal, and you would have every right to do this. Other scenarios could be if another developer sent you their APK to install and test, or perhaps a company were to post an APK file online, like VLC, for their app to install outside an app store environment. All of these are perfectly legal and sensible uses of the ApkInstaller, and they are why ASUS includes it. This version of Android for the Tinker Board is really intended for developers to have a high-powered test bed to play around in Android so that they don’t have to have an emulator on their desktop or a phone or tablet.
How It Works
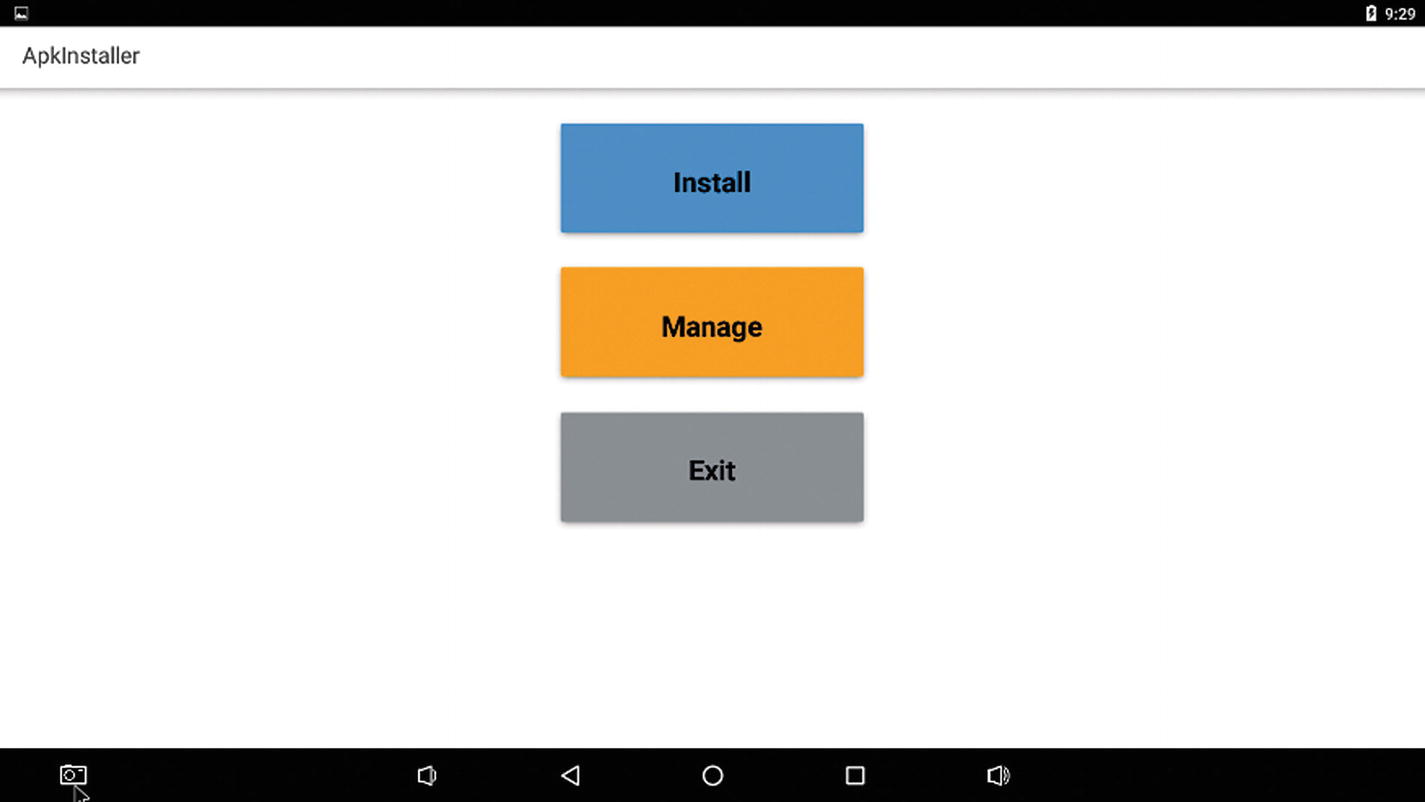
The ApkInstaller GUI
Install

Attached storage devices available to install APK files from
Manage
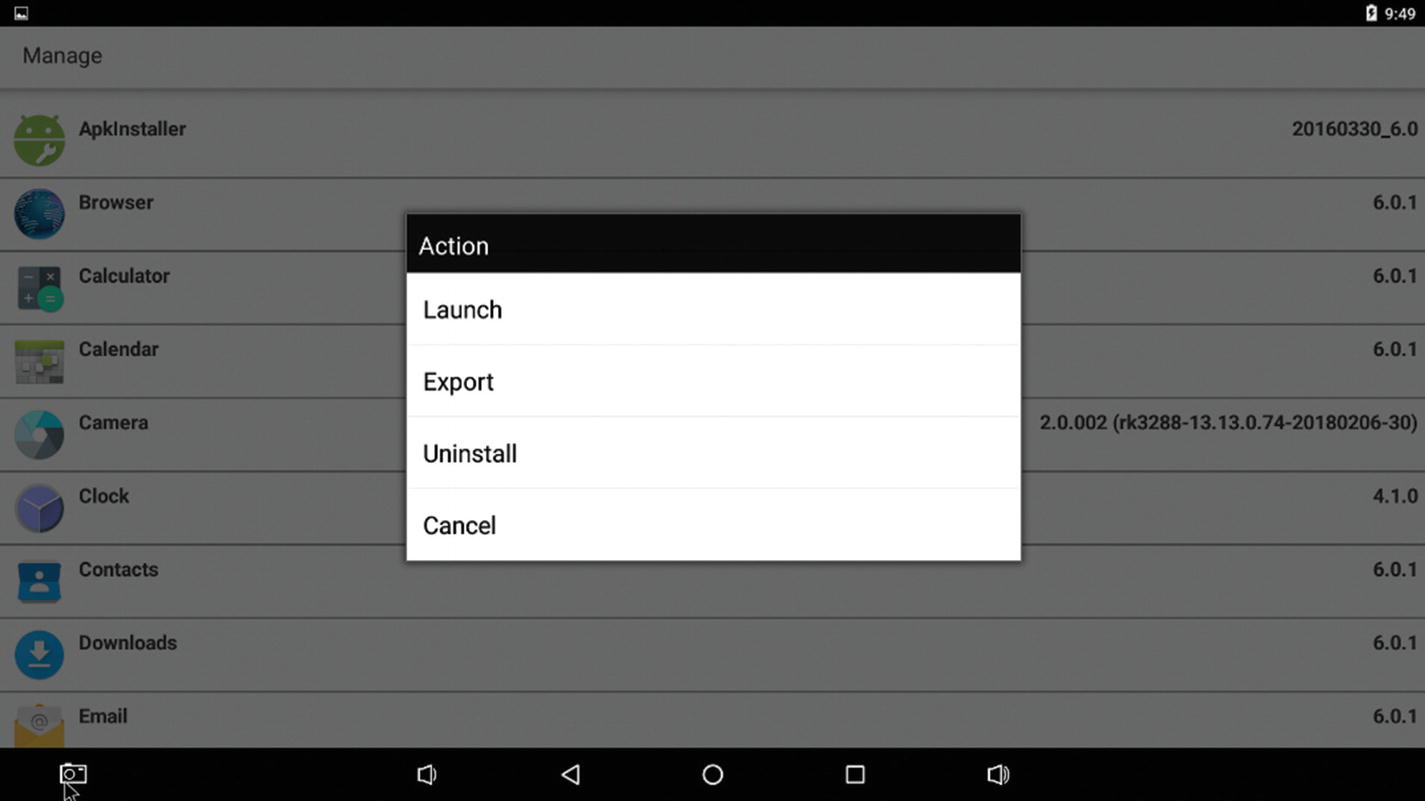
Options available for apps when using the Manage tool
Note
If you export any APK files, please keep the legal discussion from earlier in the chapter in mind.
Exit
The last button available in ApkInstaller is Exit, and unlike its counterparts, it doesn’t have any advanced features of functionality; it simply closes out the app.
But as you can see, the ApkInstaller app is quite powerful and really opens up the Android experience for developers. It does some things with a single click that can sometimes be nearly impossible or extremely difficult otherwise. But as discussed earlier, it’s important to use this app for its intended purpose only and not to use it for malicious purposes.
Power
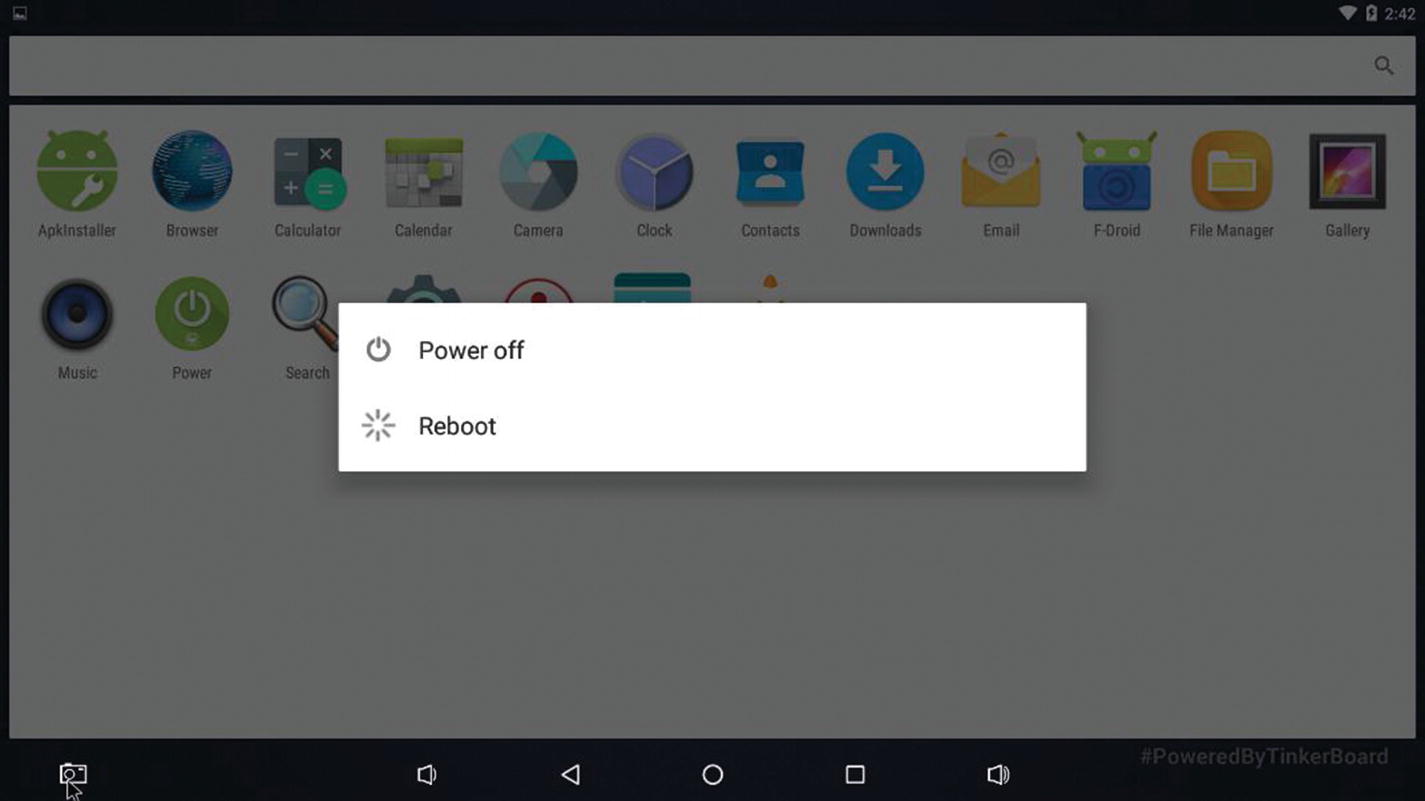
The options for shutdown and reboot
Where Is the App Store?
With all this talk about apps, you may have noticed that there is no app store preinstalled on this Android distro. Traditionally the app store that you would find on most Android phones or tablets is the Google Play store; so why isn’t it on the Tinker Board? Again, this distro is meant for developers, but another reason is that in order for Google Play to run and be used on an Android device, it needs to be a certified Google Android device.
The Tinker Board is not a certified Google Android device, but there are other app stores available for Android that can be installed and used on the Tinker Board. The one that we’re going to look at is F-Droid, which features free and open source applications to install. They also have automatic updates and security patches for their apps similar to what you may be familiar with on your smart phone or tablet’s app store.
Note
There have been some success stories on the forums of getting the Google Play store running on the Tinker Board. However, the process has not worked consistently, and it is a bit of a hack. Additionally, since the Tinker Board is not a certified Google Android device at this time, this would be a violation of the Google Play terms of service. As a result, the process could not be showcased in this book. Therefore, we are instead looking at the open source option F-Droid.
Installing F-Droid
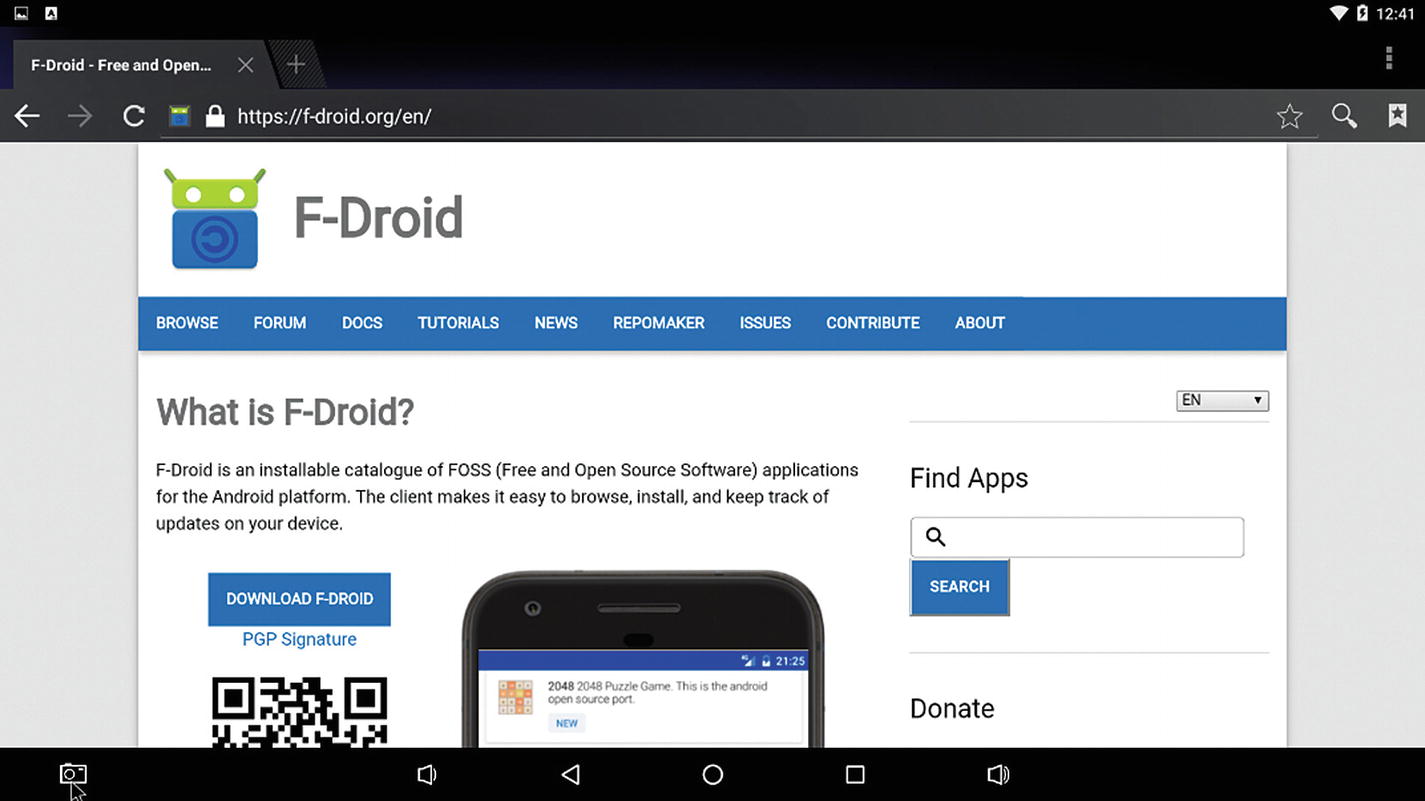
The F-Droid web page. Notice the download option toward the middle of the page.
Exploring F-Droid
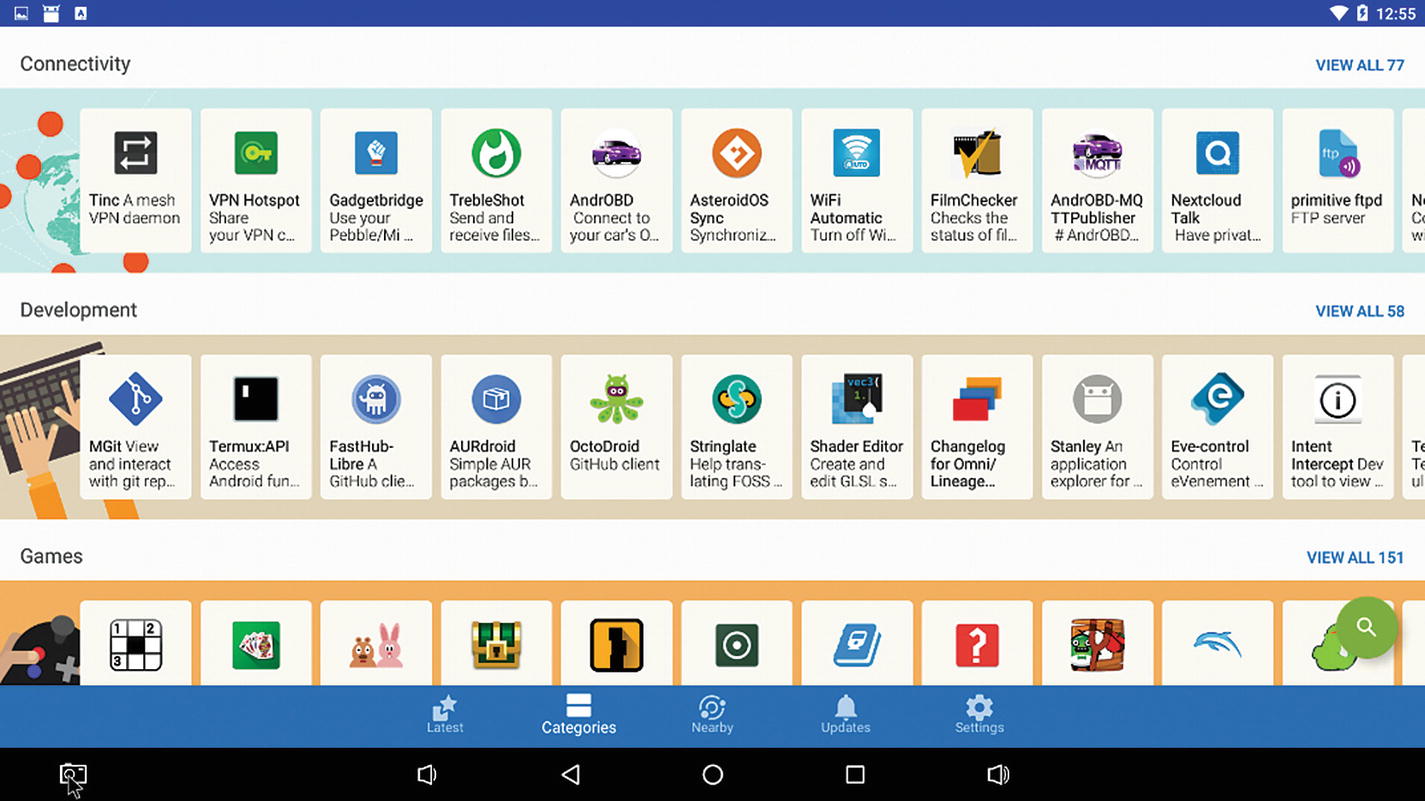
The F-Droid app store’s Categories view
Almost every app genre is featured here, though, from audio players to Internet security to games. We’re going to look at a couple of apps from F-Droid to fill in some gaps left by the absence of the Google Play store that some avid Android fans may be feeling.
How apps appear for installation in F-Droid
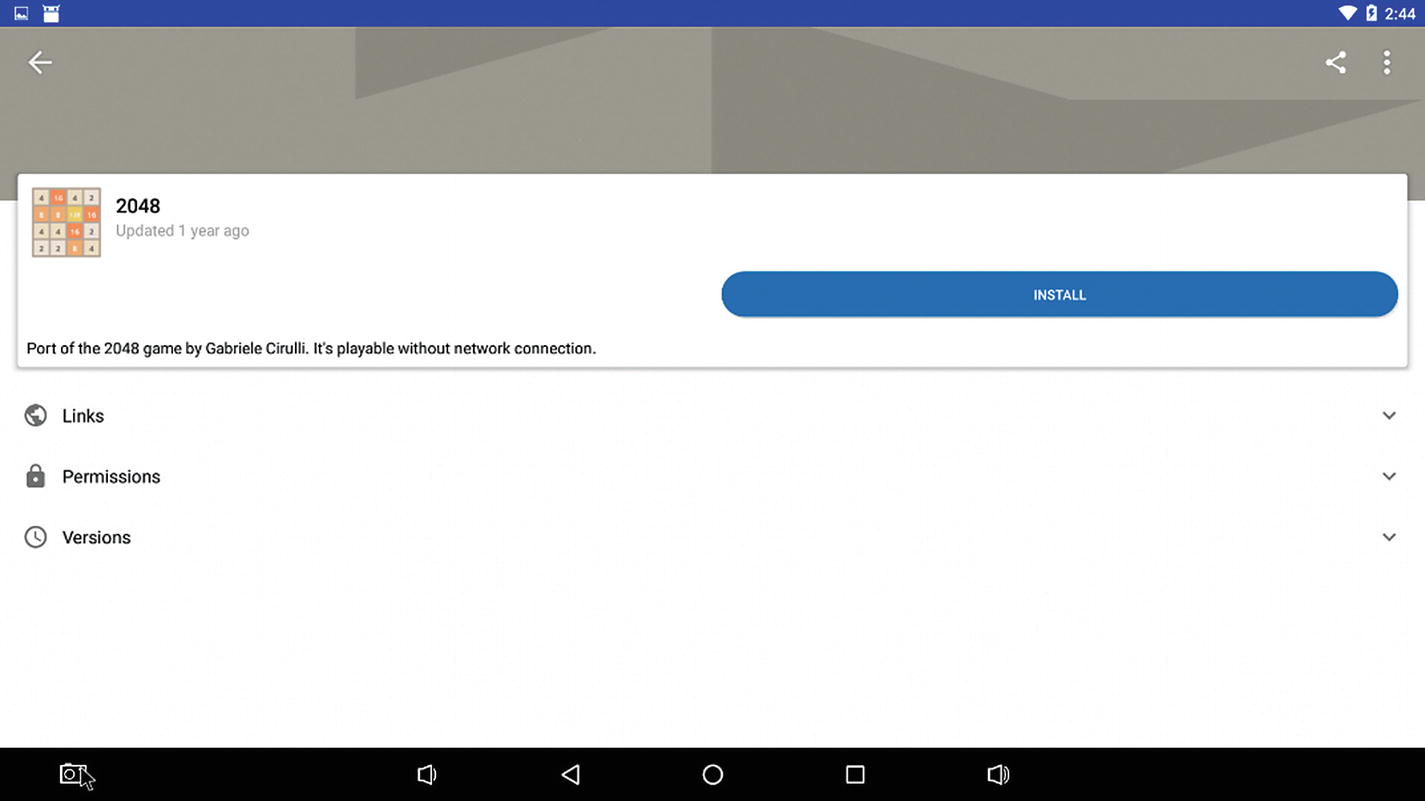
As you can see, there are a wide variety of apps to choose from and try out in the F-Droid store. A few that many people may find particularly interesting are Newpipe, 2048, and Open Camera.

The Newpipe video settings
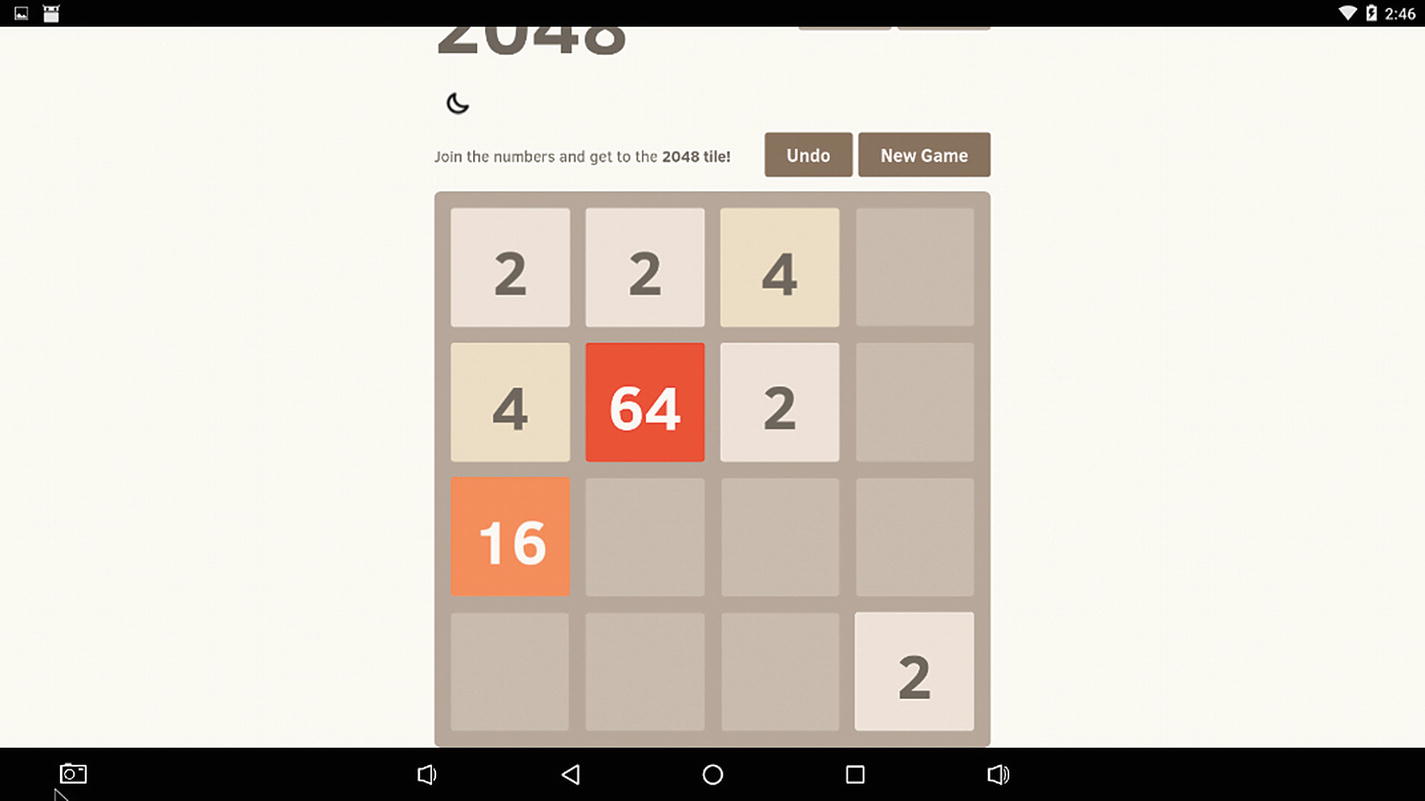
2048 gameplay in action
Media playback and games are great, but let’s wrap this up with a look at a more functional app: Open Camera. Open Camera is a camera app that utilizes a camera attached to the Tinker Board just like the included Camera app in the Android distro. Open Camera is a much more robust camera app though, featuring many advanced controls, such as zoom, bitrate, and framerate controls for video and a customizable GUI.
Using Open Camera for Time-Lapses
One feature that really stands out for Open Camera is the timer. This allows you to set up a time-lapse camera with very little effort. Time-lapse camera projects with single-board computers are quite popular because of their size, processing power, and storage capabilities. Often this is done in a Linux operating system, like TinkerOS, but that requires programming and can be complicated depending on your needs. Using Open Camera with this Android distro, though, makes things simple and allows you to adjust settings easily if you need to through the GUI.
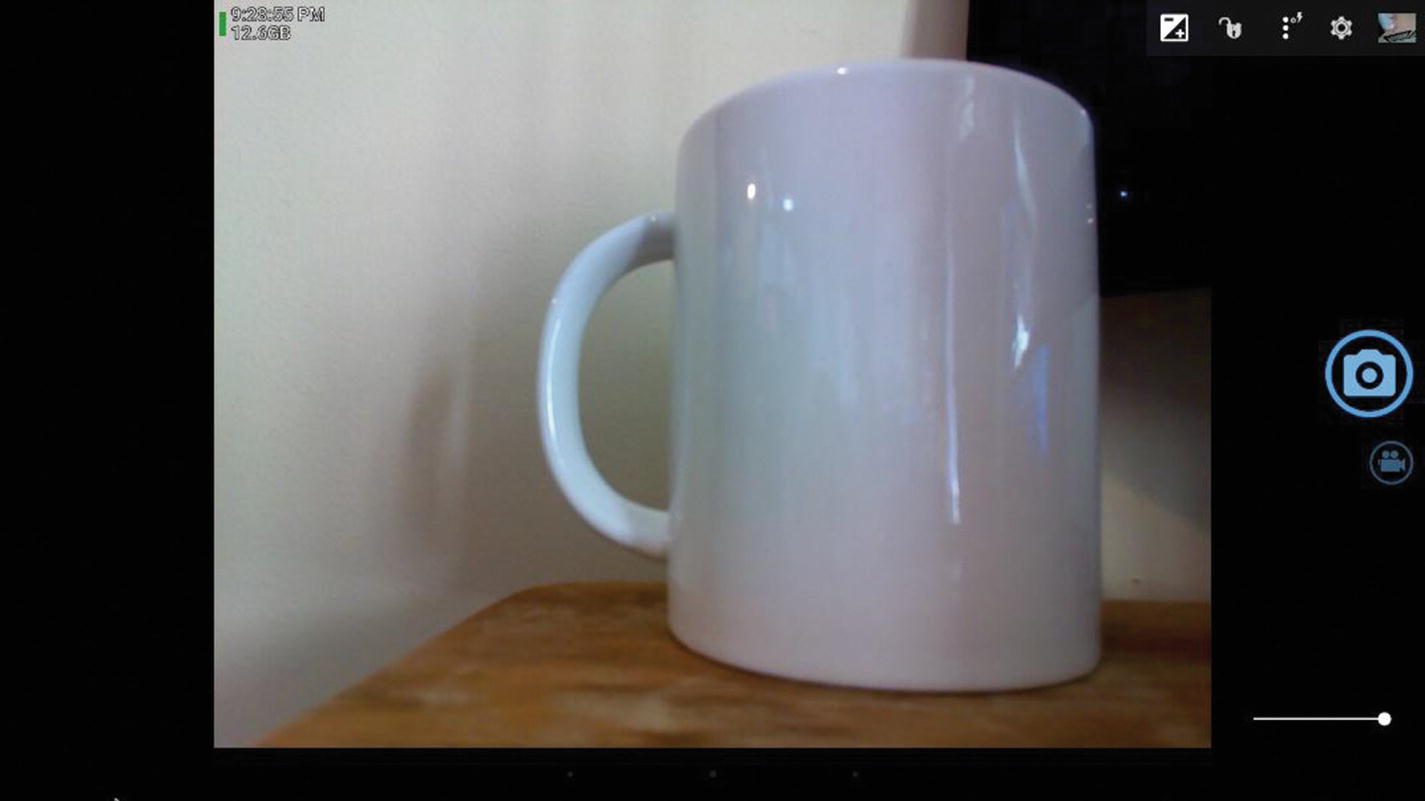
The Open Camera GUI
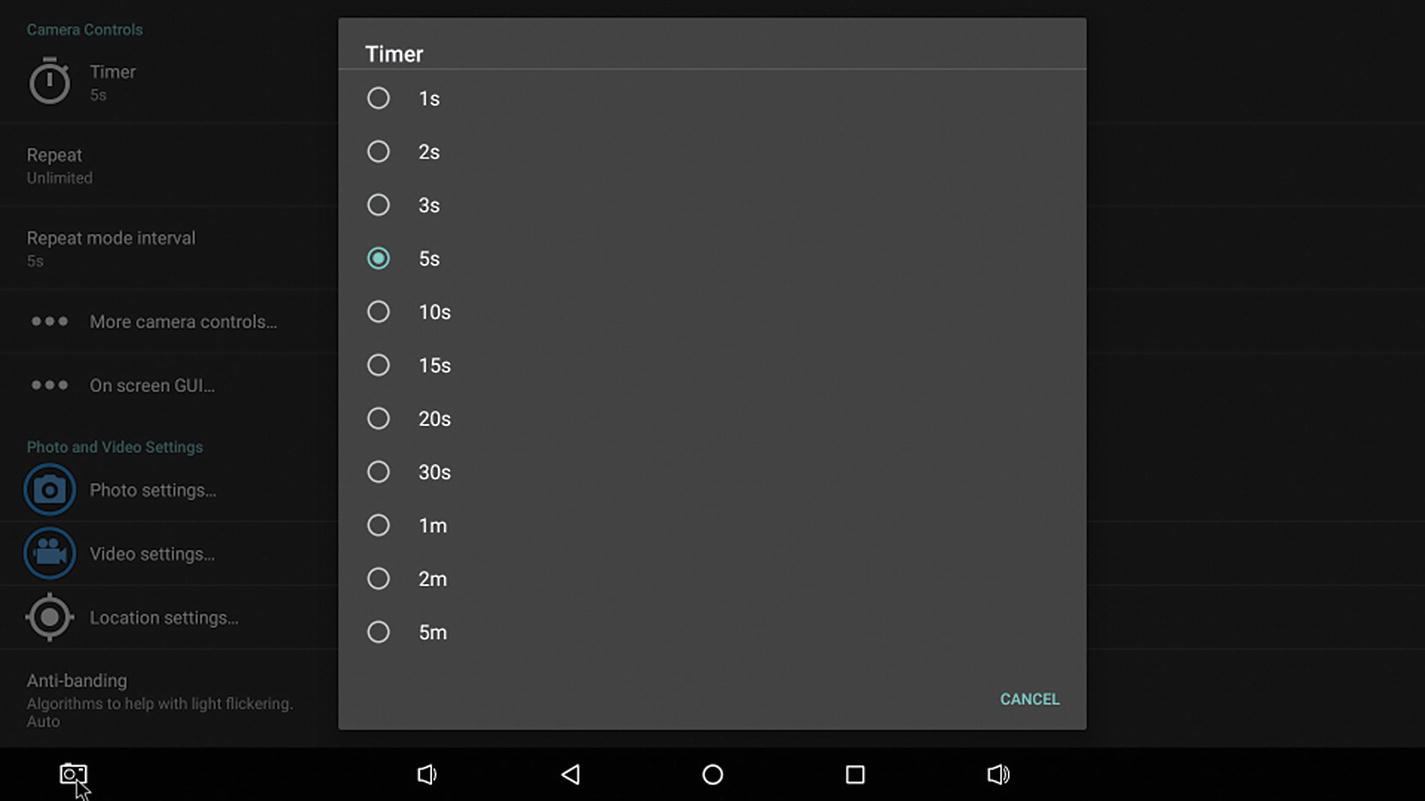
The Timer options for time intervals
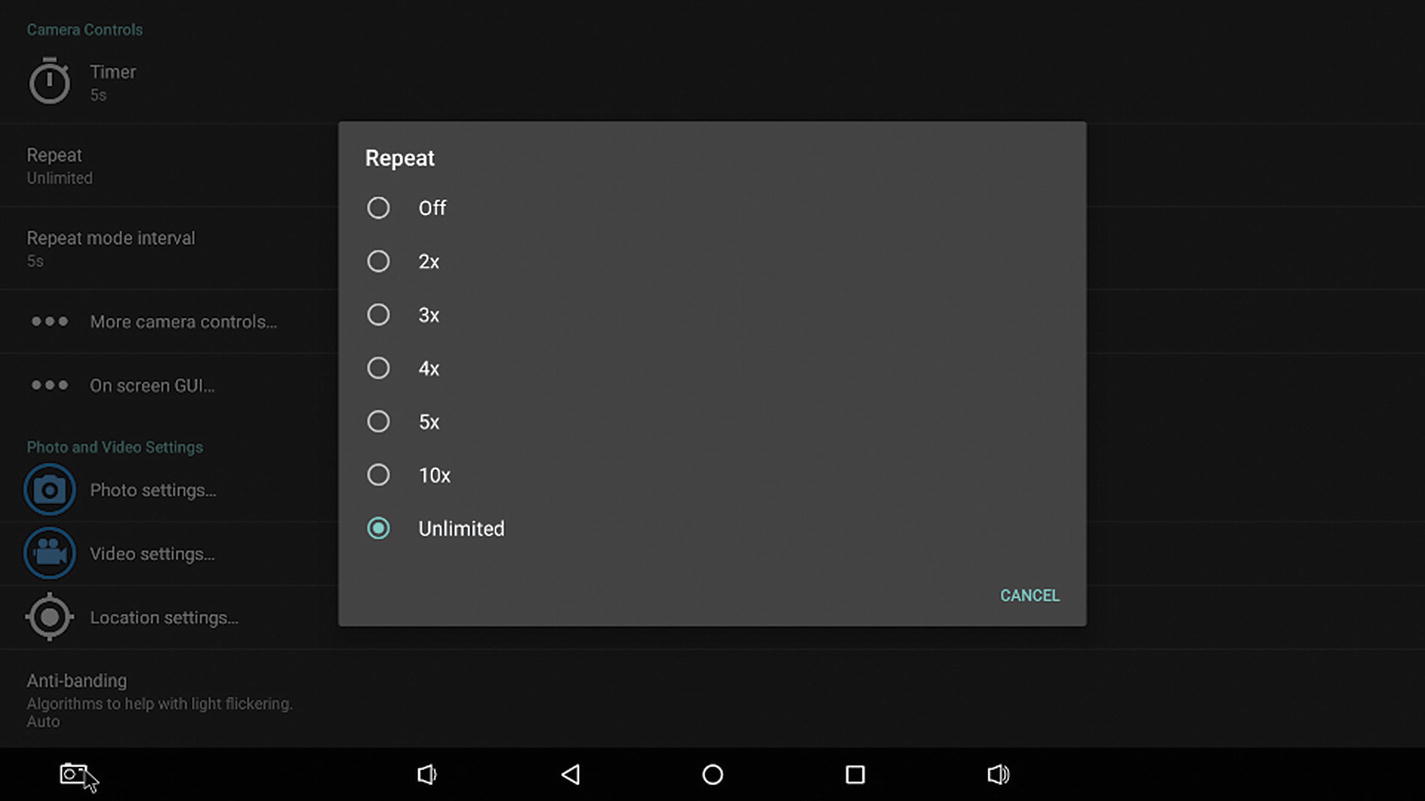
The Repeat options. Unlimited will allow your time-lapses to go for as long as you want them to.

Options available for the repeat mode interval
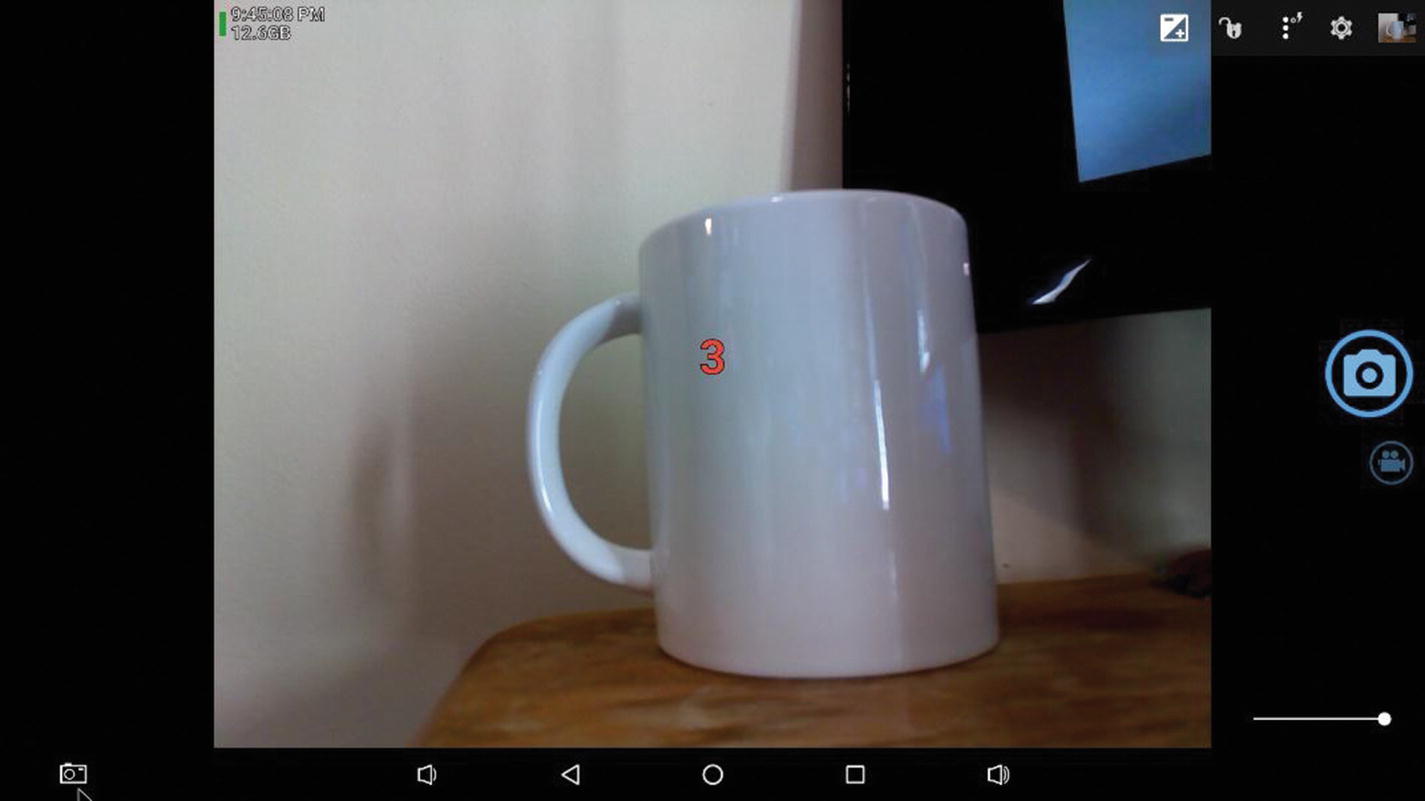
The Open Camera GUI while a time-lapse is in progress. Notice the 3 over the preview window, which lets you know that a photo will be taken in 3 seconds.
Note
If you want to take a single photo with the app, then you’ll have to reset your timer settings that were set up in the previous steps.
Conclusion
When we typically think of Android, we think of smart phones or tablets, usually with Google integration. Android for the Tinker Board is a departure from that and instead goes the open source route to give you an idea of what this OS architecture is capable of outside its branded smart phone and tablet form. At this time there aren’t many single-board computers that have a dedicated Android operating system distributed by the manufacturer, so the Tinker Board provides a great opportunity to explore Android from a different perspective.