
We’ve spent the last few chapters getting acquainted with the Tinker Board, covering all the basics from the architecture of its system on a chip (SoC) to running a full OS and finally running code that interfaces with electrical circuits attached to its GPIO pins. That’s a lot to go over, and we’ve only scratched the surface. Now it’s time to take what we’ve learned and apply it to projects that will take the Tinker Board to the next level as a practical tool. The first project that we’re going to look at has become an increasingly popular project among single-board computer users: a game emulation system.
What Is Emulation?
Game emulation is a software-based process that emulates the hardware characteristics of gaming systems or computer architectures. This allows your computer or other device to run games or other programs that would otherwise be incompatible. Single-board computers are great choices for emulator hardware because of their form factor, system specs, and ability to run Linux. This makes the Tinker Board and Tinker Board S especially appealing as emulation hardware with their higher-than-average SoC specs.
Even though game emulation is often targeted at hardware that is much older and underpowered compared to modern hardware, system specs do matter. You may think that if you’re trying to emulate a system that had utilized an 8-bit architecture you don’t have to worry about the speed of your CPU or amount of RAM, but because everything is software-based, system specs become a paramount concern and the higher the spec the better. An underpowered system can ruin an emulation experience and render the emulator and emulated program unusable.
There are many ways to emulate games, and often your final choice will come down to preference. For this project we’re going to look at a specialized Linux distribution option for gaming emulation called Lakka. We’ll walk through how to set up and navigate Lakka for the Tinker Board.
ROMs
Before we go any further, though, we need to address the elephant that always sneaks into the room during any discussion on game emulation: the legality of ROMs. ROM stands for read-only memory and is a reference to the chips found on old game cartridges that held the game data that would be read by the gaming system. Despite its hardware origin, the term ROM has come to be used for the digital files of these old games and programs.
There is a lot of debate and discussion surrounding the use of ROMs for off-the-shelf games that would have been purchased in cartridge form back in the day. Is their very existence legal, let alone their active use inside emulation software? These legal considerations vary based on your location and the original game publisher’s specifications for each game, so be sure to do your research.
There are games and other programs available that do not carry these considerations, though, such as games that exist in the public domain, open source projects, and games made by independent developers, often called homebrew games.
Lakka
The emulation OS that we’re going to use here is Lakka. As previously stated, Lakka is a specialized Linux distribution for retro gaming emulation. It’s a fork of another Linux distro called LibreELEC that we’ll also look at in the next chapter.
Lakka is built on top of RetroArch, which is an open source project for a front-end API that many emulators are based on. RetroArch has been ported to run on many platforms as a standalone program, from modern game consoles to desktop Windows computers. As a front-end, RetroArch controls the GUI, controller inputs, video settings, and similar settings for the emulators.
The actual emulation process takes place on the back end with what are called cores that are built with Libretro, an additional open source project that is built in tandem with RetroArch. Each core is a different game system or older hardware emulator that can be loaded into RetroArch to run corresponding ROMs. The cores take care of the processing and running the code behind the scenes, making Libretro and RetroArch a great pairing of software.
Lakka’s purpose in all of this is basically to load RetroArch upon boot. Instead of implementing the traditional Linux desktop or other GUI, Lakka has only the basics necessary to boot up and load RetroArch automatically. As a result, no other software can really be loaded onto Lakka. Its sole purpose is to run RetroArch. With this setup you are setting yourself up for the best possible emulation experience, since your hardware will not be tied up with any additional back-end processes aside from running the emulators.
Downloading and Installing Lakka
To download the Lakka disk image, we need to navigate to its main builds page at le.builds.lakka.tv, which is separate from the main Lakka web site. This page has every single build available for a multitude of different hardware, some of which would be considered beta or even alpha builds. As of the writing of this chapter, Lakka is not considered to be 100% stable for full release for the Tinker Board, which is why the Tinker Board’s build is located on this page.

The link to the Lakka builds for the Tinker Board

A list of the available Lakka disk images for the Tinker Board. Notice the version numbers, file extensions, and dates.
Next reformat your microSD card or the eMMC flash module on the Tinker Board S, following the directions in Chapter 3. As with any operating system install, it’s important to start with fresh media for best results.
Note
It’s recommended to use a storage device with a capacity of at least 16GB and a speed of at least 10Mbps. Otherwise, you may run into compatibility issues.
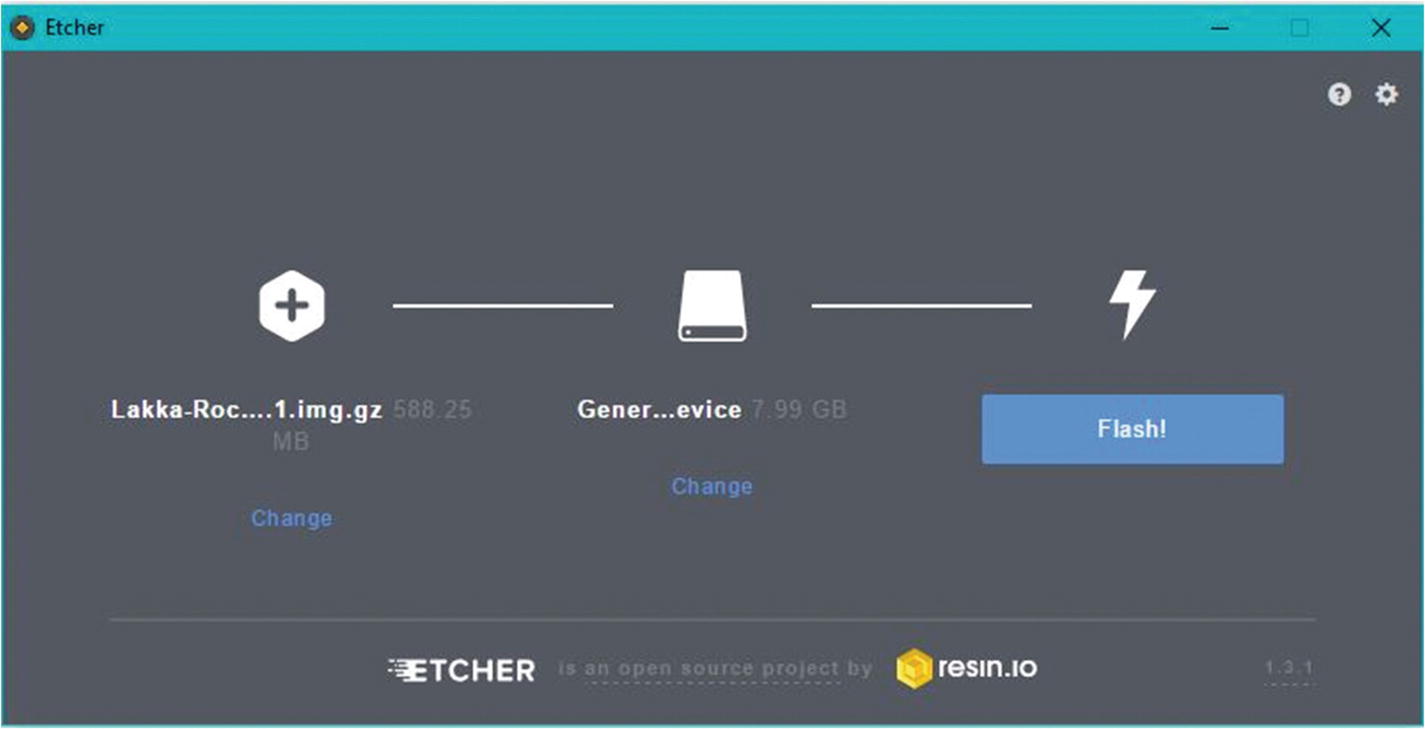
The Lakka disk image loaded into Etcher
First Boot
After flashing the Lakka image to your selected storage device, you can power up the Tinker Board for the first boot. Much as it does with other operating systems, the first boot takes a bit longer than subsequent boots. During Lakka’s first boot, the file system will be resized and then finally boot into the landing page for RetroArch.
Here will be a test of whether your chosen storage is too small or too slow. If Lakka seems to get stuck at all, that is probably the case. Again, it’s recommended to use a storage device that is at least 16GB and has speeds comparable to SDHC cards.
The Lakka GUI
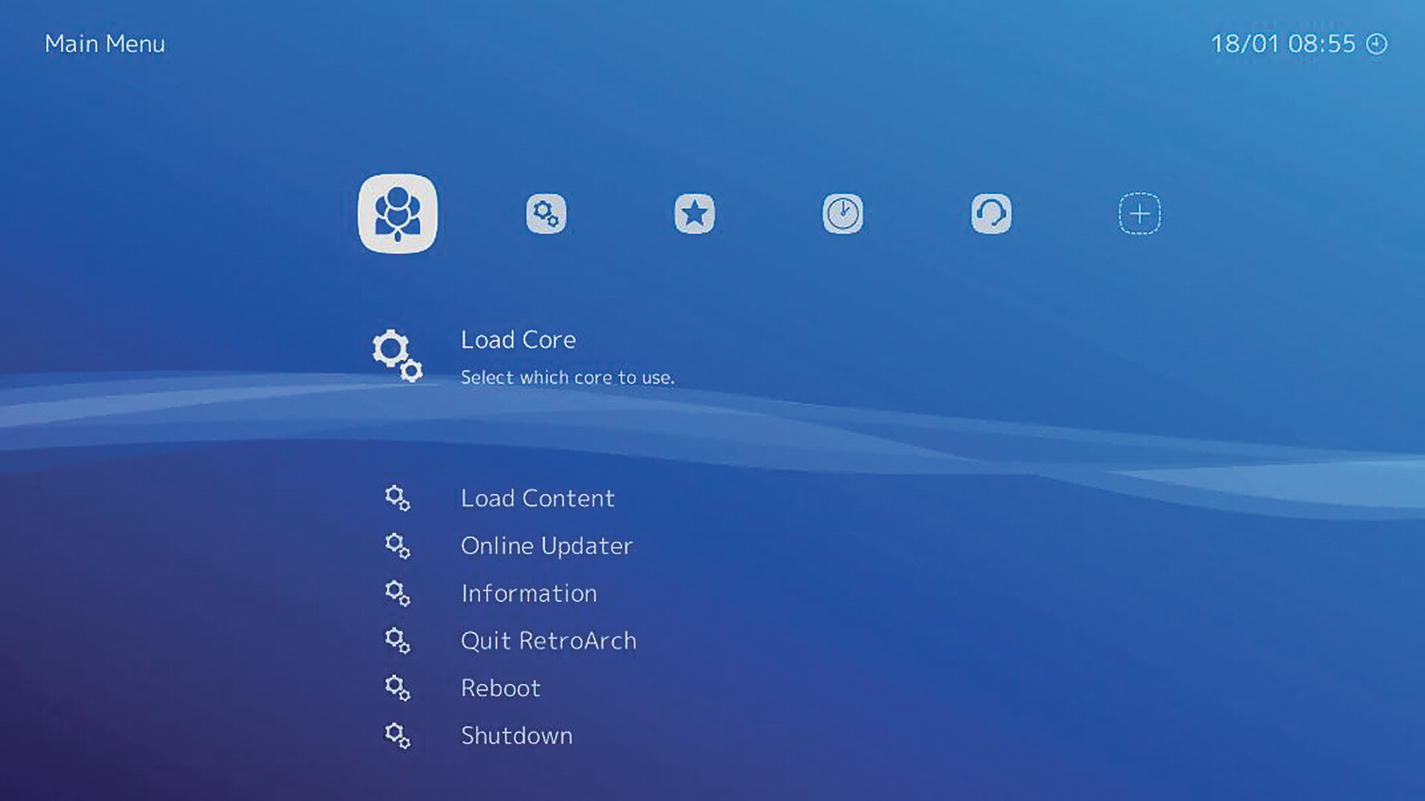
Navigating Lakka: the Main Menu
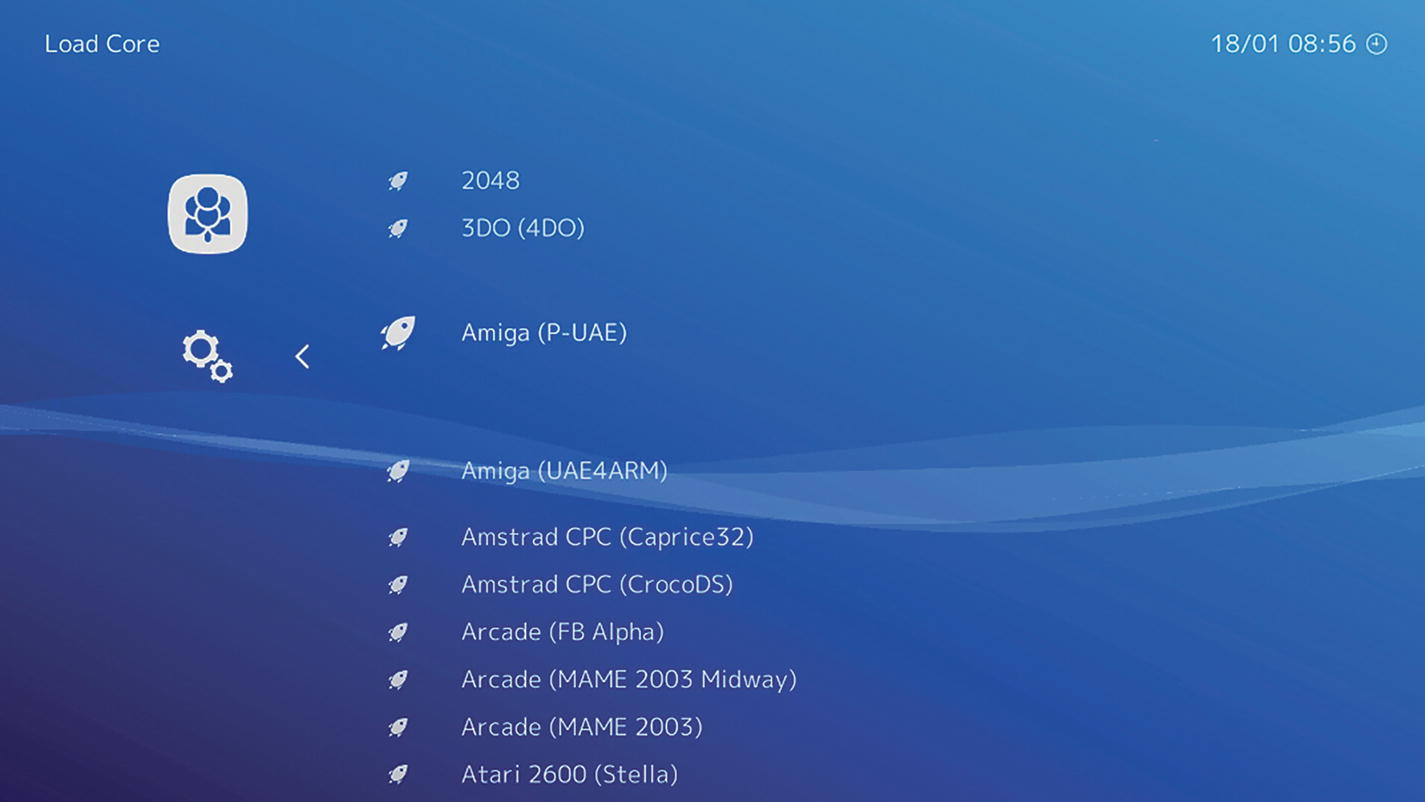
The Load Core menu. All of these cores are built with libretro.
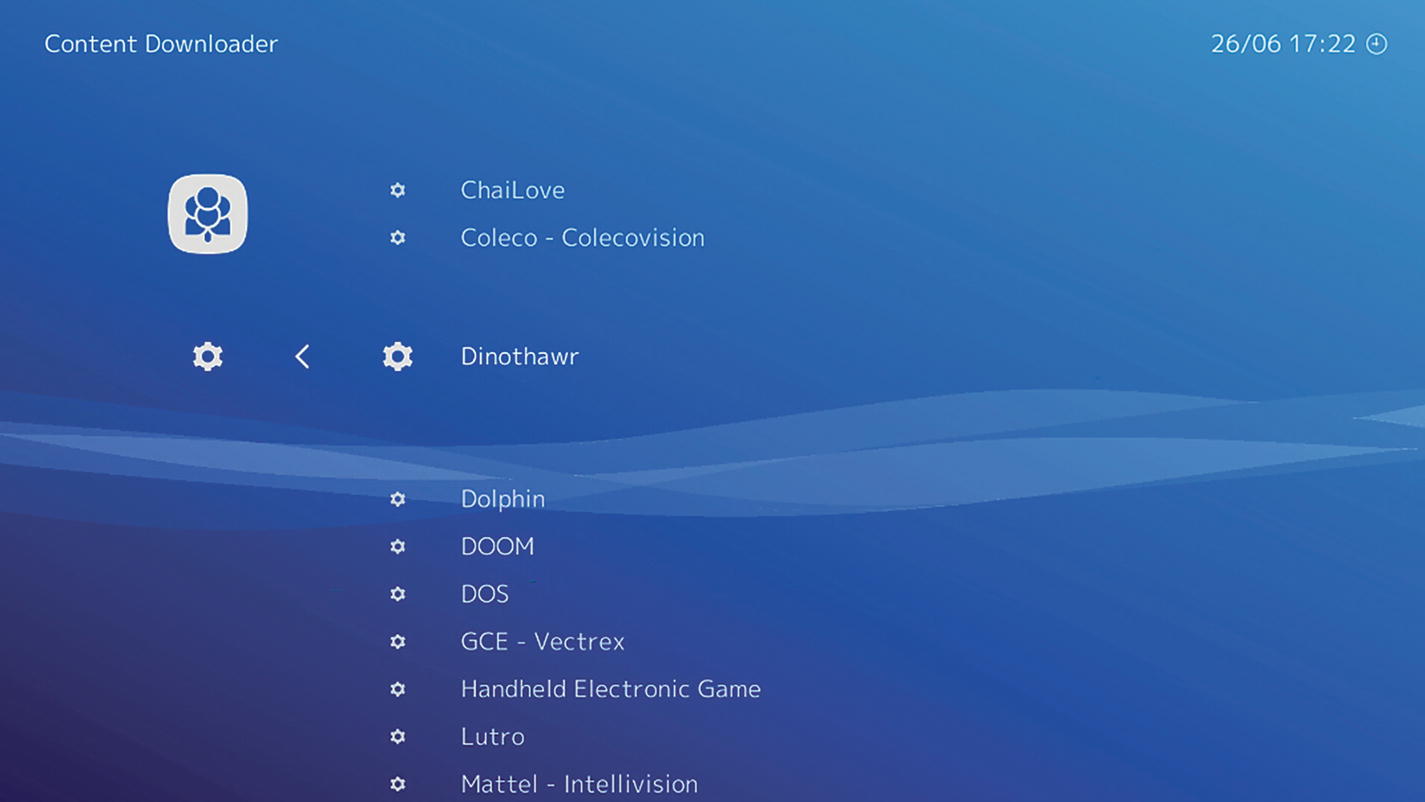
The Content Downloader menu
Note
In order for any options to appear in the Content Downloader menu, you need to have the Tinker Board connected to the Internet.
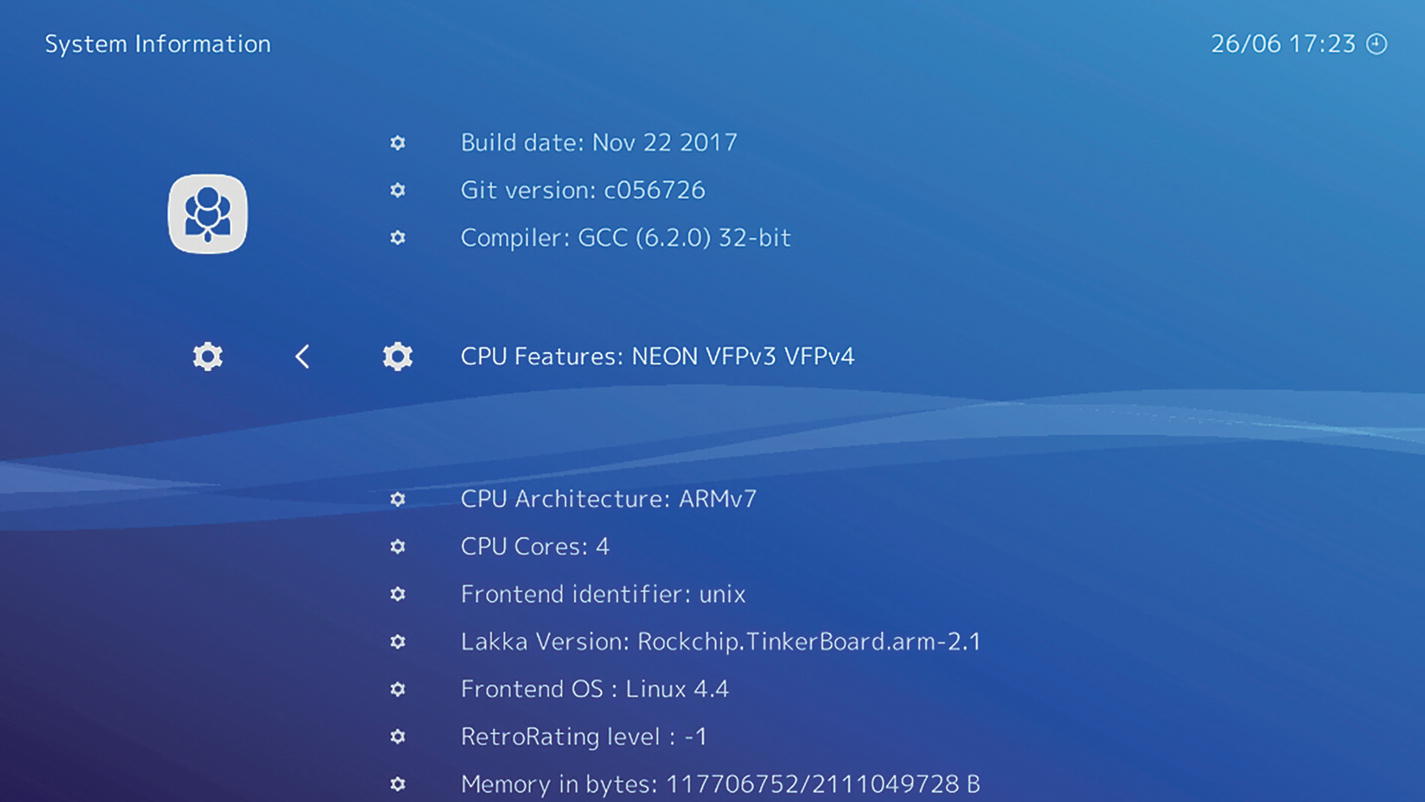
The System Information for the Tinker Board in Lakka. Some of these specs will look quite familiar now.
The last three options on the Main menu are utilities for Lakka. Quit RetroArch exits the program (and then goes right back into it since there is nothing else to run on Lakka besides RetroArch), Reboot reboots the system, and Shutdown safely shuts everything down.
Settings
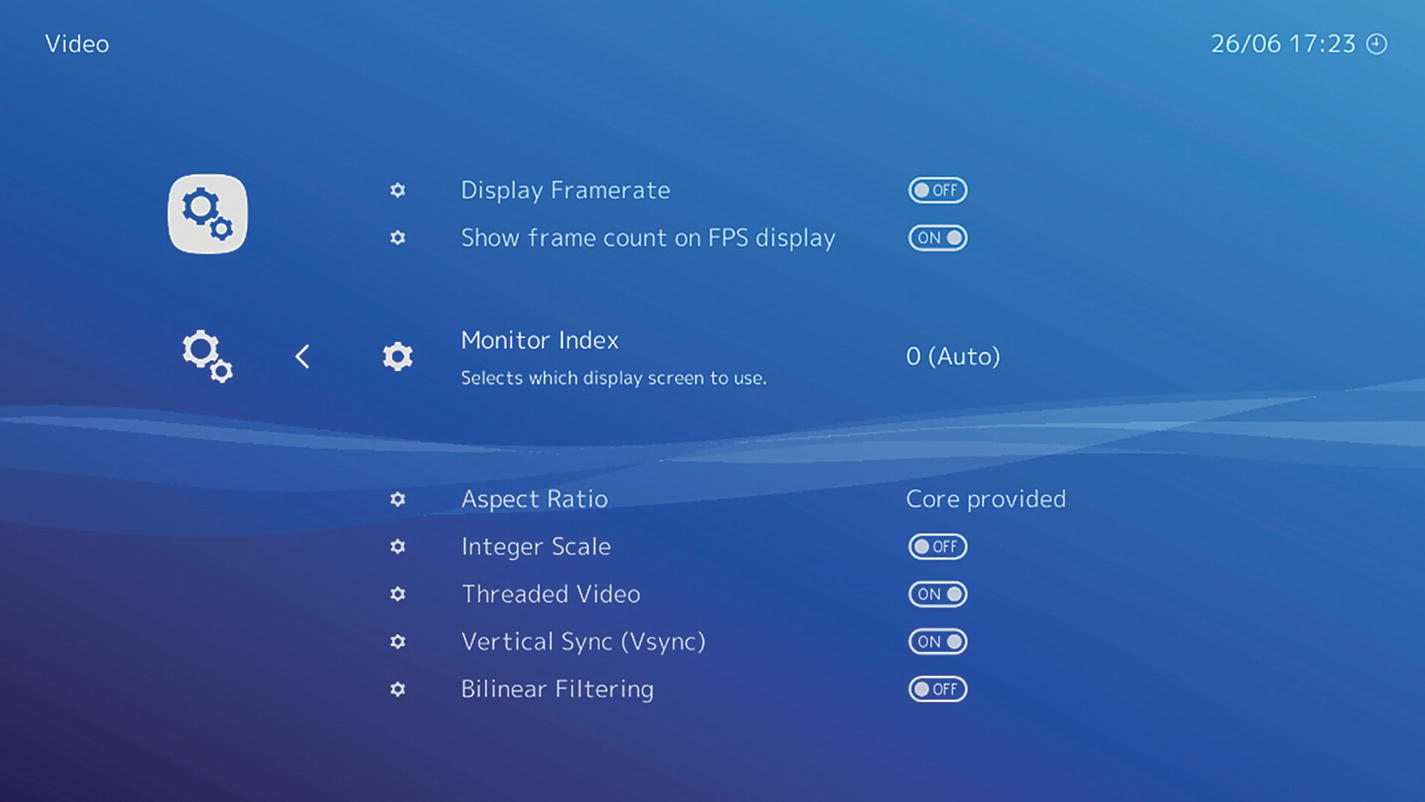
The Video Settings page
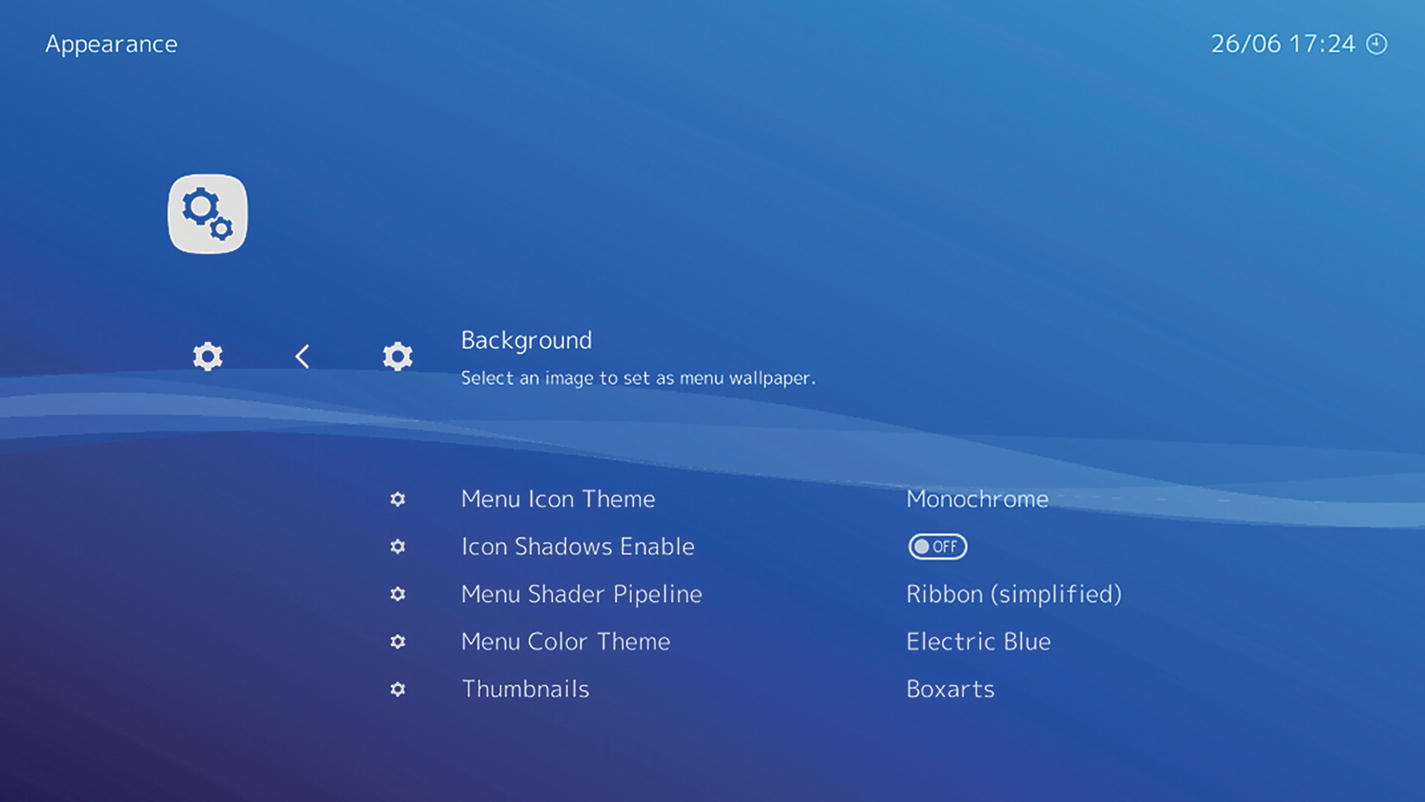
Editable Appearance options for Lakka. Much like other operating systems we’ve looked at, the GUI has a lot of customization options.
Wi-Fi lets you connect to a wireless network. Simply select it from the menu, and Lakka will scan for available networks. Once yours appears, select it and enter your password. You’ll now be connected to Wi-Fi. You won’t need to be connected to the Internet to successfully use Lakka, but it can be useful for some tasks.
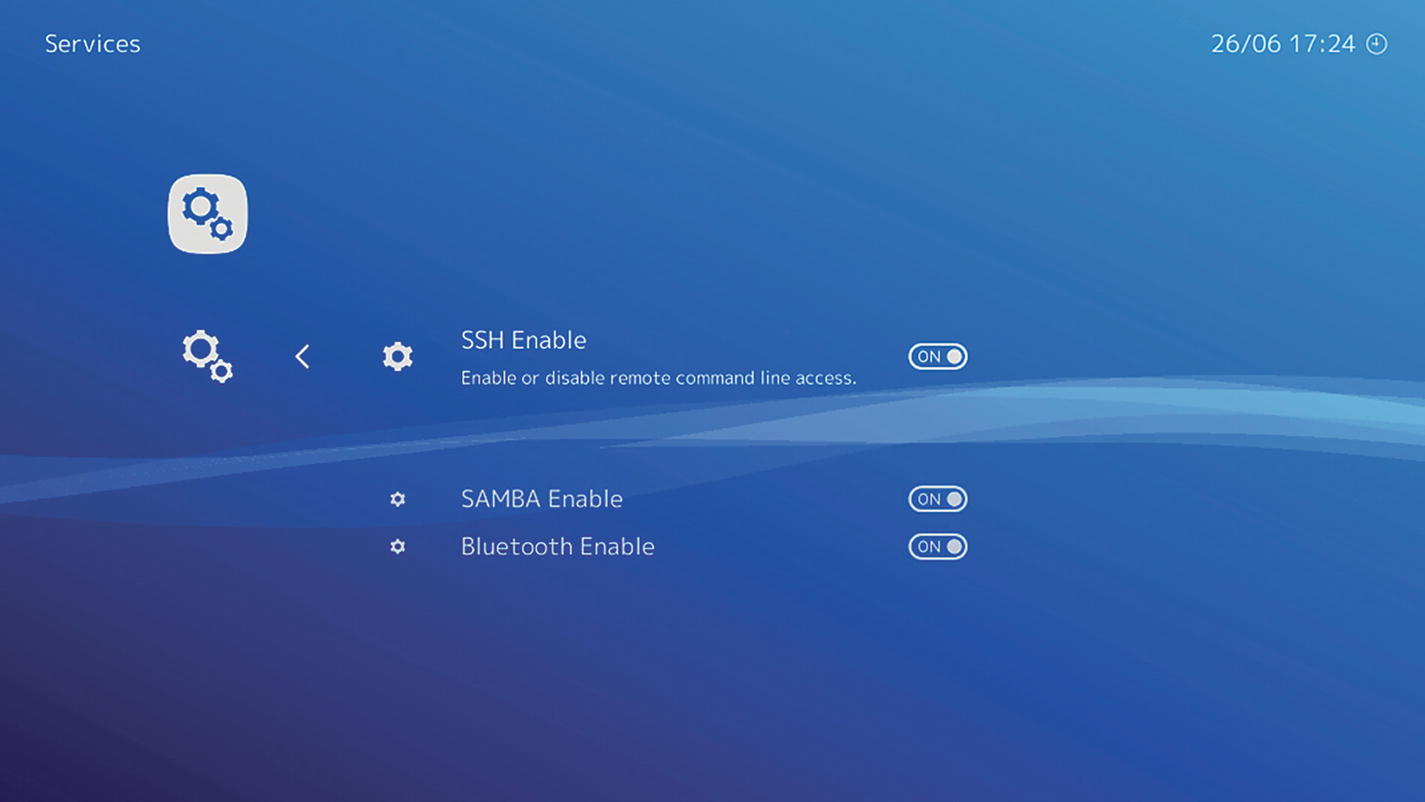
The Services menu. All three Services can be toggled on or off
Favorites, History, Netplay, and Import Content
Moving on to the last few menus, Favorites will eventually populate with ROMs that you mark as favorites and add to playlists as mentioned earlier. History will also populate after you play a few games, showing the most recently played in a list. Netplay is a feature of RetroArch that allows you to play multiplayer games between two different builds of Lakka. Import Content is the utility used to import any media, including ROMs, into your Lakka install. We’ll go over how to do this shortly.
Importing ROMs into Lakka
Now that we’ve toured Lakka’s GUI, we can start using it properly by first loading in some ROMs. There are a few methods for loading ROMs and other content into Lakka. We’ll go over two methods that are OS-agnostic, meaning that no matter which desktop operating system you’re using, whether Windows, macOS, or Linux, you’ll be able to follow these steps to load ROMs onto Lakka on the Tinker Board.
Loading ROMs over the Network
The first method we’ll discuss is loading ROMs over the network from your computer to the Tinker Board. To do this, both devices need to be on the same network, either wirelessly or wired. For Lakka, make sure you either enable and connect to Wi-Fi as discussed earlier in the chapter or connect an Ethernet cable to the Tinker Board.
Once the Tinker Board is online, go to your computer and open your file browser. Enter your Tinker Board’s IP address, which can be found under Main Menu ➤ Information ➤ Network Information in Lakka, at the top of your file directory’s window using the proper IP syntax for your operating system.

Lakka’s file system viewed remotely
You’ve probably figured out by looking at Figure 7-11 that ROMs are stored in the ROMs folder in Lakka. Open that folder and then open a second file directory window on your computer to navigate to your locally stored ROMs that you want to transfer to the Tinker Board.
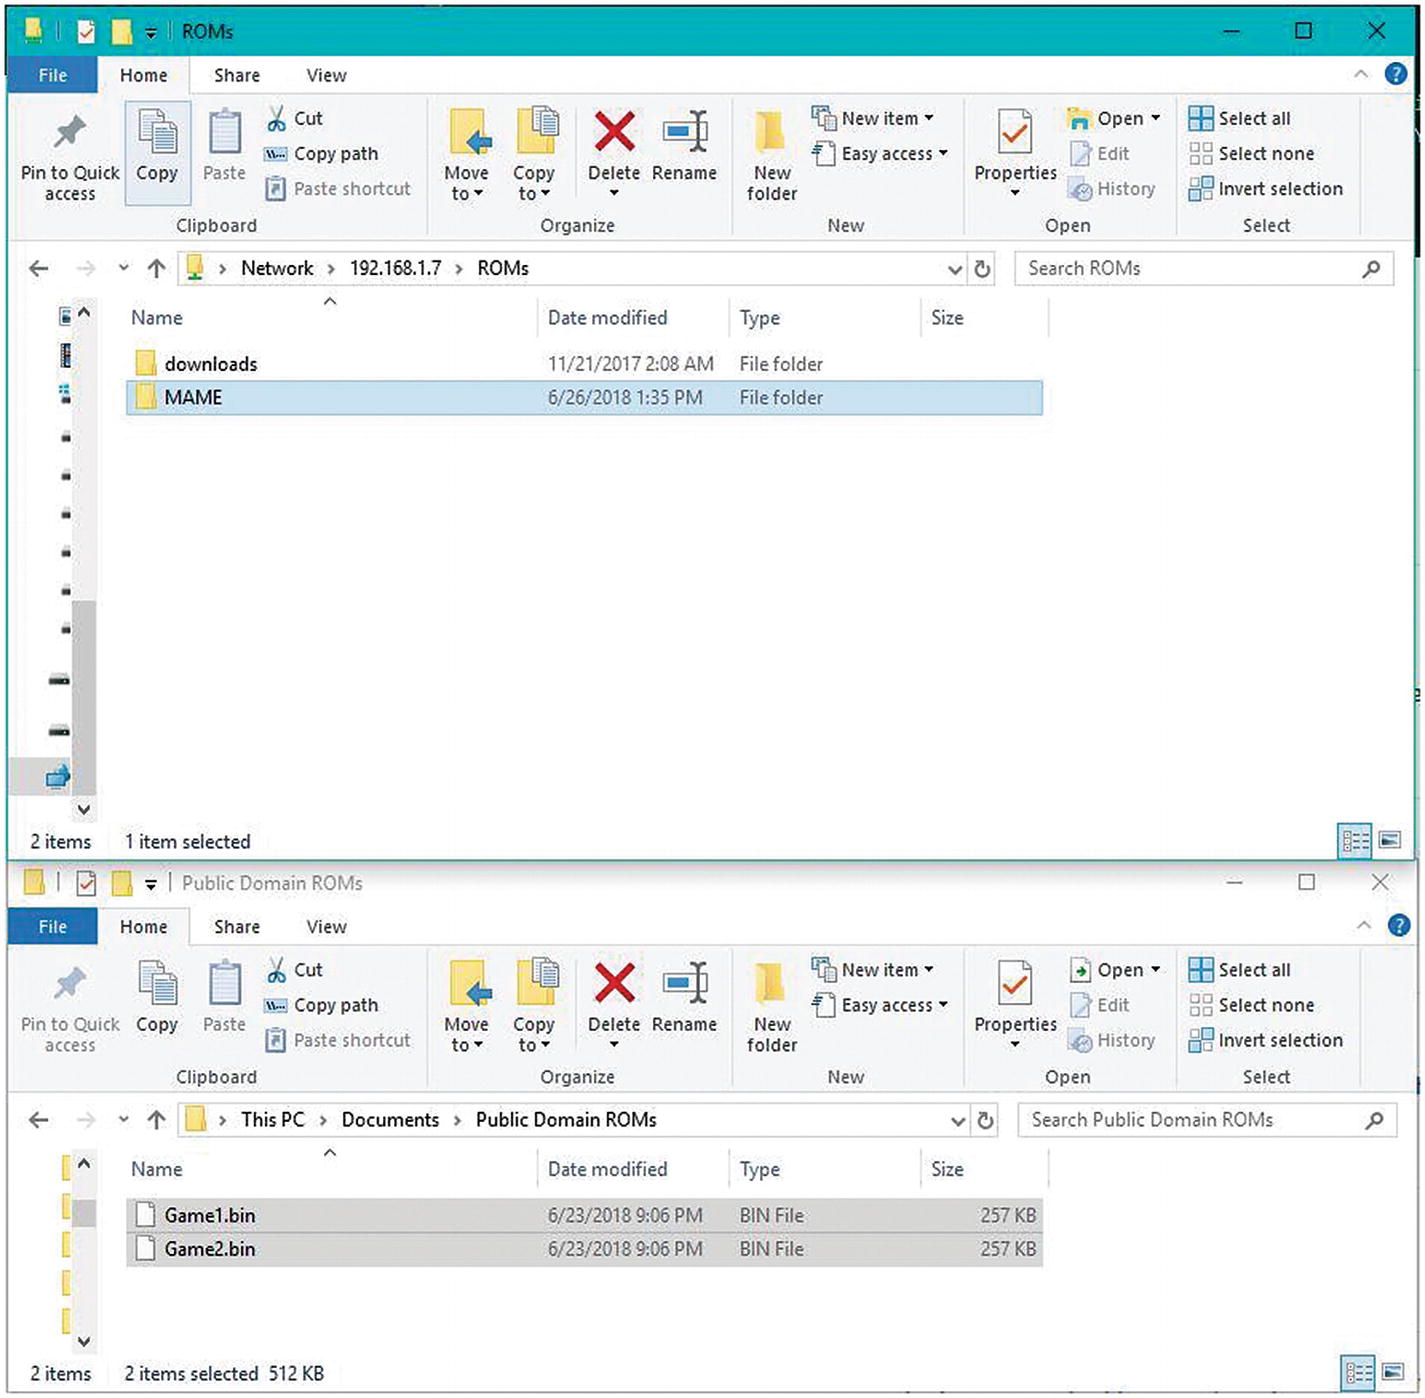
A new folder has been created in Lakka’s ROMs folder, and your locally stored ROMs are queued up
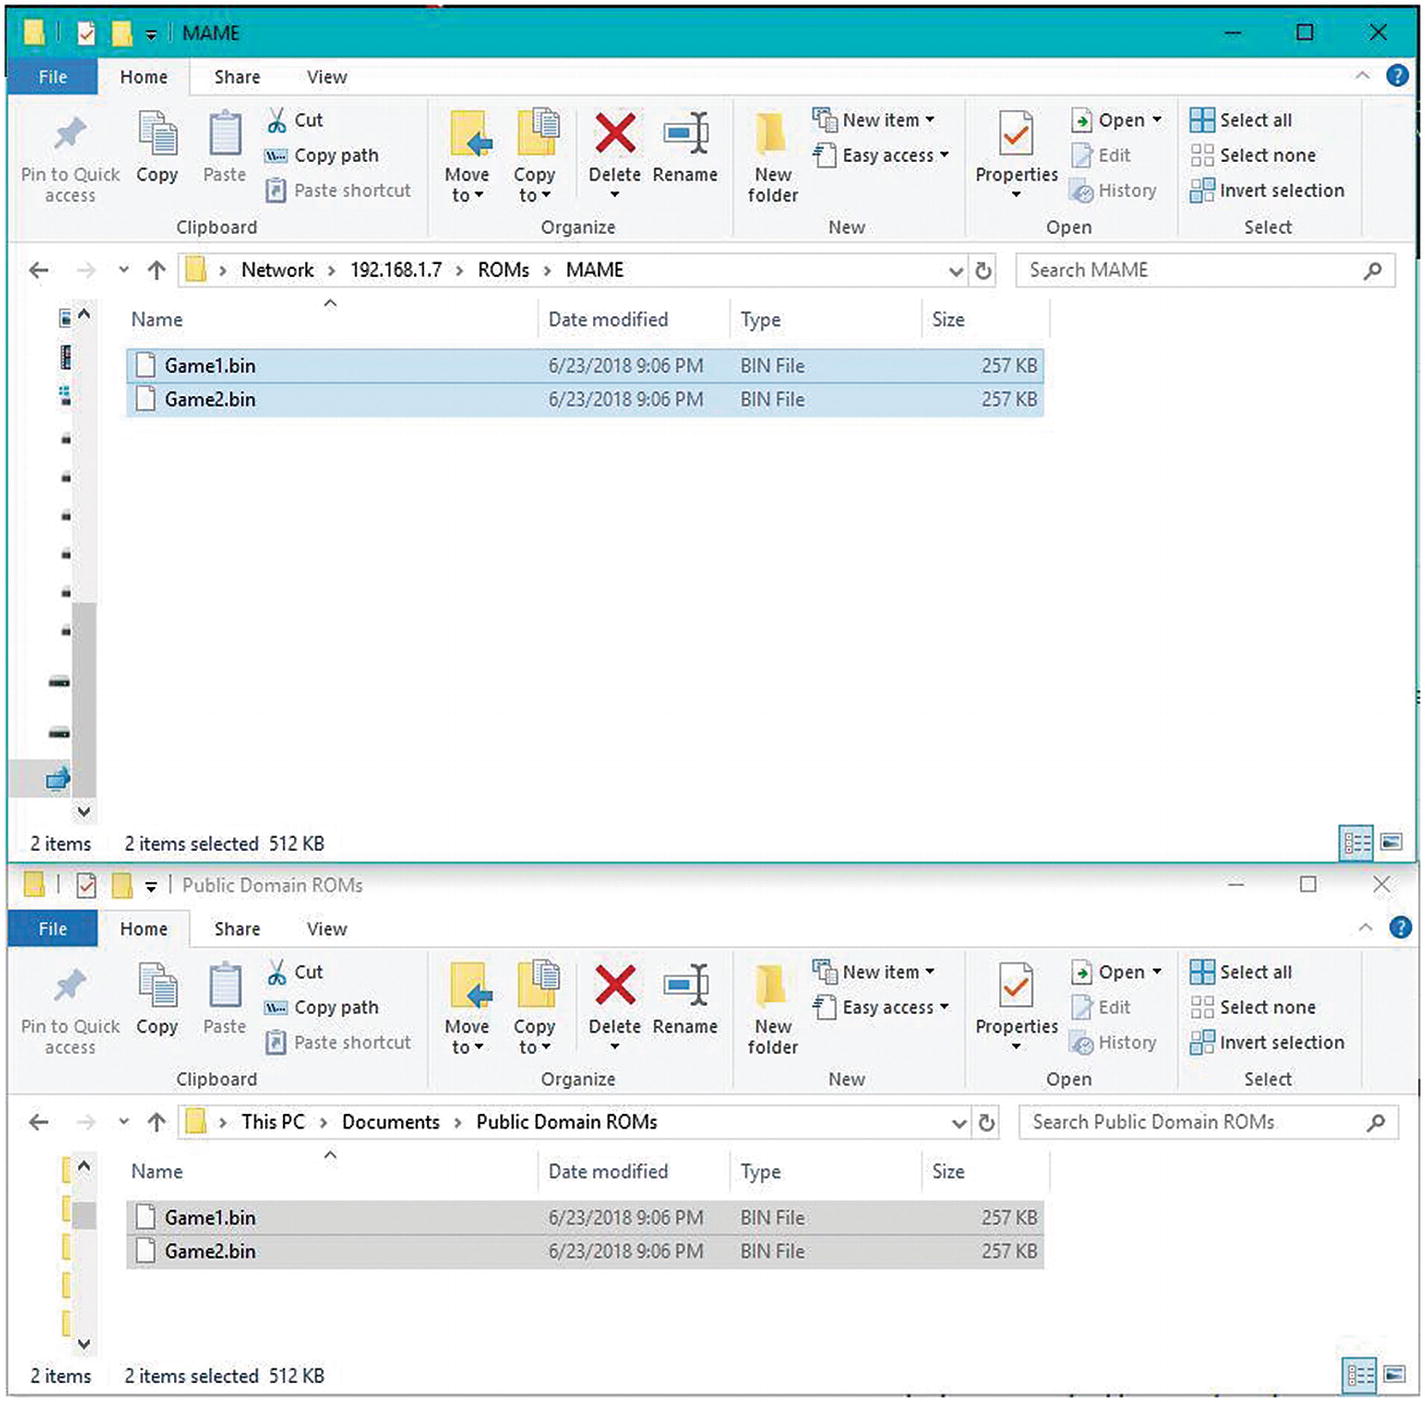
Locally stored ROMs successfully copied to Lakka’s ROMs folder

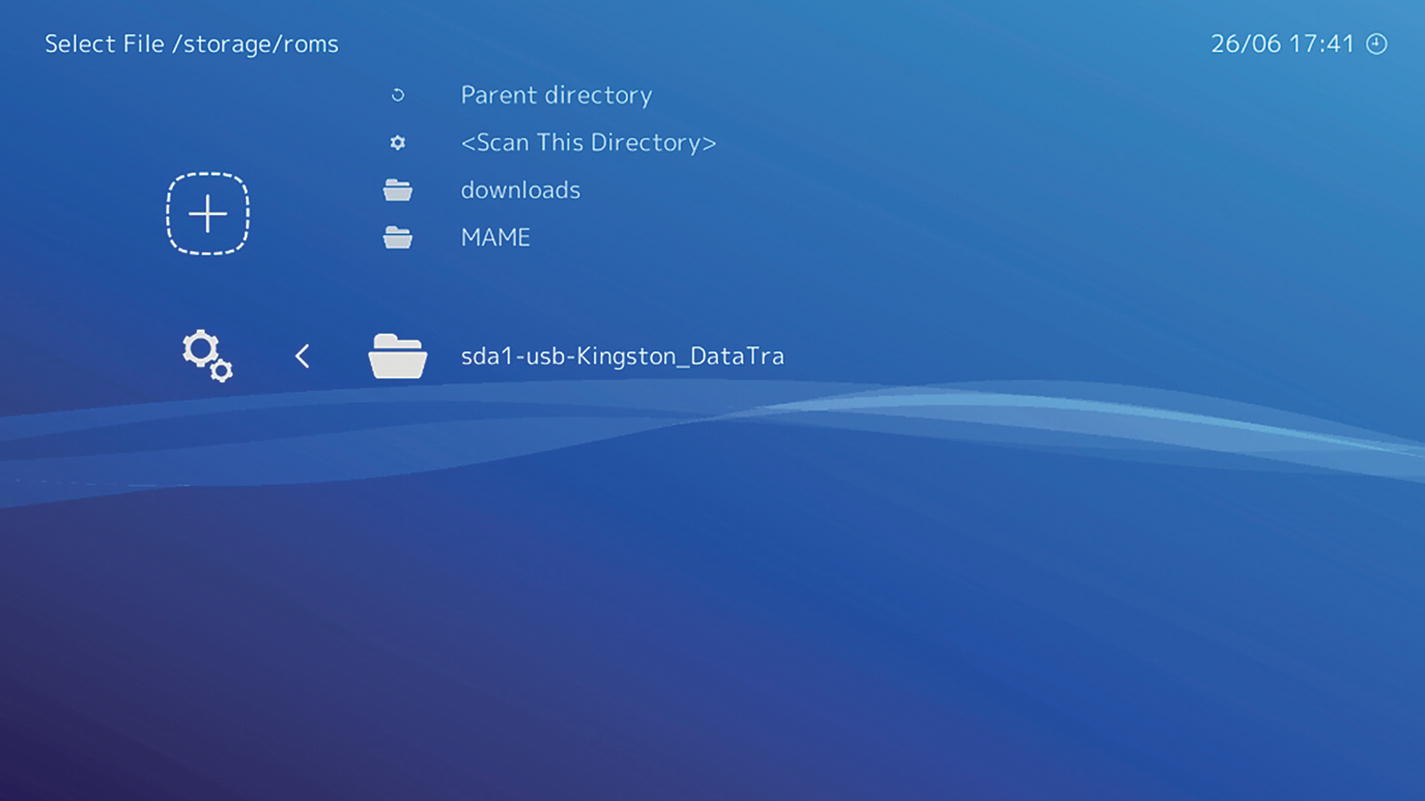
The directory scan function for Lakka’s local ROMs folder
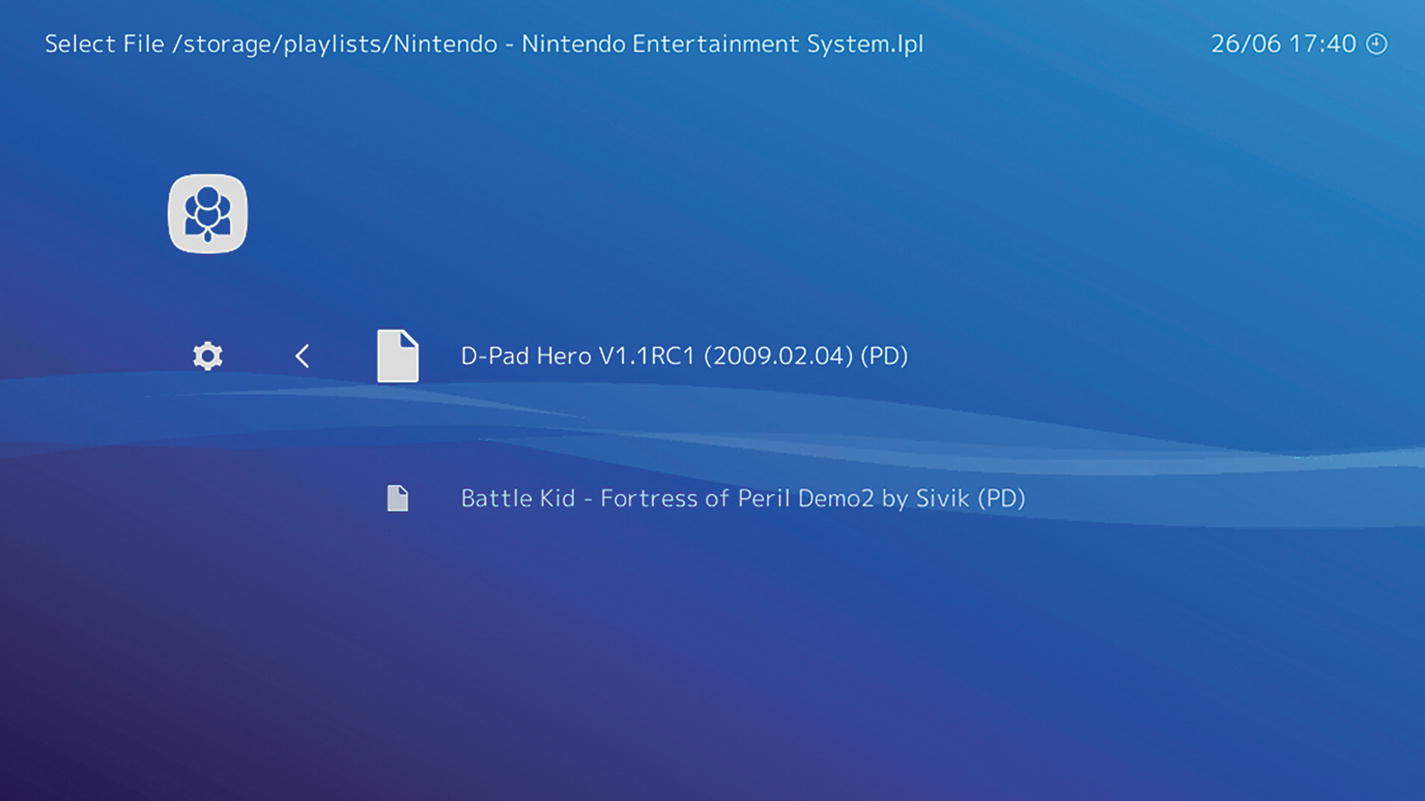
A list of ROMs added via the network. Both of these games are homebrewed by independent developers and as a result are a part of the public domain.
Loading ROMs over USB
If you have an exceedingly large ROM collection or you don’t want to connect your Lakka system to your network, you also have the option to load ROMs from a USB drive. To do this we first need to format the USB drive to a compatible format for Lakka. The preferred formats are FAT, NTFS, and exFat.
The USB drive mounted in Lakka

The USB drive is also accessible under the Main Menu
Playing Games
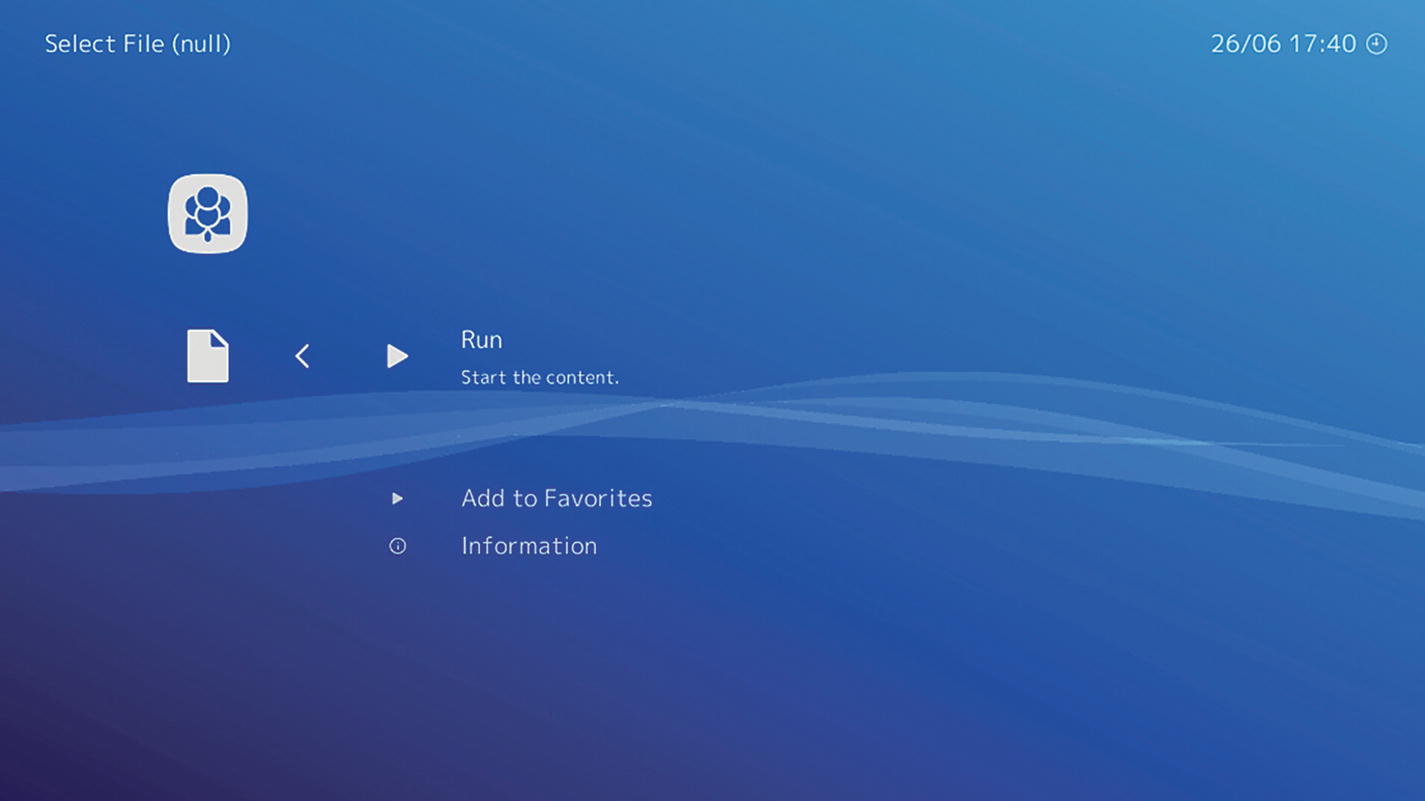
The ROM menu
If your ROM collection is large, you may want to create a Favorites list where you can easily access frequently played games. Information lists the full file name of the ROM, and Run starts the game. Once inside the game, you’ll use your preferred controller to play just as you would if playing on the original hardware.
Once a game is running, the Quick Menu will appear under the Main Menu. In the Quick Menu, you can access save states and other in-game settings that are unique to Lakka. This allows you to save your progress in games created for systems that wouldn’t traditionally allow save states or load ROMs from these save states. This menu is only available when a ROM is running in the background. Once the ROM is exited or the system is rebooted, the Quick Menu will disappear.
Connecting via SSH
Even though Lakka has a detailed GUI that lets you access almost every setting, you may find yourself missing the command line. Although accessing the terminal is not possible on single-board computer builds of Lakka at this time, you can access it remotely from a desktop computer.
First enable SSH under Settings ➤ Services on Lakka. After that, move to your desktop system. If you’re using macOS or Linux, you can simply open a terminal to log in via SSH. Once you open a terminal, type in ssh root@ followed by the IP of the Tinker Board with no spaces. For example, if your IP was 111.111.1.1 you would type ssh [email protected] and then hit enter to connect. You’ll then be prompted for a password, which is root.
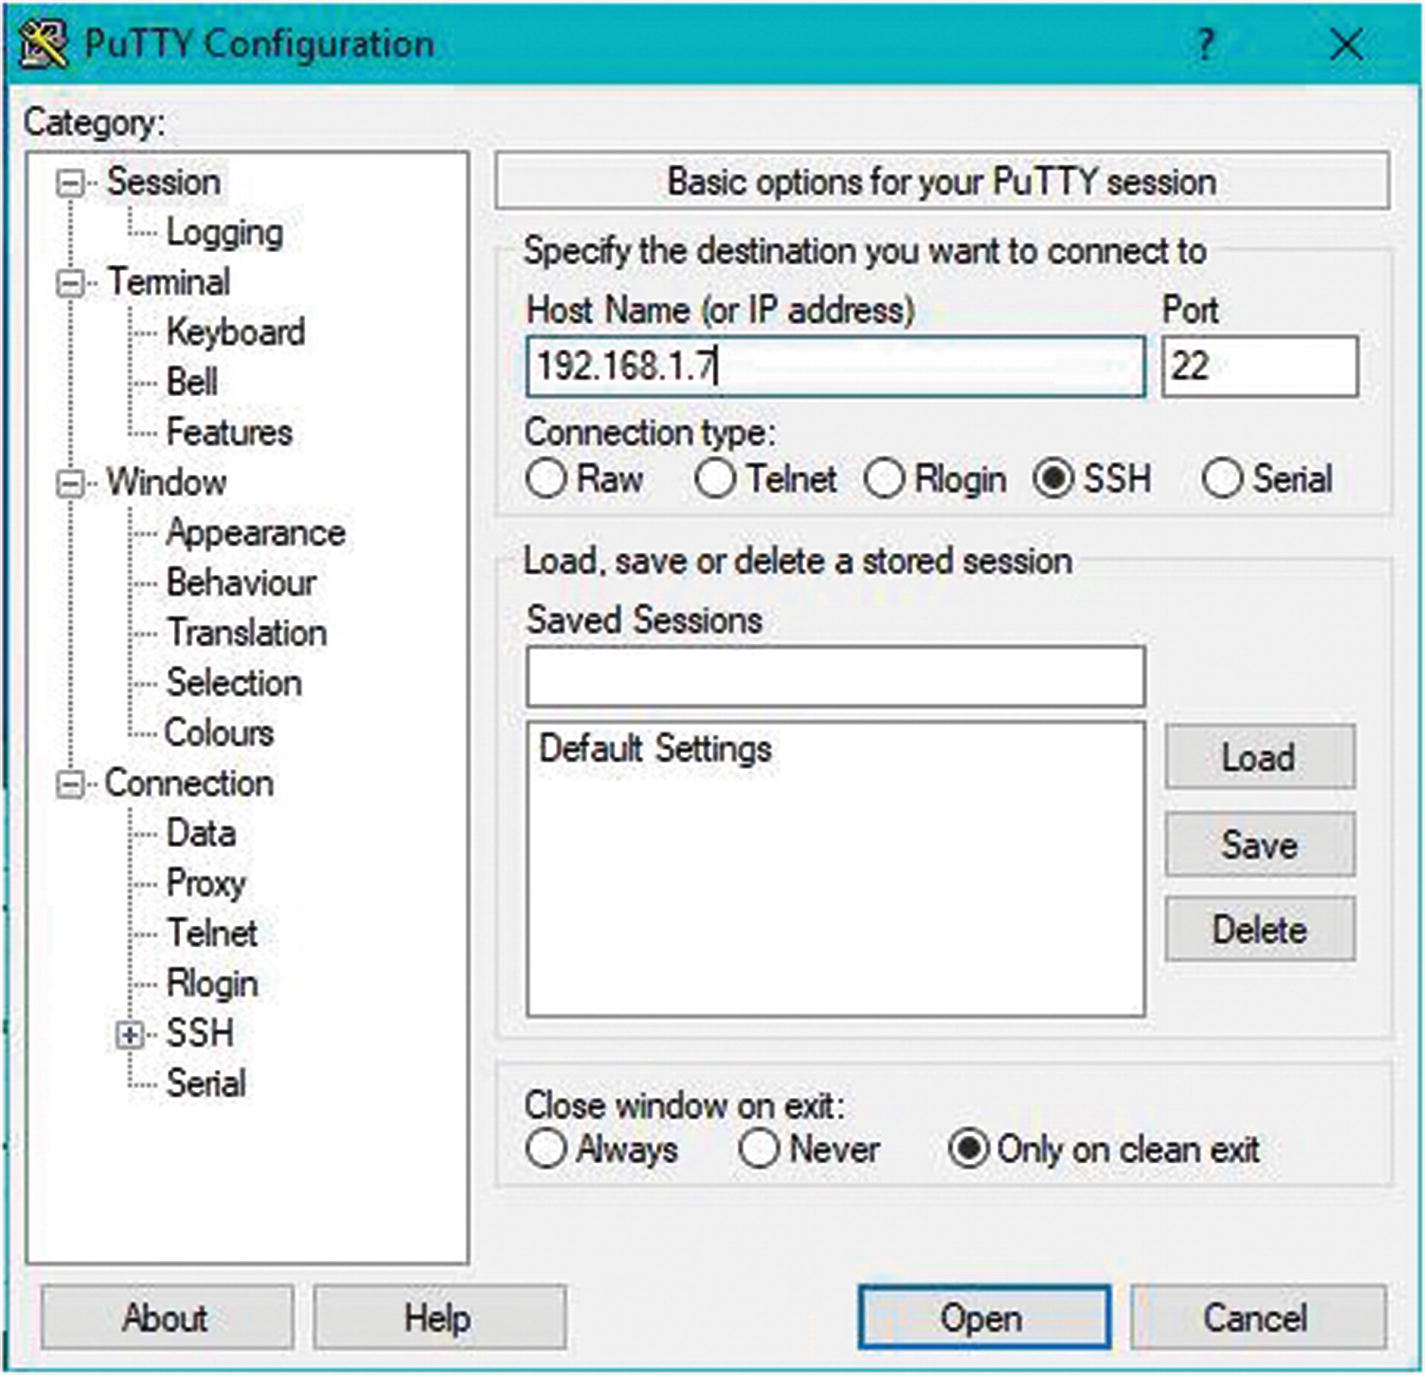
PuTTY’s GUI window. Notice that SSH is selected as the connection type. Also note that your IP address will be different.
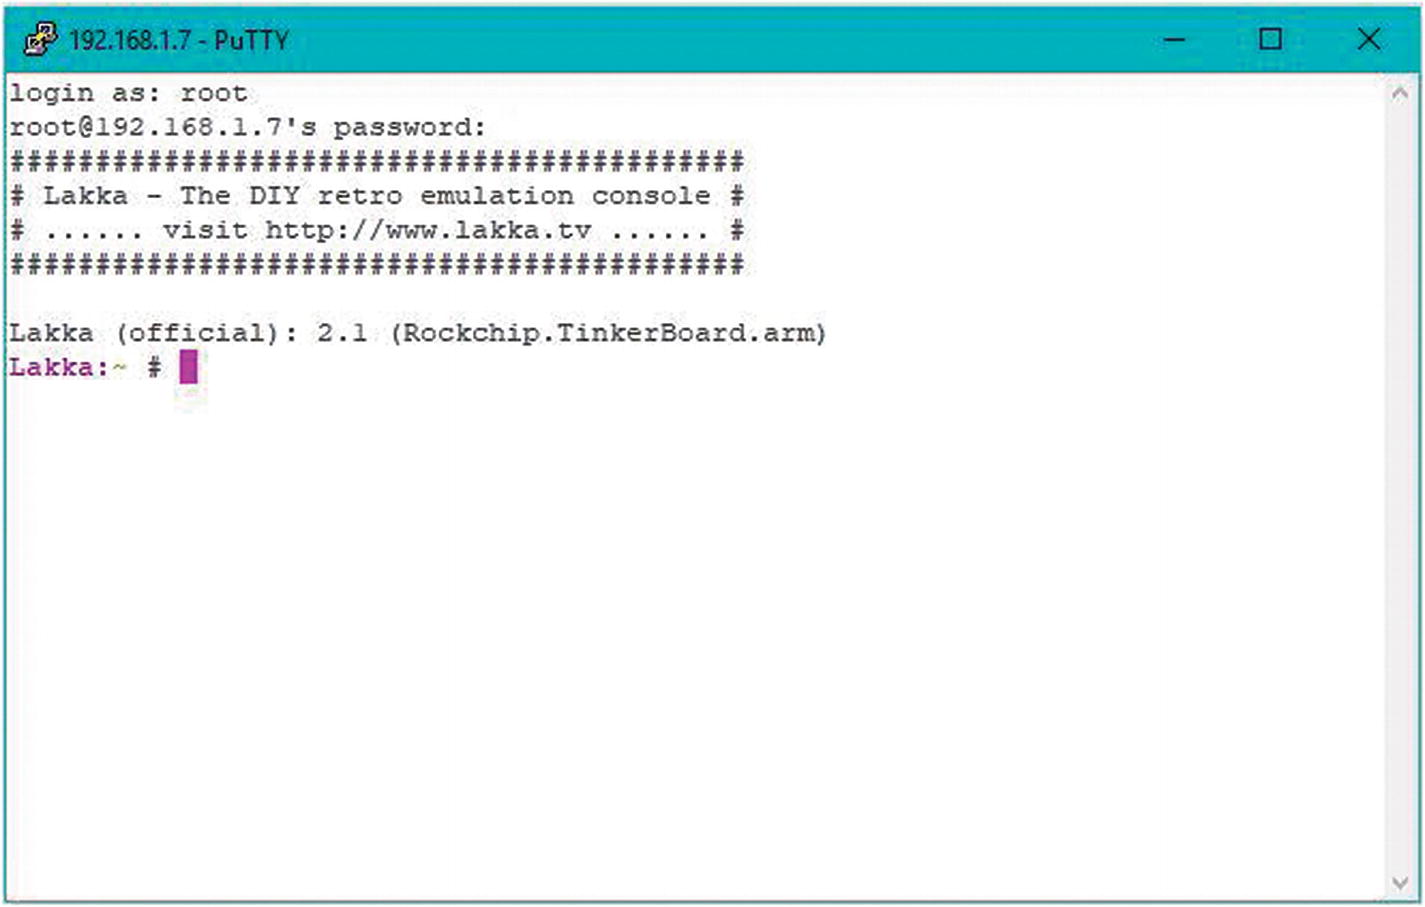
A successful login to the Tinker Board running Lakka via SSH
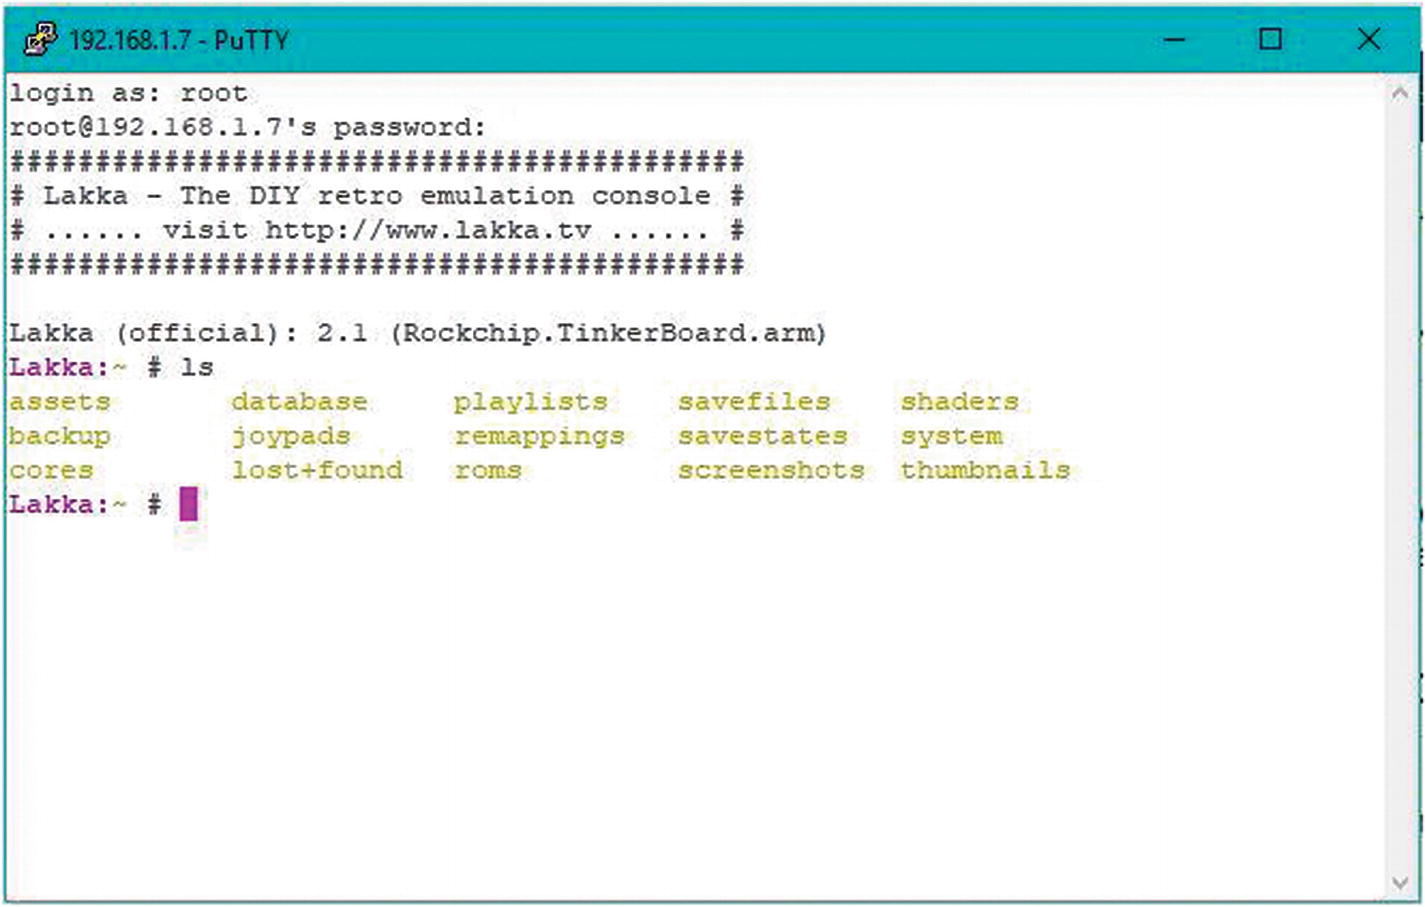
The results of the ls command
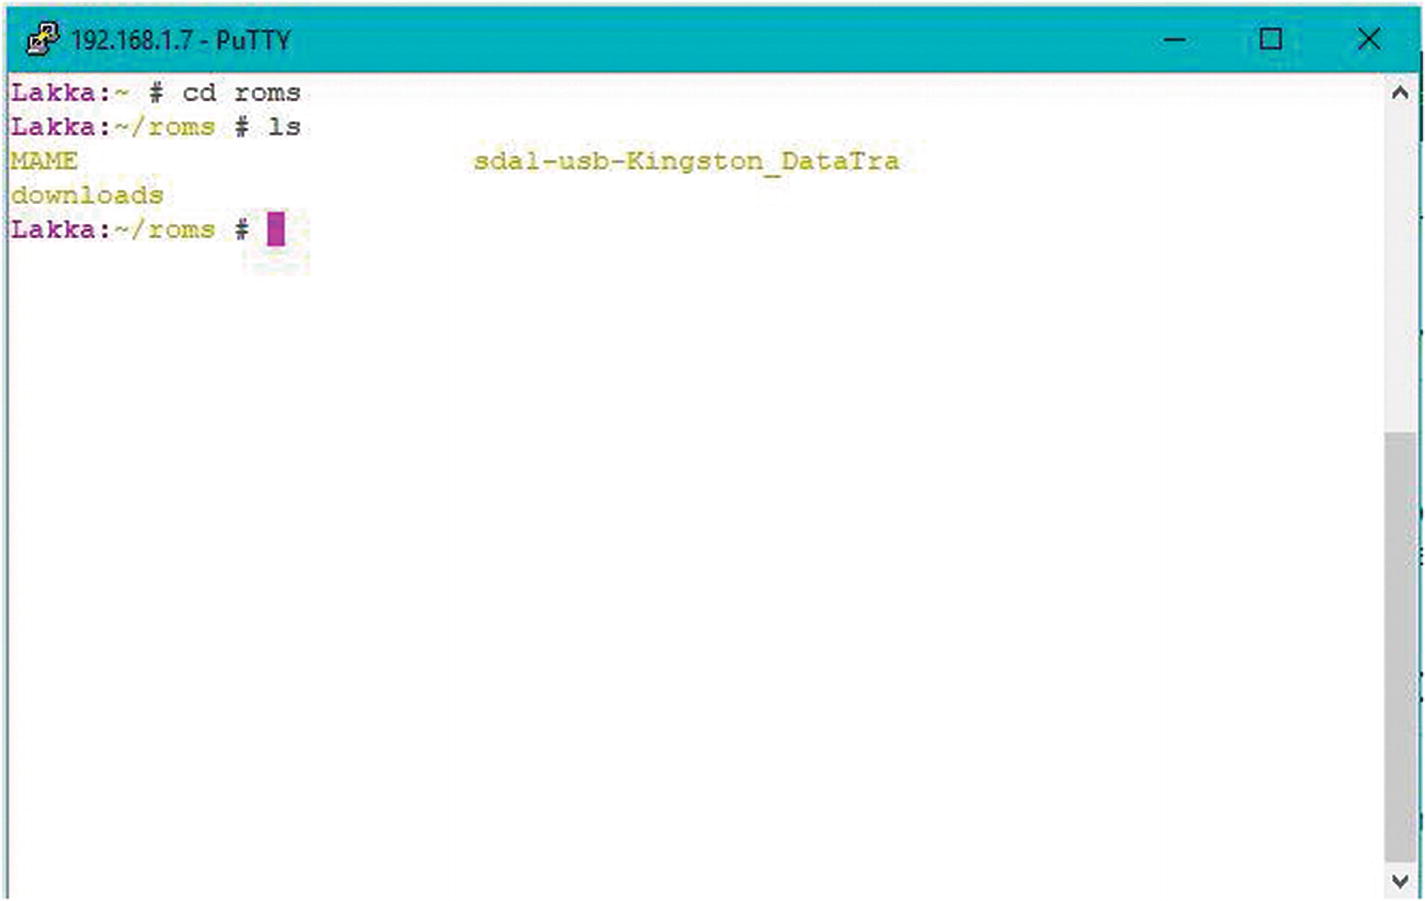
The results of the ls command in the ROMs folder
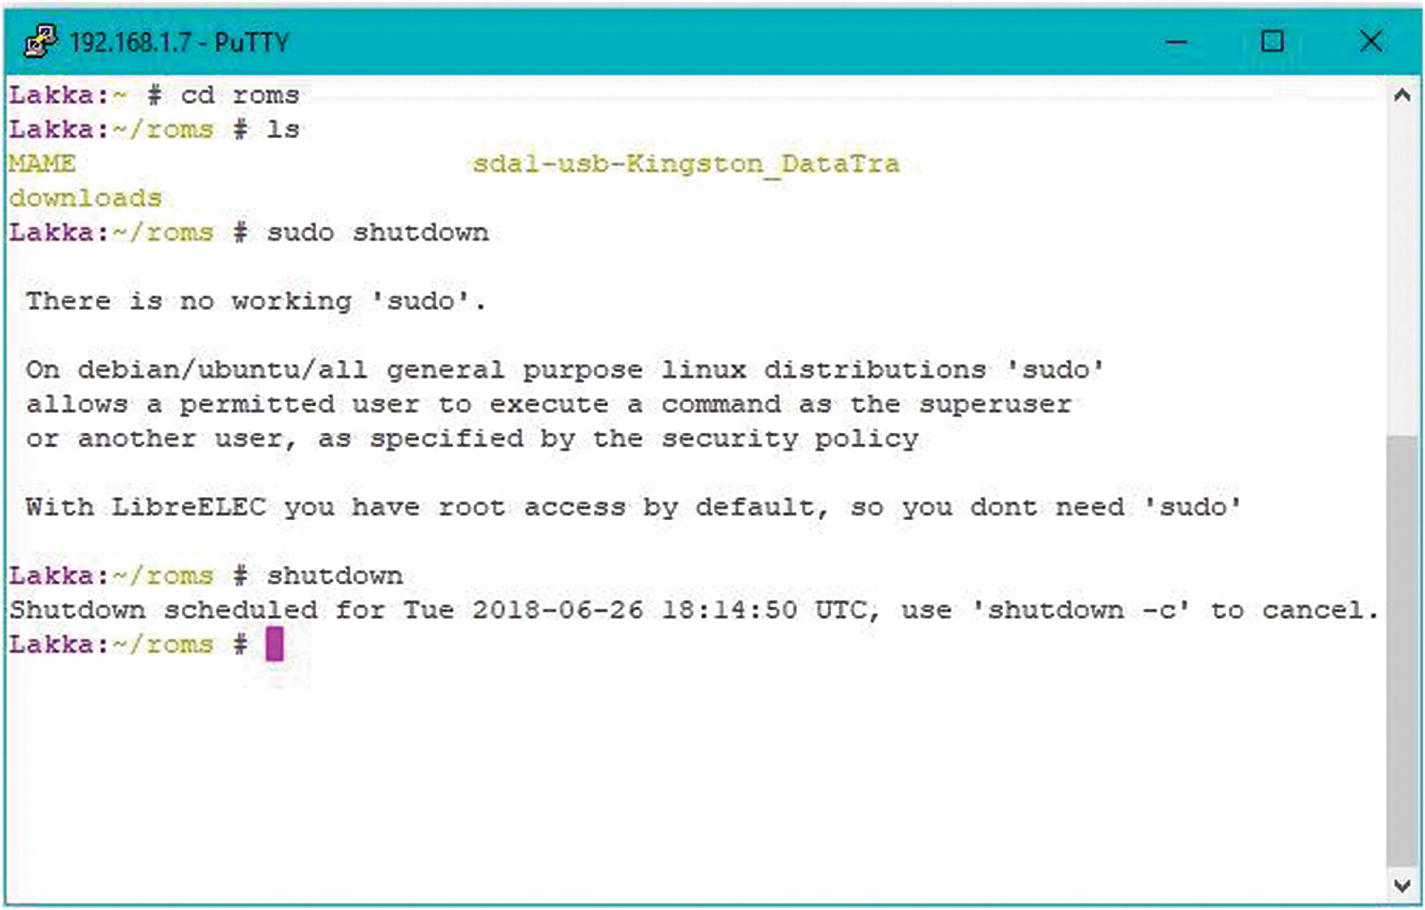
The sudo command is not necessary when using the terminal with Lakka
Note
If you shut down the Tinker Board or exit the terminal window, you’ll close your SSH connection to the Tinker Board and will have to reconnect.
Wrapping Things Up
Using your Tinker Board as an emulation system is a fun and simple project that goes beyond the basic desktop tasks that we’ve looked at in previous chapters. The developers of Lakka have done a great job in porting over a build for the Tinker Board, which is a testament to the open source community. Keep in mind that as an end user of open source software you can also contribute to open source projects by simply reporting bugs to developers and with some experience testing pre-release builds. For now, let’s look at some more specialized Linux distros for the Tinker Board to build additional projects in the upcoming chapters.