Before diving in, let’s discuss some basics. What is a single-board computer? What can it do? And why would you want to use one in a project?
A Little Context
The maker movement has empowered the everyday person to tap into an intrinsic human element: making things. The ability to create robots or weather stations or other large-scale intelligent devices was once reserved for the most educated among us, with access to expensive equipment and fabrication tools. Now most of these items and skill sets can be acquired by anyone with a modest budget who just has the urge to learn. But as the abilities and interests of makers grow, the power and versatility of the resources must grow as well.
The Tinker Board is a part of the next wave of more powerful maker tools. As a single-board computer, it offers a multitude of options for a maker. It can control hardware with code, it can run specialized operating systems for niche projects, or it can be a small–form-factor computer for personal use.
What Is a Single-Board Computer?
But let’s back up for a moment. What exactly is a single-board computer? A single-board computer (SBC) has a fairly self-explanatory name. It’s a computer that has all of its components fit onto one circuit board that usually fits in the palm of your hand. Most desktop computers have a motherboard with modules that plug in, including the CPU, RAM, graphics card, and so on. By contrast, an SBC usually has everything soldered directly to the board so that the user just needs to provide power and peripherals to be up and running.
System on a Chip
A hallmark of SBCs is that they usually feature a system on a chip (SoC). An SoC is an integrated circuit (IC) that contains most of the main components of a computer in one package that takes up a single spot on a circuit board. The processor is often an Advanced RISC Machine (ARM)-based architecture, which is also found in modern Android phones and Chromebooks.
The power and technology found inside modern consumer devices in an unlocked form factor available to makers has a lot of possibilities. Makers can expand on their project’s limits without breaking the bank, which leads us back to the Tinker Board.
The Tinker Board’s Hardware

The ASUS Tinker Board
Its GPU is an ARM Mali-T760, which also has four cores and is clocked at 600MHz. For RAM, it has 2GB of LPDDR3 memory, which gives a nice amount of headroom to avoid bottlenecking with the processor and GPU specs.
For inputs and outputs (I/O), as shown in Figure 1-2, it features four USB 2.0 ports to connect peripherals and HID devices. There is also an Ethernet jack for a wired Internet connection. However, the board also has Wi-Fi capabilities if you need it to be mobile. It takes power through a micro-USB connection but requires a relatively large power supply of at least 5V/2A-2.5A for the original Tinker Board and 5V/3A for the Tinker Board S, which is a consequence of the hefty RK3288.
HDMI 1.4 is available on the board for video at 1080p and 4K for some applications. It can also carry audio, but if you prefer a dedicated audio output there is a 3.5mm headphone jack that can play up to 24-bit/192KHz resolution.
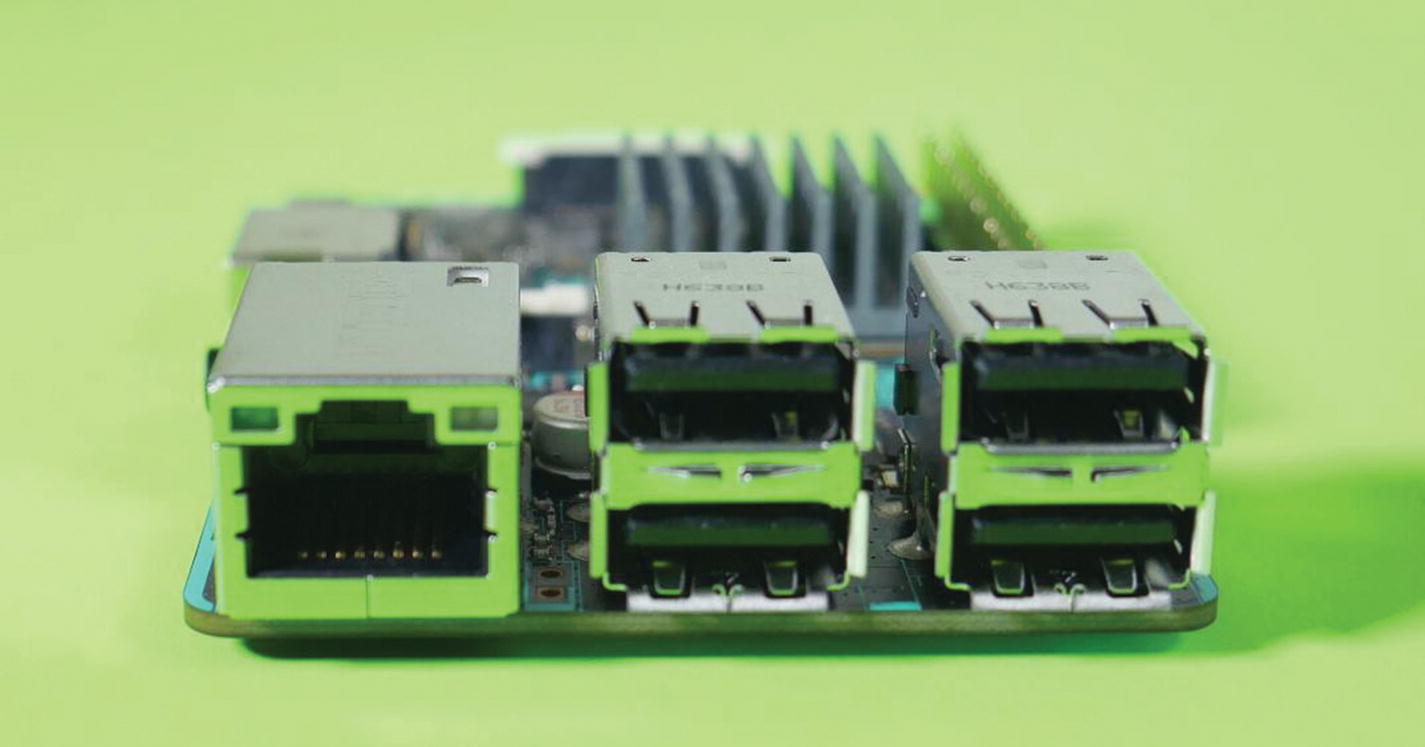
The Tinker Board’s four USB 2.0 ports and Ethernet port
GPIO
One of the Tinker Board’s most prominent and unique features, though, is the set of general purpose input/output (GPIO) pins. The GPIO pins are breakout pins that allow external electronic components and circuits to interact with the Tinker Board.
This enables the Tinker Board to go beyond just a small circuit board with the same features as your average PC. By having access to the GPIO, you can build circuits using a variety of components to create unique projects that you have full control over.
There are 40 individual pins arranged in two horizontal rows of 20 (Figure 1-3). Each pin is identified by a number, and the Tinker Board has the GPIO header color-coded so that you can easily tell at a glance what a pin’s dedicated function is.
A plus for the Tinker Board is that it shares a GPIO pinout with the Raspberry Pi series of SBCs. This means that existing circuits for the Raspberry Pi can, in most cases, be ported to the Tinker Board with no problems.
There are also add-on modules for the Raspberry Pi series of boards, called HATs and Bonnets. These add-ons have a female port that fits directly onto the GPIO pins and have pre-built circuits for more complicated applications, such as servo motor control, LED matrixes, camera control, and so on. Since the Tinker Board has an identical pinout, these add-ons can in many cases work with the Tinker Board in many cases.

A closer look at the Tinker Board’s GPIO pins . Note that they are color-coded to easily identify their individual functions.
Tinker Board S
The newest update to the Tinker Board family is the Tinker Board S. On the surface, the Tinker Board S looks very much the same as the original Tinker Board. However, there are some key differences that could make a big difference in performance for some projects and use cases.
eMMC
The most notable addition to the Tinker Board S is the inclusion of 16GB of on-board eMMC (embedded MultiMediaCard) flash storage. The advantage of eMMC is that since it’s soldered directly to the board, it doesn’t utilize a lot of RAM; it can communicate small pieces of data between the other onboard components more easily than external storage.
The speeds are similar to what you’ll experience with an SD card, which is why you’ll see the biggest advantage with small pieces of data. But when you are working on a project that is pushing the hardware to its limit, on-board eMMC can make a big difference for running your operating system. We’ll discuss the different storage methods and what you’ll need in the next chapter.
I2S
Looking toward the GPIO, the designers made a significant change to the I2S (inter-IC sound) functionality on the Tinker Board S. As the name suggests, I2S allows sound in the form of PCM audio data to be transmitted between integrated circuits by separating the clock and serial data into separate channels. This is ideal for high-stakes audio applications when dealing with digital systems and is used with DACs (digital-to-analog converters) for high-quality audiophile listening experiences.
Traditionally, the clock speed for I2S can act in either master mode, where the pin’s output sets the clock, or slave mode, where the pin accepts the clock from an external source. The original Tinker Board’s I2S pins only allowed it to act in master mode, but for the Tinker Board S, the pins can act in either master or slave mode. This gives greater flexibility for audio projects with the Tinker Board S and will allow it to have more compatibility with specialty DACs and ADCs. There are DAC and ADC hats available that fit over the GPIO pins. We’ll be looking at these along with a specialized audio operating system in a project later in this book.
An additional audio upgrade on the Tinker Board S is the ability for the board to automatically switch between the 3.5mm jack and HDMI for audio output once a source is plugged in. This will be incredibly helpful for a traditional desktop setup or a home media center project.
Power-on Header
The final update for the Tinker Board S is the addition of a two-pin power-on header . This may seem trivial, but one of the biggest features missing from many single-board computers is the ability to turn the board on discretely. The original Tinker Board, along with many others, can only be turned on by plugging the power supply into the board.
Makers have shared mods that use the GPIO to hook-up a power button, but that sacrifices valuable GPIO pins for a very simple function. Having dedicated pins that are separate from the GPIO on the Tinker Board S for this purpose is very useful and simple for users who want the ability to embed their board in a housing or avoid having to repeatedly unplug and plug in their board.
Original Tinker Board or Tinker Board S?
Aside from these changes, the Tinker Board S is very much the same as the original Tinker Board. It uses the same SoC, GPU, RAM, I/O, GPIO (apart from the updated I2S feature) and form factor. Most users may not even notice the differences between these two boards since the updates to the Tinker Board S are specialized in nature.
However, these updates can also be the difference between a smooth project experience and a frustrating one. When choosing between the two, it’s important to consider your use case scenario and make your decision from there. Both boards will be referenced throughout this book to demonstrate if one has an advantage over the other for certain tasks. This should help you in your decision when planning your projects.
Conclusion
It’s these features and abilities that bring projects to the next level with the Tinker Board and similar SBCs. Compared to a more basic platform, like the Arduino Uno board, the possibilities expand when it comes to the different peripherals and technologies that you can seamlessly incorporate. For example, providing an Arduino-based project with Internet connectivity is possible, but getting the board online is almost a project by itself. With the Tinker Board, Wi-Fi is already a built-in feature for the board so it’s as simple as signing into your network or plugging in an Ethernet cable.
The one thing that could hold the Tinker Board back is the fact that the RK3288 is running on the ARMv7-A architecture, which is 32-bit rather than the more modern 64-bit. However, most SBC operating systems and processes do not utilize 64-bit at this time, so you shouldn’t experience issues with your projects. It’s just something to keep in mind about the architecture of the hardware.
The RK3288 is built to streamline heavier processes since it has hardware acceleration for larger video files and codecs, which is often a performance choke point for SBCs. It’s also been used in many Android phones and Chromebooks; this shows that it can stand-up to everyday use, which is a good vote of confidence for its use in an SBC.
This brings us to a question that you may have asked yourself already: why use the Tinker Board over another SBC where there are so many to choose from? Since the Tinker Board has higher specs than the average SBC, it’s perfect for more advanced projects that would have pushed the limits of other SBCs in the past. It’s also a great choice for makers or tech enthusiasts who want to dig a bit deeper into different Linux distributions.
So if you’re curious about exploring Linux further and building projects that push the boundaries, then the Tinker Board is a good choice for you. In Chapter 2 let’s discuss what peripherals you need to take full advantage of the Tinker Board’s features.