
In the last few chapters, you’ve learned how to install a Linux host, explored some basic Linux concepts, and been introduced to the concept of users and groups. This chapter is going to delve deeper into the workings of your Linux host and examine the way it operates “under the hood.”
In this chapter, we’ll look at what happens when your host starts up, or boots. We’ll step through the process and show you how to start your host in a variety of modes and how to configure and modify the startup process. To demonstrate all of this, we’ll take you through the process of how your host boots from when you power it on to the login prompt.
We’ll also take you beyond the boot process and look at how your host starts and stops applications, system services, and other processes. Each distribution, CentOS and Ubuntu, manages the addition, removal, starting, and stopping of these services slightly differently. We’ll show you how to manage these services on each of these distributions and the nuances involved. You’ll learn what services are, how to start and stop services, and how to see their status. Finally, we’ll talk about how to make services start and stop automatically when your host boots or shuts down.
What Happens When Your Host Starts?
The boot process (boot is short for bootstrap) usually involves three separate but connected processes: the BIOS (Basic Input/Output System) or UEFI Unified Extensible Firmware Interface ), the boot loader, and the loading of the operating system.
The BIOS or UEFI initiates and checks your hardware.
The boot loader lets you select an operating system to load.
Finally, your operating system is loaded and initiated.
These steps are not specific to Linux; you’ll find most operating systems perform a similar set of functions and steps.
You will find modern hardware will support UEFI . It is a replacement for BIOS and older systems will use BIOS. They both perform a similar task and we will explain each of them to you, starting with BIOS.
Powering On
Let’s look in a bit more detail at what happens when you boot your host. You may have noticed that when you turn on your host, it is common to hear a few beeps and whirrs and see some blinking lights on your front panel and keyboard. This is the first step of your host starting up, and this process, on a host running BIOS, is controlled by a small chip on the motherboard called the BIOS.
The BIOS
The BIOS performs rudimentary system checks or power-on self-test (POST) operations on the availability of different bits of hardware attached to your system, like the memory, hard drives, keyboard, and video card. Depending on your BIOS, you can change different settings, but we will leave that to you to investigate at your leisure.
The BIOS will also poll other hardware such as hard drive controllers and initiate their onboard chips. Depending on your hardware, you may see the BIOS screen followed by information about devices the controller has found. You may be given an option to configure controllers or other hardware by pressing a certain key sequence (usually displayed on the screen when the hardware is initiated). This menu gives you the ability to manipulate the configuration of your host; for example, it allows you to set up RAID (Redundant Array of Inexpensive Disks) on a hard disk controller or troubleshoot problems with existing hardware configuration.
Caution
Changing some configurations can be dangerous; for example, incorrectly changing a RAID configuration could destroy your data, so use these menus with caution.
The BIOS also allows you to change the boot source for your host. The boot source is the media (e.g., a hard drive) where your host looks for your operating system. The boot sequence setting allows you to boot from one of a number of sources: hard drives, CD/DVDs, or even USB keys. By default, your host will usually try to boot from an attached hard drive and, if configured, look for alternatives such as a CD/DVD drive or a USB key.
Every motherboard manufacturer has a different way of getting to the boot source menu, for example, by pressing Esc, Del, or a function key such as F1, F2, or F10. Usually a message appears on your screen indicating the appropriate key to press. From here a menu is usually displayed, and you can select the boot sequence you would like.
The Unified Extensible Firmware Interface
More recent motherboards will support UEFI. When you boot your host with UEFI you will notice very little difference compared to BIOS; the lights will flash and things will whirr. It is expected to be a little faster than BIOS. However, behind the scenes things are quite different.
UEFI was created to overcome some of the very real limitations of BIOS. BIOS runs on a 16-bit processor; UEFI can run on modern processors. BIOS was limited in RAM; UEFI can run in as much RAM as required. BIOS reads from a small section of a hard drive (the master boot record, or MBR) to load the operating system. UEFI instead reads from a special FAT32 partition created at installation time and is not limited to 512 bytes. Also UEFI requires that the partition table on the disk is GPT (GUID Partition Table), and this means that we can boot off disks over 2TiB in size. It is said that UEFI is more like a modern operating system than the old BIOS; it can even run nicer graphical interfaces with mouse and keyboard support.
One of the ways that malware can be loaded on a system is via the boot loader. UEFI offers “secure boot” that is designed to protect against this by verifying signed boot loaders and hardware via public/private keys before loading them. Most modern 64-bit distros should support secure boot, but this is still relatively new and you may have problems with some hardware under secure boot. In this case you can file a bug report with the distribution and disable secure boot via the UEFI configuration screen.
Finally, it is currently not mandatory that you use UEFI. BIOS is still available in most motherboards as “legacy” and has been widely tested and supported. It is, however, mandatory under the following circumstances; you are running dual boot with a system already running UEFI and you want to access disks larger than 2TiB. The purpose of both BIOS and UEFI is to get your hardware ready and find the boot loader to load your operating system.
More on Disks
In previous chapters we have talked about partitioning disks and said that a disk is like a cake, in that you can carve up slices, but how does that work? When you slice up your disk you create table on the disk called the partition table . The partition table is normally found at the beginning of the disk and tells the computer how the disk has been laid out. That is, how much of the disk has been allocated to the '/boot' partition, how much is expected to be logical volume management (LVM), and so on.
Above we have talked about MBR and GPT and these are two types of partition tables. A partition table holds information about the block addresses (in chunks of 512 bytes or 4KB of disk). The MBR can only hold 2TiBs worth of addresses while GPT can hold 8-9ZiB.

Figure 6-1. Your hard disk
A disk will either have a MBR at the start (in the first 512 bytes) or GPT . If it has a MBR the partition table is written after the first 446 bytes of the disk. The size of the partition table is 64 bytes and is followed by the MBR boot signature (2bytes). The remaining space up until the first partition is often called the MBR gap and varies in size as most partitioners align the start of partitions to the first 1MB.
GPT on the other hand has an address space of 16,384 bytes and can hold up to 128 partitions. GPT makes a copy of itself at the end of the disk for recovery in case of corruption. The remaining disk, excluding the partition tables, can be divided as you see fit. See the following for more detail:
Boot Loaders
The Boot Loader with BIOS
Once your host has loaded all the checked everything attached to your motherboard and has set low-level system settings it is ready to boot up your operating system. Neither BIOS nor UEFI knows anything about the operating system you are trying to boot, but it does know how to run the code supplied by your distro. This code is called the Boot Loader and it needs to be in the right place on the disk you are booting from.
Note
It is not strictly true that UEFI “knows nothing about your operating system.” It actually does know a fair bit, but the main point is that it is not your operating system but a lower-level interface with the hardware.
A host running BIOS uses the boot source setting to specify where to look for the next stage of the boot process: the boot loader. The BIOS uses the special section on your hard drive, the master boot record.
When we installed our operating system our installation installed a boot loader called GRUB2 . This stands for GRand Unified Bootloader (2) and its job is to launch itself, then find, load, and hand off to your operating system. It does this in two stages, the purpose of the first stage is to load the second stage. We talked previously about the MBR and said that there was 446 bytes at the start of the disk before the partition table. This is where the first stage of the boot loader code for your operating system will be stored and the BIOS will attempt to execute the code it finds there. For Linux, this a file called boot.img.
When BIOS executes boot.img it finds and runs a file called core.img. This file is normally installed into the MBR gap, the space between the MBR and the first partition on the disk. The job of core.img is to access /boot/grub and load the modules it finds there. The core.img will load the menu and has the ability to load the target operating system.
The Boot Loader with UEFI
If you use an UEFI system the boot process is a little different. The UEFI can read the GPT partition table and can find and execute the boot loader code in the /EFI/ directory in the EFI system partition. Unlike BIOS, UEFI has its own partition that the boot loader and modules can be installed into.
In Figure 6-2 we can see that after our installation we have three partitions created on drive /dev/sda. The first one is our EFI System Partition and it is a FAT32 file system of 537MB in size. It has the boot and esp flags (both meaning it is a boot partition). The other thing to note is that the partition table is GPT.

Figure 6-2. EFI partition on Ubuntu
So when UEFI is ready to run the boot loader it reads this partition looking for a boot loader. In this case on our Ubuntu host will find /EFI/ubuntu/grubx64.efi. This initial part of the boot loader will find the '/boot' partition that contains the GRUB2 software and load core.efi from and bring up the GRUB2 menu.
For more information on UEFI and the UEFI Shell (an interactive shell that you can use to manage your UEFI) see the following:
https://fedoraproject.org/wiki/Unified_Extensible_Firmware_Interface
https://www.happyassassin.net/2014/01/25/uefi-boot-how-does-that-actually-work-then/
Without any intervention GRUB2 will boot the default kernel after a brief countdown. Pressing any key will stop the countdown, show you a more detailed menu of available options, and give you the opportunity to edit your boot configuration. Later in the section “Using the GRUB2 Menu,” we will explain these choices and how to manipulate them.
After picking the kernel you wish to boot into (or waiting until the default is loaded after the timeout), GRUB2 will now find the kernel binary (vmlinuz-<release-number>) and then load a special file called initrd.img into memory. This file contains the drivers your kernel needs to load to make use of the hardware of your host.
Starting the Operating System
After loading initrd.img, GRUB2 completes and hands over control to the kernel, which continues the boot process by initiating your hardware, including your hard disks. Your operating system is started, and a special program called systemd, upstart or init is called that starts your services and brings your host to life. We’ll take a look at all three of these system initializers and how to manage services later in this chapter, but first, more on the boot loader.
Understanding the GRUB2 Boot Loader
So let’s now delve into what the boot loader is and what it does. We’ll also look a bit at how you can configure it. We’re not going to cover every detail of the boot loader, because you’ll rarely need to change it, and most changes to it occur automatically, for example, when you install a new kernel package. But you should understand what it does and where it fits into your host’s boot process.
Some history; in the Linux world, there were two main boot loaders that existed: LILO and GRUB. The GRUB boot loader became the default for Red Hat and Ubuntu several years ago. We will be concentrating on the latest version of GRUB, GRUB2, here. GRUB2 is a powerful multiboot loader. A multiboot loader can enable your host to boot into many different operating systems. Unlike Microsoft Windows or Mac OS X (and their boot loader tools—NTLDR and Boot Camp, respectively), GRUB2 allows you to boot multiple versions of Linux, Microsoft Windows, and Mac OS X on a single piece of hardware. This does not mean you can run them all simultaneously, like you can with virtual machine technology, but you can boot into them individually by selecting them from the GRUB2 menu at startup.
Note
LILO is a legacy boot loader used as the default boot loader on many older versions of Linux distributions. It is rarely seen today and development ceased on it in 2015. For information on the LILO boot loader, please see http://tldp.org/ HOWTO/LILO.html.
So how does GRUB2 work? GRUB2 at its heart uses four items to boot your system: a kernel file, the name of the drive, the partition number where the kernel file resides, and optionally an initial RAM disk.
GRUB2 is capable of booting in two ways. One is directly by finding and loading the desired kernel, and this is the way most Linux distributions are booted. GRUB2 also supports a method of booting, called chain loading; with this method GRUB2 loads another boot loader, such as the loader for Microsoft Windows, which then loads the desired operating system kernel. This allows GRUB2 to boot other operating systems using their own boot loaders.
Using the GRUB2 Menu
When your host boots, it will boot into the default kernel (or operating system) or you can override it and display the GRUB2 menu. Once the menu is displayed, you will be presented with a list of boot options, and you can use the up and down arrows on your keyboard to choose the kernel you wish to boot. You can also edit the GRUB menu and change parameters, commands, and arguments before proceeding to boot into your chosen kernel.
For example, we could choose to boot into what is called single-user mode, or maintenance mode. This special mode, used when something is broken on your host, restricts access to the host to the root user: usually at the system console. This mode, which functions much like the Microsoft Windows Recovery Console, allows you to work with resources like disks and files without worrying about conflicts or other users manipulating the host. Let’s look at booting into single-user mode now.
First, again, this is slightly different between CentOS and Ubuntu. Both show a similar GRUB2 boot menu that allows you to select which kernel you would like to run with your arrow keys. CentOS presents the two menu entries that we talked about earlier, one being the kernel and the other described as a rescue kernel. On Ubuntu you will see a sub-menu entry called Advanced Options. You can use your arrow keys to navigate to see the recovery mode kernel.
We are going to use the normal kernel of an Ubuntu host in this exercise. Press the e key to edit the highlighted kernel. You will see the configuration of that kernel, such as its location and parameters, displayed as in Figure 6-3.
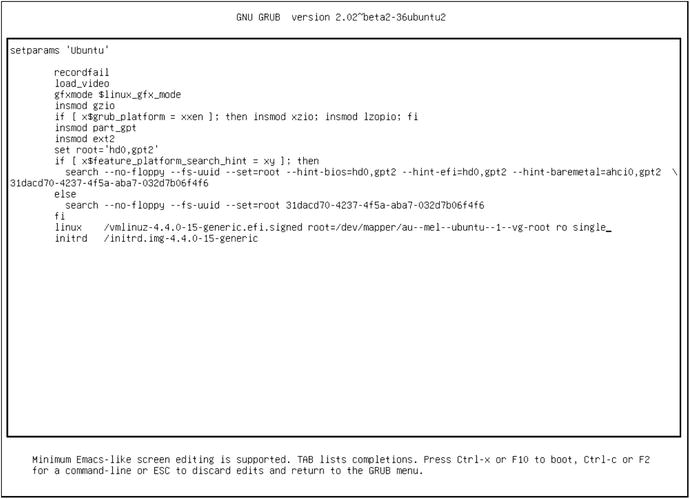
Figure 6-3. Booting to single-user mode , or maintenance mode , using the GRUB2 menu
You’ll see the details here as you saw in the grub.cfg menuentry. The line we are interested in this particular example is the linux /vmlinuz-4.4.0-15-generic.efi.signed… line. Use the arrow keys to navigate to the end of that line. To boot into single-user mode, add the word ‘single’ (without quotes) to the end of this line. In Figure 6-3, you can see that we have already added the word single to the end of the line. At the bottom of Figure 6-3 you can see that we can now enter Ctrl-x or F10 to boot with this setting or Ctrl-c to get a command line or ESC to abandon these changes and go back to the main menu.
We can choose Ctrl-x and boot into single-user mode. We are first asked for the password to decrypt our hard drive. Then, depending on your distribution, you will either be given a maintenance password prompt that expects the root user (CentOS only) or you will be able to hit enter and be given a shell prompt (see Figure 6-4).

Figure 6-4. Maintenance mode
Now that we have the shell prompt we can go about repairing any of the problems we might have on our system. These changes to the kernel line are not permanent though, and the next time the host is booted, it will boot normally. Using the GRUB2 menu, you can manipulate almost all of the boot runtime configuration settings available.
With a note of caution, we are providing the above as an example and it clearly has some security implications associated with it—this provides very powerful access to your hosts if you have access to a console at boot time. We help to address that issue next. There are also other methods for recovery and in Chapter 9 we will go over this further. In the meantime the following are good sources of information:
Configuring GRUB2
The GRUB2 boot loader is highly configurable, and its configuration is contained in the grub.conf configuration file. GRUB2 has made the grub.cfg more modular than its simpler predecessor. The chance that you will need to make many changes to the GRUB2 configuration is small but possible.
The GRUB2 files are located in different places on different distributions. On Red Hat-based hosts like CentOS, they can be found at /boot/grub2/grub.cfg (and the file is usually linked symbolically to /etc/grub.conf). On Ubuntu and Debian hosts, the files can be found at /boot/grub/grub.cfg.
The grub.cfg file in GRUB2 is made up of a series of configuration files. On both Ubuntu and CentOS hosts you will find the configuration files in the directory /etc/grub.d. In that directory you will see a number ordered list of files. In Listing 6-1 you can see the files found on the CentOS 7 host.
Listing 6-1. ls –la /etc/grub.d
total 72-rwxr-xr-x. 1 root root 8702 Nov 25 02:49 00_header-rwxr-xr-x. 1 root root 992 May 4 2015 00_tuned-rwxr-xr-x. 1 root root 230 Nov 25 02:49 01_users-rwxr-xr-x. 1 root root 10232 Nov 25 02:49 10_linux-rwxr-xr-x. 1 root root 10275 Nov 25 02:49 20_linux_xen-rwxr-xr-x. 1 root root 2559 Nov 25 02:49 20_ppc_terminfo-rwxr-xr-x. 1 root root 11169 Nov 25 02:49 30_os-prober-rwxr-xr-x. 1 root root 214 Nov 25 02:49 40_custom-rwxr-xr-x. 1 root root 216 Nov 25 02:49 41_custom-rw-r--r--. 1 root root 483 Nov 25 02:49 README
Listing 6-1 shows the files that make up a grub.cfg file. These files are read in via the grub2-mkconfig command from 00_header to 41_custom in this case. You will not need to know much about these files normally as you rarely need to touch them on a regular basis. The files you might be interested in are 01_users and 40_custom files. The 01_users file loads in the boot loader password if it set. The 40_custom file is where you may wish to add custom GRUB2 configurations.
Tip
In Linux configuration files, lines prefixed with the # symbol usually indicate comments, and these lines are skipped when processing your configuration files.
The GRUB2 configuration file is made via the grub2-mkconfig command. It takes one argument, the –o or --output option of where you would like the file to be created. You can create your own grub.cfg file now. It will probe your system and run through your configuration files and output a file that you can view. Of course, you don’t have to override your current grub.cfg with this file, so we will change the output to be a file in our local directory.
Listing 6-2. Creating a grub.cfg
$ sudo grub2-mkconfig --output mygrub.cfgGenerating grub configuration file ...Found linux image: /boot/vmlinuz-3.10.0-327.el7.x86_64Found initrd image: /boot/initramfs-3.10.0-327.el7.x86_64.imgFound linux image: /boot/vmlinuz-0-rescue-65e567f18fe84907a6f1d8519e921c97Found initrd image: /boot/initramfs-0-rescue-65e567f18fe84907a6f1d8519e921c97.imgdone
In Listing 6-2 you can see that we have used the sudo command to escalate our privileges to perform the grub2-mkconfig command . This command runs through the files in the /etc/grub.d directory and executes them in numbered order. The output of the command to the console shows that is has found two kernels (vmlinuz) with one being a “rescue” kernel. The grub2-mkconfig command has probed our system and found them via /etc/grub.d/30_os-prober script.
Taking a look at the mygrub.cfg file that has been produced (use $ less mygrub.cfg) you will see the output of all those files in /etc/grub.d. We are going to concentrate on the part that starts your operating system, and that starts with the following line:
### BEGIN /etc/grub.d/10_linux ###Below that BEGIN line is the menuentry that configures our menu item.
Listing 6-3. menuentry in the grub.cfg
menuentry 'CentOS Linux (3.10.0-327.el7.x86_64) 7 (Core)' --class centos --class gnu-linux --class gnu --class os --unrestricted $menuentry_id_option 'gnulinux-3.10.0-327.el7.x86_64-advanced-f60589f6-4d39-4c5b-8ac6-b1252f28f323' {....}
That already seems like a lot to digest and we have reduced Listing 6-3 to just the first line. Beginning with menuentry, this tells grub that we have a new menu item for it to list. ‘CentOS Linux (...) 7 (Core)’ gives us the name as it will appear in the menu list. Other information is provided by the --class parameter are used to display certain themes (like splash screens and so on).
The --unrestricted option is used to allow any user to run that entry at boot time via the console menu. This can be changed with the --users option where you can list users that may be able to run that entry (note that anyone listed as a superuser will still have access). Of course, this means that any entry with --unrestricted removed will not boot automatically and will require intervention. The GRUB2 documentation says that this is not really the best form of security as it will require access to the console on reboots but might be considered in kiosk type of installations. We will talk more on this and superusers in the section “Securing Your Boot Loader.”
In Listing 6-3 we have left out the code between the curly braces, { }. Let’s go through that code now in Listing 6-4.
Listing 6-4. Grub Boot Menu Code
menuentry ... {load_videoset gfxpayload=keepinsmod gzioinsmod part_msdosinsmod xfsset root='hd0,msdos1'if [ x$feature_platform_search_hint = xy ]; thensearch --no-floppy --fs-uuid --set=root --hint-bios=hd0,msdos1 --hint-efi=hd0,msdos1 --hint-baremetal=ahci0,msdos1 --hint='hd0,msdos1' 85932bb0-c5fe-431f-b129-93c567e4f76felsesearch --no-floppy --fs-uuid --set=root 85932bb0-c5fe-431f-b129-93c567e4f76ffilinux16 /vmlinuz-3.10.0-327.el7.x86_64 root=/dev/mapper/centos-root ro crashkernel=auto rd.lvm.lv=centos/root rd.lvm.lv=centos/swap rhgb quietinitrd16 /initramfs-3.10.0-327.el7.x86_64.img}
Inside the curly braces of the menuentry code the first few lines of code install various modules. For example, the first line, load_video calls a function within the grub.cfg script that inserts the various video modules for the splash screen. The modules on a CentOS 7 host can be found in /boot/grub/i386-pc/ and are loaded via the insmod command you see in the subsequent lines. The three insmod lines you see here are loading compression and file system modules.
The set root='hd0,msdos1' is how we set the root device for GRUB2. GRUB2 uses this setting to help find files that GRUB2 needs. What it means is the root device is on a hard drive (hd) and is the first hard drive (hd0). The 'msdos' is the filesystem of the root device and the final ‘1’ is the partition number on hd0. If you were booting off a USB drive you might expect it to look like 'usb0,msdos1' instead.
Note
Numbering in the Linux operating system generally starts counting from 0 and not 1. However, the first partition on a disk is partition 1, as far as GRUB2 is concerned. The first disk/device is numbered from 0.
Next in Listing 6-4 we see an if…fi conditional statement that has a search command inside it. The search command is different depending if ‘$feature_platform_search_hint’ is set to y. What is happening here is that the search command is looking for a device by a UUID (universal unique identifier). This is used to again set the root device for GRUB2 so it can find the Linux kernel we are going to load.
In Listing 6-4 we are at last loading our Linux kernel. The first part of the line linux16 says we are going to load the kernel using a 16-bit mode (16-bit mode is used to get around certain problems with video modes). The next part is the Linux kernel itself, /vmlinuz-3.10.0-327.el7.x86_64. You will find this file in the /boot directory. Next we pass in options to the kernel. We pass root=/dev/mapper/centos-root to provide the path to the ‘/’ partition. Initially we load the kernel as ‘ro’ or read only. The crashkernel=auto option is a setting for kdump kernel indicating the amount of memory reserved for it. The next two options tell the kernel that there are two LVM logical volumes it needs to load: centos/root and centos/swap. Finally, we can see that we load the Red Hat Graphical Boot (rhgb), a nicer boot experience than text, and we set the quiet option to supress noisy output during boot time.
Finally, the last line we are concerned with in Listing 6-4 is loading the kernel initrd. The initrd is a temporary root file system that is used by the boot process to first load the needed executables and drivers and then mount the system’s “true” root (‘/’) file system. It is only used at boot and is unmounted once the true file system has been mounted.
We have shown you only one GRUB2 menuentry and only from a CentOS host. The menuentry will be slightly different for an Ubuntu host. Normally you see at least two menu entries per kernel you have installed, with one entry being a “rescue” kernel for system recovery. It is a copy of the kernel in case one is corrupted on CentOS with no special kernel options. Ubuntu is different as it passes the recovery and nomodeset kernel options. We will talk more about these shortly.
Note
You can find more information on defining kernels and kernel options to GRUB2 at http://www.gnu.org/software/grub/manual/grub.html and https://wiki.archlinux.org/index.php/kernel_parameters . You can also find information via the info grub command.
Securing Your Boot Loader
Having such a versatile and configurable boot loader can have its drawbacks. One of those we have mentioned is security. An unsecured boot loader can be altered at boot time by any person with malicious intent. Many small offices will have their servers on or under a couple of desks rather than in a locked computer room, and these servers are therefore very susceptible to such attacks. We strongly suggest you consider setting a password on your boot loader and store it in a very safe place along with your other passwords.
Caution
Again, you should always put your passwords somewhere secure like a safe or other secure, locked location. Sometimes it is also good to keep this somewhere offsite (as you would with offsite backups) so that if something happens to your site, you will not only be able to restore your data, but also have the right passwords handy to access your host. You should also have a backup of all passwords and tell someone you trust in your company where to find those passwords in case of an emergency.
Luckily GRUB2 provides the ability to set a password to the boot loader so that any changes to the preconfigured boot process require the user to enter a password. CentOS hosts have tools that make this easy for us and we will explore that distribution in this exercise. First we issue the following command:
$ sudo grub2-setpasswordThis will ask you for a password and confirmation and will only create a password for the root user. What this command actually does is create a file /boot/grub2/user.cfg. The contents of that file looks as follows:
GRUB2_PASSWORD=grub.pbkdf2.sha512.10000.00E574C[...]DDF512CC090A9B[...]CCEA3BNow that is file is created, when your host is rebooted this code in the /boot/grub2/grub.cfg file will now be executed:
Listing 6-5. Adding Root User to grub.cfg
### BEGIN /etc/grub.d/01_users ###if [ -f ${prefix}/user.cfg ]; thensource ${prefix}/user.cfgif [ -n ${GRUB2_PASSWORD} ]; thenset superusers="root"export superuserspassword_pbkdf2 root ${GRUB2_PASSWORD}fifi### END /etc/grub.d/01_users ###
What that code is saying in Listing 6-5 is, if the user.cfg file exists, then we will “source” the contents. If there is a $GRUB2_PASSWORD variable declared, then we will add rootto the superusers list and this locks out other users to the GRUB2 command line. Then, finally, password_pbkdf2 is a GRUB2 command that associates the user with a password. We now need to run the grub2-mkconfig –o /boot/grub2/grub.cfg to set the superuser root password.
When your host next boots, you will notice that if you interrupt the boot process at the GRUB2 stage, you will be able to select one of the kernels with the --unrestricted menuentry option. However, if you want to edit any of the GRUB2 configuration details, by pressing e, you are required to enter a password. You will then be able to edit the GRUB2 configuration as normal.
To remove the password, remove the user.cfg file. Remember the GRUB2 documentation does suggest that this is not recommended except in situations where your hosts are publicly exposed. We suggest you use your best judgment considering your circumstances.
Remember that Ubuntu doesn’t provide these tools to you out of the box, but you can follow a similar process with that distribution. For an Ubuntu specific guide see https://help.ubuntu.com/community/Grub2/Passwords .
What Happens After You Boot?
So your host has found your kernel and booted it. Your operating system now starts to load, your hardware is initialized, disks are readied, IP (Internet Protocol) addresses are assigned, and a variety of other tasks are performed. To do this, Linux runs a program, which is tasked with initiating the operating system and its services. This program is the first program to be started on your system and is running until the system is shut down; unsurprisingly this process will have the process id (PID) of 1. The initialization program, or “init,” will bring the system up to a known “state” by finding out what services need to started and what they’re dependent on. It does this by going through a series of files on the file system and reading their instructions.
Currently Linux is in a bit of a transition. Up until recently, there were at least three different possible programs that handled the system initialization. These were the older SysV Init program, Ubuntu’s Upstart program, or the much more recent Systemd.
Upstart was Ubuntu’s attempt at replacing the older SysV Init initializer. Because it was compatible with SysV it was used by other distributions too as their initializer; however, not many fully implemented Upstart. It was just used as a better “init.” Red Hat-based hosts have since implemented Systemd completely and Debian-based systems, such as Ubuntu, are transitioning from Upstart and SysV Init to Systemd.
Systemd is a newer approach to system initialization and can be found as the default (or is said to be natively running systemd) on CentOS and you can see that systemd is PID 1 in Figure 6-5. Ubuntu on the other hand, is said to “emulate” SysV Init. It does this by using SysV initd scripts to initialize many services using compatibility scripts provided by Systemd packages.
Figure 6-5. PID 1 on CentOS

Figure 6-6. PID 1 onUbuntu
On Ubuntu the /sbin/init program is PID 1 . That init program with PID 1 comes from the systemd-sysv package and is actually linked to the systemd binary or program. Ubuntu currently is supporting all three init types while it is transitioning to run Systemd natively.
Both distributions have the systemd-sysv package installed and that contains the compatibility utilities for running SysVInit style initd scripts. It is designed to be a drop in replacement for SysVInit but is not 100% compatible in every sense.
Let’s go through how to manage Systemd native implementations. We will also briefly discuss Upstart and the older SysV init.
Note
There is a long history of init programs and popular and unpopular attempts to solve the problem of how to start a system. For a good look at them please see http://blog.darknedgy.net/technology/2015/09/05/0/ .
Understanding Systemd
As we have already mentioned, Systemd is the newest system initializer that is used across many modern distributions. Systemd is the replacement for both SysV Init and Upstart. It has been criticized as being against the Unix philosophy (do one thing, do it well), but it offers many advantages over its predecessors in the following ways (to a greater or lesser degree):
It is event driven. This means it can respond to system events (such as new hardware being plugged in, traffic starting on a network port)
Concurrent and parallel boot processing
It can respawn processes
Event logging
Tracks processes via the kernel’s CGroups
For those already familiar with SysV, Systemd doesn’t have runlevels like SysV but instead has “targets.” Targets are used to group service dependencies together. There are some common targets in systemd like multiuser, reboot, and rescue. So much as in runlevels, we can have different targets that bring us up to certain and discrete states. For example, if we want the system to be in the state where everyone can log in and use services we would use the target multiuser. In that state, we would like sshd, logging, and networking to be available. These are considered “wants” of the multiuser target.
Remember in Figure 6-3 where we showed you how to enter “maintenance” mode from the GRUB2 menu? We typed the word “single” at the end of the line where we launched the Linux kernel. Well, with Systemd we can also do the same thing by declaring the target we wish to launch into.
Listing 6-6. Using Systemd Targets to Boot to Rescue Mode
linux16 /vmlinuz-3.10.0-327.el7.x86_64 root=/dev/mapper/centos-root ro crashkernel=auto rd.lvm.lv=centos/root rd.lvm.lv=centos/swap rhgb quiet systemd.unit=rescue.targetFrom looking at Listing 6-6 you might be able to recognize that we are on a CentOS server; we can do the same on an Ubuntu server. You can see that we have issued the systemd.unit=rescue.target on the end of the line. We are telling the kernel that when it runs systemd we should got to the rescue target.
Systemd uses a set of “unit” files to manage the services on your system. When systemd starts it looks for the required unit files by traversing the following load path:
Table 6-1. Systemd Load Path
Path | Purpose |
|---|---|
/etc/systemd/system | Localized configuration files |
/run/systemd/system | Runtime unit files |
/usr/lib/systemd/system | Unit files of installed packages |
Because we used the system.unit=rescue.target parameter, when the system process starts it will look for the rescue.target file in these directories in order of precedence, the /etc/systemd/system, then the /run/systemd/system directories and then finally in the /usr/lib/systemd/system directory. The /etc/systemd/system and /run/systemd/system directories are called “drop-in” directories and systemd will search for unit and *.conf files there. The target file will look like the following rescue.target.
Listing 6-7. The rescue.target File
[Unit]Description=Rescue ModeDocumentation=man:systemd.special(7)Requires=sysinit.target rescue.serviceAfter=sysinit.target rescue.serviceAllowIsolate=yes[Install]Alias=kbrequest.target
In Listing 6-7 we have removed the comments beginning with the ‘#’ which are ignored by the system process. The options are case sensitive. In breaking this file down you can see that it has two sections, denoted by the square brackets([…]). Systemd unit files require at least the [Unit] and [Install] sections. You have the option to include a [Service] section, and we will discuss that shortly.
The [Unit] section has a Description and a Documentation setting, and they are pretty self-explanatory. In Listing 6-7 we can see that the rescue target Requires the sysinit.target and rescue.service. Requires does not provide ordering but tells systemd that these services should be executed too. If one of the required targets or services fails, this unit will be deactivated too.
Ordering support of targets or services is provided by adding options like the After. The rescue.unit should now be started after sysinit.target and rescue.service. It is a common pattern to see the same services and targets in the Required option also listed in the After option.
The AllowIsolate option is a Boolean read by the systemctl isolate command. The isolate argument to the systemctl command is similar in nature to a SysV runlevel. You can use it to put your system in a particular “state,” so to start your graphical environment you may choose to run systemctl isolate graphical.target. For this reason, AllowIsolate is set to “false/no” by default because not every target file provides a stable system state.
The [Install] section is used by the systemctl tool when the unit is enabled or disabled. The systemctl tool is the utility tool used to manage systemd. The Alias option here points to the kbrequest.target which is a special systemd unit that is started whenever the Alt+ArrowUp is pressed on the console. Take a look at Figure 6-7 to see how that works.

Figure 6-7. Using systemctl to enable the Alt-ArrowUp alias
In Figure 6-7 you can see that when we issue the $ sudo systemctl enable rescue.target, the Alias option of the Install section means that we create a symlink from kbrequest.target to the rescue.target. Now, on the console, if we hit the Alt+ArrowUp keys we get the following as shown in Figure 6-8.
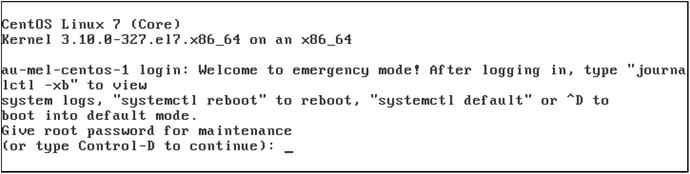
Figure 6-8. Entering rescue console from pressing the Alt+ArrowUp keys
Let’s take a quick look at a service file that configures how we manage the rsyslog daemon. Rsyslog is the logging service on Linux and we look at it in depth in Chapter 18. In Listing 6-8 we have displayed the contents of our rsyslog.service file.
Listing 6-8. The rsyslog.service systemd File
[Unit]Description=System Logging Service;Requires=syslog.socket[Service]Type=notifyEnvironmentFile=-/etc/sysconfig/rsyslogExecStart=/usr/sbin/rsyslogd -n $SYSLOGD_OPTIONSRestart=on-failureUMask=0066StandardOutput=null[Install]WantedBy=multi-user.target;Alias=syslog.service
In this file we have the [Unit] and [Install] sections as we have seen before. It is worth noting that in these sections you can see a semicolon on the Requires and Alias options. If lines start with a #or a;then they are considered comments and are ignored. In Listing 6-8 we see that there is a [Service] section and we use that to describe the service we are configuring to run on our system.
All [Service] sections require a Type option. It can be set to “simple,” “forking,” “oneshot,” “dbus,” “notify,” or “idle.” The default setting is “simple.” With a type of simple you expect that the process run by the ExecStart option is to be the main process (i.e., it doesn’t fork a child process). Notify is similar to simple but it will send a notification message once it has finished starting up. Systemd will then start other units once it reads this message. Since this is a logging service, it makes sense to make sure the service is up and running before starting other units dependent on recording log events.
EnvironmentFileis where we can load environmental parameters. There are many optional parameters that can be set for rsyslogd and you can add them into the /etc/sysconfig/rsyslog file. Options found in man rsyslogd can be added to the file.
Next we have the ExecStart option . This is the command that is executed, along with any arguments. This should be the main process of the daemon, unless you are going to fork the process (with Type=fork).
The Restart option controls how systemd monitors the service and reacts to any issues. The options are “no,” “on-success,” “on-failure,” “on-abnormal,” “on-watchdog,” “on-abort,” or “always.” The rsyslog service is set to restart on failure and the default is “no” if not set. Setting on-failure means that systemd will attempt to restart the service when the process exits with a non-zero exit code, it is terminated by a signal, an operation times out, or a watch-dog timeout is triggered.
UMask sets the permissions of any files created by this process. If we remember what we learned back in Chapter 4, the umask is an octet and is used to set permissions on files and directories. When applied it means we give files created by this process permissions of 0711, or rwx-x-x. This means that the owner of the process is given read, write, and execute permission on the files, the group and everyone else will have execute only.
The last option in the [Service] section is StandardOutput and defines where the file descriptor 1 or standard output of the process should be connected to. The values are “inherit,” “null,” “tty,” “journal,” “syslog,” “kmsg,” “journal+console,” “syslog+console,” “kmsg+console,” or “socket.” The rsyslogd service has been set to null, which is to a special file on Linux called /dev/null. If you write to /dev/null you expect your data to be blackholed or lost. This means we don’t care about the output of this service on standard out.
Finally, if you look at the [Install] section you will see a WantedBy=multi-user.target. This line instructs the systemctl command to create a symbolic link in the /etc/systemd/system/multi-user.target.wants directory to the /lib/systemd/system/rsyslog.service when a service is enabled, or remove the link if the service is disabled. More on this shortly.
Systemd unit files are complex and rely on many other dependency units. There are also countless options and settings available to systemd units. For further reading please see the following helpful links:
Once your kernel has passed off to the systemd process and it has brought up your machine to a target state you will need to know how to interact with the services running on your system. We will explore that shortly when we look at the systemctl command.
Upstart: Ubuntu’s Init
The idea behind Upstart was to create a comprehensive init process that can be used to start, stop, monitor, and respond to events on behalf of services on your Linux host. It was a reworking and expansion of the SysV Init paradigm; rather than outright replacing SysV Init, the designers created Upstart to emulate SysV Init until everyone converted over.
The init process under Upstart is an event-based daemon that uses event triggers to start or stop processes. An event is a change of state that init can be informed of. The event can be the adding of a peripheral device, like plugging in a USB memory stick. The kernel can then inform init of this action by sending an event notice. This event in turn can trigger other jobs to be initiated or stopped depending on the job definitions under init’s control.
Upstart collectively calls processes under its command jobs, and you interact with those jobs using the initctl command. Jobs can either be services or tasks or abstract. Services are persistent, like a mail server, and tasks perform a function and then exit to a waiting state, like a backup program. An abstract job runs forever but has no child process. The definition files (or Upstart scripts) for jobs can be found under the /etc/init directory.
Listing 6-9 illustrates what is called a system job definition for the rsyslogd daemon . In this case, rsyslogd is a logging daemon that needs to write to the /var/log/syslog file. As logging daemon, it is important that if this gets stopped for some reason, it is good to get it to try to restart itself. Let’s run through the major points here.
Listing 6-9. /etc/init/rsyslog.conf
# rsyslog - system logging daemon## rsyslog is an enhanced multi-threaded replacement for the traditional# syslog daemon, logging messages from applicationsDescription "system logging daemon"start on filesystemstop on runlevel [06]expect forkrespawnpre-start script/lib/init/apparmor-profile-load usr.sbin.rsyslogdend scriptscript. /etc/default/rsyslogexec rsyslogd $RSYSLOGD_OPTIONSend script
Upstart is “evented,” meaning it can react to events on your system. The start on filesystem means that when the filesystem “event” takes place, we will automatically start rsyslog too. The stop on configuration option is an event definition signalling Upstart to stop rsyslogd when a runlevel 0 or 6 event is detected. As you may know, runlevels 0, 1, 6 are special runlevels that either shut down, reboot, or put your host into maintenance mode. We expect the service to fork another process and the respawn option directs Upstart to restart the job if it is stopped unexpectedly. We can write prestart scripts that run prior to executing the main script section.
While Upstart is different from SysV and has no natural concept of runlevels, it has been made backward compatible with SysV Init scripts. These help emulate the old-style SysV scripts by executing the /etc/init.d/rc script. This will in turn run through the old /etc/rcN.d directory and start and stop services for that particular runlevel.
You manage Upstart with the initclt command and that allows you to start, stop services.
$ sudo initctl start rsyslog$ sudo initctl stop rsyslog
Upstart doesn’t have a tool to enable or disable services, but you can use pre-start script section to source in a file that contains an ENABLED variable set. The Upstart Ubuntu Cookbook suggests something like this is the accepted way:
pre-start script# stop job from continuing if no config file found for daemon[ ! -f /etc/default/myapp ] && { stop; exit 0; }# source the config file. /etc/default/myapp# stop job from continuing if admin has not enabled service in# config file.[ -z "$ENABLED" ] && { stop; exit 0; }end script
You can read more on Upstart at http://upstart.ubuntu.com/cookbook/ .
Remembering SystemV
Let’s go back in time somewhat. For a long time Linux systems were initialized by a program called SystemV Init, SysV Init , SysV, or just init. Init has since been replaced by another program called Systemd in most major distributions, including CentOS and Ubuntu. However, both of these distributions still support SysVInit startup scripts. We are going to give you a bit of a background on Init and how it works.
SysVInit has a concept of runlevels. Runlevels define what state a host should be in at a particular point. Each runlevel comprises a set of applications and services and an indicator of whether each should be started or stopped. For example, during the normal boot of your host, the init tool at each runlevel will initiate all the required sets of applications and services in that runlevel. Another example occurs when you shut down your host. When you tell your host to shut down, the init tool changes the runlevel to 0. At this runlevel all applications and services are stopped and the system is halted.
SysV has seven runlevels, ranging from 0 to 6, and each distribution uses different runlevels for different purposes. But some runlevels are fairly generic across all distributions. The common runlevels are 0, 1, and 6. You’ve already seen runlevel 0, which is used to shut down the host. Runlevel 1 is the single-user mode, or maintenance mode, that we described earlier in this chapter. Runlevel 6 is used when your host is being rebooted.
The runlevels on Ubuntu and CentOS hosts differ slightly. On Ubuntu, the runlevels 2 to 5 all run what is called multiuser mode . Multiuser mode is the mode where multiple users can sign in, not just a single console user. All required services are usually set to be started in this runlevel.
In comparison, CentOS generally starts in runlevel 5 if you have a GUI console installed or runlevel 3 for command line only. CentOS has the following runlevels :
Runlevel 0: Shuts down the host and brings the system to a halt
Runlevel 1: Runs in single-user (maintenance) mode, command console, no network
Runlevel 2: Is unassigned
Runlevel 3: Runs in multiuser mode, with network, and starts level 3 programs
Runlevel 4: Is unassigned
Runlevel 5: Runs in multiuser mode, with network, X Windows (KDE, GNOME), and starts level 5 programs.
Runlevel 6: Reboots the host
Managing SysV init files
Traditionally, on most distributions the /sbin/init tool was configured using the /etc/inittab file. The inittab file specified the default runlevel the system should use. It also detailed the other runlevels and where to find the list of applications to start or stop in each runlevel. On systems running Systemd you can forget about basically ignore runlevels as they don’t strictly apply in the new world and you will not find the inittab file on your system.
Note
If you’re looking for more detailed information than what is in the man page on the inittab, you can read information at www.cyberciti.biz/howto/question/man/inittab-man-page.php .
The traditional init program would read the inittab to determine the default runlevel and then execute a series of scripts for that runlevel (files in the /etc/rcX.d directories where X is the runlevel). Files in those directories starting with S or K’ would be executed depending if the system was starting (S) or shutting down (K) (or moving between runlevels where the service is expected to be running or stopped).
With hosts with the systemd-sysv package installed, if we cannot find a systemd service file, the system will look for files in the /etc/init.d directory; for example, /etc/init.d/postfix . This file will be picked up and generated in to a systemd service file (more on these later).
On modern distributions running Systemd, there is no longer a need to configure SysV.
Moving Between Runlevels
On older systems you can use the telinit or init command to switch between runlevels. On today’s systems you can still use these commands but the true concept of runlevels no longer applies. These now map to different systemd “targets.”
However, if you happen to find yourself on the old SysV hosts you can use the telinit command as follows:
$ sudo telint 3This would move you from your current runlevel to runlevel 3. See the man page for more information.
Understanding Initd Scripts in SysV Init
Initd scripts are scripts that stop and start processes, as well as sometimes providing the current status of the process and possibly other actions. Today’s initd scripts are said to be LSB compliant in that they have a certain structure to them. Let’s start by looking at an init script: take a look at the postfix script located in /etc/init.d on our Ubuntu server.
What’s LSB? Short for Linux Standard Base , it is a set of standards agreed to by the various Linux distributions to make life easier for everyone using it, especially for those who develop on it. It seeks to make common standards for Linux configurations, file locations, package names, and other conventions. LSB has struggled to stay relevant in recent years and less distributions are being certified under it. You can read more about it at www.linuxfoundation.org/en/LSB .
Listing 6-10. Ubuntu Postfix Script Header
#!/bin/sh –e### BEGIN INIT INFO# Provides: postfix mail-transport-agent# Required-Start: $local_fs $remote_fs $syslog $named $network $time# Required-Stop: $local_fs $remote_fs $syslog $named $network# Should-Start: postgresql mysql clamav-daemon postgrey spamassassin saslauthd dovecot# Should-Stop: postgresql mysql clamav-daemon postgrey spamassassin saslauthd dovecot# Default-Start: 2 3 4 5# Default-Stop: 0 1 6# Short-Description: Postfix Mail Transport Agent# Description: postfix is a Mail Transport agent### END INIT INFO
We have omitted some details here, but the important information for our discussion is between the ###BEGIN and ###END comments. LSB-compliant init scripts require a standard header. The standard says that you must have the following keywords followed by a list of arguments, some denoted by a $ prefix. These $ arguments are reserved virtual facilities, which are described in the LSB specification. They are designed to give more order to your init scripts. For instance, $local_fs means “all local filesystems are mounted.” So when you see ‘Required-Start’, it means the listed services must be started before executing this script. The example in Listing 6-10 would prevent Postfix from starting unless all the filesystems are mounted, the log service is running, the named server is running, the network is up, and the time has been synchronized.
The meanings of the keywords from Listing 6-10 and listed here are:
Provides: Gives a brief indication what this service provides. This information is used by other services.
Required-Start: Lists services that must be available for this script to start.
Required-Stop: Indicates this service must be stopped before the services listed here are stopped.
Should-Start: Defines a list of what services can be started, although not mandatory, before this service starts.
Should-Stop: Indicates this service should be stopped, although not mandatory, before the services listed here.
Default-Start: Defines the default runlevels the service should be run in.
Default-Stop: Defines the default runlevels this service should not run in.
Description: Gives a description of the service.
More information about LSB init scripts can be found at
http://refspecs.linux-foundation.org/LSB_5.0.0/LSB-Core-generic/LSB-Core-generic/iniscrptact.html
https://wiki .debian.org/LSBInitScripts
Dissecting further the Listing 6-10 example notice the Default Start and Default Stop keywords . These map to the runlevels that we have talked about previously. In this script we are told that Postfix should start in runlevels 2 3 4 and 5. We should not be running in runlevels 0 1 and 6.
Note
Older operating systems like CentOS 5 used the pre-LSB standard for writing init.d scripts. These were superseded and replaced with the LSB standard. Ubuntu has used LSB-compliant init.d scripts for many releases now.
The rest of the contents of the postfix init script (which we’ve omitted from Listing 6-10) are the instructions used to start, stop, and sometimes query the status of the application or service managed by the script.
Managing Services
In Chapter 4, we introduced you to the concept of processes and services. Each application and command you run creates a process. Some processes finish when the command completes, for example, listing the contents of a directory. Other processes are more long running and don’t stop until you request them to do so or you reboot the host. Some of these long-running processes run applications and services like mail and web servers or print or file services. These types of long-running processes are often called daemons. Daemons are processes that run in the background; that is, they are not required to be attached to a console. As we explained in Chapter 4, each of these processes has a name; for example, sshd daemon or httpd, or apache for the Apache web server.
Note
All processes on Linux originate from a parent process. Forking a process involves a parent process making a copy of itself, called a child process. With Systemd, the systemd process would be the parent. This means that processes can persist without requiring to be attached to a console or user session. When the parent process stops, so do all its children. For example, if you kill the systemd process on a host, you will stop all processes on the host. This is not a very good idea and will probably have unfortunate effects on a host. If you need to start and stop all services, you should use the commands we introduce in this chapter.
Managing Services with Systemd
As we have explained previously, in Systemd targets are used to group units so that when you boot our host to a particular target, you can expect certain services to be available and other, possibly conflicting, services to be stopped. If you change targets your services can also change from running to stopped. You can also stop and start individual services manually at any time.
Systemd has a command tool called systemctl. Systemctl is used to manage systemd resources on a local, remote, or virtual container. By issuing the --help argument we can see the list of arguments, unit file commands, machine commands, job commands, and more. To begin with, let’s look at how we can manage an individual service and then we can look at the wider system.
Note
Yes, you can use systemctl to manage remote or virtual machines. When specified with the --host <hostname>, systemctl uses SSH to log into the remote system and execute the systemctl command. When specified with a --machine <machinename> it will execute command on the specified local container.
Systemd Services—Status, Stop, and Start
So first, let’s look at how to get the status of a service called postfix , which is a SMTP server for sending e-mail.
Listing 6-11. Getting the Status of the postfix Service
$ sudo systemctl status postfix.service• postfix.service - Postfix Mail Transport AgentLoaded: loaded (/usr/lib/systemd/system/postfix.service; enabled; vendor preset: disabled)Active: active (running) since Wed 2016-04-27 20:35:10 AEST; 3h 0min agoProcess: 642 ExecStart=/usr/sbin/postfix start (code=exited, status=0/SUCCESS)Process: 636 ExecStartPre=/usr/libexec/postfix/chroot-update (code=exited, status=0/SUCCESS)Process: 621 ExecStartPre=/usr/libexec/postfix/aliasesdb (code=exited, status=0/SUCCESS)Main PID: 993 (master)CGroup: /system.slice/postfix.service├─ 993 /usr/libexec/postfix/master -w├─1003 qmgr -l -t unix -u└─1926 pickup -l -t unix -uApr 27 20:35:09 au-mel-centos-1 systemd[1]: Starting Postfix Mail Transport Agent...Apr 27 20:35:10 au-mel-centos-1 postfix/master[993]: daemon started -- version 2.10.1, configuration /etc/postfixApr 27 20:35:10 au-mel-centos-1 systemd[1]: Started Postfix Mail Transport Agent.
We see a lot of detail here. The main things I want to draw your attention to are Loaded and Active. Loaded shows you what unit file is being used to launch this service. Active gives you the current status of the service, “active,” and how long it has been running for. From this output we can also see that this service was started by running /usr/sbin/postfix start and that that process (642) ended with an exit code 0 or success. We also executed two other ExecStartPre commands which were both successful. These map nicely to the systemd postfix.service unit file on CentOS.
[Service]Type=forkingPIDFile=/var/spool/postfix/pid/master.pidEnvironmentFile=-/etc/sysconfig/networkExecStartPre=-/usr/libexec/postfix/aliasesdbExecStartPre=-/usr/libexec/postfix/chroot-updateExecStart=/usr/sbin/postfix start
The other thing to note in Listing 6-11 is the CGroup information. This shows that the postfix.service is under the CGroup system.slice. CGroups are implemented in the kernel and are used to group system resources for isolation and performance purposes.
The output in Listing 6-11 is very verbose and is useful for the system administrator to view the details, but if we were to do this programmatically it is a lot of data to “grok” to see the status of our service. So systemctl provides a way of condensing the same information to make it easy for a program to detect the status.
$ sudo systemctl is-active postfix.service ; echo $?active0
The above command provides both the state (“active,” “inactive”) to the standard output and an exit code (0 for active, non-zero for other state)—both of which you can test for in a script or program that might manage the service. In the line above we are making use of the special variable $? in our bash shell which holds the exit code of the last command run.
Now that we know how to see the status of our service and we can see that is it already running, let’s stop the service.
$ sudo systemctl stop postfix.serviceThere is no noticeable output from that command so if we query the status, we can see that it is stopped.
● postfix.service - Postfix Mail Transport AgentLoaded: loaded (/usr/lib/systemd/system/postfix.service; enabled; vendor preset: disabled)Active: inactive (dead) since Thu 2016-04-28 11:28:04 AEST; 1s agoProcess: 5304 ExecStop=/usr/sbin/postfix stop (code=exited, status=0/SUCCESS).....Main PID: 5267 (code=killed, signal=TERM)
Clearly we can see that the service is “inactive” and that the Main PID was killed with a TERM signal.
Note
Processes can accept “signals” from the kill command. A TERM or SIGTERM signal tells a process to finish up what it is doing and exit. You can also send harsher signals like SIGKILL which will exit the process immediately, possibly in the middle of something important. SIGHUP can sometimes be used to reload configurations of running processes. See http://linux.die.net/man/7/signal for more information.
Now that the postfix service is stopped, we will start it again.
$ sudo systemctl start postfix.serviceAgain there is no output to the console; we run the status to confirm that it is running.
● postfix.service - Postfix Mail Transport AgentLoaded: loaded (/usr/lib/systemd/system/postfix.service; enabled; vendor preset: disabled)Active: active (running) since Thu 2016-04-28 11:51:45 AEST; 2s ago
What we have seen in this section is how to start, stop, and see the status of a service using the systemctl command . But how did those services start in the first place? How are these services enabled to be started at boot time? Let’s investigate that now.
Isolated Targets
As we have said, systemd is the process that manages all the services on our host and systemctl is the command we use to manage the systemd process. We have talked about systemd targets and that they bring the system up to a certain state where the right processes are running. In SysV we called them runlevels and they were controlled by a series of files symlinked from the /etc/rcX.d directories. Well with systemd this concept of a single runlevel is not quite accurate, as many targets can be active at once. However, in systemd, some targets have a special purpose.
In systemd , targets like multiuser, if they have the Boolean AllowIsolate=yes set in their unit files. This means that these targets will respond to the systemctl isolate command. This command allows us to start discrete system “states” where we start one unit (and all their dependencies) and stop all others.
Let’s discover our current system state. We are going to use the systemctl command again and this time we are going to list the current targets running on our system.
$ sudo systemctl list-units --type targetUNIT LOAD ACTIVE SUB DESCRIPTIONbasic.target loaded active active Basic Systemcryptsetup.target loaded active active Encrypted Volumesgetty.target loaded active active Login Promptslocal-fs-pre.target loaded active active Local File Systems (Pre)local-fs.target loaded active active Local File Systemsmulti-user.target loaded active active Multi-User Systemnetwork.target loaded active active Networkpaths.target loaded active active Pathsremote-fs.target loaded active active Remote File Systemsslices.target loaded active active Slicessockets.target loaded active active Socketsswap.target loaded active active Swapsysinit.target loaded active active System Initializationtimers.target loaded active active Timers
Here is a list of the current targets running on our system. Some of these targets are “special” targets like swap.target which is used to manage swap partitions and swap files and slices.target, which sets up all the CGroup slice units. The multiuser target is made up of all these other targets. If you look into the unit file for multiuser.target you will see that it Requires=basic.target. The basic.target has Requires=sysinit.target. The sysinit.target has Wants=local-fs.target swap.target. I am leaving out some other detail here, like Conflicts and After directives, but you should be able to see that the multiuser target is made up of all these other targets and that is how systemd knows what target to pull in.
We have said that some of these targets define a “state” of a machine. These states are like rescue, multiuser, graphical, and shutdown. When your system has started you can move between these targets by issuing the following command:
$ sudo systemctl isolate graphical.targetWhat this command will do look at the graphical.target unit file, determine if it has AllowIsolate=yes, then execute the Requires, Conflicts, After, Wants and other directives to bring the system to that “state.” You will notice when you look at the graphical.target unit file (found in /lib/systemd/system directory) that it Requires the multiuser target and should not start until After it is completed. So how does systemd know how to start our postfix service on boot?
Disabling Services
Let’s explore this by looking at what happens when we disable our postfix service. If we don’t want the service to start when our system reboots, we need to disable it. To disable it let’s execute the following command:
$ sudo systemctl disable postfix.serviceRemoved symlink /etc/systemd/system/multi-user.target.wants/postfix.service.
The output of this command has told us what it is has done. It has removed a symbolic link (symlink) from the /etc/systemd/system/multi-user.target.wants directory. If we look at our postfix.service file in the /lib/systemd/system directory we will see that the [Install] section has the option, WantedBy=multi-user.target. If we remember that the [Install] section contains directives that tells systemctl to create the symlink or remove the symlink when we enable or disable the service, it is this option that tells systemctl to remove the symlink when we disable the service.
Enabling Services
Now that we have done that, we want to enable the service so that it starts automatically when our system boots. Let’s enable the service again and see what the output is:
$ sudo systemctl enable postfix.serviceCreated symlink from /etc/systemd/system/multi-user.target.wants/postfix.service to /usr/lib/systemd/system/postfix.service.
The output is telling us that is has created the symlink to the postfix.service file in the /etc/systemd/system/multi-user.target.wants directory. Now when systemd initiates the multiuser.target it will look inside the multi-user.target.wants directory and start those services also.
Let’s try now to get a list of all the current running services that systemd is controlling (see Listing 6-12).
Listing 6-12. Listing the Running Services
$ sudo systemctl --type=service --state=runningUNIT LOAD ACTIVE SUB DESCRIPTIONatd.service loaded active running Job spooling toolscrond.service loaded active running Command Scheduler[email protected] loaded active running Getty on tty1NetworkManager.service loaded active running Network Managerpostfix.service loaded active running Postfix Mail Transport Agentsystemd-journald.service loaded active running Journal Servicesystemd-logind.service loaded active running Login Servicesystemd-udevd.service loaded active running udev Kernel Device Managerwpa_supplicant.service loaded active running WPA Supplicant daemon
In Listing 6-12 we can see the (trimmed) output of the systemctl command which has been run with the --type=service and --state=running options. If you run the systemctl command without any options or arguments you get a full list of every loaded unit definition (unit file) systemd has loaded. We are reducing this list by add the --type of unit we are interested in and the --state of that unit. You can see in that list that our postfix.service is loaded, active, and running. You can see all inactive units too by adding --all to the command.
Managing SysV style files
So far we have seen how we handle systemd unit files that control services. Remember we can also use the older SysV init.d files too. We have also said that systemd will first look in its own directory paths looking for a name.service file, or in our case postfix.service. If it cannot find one it will look in /etc/init.d/ for an executable postfix file (without the .service suffix). If there is one there and it is LSB compliant, it will run systemd-generate-sysv command to create a systemd wrapper file.
The Ubuntu server still uses some SysV init.d system files (whereas CentOS uses systemd natively) so we will look at how that distribution manages the postfix service. When the system starts up or after a systemctl daemon-reload is triggered, if systemd finds a postfix init.d service file it passes it to systemd-generate-sysv which will create a postfix.service and place it in /run/systemd/generator.late/postfix.service. It will also create the appropriate symlinks to multi-user.target.wants directory in the /run/systemd/generator.late directory.
The unit files generated have the same options ([Unit] and [Service]) as other unit files. The start, stop, and reload options refer to the init.d file as follows:
[Service]...ExecStart=/etc/init.d/postfix startExecStop=/etc/init.d/postfix stopExecReload=/etc/init.d/postfix reload
We can use the same systemctl start|stop postfix.service to manage the service. Likewise we can use the systemctl enable|disable to manage if we want it to start or not on boot.
$ sudo systemctl disable postfixpostfix.service is not a native service, redirecting to systemd-sysv-installExecuting /lib/systemd/systemd-sysv-install disable postfix
When dealing with SysV init.d scripts systemd does two things. One is to apply the same symlinks to the multi-user.target.wants directory for the postfix service (in /run/systemd/generator.late/ directory). But here you can also see that since we are not using a native systemd service we will redirect this to another compatibility script to handle the enabling and disabling in SysV land. This script executes, under the hood, the older SysV init.d manager, in this case on Ubuntu , update-rc.d. On CentOS this would be the chkconfig command.
Let’s quickly go through those commands so that you are also familiar with what is happening under these circumstances.
Update-rc.d—Managing Ubuntu SysV init.d
Managing SysV init.d services onUbuntu is done via the update-rc.d command. The update-rc.d command will create symbolic links into the /etc/rc?.d directories or remove them if instructed to do so. The update-rc.d command takes the options listed in Table 6-2.
Table 6-2. update-rc.d Options
Option | Description |
|---|---|
Start | Allows you to explicitly state the runlevels and startup sequence. |
Stop | Allows you to explicitly state the sequence and runlevels you wish to stop the service. |
Defaults | The update-rc.d script will create start symlinks with the default start sequence (S20) into runlevels 2, 3, 4, and 5 and stop symlinks into runlevels 0, 1, 6 with the stop sequence (K80). |
Remove | Removes the symlinks from each runlevel as long as the file /etc/init.d/ script-name has already been removed. (See -f for more information.) |
-n | Gives you a dry run of what would happen without changing anything. |
-f | When used with the remove option, forces the removal of the symlinks from the /etc/rcn.d directories, even if /etc/init.d/ script-name is still present. |
The update-rc.d command will simply link init.d scripts into the /etc/rcN.d directories (where N is the runlevel), usually with the defaults of runlevels 2, 3, 4, 5 and a start priority of S20, and runlevels 0, 1, 6 and a stop priority of K80.
From the command line , you can then issue update-rc.d to manipulate the services that run at particular runlevels. For example, to turn a service on with the Ubuntu defaults, you issue the following:
$ sudo update-rc.d postfix start defaultsWith the defaults, as stated previously, the init.d scripts are symbolically linked to the /etc/rcN.d directories and given the standard start and stop priorities of 20 and 80.
You can specify the runlevels and priorities you wish your services to start on with the following:
$ sudo update-rc.d postfix start 23 40Here we have set the service to start at runlevels 2 and 3 with a priority of 40.
To turn off the service in runlevel 2, issue the following:
$ sudo update-rc.d postfix stop 2The preceding command will add a K80postfix symbolic link into the /etc/rc2.d directory.
To remove services from all runlevels, you would issue the following command:
$ sudo update-rc.d postfix removeIf the init.d script for the service you are trying to remove is still present in the /etc/init.d directory, which will be the case if you have not uninstalled Postfix, you will get an error unless you use the -f option. In this case, you issue the following:
$ sudo update-rc.d -f postfix removeThat is how you would manage Ubuntu SysV init.d. Let’s look at shutting down your system next.
Shutting Down and Rebooting Your Linux Host
There are several ways to shut down and reboot a Linux host both from the GUI and the command line. From the command line, we can use the systemctl command to manage the power state of our hosts.
To shut down and power off the system we would issue the following:
$ sudo systemctl poweroffThis will power off the system immediately. You can also issue a reboot, halt, hibernate, sleep, and more. See the systemctl --help for more information.
We can still issue the older commands too to shut down the host—you can issue the appropriately named shutdown command:
$ sudo shutdown –h nowThe systemctl poweroff and the shutdown command both link to the same systemd target of /lib/systemd/system/poweroff.target.
From the GUI, shutting down the host is easy. Find the power symbol, usually top right of the screen, and then select the Shutdown option.
Scheduling Services and Commands
You can schedule repeated jobs with Linux to run at specified events or at specified times or at specified intervals. There are two ways to do this. One is with systemd timers and the other is with a tool called Cron .
Systemd Timers
Systemd timers are unit files that end with *.timer suffix. They control when a service is run. It is expected that these will replace Cron for managing regularly scheduled job management.
It has advantages over Cron in that it can trigger events based on not only the wall clock (the system’s time) but also things like the period after the last event was run, on boot, on startup or a combination of these sorts of things. A timer unit file can also be used to trigger another service unit that doesn’t have a timer.
The configuration requires a [Timer] section in the unit file. Let’s take this example of the daily apt schedule that manages the daily checks for the apt cache (see Listing 6-13).
Listing 6-13. Systemd timer /lib/systemd/system/apt-daily.timer
[Unit]Description=Daily apt activities[Timer]OnCalendar=*-*-* 6,18:00RandomizedDelaySec=12hAccuracySec=1hPersistent=true[Install]WantedBy=timers.target
Here you can see that we have the usual sections for [Unit] and [Install]. The OnCalendar option specifies when we should run the service, and that can be specified by the day of the week, the year, the month, the day, and then HH:MM:SS or any number of ways! There is a full list of options in man 7 systemd.timer. Asterisks (*) mean any value and this is shorthand for daily (*-*-*). It is triggered to occur at either 06:00 or 18:00Hrs, with a 12-hour random window (RandomizedDelaySec), give or take an hour (AccuracySec). The Persistence=true says to run if it missed the last start (like the system was shutdown).
Let’s imagine we have a monitor.service file that makes a cURL POST request to a web site to tell us the system has booted, and checks in every 20 minutes after that.
[Unit]Description=Tell the monitoring service we are up[Timer]OnBootSec=2minOnUnitActiveSec=20min[Install]WantedBy=timers.target
We will put this configuration into a file called /etc/systemd/system/monitor.timer, next to our monitor.service file. Here, we can see that a unit file for a timer needs these three sections, [Unit], [Timer], and [Install].
The [Timer] section is where we put our timer options. We have chosen here to trigger our cURL job 2 minutes after the boot event (OnBootSec), and then every 20 minutes after the last event (OnUnitActiveSec). The times here could be expressed as 1h (1 hour), 2w (2 weeks), or a variety of other ways. These are called monotonic timers as opposed to the real-time timer we saw in Listing 6-13.
The WantedBy=timers.target in the [Install] section creates the symlinks to the timers target which enables the timer in systemd. We can enable the timer with the following:
$ sudo systemctl enable monitor.timerCreated symlink from /etc/systemd/system/timers.target.wants/monitor.timer to /etc/systemd/system/monitor.timer.
We can now list our timers with the following:
You can see our timer in Figure 6-9. You can see that it activates our monitor.service and that it was successful 18 minutes ago. You can also see the apt-daily.timer too.

Figure 6-9. Listing timers
One of the things it doesn’t do simply is trigger an e-mail in the event of failure. Some people rely on this feature and that is why they might choose Cron instead.
For more information on timers see
Introducing Cron
There is a last type of service management we need to show you: scheduling. You may already be familiar with the Microsoft Task Scheduler, which you can use to schedule tasks to be run once or repeated regularly on a given minute, hour, day, week, or month. The equivalent in Linux is called crontab (short for chronograph table). Its purpose is to submit tasks at set times according to the host’s clock. Tasks can be any script or application that you desire. Commonly, you will find maintenance-type tasks in the crontabs. These can be scheduled to run nightly, weekly, or monthly and perform some kind of script, like one that deletes all files in the /var/ log/httpd directory older than two months.
Cron jobs (the tasks that crontab performs) are defined in a series of scripts under the directories defined in the /etc/crontab file. These are referred to as system cron jobs. The lists of directories in the /etc/crontab file looks like this:
$ less /etc/crontabSHELL=/bin/bashPATH=/sbin:/bin:/usr/sbin:/usr/binMAILTO=rootHOME=/# run-parts01 * * * * root run-parts /etc/cron.hourly02 4 * * * root run-parts /etc/cron.daily22 4 * * 0 root run-parts /etc/cron.weekly42 4 1 * * root run-parts /etc/cron.monthly
You should not edit this file because, being the system crontab file, it is likely to be replaced with a new version each time crontab is updated. This means any changes will be lost. Plus you could cause other problems if you make a mistake. It does, however, provide a good example of the syntax of a crontab file.
Tip
When a single host is used to run a lot of virtualized servers, you should change the times cron jobs start on each virtual server to ensure they do not all start running at the same time. Having multiple virtual servers all start their daily cron tasks at the same time would impact system performance.
Listed at the top of the file are SHELL, PATH, MAILTO, and HOME environment variables, which we described in Chapter 4. Lines starting with # are comments and can be ignored. Further down the file, you can see five columns with either a number or *, a column with root, a column with run-parts, and finally a directory listing.
The first five columns represent minute, hour, day of the month, month, and day of the week. Let’s look at the last line:
42 4 1 * * root run-parts /etc/cron.monthlyHere, 42 is the 42nd minute of the hour, the hour is 4 (with hours being based on a 24-hour clock), and 1 represents the first day of the month. So crontab will run the last line at 04:42 a.m. on the first day of every month.
Note
You can also specify the standard three-letter abbreviations for the months, days in the month, and days of the week columns, for example, sun for Sunday and aug for August, respectively.
Any column with an asterisk (*) in it means all values are valid and are not restricted as to when to run. Let’s take a look at our last line again:
42 4 1 * 3 root run-parts /etc/cron.monthlyHere we’ve changed the value in the day of the week column to 3. Our job would now run at 04:42 a.m. on the first day of the month and also every Wednesday.
Note
Day of the week starts with Sunday at 0 and goes through to Saturday at 6. When specified with a value in the day of the month column, days are cumulative. So a job will execute on all the days listed in the day of the month column and on every weekday listed in the day of the week column.
You can also specify automatically reoccurring jobs as follows:
*/2 4 1 * 3 root run-parts /etc/cron.monthlyHere, instead of specifying an exact time to run, we have used the notation */2. This notation tells cron to run the job every time the number of minutes is cleanly divisible by 2. This allows you to do some powerful stuff. For example, you could use */4 in the hour column, and the job would run every other minute every fourth hour, like so:
*/2 */4 1 * * root run-parts /etc/cron.monthlyThe use of the comma indicates a list of values, for example
2 0,1,2,3,4 1 * * root run-parts /etc/cron.monthlyThis would run the job at 12:02 a.m., 1:00 a.m., 2:00 a.m., 3:00 a.m., and 4:00 a.m.
You can also specify ranges of numbers as follows:
2 0-4,12-16 1 * * root run-parts /etc/cron.monthlyHere the command would be run at 2 minutes past the hour between the hours of 12 a.m. and 4 a.m. and between 12 p.m. and 4 p.m.
The next column, root, represents the user that this program will run as. When you add your own cron jobs (or scripts), you can set this to be any valid user.
The run-parts option is the command that is being run. run-parts is a special command that will run any executable script within a specified directory. In this case, run-parts will change to the /etc/cron.hourly directory, /etc/cron.daily directory, and so on, and run the executable script it finds there.
Let’s inspect one of the system cron directories, the /etc/cron.daily directory, for example, and examine one of the scripts already present on the Red Hat host. These are system crons that will run once every day unless otherwise defined.
Note
You can edit the scripts in these crontab directories if you need to; however, any changes may be overwritten when your packages are updated. You can also add your own scripts in these directories to run them every hour, day, week, or month.
$ ls -l /etc/cron.daily/-rwxr-xr-x 1 root root 379 Dec 19 2016 0anacron-rwxr-xr-x 1 root root 118 Oct 1 00:06 cups-rwxr-xr-x 1 root root 180 Oct 22 2017 logrotate-rwxr-xr-x 1 root root 114 Jan 16 2018 rpm-rwxr-xr-x 1 root root 290 Nov 26 2016 tmpwatch
Let’s view one of these files, /etc/cron.daily/rpm, and see what is inside it.
$ less /etc/cron.daily/rpm#!/bin/sh/bin/rpm -qa --qf '%{name}-%{version}-%{release}.%{arch}.rpm ' 2>&1| /bin/sort > /var/log/rpmpkgs
This daily executed script populates the /var/log/rpmpkgs file with a sorted list of all the RPM packages on your host.
Note
We’ll discuss RPM packages further in Chapter 8.
Individual users can also create a crontab. You create and edit existing crontabs with the crontab –e command. If a crontab for your user does not exist already, this command creates a crontab file in /var/spool/cron/ username.
The syntax used in a user’s cron jobs is identical to that of the system crontab file you saw earlier, with one difference. You can only specify the user field in the system crontab file. Let’s look at an example created by the user jsmith using the –l, or list, option for crontab.
$ crontab -l*/2 * * * * [ -e /tmp/log ] && rm -f /tmp/log
You will see a list of all the cron jobs scheduled by this user. This is a simple series of commands that first check for the existence of a file called /tmp/log, and if it exists, remove it. It is set to run once every 2 minutes (*/2).
As a privileged user, you can view another person’s cron by issuing the crontab command with the –u username option.
$ sudo crontab –u ataylor –l1 2 * * * /usr/local/bin/changeLog.sh
You can also edit another person’s cron by issuing the same crontab command and the –u username -e options.
$ sudo crontab –u ataylor –eThis allows you to edit the crontab for the user.
You can also remove your crontab or another user’s crontab by issuing the crontab command with the –r option.
$ sudo crontab –u ataylor –rThis removes ataylor’s crontab file: /var/spool/cron/ataylor.
Your host has a service that monitors the cron jobs and any changes to them. It also executes the individual jobs when they are scheduled. This service is called crond and can be started and stopped via the systemctl commands we talked about earlier.
$ sudo systemctl start|stop|reload cron(d if CentOS)Summary
This chapter has explored how the host boots and the processes behind it like the init daemon. You have learned how to manage your services, how to start and stop them, and how to add and delete them from the different runlevels. You have also looked at the LSB project and got an overview of the new Upstart init daemon.
You should now be able to do the following:
Describe the boot process for Linux.
Use, configure, and secure GRUB2.
Describe init scripts, including those using the LSB standard.
Describe SysV, Upstart, and Systemd
Start and stop services on Red Hat and Ubuntu.
Understand targets and runlevels.
Schedule tasks with crontab and Systemd Timers.
In the next chapter, we will show you how to configure your network, discuss firewalls, and introduce you to Linux security.