
CHAPTER 18
![]()
Spring Integration and Your Web Application
This tour of Spring Integration has gone full circle, covering all the different components to support integrating application horizontally across an enterprise. As discussed in the Chapter 1, the majority of the focus of application development today is on vertical database-backed web applications. While Spring Integration can of course be used from a Spring MVC controller (and, generally, other Spring beans), we will look at how Spring Integration can be used to provide HTTP-based services. Spring Integration can be used to create a basic web interface with the HTTP inbound and outbound gateways.
Most web applications operate in request/reply mode, where the user must initiate the interaction by submitting a request via a browser, in effect asking for information. With projects such as DWR, Atmosphere, and BlazeDS, the paradigm has been turned around. In this scenario, the server pushes data to the client browsers without the client browser pulling (or requesting) it. Applications such as business dashboards providing real-time display of enterprise status, chats, and any other web application that might benefit from real-time awareness of server-side events can now be realized. Many of these technologies are still in development, but this chapter will show what is available now and where the future is heading.
HTTP Adapters and Gateways
The inbound and outbound HTTP channel adapters and gateways offer the most basic support in Spring Integration for web protocols. The HTTP adapters can be used for creating simple browser views, but more typically they are used for communication using the HTTP protocol with back-end services. The inbound HTTP adapter and gateway must be deployed within a servlet container to support receiving HTTP requests. HTTP requests must ultimately deliver a reply. The inbound HTTP gateway handles requests and allows you to provide a response with a reply message. The inbound adapter works the same way, but removes the burden of providing the reply and instead supports several default operations (like returning HTTP status code 200).
The HTTP support is another example of where Spring Integration is very different from other integration servers or solutions. To use the inbound HTTP adapters, you simply configure a servlet in the container of your choice—no need to involve a separate port or enlist administrators to set up a new application process on your servers. Additionally, you are now free to deploy your HTTP request-handling code in the same environment as your web application, on the same host and context. Additionally, the inbound HTTP adapters take advantage of the core Spring web application infrastructure. The inbound HTTP adapter is an org.springframework.web.HttpRequestHandler, which in the Spring web context support is the simplest unit of work that can be wired to respond to HTTP requests. At a higher level, there is also an inbound HTTP gateway that supports forwarding web requests to Spring MVC controller classes, where you can take advantage of all the Spring MVC request-handling features, including RESTful controllers and components.
The most basic inbound adapter is shown in Listing 18–1. This bean is typically configured in the Spring application context and delegated by the org.springframework.web.context.support.HttpRequestHandlerServlet or org.springframework.web.servlet.DispatcherServlet in the web.xml file. The servlet name and the bean ID must match. The expectedReply flag must be set in the constructor of HttpRequestHandlingMessagingGateway if a response based upon the replyChannel is desired; otherwise, a 200-OK response will be returned. The default request methods are GET and POST, but other methods may be set using the supportedMethods property. A converter may be specified to map between the incoming HttpServletRequest and the Message object by setting the messageConverters property. If this property is not set, the default converters will be use providing basic mappings such as converting to a String during a POST when the content type is text. Note that this adapter only requires the Spring web support and the HttpRequestHandlerServlet, not the full Spring MVC stack.
Listing 18–1. HTTP Inbound Gateway HttpRequestHandlingMessagingGateway.
<bean id="inboundGateway"

   class="org.springframework.integration.http.inbound.HttpRequestHandlingMessagingGateway">

  <property name="requestChannel" ref="httpRequestChannel"/>

  <property name="replyChannel" ref="httpReplyChannel"/>

</bean>
The HttpRequestHandlingController serves as a Spring MVC controller class and may be used in conjunction with Spring’s core web DispatcherServlet class to return a ModelAndView object. This allows you to specify a view through the viewName property to be passed back to the client or browser. An example of the HttpRequestHandlingController is shown in Listing 18–2. If you set the constructor expectReply flag to true, the gateway will wait for a reply message before sending a response back to the browser or client. This adapter requires the full Spring MVC stack but affords you much more power.
Listing 18–2. HTTP Inbound Gateway HttpRequestHandlingController.
<bean id="httpInbound"

      class="org.springframework.integration.http.inbound.HttpRequestHandlingController">

<constructor-arg value="true"/>

  <property name="requestChannel" ref="httpRequestChannel"/>

  <property name="replyChannel" ref="httpReplyChannel"/>

  <property name="viewName" value="pageView"/>

  <property name="supportedMethodNames">

    <list>

      <value>GET</value>

      <value>POST</value>

    </list>

  </property>

</bean>
Spring Integration also supports the outbound HTTP gateway, as shown in Listing 18–3. This bean, leveraging the RestTemplate, executes an HTTP request. In the example configuration, an HTTP request is made to the URL http://localhost:8080/test, where the HTTP body is based on the Message sent to the outputChannel.
Listing 18–3. HTTP Outbound Gateway HttpRequestExecutingMessageHandler
<bean id="httpOutbound"

   class="org.springframework.integration.http.outbound.HttpRequestExecutingMessageHandler">

  <constructor-arg value="http://localhost:8080/test"/>

  <property name="outputChannel" ref="httpOutputChannel"/>

</bean>
The converters used in mapping the channel message to the HTTP body may be specified through the messageConverters property, as shown in Listing 18–4. By default the HTTP request is created using the org.springframework.http.client.SimpleClientHttpRequestFactory. This factory uses the JDK HttpUrlConnection. The factory may be overridden using the requestFactory property. For example, you can use the Apache Commons HTTP client instead, by providing an alternative reference for this property.
Listing 18–4. HTTP Outbound Gateway Setting Converters and HTTP Request Factory
<bean id="httpOutbound"

     class="org.springframework.integration.http.outbound.HttpRequestExecutingMessageHandler">

  <constructor-arg value="http://localhost:8080/test"/>

  <property name="outputChannel" ref="httpOutputChannel"/>

  <property name="messageConverters" ref="messageConverterList"/>

  <property name="requestFactory" ref="httpFactory"/>

</bean>


<bean id="httpFactory

      class=" org.springframework.http.client.CommonsClientHttpRequestFactory”/>
HTTP Adapter and Gateway Namespace Support
Spring Integration also provides namespace support for the HTTP adapters. The namespace support can be added to any Spring XML context by adding the following: http://www.springframework.org/schema/integration/http. An example of configuring an inbound HTTP adapter is shown in Listing 18–5. This is a simple configuration where the incoming HTTP request is mapped to the request channel. The supported methods GET and POST are specified through the supported-methods attribute.
Listing 18–5. Inbound HTTP Channel Adapter
<http:inbound-channel-adapter id="httpChannelAdapter"

                              channel="request"

                              supported-methods="GET, POST"/>
In the case where you want more than just a 200-OK reply (e.g., if you want a web page response), you can use the configuration in Listing 18–6 to configure an HTTP gateway. The input and output channel are specified using the request-channel and reply-channel attributes, respectively.
Listing 18–6. Inbound HTTP Gateway
<http:inbound-gateway id="inboundGateway"

                      request-channel="request"

                      reply-channel="response"/>
An example of configuring an outbound HTTP gateway is shown in Listing 18–7. Since this a gateway, the request and reply channel must be specified. By default the outbound gateway method is a POST, with a default response type of null. In the case of a null response type, only the response status code is included in the reply message payload if the status is successful. If an error occurs, an exception will be thrown, which may be handled through the Spring Integration error handling discussed in Chapter 10. If another type is expected in the response body (e.g., String), it must be specified through the expected-response-type attribute.
Listing 18–7. Outbound HTTP Gateway
<http:outbound-gateway request-channel="request"

                       reply-channel="reply"

                       url="http://localhost:8080/test"

                       http-method="POST"

                       expected-response-type="java.lang.String"/>
If the integration is using the outbound adapter in a unidirectional way, the HTTP outbound channel adapter may be used. The adapter creates no reply message, and any unsuccessful response will result in an exception being thrown by the adapter. An example of an HTTP outbound channel adapter is shown in Listing 18–8. The configuration is similar to the gateway, except that only one message channel is configured.
Listing 18–8. Outbound HTTP Channel Adapter
<http:outbound-channel-adapter url="http://localhost:8080/test"

                               http-method="GET"

                               channel="request"/>
One of the nice features of the outbound HTTP adapters is the ability to map to the URI variables through the uri-variable subelement. For example, if an adapter will be used to perform a GET to request information about a customer with a first name of John and a last name of Smith, the configuration would look something like Listing 18–9. Note the use of Spring Expression Language to pull the data from the message payload and populate the URI variables.
Listing 18–9. Outbound HTTP Gateway Using URI Variable Mapping
<http:outbound-gateway
url="http://localhost:8080/getCustomer?firstName={firstName}&lastName={lastName}"
request-channel="request"
reply-channel="reply"
http-method="GET"
expected-response-type="java.lang.String">
<http:uri-variable name="firstName" expression="payload.getFirstName()"/>
<http:uri-variable name="lastName" expression="payload.getLastName()"/>
</http:outbound-gateway>HTTP Adapter and Gateway Example
To demonstrate the use of the Spring Integration HTTP adapters, a simple example will be created. To use the HTTP adapters, the Spring Integration HTTP library dependency must be added to the pom.xml file, as shown in Listing 18–10.
Listing 18–10. Spring Integration HTTP Dependencies pom.xml
    <dependency>

      <groupId>org.springframework.integration</groupId>

      <artifactId>spring-integration-http</artifactId>

      <version>2.0.1.RELEASE</version>

    </dependency>

    <dependency>

      <groupId>org.springframework</groupId>

      <artifactId>spring-webmvc</artifactId>

      <version>3.0.5.RELEASE</version>

    </dependency>
In addition, since this is a web application, the value of the package element in the pom.xml file must be set to war, as follows:
<packaging>war</packaging>The first part of creating a servlet-based web application is creating the web.xml file. This example uses the Spring DispatcherServlet and forwards a request to the Spring Integration components configured in servlet-config.xml. The web.xml file also configures a servlet mapping for only pages with the postfix html(see Listing 18–11).
Listing 18–11. Servlet web.xml File
<?xml version="1.0" encoding="UTF-8"?>

<web-app xmlns:xsi="http://www.w3.org/2001/XMLSchema-instance"

         xmlns="http://java.sun.com/xml/ns/javaee"

         xmlns:web="http://java.sun.com/xml/ns/javaee/web-app_2_5.xsd"

         xsi:schemaLocation="http://java.sun.com/xml/ns/javaee

         http://java.sun.com/xml/ns/javaee/web-app_2_5.xsd"

         id="WebApp_ID"

         version="2.5">


  <display-name>spring-http</display-name>


  <servlet>

    <servlet-name>webapp</servlet-name>

    <servlet-class>org.springframework.web.servlet.DispatcherServlet</servlet-class>

    <init-param>

      <param-name>contextConfigLocation</param-name>

      <param-value>/WEB-INF/servlet-config.xml</param-value>

    </init-param>

    <load-on-startup>1</load-on-startup>

  </servlet>


  <servlet-mapping>

    <servlet-name>webapp</servlet-name>

    <url-pattern>*.html</url-pattern>

  </servlet-mapping>


  <welcome-file-list>

    <welcome-file>

      index.jsp
    </welcome-file>

  </welcome-file-list>


</web-app>
The servlet-config.xml file is of course where all the action occurs. The Spring Integration components are configured through this file. The configuration file in Listing 18–12 configures both an HTTP inbound channel adapter and inbound gateway. The inbound channel adapter returns a 200-OK response code as long as no exception is thrown. The URI is /inboundChannel.html. The request is mapped into a Message object and sent to the receiveChannel. For the inbound gateway, the URI is /inboundGateway.html, and the request is mapped into a Message object and sent to the inboundChannel. The difference between the gateway and the inbound channel is that a reply Message must be sent to the outboundChannel, which will be mapped to the HTTP reply for a gateway, whereas you can leave Spring Integration to provide a simple reply using the inbound adapter. Usually a converter is needed to ensure that a browser-compatibly message is returned, or that the client can parse the message using a format such as an HTML or XML.
Listing 18–12. Spring Integration Configuration the servlet-config.xml
<?xml version="1.0" encoding="UTF-8"?>

<beans xmlns="http://www.springframework.org/schema/beans"

       xmlns:xsi="http://www.w3.org/2001/XMLSchema-instance"

       xmlns:int="http://www.springframework.org/schema/integration"

       xmlns:http="http://www.springframework.org/schema/integration/http"

       xmlns:context="http://www.springframework.org/schema/context"

       xsi:schemaLocation="http://www.springframework.org/schema/beans

    http://www.springframework.org/schema/beans/spring-beans-3.0.xsd

    http://www.springframework.org/schema/context

    http://www.springframework.org/schema/context/spring-context-3.0.xsd

    http://www.springframework.org/schema/integration

    http://www.springframework.org/schema/integration/spring-integration-2.0.xsd

    http://www.springframework.org/schema/integration/http

    http://www.springframework.org/schema/integration/http/spring-integration-http-2.0.xsd">


  <context:component-scan base-package="com.apress.prospringintegration.web"/>


  <http:inbound-channel-adapter id="httpInboundAdapter"

                                channel="receiveChannel"

                                name="/inboundChannel.html"

                                supported-methods="GET, POST"/>


  <http:inbound-gateway request-channel="inboundChannel"

                        reply-channel="outboundChannel"

                        name="/inboundGateway.html"

                        supported-methods="GET, POST"/>


  <int:channel id="receiveChannel"/>


  <int:channel id="inboundChannel"/>


  <int:channel id="outboundChannel"/>


  <int:service-activator id="receiver" input-channel="receiveChannel" ref="httpReceiver"/>
  <int:service-activator id="gateway" input-channel="inboundChannel" ref="gatewayHandler"/>


  </beans>
The last part of this example is a service activator that simply logs the incoming message. The service activator class for the HTTP inbound channel adapter is shown in Listing 18–13.
Listing 18–13. Service Activator Class HttpReceiver
package com.apress.prospringintegration.web;


import org.springframework.integration.Message;

import org.springframework.integration.annotation.ServiceActivator;

import org.springframework.stereotype.Component;


@Component

public class HttpReceiver {


    @ServiceActivator

    public void receive(Message<?> message) {

        System.out.println("Http Message: " + message);

    }

}
The service activator class for the HTTP inbound gateway is shown in Listing 18–14.
Listing 18–14. Service Activator for the HTTP Inbound Gateway
package com.apress.prospringintegration.web;


import org.springframework.integration.Message;

import org.springframework.integration.annotation.ServiceActivator;

import org.springframework.stereotype.Component;


@Component

public class GatewayHandler {


    @ServiceActivator

    public Message handleMessage(Message<?> message) {

        System.out.println("Http Gateway Message: " + message);

        return message;

    }

}
Build the web application by issuing the command mvn install, and deploy the resultant WAR file http-adapter-1.0.0.war to a servlet container such as Tomcat or Jetty by copying it to the webapps directory. If you are using the SpringSource Tool Suite, you will already have a developer edition of SpringSource tc Server configured in your Servers panel. Drag the web application to the STS Servers panel and simply click the Deploy button. The URL for the HTTP inbound adapter is http://localhost:8080/http-adapter-1.0.0/inboundChannel.html, and the URL for the HTTP gateway is http://localhost:8080/http-adapter-1.0.0/inboundGateway.html. Hitting each of the endpoints will result in a log message from the respective message handler classes.
Multipart Support
Spring Integration 2.0 now supports multipart HTTP requests. In order to support the multipart requests, additional dependencies are required, as shown in Listing 18–15.
Listing 18–15. Maven Dependencies to Support the Multipart HTTP Request
    <dependency>

      <groupId>commons-fileupload</groupId>

      <artifactId>commons-fileupload</artifactId>

      <version>1.2</version>

    </dependency>

    <dependency>

      <groupId>org.apache.commons</groupId>

      <artifactId>commons-io</artifactId>

      <version>1.3.2</version>

    </dependency>
The client can simply use the Spring core RestTemplate class to send the request. A MultiValueMap is created, populated with the multipart data, and sent as an HTTP request. A code example is shown in Listing 18–16. The class attaches an image file to a MultiValueMap for sending to the HTTP endpoint.
Listing 18–16. Multipart HTTP Request Client
package com.apress.prospringintegration.web;


import org.springframework.core.io.ClassPathResource;

import org.springframework.core.io.Resource;

import org.springframework.http.*;

import org.springframework.util.LinkedMultiValueMap;

import org.springframework.util.MultiValueMap;

import org.springframework.web.client.RestTemplate;


public class MultipartHttpClient {


    public static void main(String[] args) {

        RestTemplate template = new RestTemplate();

        String uri =

                "http://localhost:8080/ http-adapter-1.0.0/inboundMultipartAdapter.html";

        Resource picture =

                new ClassPathResource("com/apress/prospringintegration/web/test.png");

        MultiValueMap map = new LinkedMultiValueMap();

        map.add("name", "John Smith");

        map.add("picture", picture);

        HttpHeaders headers = new HttpHeaders();

        headers.setContentType(new MediaType("multipart", "form-data"));

        HttpEntity request = new HttpEntity(map, headers);

        ResponseEntity<?> httpResponse =

            template.exchange(uri, HttpMethod.POST, request, null);

        System.out.println("Status: " + httpResponse.getStatusCode().name());

    }

}
Configuring the HTTP inbound channel adapter for receiving the multipart HTTP request is simply a matter of adding a service activator that knows how to parse the multipart message. The configuration for the inbound channel adapter is identical to the preceding example for a standard request. A service activator reference has been added to support reading the multipart message. The pertinent parts of the configuration are shown in Listing 18–17.
Listing 18–17. Spring Configuration for Receiving the Multipart HTTP Request servlet-config.xml
<?xml version="1.0" encoding="UTF-8"?>

<beans xmlns="http://www.springframework.org/schema/beans"

       xmlns:xsi="http://www.w3.org/2001/XMLSchema-instance"

       xmlns:int="http://www.springframework.org/schema/integration"

       xmlns:http="http://www.springframework.org/schema/integration/http"

       xmlns:context="http://www.springframework.org/schema/context"

       xsi:schemaLocation="http://www.springframework.org/schema/beans

    http://www.springframework.org/schema/beans/spring-beans-3.0.xsd

    http://www.springframework.org/schema/context

    http://www.springframework.org/schema/context/spring-context-3.0.xsd

    http://www.springframework.org/schema/integration

    http://www.springframework.org/schema/integration/spring-integration-2.0.xsd

    http://www.springframework.org/schema/integration/http

    http://www.springframework.org/schema/integration/http/spring-integration-http-2.0.xsd">


  <context:component-scan base-package="com.apress.prospringintegration.web"/>


  <http:inbound-channel-adapter id="httpInboundAdapter"

                                channel="receiveChannel"

                                name="/inboundChannel.html"

                                supported-methods="GET, POST"/>


  <http:inbound-gateway request-channel="inboundChannel"

                        reply-channel="outboundChannel"

                        name="/inboundGateway.html"

                        supported-methods="GET, POST"/>


  <int:channel id="receiveChannel"/>


  <int:channel id="inboundChannel"/>


  <int:channel id="outboundChannel"/>


  <int:service-activator id="receiver" input-channel="receiveChannel" ref="httpReceiver"/>


  <int:service-activator id="gateway" input-channel="inboundChannel" ref="gatewayHandler"/>


  <int:channel id="inboundMultipartChannel"/>


  <http:inbound-channel-adapter channel="inboundMultipartChannel"

                                name="/inboundMultipartAdapter.html"

                                supported-methods="GET, POST"/>


  <int:service-activator input-channel="inboundMultipartChannel"
                         ref="multipartReceiver"/>


</beans>
In addition, a MultipartResolver will need to be defined in the context to resolve the incoming multipart request. For this example, it is done using the JavaConfiguration, as shown in Listing 18–18. The HTTP adapter looks for the bean name multipartResolver by default. The CommonsMultipartResolver class is used for this example.
Listing 18–18. JavaConfiguration of the Multipart Resolver
package com.apress.prospringintegration.web;


import org.springframework.context.annotation.Bean;

import org.springframework.stereotype.Component;

import org.springframework.web.multipart.MultipartResolver;

import org.springframework.web.multipart.commons.CommonsMultipartResolver;


@Component

public class MultipartResolverConfiguration {


    @Bean

    public MultipartResolver multipartResolver() {

        return new CommonsMultipartResolver();

    }

}
The service activator is configured using Spring component scanning. The service activator class is shown in Listing 18–19. The class uses the Spring support to parse the multipart request.
Listing 18–19. MultipartReceiver Service Activator to Support Reading the Multipart Request
package com.apress.prospringintegration.web;


import org.springframework.integration.annotation.ServiceActivator;

import org.springframework.integration.http.multipart.UploadedMultipartFile;

import org.springframework.stereotype.Component;

import org.springframework.util.LinkedMultiValueMap;


import java.util.LinkedList;


@Component

public class MultipartReceiver {


    @ServiceActivator

    public void handleMultipartRequest(

            LinkedMultiValueMap<String, Object> multipartRequest) {

        System.out.println("Received multipart request: " + multipartRequest);

        for (String elementName : multipartRequest.keySet()) {

            if (elementName.equals("name")) {

                LinkedList value = (LinkedList) multipartRequest.get("name");

                String[] multiValues = (String[]) value.get(0);

                for (String name : multiValues) {
                    System.out.println("Name: " + name);

                }

            } else if (elementName.equals("picture")) {

                System.out.println("Picture as UploadedMultipartFile: "

                        + ((UploadedMultipartFile) multipartRequest.getFirst("picture"))

                        .getOriginalFilename());

            }

        }

    }

}
Again, build the web application with the command mvn install and deploy the WAR file http-adapter-1.0.0.war to a servlet container. Running the multipart HTTP request clientin Listing 18–16 will upload the multipart file test.png, as can be seen in the servlet log file:
Received multipart request: {name=[[Ljava.lang.String;@4b12d9],

picture=[org.springframework.integration.http.multipart.UploadedMultipartFile@c28cb7]}

Name: John Smith

Picture as UploadedMultipartFile: test.png
Spring Integration, Comet, and the Asynchronous Web
The previous examples all required the interaction with the web server to originate from the user. However, web applications can also be event driven. One of the issues with an event-driven web application is maintaining state so that the web server knows how to send the data to the client. The other issue is how to maintain an open socket connection to the client.
With the introduction and mainstream adoption of Ajax-style applications in 2005, developers have had an easy way for performing RPC-style interactions with web servers without refreshing the page. Additionally, the illusion of server-side push-based applications could be maintained by having the client poll the server side, or by the server keeping a single request open for an extended period of time and only flushing responses when an interesting event has occurred on the server side. This technique works—clients perceive that server-side events are visible instantly on the client, but this approach has a serious drawback because most server implementations block when they handle inbound HTTP requests. Typically, this is because HTTP requests are mapped one to one with threads—each request gets a full thread to itself. Thus, such applications are limited by how many threads the server can keep open—any more threads and they run the risk of exceeding memory. Over time, web application vendors have introduced asynchronous request-processing mechanisms. In them, a request may be made and acknowledged by the server, which then may make the responding thread passive until some other interesting event requires the responding thread to wake up and resume writing output. This has made it far more efficient to support such Comet-style interactions. However, each implementation solves this problem in its own unique way Tomcat, Jetty, JBoss, GlassFish, and others all have proprietary mechanisms that enable asynchronous responses. Recently, the Servlet specification version 3.0 was released. This latest iteration is already supported by Tomcat 7, as well as Jetty 7 and all Java EE6 implementations. Servlet 3.0 specifies support for asynchronous HTTP request handling.
The Comet style of applications is an umbrella term for all the different techniques for allowing the web server to push the data to the client or web browser. All of the approaches rely on JavaScript to support the client interaction. There is currently a Comet adapter in the Spring Integration sandbox based on the Atmosphere project (http://atmosphere.java.net). The Atmosphere project is a unified Comet framework. It is a hodgepodge servlet that implements all the proprietary asynchronous HTTP request-processing classes, and surfaces one unified API to work with all the different servers. In addition, it supports Servlet 3.0. The Atmosphere adapter is still in active development and will no doubt see changes before it is finished, even for the example that will be shown. However, Atmosphere—and this adapter—demonstrates the potential of an event-driven web application using Spring Integration and Comet. The Comet adapter may be downloaded and built using the set of commands shown in Listing 18–20.
Listing 18–20. Command to Download and Build the Comet Adapter
git clone git://git.springsource.org/spring-integration/sandbox.git

cd sandbox/spring-integration-comet

mvn clean install
The basic premise of this example will be to use Spring Integration to push data to the web browser by using the Comet adapter and Atmosphere JQuery library. Atmosphere provides the ability to use JQuery to subscribe to a message notification originating from the web server. Thus, real-time updates can occur on a web page based on messages published from the web server.
The current Spring Integration Comet adapter is still in development and only supports JSON messages. The adapter source code will be modified to also support string messages, which will simplify this example. Make the modification shown in Listing 18–21 to the org.springframework.integration.comet.HttpMessageBroadcaster class. This will allow concatenating multiple messages into a single string value so that it can be displayed on the HTML page. The code loops over the list of org.springframework.integration.comet.HttpBroadcastMessages and appends each message value with a ; delimiter. After making the changes, rebuild using the Maven command mvn clean install.
Listing 18–21. Modification to the Comet Adapter Code
private Message<?> mergeMessagesForBroadcast(List<HttpBroadcastMessage> messages) {

    if (!messages.isEmpty() &&

            messages.get(0).getMessage().getPayload() instanceof String) {

        StringBuffer stringPayload = new StringBuffer();

        boolean isFirstValue = true;

        for (HttpBroadcastMessage message : messages) {

            if (!isFirstValue) {

                stringPayload.append(";");

            } else {

                isFirstValue = false;

            }

            stringPayload.append(message.getMessage().getPayload());

        }

        return MessageBuilder.withPayload(stringPayload.toString()).build();

    }


    List<Object> payloads = new ArrayList<Object>();

    for (HttpBroadcastMessage message : messages) {

        payloads.add(message.getMessage().getPayload());

    }

    return MessageBuilder.withPayload(payloads).build();

}
This example will require the Maven dependencies shown in Listing 18–22. Note that the Comet adapter is the snapshot version previouslybuilt.
Listing 18–22. Maven Dependencies for the Comet Adapter Example
<dependency>

      <groupId>org.springframework.integration</groupId>

      <artifactId>spring-integration-http</artifactId>

      <version>2.0.1.RELEASE</version>

    </dependency>

    <dependency>

      <groupId>org.springframework</groupId>

      <artifactId>spring-webmvc</artifactId>

      <version>2.0.1.RELEASE</version>

    </dependency>

    <dependency>

      <groupId>org.springframework.integration</groupId>

      <artifactId>spring-integration-comet</artifactId>

      <version>2.1.BUILD-SNAPSHOT</version>

    </dependency>
To use Atmosphere, the Comet request must be handled. This is done by configuring the Atmosphere servlet class org.atmosphere.cpr.MeteorServlet. The configuration is shown in Listing 18–23. The important part to note is the reference to the Spring DispatcherServlet and the Comet adapter: the org.springframework.integration.comet.HttpMessageBroadcaster class. This enables the interface to the Spring Integration Comet adapter. The housekeeping task will be handled by the Atmosphere servlet, and the Spring Integration specifics will be handled by Spring MVC, which will forward the request to the Comet adapter specified by the servlet-config.xml file.
Listing 18–23. Servlet Configuration web.xml
<?xml version="1.0" encoding="UTF-8"?>

<web-app xmlns:xsi="http://www.w3.org/2001/XMLSchema-instance"

         xmlns="http://java.sun.com/xml/ns/javaee"

         xmlns:web="http://java.sun.com/xml/ns/javaee/web-app_2_5.xsd"

         xsi:schemaLocation="http://java.sun.com/xml/ns/javaee

         http://java.sun.com/xml/ns/javaee/web-app_2_5.xsd"

         id="WebApp_ID"

         version="2.5">


  <display-name>comet-adapter-example</display-name>


  <welcome-file-list>

    <welcome-file>

      index.html

    </welcome-file>

  </welcome-file-list>


  <!-- Handles Comet requests -->

  <servlet>

    <servlet-name>cometServlet</servlet-name>

    <servlet-class>org.atmosphere.cpr.MeteorServlet</servlet-class>

    <init-param>

      <param-name>org.atmosphere.servlet</param-name>

      <param-value>org.springframework.web.servlet.DispatcherServlet</param-value>

    </init-param>
    <init-param>

      <param-name>org.atmosphere.cpr.broadcasterClass</param-name>

      <param-value>

        org.springframework.integration.comet.HttpMessageBroadcaster

      </param-value>

    </init-param>

    <init-param>

      <param-name>org.atmosphere.useStream</param-name>

      <param-value>true</param-value>

    </init-param>

    <init-param>

        <param-name>org.atmosphere.cpr.broadcasterCacheClass</param-name>

        <param-value>org.atmosphere.cache.HeaderBroadcasterCache</param-value>

    </init-param>

    <init-param>

      <param-name>contextConfigLocation</param-name>

      <param-value>/WEB-INF/servlet-config.xml</param-value>

    </init-param>

    <load-on-startup>1</load-on-startup>

  </servlet>


  <servlet-mapping>

    <servlet-name>cometServlet</servlet-name>

    <url-pattern>/pubsub/*</url-pattern>

  </servlet-mapping>


</web-app>
The Spring Integration configuration file servlet-config.xml is where all the action takes place. Namespace support is not yet available, so we configure the adapter directly. The adapter class is org.springframework.integration.comet.AsyncHttpRequestHandlingMessageAdapter, as shown in Listing 18–24. The bean name maps to the message topic. The messageChannel property specifies the input channel, and the messageThreshold property specifies how many messages will be cached before being broadcasted, using server-side push or Comet, to the browser. For demonstration purposes, a simple inbound channel adapter will be configured with a poll rate of 5,000 ms (5 seconds). The adapter will call the invokeService method on the InboundService class, which is configured through component scanning, each time it is polled.
Listing 18–24. Spring Integration Configuration servlet-config.xml
<?xml version="1.0" encoding="UTF-8"?>

<beans xmlns="http://www.springframework.org/schema/beans"

       xmlns:xsi="http://www.w3.org/2001/XMLSchema-instance"

       xmlns:int="http://www.springframework.org/schema/integration"

       xmlns:http="http://www.springframework.org/schema/integration/http"

       xmlns:context="http://www.springframework.org/schema/context"

       xsi:schemaLocation="http://www.springframework.org/schema/beans

    http://www.springframework.org/schema/beans/spring-beans-3.0.xsd

    http://www.springframework.org/schema/context

    http://www.springframework.org/schema/context/spring-context-3.0.xsd

    http://www.springframework.org/schema/integration

    http://www.springframework.org/schema/integration/spring-integration-2.0.xsd

    http://www.springframework.org/schema/integration/http

    http://www.springframework.org/schema/integration/http/spring-integration-http-2.0.xsd">
  <context:component-scan base-package="com.apress.prospringintegration.comet.example"/>


  <int:channel id="recentActivity"/>


  <bean name="/recent/notifications"

      class="org.springframework.integration.comet.AsyncHttpRequestHandlingMessageAdapter">

  <property name="messageChannel" ref="recentActivity"/>

  <property name="messageThreshold" value="1"/>

</bean>


  <int:inbound-channel-adapter channel="recentActivity"

                               ref="inboundService"

                               method="invokeService">

    <int:poller fixed-rate="5000"/>

  </int:inbound-channel-adapter>


</beans>
As shown in Listing 18–25, the inbound channel adapter will send a message payload string with an incrementing index. This message will be pushed to the Comet adapter and broadcasted to the browser.
Listing 18–25. Inbound Channel Adapter Class InboundService
package com.apress.prospringintegration.comet.example;


import org.springframework.stereotype.Component;


@Component

public class InboundService {


    private int i = 0;


    public String invokeService() {

        String message = "Invoking service " + i;

        i++;

        System.out.println(message);

        return message;

    }

}
The JQuery JavaScript makes it quite easy to subscribe to the broadcast messages and add them to the web page (see Listing 18–26). Using the Atmosphere JQuery library, the web page subscribes to the broadcast destination (having the servlet filter pubsub) followed by the broadcast topic /recent/notifications. The callback function activityNotificationHandler is defined, which will add each of the messages to the HTML tag ul. After the page has loaded, the web page will subscribe to the broadcast destination and display each message in real time as it is received. There are two major categories of methods for implementing Comet: streaming and long polling. Long polling is used for this example.
Listing 18–26. JavaScript for the Comet Adapter Example
$(document).ready(function() {

    var basePath = document.location.toString();


    $.atmosphere.subscribe(

            basePath + 'pubsub/recent/notifications',

            activityNotificationHandler,

            $.atmosphere.request = { transport: "long-polling" });


    function activityNotificationHandler(response) {

        if (response.status == 200) {

            var data = response.responseBody;

            if (data.length > 0) {

                $('ul').prepend($('<li></li>').text(" Message Received: " + data));

            }

        }

    }


});
The HTML page imports the JQuery and Atmosphere JavaScript libraries. As each of the messages is received, it will be added to the web page (see Listing 18–27). This demonstrates the ability to use Spring Integration and Comet to asynchronously publish data to a web client.
Listing 18–27. HTML Page Receiving broadcast Message from the Comet Adapter index.html
<html>

<head>

    <script type="text/javascript" src="jquery/jquery-1.4.2.js"></script>

    <script type="text/javascript" src="jquery/jquery.atmosphere.js"></script>

    <script type="text/javascript" src="jquery/jquery-comet-example.js"></script>

</head>

<body>

<h2>Real Time PubSub Update</h2>

<ul></ul>

</body>

</html>
The current example only works on Jetty 7 or later, and version 8 is recommended (see http://download.eclipse.org/jetty). There still seems to be some issues with older versions of the Tomcat web server and Atmosphere. Deploying Comet example application is as simple as building and copying the WAR file to the webapps directory of the Jetty installation. Sample output is shown in Listing 18–28, and can be seen at http://localhost:8080/comet-adapter-example-1.0.
Listing 18–28. Spring Integration Comet Adapter Example Output
Real Time PubSub Update

Message Received: Invoking service 6

Message Received: Invoking service 5

Message Received: Invoking service 4

Message Received: Invoking service 3

Message Received: Invoking service 0;Invoking service 1;Invoking service 2
Spring Integration, Flex, and BlazeDS
Macromediainitially released Flash to bring the animation finesse of Macromedia Shockwave to the Internet. As time went on, the animation facilities grew to include a sophisticated programming environment. The only thing missing was support for data-intensive applications, a niche formerly occupied by Visual Basic. It came as no surprise that in 2004 Macromedia announced Flex, an environment with a generous complement of data-bound controls and full support for RPC. There were early adopters, even if the interest was muted. The problem was that the platform was closed source and expensive. The tooling, SDK, and integration middleware were all costly, and Flex was an unproven architecture, which meant that fewtook the risk, as the barrier to entry was too high.
Adobe, which bought Macromedia in 2005, eventually started opening up the framework. The Flex platform’s SDK was made available so that Flex code and scripts could be compiled from the command line. Flash offers a binary protocol called Action Message Format (AMF), which allows the Flash VMs to talk to servers. This protocol is quick and compact, especially compared to JSON and SOAP. While many open source projects had reverse-engineered the protocol and exposed similar, alternative integrations for their favorite platform (PHP, Python, and in the Java world, Granite DS), the ideal solution was a proper implementation that exposed Adobe’s expensive Lifecycle Data Services (LDS) middle project. Key parts of LDS were released under an open source license and renamed BlazeDS.
The development tool, an Eclipse derivative called Adobe Flash Builder, is still a pay-for-use product;however, this does not impede others from creating their own tooling. Particularly, IntelliJ’s IDEA product, versions 9 and 10, support Flex and AIR development with aplomb. Additionally, it is entirely possible to build entire Flex and AIR applications using only the command line, or with third-party tools, such as the Maven 2 FlexMojos project, which supports building Flex applications using Maven. If you are using Flash Builder, you can take the important non-Eclipse plug-ins and simply add them to the SpringSource Tool Suite’s plug-in folder to get a combined STS/Flash Builder environment so you don’t need to run two Eclipse derivatives.
As the platform has become more open, so too has the number of open source projects supporting the Flex environment. For BlazeDS to connect to Spring services, there is specialized support built in cooperation between SpringSource and Adobe, called Spring BlazeDS Integration. In addition, there is now support for directly connecting Spring Integration to BlazeDS. On the client side, the Spring ActionScript project provides a familiar environment for Java developers in the same vein as provided by the Spring platform. An example will be presented on how to use Spring Integration to push data to the Flex web client.
Whereas Flash provides an animation-centric environment with support for creating timelines and importing graphics, Flex is a code-centric platform. The two source artifacts of a Flex application are the ActionScript files (ending in .as) and the MXML files.
ActionScript files can contain classes, public functions and variables, and annotations. Indeed, ActionScript files may house any number of public classes. The look and feel of the language will feel familiar to anyone who’s used to Java, C#, or Scala.
MXML files are an XML variant that describe the UI components and provide a DOM. In addition, scripts may be inline. Each tag in MXML describes a component or object that is registered with its container. In the case of Flex applications, the outermost tag is the <mx:Application/> tag; in AIR, it’s <mx:WindowedApplication/>. These tags describe containers that themselves handle all the minutiae of creating components on the Flash Stage object.
MXML may be used to instantiate regular ActionScript objects similar to Spring’s beans.However some uses will better suited to code and some to MXML. An entire Flex application may be created using only ActionScript with no MXML. When the MXML files are compiled, they are converted to ActionScript expressions as an intermediary format, and that is what is ultimately compiled. MXML files support a limited form of expression language binding. Flex components are wired together using the expression binding support and the powerful event mechanism underlying most of Flex.
For the purposes of demonstrating the ability to use Spring Integration with Flex and BlazeDS in the same way as we did with the Comet example, we will develop a push-based application starting with a simple MXML file. The code will subscribe to the to the BlazeDS messaging system to create an event-driven asynchronous web application where the Flex web client will display messages sent from Spring Integration through BlazeDS. The MXML file is shown in Listing 18–29.
Listing 18–29. Flex Client MXML client.mxml
<?xml version="1.0" encoding="utf-8"?>


<s:Application xmlns:fx="http://ns.adobe.com/mxml/2009"

               xmlns:s="library://ns.adobe.com/flex/spark"

               xmlns:mx="library://ns.adobe.com/flex/mx">

  <fx:Script>

    import mx.messaging.messages.AsyncMessage;

  </fx:Script>


  <fx:Declarations>


    <s:ChannelSet id="channelSet">

      <s:AMFChannel uri="http://localhost:8080/spring-flex-1.0/mb/amf"/>

    </s:ChannelSet>


    <s:Consumer id="c" destination="client" channelSet="{channelSet}"

                message="ta.text += event.message.body + '
'"/>


  </fx:Declarations>


  <s:applicationComplete>c.subscribe();</s:applicationComplete>


  <s:layout>

    <s:VerticalLayout/>

  </s:layout>


  <s:TextArea id="ta" width="300" height="400"/>


</s:Application>
The MXML is an XML file using the different Flex namespaces. The asynchronous messaging class is imported, and a listening channel is configured to subscribe to the BlazeDS message broker, which will be discussed in more detail below. The message consumer will simply append the incoming message to a Flex text window. In order to compile the MXML file, you must download the Flex SDK from Adobe, at www.adobe.com/cfusion/entitlement/index.cfm?e=flex4sdk. At the time of this writing, the most current version of the SDK is 4.1.
To use the SDK, download it and extract the archive. Put the bin folder inside the SDK on your system’s PATH variable (as you might when setting up Ant, Maven, and the Java SDK). The Flex SDK offers two compilers: one for components and one for Flex applications. For compiling components, use compc. For compiling an application such as the MXML file shown previously, use mxmlc (e.g., mxmlc client.mxml). This will create a client.swf file that will be added to the web application root in the webapp directory.
The Spring Integration 2.0 support for the Spring BlazeDS integration project is currently in the Spring BlazeDS trunk, and must be downloaded and built manually for this example. Check the code out from the SVN repository using the command in Listing 18–30.
Listing 18–30. SVN Command for Checking Out the Spring BlazeDS Integration Project
svn co https://src.springsource.org/svn/spring-flex/trunk spring-flexThe BlazeDS code required to build this code is not in the public Maven repositories as of this writing. The following Maven dependency must be added to the parent pom.xml file, as shown in Listing 18–31, in order for the code to build.
Listing 18–31. Adobe BlazeDS Maven Repositiory
    <repositories>

      <repository>

        <id>repository.springframework.maven.external</id>

        <name>Spring Framework External Repository</name>

        <url>http://maven.springframework.org/external</url>

      </repository>

    </repositories>
The Spring BlazeDS integration requires setting up the DispatchServlet—the same infrastructure used for Spring Faces, Spring Web Flow, Spring MVC, and so on. Listing 18–32 shows the root Maven pom.xml file, which is needed to support Spring Integration, Flex, and BlazeDS.
Listing 18–32. Maven pom.xml for Spring Integration, Flex, and BlazeDS
<?xml version="1.0" encoding="UTF-8"?>

<project xmlns="http://maven.apache.org/POM/4.0.0"

         xmlns:xsi="http://www.w3.org/2001/XMLSchema-instance"

         xsi:schemaLocation="http://maven.apache.org/POM/4.0.0

         http://maven.apache.org/xsd/maven-4.0.0.xsd">

  <modelVersion>4.0.0</modelVersion>


  <groupId>spring-flex</groupId>

  <artifactId>spring-flex</artifactId>

  <packaging>war</packaging>

  <version>1.0</version>


  <dependencies>

    <dependency>

      <groupId>org.springframework.integration</groupId>

      <artifactId>spring-integration-core</artifactId>

      <version>2.0.1.RELEASE</version>

    </dependency>

    <dependency>

      <groupId>org.springframework</groupId>

      <artifactId>spring-webmvc</artifactId>

      <version>3.0.5.RELEASE</version>

    </dependency>

    <dependency>

      <groupId>org.springframework.flex</groupId>

      <artifactId>spring-flex-core</artifactId>

      <version>1.5.0.BUILD-SNAPSHOT</version>

    </dependency>

  </dependencies>
  <build>

    <plugins>

      <plugin>

        <groupId>org.apache.maven.plugins</groupId>

        <artifactId>maven-compiler-plugin</artifactId>

        <configuration>

          <source>1.6</source>

          <target>1.6</target>

          <compilerArgument>-Xlint:all</compilerArgument>

          <showWarnings>true</showWarnings>

          <showDeprecation>false</showDeprecation>

        </configuration>

      </plugin>

    </plugins>

  </build>


  <repositories>

    <repository>

      <id>repository.springframework.maven.release</id>

      <name>Spring Framework Maven Release Repository</name>

      <url>http://maven.springframework.org/release</url>

    </repository>

    <repository>

      <id>repository.springframework.maven.milestone</id>

      <name>Spring Framework Maven Milestone Repository</name>

      <url>http://maven.springframework.org/milestone</url>

    </repository>

    <repository>

      <id>repository.springframework.maven.snapshot</id>

      <name>Spring Framework Maven Snapshot Repository</name>

      <url>http://maven.springframework.org/snapshot</url>

    </repository>

    <repository>

      <id>repository.springframework.maven.external</id>

      <name>Spring Framework External Repository</name>

      <url>http://maven.springframework.org/external</url>

    </repository>

  </repositories>

</project>
There is no need for any custom BlazeDS servlet or web.xml configuration. The configuration lives in the web.xml file, and a mapping will be provided to send Flex requests. Note that the following configuration could be used in setting up Spring MVC or Spring Web Flow also. There is nothing specific to BlazeDS or the Spring BlazeDS integration in the code shown in Listing 18–33.
Listing 18–33. Servlet web.xml for Spring Support
<web-app version="2.4"

xmlns="http://java.sun.com/xml/ns/j2ee"

xmlns:xsi="http://www.w3.org/2001/XMLSchema-instance"

xsi:schemaLocation="http://java.sun.com/xml/ns/j2ee

     http://java.sun.com/xml/ns/j2ee/web-app_2_4.xsd">


   <display-name>Spring Flex BlazeDS integration example</display-name>
   <servlet>

      <servlet-name>spring-flex</servlet-name>

      <servlet-class>

         org.springframework.web.servlet.DispatcherServlet

      </servlet-class>

      <init-param>

         <param-name>contextConfigLocation</param-name>

         <param-value>/WEB-INF/flex-context.xml</param-value>

      </init-param>

      <load-on-startup>1</load-on-startup>

  </servlet>


    <servlet-mapping>

        <servlet-name>spring-flex</servlet-name>

        <url-pattern>/mb/*</url-pattern>

    </servlet-mapping>

</web-app>
This configuration is the simplest configuration possible, but it is enough to install support for Spring in the example web application. TheFlex message broker will need to be set up using a Spring context file. The file /WEB-INF/flex-context.xml is referenced to set up the message broker.
The Spring configuration file is shown in Listing 18–34. This context file imports a numberof namespaces that will be used later to support Spring Integration and messaging channels. Here, the context element is used to enable component scanning and to tell the Spring framework the package in which it should scan for and automatically register components (beans). Again, component scanning is Spring support, which will be used later in this example. So, the only thing that has been configured of any interest here is the BlazeDS message broker. The message broker, in turn, creates channels, which are like named ports from which messages may be sent or received—these are not the same as Spring Integration channels. The specifics of the channel (polling frequency, timeout settings, the specific sub-URL, streaming, etc.) are specified in the services configuration file. The message broker will, by default, look for the services-config.xml file in /WEB-INF/flex/services-config.xml. The explicit declaration may be removed, as it is redundant. It is shown here to demonstrate how to vary that location, though the default (WEB-INF/flex) is a very broad de facto standard.
Listing 18–34. Spring Configuration flex-context.xml
<?xml version="1.0" encoding="UTF-8"?>

<beans xmlns="http://www.springframework.org/schema/beans"

       xmlns:flex="http://www.springframework.org/schema/flex"

       xmlns:xsi="http://www.w3.org/2001/XMLSchema-instance"

       xmlns:int="http://www.springframework.org/schema/integration"

       xmlns:context="http://www.springframework.org/schema/context"

       xsi:schemaLocation="http://www.springframework.org/schema/beans

           http://www.springframework.org/schema/beans/spring-beans-3.0.xsd

           http://www.springframework.org/schema/flex

           http://www.springframework.org/schema/flex/spring-flex-1.0.xsd

           http://www.springframework.org/schema/integration

           http://www.springframework.org/schema/integration/spring-integration-2.0.xsd

           http://www.springframework.org/schema/context

           http://www.springframework.org/schema/context/spring-context-3.0.xsd">


  <context:component-scan base-package="com.apress.prospringintegration.flex"/>
  <flex:message-broker services-config-path="/WEB-INF/flex/services-config.xml">

    <flex:message-service default-channels="my-amf"/>

  </flex:message-broker>


</beans>
The BlazeDS message broker configuration specifies the services-config.xml configuration file, whose contents are presented in Listing 18–35.
Listing 18–35. BlazeDS Messge Broker Configuration services-config.xml
<?xml version="1.0" encoding="UTF-8"?>

<services-config>

  <channels>

    <channel-definition id="my-amf" class="mx.messaging.channels.AMFChannel">

      <endpoint url="http://{server.name}:{server.port}/{context.root}/mb/amf"

                class="flex.messaging.endpoints.AMFEndpoint"/>

    </channel-definition>

  </channels>

</services-config>
The endpoint’s url attribute defines where this service is expected to be mounted. Any service that is exposed using the my-amf channel will be available via that URL. This value will be needed in the client Flex application. For the sample application, the service application will be deployed at the root web context. The URL http://127.0.0.1:8080/mb/amf will be used in Flex client code.
The next step is to use Spring Integration to push messages to the Flex client. The complete flex-context.xml file is shown in Listing 18–36. To simulate an inbound channel adapter, a simple MessageProducer class is created to simply publish an incrementing message to the channel clientPubSubChannel. A poller is added to trigger a new message every 5,000 ms (5 seconds). The Spring BlazeDS Integration project provides support for consuming messages from a Spring Integration message channel and publishing them to the BlazeDS message broker. A topic channel is used to allow multiple clients to subscribe to the messages.
Listing 18–36. Spring Configuration File flex-context.xml Including Spring Integration
<?xml version="1.0" encoding="UTF-8"?>

<beans xmlns="http://www.springframework.org/schema/beans"

       xmlns:flex="http://www.springframework.org/schema/flex"

       xmlns:xsi="http://www.w3.org/2001/XMLSchema-instance"

       xmlns:int="http://www.springframework.org/schema/integration"

       xmlns:context="http://www.springframework.org/schema/context"

       xsi:schemaLocation="http://www.springframework.org/schema/beans

           http://www.springframework.org/schema/beans/spring-beans-3.0.xsd

           http://www.springframework.org/schema/flex

           http://www.springframework.org/schema/flex/spring-flex-1.0.xsd

           http://www.springframework.org/schema/integration

           http://www.springframework.org/schema/integration/spring-integration-2.0.xsd

           http://www.springframework.org/schema/context

           http://www.springframework.org/schema/context/spring-context-3.0.xsd">


  <context:component-scan base-package="com.apress.prospringintegration.flex"/>


  <flex:message-broker services-config-path="/WEB-INF/flex/services-config.xml">

    <flex:message-service default-channels="my-amf"/>
  </flex:message-broker>


  <int:publish-subscribe-channel id="clientPubSubChannel"/>


  <flex:integration-message-destination id="client"

                                        channels="my-amf"

                                        message-channel="clientPubSubChannel"/>


  <int:inbound-channel-adapter channel="clientPubSubChannel"

                               ref="messageProducer"

                               method="publish">

    <int:poller fixed-rate="5000"/>

  </int:inbound-channel-adapter>


</beans>
The message-publishing class MessageProducer is shown in Listing 18–37. This class simply produces a Spring message that is pushed to the clientPubSubChannel message channel and eventually makes it to the Flex client.
Listing 18–37. Message Publishing Class MessageProducer
package com.apress.prospringintegration.flex;


import org.springframework.stereotype.Component;


@Component

public class MessageProducer {

    private int i;


    public String publish() {

        String message = "Pushing message: " + i;

        i++;

        System.out.println(message);

        return message;

    }

}
Now you can build the example project using the Maven command mvn install, which will produce the WAR file spring-flex-1.0.war. This WAR file may be deployed in any servlet container. Using a browser, go to the URL http://localhost:8080/spring-flex-1.0/client.swf. More than one browser may be used to demonstrate that there can be multiple subscribers. The output should look something like that shown in Figure 18–1. Note that an exception will be thrown until at lease one client hooks up, since if no client is hooked up there is no place for the message to go. This may be handled more gracefully with the addition of some error-handling code.
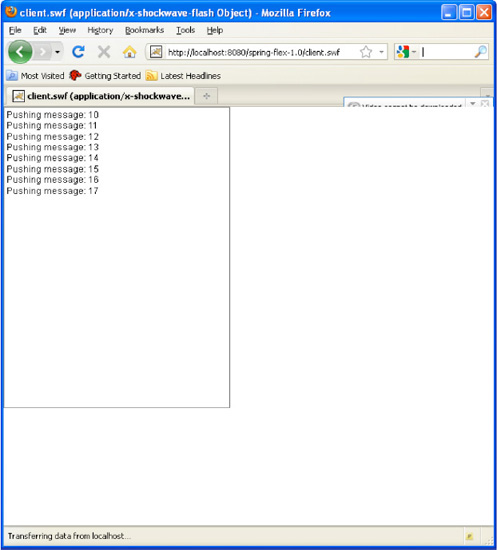
Figure 18–1. Flex Client Receiving Spring Integration Messages
Summary
This has been a quick tour of how Spring Integration can be used with your web application. First, we discussed the basic HTTP gateways and adapters, which provide a simple way to create web applications. In addition, these HTTP components can be used to interact with multipart requests. Finally, the various push architectures were discussed. Moving beyond the standard request/reply interaction using a web browser, we explored technologies such as Comet and BlazeDS.