
Chapter 10
Using NoSQL in the Cloud
WHAT’S IN THIS CHAPTER?
- Exploring ready-to-use NoSQL databases in the cloud
- Leveraging Google AppEngine and its scalable data store
- Using Amazon SimpleDB
Most current-generation popular applications, like Google and Amazon, have achieved high availability and the ability to concurrently service millions of users by scaling out horizontally among multiple machines, spread across multiple data centers. Success stories of large-scale web applications like those from Google and Amazon have proven that in horizontally scaled environments, NoSQL solutions tend to shine over their relational counterparts. Horizontally scaled environments available on-demand and provisioned as required have been christened as the “cloud.” If scalability and availability is your priority, NoSQL in the cloud is possibly the ideal setup.
In some situations, both relational and non-relational stores have been used in combination. It would be inaccurate to say that only NoSQL works in horizontally scaled environments. A lot depends on the required scale, the underlying data structure, and the transactional integrity expectations in the application.
Many cloud service providers exist and multiple NoSQL products are available. In many cases, like Amazon EC2 (Elastic Compute Cloud), you have the choice to install any NoSQL product you want to use. Appendix A covers instructions on how you could successfully install some of the popular NoSQL product clusters on EC2. Notwithstanding the freedom of choice, a few cloud service providers make your life easier by providing you with a fully installed, set up, and configured database infrastructure, ready for you to use. This chapter covers such fully ready NoSQL options in the cloud.
RELATIONAL DATABASES IN THE CLOUD
A number of relational database options are offered in the cloud. Prominent among these are:
- Microsoft’s SQL data services on the Windows Azure platform (microsoft.com/windowsazure/)
- Amazon Relational Database Service (RDS), which hosts clusters of MySQL instances (http://aws.amazon.com/rds/)
Alternatively, many Amazon Machine Image (AMI) options for Oracle, PostgresSQL, MySQL, and others allow you to set up your own database clusters in the EC2 environment. A few RDBMS vendors like Oracle and Greenplum have begun to offer solutions for private cloud environments as an appliance. Although possibly scalable, there is open debate as to whether a private cloud is a cloud at all.
This chapter walks through the details of two NoSQL options in the cloud: Google’s Bigtable data store and Amazon SimpleDB. It includes a passing reference to a few other emerging database options on tap: CouchOne, MongoHQ, and Riak on Joyent’s Smart machines.
Google revolutionized the cloud computing landscape by launching a services-ready, easy-to-use infrastructure. However, Google wasn’t the first to launch cloud offerings. Amazon EC2 was already an established player in the market when Google first announced its service. Google’s model was so convenient, though, that its cloud platform, the Google App Engine (GAE), has seen widespread and rapid adoption in a short time frame. The app engine isn’t without its share of limitations. Its sandboxed environment and lack of support for long-running processes are among a few of its aspects that are much disliked.
This chapter starts with GAE’s Bigtable-based data store. Using illustrations and examples, the chapters presents the data store’s capabilities and its recommended usage patterns.
The Google App Engine (GAE) provides a sandboxed deployment environment for applications, which are written using either the Python programming language or a language that can run on a Java Virtual Machine (JVM). Google provides developers with a set of rich APIs and an SDK to build applications for the app engine.
To explain the data store features and the available APIs for data modeling, I first cover all that relates to the Python SDK for the app engine. Subsequently, I extend the discussion to include the features that are above and beyond the common concepts and relate specifically to the Java SDK for the same underlying facility.
GAE Python SDK: Installation, Setup, and Getting Started
To get started you need to install Python and the GAE Python SDK. You can download Python from python.org and the GAE Python SDK is available online at http://code.google.com/appengine/downloads.html#Google_App_Engine_SDK_for_Python. Detailed installation instructions are beyond the scope of this chapter but installation of both Python and GAE Python SDK on all supported environments is fairly easy and straightforward. If you still run into trouble while setting up your environment, just Google for a solution to your problem and like most developers you won’t be disappointed.
Although this chapter exclusively focuses on the GAE data store, you will benefit from understanding the essentials of application development on the app engine. For the Python SDK, spend a little while reading through the tutorial titled “Getting Started: Python,” which is available online at http://code.google.com/appengine/docs/python/gettingstarted/. Applications built on GAE are web applications. The getting started tutorial explains the following:
- The essentials of how Python web applications are built on the GAE.
- How requests are handled and responses served.
- How URL(s) are mapped to handlers.
- How dynamic and static content are included.
- How data is modeled and persisted in the underlying data store.
- How templates can be used to decouple view and logic elements.
- How services, like authentication, mail, task queues, and Memcache can be leveraged.
- How applications, once built, can be locally run in a development web server.
- How applications can be deployed to the production environment.
The tutorial is terse and to the point and you can quickly get up to speed with the basics by reading it. If you have limited or no experience with developing web applications using Python, you should go through some basic Python web development lessons before you continue with this chapter. If you are conversant with Python web development, you may still consider quickly reading through the getting started tutorial to make sure you understand which of your familiar tools and methods are available and where is it that you may need to use an alternative strategy.
If you are a complete newcomer who has no experience of programming in Python, consider learning the language basics by reading Mark Pilgrim’s wonderful book, Dive into Python, available online at diveintopython.org.
The next few sections get deeper into data modeling and create, read, update, and delete (CRUD) operations for application data in the GAE data store. For the purposes of context and specificity, concepts are explained via a sample application instead of abstract ideas.
Task Manager: A Sample Application
Consider a simple task management application in which a user can define a task, track its status, and check it as done once completed. To define a task, the user needs to give it a name and a description. Tags can be added to categorize it and start, and expected due dates could be specified. Once completed, the end date can be recorded. Tasks belong to a user and in the first version of the application they are not shared with anyone other than the owner.
To model a task, it would be helpful to list the properties, specify the data type for each property, state whether it’s required or optional, and mention whether it is single or multiple valued. Table 10-1 lists a task’s properties and its characteristics.
TABLE 10-1: Properties of a Task
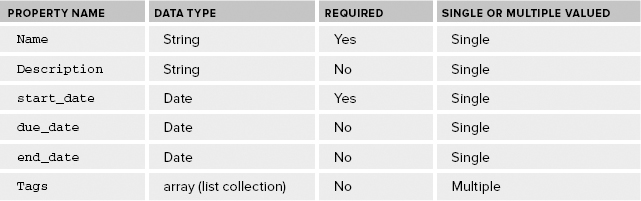
The GAE Python SDK provides a data modeling API that enables a developer to create a Python class to represent a task. The simplest form of such a model class for tasks can be as follows:
import datetime
from google.appengine.ext import db

class Task(db.Model):
  name = db.StringProperty()
  description = db.StringProperty()
  start_date = db.DateProperty()
  due_date = db.DateProperty()
  end_date = db.DateProperty()
  tags = db.StringListProperty()
taskmanager GAE project
If you have programmed in a web framework like Django (djangoproject.com/) or used an ORM like SQLAlchemy, a popular database toolkit for Python (sqlalchemy.org/), you have certainly seen similar data modeling APIs. The GAE Python data modeling API adheres to syntax and semantics that a Python web developer is familiar with.
ORM, or Object-Relational Mapping, provides a bridge between the object-oriented programming and the relational database worlds.
In Table 10-1, name and start_date are specified as required fields but they haven’t been incorporated into the model yet. Here, the Task class is modified to specify constraints:
import datetime
from google.appengine.ext import db

class Task(db.Model):
  name = db.StringProperty(required=True)
  description = db.StringProperty()
  start_date = db.DateProperty(required=True)
  due_date = db.DateProperty()
  end_date = db.DateProperty()
  tags = db.StringListProperty()
taskmanager GAE project
A number of validation options are available. For example, required=True makes a property value mandatory. The argument choices=set(["choice1", "choice2", "choice3", "choice4"]) restricts the value to members of the defined set. Custom validation logic defined in a function can be passed as a value to the validator argument of a particular property class.
GAE uses Google’s Bigtable as the data store. Bigtable is a sorted, ordered, distributed sparse column-family-oriented map, which imposes little restrictions on the number or types of columns in a column-family or the data type of the values stored in these columns. Also, Bigtable allows sparse data sets to be saved effectively, thereby allowing two rows in a table to have completely different sets of columns. It also permits different value types for the same columns. In other words, in a single data store, two entities of the same kind (for example, Task) can have different sets of properties or two entities of the same kind can have a property (identified by the same name) that can contain different types of data.
The data modeling API provides a level of structure on top of the more accommodating Bigtable. The data modeling API provides an application-level restriction on the property data types, its values sets, and the relationship among them. In the simple example that depicts a “Task” entity, a Python class named Task defines the data model.
The GAE data store can be thought of as an object store where each entity is an object. That means data store entities or members could be instances of a Python class, like Task. The class name, Task, translates to an entity kind. A key uniquely identifies an entity among all entities in the data store. A key is a combined identifier that includes:
- Inheritance path
- Entity kind
- Entity ID or entity key name
Hypothetically, that means if an entity of the BaseTask kind is a parent of a Task entity, then the inheritance path for the Task entity includes references to the parent entity of the BaseTask kind. Task itself becomes the entity kind. A specific entity of the kind, Task, has an ID, which can be thought of as the primary key. An ID can be either of the following:
- Application provided value, named key_name, which is a string
- System-generated (i.e., GAE data store) unique numeric ID
So, you could create and save an entity as follows:
task = Task(name = "Design task manager app",
            description = "Design the task management application.
Create the initial blueprint and the app architecture.",
            start_date = datetime.datetime.now().date())
task.put()
taskmanager GAE project
This creates a task instance. The instance was created by passing values for name, description, and start_date to the constructor. Alternatively, you could create an instance and then assign values to the properties of that instance. You need to pass in values to the constructor for all required properties at instantiation time. Values to the non-mandatory properties can be assigned using either of the methods: via the constructor or via property assignments.
In the preceding example, no value was passed in for the key_name property so the data store created a unique numeric ID for the entity. You can query for the key like so:
my_entity_key = task.key()
The output is a numeric value appended to the kind, which in this case is Task. Alternatively, you could create a key for an entity and pass that in at creation time. Say you wanted to use task1 as the key for an entity of the Task kind, you could instantiate a task entity like so:
another_task = Task(key_name = "task1",
         name = "Yet another task",
         description = "Yet another task is, as the name says, yet another task.",
         start_date = datetime.datetime(2011, 2, 1, 12, 0, 0).date())
Now, querying for the key using another_task.key() returns Task: task1, which includes the key_name you assigned at the time of creation.
In the example where I created another_task, I assigned the start_date value as 2011/02/01. This was an arbitrary date I picked just to demonstrate that it could be any valid date value. The standard Python datetime.datetime module is used to create date values in the correct format. The datetime.datetime module, by default, creates and reads dates using the UTC time zone. You can choose to set the time zone and other attributes using the module’s capabilities. This is all standard Python and you can manipulate dates the Python way that you may be accustomed to.
Next, I revisit the model class and explain a few features that were originally only alluded to in the code sample. I will also modify the model class to depict a few additional capabilities.
Essentials of Data Modeling for GAE in Python
Although a first rudimentary model class example has already been presented, a slightly more formal and detailed explanation will be useful. As I explain the details, I will build on what I have already covered. Look again at the Task model class:
class Task(db.Model):
  name = db.StringProperty(required=True)
  description = db.StringProperty()
  start_date = db.DateProperty(required=True)
  due_date = db.DateProperty()
  end_date = db.DateProperty()
  tags = db.StringListProperty()
taskmanager GAE project
The first thing to note is that the Task model class extends the db.Model class. The Model class (in the google.appengine.ext.db module) is one of the three built-in model classes provided in the data modeling API. The other two classes are named Expando and PolyModel. The Model class is the most rigid and formal of the three model classes. A Model defines a structured data model, with a well-defined set of properties, where the data types for each of the properties is stated at design time. In some ways, defining a Model class or inheriting from it is analogous to defining a traditional database schema.
The Task class, which is a Model type, defines six properties. Each of the six properties have a well-defined type, where the type is defined using a subclass of the Property class. The Python wrapper (SDK and API) defines and supports a set of property data types. A corresponding set of classes helps define properties in a data model. A Property class defines a data type for the property’s value. It also defines how values are validated and stored in the data store. For example, the StringProperty class represents all Python str or unicode value types that are up to 500 characters in length. DateProperty, which is a subtype of a DateTimeProperty, represents just the date part of a date and time value. StringListProperty represents a list of string values.
You can get a list of all supported value types in a subsection in the online documentation for the GAE Python API. The subsection is titled “Properties and Values.” You can access the document online at http://code.google.com/appengine/docs/python/datastore/entities.html#Properties_and_Value_Types. You can access the list of corresponding types and property classes at http://code.google.com/appengine/docs/python/datastore/typesandpropertyclasses.html. The most common of the supported types and corresponding classes are summarized in Table 10-2.
TABLE 10.2: Property Types and Corresponding Classes in GAE Python API
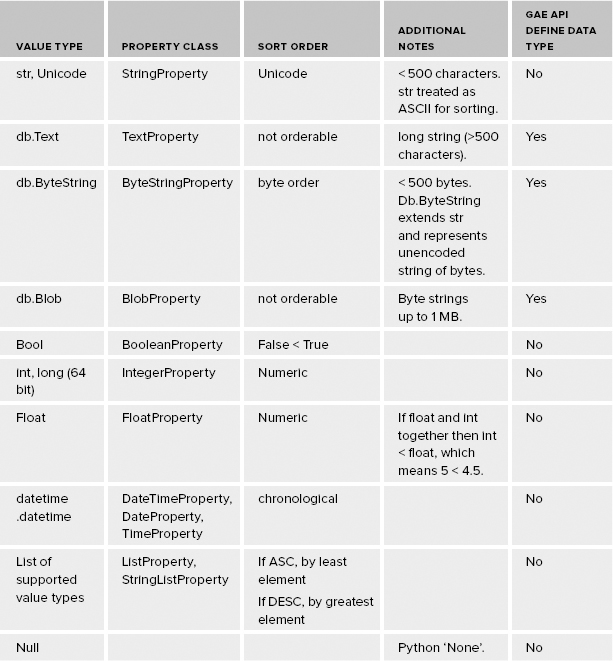
A value of ‘No’ in this column implies that the data type isn’t defined in the GAE Python API but is defined in the Python language and its standard libraries.
In addition to the common data types listed in Table 10-2, additional types are supported to define an entity key and to model Google accounts and typical communication identities that involve e-mail, instant messaging, postal address, and phone number. Classes are also defined to model a geographical point, a tag or a rating value. A data store key is modeled using the Key class in the google.appengine.ext.db module. The additional supported types are as follows:
- Google accounts — users.User
- Email — db.Email
- IM — db.IM (Instant Messaging ID)
- Postal address — db.PostalAddress
- Phone number — db.PhoneNumber
- Category — db.Category
- Link — db.Link
- Rating — db.Rating
- Geographical point — db.GeoPt
While the Model class with the help of supported types allows you to precisely define a desired data schema, sometimes flexibility in the model is important. You may also recall that the underlying data store imposes no restrictions either in terms of a schema or data types. In other words, you are allowed to add properties as required and the set of properties could vary between two entities of the same kind. Also, two entities may choose to store a different data type for the same property. In order to model such dynamic and flexible schemas, the GAE Python API defines a model class namedExpando.
Google App Engine also offers a Blobstore, distinct from the data store. The Blobstore service allows you to store objects that are too large for the data store. A blob in the Blobstore is identified by a blobstore.BlobKey. BlobKey(s) can be sorted on byte order.
Expando
Properties can be of two types:
- Fixed properties
- Dynamic properties
Properties defined as attributes of a model class are fixed properties. Properties added as attributes to a model instance are dynamic properties.
A model instance, and not a class, persists as an entity.
An instance of a model class that inherits from the Expando model class can have both fixed and dynamic properties. This allows two model instances, which are persisted as entities, to have different data types for the same attribute. It also makes it possible that one instance adds an attribute (say, new_attribute) and the other does not add this attribute at all. Instances can include a new attribute but leave it unset. I refactored the Task model class to inherit from Expando. A code snippet for the new Task class and its instances is as follows:
import datetime
from google.appengine.ext import db

class Task(db.Expando):
  name = db.StringProperty(required=True)
  description = db.StringProperty()
  start_date = db.DateProperty(required=True)
  due_date = db.DateProperty()
  end_date = db.DateProperty()
  tags = db.StringListProperty()

t1 = Task(name="task1", start_date=datetime.datetime.now().date())
t1.description = "this is task 1"
t1.tags = ["important", "sample"]
t1.collaborator = "John Doe"

t2 = Task(name="task2", start_date=datetime.datetime.now().date())
t2.description = "this is task 2"
t2.tags = ["important", "sample"]
t2.resources = ["resource1", "resource2"]
taskmanager GAE project
The example is self-explanatory and demonstrates the power of the flexible Expando model. Flexibility comes at some cost, though. The dynamic properties are not validated like their fixed counterparts. The modeling API provides another model class variant that allows you to define polymorphic behavior.
PolyModel
The PolyModel class (in the google.appengine.ext.db.polymodel module) allows you to define an inheritance hierarchy among a set of model classes. Once a hierarchical structure is established via class inheritance, you can query for a class type and get qualifying entities of both the class and its subclasses in the result set. To illustrate, I modified the Task class one more time. I refactored the Task class to extend the PolyModel class. Then I created two subclasses of the Task class. The subclasses are IndividualTask and TeamTask, which represent tasks for individual owners and groups, respectively. The sample code is as follows:
from google.appengine.ext import db
from google.appengine.ext.db import polymodel

class Task(polymodel.PolyModel):
  name = db.StringProperty(required=True)
  description = db.StringProperty()
  start_date = db.DateProperty(required=True)
  due_date = db.DateProperty()
  end_date = db.DateProperty()
  tags = db.StringListProperty()

class IndividualTask(Task):
  owner = db.StringProperty()

class TeamTask(Task):
  team_name = db.StringProperty()
  collaborators = db.StringListProperty()
taskmanager GAE project
Now if I query for Task entities, I will get IndividualTask entities and TeamTask entities in addition to Task entities in my result set. You will understand this better once you understand the query mechanisms available in the app engine. Next, I cover queries and indexes.
Queries and Indexes
The app engine provides a SQL-like query language called GQL. Although not as fully capable as SQL, GQL closely mirrors the syntax and semantics that we are all used to in the world of SQL. GQL queries on entities and their properties. Entities manifest as objects in the GAE Python and the Java SDK. Therefore, GQL is quite similar to object-oriented query languages that are used to query, filter, and get model instances and their properties. Java Persistence Query Language (JPQL), http://download.oracle.com/javaee/5/tutorial/doc/bnbtg.html, is an example of a popular object-oriented query language.
To retrieve five Task entities with start_date of January 1, 2011 and print their names you could query like so:
q = db.GqlQuery("SELECT * FROM Task" +
                 "WHERE start_date = :1", datetime.datetime(2011, 1, 1, 12, 0,
0).date())
results = q.fetch(5)
for task in results:
  print "Task name: %s" % (task.name)
taskmanager GAE project
Alternatively, you could get the same result by querying using the Query interface like so:
q = Task.all()
q.filter("start_date =", datetime.datetime(2011, 1, 1, 12, 0, 0).date())
results = q.fetch(5)
for task in results:
  print "Task name: %s" % (task.name)
taskmanager GAE project
The first option uses the GqlQuery interface and the second variant uses the Query interface. In each case, a filter criterion is specified to narrow the result set down to only those entities whose start_date property matches a specified date. This is similar to passing in a conditional value via a SQL where clause. In the previous example, 12 noon of January 1, 2011 is used as the parameter. The time part could be any other relevant value like 10 a.m. or 8 p.m. and the effective parameter would remain the same. Only the date part of the parameter is used.
The app engine allows a fairly rich set of filter criteria, which I explain in a following subsection.
The result in the preceding example is obtained using the fetch method. The fetch method takes a limit argument to restrict the result set. Optionally, an offset argument can also be passed to the fetch method. Therefore, calling fetch(limit=5, offset=10) instead of fetch(5) in the example returns the 11th to the 15th record instead of the first 5 records. That brings us to the notion of order and an obvious question could be: “What is the order of the entities in the result set?” Because no explicit order criterion was specified, the order of the result set is not deterministic and thus could change from one query run to the other. To assure a specific order you could add that to the query. For example, you could order the result set by name as follows:
  q = db.GqlQuery("SELECT * FROM Task" +
                "WHERE start_date = :1" +
                "ORDER BY name", datetime.datetime(2011, 1, 1, 12, 0, 0).date())
taskmanager GAE project
You may recall that Bigtable stores rows in a sorted and ordered manner. Therefore, seeking a specific row does not involve a random read. Instead, the row-key can easily be used to identify the region server that hosts the row and the row data (or entity) can be read sequentially. When a property of an entity is used to filter the complete collection, a corresponding index that keeps the rows in the desired sorted order is looked up. A query that accesses Task entities by filtering them on the basis of the start_date property and then ordering them on the basis of name property uses an index where the data is kept in a pre-sorted order, first by start_date and then by name. In fact, every valid query is served with the help of an underlying index. To put it another way, no query can run if there is no corresponding index for it. Some queries that look different may leverage the same index. The app engine creates a few implicit indexes, especially for those that involve filtering on equality operators on property values, keys, or ancestors. For queries that involve filtering on the basis of multiple properties or involve inequality comparators or have multiple orders by properties, you need to necessarily and explicitly define an index. The development server helps in identifying required indexes and creates one when a corresponding query is run. Indexes are explicitly defined in a configuration file named index.yaml.
Next, a survey of the supported filter operators is illustrated.
Allowed Filters and Result Ordering
The app engine allows you to use the following operators on property values:
- =
- >
- >=
- <
- <=
- !
- IN
To match an inequality filter the index is scanned to find the first matching row, from where on all consecutive rows are returned until a row is not matched. Remember, all rows are ordered in the index by that property! You can define multiple inequality filters on a single property but you are not allowed to have multiple inequality filters on different properties in the same query. Multiple inequality filters on a single property are split into multiple queries where the result sets are merged before returned. So a query as follows:
SELECT * FROM Task WHERE start_date >= :a_specified_date
                       AND start_date <= :another_specified_date
is run in two parts, where one part matches all rows where start_date is greater than or equal to a specified date and another matches all rows where start_date is less than or equal to another start date. Finally, the results from both queries are merged.
When ordering queries that involve inequality filters it is required that you first order by the property on which the inequality filter operator is applied. You can include other properties in the ordering only after the property on which the inequality filter is applied.
Multiple equality filter operators on different properties can be used in the same query that uses an inequality filter operator on a property. However, again when it comes to defining an ORDER BY criteria for this query, remember to order the result first by the property that defines the inequality property.
The data store allows properties to contain a list of values. It also allows two entities to have different data types for the same property. The IN operator works on values that contain a list. The IN operator evaluates membership. An entity is returned in the result if even one element in the list matches the filter. For example, a_prop = [1, 2] will match both a_prop =1 and a_prop = 2. However, a_prop = [1, 2] will not match if the query specifies a_prop > 1 and a_prop < 2 because although one element matches either condition, none matches both. When it comes to multi-valued properties, the ones that contain a list of values, each property in the list is added to the index. This, apart from the stated matching behavior, also imposes a few side effects when it comes to ordering. A multi-valued property is ordered by the smallest value in ascending order and by the largest value in descending order. So a multi-valued property that contains [1, 3, 5, 7] is treated as 1 when ascending order is applied and the same property value is treated as 7 when a descending order is applied. Thus, when it comes to order [1, 3, 5, 7] is both smaller and greater than [2, 3, 4, 5, 6].
Two entities can contain different data types for the same property and some entities may not even have that property. Entities that don’t define a property are skipped when a query filters on the basis of that property. If you would like that entity to be included in the result, then at least set a null (or None in Python) value for the property in the particular entity. Queries match only those entities that contain the same data type as that specified by the query filter. So, a query that matches on a string value will only look for matches with those entities that have a string type for the same property. Mixing of data types in a single property also creates a few side effects when it comes to ordering. There is a hierarchy in ordering between data types. For example, integers are ordered before floats. Therefore, ordering by a property that, for example, contains both integer and float values can be tricky because 5 < 4.5.
I mentioned earlier that every query needs an index. A query and its explicitly defined index could be like so:
q = db.GqlQuery("SELECT * FROM Task" +
                "WHERE start_date >= :1" +
                "tags IN :2" +
                "ORDER BY start_date",
datetime.datetime(2011, 1, 1, 12, 0, 0).date(), ["Important", "Sample"])
taskmanager GAE project
indexes:
- kind: Task
  properties:
  - name: start_date
  - name: tags
index.yaml in taskmanager GAE project
In the example so far, a query result has been obtained with the help of the fetch method. The fetch method allows you to get a set of records in a single call. The number of result records returned is defined by the limit. If you just want a single entity you can use the get method to retrieve the entity at the top of the order. If all you want to know is the number of entities in the result, then simply use the count method. The count method returns with a count of all entities in the result unless it times out. The app engine is suited for fast responses that can scale easily. Any response that takes more than 30 seconds times out.
If you need to traverse through the entire result set, you need use the Query interface as an iterable object. An example could be as follows:
q = db.GqlQuery("SELECT * FROM Task" +
                "WHERE start_date = :1" +
                "ORDER BY name", datetime.datetime(2011, 1, 1, 12, 0, 0).date())
for task in q:
  print "Task name: %s" % (task.name)
taskmanager GAE project
The iterable object allows you to access the result set in small chunks until you receive all the results. Although an iterable object allows you to traverse the entire set it is doesn’t let you go back later and fetch incrementally since the last fetch. For such an incremental fetch the cursor is a suitable feature.
After a fetch, you can get a cursor using the query object’s cursor method. A cursor is a base64-encoded data pointer that allows you to fetch additional results incrementally. The second query to fetch incremental results should be identical to the first one as far as the filters, sort order, and ancestors are concerned. Before executing the query, you need to pass the cursor to the query object’s with_cursor method. Cursors remain unaffected by any changes to the data that is already fetched. Any updates or inserts in the range prior to the current cursor are overlooked.
To facilitate consistent data state, the app engine supports atomic transactions for all entity and entity group-level updates. Transactional integrity means either the operation succeeds or it’s rolled back. All writes to the data store (that is, create, update, and delete operations) in the context of a single entity are atomic.
An entity, its ancestors, and its children form an entity group. A function manipulating entities in an entity group can be enclosed within a transactional boundary. A function can explicitly run as a transactional unit if it is passed along with its arguments to the db.run_in_transaction method. An example is depicted in Listing 10-1.
LISTING 10-1: taskmanager GAE project
import datetime
from google.appengine.ext import db

class Task(db.Model):
  name = db.StringProperty(required=True)
  description = db.StringProperty()
  start_date = db.DateProperty(required=True)
  due_date = db.DateProperty()
  end_date = db.DateProperty()
  tags = db.StringListProperty()
  status = db.StringProperty(choices=('in progress', 'complete', 'not started'))

def update_as_complete(key, status):
  obj = db.get(key)
  if status == 'complete':
    obj.status = 'complete'
    obj.end_date = datetime.datetime.now().day()

  obj.put()

q = db.GqlQuery("SELECT * FROM Task" +
                "WHERE name = :1", "task1")
completed_task = q.get()

db.run_in_transaction(update_as_complete, completed_task.key(), "complete")
jtaskmanager GAE project
The app engine does not lock any rows. Optimist locking and reconciling on the basis of the last updated time resolves any conflicts. Transactions across operations that span two or more root entities are not supported.
Having explored most of the essential features of the app engine and the Python SDK for the app engine, let’s cover some of the idioms in the Java app engine SDK next.
Tersely Exploring the Java App Engine SDK
To get started, read the introductory tutorial, available online at http://code.google.com/appengine/docs/java/gettingstarted/. Programs written in Java to run on the app engine are web applications that leverage the standard Java specification like Java Servlets. The app engine run time hosts a Java application server. The container itself is a customized implementation of the Webtide Jetty application server.
The fundamentals of the app engine remain the same whether they are accessed from Python or Java so repeating what has already been described would be futile. Therefore, this section jumps right in to show a few bits about accessing the data store using the Java standards like JDO and JPA.
The DataNucleus (www.datanucleus.org/) open-source app engine plug-in bridges the gap between the Java standard persistence frameworks (in particular JDO and JPA) and the Google Bigtable-based data store.
To set up and configure JDO read the online documentation at http://code.google.com/appengine/docs/java/datastore/jdo/. For JPA configuration look at http://code.google.com/appengine/docs/java/datastore/jpa/.
The Task class from the Python example can be created as a JDO-aware plain old Java object (POJO) like so:
package taskmanager;

import com.google.appengine.api.datastore.Key;
import java.util.Date;
import javax.jdo.annotations.IdGeneratorStrategy;
import javax.jdo.annotations.PersistenceCapable;
import javax.jdo.annotations.Persistent;
import javax.jdo.annotations.PrimaryKey;

@PersistenceCapable
public class Task {
    @PrimaryKey
    @Persistent(valueStrategy = IdGeneratorStrategy.IDENTITY)
    private Key key;

    @Persistent
    private String name;

    @Persistent
    private String description;

    @Persistent
    private Date startDate;

    @Persistent
    private String status;

    public Greeting(String name, String description, Date startDate,
String status) {
        this.name = name;
        this.description = description;
        this.startDate = startDate;
        this.status = status;
    }

    public Key getKey() {
        return key;
    }

    public User getName() {
        return name;
    }

    public String getDescription() {
        return description;
    }

    public Date getStartDate() {
        return startDate;
    }

    public String getStatus() {
        return status;
    }

    public void setName(String name) {
        this.name = name;
    }

    public void setDescription(String description) {
        this.description = description;
    }

    public void setStartDate(Date startDate) {
        this.startDate = startDate;
    }

    public void setStatus(String status) {
        this.status = status;
    }
}
jtaskmanager GAE project
A JDO PersistenceManager class takes care of persisting the entity just defined to the data store. You need to get a PersistenceManager instance from the PersistenceManagerFactory like so:
package taskmanager;

import javax.jdo.JDOHelper;
import javax.jdo.PersistenceManagerFactory;

public final class PMF {
    private static final PersistenceManagerFactory pmfInstance =
        JDOHelper.getPersistenceManagerFactory("transactions-optional");

    private PMF() {}

    public static PersistenceManagerFactory get() {
        return pmfInstance;
    }
}
jtaskmanager GAE project
Finally, you can save an object as follows:
String name = "task1";
String description = "a task";
Date startDate = new Date();
String status = "task created";

Task task = new Task(name, description, startDate, status);
PersistenceManager pm = PMF.get().getPersistenceManager();
try {
    pm.makePersistent(task);
    } finally {
    pm.close();
    }
jtaskmanager GAE project
Then you can query for all tasks using the JDO Query Language (JDOQL), which is similar to GQL, like so:
PersistenceManager pm = PMF.get().getPersistenceManager();
String query = "select from " + Task.class.getName();
List<Task> tasks = (List<Task>) pm.newQuery(query).execute();
jtaskmanager GAE project
The use of JDO and JPA (which is not illustrated in this chapter) bridge the gap between the typical object-centric application development and a scalable ordered and sorted column-family store like GAE’s data store. They help developers leverage the app engine’s scalable environment without the necessity to learn a completely new database technology. However, one must keep in mind that the JDO and JPA that apply to the app engine are just a subset of the overall specification.
All that was explained about the queries, their behavior, and their limitations remains the same, whether used with the Python or the Java SDK. Also, indexes and transactional capabilities and concepts remain the same.
Next, I explore Amazon SimpleDB.
In the preceding section you saw how GAE’s data store provided a fully managed database for use. The complexity and burden of managing a large and scalable database was completely abstracted from you. You did not have to worry about database administration, database index management, or performance tuning. As far as the data store goes, all you had to do was concentrate on your application and its data logic.
Amazon SimpleDB is a ready-to-run database alternative to the app engine data store. It’s elastic and is a fully managed database in the cloud. The two data stores — app engine data store and SimpleDB — are quite different in their API as well as the internal fabric but both provide you a highly scalable and grow-as-you-use model to a data store.
Amazon EC2 database AMI(s) allow you to spin your own favorite database (Oracle, MySQL, PostgreSQL, DB2 or any other) in the AWS cloud but the onus of managing it is yours.
Getting Started with SimpleDB
Amazon SimpleDB is offered as a part of the Amazon Web Services (AWS) offerings. Getting started is as simple as setting up a SimpleDB account at http://aws.amazon.com/sdb. You need two sets of credentials: an access key and a secret key to access AWS. These credentials can be obtained from the account details section, accessible once you have logged in to your http://aws.amazon.com/page. Details on AWS registration and access are not covered in this chapter or elsewhere in this book. However, following the instructions on the AWS home page, http://aws.amazon.com/, should get you easily set up.
SimpleDB is a very simple database by design. It imposes a few restrictions and provides a very simple API to interact with your data. The highest level of abstraction in SimpleDB is an account. Think of it as a database instance in a traditional RDBMS setup. Better still, think of it as a Microsoft Excel document with a number of different worksheets.
Each account can have one or more domains and each domain is a collection of items. By default, a SimpleDB domain (a collection) can hold up to 10 GB of data and you can have up to 100 domains per account. That’s not the ceiling, though, it’s only the default. You can contact AWS to provision higher capabilities if your configuration needs it. Even at default levels, you can set up a 1 TB data set. That’s not all that small! Also, a clever combination of SimpleDB and Amazon Simple Storage Service (S3) could help you optimize your storage. Keep all large objects in S3 and keep all smaller objects and the metadata for the large objects in SimpleDB. That should do the trick.
Within a domain you can persist items. Items can be of any type as long as they can be defined using attribute-value pairs. Therefore, each item is a collection of attribute-value pairs. Two items in the same domain are not required to have the same set of attribute-value pairs. In fact, in an extreme case, you can choose to keep two items in a domain even if the two don’t have a single attribute in common. This sort of an extreme case may have little practical use but from SimpleDB’s standpoint it’s all acceptable.
Earlier in the book you saw document databases had similar characteristics. CouchDB and MongoDB provided similar freedom and capabilities. SimpleDB can be thought of as a document database in the cloud, expandable on demand. It would be both easy and appropriate to store data on SimpleDB that is in the following log file data format (from Chapter 3):
{
    "ApacheLogRecord": {
        "ip": "127.0.0.1",
        "ident" : "-",
        "http_user" : "frank",
        "time" : "10/Oct/2000:13:55:36 -0700",
        "request_line" : {
            "http_method" : "GET",
            "url" : "/apache_pb.gif",
            "http_vers" : "HTTP/1.0",
        },
        "http_response_code" : "200",
        "http_response_size" : "2326",
        "referrer" : "http://www.example.com/start.html",
        "user_agent" : "Mozilla/4.08 [en] (Win98; I ;Nav)",
    },
}
This example is a JSON document. Each key/value pair of JSON elements will correspond to an attribute-value pair in SimpleDB.
The JSON format in the example above is used simply to illustrate key/value pairs. SimpleDB is not natively capable of understanding JSON formats or querying JSON documents. You will need to parse a JSON document and extract the key/value pairs before you can store it in SimpleDB.
Like most AWS options, SimpleDB offers a simple API to manipulate your domain, its items, and the attribute-value pairs of an item. The API follows both REST- and SOAP-style idioms and is available as a web service. The client makes a request to carry out a specific operation, such as create a domain, insert an item, or update an attribute-value pair. The SimpleDB server completes the operations, unless there is an error, and responds with a success code and response data. The response data is an HTTP response packet, which has headers, storing metadata, and some payload, which is in XML format.
Next, I quickly list the available commands in the SimpleDB API. I start by listing commands that help manipulate a domain.
Commands for managing SimpleDB domains:
- CreateDomain — Create a domain to store your items.
- DeleteDomain — Delete an existing domain.
- ListDomains — List all the domains within your account.
- DomainMetadata — Get information on a domain, its items, and the items’ attribute-value pairs. Information like domain creation date, number of items in the domain, and the size of attribute-value pairs can be obtained.
Once you create a domain, you can use the PutAttributes method to insert or update an item. Remember that an item is a collection of attribute-value pairs. Inserting an item implies creating the set of attribute-value pairs that logically forms an item. Updating an item implies retrieving a particular item and then updating the value for one or more attributes of the item. BatchPutAttributes is also available to carry out multiple put operations in a single call.
DeleteAttributes allows you to delete an item, an attribute-value pair, or just an attribute-value from your domain. BatchDeleteAttributes allows multiple delete operations in a single call.
You can get the attribute-value pairs of a single item by using the GetAttributes operation. Alternatively, you can use the SELECT operations to query and filter items in your domain. SimpleDB supports a rich set of features to filter a data set in a domain. The syntax and semantics are similar to that offered by SQL. SimpleDB automatically creates and manages indexes to make querying efficient.
Although SimpleDB’s query mechanism feels a bit like SQL, you should not confuse SimpleDB for an RDBMS. It’s not a relational store and does not support complex transactions or referential foreign key-based constraints as relational databases do.
SIMPLEDB REGIONS
Currently, AWS offers SimpleDB in four different regions: U.S. East, U.S. West, Europe, and Asia. You need to choose a region before you create a domain. Choose a region close to your users to reduce latency and improve performance. Two domains in different regions could have the same name but they are different and completely isolated from each other. They do not share any data between them.
The four available regions (with their physical locations) are as follows:
- sdb.amazonaws.com — U.S. East (Northern Virginia)
- sdb.us-west-1.amazonaws.com — U.S. West (Northern California)
- sdb.eu-west-1.amazonaws.com — Europe (Ireland)
- sdb.ap-southeast — Asia (Singapore)
Next, I illustrate a few ways to access and use SimpleDB.
Using the REST API
The easiest way to use SimpleDB is to use its REST API. Although SimpleDB’s REST API isn’t thoroughly RESTful from a purist’s standpoint, it provides a simple HTTP-based request-response model. Read Subbu Allamaraju’s post titled, “A RESTful version of Amazon SimpleDB” at www.subbu.org/weblogs/main/2007/12/a_restful_versi.html, to understand why the SimpleDB REST API isn’t truly RESTful. The easiest way to test this API is to run the operations using a command-line client. I will use a Perl-based command-line client in this subsection. The name of this command-line client is amazon-simpledb-cli. You can download a copy of this client from its project page, accessible online at http://code.google.com/p/amazon-simpledb-cli/. The amazon-simpledb-cli program depends on the Amazon-provided Perl modules for AWS. The Perl modules for AWS are available for download at http://aws.amazon.com/code/1136.
A SOAP API is also available for Amazon SimpleDB. I don’t cover the SOAP API in this book but you can learn more about the SOAP API in the online developer documentation at http://aws.amazon.com/documentation/simpledb/.
To install amazon-simpledb-cli, first make sure you have Perl installed on your machine. If you are a POSIX system user (which includes various flavors of Linux, BSD, and Mac OSX) you will likely have Perl preinstalled on your machine. If not, you need to get a copy of the Perl compiler and interpreter and get it up and running first. Instructions for installing Perl are beyond the scope of this book, but start at perl.org if you need help.
To get started, first make sure to get (or update) the following Perl modules:
- Getopt::Long
- Pod::Usage
- Digest::SHA1
- Digest::HMAC
- XML::Simple
- Bundle::LWP
- Crypt::SSLeay
You can install Getopt::Long like so:
perl -MCPAN -e 'install Getopt:Long'
You can install the other required Perl modules in the same manner. Just make sure to replace Getpot::Long with the name of the specific module. On some systems and for some modules you may need to run the commands as root. Once the required modules are installed and updated you can install the downloaded AWS Perl module as follows:
1. First, unzip the downloaded distribution as follows: unzip AmazonSimpleDB-*-perl-library.zip
2. Then get the Perl sitelib like so: sitelib=$(perl -MConfig -le 'print $Config{sitelib}')
3. Finally, copy the Amazon module to the sitelib as follows: sudo scp -r AmazonSimpleDB-*-perl-library/src/Amazon $sitelib
After the AWS Perl module is installed, get the amazon-simpledb-cli script like so:
sudo curl -Lo /usr/local/bin/simpledb http://simpledb-cli.notlong.com
and set the script permissions to allow everyone to execute the script as follows:
sudo chmod +x /usr/local/bin/simpledb
The program is now all ready to be used. Next, make sure to locate the AWS credentials — the AWS access key and the AWS access secret key, which are available from your account page — and have them handy to test the amazon-simpledb-cli script (installed as simpledb in the /usr/local/bin folder) you just installed.
To use the simpledb script you need to pass in the access key and the secret access key to the aws-access-key-id and aws-secret-access-key command-line arguments, respectively. Alternatively, you can set default access key and secret access key values using the $AWS_ACCESS_KEY_ID and $AWS_SECRET_ACCESS_KEY environment variables.
You can create a domain as follows:
simpledb create-domain domain1
You can add items to this domain as follows:
simpledb put domain1 item1 key1=valueA key2=value2 anotherKey=someValue
simpledb put domain1 item2 key1=valueB key2=value2 differentKey=aValue
Then you can edit item1 and add another attribute-value pair to it as follows:
simpledb put domain1 item1 yetAnotherKey=anotherValue
You can replace an attribute-value pair with a newer one as follows:
simpledb put-replace domain1 item1 key1=value1 newKey1=newValue1
You can delete an attribute or just the value of an attribute. Examples could be:
simpledb delete mydomain item1 anotherKey
simpledb delete mydomain item2 key2=value2
At the account level you can list all domains like so:
simpledb list-domains
You can list all item names in a domain like so:
simpledb select 'select itemName() from domain1'
Or choose to filter the list of items using a SQL-like syntax and list all matching items and its attributes as follows:
simpledb select 'select * from domain1 where key1="valueA"'
If you would like to list all attributes on a specific item, say item1, then you could use simpledb like so:
simpledb get domain1 item1
If you would like to restrict the output to only a specified set of attributes, you can pass in the attribute names to the last command as follows:
simpledb get mydomain item1 newKey1 key2
If you don’t need a domain any more and want to remove a domain and all its constituents, you can run a simpledb command like so:
simpledb delete-domain domain1
AUTHENTICATING REQUESTS
Every request to SimpleDB needs to be authenticated. A client passes in the following with the request:
- AWS access key
- An HMAC-SHA1 signature generated on the basis of the AWS secret access key and the request
- Timestamp
AWS accesses the secret access key on the basis of the passed-in AWS access key and then generates an HMAC-SHA1 signature using the secret access key and the passed-in request. If the HMAC-SHA1 signature passed in by the client matches the one generated by the server, the request is served with an appropriate response; otherwise an authentication error is thrown.
A passed-in timestamp acts as an additional level of security. Requests with timestamps older than 15 minutes are considered too stale to be served.
The command stated previously gives a flavor of what’s possible with amazon-simpledb-cli. It also hints to the simple data querying and management commands available in Amazon SimpleDB.
For the sake of completeness I will also illustrate a little about the underlying request and response when the REST API is used. A call like:
simpledb put domain1 item1 key1=valueA key2=value2 anotherKey=someValue
is translated to:
https://sdb.amazonaws.com/
?Action=PutAttributes
&DomainName=domain1
&ItemName=item1
&Attribute.1.Name=key1
&Attribute.1.Value=valueA
&Attribute.2.Name=key2
&Attribute.2.Value=value2
&Attribute.3.Name=anotherKey
&Attribute.3.Value=someValue
&AWSAccessKeyId=[valid access key id]
&SignatureVersion=2
&SignatureMethod=HmacSHA256
&Timestamp=2011-01-29T15%3A03%3A05-07%3A00
&Version=2009-04-15
&Signature=[valid signature]
The response to this is an XML document, whose format is as follows:
<PutAttributesResponse>
  <ResponseMetadata>
    <RequestId></RequestId>
    <BoxUsage></BoxUsage>
  </ResponseMetadata>
</PutAttributesResponse>
The Amazon SimpleDB XSD is available online at http://sdb.amazonaws.com/doc/2009-04-15/AmazonSimpleDB.xsd. Details of the response XML schema are defined in this document.
Having illustrated many of SimpleDB’s features, I will cover a few libraries to access SimpleDB from Java, Python, and Ruby.
Accessing SimpleDB Using Java
AWS provides a comprehensive and well-supported SDK for Java developers to write applications to interact with AWS. The AWS SDK for Java is available online at http://aws.amazon.com/sdkforjava/. To get started, read the introductory tutorial on the SDK at http://aws.amazon.com/articles/3586. The SDK supports a range of AWS including the SimpleDB. The download bundle includes a few samples to get you started. An elementary example that shows its usage is included in Listing 10-2.
LISTING 10-2: A simple Java program that interacts with SimpleDB using the AWS SDK
import java.util.ArrayList;
import java.util.List;
import com.amazonaws.AmazonClientException;
import com.amazonaws.AmazonServiceException;
import com.amazonaws.auth.PropertiesCredentials;
import com.amazonaws.services.simpledb.AmazonSimpleDB;
import com.amazonaws.services.simpledb.AmazonSimpleDBClient;
import com.amazonaws.services.simpledb.model.Attribute;
import com.amazonaws.services.simpledb.model.BatchPutAttributesRequest;
import com.amazonaws.services.simpledb.model.CreateDomainRequest;
import com.amazonaws.services.simpledb.model.Item;
import com.amazonaws.services.simpledb.model.ReplaceableAttribute;
import com.amazonaws.services.simpledb.model.ReplaceableItem;

public class SimpleDBExample {

    public static void main(String[] args) throws Exception {
        AmazonSimpleDB sdb = new AmazonSimpleDBClient(new PropertiesCredentials(
SimpleDBExample.class.getResourceAsStream("aws_credentials.properties")));

        try {
            String aDomain = "domain1";
            sdb.createDomain(new CreateDomainRequest(aDomain));

            // Put data into a domain
            sdb.batchPutAttributes(new BatchPutAttributesRequest(myDomain,
createSampleData()));
        } catch (AmazonServiceException ase) {
            System.out.println("Error Message:    " + ase.getMessage());
            System.out.println("HTTP Status Code: " + ase.getStatusCode());
            System.out.println("AWS Error Code:   " + ase.getErrorCode());
            System.out.println("Error Type:       " + ase.getErrorType());
            System.out.println("Request ID:       " + ase.getRequestId());
        } catch (AmazonClientException ace) {
            System.out.println("Error Message: " + ace.getMessage());
        }
    }

    private static List<ReplaceableItem> createSampleData() {
        List<ReplaceableItem> myData = new ArrayList<ReplaceableItem>();

        sampleData.add(new ReplaceableItem("item1").withAttributes(
                new ReplaceableAttribute("key1", "valueA", true),
                new ReplaceableAttribute("key2", "value2", true),
                new ReplaceableAttribute("anotherKey", "someValue", true)
                );

        sampleData.add(new ReplaceableItem("item2").withAttributes(
                new ReplaceableAttribute("key1", "valueB", true),
                new ReplaceableAttribute("key2", "value2", true),
                new ReplaceableAttribute("differentKey", "aValue", true)
                );

        return myData;
    }
}
SimpleDBExample.java
The example in Listing 11-2 assumes that you specify the AWS credentials in a file named aws_credentials.properties. The contents of aws_credentials.properties are as follows:
accessKey =
secretKey =
The example so far demonstrates the usage of the API from a standalone Java program. If the program were more complex than a simple standalone program, you are likely to leverage standard Java idioms including the Java Persistence API (JPA). A few open-source options exist for using JPA to persist to SimpleDB. SimpleJPA is one such project. SimpleJPA covers a subset of JPA, relevant in the context of SimpleDB.
Using SimpleDB with Ruby and Python
Rails is the choice web development in the Ruby community. If you would like to use SimpleDB with your Rails application, you wouldn’t be able to simply plug SimpleDB in place of your relational database like MySQL without any external help. However, SimpleRecord can solve much of your problem. SimpleRecord implemented via an open-source project by the same name is available at https://github.com/appoxy/simple_record/. SimpleRecord is an ActiveRecord replacement for Rails applications that would like to use Amazon SimpleDB as their persistent store.
Using SimpleRecord is easy. Installing SimpleRecord is a single-line effort:
gem install simple_record
The assumption is that you have Ruby, RubyGems, and Rails already installed and set up. The simplest example could be as follows:
require 'simple_record'
 class MyModel < SimpleRecord::Base
    has_strings :key1
    has_ints :key2
 end
As always is the case with AWS, configure the AWS credentials so that you are ready to persist your model to SimpleDB. You can configure AWS credentials like so:
AWS_ACCESS_KEY_ID='<aws_access_key_id>'
 AWS_SECRET_ACCESS_KEY='<aws_secret_access_key>'
 SimpleRecord.establish_connection(AWS_ACCESS_KEY_ID,AWS_SECRET_ACCESS_KEY)
Finally, you could store a model instance as follows:
m_instance = MyModel.new
 m_instance.key1 = "valueA"
 m_instance.key2 = value1
 m_instance.save
You can retrieve model instances by finding by id as follows:
m_instance_2 = MyModel.find(id)
Alternatively, you can find for all instances that match a filter like so:
all_instances = MyModel?.find(:all, ["key1=?", "valueA"],
:order=>"key2", :limit=>10)
That should give you a hint of how you could leverage SimpleDB with your Rails application. Other alternative libraries are available, including one from Amazon that provides a Ruby language interface to connect to Amazon’s services. You can explore the Ruby library for SimpleDB by downloading it from http://aws.amazon.com/code/Amazon-SimpleDB/3324.
Next, and last of all, I cover AWS SimpleDB interaction from Python. Boto, available online at http://code.google.com/p/boto/, is the most popular choice for connecting to SimpleDB from Python. To get started, download the latest source of boto from its Github mirror as follows:
git clone https://github.com/boto/boto.git
Then change into the cloned repository directory and run python install setup.py to install boto. Once installed, fire up a Python interactive session and you can easily create a new domain and add items to it as follows:
import boto
 sdb = boto.connect_sdb('<your aws access key>', '<your aws secret key'>)
 domain = sdb.create_domain('domain2')
 item = domain.new_item('item1')
 item['key1'] = 'value1'
 item['key2'] = 'value2'
 item.save()
Beyond this, the SimpleDB commands and ways of interactions remain consistent with what you have seen in the other cases.
This chapter covered the two popular and scalable database services in the cloud, illustrating their behavior characteristics and peculiarities. It also showed how libraries, specifications, and frameworks in various languages can be used in conjunction with the NoSQL stores.
Google’s app engine data store and Amazon SimpleDB are revolutionizing the database landscape, making everyone rethink their current efforts around managing database complexity in their applications. Not only is it tempting for many to achieve scalable architectures on the shoulders of the giants, but it is also practical and prudent from a cost and flexibility standpoint.
Though Google’s and Amazon’s offerings are the most well known and robust in their category, multiple options for database in the cloud are beginning to now emerge. For example, a host of cloud-based elastic database hosts for CouchDB and MongoDB now exist. The makers of CouchDB have launched one, named CouchOne (www.couchone.com). Similarly, MongoHQ is a scalable MongoDB host. Document databases are not the only ones with hosted scalable options. Eventually consistent key/value database creator Basho is offering ready-to-use Riak 3 and 5 node clusters in association with Joyent. We are likely to see more alternatives emerge in future.
As cloud computing continues to grow in adoption, we are likely to see a lot of database services in the cloud. Many, if not most, of these databases in the cloud will leverage NoSQL products. This is likely to provide many developers the opportunity to use NoSQL and to start thinking of a database as a persistence service.