
1
Camcorder Basics: Getting Started
The Vixia HF G10 is Canon’s top-of-the-line consumer high-definition camcorder. Canon also manufactures and markets an almost identical model, the XA10, as part of its professional line. These two camcorders are packed with more features than any other camcorder their size or in their price range. Canon describes the Vixia HF G10 as providing “professional capabilities” at a consumer price, and the XA10 as a “fully featured, ultra-compact pro video camera that shares nearly all the functionality” of Canon’s professional XF100 camcorder, “but in a smaller, run-and-gun form factor.” Are the G10 and XA10 truly professional? What are their advantages and limitations? This text is a field guide to producing professional and semi-professional results with these camcorders and a thorough guide to their features, operation, and accessories. It’s also an introduction to their use in documentary, fiction, corporate, event, alternative, and personal media making, from amateur to professional.
Features
The Vixia HF G10 and XA10 weigh only 0.78 kilograms (1.71 pounds), not including battery, memory card, lens hood, and accessories. Considering their diminutive size, they are filled with an impressive array of professional features, including the following:
![]() Manual control overrides for every focus and exposure parameter
Manual control overrides for every focus and exposure parameter
![]() Manual audio controls
Manual audio controls
![]() Audio level monitor
Audio level monitor
![]() Edge sharpness monitor
Edge sharpness monitor
![]() Waveform monitor
Waveform monitor
![]() Two zebra pattern settings
Two zebra pattern settings
![]() Multiple frame rates, including 24p
Multiple frame rates, including 24p
![]() Custom settings
Custom settings
![]() Cine modes
Cine modes
![]() Color bars
Color bars
![]() Audio tone
Audio tone
![]() A 10× high-definition zoom lens with an eight-blade iris instead of the usual six blades in this price range
A 10× high-definition zoom lens with an eight-blade iris instead of the usual six blades in this price range
![]() 32 gigabytes (GB) or 64GB of internal memory plus two slots for removable memory, capable of simultaneously making a backup recording for file protection or sequentially recording for a total of 15 to 72 hours without reloading
32 gigabytes (GB) or 64GB of internal memory plus two slots for removable memory, capable of simultaneously making a backup recording for file protection or sequentially recording for a total of 15 to 72 hours without reloading
![]() The ability to record in 1080p true HD video
The ability to record in 1080p true HD video
Canon’s third-generation high-definition image processor provides improved dynamic range and further reduces visual noise in low-light situations. The HF G10 and XA10 record AVCHD high-definition video up to a data rate of 24 megabits per second (Mbps)—the limit for AVCHD format—in what is called 4:2:0 color space (discussed later).
Canon designed a daring ![]() -inch CMOS Pro photo sensor for the G10/ XA10 with 1,920×1,080 native pixels—offering exactly the number of pixels of the high-definition television image instead of making a much higher number of megapixels the selling point to enhance still photo capabilities, like most manufacturers. This ensures that there are no video artifacts from downscaling a much larger number of much smaller pixels. With this design, the area of each pixel can be maximized, which dramatically improves low-light responsiveness. The CMOS Pro photo sensor also features a high-speed readout to minimize skew of fast-moving images, which can appear to bend like jelly (an artifact of many CMOS sensors, including video footage from DSLR still cameras).
-inch CMOS Pro photo sensor for the G10/ XA10 with 1,920×1,080 native pixels—offering exactly the number of pixels of the high-definition television image instead of making a much higher number of megapixels the selling point to enhance still photo capabilities, like most manufacturers. This ensures that there are no video artifacts from downscaling a much larger number of much smaller pixels. With this design, the area of each pixel can be maximized, which dramatically improves low-light responsiveness. The CMOS Pro photo sensor also features a high-speed readout to minimize skew of fast-moving images, which can appear to bend like jelly (an artifact of many CMOS sensors, including video footage from DSLR still cameras).
What the HF G10 and XA10 lack professionally includes the following:
![]() Interchangeable lenses
Interchangeable lenses
![]() 4:2:2 or 4:4:4 color space
4:2:2 or 4:4:4 color space
![]() 50Mbps, 100Mbps, or higher data rates
50Mbps, 100Mbps, or higher data rates
![]() The ability to record uncompressed images, such as in RAW format, Apple ProRes, or Avid DNX of high-end professional camcorders
The ability to record uncompressed images, such as in RAW format, Apple ProRes, or Avid DNX of high-end professional camcorders
This is an unfair comparison, however, to a much higher price range where just the lenses can cost many times more than an entire G10 or XA10 camcorder. People have made feature films with much less than what these two camcorders have to offer.
Differences Between the HF G10 and XA10
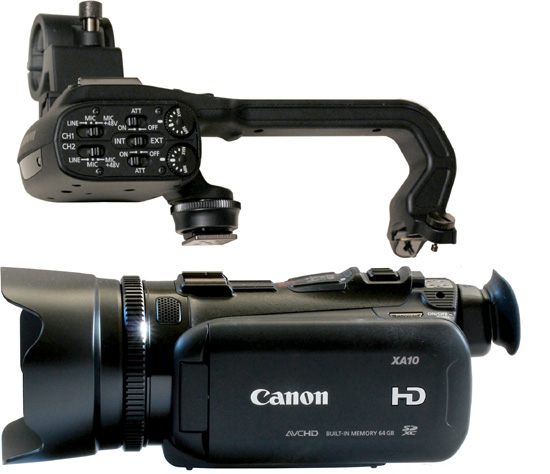
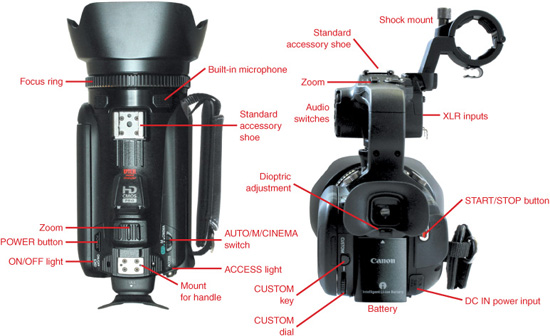
The XA10 costs about $500 more than the HF G10. The XA10 has 64GB of built-in memory, which can record nearly six hours of high-definition video at the highest quality setting, whereas the G10 has 32GB of built-in memory. The biggest difference is that the XA10 has a removable handle unit that slides onto the camcorder’s front and rear accessory sockets and is secured into place with two screws in the rear and a tightening ring in the front. Aside from providing more options for ergonomically carrying and holding the camcorder, the attachable handle contains the following (see Figure 1.1):
![]() XLR microphone or line inputs for professional audio recording
XLR microphone or line inputs for professional audio recording
![]() 48 volts of phantom power for professional microphones
48 volts of phantom power for professional microphones
![]() A full complement of manual audio controls
A full complement of manual audio controls
![]() An audio attenuator
An audio attenuator
![]() A microphone shock mount
A microphone shock mount
![]() A standard mounting shoe for accessories
A standard mounting shoe for accessories
![]() An additional record button with a lock lever
An additional record button with a lock lever
![]() Additional zoom control
Additional zoom control
![]() A tally light
A tally light
![]() An infrared light
An infrared light
This combination of features is rarely found in a package this small. Infrared recording is not present on the HF G10, nor does the G10 have a second accessory shoe or screw holes to accommodate the auxiliary handle and its professional sound inputs. Right now, the Canon XA10 is the best full featured palm-sized camcorder in its price class.
Figure 1.1 The accessory handle for the Canon XA10.
The XA10 is a good transition camcorder for individuals moving up to professional-quality and control from previous experience with consumer models. The XA10 is an ideal camcorder for college or university media programs because it is capable of operating in full AUTO mode like a consumer model, but offers students the opportunity to learn professional techniques with its XLR-balanced line sound inputs, phantom power, waveform monitor, multiple frame rates, and manual focus, exposure, and color-balance controls. The XA10 may seem expensive to some, but considering all its features, it is a great field camcorder in its price class.
The G10 would be the camcorder of choice for those on a much tighter budget. It will do almost everything the XA10 will do except shoot infrared and record on balanced line audio inputs from professional microphones. It also lacks the ergonomic convenience of the handle and its built-in shock mount. There are some workarounds with respect to sound, including semi-pro microphones with mini-plugs, XLR to mini-plug adapter cables or converter boxes, and double system sound (using a separate audio recorder). These are discussed in Chapter 7, “Improving Sound.”
Single Chip Versus Three Chips
The HF G10 and XA10 are based on Canon’s newly designed single ![]() -inch CMOS Pro light-sensitive chip, which uses 1,920×1,080 photo sensors. Single-chip camcorders are generally less expensive and much more compact than three-chip models.
-inch CMOS Pro light-sensitive chip, which uses 1,920×1,080 photo sensors. Single-chip camcorders are generally less expensive and much more compact than three-chip models.
Three-chip camcorders divide the light path with a prism onto three full-screen light-sensitive mega-pixel chips that are filtered to receive only red, green, or blue light. Combined information from the three sensors provides an accurate measure of the red, green, and blue (RGB) levels for every pixel making up the picture image. A single-chip camcorder, in contrast, employs a pattern of filtered and unfiltered pixels across its single surface, where two pixels out of every four receive white light, one of four is filtered to receive only red light, and the remaining one receives only blue. Through a complex algorithm that compares adjacent pixels, RGB values are calculated for every pixel making up the picture image. For example, the brightness value for an unfiltered pixel minus the adjacent values for blue and red will approximate its green content.
Obviously, a calculated approximation for every pixel cannot be as accurate as direct RGB readings derived from three perfectly aligned chips, but single-chip designs and their algorithms have improved so much in recent years that they have definitely entered the professional world. For example, the Red One camera, which costs about $17,500 for the body and comparable or larger amounts for accessories and lenses, uses a single 4.5K chip (which has the resolution of 35mm film) for shooting dramatic motion pictures that are shown in movie theaters. Features like District 9, Pirates of the Caribbean: On Stranger Tides, and The Social Network were shot on the single-chip Red One. DSLRs (digital still cameras with the ability to shoot professional-quality video) like the Canon 5D MKII (and Mark III), 7D, and T3i all have single chips. DSLRs have been used to shoot independent feature films including Grand Prize winners at the Sundance Film Festival (Crazy Love and To Hell and Back, for example) and professional television like the season six closing episode of House,which was shot on the Canon 5D MKII. A single chip is definitely capable of professional results. There will be further discussion of the HF G10 and XA10 camcorders in comparison to DSLRs and the new generation of camcorders with 35mm sized photo sensors in Chapter 16, “Integrating with Larger Camcorders.”
4:2:0 Color Space
The HF G10 and XA10 have the same single ![]() -inch CMOS Pro chip, the same high-definition lens, and much of the functionality of Canon’s professional XF100HD and XF105HD camcorders selling for $3,000 and $4,000—but in a much smaller package and at less than half the price. The HF G10 and XA10 are much more compact because the numerous physical switch controls found on the XF100 and XF105 have been moved to the touchscreen. Another difference is that the XF100 and XF105 can record 4:2:2 color space, whereas the G10 and XA10 record 4:2:0. On a practical level, most viewers will not be able to see the difference between 4:2:0 and 4:2:2 except in circumstances like special-effects chroma keying, which could show fringing and edge artifacts in 4:2:0.
-inch CMOS Pro chip, the same high-definition lens, and much of the functionality of Canon’s professional XF100HD and XF105HD camcorders selling for $3,000 and $4,000—but in a much smaller package and at less than half the price. The HF G10 and XA10 are much more compact because the numerous physical switch controls found on the XF100 and XF105 have been moved to the touchscreen. Another difference is that the XF100 and XF105 can record 4:2:2 color space, whereas the G10 and XA10 record 4:2:0. On a practical level, most viewers will not be able to see the difference between 4:2:0 and 4:2:2 except in circumstances like special-effects chroma keying, which could show fringing and edge artifacts in 4:2:0.
4:2:0 and 4:2:2 have identical black-and-white resolution, and fortunately, most of the picture information that the human eye can see is in the black-and-white signal. The human retina contains 120 million rod-shaped photoreceptors that are sensitive to black-and-white values, and only six to seven million cone-shaped cells that read red, green, or blue and need up to 1,000 times more light. Consequently, video files are typically designed with much more black-and-white information to mimic the reception of the human eye and ultimately save signal space by discarding color information that can barely be perceived. The black-and-white information is often encoded separately from the color signal, which might occupy a second track alternating between red and blue (4:2:0) or relegated to two additional tracks, as in 4:2:2 and 4:1:1 encoding. (There does not have to be an additional track for green because it can be extrapolated by subtracting red and blue from the black-and-white signal.)
These sets of triple numbers describe what is called “color space.” They represent the relative sampling ratio of black-and-white (the first number) to the color tracks (the second and third numbers). This concept is explained further in the glossary. 4:2:2 color sampling has double the color resolution of 4:2:0, providing finer color transitions and microscopically cleaner edges. This can be important in processes like chroma keying and advanced compositing effects, and in printing video onto 35mm film. Otherwise, unless closely compared side by side, 4:2:0 images can be hard to distinguish from 4:2:2 images.
AVCHD
The 4:2:0 signal on the G10/XA10 is encoded in a format called “Advanced Video Coding High Definition,” or “AVCHD.” Instead of recording onto videotape, AVCHD is a tapeless, file-based format that allows a great deal of digital information to be stored in a very small space. It does this by highly compressing the data and making the playback hardware and software work harder in decoding the image. Because it is entirely solid state, electro-mechanical errors and other limitations of tape are no longer part of the recording process. Solid-state camcorders can be more compact, are better sealed from dirt and moisture, have longer battery life, run more quietly with no motor noise or head wear, and record cleaner, more stable images. They are also less vulnerable to air pressure, humidity, vibration, shock, and mechanical damage. Not having to record at a specific physical speed like videotape, AVCHD allows for multiple frame rates, multiple choices of image quality (through a range of compression and data rates), and a choice of progressive or interlaced scanning. It catalogs its data into folders and files on a memory chip the size of a postage stamp. The format automatically numbers your shots into a series of compressed MTS files; creates directories, file levels, and thumbnail images; and records date and time information as each shot is recorded. Working with these files is discussed in Chapter 18, “Managing and Storing Video Files.”
The downside of AVCHD is that you have many more decisions to make before shooting regarding frame rate, interlace or progressive scanning, and compression quality (measured in megabits per second), even when recording in full AUTO mode. AVCHD also has post-production options and issues to resolve as you expand these highly compressed files for playback, editing, and media storage. Larger hard drives, fast video cards, updated software, and faster and more recent computers are needed to work with AVCHD at the higher quality levels—up to four times the processing power compared to tape.
Prepping the Camcorder
Before you start using the camcorder, there are a few steps you’ll need to take. The battery needs to be charged or the power adapter needs to be attached. You also need to enter the current date and time into camcorder. To record, you need to select a recording mode (AUTO, M, or CINEMA), a quality level (compression), and a memory location, which may also need initializing. M (for manual) and CINEMA modes will involve pre-selecting additional parameters.
When you turn the power on, the ON/OFF light shines a continuous green and the ACCESS light (to the right of the viewfinder, as shown in Figure 1.2, along with several other key components of the camcorder) momentarily blinks red as the camcorder communicates with the memory chip. The access light will also blink as you record and will continue to blink for a second or two after you stop recording. While the access indicator is blinking, do not turn off power, open the memory slot cover, or change the camcorder’s operating mode. When you turn the power off, the green ON/OFF light lingers briefly and the red access light blinks while the camcorder updates data. Prematurely plugging or unplugging memory or power before these indicator lights turn dark can corrupt files, just like shutting down a computer or hard drive.
To charge the battery while it is inside the camcorder, connect the external power supply to the DC IN at the lower-right rear of the camcorder. The camcorder’s power and the ON/OFF light should be dark when connecting or disconnecting the power supply. Within a few seconds, the ON/OFF light will blink red, indicating charging, and will go out entirely when the battery has a full charge.
The camcorder must be turned off and the ON/OFF light must be entirely dark when a memory chip is inserted or removed, a battery is inserted or removed, or the power adapter is connected or disconnected.
Figure 1.2 Top and rear view of the Canon XA10. The Vixia G10 is identical except for the accessory shoe and the handle.
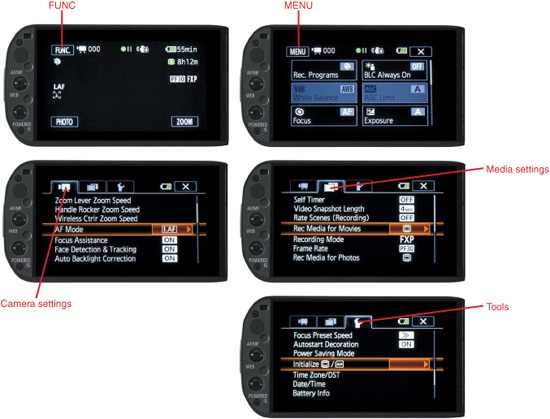
The G10/XA10 has five layers of menus. (See Figure 1.3.) If the readouts do not appear on the LCD screen, press the DISP. (display) button on the left side of the camcorder (look ahead to Figure 1.4). The top layer is the Function display (FUNC), which indicates the status of current functions. Pressing FUNC opens the next layer; the word “MENU” appears in the upper-left corner, where the word FUNC used to be. This layer offers a number of program controls and settings when in record mode and a selection of image icons representing your recorded files when in Playback mode. Pressing MENU opens overlapping tabs for the remaining three displays, giving you a choice of a Camera/Play icon, which reveals record/play options; a Film Clip icon, where you select items like recording chip, quality mode, and frame rate; and a Tool icon, which offers additional controls and adjustments, including initializing the recording chip. See Appendix C, “Menu Map,” available at www.courseptr.com/ downloads, for an outline of the menu displays.
The default language of the menu and its layers is English, but there is a choice of 26 other languages. To change the language, choose FUNC > MENU > Tool icon, scroll down to Language, and select your language of choice. When you’re finished, press X to exit the menu.
Setting the date and time is necessary because the camcorder’s system logs each recorded segment of video using date/time information. If the camera’s clock has not been set (or has lost its setting), the Date/Time menu will automatically appear when you power up the camcorder. You can set the year, month, date, hour, and minutes by touching their fields and the up/down icons. You have a choice of whether each file is logged as Y/M/D (year/month/day), M/D/Y, or D/M/Y, and whether time is based on 24 hours or 12 hours a.m./p.m. You can later correct or reset the clock time as well as set a time zone for home and travel by pressing FUNC > MENU > Tool icon > Date/Time. A small internal lithium battery runs the clock and holds your menu settings for about three months without recharging. It is recharged as you use your camcorder. If the camcorder is idle for long periods of time, you will need to connect the power adapter to the camcorder once every two to three months overnight so as not to lose your settings.
Figure 1.3 Five levels of menu screens: the initial FUNC display, MENU (program modes), and Camera, Film Clip (media), and Tool screens.
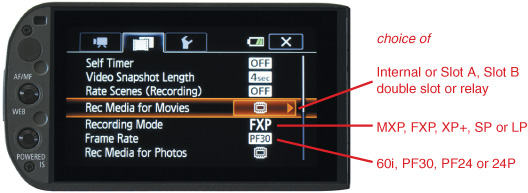
Initially, the camcorder will automatically record to its internal memory unless you specifically set it to record to one of the removable memory slots. To select a memory slot, turn the AUTO/M/CINEMA mode switch (on the upper-right side of the camcorder; refer to Figure 1.2) to M or CINEMA; then tap FUNC > MENU > Film Clip icon > Rec Media for Movies. This will give you a choice of Internal, Memory Slot A, or Memory Slot B, as well as choices for simultaneous backup recording or relay recording as each chip gets full to maximize your total recording time. The display will provide the approximate available recording duration for the selected memory card and the current quality mode.
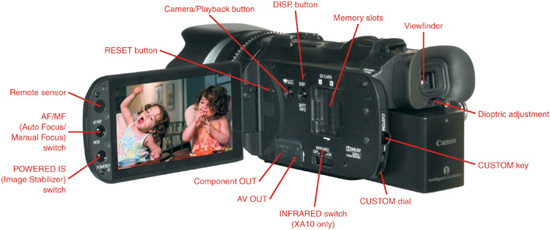
The camcorder can operate at lower quality levels with memory cards as slow as Class 4 SDHC, but 32GB Class 10 Secure Digital High Capacity (SDHC) or the newer 64GB Class 10 SDXC “extended” capacity memory cards are recommended to record at the two highest quality levels. This considerably accelerates transfer times and minimizes reading/writing errors, stalling, and lost frames. Note that to read SDXC extended-capacity cards, Mac computers need system 10.6.4 Snow Leopard or later, and PC computers need Windows 7, Windows XP with service pack 3 plus KB955704 update, or Windows Vista with service pack 1 or later. An incompatible computer will signal an SDXC card as defective or unreadable and will prompt you to initialize it. Initializing it would be a mistake, however, as it would erase any files you had recorded. Also, if the computer was incompatible with SDXC to begin with, it would not properly initialize the card anyway. Newer computers will not have this problem, but all memory cards should be initialized in the camcorder. A 64GB Class 10 SDXC with a speed of 45Mbps is a good choice if your computer system is compatible; otherwise, use 32GB Class 10 SDHC cards with a speed of 20Mbps or higher made by major manufacturers like SanDisk, Toshiba, and Panasonic. To insert external memory, turn the power off and wait until all indicator lights are dark. Slide back the memory slot cover and insert the card with its label facing the front of the camcorder and its indentation upward and toward the slot. Push the memory card in until it clicks. Figure 1.4 shows the memory slots (and several other features). To remove a memory card after recording, the power must be turned off, and all indicator lights dark. Press the card in once and it should release for removal. See Chapter 18 for details on transferring, storing, and archiving your video files.
The memory card absolutely must face the right direction (label forward, indentation upward). Electronic components are packed so tightly in the G10/XA10 that forcing a memory card the wrong way can crack a circuit board and cause extensive internal damage.
Figure 1.4 Controls on the left side.
Initializing
Your camera will ask you to “initialize” a newly installed memory card. Alternatively, you may choose to erase a previously recorded card to record new material. The camcorder’s built-in memory comes pre-initialized. So, you will not go through this process for internal memory until after you have recorded on it, copied and stored any files you want to keep, and are ready to erase and re-record. To initialize, start by choosing FUNC > MENU > Film Clip icon > Rec Media for Movies > Circuit Board icon (for internal memory) or Card icon (for external memory) > slot A or slot B > Initialize. (Look ahead to Figure 1.5.)
This first Initialize command simply clears the file allocation table from the memory and allows for recording over existing files. Previous video files will appear to be gone because they are no longer catalogued and the camcorder can now record over existing files, erasing them file-by-file in the process (just like recording over a previously recorded videotape). Under certain conditions, earlier video files can later be recovered if they have not been recorded over. After the “initial” initializing step, you have the option to Complete Initialization, which will physically erase all the data from the card and thus minimize potential problems by providing a completely clean space for recording. After the second stage of initialization, all previous files that have not been stored elsewhere will be lost. Touch X when you want to exit the menu.
Selecting the Recording Quality
The Recording Mode setting, which you access by choosing FUNC > MENU > Film Clip icon > Recording Mode (with the AUTO/M/CINEMA mode switch set to M or CINEMA), determines the data rate and compression, and consequently the quality of your image. (Look ahead to Figure 1.5.) Select MXP for highest quality. Alternatively, to operate with 40 percent more recording capacity, select FXP for good quality. Both of these modes record a full 1,920×1,080 image. 64GB of memory will provide nearly six hours of recording time at the highest data rate of 24Mbps. So, the built-in storage in the XA10 plus two 64GB SHXC cards in the removable memory slots can accommodate 18 hours of high-definition footage at 24Mbps, the highest quality level, without reloading. Table 1.1 outlines various AVCHD quality modes.
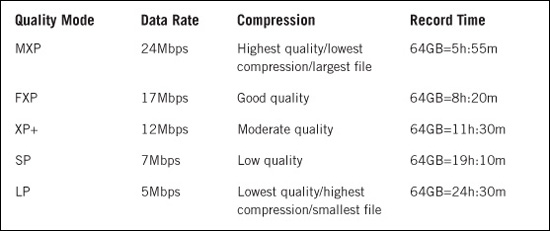
FXP at 17Mbps and all slower rates can be authored without re-encoding onto standard DVD discs for direct playback as a special “AVCHD disc” that some, but not all, Blu-ray players and media consoles can read. Compatible Blu-ray players will usually have an AVCHD logo. MXP exceeds the data rate standard for AVCHD playable discs, but MXP can be recorded as a data file (as opposed to a playable disc) for storage on 25GB or 50GB Blu-ray discs as well as single-layered 4.7GB or double-layered 9GB standard DVDs. These files can then be played or edited when transferred from the disc to a high-speed hard drive and appropriate computer.
MXP is the AVCHD acquisition format for maintaining the highest quality. Unless you intend to exhibit only on AVCHD-playable discs recorded on standard DVDs, MXP is the mode of choice for all high-quality projects. Some post-production programs edit AVCHD files directly, while others expand each file into an intermediate format and transcode again on export to yet another kind of file or exhibition format. Starting with MXP will ensure the highest quality. The transcoded output of an editing or authoring program can be authored to an actual Blu-ray movie disc playable on any Blu-ray deck (as opposed to an AVCHD disc, which is a standard DVD containing an AVCHD file playable on certain Blu-ray decks).
The middle- and lowest-quality modes save file space by even greater compression and by recording the video’s 1,920 pixel width across only 1,440 pixels, which are later expanded in playback. This results in a significant loss of horizontal resolution. The lowest modes might be used for minor video postings on the Internet or in situations where image quality does not matter. It’s always best to record in the highest quality mode and then down-convert the image for Web compression in postproduction. Vimeo and YouTube both accept HD video for playback over the Web. YouTube accepts HD video up to 4K in resolution.
Selecting Frame Rate
On the G10 and XA10, the default frame rate in full AUTO mode is 60i and in Cinema mode is PF24. In the M mode, the labeled choices of frame rate are 60i, PF30, PF24, and 24P. To set the frame rate, choose FUNC > MENU > Film Clip icon > Frame Rate (with the AUTO/M/ CINEMA mode switch set to M). All these rates are nominally referred to in whole numbers but are actually 0.1 percent slower than labeled. This is due to the fact that when the U.S. set standards for color television in 1953, it needed to accommodate an additional color reference signal that had to fit within the same bandwidth that formerly carried a full black-and-white signal. This was accomplished by slowing the frame rate from 30 frames per second (fps) to 29.97fps, and because each frame is composed of two interlaced fields, the field rate becomes 59.94fps. Now that we are in the digital age, it is possible to record, broadcast, and view a whole range of frame rates, including a true 24, 30, or 60—or 0.1 percent slower as well as a true 25 (the PAL standard). Camcorders made for use in the United States typically run 0.1 percent slower than labeled in order to be the most compatible with America’s pre-existing formats, editing software, and broadcast standards.
Figure 1.5 Selecting memory, recording mode (quality), and frame rate.
So the Vixia’s 60i setting is really 59.94 “fields” per second that are interlaced together to present 29.97 frames per second. This has been the standard for analog television in the United States since 1953. In interlaced video, each frame is composed of two alternating interlaced fields that contain only the odd or the even scanning lines. An interlaced image creates smoother motion that is less likely to strobe, but at the expense of the greater resolution we are able to perceive when an image is scanned progressively as on a computer screen. 60i is a holdover from analog television, yet is one of the main standards for ATSC digital television introduced in 1996, and is still prominent today. It is the rate most compatible with old analog TV sets and with mastering on actual tape. Consequently, many cable and broadcast stations use 60i more than any other frame or field rate. Modern LCD digital TV sets actually take the 60i (59.94i) signal and de-interlace it to 30p (29.97p) for sharper viewing, although some sets do this better than others.
Canon’s PF30 setting is actually 29.97 fps scanned progressively for maximum sharpness but then divided into separate fields and recorded at the 59.96i standard for compatibility with tape, editing software, and the widest range of TV sets. If it had actually been recorded as a progressive 30 (29.97fps) file, it would have been called “30P” instead of “PF30.” This is a very good-looking setting that produces a live camera feeling to the recorded image. It is useful for most purposes, including broadcast and DVD on digital televisions, and particularly the Internet, where video files are often down-converted to 15 fps to be manageable on most servers and computers. With progressive scanning, there is a danger that movement at certain speeds will have a noticeable strobe effect. Professionals keep this under control by avoiding situations that would produce a pronounced strobe, such as a moderately fast pan across a black iron fence in front of a light background. Many videographers are willing to accept minor strobing in return for greater sharpness and the absence of interlacing artifacts.
The PF24 setting is actually 23.976 fps scanned progressively for maximum sharpness but then recorded at 59.96i through a process called 3:2 pulldown (or 2:3 pull-down). This process creates extra interpolated frames by selectively combining interlace fields derived from the original progressively scanned images. PF24 produces a motion-picture film look or more precisely a film-to-video look recorded in a format ready to use with the widest range of editing software, monitors, TV sets, and tape. Through a lifetime of cultural conditioning, viewers psychologically associate this 24-frame look with Hollywood films, international films, and high production values. Contrast and color settings under Cinema mode may further enhance the film look. If you wanted to record at PF24 but edit and exhibit in a true 24p, some editing software can accomplish reverse 3:2 to de-interlace and convert the files back to 24 progressive frames. This is unnecessary in the M mode, however, because the G10 and XA10 offer a true 24p.
The obvious question is, what is the difference between PF24 and 24p? The 24p setting is actually 23.976 progressively scanned frames per second recorded as such (not transcoded to 60i). Choose this setting if you want the film look and your editing software and exhibition situations can handle true 24p (23.976p) files. The advantage of a true 24p (23.976p) is that the files are ![]() the size of PF24, PF30, or 60i formats, and they have undergone no extra processing to interpolate and render new frames or interlace fields. It is possible to shoot, edit, master, and release a project on standard DVD or Blu-ray entirely in 24p. A project in 24p will play on modern LCD television sets, computer monitors, and multi-sync video projectors. If a version is needed for broadcast, tape, or compatibility with older TV sets, then Final Cut, Avid, or Adobe Premiere editing software can convert and re-render the edited 24p project as a 60i HD or standard definition master file. However, the Canon camcorder itself cannot convert 24p to standard definition as it can with the 60i, PF30, and PF24 speeds. 24p is a favorite among film students who have the appropriate editing software and plan to exhibit on DVD, Blu-Ray, or a computer screen.
the size of PF24, PF30, or 60i formats, and they have undergone no extra processing to interpolate and render new frames or interlace fields. It is possible to shoot, edit, master, and release a project on standard DVD or Blu-ray entirely in 24p. A project in 24p will play on modern LCD television sets, computer monitors, and multi-sync video projectors. If a version is needed for broadcast, tape, or compatibility with older TV sets, then Final Cut, Avid, or Adobe Premiere editing software can convert and re-render the edited 24p project as a 60i HD or standard definition master file. However, the Canon camcorder itself cannot convert 24p to standard definition as it can with the 60i, PF30, and PF24 speeds. 24p is a favorite among film students who have the appropriate editing software and plan to exhibit on DVD, Blu-Ray, or a computer screen.
Shooting 24 images per second instead of 30 or 60 may produce slightly more motion blur if the shutter speed is slowed to ![]() instead of
instead of ![]() . Video and film can shoot at slower shutter speeds than still photography and maintain a relatively sharp appearance because the viewer’s eye can perceive detail and sharpness in a sequence of slightly blurred images in motion through a process of perception called “temporal resolution.” Under certain conditions, blur helps blend motion from frame to frame, softening some of the strobing of progressive scanning, but in general you will see more strobing at 24 than with 30 or 60, particularly with subjects of high-contrast.
. Video and film can shoot at slower shutter speeds than still photography and maintain a relatively sharp appearance because the viewer’s eye can perceive detail and sharpness in a sequence of slightly blurred images in motion through a process of perception called “temporal resolution.” Under certain conditions, blur helps blend motion from frame to frame, softening some of the strobing of progressive scanning, but in general you will see more strobing at 24 than with 30 or 60, particularly with subjects of high-contrast.
Depending on the input preferences on the editing software, Canon’s 60i, PF30, and PF24 speeds can presumably be edited together because their files are actually recorded at 60i (59.94i). However, they each look slightly different even though the editing program sees them all as 60i. So in most cases, you want to set your frame rate to be consistent within an entire project.
The Lens Shade
One of the important tasks you need to do before shooting is install the tulip-shaped lens shade on the camcorder. The shade serves several functions. First, the lens shade allows for cleaner, sharper images because it prevents light coming from just beyond the boundary of your frame from hitting the front elements and bouncing inside the lens barrel as unfocused light, which ultimately affects exposure, degrades your image, washes out contrast and color saturation, and potentially produces glare and lens flare. You get the maximum optical quality of your lens when the shade is in place. Second, most of the lens of the G10/XA10 is buried in the body of the camcorder; only a shallow amount of it protrudes from the front. Without the shade, it is very easy to get your fingers in the shot as you hold the camcorder, particularly as you reach beyond the viewfinder to turn the focus ring.
The tulip contour is a sophisticated design that blocks the maximum amount of extraneous light with the minimum profile, without the shade itself darkening or vignetting the edges of the picture. The tulip lens shade perfectly matches the light-gathering area of the widest angle of the lens and offers reasonable protection for most of the zoom range.
To install the shade, first remove the lens cap. Then align the lip pattern of the shade onto the front of the lens at a 45° rotation and turn clockwise to lock it in place. When the shade is installed, the lens cap can fit on or off the lens, so re-capping the lens is not an issue. The shade not only keeps your fingers from getting in the shot, it prevents you from accidentally touching the front element of the lens when the cap is off. If your camera case will accommodate the added length, the lens shade should be permanently left on the camcorder.
Shooting in AUTO Mode
With the lens shade in place, with a charged battery, and with memory location and recording mode selected, you are now ready to shoot in auto focus and auto exposure by sliding the mode switch to AUTO. After turning the power on, just press the START/STOP button to begin recording, and press it a second time to stop. Tally numbers will accumulate on the LCD screen while recording, and the access light will blink as the camcorder writes data to memory. In full AUTO mode, the camcorder will determine focus and exposure, and most of the camcorder’s settings will not be adjustable on the touchscreen menu. No matter what frame rate you may have selected in M mode, the frame rate reverts to 60i in AUTO mode.
Until recently, most professionals would never shoot video in AUTO mode. Auto exposure could jump to extremes as you pan past a bright window or when a person wearing a white shirt enters or leaves the frame, and auto focus could easily lock on an unwanted detail in the background or indecisively waiver between two points, producing unusable footage. The default AUTO settings for focus and exposure on the HF G10 and XA10 are more intelligently designed and more subtly articulated than previous models. The camcorder’s logic circuit which includes SMART AUTO is in full effect when you shoot in AUTO mode. SMART AUTO recognizes 38 different scene types to more selectively adapt to faces, landscapes, foreground/ background relationships, and lighting conditions. There may be times when you have no choice but to rely on AUTO mode. As you get accustomed to the camcorder, it would be very useful to test full AUTO mode in a variety of lighting and focus situations to find what you can trust it to do and what its limitations are.
The next chapter more completely explains SMART AUTO and explores more sophisticated semi-automatic controls like Touch Focusing, Touch & Track, Face Recognition, programmed settings, and custom keys while shooting on the fly.
Playback
To review your footage in the camcorder, press the button that toggles between Camera and Playback on the left side of the camcorder (next to the DISP. button). You can also press and hold the Camera/Play button on the wireless remote for about two seconds to enable playback. The LCD screen will display a thumbnail storyboard of the initial image of each shot. The Zoom lever on the top of the camcorder adjusts the storyboard to display the initial frame of either six shots or 15 shots at a time. Four icons under the storyboard lead to submenus for selecting memory source and date, filmstrip or Rolodex storyboard format, basic editing, and shot information. (See Figure 1.6.)
Figure 1.6 Playback menus and controls.
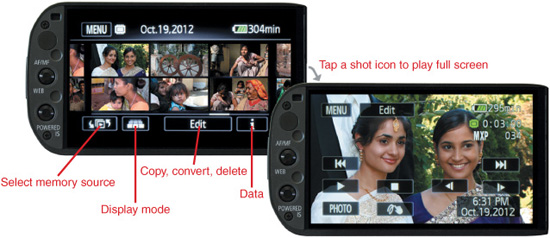
Tap the image of a shot on the camcorder’s LCD and it will instantly play full screen. If you tap the screen after a shot has been selected, controls appear for play/pause, stop, fast forward, reverse, previous shot, next shot, volume, and decorative effects. Tapping the screen while in Pause mode will toggle the playback controls from visible to hidden. During other playback functions, the controls disappear on their own after a few seconds.
To locate a shot, scroll the storyboard display with your finger. Shots are grouped according to recording date. The filmstrip storyboard format is easiest for locating an individual shot within a particular date. The Rolodex format, which Canon calls “3D Flip View,” is easier for efficiently scrolling among many recording dates because it presents a compact stack of picture icons for each date.
After you initiate playback from either of the storyboard displays, each subsequent file plays automatically. To stop playback, tap the screen so that playback controls appear; then press the Stop symbol.
For playback on a larger screen, connect a cable from the mini HDMI output below the hand strap of the camcorder to the full size HDMI input of a monitor or digital video projector. A six-foot mini-HDMI-to-HDMI cable costs from $3 to $7 at amazon.com and similar sources. HDMI, which stands for “High Definition Media Interface,” carries both picture and sound signals to modern HDTV monitors and projectors. If your monitor accepts 1080p (progressively scanned) signals, press the Camera/Playback button to select Playback; then choose MENU > Tool icon > HDMI 1080p Output > ON.
Turning on Control for HDMI (an additional option under the Tool icon just above HDMI 1080p Output) allows monitors equipped with HDMI-CEC (Consumer Electronic Control) to operate the playback functions of the G10/XA10 from the monitor’s remote control. If you do not want to use this function, make certain it is off, and playback control will remain with the camcorder. Checking HDMI Status, under the Tool icon, will verify the standard of your HDMI output signal. Connecting to the HDMI output will disable the camcorder’s other video outputs.
For connecting to an HDTV through “component” inputs, you will need two cables. For the picture signal, attach the cable that ends with red, green, and blue RCA plugs to the monitor and the plug on the opposite end to the camcorder’s Component OUT on the left side of the camcorder. For audio, connect red and white RCA plugs to the monitor and the ![]() -inch mini plug into the camcorder’s A/V Output. Go to MENU > Tool icon > AV/Headphones > AV.
-inch mini plug into the camcorder’s A/V Output. Go to MENU > Tool icon > AV/Headphones > AV.
For connecting to an analog standard definition monitor (much lower quality), use the ![]() -inch AV OUT from the camcorder and the yellow, red, and white RCA plugs to the monitor’s video and audio inputs. Of course, you can transfer your video files to a computer and view them there. This option will be discussed in Chapter 18.
-inch AV OUT from the camcorder and the yellow, red, and white RCA plugs to the monitor’s video and audio inputs. Of course, you can transfer your video files to a computer and view them there. This option will be discussed in Chapter 18.