
Generating a test harness from existing code
Making assertions about the behavior of your code
Executing custom code during test life-cycle events
Creating data-driven tests
Testing private members and code contracts
Managing lists of tests
Application testing is one of the most important parts of writing software. Research into the costs of software maintenance have revealed that a software defect can cost up to 25 times more to fix if it makes it to a production environment than if it had been caught during development. At the same time, a lot of testing involves repetitive, dull, and error-prone work that must be undertaken every time you make a change to your code base. The easiest way to counter this is to produce repeatable automated tests that can be executed by a computer on demand. This chapter looks at a specific type of automated testing that focuses on individual components, or units, of a system. Having a suite of automated unit tests gives you the power to verify that your individual components all work as specified even after making radical changes to them.
Visual Studio 2010 has a built-in framework for authoring, executing, and reporting on test cases. Originally included only in the Team System Edition of Visual Studio, many of the testing tools are now available in the Professional Edition. This means a much wider audience can now more easily obtain the benefits of automated, robust testing. This chapter focuses on creating, configuring, running, and managing a suite of unit tests as well as adding support to drive the tests from a set of data.
Writing test cases is not a task that is easily automated, because the test cases have to mirror the functionality of the software being developed. However, at several steps in the process code stubs can be generated by a tool. To illustrate this, start with a fairly straightforward snippet of code to learn to write test cases that fully exercise the code. Setting the scene is a Subscription class with a public property called CurrentStatus, which returns the status of the current subscription as an enumeration value:
- VB
Public Class Subscription
    Public Enum Status
        Temporary
        Financial
        Unfinancial
        Suspended
    End Enum

    Public Property PaidUpTo As Nullable(Of Date)

    Public ReadOnly Property CurrentStatus As Status
        Get
            If Not Me.PaidUpTo.HasValue Then Return Status.Temporary
            If Me.PaidUpTo > Now Then
                Return Status.Financial
            Else
                If Me.PaidUpTo >= Now.AddMonths(-3) Then
                    Return Status.Unfinancial
                Else
                    Return Status.Suspended
                End If
            End If
        End Get
    End Property
End Class
- C#
public class Subscription
{
    public enum Status
    {
        Temporary,
        Financial,
        Unfinancial,
        Suspended
    }

    public DateTime? PaidUpTo { get; set; }

    public Status CurrentStatus
{ get { if (this.PaidUpTo.HasValue == false) return Status.Temporary; if (this.PaidUpTo > DateTime.Today) return Status.Financial; else { if (this.PaidUpTo >= DateTime.Today.AddMonths(-3)) return Status.Unfinancial; else return Status.Suspended; } } } }
As you can see from the code snippet, four code paths need to be tested for the Current Status property. To test this property you create a separate SubscriptionTest test class in a new test project, into which you add a test method that contains the code necessary to instantiate a Subscription object, set the PaidUpTo property, and check that the CurrentStatus property contains the correct result. Then you keep adding test methods until all of the code paths through the CurrentStatus property have been executed and tested.
Fortunately, Visual Studio automates the process of creating a new test project, creating the appropriate SubscriptionTest class and writing the code to create the Subscription object. All you have to do is complete the test method. It also provides a runtime engine that is used to run the test case, monitor its progress, and report on any outcome from the test. Therefore, all you have to do is write the code to test the property in question. In fact, Visual Studio generates a code stub that executes the property being tested. However, it does not generate code to ensure that the Subscription object is in the correct initial state; this you must do yourself.
You can create empty test cases from the Test menu by selecting the New Test item. This prompts you to select the type of test to create, after which a blank test is created in which you need to manually write the appropriate test cases. However, you can also create a new unit test that contains much of the stub code by selecting the Create Unit Tests menu item from the right-click context menu of the main code window. For example, right-clicking within the CurrentStatus property and selecting this menu item brings up the Create Unit Tests dialog displayed in Figure 11-1. This dialog shows all the members of all the classes within the current solution and enables you to select the items for which you want to generate a test stub.
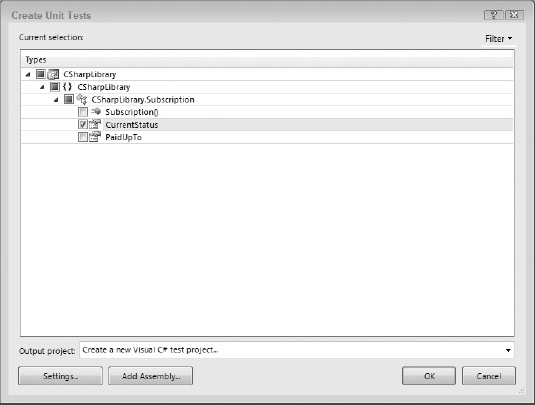
If you have a unit test project already in your solution you can generate your new test class into it by selecting it from the Output Project drop-down list; otherwise, keep the default selection and Visual Studio will create a new test project for you. Unlike alternative unit test frameworks such as NUnit, which allow test classes to reside in the same project as the source code, the testing framework within Visual Studio requires that all test cases reside in a separate test project. When test cases are created from the dialog shown in Figure 11-1, they are named according to the name of the member and the name of the class to which they belong.
Note
You can alter this naming convention in the Test Generation Settings dialog, which you can access by clicking the Settings button. You will find other settings that allow you to control how the test code is generated as well.
With the CurrentStatus property checked as in Figure 11-1, clicking the OK button generates the following code (some comments and commented-out code have been removed from this code):
- VB
<TestClass()>
Public Class SubscriptionTest

    Private testContextInstance As TestContext

    Public Property TestContext() As TestContext
Get Return testContextInstance End Get Set(ByVal value As TestContext) testContextInstance = value End Set End Property <TestMethod()> Public Sub CurrentStatusTest() Dim target As Subscription = New Subscription() ' TODO: Initialize to an appropriate value Dim actual As Subscription.Status actual = target.CurrentStatus Assert.Inconclusive("Verify the correctness of this test method.") End Sub End Class
- C#
[TestClass()]
public class SubscriptionTest
{

    private TestContext testContextInstance;

    public TestContext TestContext
    {
        get
        {
            return testContextInstance;
        }
        set
        {
            testContextInstance = value;
        }
    }

    [TestMethod()]
    public void CurrentStatusTest()
    {
        Subscription target = new Subscription();
// TODO: Initialize to an appropriate value
        Subscription.Status actual;
        actual = target.CurrentStatus;
        Assert.Inconclusive("Verify the correctness of this test method.");
    }
}
The test case generated for the CurrentStatus property appears in the final method of this code snippet. (The top half of this class is discussed later in this chapter.) As you can see, the test case was created with a name that reflects the property it is testing (in this case CurrentStatusTest) in a class that reflects the class in which the property appears (in this case SubscriptionTest). One of the difficulties with test cases is that they can quickly become unmanageable. This simple naming convention ensures that test cases can easily be found and identified.
If you look at the test case in more detail, you can see that the generated code stub contains the code required to initialize everything for the test. A Subscription object is created, and a test variable called actual is assigned the CurrentStatus property of that object. All that is missing is the code to actually test that this value is correct. Before going any further, run this test case to see what happens by opening the Test View window, shown in Figure 11-2, from the Test Windows menu.
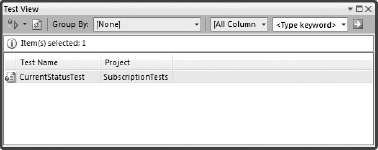
Selecting the CurrentStatusTest item and clicking the Run Selection button, the first on the left, invokes the test. This also opens the Test Results window, which initially shows the test as being either Pending or In Progress.
Note
The Test View is just one way to select and run a test case. If you right-click the test case itself in the code window there is a Run Tests option. There is also a Tests toolbar with an option to run all the tests in the current context. This will run an individual test case, a whole test class, a test assembly, or all tests in the solution depending on the current selection. Finally, you can create lists of tests using the Test List Editor, which you see later in this chapter.
In addition to each of these methods you can also set breakpoints in your code and run test cases in the debugger by selecting one of the Debug Tests options from the main toolbar or the Test View window.
Once the test has completed, the Test Results window will look like the one shown in Figure 11-3.
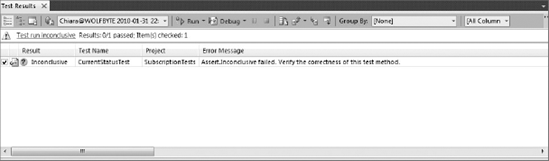
You can see from Figure 11-3 that the test case has returned an inconclusive result. Essentially, this indicates either that a test is not complete or that the results should not be relied upon, because changes may have been made that would make this test invalid.
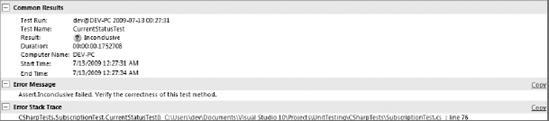
You can get more information on the result of any particular test result by double-clicking it. Figure 11-4 shows the result of double-clicking the inconclusive result for the example. The results show basic information about the test, the result, and other useful environmental information such as the computer name, test execution duration, and start and end times.
Note
As well as information about a particular result, you can also get information about a complete test run by clicking the Run Details button in the Test Results window. By default, the Test Results window shows the details of the most recent test run, but Visual Studio stores all of the results from a number of recent test runs and you can use the Test Run drop-down list to browse the results of previous runs.
When test cases are generated by Visual Studio, they are all initially marked as inconclusive by means of the Assert.Inconclusive statement. In addition, depending on the test stub that was created, there may be additional TODO statements that will prompt you to complete the test case.
Returning to the code snippet generated for the CurrentStatusTest method, you can see both an Assert.Inconclusive statement and a TODO item. To complete this test case, remove the TODO comment and replace the Assert.Inconclusive statement with Assert.AreEqual, as shown in the following code:
- VB
<TestMethod()> Public Sub CurrentStatusTest() Dim target As Subscription = New Subscription Dim actual As Subscription.Status actual = target.CurrentStatusAssert.AreEqual(Subscription.Status.Temporary, actual, _"Subscription.CurrentStatus was not set correctly.")End Sub
- C#
[TestMethod()] public void CurrentStatusTest() { Subscription target = new Subscription(); Subscription.Status actual; actual = target.CurrentStatus;Assert.AreEqual(Subscription.Status.Temporary, actual,"Subscription.CurrentStatus was not set correctly.");}
Each test shown in the Test Results window has a checkbox next to it allowing it to be selected. When test results are selected, clicking the Run Tests button in the Test Results window causes only those selected tests to be run. By default, after a test run any tests that did not pass are selected. After you fix the code that caused these tests to fail, click the Run Tests button to re-run these test cases and produce a successful result, as shown in Figure 11-5.

Note
Any test case that makes no assertions is considered to pass, which is why Visual Studio automatically puts an Assert.Inconclusive warning into generated test cases. By removing this assertion you are indicating that the test case is complete. In this example, we have only exercised one code path and you should add further test cases that fully exercise the other three.
When you first created the unit test at the start of this chapter you may have noticed that, in addition to the new test project, two items were added under a new solution folder called Solution Items. These are Chapter11.vsmdi and Local.testsettings.
The .vsmdi file is a metadata file that contains information about the tests within the solution. When you double-click this file in Visual Studio, it opens the Test List Editor, which is discussed at the end of this chapter.
The .testsettings file is a Test Run Configuration file. This is an XML file that stores settings that control how a set of tests, called a test run, is executed. You can create and save multiple run configurations that represent different scenarios, and then make a specific run configuration active using the Test
Note
If you are using the Ultimate edition of Visual Studio then you might also have a TraceAndTestImpact.testsettings file when you create a new test project. This Test Run Configuration is used by Visual Studio to implement the Test Impact Analysis feature which is covered in Chapter 56.
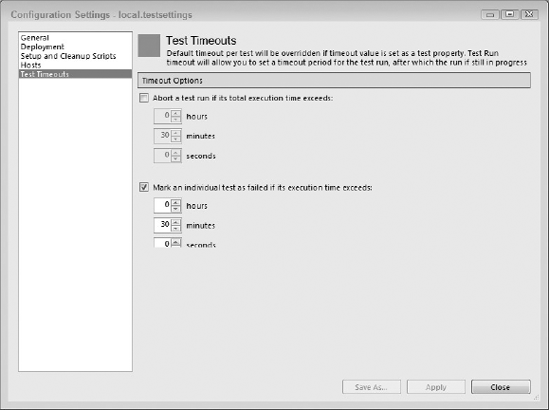
When you double-click to open the Local.testsettings file, it launches a special-purpose editor. Within this editor you can configure a test run to copy required support files to a deployment directory, or link to custom startup and cleanup scripts. The editor also includes a Test Timeouts section, shown in Figure 11-6, which enables you to define a timeout after which a test will be aborted or marked as failed. This is useful if a global performance limit has been specified for your application (for example, if all screens must return within five seconds).
Most of these settings can be overridden on a per-method basis by means of test attributes, which are discussed in the next section.
Before going any further with this scenario, take a step back and consider how testing is carried out within Visual Studio 2010. As mentioned earlier, all test cases have to exist within test classes that themselves reside in a test project. But what really distinguishes a method, class, or project as containing test cases? Starting with the test project, if you look at the underlying XML project file, you will see that there is virtually no difference between a test project file and a normal class library project file. In fact, the only difference appears to be the project type: When this project is built it simply outputs a standard .NET class library assembly. The key difference is that Visual Studio recognizes this as a test project and automatically analyzes it for any test cases in order to populate the various test windows.
Classes and methods used in the testing process are marked with an appropriate attribute. The attributes are used by the testing engine to enumerate all the test cases within a particular assembly.
All test cases must reside within a test class that is appropriately marked with the TestClass attribute. Although it may appear that there is no reason for this attribute other than to align test cases with the class and member that they are testing, you will later see some benefits associated with grouping test cases using a test class. In the case of testing the Subscription class, a test class called SubscriptionTest was created and marked with the TestClass attribute. Because Visual Studio uses attributes to locate classes that contain test cases, the name of this class is irrelevant. However, adopting a naming convention, such as adding the Test suffix to the class being tested, makes it easier to manage a large number of test cases.
Individual test cases are marked with the TestMethod attribute, which is used by Visual Studio to enumerate the list of tests that can be executed. The CurrentStatusTest method in the SubscriptionTest class is marked with the TestMethod attribute. Again, the actual name of this method is irrelevant, because Visual Studio only uses the attributes. However, the method name is used in the various test windows when the test cases are listed, so it is useful for test methods to have meaningful names. This is especially true when reviewing test results.
As you have seen, the unit-testing subsystem within Visual Studio uses attributes to identify test cases. A number of additional properties can be set to provide further information about a test case. This information is then accessible either via the Properties window associated with a test case or within the other test windows. This section goes through the descriptive attributes that can be applied to a test method.
Because test cases are listed by test method name, a number of tests may have similar names, or names that are not descriptive enough to indicate what functionality they test. The Description attribute, which takes a String as its sole argument, can be applied to a test method to provide additional information about a test case.
The Owner attribute, which also takes a String argument, is useful for indicating who owns, wrote, or is currently working on a particular test case.
The Priority attribute, which takes an Integer argument, can be applied to a test case to indicate the relative importance of a test case. Though the testing framework does not use this attribute, it is useful for prioritizing test cases when you are determining the order in which failing, or incomplete, test cases are resolved.
The TestCategory attribute accepts a single String identifying one user-defined category for the test. Like the Priority attribute the TestCategory attribute is essentially ignored by Visual Studio but is useful for sorting and grouping related items together. A test case may belong to many categories but must have a separate attribute for each one.
The WorkItem attribute can be used to link a test case to one or more work items in a work-item-tracking system such as Team Foundation Server. If you apply one or more WorkItem attributes to a test case, you can review the test case when making changes to existing functionality. You can read more about Team Foundation Server in Chapter 57.
It is possible to temporarily prevent a test method from running by applying the Ignore attribute to it. Test methods with the Ignore attribute will not be run and will not show up in the results list of a test run.
Note
You can apply the Ignore attribute to a test class as well to switch off all of the test methods within it.
A test case can fail for any number of reasons. A performance test, for example, might require a particular functionality to complete within a specified time frame. Instead of the tester having to write complex multi-threading tests that stop the test case once a particular timeout has been reached, you can apply the Timeout attribute to a test case with a timeout value in milliseconds, as shown in the following code. This ensures that the test case fails if that timeout is reached.
- VB
<TestMethod()><Owner("Mike Minutillo")><Description("Tests the functionality of the Current Status Property")><Priority(3)><Timeout(10000)><TestCategory("Financial")>Public Sub CurrentStatusTest() Dim target As Subscription = New Subscription Dim actual As Subscription.Status actual = target.CurrentStatus Assert.AreEqual(Subscription.Status.Temporary, actual, _ "Subscription.CurrentStatus was not set correctly.") End Sub
- C#
[TestMethod()]
[Owner("Mike Minutillo")][Description("Tests the functionality of the Current Status Method")][Priority(3)][Timeout(10000)][TestCategory("Financial")]public void CurrentStatusTest() { Subscription target = new Subscription(); Subscription.Status actual; actual = target.CurrentStatus; Assert.AreEqual(Subscription.Status.Temporary, actual, "Subscription.CurrentStatus was not set correctly."); }
This snippet augments the original CurrentStatusTest method with some of these attributes to illustrate their usage. In addition to providing additional information about what the test case does and who wrote it, this code assigns the test case a priority of 3 and a category of "Financial". Lastly, the code indicates that this test case should fail if it takes more than 10 seconds (10,000 milliseconds) to execute.
So far, this chapter has examined the structure of the test environment and how test cases are nested within test classes in a test project. What remains is to look at the body of the test case and review how test cases either pass or fail. (When a test case is generated, you saw that an Assert.Inconclusive statement is added to the end of the test to indicate that it is incomplete.)
The idea behind unit testing is that you start with the system, component, or object in a known state, and then run a method, modify a property, or trigger an event. The testing phase comes at the end, when you need to validate that the system, component, or object is in the correct state. Alternatively, you may need to validate that the correct output was returned from a method or property. You do this by attempting to assert a particular condition. If this condition is not true, the testing system reports this result and ends the test case. A condition is asserted, not surprisingly, via the Assert class. There is also a StringAssert class and a CollectionAssert class, which provide additional assertions for dealing with String objects and collections of objects, respectively.
The Assert class in the UnitTesting namespace, not to be confused with the Debug.Assert or Trace.Assert method in the System.Diagnostics namespace, is the primary class used to make assertions about a test case. The basic assertion has the following format:
- VB
Assert.IsTrue(variableToTest, "Output message if this fails")
- C#
Assert.IsTrue(variableToTest, "Output message if this fails");
As you can imagine, the first argument is the condition to be tested. If this is true, the test case continues operation. However, if it fails, the output message is emitted and the test case exits with a failed result.
This statement has multiple overloads whereby the output message can be omitted or String formatting parameters supplied. Because quite often you won't be testing a single positive condition, several additional methods simplify making assertions within a test case:
IsFalse: Tests for a negative, or false, conditionAreEqual: Tests whether two arguments have the same valueAreSame: Tests whether two arguments refer to the same objectIsInstanceOfType: Tests whether an argument is an instance of a particular typeIsNull: Tests whether an argument is nothing
This list is not exhaustive — several more methods exist, including negative equivalents of those listed. Also, many of these methods have overloads that allow them to be invoked in several different ways.
The StringAssert class does not provide any additional functionality that cannot be achieved with one or more assertions via the Assert class. However, it not only simplifies the test case code by making it clear that String assertions are being made; it also reduces the mundane tasks associated with testing for particular conditions. The additional assertions are as follows:
DoesNotMatch: Tests whether aStringdoes not match a regular expressionEndsWith: Tests whether aStringends with a particularStringMatches: Tests whether aStringmatches a regular expressionStartsWith: Tests whether aStringstarts with a particularString
Similar to the StringAssert class, CollectionAssert is a helper class that is used to make assertions about a collection of items. Some of the assertions are as follows:
AllItemsAreNotNull: Tests that none of the items in a collection is a null referenceAllItemsAreUnique: Tests that no duplicate items exist in a collectionContains: Tests whether a collection contains a particular objectIsSubsetOf: Tests whether a collection is a subset of another collection
Sometimes test cases have to execute paths of code that can cause exceptions to be raised. Though exception coding should be avoided, conditions exist where this might be appropriate. Instead of writing a test case that includes a Try-Catch block with an appropriate assertion to test that an exception was raised, you can mark the test case with an ExpectedException attribute. For example, change the CurrentStatus property to throw an exception if the PaidUp date is prior to the date the subscription opened, which in this case is a constant:
- VB
Public Const SubscriptionOpenedOn As Date = #1/1/2000#Public ReadOnly Property CurrentStatus As Status Get If Not Me.PaidUpTo.HasValue Then Return Status.Temporary If Me.PaidUpTo > Now Then Return Status.Financial Else If Me.PaidUpTo >= Now.AddMonths(-3) Then Return Status.UnfinancialElseIf Me.PaidUpTo > SubscriptionOpenedOn ThenReturn Status.SuspendedElseThrow New ArgumentOutOfRangeException( _"Paid up date is not valid as it is before the subscription opened.")End IfEnd If End Get End Property
- C#
public static readonly DateTime SubscriptionOpenedOn = new DateTime(2000, 1, 1);public Status CurrentStatus { get { if (this.PaidUpTo.HasValue == false) return Status.Temporary; if (this.PaidUpTo > DateTime.Today) return Status.Financial; else { if (this.PaidUpTo >= DateTime.Today.AddMonths(-3)) return Status.Unfinancial;else if (this.PaidUpTo >= SubscriptionOpenedOn)return Status.Suspended;elsethrow new ArgumentOutOfRangeException("Paid up date is not valid as it is before the subscription opened");} } }
Using the same procedure as before, you can create a separate test case for testing this code path, as shown in the following example:
- VB
<TestMethod()><ExpectedException(GetType(ArgumentOutOfRangeException),"Argument exception not raised for invalid PaidUp date.")>Public Sub CurrentStatusExceptionTest() Dim target As Subscription = New Subscription target.PaidUpTo = Subscription.SubscriptionOpenedOn.AddMonths(-1) Dim expected = Subscription.Status.Temporary Assert.AreEqual(expected, target.CurrentStatus, _ "This assertion should never actually be evaluated") End Sub
- C#
[TestMethod()]
[ExpectedException(typeof(ArgumentOutOfRangeException),"Argument Exception not raised for invalid PaidUp date.")]public void CurrentStatusExceptionTest() {Subscription target = new Subscription(); target.PaidUpTo = Subscription.SubscriptionOpenedOn.AddMonths(-1); var expected = Subscription.Status.Temporary; Assert.AreEqual(expected, target.CurrentStatus, "This assertion should never actually be evaluated"); }
The ExpectedException attribute not only catches any exception raised by the test case; it also ensures that the type of exception matches the type expected. If no exception is raised by the test case, this attribute will cause the test to fail.
Despite Visual Studio generating the stub code for test cases you are to write, typically you have to write a lot of setup code whenever you run a test case. Where an application uses a database, that database should be returned to its initial state after each test to ensure that the test cases are completely repeatable. This is also true for applications that modify other resources such as the file system. Visual Studio provides support for writing methods that can be used to initialize and clean up around test cases. (Again, attributes are used to mark the appropriate methods that should be used to initialize and clean up the test cases.)
The attributes for initializing and cleaning up around test cases are broken down into three levels: those that apply to individual tests, those that apply to an entire test class, and those that apply to an entire test project.
As their names suggest, the TestInitialize and TestCleanup attributes indicate methods that should be run before and after each test case within a particular test class. These methods are useful for allocating and subsequently freeing any resources that are needed by all test cases in the test class.
Sometimes, instead of setting up and cleaning up after each test, it can be easier to ensure that the environment is in the correct state at the beginning and end of running an entire test class. Previously, we explained that test classes are a useful mechanism for grouping test cases; this is where you put that knowledge to use. Test cases can be grouped into test classes that contain one method marked with the ClassInitialize attribute and another marked with the ClassCleanup attribute. These methods must both be marked as static, and the one marked with ClassInitialize must take exactly one parameter that is of type UnitTesting.TestContext, which is explained later in this chapter.
The final level of initialization and cleanup attributes is at the assembly, or project, level. Methods that are intended to initialize the environment before running an entire test project, and cleaning up after, can be marked with the AssemblyInitialize and AssemblyCleanup attributes, respectively. Because these methods apply to any test case within the test project, only a single method can be marked with each of these attributes. Like the class-level equivalents, these methods must both be static and the one marked with AssemblyInitialize must take a parameter of type UnitTesting.TestContext.
For both the assembly-level and class-level attributes, it is important to remember that even if only one test case is run, the methods marked with these attributes will also be run.
Note
It is a good idea to put the methods marked with AssemblyInitialize and AssemblyCleanup together into their own test class to make them easy to find. If there is more than one method marked with either of these attributes, then running any tests in the project results in a runtime error.
When you are writing test cases, the testing engine can assist you in a number of ways, including by managing sets of data so you can run a test case with a range of data, and by enabling you to output additional information for the test case to aid in debugging. This functionality is available through the TestContext object that is generated within a test class and passed into the AssemblyInitialize and ClassInitialize methods.
The CurrentStatusTest method generated in the first section of this chapter tested only a single path through the CurrentStatus property. To fully test this method, you could have written additional statements and assertions to set up and test the Subscription object. However, this process is fairly repetitive and would need to be updated if you ever changed the structure of the CurrentStatus property. An alternative is to provide a DataSource for the CurrentStatusTest method whereby each row of data tests a different path through the property. To add appropriate data to this method, use the following process:
Create a local SQL CE database and database table to store the various test data. In this case, create a database called LoadTest with a table called
Subscription_CurrentStatus. The table has an Identitybigintcolumn called Id, a nullabledatetimecolumn called PaidUp, and annvarchar(20)column called Status.Add appropriate data values to the table to cover all paths through the code. Test values for the
CurrentStatusproperty are shown in Figure 11-7.Select the appropriate test case in the Test View window and open the Properties window. Select the Data Connection String property and click the ellipsis button to open the Connection Properties dialog.
Use the Connection Properties dialog to connect to the database created in Step 1. You should see a connection string similar to the following:
data source=|DataDirectory|LoadTest.sdf
If the connection string is valid, a drop-down box appears when you select the
DataTableproperty, enabling you to select the database table you created in Step 1.To open the test case in the main window, return to the Test View window and select Open Test from the right-click context menu for the test case. Notice that a
DataSourceattribute has been added to the test case. This attribute is used by the testing engine to load the appropriate data from the specified table. This data is then exposed to the test case through theTestContextobject.Note
If you are using a SQL Server CE database, you'll also get a
DeploymentItemattribute added by default. This ensures that the database will be copied if the test assembly is deployed to another location.Modify the test case to access data from the
TestContextobject and use the data to drive the test case, which gives you the followingCurrentStatusTestmethod:

- VB
<DataSource("System.Data.SqlServerCe.3.5", _"data source=|DataDirectory|LoadTest.sdf", _"Subscription_CurrentStatus", DataAccessMethod.Sequential)> _<DeploymentItem("SubscriptionTestsLoadTest.sdf")> _<TestMethod()>_ Public Sub CurrentStatusDataTest() Dim target As Subscription = New SubscriptionIf Not IsDBNull(Me.TestContext.DataRow.Item("PaidUp")) Thentarget.PaidUpTo = CType(Me.TestContext.DataRow.Item("PaidUp"), Date)End IfDim val As Subscription.Status = _CType([Enum].Parse(GetType(Subscription.Status), _CStr(Me.TestContext.DataRow.Item("Status"))), Subscription.Status)Assert.AreEqual(val, target.CurrentStatus, _ "Subscripiton.CurrentStatus was not set correctly.") End Sub
- C#
[DataSource("System.Data.SqlServerCe.3.5",
  "data source=|DataDirectory|\LoadTests.sdf",
  "Subscription_CurrentStatus",
  DataAccessMethod.Sequential)]
[DeploymentItem("SubscriptionTests\LoadTests.sdf")]
[TestMethod()]
public void CurrentStatusDataTest()
{
  var target = new Subscription();
  var date = this.TestContext.DataRow["PaidUp"] as DateTime?;
  if (date != null)
  {
    target.PaidUpTo = date;
  }

  var val = Enum.Parse(typeof(Subscription.Status),
    this.TestContext.DataRow["Status"] as string);

  Assert.AreEqual(val, target.CurrentStatus,
    "Subscription.CurrentStatus was not set correctly.");
}
When this test case is executed, the CurrentStatusTest method is executed four times (once for each row of data in the database table). Each time it is executed, a DataRow object is retrieved and exposed to the test method via the TestContext.DataRow property. If the logic within the CurrentStatus property changes, you can add a new row to the Subscription_CurrentStatus table to test any code paths that may have been created.
Before moving on, take one last look at the DataSource attribute that was applied to the CurrentStatusTest. This attribute takes four arguments, the first three of which are used to determine which DataTable needs to be extracted. The remaining argument is a DataAccessMethod enumeration, which determines the order in which rows are returned from the DataTable. By default, this is Sequential, but it can be changed to Random so the order is different every time the test is run. This is particularly important when the data is representative of end user data but does not have to be processed in any particular order.
Writing unit tests is all about automating the process of testing an application. Because of this, these test cases can be executed as part of a build process, perhaps even on a remote computer. This means that the normal output windows, such as the console, are not a suitable place for outputting test-related information. Clearly, you also don't want test-related information interspersed throughout the debugging or trace information being generated by the application. For this reason, there is a separate channel for writing test-related information so it can be viewed alongside the test results.
The TestContext object exposes a WriteLine method that takes a String and a series of String.Format arguments that can be used to output information to the results for a particular test. For example, adding the following line to the CurrentStatusDataTest method generates additional information with the test results:
- VB
TestContext.WriteLine("No exceptions thrown for test id {0}", _
    CInt(Me.TestContext.DataRow.Item(0)))
- C#
TestContext.WriteLine("No exceptions thrown for test id {0}",
                this.TestContext.DataRow[0]);
Note
Although you should use the TestContext.WriteLine method to capture details about your test executions, the Visual Studio test tools will collect anything written to the standard error and standard output streams and add that data to the Test Results window.
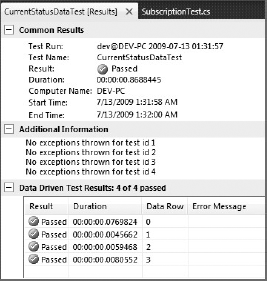
After the test run is completed, the Test Results window is displayed, listing all the test cases that were executed in the test run along with their results. The Test Results Details window, shown in Figure 11-8, displays any additional information that was outputted by the test case. You can view this window by double-clicking the test case in the Test Results window.
In Figure 11-8, you can see in the Additional Information section the output from the WriteLine method you added to the test method. Although you added only one line to the test method, the WriteLine method was executed for each row in the database table. The Data Driven Test Results section of Figure 11-8 provides more information about each of the test passes, with a row for each row in the table. Your results may differ from those shown in Figure 11-8, depending on the code you have in your Subscription class.
Up until now, you have seen how to write and execute unit tests. This section goes on to examine how you can add custom properties to a test case, and how you can use the same framework to test private methods and properties.
The testing framework provides a number of test attributes that you can apply to a method to record additional information about a test case. This information can be edited via the Properties window and updates the appropriate attributes on the test method. At times you might want to drive your test methods by specifying your own properties, which can also be set using the Properties window. To do this, add TestProperty attributes to the test method. For example, the following code adds two attributes to the test method to enable you to specify an arbitrary date and an expected status. This might be convenient for ad hoc testing using the Test View and Properties window:
- VB
<TestMethod()>
<TestProperty("SpecialDate", "1/1/2008")><TestProperty("SpecialStatus", "Suspended")>Public Sub SpecialCurrentStatusTest() Dim target As New Subscriptiontarget.PaidUpTo = CType(Me.TestContext.Properties.Item("SpecialDate"), _Date)Dim val As Subscription.Status = _[Enum].Parse(GetType(Subscription.Status), _CStr(Me.TestContext.Properties.Item("SpecialStatus")))Assert.AreEqual(val, target.CurrentStatus, _"Correct status not set for Paidup date {0}", target.PaidUpTo) End Sub
- C#
[TestMethod]
[TestProperty("SpecialDate", "1/1/2008")][TestProperty("SpecialStatus", "Suspended")]public void SpecialCurrentStatusTest() { var target = new Subscription();target.PaidUpTo = this.TestContext.Properties["SpecialDate"] as DateTime?;var val = Enum.Parse(typeof(Subscription.Status),this.TestContext.Properties["SpecialStatus"] as string);Assert.AreEqual(val, target.CurrentStatus, "Correct status not set for Paidup date {0}", target.PaidUpTo); }
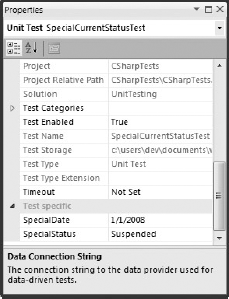
By using the Test View to navigate to this test case and accessing the Properties window, you can see that this code generates two additional properties, SpecialDate and SpecialStatus, as shown in Figure 11-9.
You can use the Properties window to adjust the SpecialDate and SpecialStatus values. Unfortunately, the limitation here is that there is no way to specify the data type for the values. As a result, the property grid displays and enables edits as if they were String data types.
Note
In the previous version of Visual Studio the TestContext.Properties dictionary was not automatically filled in and you had to do this by hand in your TestInitialize method. In Visual Studio 2010 this is all handled for you.
One of the selling points of unit testing is that it is particularly effective for testing the internals of your class to ensure that they function correctly. The assumption here is that if each of your components works in isolation, there is a better chance that they will work together correctly; and in fact, you can use unit testing to test classes working together. However, you might be wondering how well the unit-testing framework handles testing private methods.
One of the features of the .NET Framework is the capability to reflect over any type that has been loaded into memory and to execute any member regardless of its accessibility. This functionality does come at a performance cost, because the reflection calls obviously include an additional level of redirection, which can prove costly if done frequently. Nonetheless, for testing, reflection enables you to call into the inner workings of a class and not worry about the potential performance penalties for making those calls.
The other, more significant issue with using reflection to access non-public members of a class is that the code to do so is somewhat messy. Fortunately, Visual Studio 2010 does a very good job of generating a wrapper class that makes testing even private methods easy. To show this, return to the CurrentStatus property, change its access from public to private, and rename it PrivateCurrentStatus. Then regenerate the unit test for this property as you did earlier.
The following code snippet is the new unit-test method that is generated:
- VB
<TestMethod(), _
 DeploymentItem("Subscriptions.dll")> _
Public Sub PrivateCurrentStatusTest()
    Dim target As Subscription_Accessor = New Subscription_Accessor()
    ' TODO:  Initialize to an appropriate value
    Dim actual As Subscription.Status
    actual = target.PrivateCurrentStatus
    Assert.Inconclusive("Verify the correctness of this test method.")
End Sub
- C#
[TestMethod()]
[DeploymentItem("Subscriptions.dll")]
public void PrivateCurrentStatusTest()
{
    Subscription_Accessor target = new Subscription_Accessor();
    Subscription.Status actual;
    actual = target.PrivateCurrentStatus;
    Assert.Inconclusive("Verify the correctness of this test method.");
}
As you can see, the preceding example uses an instance of a new Subscription_Accessor class to access the PrivateCurrentStatus property. This is a class that was auto-generated and compiled into a new assembly by Visual Studio. A new file was also added to the test project with the .accessor extension, which is what causes Visual Studio to create the new accessor classes.
You can add a private accessor class to a test project without generating a unit test. To do this, open the class that you want a private accessor for and select Create Private Accessor from the context menu of the editor.
Note
You don't need to create a private accessor for every class in a project individually. Each .accessor file actually relates of a single project and creates an accessor class for all of the classes in that project.
If you are using the new Code Contracts feature described in Chapter 13, then you might want to write tests that verify the behavior of your contracts. The simplest way to do this is to open the Code Contracts project properties page and uncheck the Assert on Contract Failure checkbox. When you do this the Code Contracts API will raise exceptions instead of causing Assertion failures. You can check for these exceptions with an ExpectedException attribute if you know the type of exception to expect. By default, the Code Contracts tools generate the exceptions that will be thrown and their type cannot be known at runtime. Many of the contract methods have an overload which accepts an exception type as a generic parameter.
Here is a simple class which performs a mathematical operation on positive integers and a unit test to check the case where a negative number is passed in.
- VB
Class Calculator
  Public Function Factorial(ByVal n As Integer) As Integer
    Contract.Requires(Of ArgumentOutOfRangeException)(n >= 0, "n")

    If n = 0 Then Return 1
    Return n * Factorial(n - 1)

  End Function
End Class


<TestMethod(), ExpectedException(GetType(ArgumentOutOfRangeException))>
Public Sub NegativeTest()

  Dim generator As New Calculator()
  Dim actual = generator.Factorial(-1)

  Assert.Fail("Contract not working")
End Sub
- C#
class Calculator
{
  public int Factorial(int n)
  {
    Contract.Requires<ArgumentOutOfRangeException>(n >= 0, "n");

    if (n == 0) return 1;
    return n * Factorial(n - 1);
  }
}

[TestMethod, ExpectedException(typeof(ArgumentOutOfRangeException))]
public void NegativeTest()
{
  var generator = new Calculator();
  var actual = generator.Factorial(-1);

  Assert.Fail("Contract not working");
}
Although this method of testing Code Contracts works, it is not really recommended as it may cover up errors in the code. A better option is to hook into the Code Contracts system and override its default behavior from within the test project itself. You do this by registering for the ContractFailed event on the static Contract class inside of an AssemblyInitialize method. Inside of the event handler you tell the Code Contracts API that you have handled the contract failure and that you would like to throw an appropriate exception.
- VB
<AssemblyInitialize()>
Public Shared Sub AssemblyInitialize(ByVal testContext As TestContext)

  AddHandler Contract.ContractFailed, Sub(sender As Object,
                      e As ContractFailedEventArgs)
                      e.SetHandled()
                      e.SetUnwind()
                    End Sub
End Sub

<TestMethod(), ExpectedException(GetType(Exception), AllowDerivedTypes:=True)>
Public Sub NegativeTest()

  Dim generator As New Calculator()
Dim actual = generator.Factorial(-1) Assert.Fail("Contract not working") End Sub
- C#
[AssemblyInitialize] public static void AssemblyInitialize(TestContext testContext) { Contract.ContractFailed += (s, e) => { e.SetHandled(); e.SetUnwind(); }; }[TestMethod,ExpectedException(typeof(Exception), AllowDerivedTypes = true)] public void NegativeTest() { var generator = new Calculator(); var actual = generator.Factorial(-1); Assert.Fail("Contract not working"); }
Note
When Code Contracts are configured to cause Asserts, the intended exception is lost, so the code sample checks for any subclass of Exception. The actual exception that gets thrown is a System.Diagnostics.Contracts.ContractException, which is private to the .NET Framework, so you can't detect it directly.
Visual Studio provides both the Test View window and the Test List Editor to display a list of all of the tests in a solution. The Test View window, which was shown earlier in the chapter in Figure 11-2, simply displays the unit tests in a flat list. However, if you have hundreds, or even thousands, of unit tests in your solution, trying to manage them with a flat list will quickly become unwieldy.
The Test List Editor enables you to group and organize related tests into test lists. Because test lists can contain both tests and other test lists, you can further organize your tests by creating a logical, hierarchical structure. All the tests in a test list can then be executed together from within Visual Studio, or via a command-line test utility.
You can open the Test List Editor from the Test Windows menu, or you can double-click the Visual Studio Test Metadata (.vsmdi) file for the solution. Figure 11-10 shows the Test List Editor for a solution with a number of tests organized into a hierarchical structure of related tests.
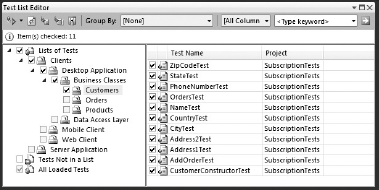
On the left in the Test List Editor window is a hierarchical tree of test lists available for the current solution. At the bottom of the tree are two project lists, one showing all the test cases (All Loaded Tests) and one showing those test cases that haven't been put in a list (Tests Not in a List). Under the Lists of Tests node are all the test lists created for the project.
To create a new test list, click Test
After creating a test list, you can run the whole list by checking the box next to the list in the Test Manager. The Run button executes all lists that are checked. Alternatively, you can run the list with the debugger attached using the Debug Checked Tests menu item.
This chapter described how you can use unit testing to ensure the correct functionality of your code. The unit-testing framework within Visual Studio is quite comprehensive, enabling you to both document and manage test cases.
You can fully exercise the testing framework using an appropriate data source to minimize the repetitive code you have to write. You can also extend the framework to test all the inner workings of your application.
Visual Studio Premium and Ultimate contain even more functionality for testing, including the ability to track and report on code coverage, and support for load and web application testing. Chapter 56 provides more detail on these advanced testing capabilities.