4
Voice of the Project Customer
This chapter is contributed by Jose Campos.
It is only if the customer says it is
(Anonymous)
This chapter focuses on tools for the identification and translation of voice of the project customer, including the following:
- Customer Roadmap
- Focus Statement
- Sample Selection
- Discussion Guide
- Quality Function Deployment (QFD)
In particular, these tools—often referred to as customer intimacy tools—orchestrate the activities to define the type of customer information needed by the project and obtain input from the project customers. Also, they ensure that the project team contacts the right type of customer and plans the various contacts with customers. Once the information about customer requirements is acquired, the tools provide a basic framework to translate it into the project scope. Apparently, because their use is part of scope planning, there is a need for close coordination with the tools of schedule and cost planning as the project baseline is defined (see Figure 4.1).
This chapter aims at helping practicing and prospective project managers to
- Learn how to use various tools when dealing with voice of the project customer.
- Choose those tools that are most appropriate for their project situation.
- Customize the tools of their choice.
Clearly, getting a hold of these skills is an enabler of understanding and internalizing customer requirements, and building them in the project products. Consequently, the skills have a premier place in project planning and building a standardized PM process.
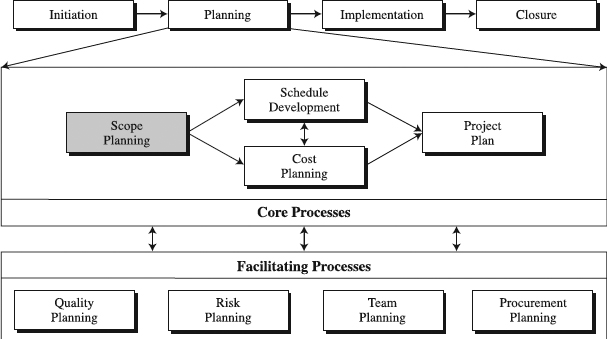
Figure 4.1 The role of voice-of-the-customer tools in the standardized project management process.
Customer Roadmap
What Is the Customer Roadmap?
The Customer Roadmap is a tool for setting up a systematic approach for listening to the voice of the customer in projects (see Figure 4.2). To carry out the approach, the roadmap defines a series of steps and their timing that outline the process to obtain, document, and use customer input. When streamlined and consistently executed, the process has a high potential to help establish a culture of customer involvement in the design and implementation of projects.
The logic of having the Customer Roadmap in place is straightforward and powerful. Any reasonable effort to obtain input from the project customer requires a plan, much like any other project work package or activity does. By carefully developing the roadmap, the project manager can ensure that there is enough time to listen to the customer and effectively use the obtained information. In plain terms, the Customer Roadmap is the plan that prescribes the use of tools in this chapter and their time line.
Constructing a Customer Roadmap
The development and use of Customer Roadmaps is a relatively new phenomenon in project organizations. This lack of experience automatically raises the red flag, pointing to the need to identify risks of missteps. A way to avoid missteps is to methodically design and deploy a Customer Roadmap with well-synchronized and integrated sequence of steps. We describe these steps in the text that follows.
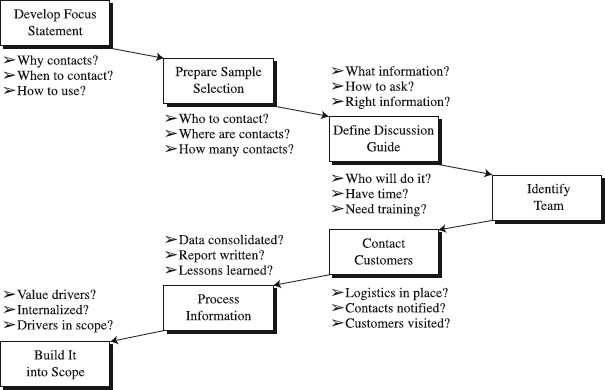
Figure 4.2 Customer Roadmap.
Prepare Information Inputs. Two quality inputs significantly impact the successful development of a Customer Roadmap:
- Project proposal
- List of team members
Typically prepared as part of the project selection process, the project proposal provides the information about the proposed goals, scope, and implementation strategies of the project. This information will help identify customers, information that needs to be obtained from them, and how to use it afterwards. Knowing who is on the team lets you get them involved in the roadmap development process. In this way their buy-in is obtained along with their commitment to deploy the map later.
Convince the Project Team to Visit the Project Customers. Often, there is a tendency to claim that the project team has all the information it needs to complete the project. In other words, it is common to encounter resistance from the team members because of overconfidence or tradition (i.e., they did not contact the project customers in previous projects). The project manager must be aware of this resistance and work toward persuading the team members that there is much that is not known. For example, the project manager may demonstrate what is unknown by asking key questions. Who are the customers of this project? Do we know all the needs from the project customers? Do we know the unarticulated needs from the project customers? Answers to these questions can help establish the need to visit customers and better understand their needs. The ultimate argument here is that understanding the needs of the project customer is the first step to customer satisfaction, a powerful strategy to make more money (see the box that follows, “Voice of the Customer Is about Return on Investment”).
Develop the Focus Statement. The highlight of this step is the construction of the Focus Statement, which defines the purpose of customer visits. Building on the sufficient interaction in their meeting, team members that may be part of making the actual customer contacts should prepare good answers to the following questions:
- Why do we need to contact customers of this project?
- When do we need to start contacts to yield maximum benefit to the project?
- How are we going to use the information obtained during the contacts?
Voice of the Customer Is about Return on Investment
Customers have taken charge. It is this competitive reality that drives the increasing importance of identifying the voice of the project customer. They tell suppliers what they want, when they want it, how they want it, and how much they are willing to pay. And suppliers listen. As a result, there is no such a thing as the customer; there is only this customer, the one using his or her power and ability to demand [4]. Leading organizations feed this customer information back into their projects, products, and service experiences to keep customers happy and loyal.
Apple Computer offers an example. Customer service staff uses its phone dialogue with customers to identify the top ten customer issues of the week. Design engineers use the top ten list to improve projects producing new releases and also to identify customers' wishes for possible new projects [5]. Satisfied customers are critical for a company's economic returns; in 1997 companies that reached higher customer satisfaction created over 100 percent more shareholder wealth than their competitors with lower customer satisfaction scores [7, 8]. No wonder, then, why the world's most successful software firms rate customer involvement as the single most important success factor in software project development—customer satisfaction begins with customer involvement [9]. The message here is that ignoring customers' voices is a poor business decision.
Prepare the Sample Selection. Once the purpose of contacting customers has been phrased, it is time to define the type or profile of customers to be contacted (see the “Every Project Has a Customer” box that follows). This is typically done in a meeting involving the team or those that may be selected to make the actual customer contacts. To shape the profile, they need to ask these questions:
- Who do we need to contact to get the right type of information?
- Where are these contacts located?
- How many contacts will be needed to get a valid sample?
This information describes the profile of customers to contact in the Sample Selection tool.
Define Discussion Guide. Now that we know whom to contact, the team needs to create and select questions or topics for discussion with the project customers. In doing so, the team must answer these questions:
- What information do we really need?
- How will we phrase questions to obtain the right information?
- Will the questions yield the right type of information?
While we may not be accustomed to viewing those that will derive “value” from the project as “customers,” they are and share the primary characteristic of customers: “One that patronizes project products.” Generally, they may be either external or internal customers [3]. External customers buy the project product, providing financial support to the organization. Apparently, it is of vital importance to satisfy their needs and keep the cash flow stream going.
When other employees of the organization derive the value from the project, the term internal customer is commonly used. Inside the company, the project team passes on its work to other employees. Also, the team receives work passed on from other company employees, the internal suppliers. Similarly, external suppliers are vendors outside the organization who sell their products, services, materials, and so on to the project team. Each project, therefore, is the customer of the preceding people, and each has customers to whom it passes on its work [6].
Internal or external customers show very similar patterns of behavior. For example, their definition of “value” is shaped by their own needs, their value set, and the current set of pressures acting on them. A common error is to assume, because everyone works for the same organization, that the needs are clearly understood. Not so, and this is a source of much aggravation in projects. In short, internal customers exhibit the same traits as external ones. The project manager must learn to listen to voice of the project customers, regardless of where these customers are located. (Note: The terms project stakeholders and project customers are often used interchangeably.)
Assuming that we may not have more than a one-hour meeting with the project customers, the Discussion Guide should contain three to four questions or topics of discussion. Everyone involved in customer contacts must use the same set of questions and in the same sequence to ensure consistency. Remember that after all interviews have been completed, all the information needs to be consolidated into a single report, consequently note taking is a critical step.
Identify the Team. This step is where we identify the team members that will do the actual interviews or customer contacts. The focus is on three major questions:
- Who from our team is best qualified to make the contacts?
- Do these team members have the time to make the contacts and process the information?
- When will these team members be trained to make effective contacts?
A useful strategy is to create teams of two members. For example, if we selected eight customers to contact, we create two teams of two members, with each team conducting four interviews. Having more than two members meet with one customer may inhibit the conversation. In addition, with a two-person team, one can ask the questions while the other takes notes. The prerequisite to being appointed to the team is to ensure that those selected have the time available to collect and process the information. Also, they need to be trained to the level required. (According to one expert, in a typical company, few project team members are properly trained to do these interviews, possibly a major reason for so many user-unfriendly products.)[10]
Finally, the interviewers need a proper budget to cover travel and other expenses, which is, of course, more critical when traveling to other cities or countries.
Contact Customers. Using the discussion guide, selected teams make the actual contact and conduct an interview with the project customers. Preparing for the interviews includes asking these questions:
- Are all logistics in place to ensure successful contacts?
- Have the customer contacts been notified?
- Has the method of capturing the information been defined and agreed to?
When preparing, we must ensure that all logistics have been taken care of so as not to interfere with the actual interviews; for example, travel time, venue, availability of the customer, and so on. Also, taking notes is an absolute requirement, since it is the only way to keep track of valuable information. Imagine trying to keep track of eight interviews without notes, particularly if several weeks have passed.
Process Information. Once all the interviews have been done, it is time to process the information into a cohesive report that will benefit the project. This can be done in a meeting where all those that interviewed customers collaborate in generating the report. The purpose of this meeting is to make sure that we get positive answers to the following questions:
- Has all the information from all the contacts been consolidated?
- Will a final report be written and circulated to all team members?
- Have lessons learned been captured to improve the next step of customer contacts?
A typical scenario for the meeting may look like this: Begin by asking for highlights, using the Discussion Guide. Each member will articulate findings, surprises, facts, customer needs, and so forth. Proceed to organize all the information into logical categories as agreed by the team members, for example, customer needs or customer frustrations. To rate and prioritize the needs, use the focus statement to establish the criteria for prioritization. Rated and prioritized needs will become so-called customer value drivers. At the end of the meeting we should have anywhere from three to five categories, with all items having a priority. The last step is to assign the responsibility of taking all information and generating a written report.
Build It into the Project Scope. Although this step is the real payoff from listening to the voice of the customer, it is sometimes forgotten. Keep in mind that all gathered information is useless unless it is built into the project. For example, one approach is to call a meeting of the project team, discussing the final report and identifying the implications or actions needed as a result of the discussion. Sharing the final report with management is also a viable option. In short, ensure that the message from the project customers is put to use by building it into the scope and design of project products and process. These questions may help you successfully complete this step:
- Have customer value drivers been identified?
- Have customer value drivers been internalized by the project team?
- Have customer value drivers been built into the scope and design of project products and process?
One structured way to translate the voice of the customer into the project scope and design is with QFD (Quality Function Deployment), discussed at length near the end of this chapter. Starting from customer value drivers (“What does customer want and in which order of priority?), QFD lays out sequential actions (“How do we meet what customer wants?”), building the drivers in the project scope or sometimes the project specification.
Utilizing the Customer Roadmap
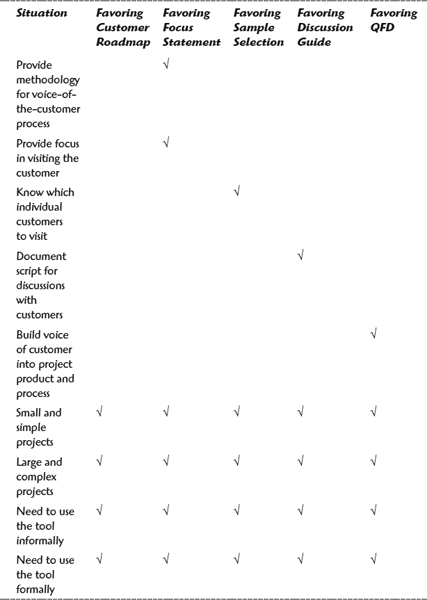
When to Use. The Customer Roadmap should be considered a must in larger projects, typically at the beginning of the project implementation when the scope is being defined. In fact, many product development teams deploy it even in preparing the project proposal for the project selection process. This allows the team to scope the project and incorporate the needed resources into the project plan. In some cases, there may be several sets of customer contacts. Each should have its own roadmap.
When you are developing the roadmap for smaller projects, the process can be very informal and flexible because of the tight budgets involved. An increasingly accepted practice in building maps is to develop a template for the company and quickly adapt it for individual projects. Regardless of the project size and complexity, developing the roadmap or adapting a template is a team activity, meant to ensure clarity and commitment.
Time to Develop. The size of the project dictates the time requirements for the Customer Roadmap. A typical Customer Roadmap in a smaller project can be built in as little as one hour of project team time, whereas more complex programs of customer contacts in large projects may take up to three or four hours to complete. In addition, efforts to obtain customer input require many resources and consume considerable time in large projects. For example, a set of customer visits by the members of the team may consume up to two days per week over six to eight weeks. By contrast, these same efforts in smaller projects may only take an hour or so.
Benefits. The Customer Roadmap aids in clarifying the needs of the project customers. Most team members concur that understanding the needs of the customers is vital, yet they may not be aware that there is a formal process to obtain the right information. The roadmap helps ensure that the right steps are taken in the right sequence. It also ensures that the proper rigor is taken to receive quality input from the project customers.
Another benefit becomes apparent when considering that what customers really want is often not well understood at the outset of a project. In particular, experience shows that in many software projects, 50 percent of the development cycle time is spent on the rework needed to include customer needs [9]. Having an adequate Customer Roadmap in place in a timely manner may help create a more meaningful project scope, reduce the rework, and help reduce time to completion.
Advantages and Disadvantages. There are two major advantages of the Customer Roadmap. It is
- Visual. Its visual depiction of the process to obtain customer input makes the process clear and simple.
- Educational. Because the Customer Roadmap is a relatively new tool for the project management community, it is helpful in educating team members of this new method to obtain quality input from the project customers.
Practice indicates the roadmap's disadvantage. It may be
- Ineffective when complex. This is the case when the Customer Roadmap is applied in planning complex customer contacts—for example, visiting many customers around the world.
Variations. Many variations of the Customer Roadmap are used in the industry, for example, McQuarrie's seven-step procedure [2]. Some are more comprehensive and detailed than others. The steps may be sequential or they may be designed to take place concurrently. The number of tools included may also vary.
Customize the Customer Roadmap. We have described the roadmap as a general-purpose tool, designed to match the needs of a variety of organizations managing projects. We can certainly increase its value if we adapt it to the project needs. Following are a few ideas about potential adaptation of the roadmap.
| Customization Action | Examples of Customization Actions |
| Define limits of use. | Use the roadmap in all large projects, whether for external or internal customers. |
| Use the roadmap in small projects flexibly and informally but following steps in the roadmap. | |
| Use separate roadmaps for new product development projects and other distinct application areas. | |
| Adapt a feature. | Append a Gantt Chart for clarity of roles, responsibilities, and time line. |
| Add a feature. | Create a glossary for new words associated with project customers to document new terminology. |
Summary
This section presented the Customer Roadmap, a tool for systematic approach for listening to the voice of the customer in projects. In larger projects, the roadmap is typically applied at the beginning of the project implementation when the scope is being defined. Smaller projects can also make a use of the roadmap, although in an informal and flexible manner. In essence, the value of the Customer Roadmap is in clarity of understanding the needs of the project customers, helping make an impact on the project outcome. The following box offers this tool's key steps.
The Focus Statement
What Is the Focus Statement?
The Focus Statement is an action guide for customer visits in order to obtain the meaningful voice of the customer. Used in preparation for the visits, the statement's essential purpose is to set the focus during the time that will be spent with the customer (see Figure 4.3). In particular, the statement first defines the reason for the visits and identifies the information to collect that will most benefit the alignment of project scope with the customer needs. It also establishes clear roles and responsibilities in the course of the visits, as well as their time line and the budget.
Customer Roadmap Check
Make sure that Customer Roadmap is properly structured. It should include steps such as:
- Develop Focus Statement.
- Prepare Sample Selection.
- Define Discussion Guide.
- Identify team.
- Contact customers.
- Process information.
- Build processed information into the project scope.
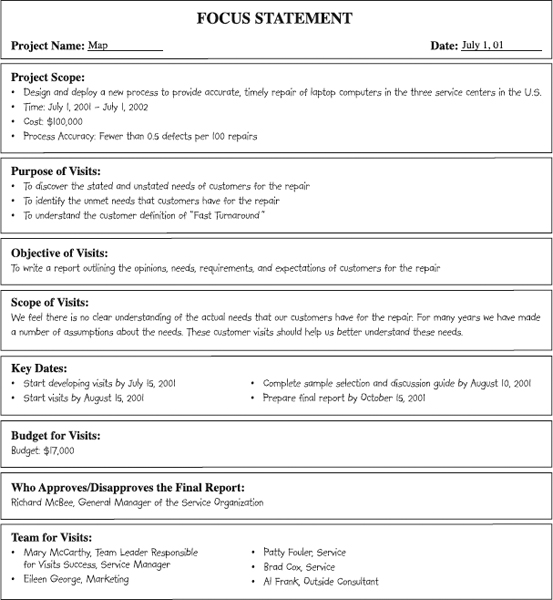
Figure 4.3 The Focus Statement.
Developing the Focus Statement
Collect Necessary Information. The development of a quality Focus Statement is based on details of the following:
- Project proposal
- Project team roster
The primary purpose of the project proposal here is to provide information on the preliminary project scope and objectives that will be used to construct the statement. We say preliminary because most of the proposals are preliminary in the nature of their information. To further detail the statement and create the visits team, you must look at the project team roster.
Restate the Project Scope. The ultimate purpose of customer visits is to enable the project scope of work that is in line with what customers want. Consequently, the whole effort should start and be led all the way throughout the visits by clear understanding of the following:
- What are project outcomes?
- What are project objectives?
To keep reminding the visits team of this, the project scope statement and objectives should be restated in the first box of the Focus Statement, with the particular emphasis on those areas that are most relevant to project customers (see Figure 4.3). In essence, this serves as the anchor for the entire focus statement and links the project scope with the reasons for visiting customers.
Clarify the Reasons. In this step we define the purpose, objectives, and scope of the visits. Together we call them the reasons for the visits. We begin by asking the following questions:
- What is the business reason for this set of visits?
- Why are we doing this set of visits?
- What is the mission of the visits team?
These questions help identify the purpose or the “why” of the proposed set of customer contacts. Continuing along this line of thought, you should ask the following question:
- What is the verifiable indicator that will show that we have accomplished what we desired from the visits?
Here the focus is on the objective for the visits (for an example, see the text box that follows, titled “From Dissatisfaction to Sheer Delight: Kano Model”). In other words, given the objectives of the project, develop a set of objectives for visiting customers (see Figure 4.3). This forces the visits team to clearly explain why they must visit customers in order to achieve the objectives of the project. A good question to ask at this point is this: What do we wish to learn from the customers?
Think of the scope of visits—the third element—as an insurance policy to validate the reasons for visiting customers. Accordingly, its purpose is to ensure that there is a full set of statements that explain reasons to visit customers. If the purpose and objectives for the visits are clear and sufficiently tangible, this box can be left unfilled (see Figure 4.3). Otherwise, answers to these questions may help fill it in:
- What specific project areas will be addressed by these visits?
- What are the specific areas of study for the visits?
- What are the specific areas that will not be addressed by the visits?
From Dissatisfaction to Sheer Delight: Kano Model
Japanese professor, Noriaki Kano, suggested three classes of customer requirements [1]:
- Dissatisfiers. Requirements that are expected in a project. In a car, a radio or steering wheel are examples, which are generally not stated by customers but assumed as given. If these features are not present, the customer is dissatisfied. Similarly, if we propose the project completion date and miss it, project customer will be dissatisfied. Dissatisfiers are “minimums,” or as some call it, the “must-haves” in a project.
- Satisfiers. Requirements that customers state they want. For example, a customer may want a moon roof. Typically, these requirements are options, but fulfilling them creates satisfaction. If a customer asks us to deliver the project by a certain date, and we do deliver, this is a satisfier.
- Delighters. The presence of features that customers do not expect may lead to their excitement and delight. This is what happened to many buyers when they first met with satellite navigational systems in automobiles. Beating the aggressive deadlines set by customers may delight them.
We can define objectives of our visits to include asking the project customers to identify the dissatisfiers, satisfiers, and delighters for our project. For example, if we meet our completion date, the customer may see it as a 7 in a scale of 1 to 10 (the highest). Thus, the obvious question is, what will it take to make it a 10? The answer may well be what we need to do to produce a “delighter.”
Set the Key Dates and Budget. This is where we define the classic elements of any action guide—the time line and the budget (Figure 4.3). The time line may typically include several key dates:
- The expected start and completion date of the visits
- Milestones such as the completion of the discussion guide, sample selection, final report presentation, etc.
Obviously, the intent is to harmonize the timing of the customer contacts with the overall time line of the project in a manner that helps complete the project and keep it in tune with its objectives. Establishing the budget for the visits is another act of sound management that is closely coordinated with the Work Breakdown Structure development and cost/resource estimating.
Establish Roles and Responsibilities. After defining the reasons for customer visits, we need to know who does what regarding the visits (see Figure 4.3). Several questions may help produce such information:
- Who is the decision maker who approves or disapproves the final report?
- Who will lead the visits team?
- Who are individuals making up the team?
- Who will be in front of the customers?
- Who will process the collected information?
- Who will generate the final report?
This question of who approves the report rightfully assumes that there will be a final report associated with the customer contacts. It is important to recognize who will have the final say on the report. Generally, this should be the person responsible for the project, typically the project manager. Next, the person who leads the visits team is responsible for planning, executing, and delivering the results of customer contacts. It is important to ensure that the person selected for the job has the time and skills to deliver the expected results. It can be one of the team members or even an outside facilitator.
Another issue is the visits team composition. While listing the members in the Focus Statement is a recommended approach, there is no need to address the remaining three questions in the statement. Rather, address them outside of the statement in order to select who is responsible for being in front of the customers and for other tasks such as writing the final report. Make sure that the persons selected have the necessary time and skills.
Document the Focus Statement. Using a team approach to develop the Focus Statement is a very efficient strategy. At the end of team meeting, the project manager ensures that all documentation is properly identified, saved, and distributed to all those involved.
Utilizing the Focus Statement
When to Use. The Focus Statement should be started immediately after or in concurrence with the Customer Roadmap. Perhaps the most suitable time for this is at the beginning of the project in conjunction with the development of the detailed project scope with Work Breakdown Structure (WBS). (WBS is featured in the next chapter.) Most often, this tool is used in larger projects, particularly those that have strategic value to the organization. This does not preclude its application in smaller and medium-sized projects, where it is valued as a checklist rather than as a fully developed written statement. Perhaps the most frequent users are new product development projects.
Time to Develop. It takes a couple of hours of team time to prepare the Focus Statement for a larger project. By contrast, smaller projects that use it as a checklist may spend 10 to 15 minutes in practicing the focus in their contacts with customers.
Benefits. The value that the Focus Statement creates for the users is related to the customer, team, and management participation. As for the customer, it ensures that the team collaborates to create alignment on the need, purpose, and results for their involvement in order to generate a customer-centric project scope and Work Breakdown Structure. Instead of seeing the customer input as an ancillary or trivial event, as is so often the case, the statement gives customers a premier role. Further, the Focus Statement allows the team to perform the “due diligence” of planning a set of customer contacts prior to investing the time and money in the actual set of visits. Finally, the Focus Statement also helps engage management and other stakeholders by ensuring their participation in reading the customer voice. To fully understand the value of the statement, imagine that it doesn't exist. In this case, the probability of building a project scope that deviates from customer needs, reworking the scope, and delaying the project is significantly higher.
Advantages and Disadvantages. The Focus Statement's advantages are that it is
- Simple. Its intuitive nature and straightforward structure give it the appeal of simplicity, a great point when it comes to selling it to new users.
- Educational. It helps educate team members who have not previously contacted project customers.
Disadvantages are that the statement may be
- Cryptic. Because of the format of this tool, there is a risk of being too cryptic—that is, of shortening information to the point of limiting communication.
- Trivialized. The false assumption that everything is known may preclude full participation in the development of the Focus Statement, creating the danger of reducing it to triviality.
Variations. Similar to the Focus Statement the variations are the addition of the objective or purpose statement of your project, [2] and the purpose statement table.
Customize the Focus Statement. We think of this tool as a generic one, designed to meet the needs of across-industry users. To derive a greater value from it, we need to customize it per our project needs. Several ideas are offered in the following table to help you visualize possible customizations.
| Customization Action | Examples of Customization Actions |
| Define limits of use. | Use the full-fledged, written statement for all larger projects. |
| Use as a checklist for all smaller projects. | |
| Adapt a feature. | Adapt the scope box to include special questions for new product development projects such as: |
| —Is this a replacement of a previous product/product line? | |
| —Is the intent of the new product to reduce the manufacturing cost? | |
| —Is the new product a revolutionary design? | |
| —Is the new product aimed at a new market? | |
| Add a feature. | Add the cost code to the budget section of the statement. |
| Add to the budget section the Work Breakdown Structure element to which customer visits belong. | |
| Add the name of the executive sponsor for customer visits. |
Summary
The Focus Statement, an action guide for customer visits, is central to this section. Perhaps the most suitable time to develop the statement is at the beginning of the project in conjunction with the development of the detailed project scope with WBS. Used in both larger and smaller projects, the statement gives customers a premier role. It allows the project team to plan for a set of customer contacts prior to investing the time and money in the actual set of visits. Customizing the statement for specific project needs increases the benefits the statement provides. The presentation highlights are recapped in the following box.
Focus Statement Check
Make sure that Focus Statement is appropriately constructed. It should include the following:
- Preliminary project scope
- Purpose, objectives, and scope of visits
- Key dates and budget
- Who approves the final report
- Team for visits with responsibilities.
Sample Selection
What Is the Sample Selection?
The Sample Selection tool identifies the right individuals in the customer organization that will provide valid and usable input information for the development of the customer-centric project scope (see Figure 4.4). Conversely, the tool's purpose is to help avoid contacting individuals that do not have information or, worse yet, that provide bogus or invalid input. The Sample Selection tool should not be confused with market segmentation tools, typically provided by marketing or sales organization, and are generally “quatitative” in nature.
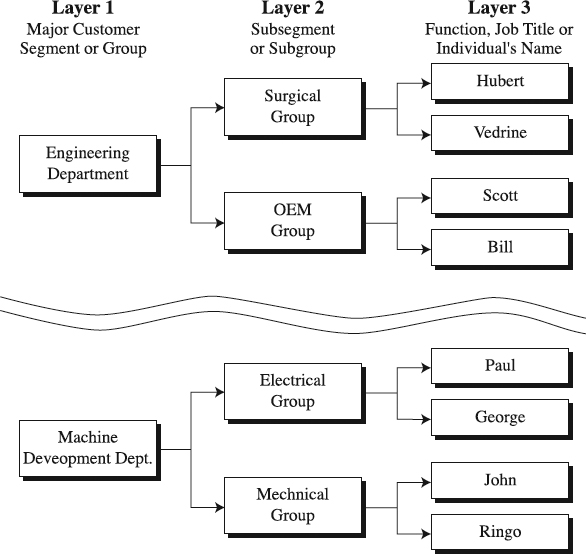
Figure 4.4 The sample selection.
Making the Sample Selection
Collect Necessary Information. Two information inputs dictate the quality of the sample selection:
- Focus Statement
- Customer organization chart
The Focus Statement's purpose, objectives, and scope of visits suggest the right target crowd to scan in order to select the right individuals who can provide customer input. Dissecting and understanding the target crowd is enabled by the information contained in the customer organization chart: organizational groupings, departments, job positions, and names.
Identify the Customer Segment or Group. The Sample Selection tool is divided into layers, with layer 1 as the highest level of segmentation. For internal customers, this could be major divisions, business units, departments, or any customer grouping that represents a major segment. For example, as shown in Figure 4.4, layer 1 includes engineering and machine development departments. They are major customer groupings in a project chartered to internally design and deploy the balanced scorecard for development projects. For external customers, it could represent customer segments per industry, business type, or geographic areas. It can also represent industries or even specific applications (for an alternative to customer visits, see box titled “Beyond Customer Visits” that follows). An example of the specific application is the high-tech fabs that may be a target customer for a new product project.
Select the Customer Sub Segment or Subgroup. Once layer 1 has been completed, selecting customer subgroupings in layer 2 is next. Here the rule is simple: All the customers in layer 2 must be a subset of those in layer 1. Refer again to Figure 4.4. The engineering department is divided into two groups: surgical and OEM (original equipment manufacturers). These two subgroupings work on projects that differ in almost any dimension—nature of projects, types of customers, life cycle, design techniques, and so forth. As a result, they have different needs with regard to the balanced scorecard, which the team in our example project has to internalize.
Choose Individuals. With layer 2 we have finished dealing with groupings. Now, in choosing layer 3 contacts, we face individuals—persons from the layer 2 groupings. They are specific people with specific functions, job titles, or, better yet, names, as indicated in Figure 4.4. This makes it simpler to track them down and contact them. At this point, we have made our Sample Selection.
One disadvantage of customer visits is that they occur within a relatively short period of time, while the project may take months if not years to meet its objectives. During this time, the needs of the customers may have changed [2]. Then, there is the need to keep the project team engaged and morale high, which can be achieved through continuous input from the project customers.
An emerging type of customer contact that some firms have adopted is called the panel of experts, also known as customer councils [2]. The experts naturally are the project customers who provide ongoing feedback at a relatively low cost. The format is rather simple. We ask a small number of our project customers to agree to be in the panel for the duration of the project or for an acceptable period of time, say, about three months. To select the panel, we use the Sample Selection form. Our project customers agree to meet on a regular basis to provide input and answer specific questions about their needs. Clearly, we should ensure that the meetings do not become a burden to our busy customers by showing flexibility. For example, hold the meetings during the lunch hour or at the convenience of our customers.
The preparations for meeting with the panel are similar to those of a customer visit. That is, we need the Focus Statement, Sample Selection, and Discussion Guide. Apparently, there are many clever ways to obtain input from the customers; many require little or no investment. All it takes is a commitment to listen to the needs of our project customers.
Utilizing the Sample Selection
When to Use. Whether smaller or larger, projects typically make a Sample Selection of their customer contacts after the objectives of the customer contacts have been drafted in the Focus Statement. While more structure and details will characterize creating of a Sample Selection in larger projects, simplicity and informality are the crux of smaller projects' approach to the selection.
Time to Use. The Sample Selection tool can be completed in as short as one hour, although additional research may be necessary. For example, obtaining the contact information for individuals may require additional time.
Benefits. The Sample Selection allows for a rational selection of customer contacts that are capable of providing usable and valid information for customizing the project scope. This prevents a tendency to contact customers that do not have the information we require, which often results in wasted energy and higher risk for the project.
| Customization Action | Examples of Customization Actions |
| Define limits of use. | Don't use the tool to accommodate very complex market or customer segmentation schemes (e.g., segmentation with many subsegments). |
| Adapt a feature. | Add more pages to represent additional customer segments and provide information about the project customers. |
| Add a feature. | If the Sample Selection is based on geography, add a map with labels calling out the customers. |
| Add a sheet with quantification on each of the segments—for example, number of customers, percent of the market, volume of sales in dollars. |
Advantages and Disadvantages. The Sample Selection is simple to use and visually effective in communicating its message. However, it is not always suitable for the selection of contacts in extended and large projects because it may grow big and complex
Customizing the Sample Selection. Tailoring this tool to account for specific project situations will create more value than using its generic, across-the-industry version that we have described here. Above are several ideas about how you can go about this customization.
Summary
In this section we detailed how to determine and utilize the Sample Selection tool. This tool creates the benefit of a rational selection of customer contacts that are capable of providing usable and valid information for customizing the project scope. More structured in larger projects and more flexible in smaller projects, the Sample Selection is typically prepared after the objectives of the customer contacts have been drafted in the Focus Statement. The following box briefly summarizes what the structure of the Sample Selection needs to include.
Sample Selection Check
Verify that sample selection has the required structure. It should include the following:
Layer 1—Major customer segment or group
Layer 2—Subsegment or subgroup
Layer 3—Function, job title or individual's name
Discussion Guide
What Is the Discussion Guide?
The Discussion Guide is a documented script or logical sequence of topics for discussion with project customers (see Figure 4.5). Its purpose is to help orchestrate each customer contact to make certain that it yields valuable information. This is accomplished by addressing the right topics in the right sequence and in the right priority during each customer interview. Also, with the same set of questions for each interview, the guide ensures repeatability across all the interviewed customers.
Constructing a Discussion Guide
Once the Sample Selection has been made, the customer visits team needs to have a selection of questions or topics for discussion with the project customers. The creation and selection of the questions occurs during the constructing the Discussion Guide.
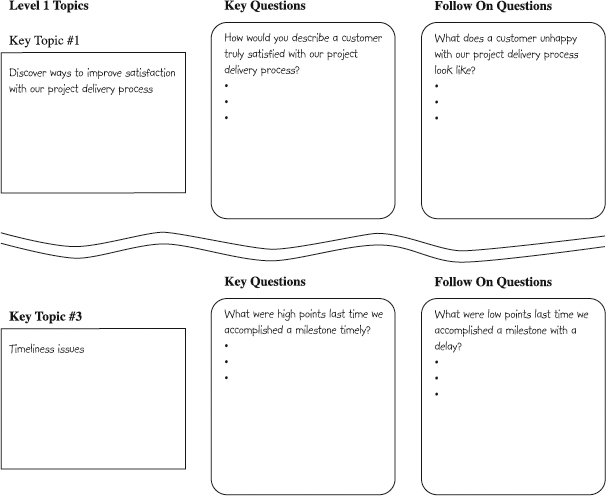
Figure 4.5 The Discussion Guide.
Collect Necessary Information. The major information inputs are the Focus Statement and the sample selection. Both will guide you selecting topics and phrasing questions for the discussion guide.
Frame the Discussion Guide. In the busy business world, odds are the customer contact may not have more than one hour for an interview. Generally, you can fit three or so topics or questions for discussion within this time slot. The philosophy here is that the objective is depth and not quantity; the idea is to get sufficient information about one topic and not small bits on many topics. Another objective is to have every interviewer use the same Discussion Guide filled with the same set of questions and in the same sequence to ensure consistency across interviews. Once all interviews have been completed, this enables you to consolidate all the information into a single report.
Identify Topics. What are key topics or important items for which you need customer input? The simplest and often most effective way to identify topics is to start with a brainstorming period, asking team members to list all the questions they believe should be discussed. Reminding the team of the reasons for contacting customers, outlined in the Focus Statement, ensures the necessary focus in the brainstorming session. When the questions have been captured, proceed to categorize them, organizing them into related topics or subjects. A popular tool to do this is the Affinity Diagram (see Chapter 8). You will likely end up with as many as seven or eight key topics.
Prioritize Topics. The next step is to prioritize the topics, not the individual ideas. Start by defining the prioritization criteria—always starting from the Focus Statement—and then use the criteria against each of the topics. The challenge now is to identify the top three topics that can fit into the framing of the discussion guide. Thus, assume that only the top three topics will be addressed. (We call them level 1 topics.) Admittedly, this will put pressure on the team, as all the topics will seem important. Some alternatives are to extend the duration of the interviews or to add more customer contacts to respond to topics four, five, six, and so on. Still, the most likely approach is three key topics for a one-hour interview.
Phrase Questions. With the three key topics identified, proceed to fill the Discussion Guide tool as in our example from Figure 4.5. Start by entering each of the three topics in the leftmost boxes. Then proceed to phrase questions that will enable the customer to address the topic under discussion. These questions are in two forms: key questions and follow-on questions. Like two sides of the same coin, they ensure that the corresponding level 1 topic is properly addressed. Together, they provide a holistic view of the issue.
Note that lots of such questions were already identified in the brain-storming session when identifying topics. Now that we know the top three topics, we may ask what question we missed in the brainstorming. This is helpful in developing a meaningful and comprehensive list. As a rule, we may have five to ten questions per key topic, including both key and follow-on ones. Finally, key questions should be entered in the middle and follow-up questions in the rightmost boxes in Figure 4.5. It is helpful to test the Discussion Guide with the team members, asking them to role-play the customer and with one team member asking all the questions in the form. Validating the choice of questions with experienced peers who are not involved in the project is also a beneficial tactic. This will help the team phrase the questions more appropriately and become familiar with the sequence of the topics.
Utilizing the Discussion Guide
When to Use. The most appropriate time to build a Discussion Guide is after the Sample Selection tool has been made and before any customer contact takes place. Logically, larger projects will strive for a more formal and structured guide, while smaller projects will demand an informal approach.
Time to Use. A team meeting is perhaps the most effective way of developing the discussion guide. This meeting should take about one hour, although for more challenging assignments, it may take up to two hours.
Benefits. Left to its own devices, a customer contact can become an exchange of ideas that are not relevant to the project. In this case, a customer interview or customer contact is not a dialogue, nor is it a discussion. That is what the Discussion Guide prevents from happening. Instead, it makes the interview a forum to enable customers to articulate their needs in their own language and address the topics of relevance (see box that follows titled “The Art of Asking Questions”). For the relevance to occur, the guide forces the team to prioritize topics and approach all customer contacts consistently, with the same questions. This allows for more productive customer contacts and the elimination of the proverbial “visit creep”; this is a colloquial term that describes conversations that move away from the topic, and end up covering subjects of little or no relevance. It may also refer to visits that take much longer than anticipated.
Advantages and Disadvantages. Designed for simple interviews where topics are relatively clearly defined, the Discussion Guide offers an advantage of simplicity. Its downside is in its inability to cover the note-taking aspect of the interview.
Variations. Several variations of Discussion Guides are available. One of them is conceived as a simple list of the topics and subtopics to be discussed, appearing like a script [2]. Market research organizations have their own formats, typically called topic guides.
Many potential pitfalls stem from how we ask questions in customer interviews. Following are a few tips on the kind of questions to avoid:
- Don't let personal biases get into the questions.
- Don't use “leading the witness” questions. This is a term from the legal world where questions are asked that lead the customer to give a desired answer.
- Don't ask restrictive questions. These stifle the customer's ability to answer in full.
Three types of questions that are particularly useful for customer contacts include the following:
- Open-ended questions. These questions enable customers to articulate their needs. For example, “What are the top three problems that you face in our project delivery process?” As we can see, the customers are not constrained and are free to list the problems based on their perception and priorities.
- Visualizing questions. These are helpful in getting customers to visualize what is possible. For example, “What if your computer could also notify you that your project is exceeding the schedule and resource threshold of variance?” While this capability may not be readily available in a computer, it helps customers think in innovative ways.
- Reversing questions. These involve answering a question with another question. For example, if our customer says, “What technology will you use in your new project?” we respond with “What would the technology need to do to meet your needs?”
Customize the Discussion Guide. This generic guide will certainly create a significant value for the user, although we believe customizing the guide to match one's project situation can generate more value. Several ideas are provided in the following table to help you visualize the effort of customizing.
| Customization Action | Examples of Customization Actions |
| Define limits of use. | Use discussion guides for face-to-face conversation (they are not a survey to be filled by the project customers). |
| Adapt a feature. | Add more questions under the main topics (if longer interviews are approved). |
| Add a feature. | Add more pages to help in the note-taking task. |
| Include a diagram or a photograph to help the customer better visualize the question. |
Summary
Covered in this section was the Discussion Guide, a script of topics for discussion with project customers. The most appropriate time to build a Discussion Guide is after the Sample Selection tool has been made and before any customer contact takes place. In so doing, the guide makes the interview a forum for customers to articulate their needs in their own language and address the topics of relevance. Consequently, the guide forces the team to prioritize topics and approach all customer contacts consistently, with same questions. The value of the guide can further be enhanced through its customization to specific project needs. In the box that follows, we summarize briefly how to structure the discussion guide.
Quality Function Deployment (QFD)
What Is QFD?
QFD is a customer-driven planning tool that builds the voice of the customer into the project. The intent is to ensure that customer requirements are integrated into each piece of the project—from the scope definition process to other project planning processes to project controlling processes to closing processes—all geared to produce the project product. For this to be possible, QFD focuses on identifying customer requirements and translating them into technical language related to the project delivery. When this is successfully done, every decision in the project management process helps meet the expressed requirements of project customers.
Constructing a QFD
QFD uses a set of matrices to relate the voice of the customer (i.e., customer requirements) to project requirements (see Figure 4.6). The figure makes obvious why QFD is often called the “House of Quality.” The steps in building the House of Quality are as follows [12]:
- Prepare customer requirements
- Identify project requirements.
- Link the customer requirements with the project requirements.
- Benchmark.
- Develop target values.
- Stop or continue.
Discussion Guide Check
Verify that Discussion Guide is appropriately structured. It should contain the following elements:
- Three level 1 topics
- Key questions to address the topics
- Follow-on questions to address the topics.
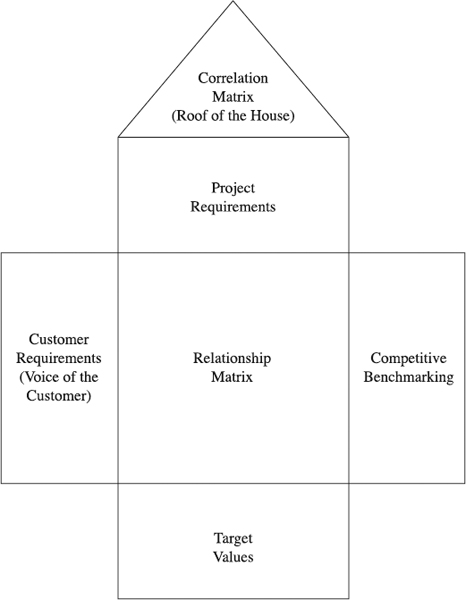
Figure 4.6 The House of Quality.
Building the House of Quality through these steps may come across as a very complex procedure, typically reserved for large projects. Actually, we hold the opposite view. It should be a simple tool: fast to deploy, formally or informally, with the purpose of serving primarily smaller projects that constitute the majority in the universe of projects. This is why our example is from a small project that took several months and some 200 person-hours to complete. The scope of the project included the development of the standard PM methodology document for a business unit in a technology corporation.
Prepare Customer Requirements. The voice of the customer is the primary input to building the House of Quality. Generally, this is the most critical and difficult step because it has to capture the essence of what the customers want. In an ideal case, the preferred scenario to identify customer requirements would follow the process of using the tools we have discussed so far: Customer Roadmap, Focus Statement, sample selection, and discussion guide. Their use would result in obtaining clear information concerning customer needs. In House of Quality terminology, customer requirements are also called the “whats”—meaning, “What do customers want?” or, if they represent prioritized wants, value drivers.
Informally, our example stuck with this process and identified the top five requirements (see Figure 4.7). In a nutshell, the customers—a group of seven managers and project managers from the business unit—wanted a short document that reflected their company culture, was clear to the target user, and related to the workgroup level of projects. Also, the methodology had to be based on the company's project life cycle.
These five requirements were extracted from a longer list of requirements that were prioritized by the sample of interviewees. The idea was to use a small number of requirements so that the House of Quality is simple and not time-consuming. A number of companies using the House of Quality follow this logic, limiting the list of “whats” to fewer than ten. The risk of having too many “whats” can be visualized from the “2500-Cell Nightmare” box that follows.
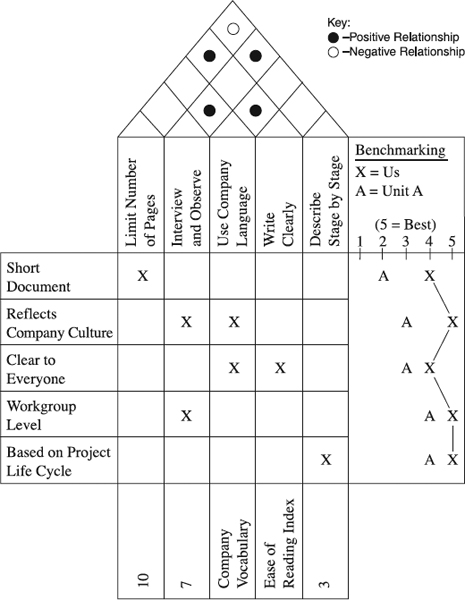
Figure 4.7 The House of Quality for a project.
Pat: What's happened with your QFD? It looks like it's far from being completed.
Jim: My team quit, and I resigned as the project manager. That's why it is incomplete.
Pat: All your team members have used QFD before, right? And then they quit. It doesn't make sense.
Jim: They just stopped coming to our meetings to develop QFD. They gave me all kind of excuses, but I know they believe it's too much work for nothing.
Pat: Too much work for nothing?
Jim: We spent 16 hours so far. We need perhaps 24 hours more. They say our QFD is too big, and, as such, it is a nightmare to use it. Plus, it takes too much time to build it.
Pat: Jim, it is a 50 (whats) × 50 (hows ) cells QFD. Frankly, it is so cumbersome it is almost impossible to use in a beneficial way. And, yes, they are busy people who cannot afford to spend a whole week constructing a QFD. Why don't you reduce it?
Jim: I wanted to. I told them. But they didn't want to consider QFD anymore. That's when I resigned.
This is a case from the real world, where a misuse of QFD turned people against the project manager. The moral to the story: QFD is a great tool only when used properly.
Identify Project Requirements. Customer requirements are expressed in the language of customers. This language has to be translated into the language of the project team planning and implementing the project. Such translation is a list of project requirements. The key is that project requirements are measurable, since their output needs to be validated against the target values identified in the step “Develop Target Values.”
Put it differently, project requirements are “hows” by which the project team acts to make “whats” happen.
In our example in Figure 4.7, there are a number of project requirements to consider. After a quick brainstorming, ten “hows” were listed and prioritized. The top five made it in the House of Quality. They are as follows:
- Limit the number of pages of the methodology document.
- Conduct interviews with project and other managers, observe their work, and review their project documents.
- Use company terminology when writing the methodology.
- Write the methodology document in a clear and readable fashion.
- Describe methodology stage by stage in their project life cycle.
The roof of the House of Quality deals with the correlation between any pair of project requirements. Various symbols may be used to describe the correlation. For simplicity, we use ![]() to denote a positive relationship and
to denote a positive relationship and ![]() for negative relationship. For example, through conducting interviews and observing, we learn about company language, which helps us in using company terminology when writing the methodology. Apparently, there is a positive relationship in this pair of “hows.” By contrast, in describing the methodology stage by stage, there will be some repetition. For example, each stage will use progress reviews. Consequently, describing the progress review in each stage will lengthen the methodology, which is in conflict with our “how” of limiting the number of pages in the methodology. Apparently, the two “hows” have a negative relationship.
for negative relationship. For example, through conducting interviews and observing, we learn about company language, which helps us in using company terminology when writing the methodology. Apparently, there is a positive relationship in this pair of “hows.” By contrast, in describing the methodology stage by stage, there will be some repetition. For example, each stage will use progress reviews. Consequently, describing the progress review in each stage will lengthen the methodology, which is in conflict with our “how” of limiting the number of pages in the methodology. Apparently, the two “hows” have a negative relationship.
Why do we analyze the relationships and build the roof? The reason is that these relationships indicate how one change of project requirements affects others, as well as their trade-offs. We have seen this in the relationship of the two “hows” of limiting the number of pages and conducting interviews. Building the roof, then, enables us to view project requirements collectively rather than individually [12].
Link the Customer Requirements with the Project Requirements. The heart of the House of Quality is the relationship matrix. It uses a similar manner as used in roof of the house to indicate whether the “hows” (project requirements) adequately address the “whats” (customer requirements). Driven by the need for simplicity and lack of time, we use X, a simple way to show that there is a strong relationship between a “what” and a “how” (see Figure 4.7). For example, using company language will strongly help with both to reflect the company culture and to make the methodology clear.
The lack of strong relationship between a “what” and a “how” indicates that the customer requirement is not addressed, or that the project will have a problem meeting the requirement. On the other hand, if a “how” does not support any “what,” chances are it is a redundancy. Most of QFDs applied in larger projects tend to use more sophisticated types of relationships. Instead of our simple X, they may use symbols for strong, medium, and weak relationships. These may be quantified, and when multiplied by the level of priority, they help us obtain importance weightings for each “how” [1].
Benchmark. This step takes care of two things: it assigns an importance rating for each customer requirement and benchmarks our project against others. We haven't rated the importance of “whats” in our example. Simply, we found them to be equally important, a valid choice for a small project coping with scarce resources. A larger project would benefit from having the ratings. In particular, they enable us to focus on requirements that customers value most.
Benchmarking highlights strengths and weaknesses against other existing or competitive projects. Since our project is internal to the business unit, it doesn't compete against other similar projects. However, management is expected to ask how our methodology stacks up against the methodology of the business unit A, which is viewed companywide as being the most mature in project management. The benchmarking shows, for example, that our methodology is much shorter. Also, it better reflects the company culture. In a technology company that highly appreciates short documents and its own cultural values, these are two major improvements over the unit A methodology. Then what is the purpose of bench-marking? It is to discover opportunities for improvement. This is, for example, very important in product development when facing very strong products of competitors.
Develop Target Values. Earlier we mentioned that it is of key importance for project requirements to be measurable. We come to address that in this step. Typically, a company performs in-house deliberations (or testing) and translates project requirements into target values. In our example in Figure 4.7, our target value for the “how” of limiting the number of pages for the methodology is ten pages. Simply our belief is that if the methodology is longer, our time-strapped project managers won't use it. Similarly, we rely on our experience in determining that interviews with seven managers and project managers will be sufficient to extract necessary information in a tight schedule. For writing clearly, we set our target at 45 percent Flesch-Kinkaid ease-of-reading index. In case of projects catering to external customers, the House of Quality often evaluates project requirements of competitive projects. That helps them establish target values for their project's “hows.”
Stop or Continue. Many projects use only one House of Quality. This helps them build customer requirements into the project planning process. Going beyond this step are usually larger projects that see value in carrying the voice of the customer throughout the project implementation process. For this they build three more houses of quality (see Figure 4.8). In this process, “hows” from first house become “whats” of the second; “hows” of the second become “whats” of the third, and so on. The idea is to relate customer requirements to successively lower-level chunks of project work, all the way to the operational level. In a sense, this is the same logic we apply in Work Breakdown Structuring: get to the level where the work gets done—the work package level. Such an approach really ensures that customer voice is built into project basic building blocks. Once one or four houses of quality are finished, reviewing and refining them is a useful last step.
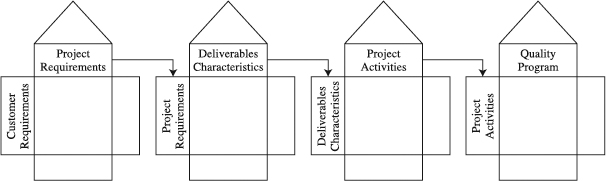
Figure 4.8 The four Houses of Quality.
Utilizing QFD
When to Use. It is not an overstatement to say that every project, large or small, would benefit from developing the House of Quality early in the project as part of the project scoping and planning. Such application is most meaningful when the development of the House of Quality follows a few guidelines. First, use a smaller House of Quality, with one level, because smaller houses tend to be more effective than the large ones. Second, build the House of Quality with the involvement of the team. Third, make sure the “whats” really come from customers. Finally, invest in training people on how to construct a House of Quality and mandate its use in each project. A disciplined emphasis on these guidelines can help build a customer-driven culture that looks at the House of Quality as a way of life.
Time to Use. The time necessary to complete a House of Quality depends on its size and the number of people involved. A small House of Quality such as one from our example in Figure 4.7, which involves three people, took about 45 minutes. Five or six project team members can easily spend five or six hours each to build a larger House of Quality, say, ten (“whats”) times ten (“hows”).
Benefits. There is strategic as well as tactical value in applying the House of Quality to projects. At the strategic level, the House of Quality offers a way out of the traditional narrow focus on project results that are measured at the project completion. This new way with the House of Quality concentrates on creating the process of how to accomplish these results, ensuring that the voice of the customer drives the project, rather than the desires and opinions of the project members. Tactically, such a new approach obliterates the tradition of the project planning process in which project teams assume to know what customers want, scoping and defining projects that will be later rescoped and redefined to meet actual customers needs. That waste of rescoping and redefining is gone when the House of Quality is applied, because it necessitates the customer requirements to be identified first and serve as a starting point in project planning. This also provides a common forum for dialogue between functional groups involved in the project.
Advantages and Disadvantages. The House of Quality' advantages are in its
- Conceptual simplicity. The House of Quality is an easy-to-understand tool because its foundations are simple, logical, and grounded in common sense.
- Visual power. At a glance, you can fathom the message of the House of Quality, which makes it a useful communication tool to keep the project team in alignment.
Major disadvantages are related to the tendency of some project teams to grow a large House of Quality, which makes it
- Cumbersome. If the list of customer needs exceeds ten, the House of Quality may become difficult to follow and tedious.
- Time-consuming. Some team members may perceive it as too much work at the front end of the project.
Variations. Plenty of matrices are used in the industry to manage the process of translating customer requirements into the project scope. Names for them vary from customer matrix to decision-making matrix.
Customize the House of Quality. Our goal in describing the House of Quality was to provide details on how to build and utilize a generic House of Quality that can benefit projects across industries. We can get more value out of this tool if we tailor it to the needs of our own projects. Following are several ideas to point you in the proper direction for customization.
| Customization Action | Examples of Customization Actions |
| Define limits of use. | Use the House of Quality in all large projects regardless of project type, either one- or four-level format will be suitable. |
| Use one-level House of Quality in smaller projects, with maximum of five “whats” and five “hows.” | |
| Adapt a feature. | Compare target values with those of competitors (for product and software development projects). |
| Add a feature. | Generate a large-format (wall-size) version of the House of Quality for everyone in the team to view. |
Check to make sure that the House of Quality is appropriately structured. It should include the following:
- Customer requirements (voice of the customer, “whats”)
- Project requirements (“hows”)
- Roof of the house (correlation matrix)
- Relationship matrix
- Competitive benchmarking
- Target values.
Summary
In this section we presented QFD (the House of Quality), a tool that helps you build customer voice in the project scope. Large or small, each project benefits from identifying the customer requirements in QFD, serving as a starting point in project planning. When that is the case, QFD ensures that the voice of the customer drives the project, rather than the desires and opinions of the project members. This also provides a common forum for dialogue between functional groups involved in the project. Customizing QFD to account for specific project needs further augments its value. A summary of QFD structuring is given in the box above.
Concluding Remarks
Five tools that we covered in this chapter—Customer Roadmap, Focus Statement, Sample Selection, Discussion Guide, and QFD—are selected as a set of complementary tools, often referred to as customer intimacy tools. Together they can help you listen to the voice of the customer and then build it into the project product and process (see the summary comparison that follows). Although their primary purpose is to be deployed as a toolset, it is not unusual to see them employed individually.
Used individually, each tool serves a specific purpose. The Customer Roadmap provides a systematic approach to planning and organizing the voice-of-the-customer process. The reason for customer visits and what information to collect are at the heart of the Focus Statement. The Sample Selection tool identifies the right individuals in the customer organization that will provide valid information. The Discussion Guide allows you to document the script or logical sequence of discussion with customers. Finally, once the voice of the customer is heard, QFD helps incorporate that voice into the project. Overall, the use of the tools is formal and documented in large projects and informal in smaller projects.
Summary Comparison of Voice-of-the-Customer Tools
References
1. Shillito, M. L. 2001. Voice of the Customer. Boca Raton, Fla.: St. Lucie Press.
2. McQuarrie, E. F. 1998. Customer Visits. Vol. 2. Thousand Oaks, Ca.: Sage Publications.
3. Goetsch, D. L. and S. B. Davis. 2000. Introduction to Total Quality. 3d ed. Upper Saddle River, NJ: Prentice Hall.
4. Hammer, M. and J. Champy. 1993. Reengineering the Corporation. New York: Harper Business.
5. McKenna, R. 1995. “Real-Time Marketing.” Harvard Business Review 73(4): 87–95.
6. Scholtes, P. R. 1996. The Team Handbook. 2d ed. Madison, Wis.: Joiner Associates.
7. University of Michigan Business School and American Society for Quality. 1998. American Customer Satisfaction Index: 1994–1998. Ann Arbor: University of Michigan Press.
8. Thompson, A. T. and A. J. Strickland. 1995. Crafting and Implementing Strategy. Boston: Irwin.
9. Hoch, D. J., C. R. Roeding, G. Purkert, and K.S. Lindner. 2000. The Secrets of Software Success. Boston, Harvard Business School Press.
10. Norman, D. A. 1998. The Invisible Computer. Cambridge, Mass.: The MIT Press.
11. Shillito, M. L. 1994. Advanced QFD. New York: John Wiley & Sons.
12. Evans, R. J. and M. W. Lindsay. 1999. The Management and Control of Quality. St. Paul, Minn.: South-Western College Publishing.