
Chapter 5: Modeling Data by Using Entities
All applications are based on data. We use them to view, create, edit, and delete information relating to the business context in which we work. For everything to work as smoothly as possible, we must design a good data model. All this in OutSystems is supported by Entities, which are representations of native SQL tables.
This chapter focuses on explaining how we can create our data models and what their foundations are. With this, we can start building a scalable and easy-to-maintain application from scratch.
The chapter covers the following topics:
- Exploring database Entities
- What are Static Entities?
- Modeling data
- Bootstrapping data into Entities from Excel spreadsheets
- Exercise 1 – creating a data model
By the end of the chapter, you will understand the concept of Entities, their purpose, and how we can relate them in order to obtain a robust, performing, and coherent repository of data and information for use in our applications.
Note
To best illustrate how to build a data model, we will start the development of our demo application from here.
The application will be to support the help desk of a conventional company with an IT department.
Technical requirements
Check out the following video to see the code in action: https://bit.ly/3xoANVs.
Exploring database Entities
As said before, database Entities are representations of tables that support our applications.
Note
A table is a structure for organizing and displaying information, with data arranged in columns and rows. Information is displayed as text, using words and numbers, and grid lines may or may not be present.
To this purpose, they have the following characteristics:
- Attributes: Attributes are the fields where we store data. They can be of several simple types. We can define some properties, varying according to the configured type, and one of the common properties is the mandatory configuration. The possible attribute types are as follows:
- Text
- Integer
- Long Integer
- Decimal
- Boolean
- Date Time
- Date
- Time
- Phone Number
- Binary Data
- Currency
- Identifier
- Primary keys: The primary key in OutSystems is called the Entity Identifier. This is created automatically at Entity creation time and cannot be a composite key. The Entity Identifier can only be of the Long Integer, Integer, Text, or other Identifier (from another Entity, making a one-to-one relation) type. It is a mandatory field. Although not a good practice, an Entity Identifier attribute can be deleted, but with the downside that from that moment on, that Entity cannot be related to others.
- Foreign keys: Foreign keys are attributes that define the relationships between Entities. A foreign key in an Entity refers to a primary key of the Entity to be related.
- Indexes: As is common in relational databases, Entities allow the creation of indexes. These are used to optimize searches. By creating an index for an attribute often used in obtaining information, it is easier and faster for the SQL engine to return the expected result. We have to be aware that indexes affect performance for data insert and update operations. Those indexes are also very useful to create unique constraints on an Entity, ensuring a more robust data model.
Foreign keys have a very useful parameter called Delete Rule. This parameter is used to guarantee referential integrity between main Entities and referenced Entities.
For this purpose, this attribute can have one of three values:
- Protect: With this value, the platform does not allow deleting the record in the main Entity while there are records in the referenced Entity associated with it.
- Delete: In this case, the platform deletes the records in the referenced tables that are associated with the record we want to delete in the main Entity. This is the cascade effect.
- Ignore: This last value has to be used very carefully and after we ensure that there is no impact on data integrity. If we choose Ignore, the platform will ignore the records in the referenced tables associated with the record that we deleted in the main Entity, leaving them orphaned. This is the advised type of delete rule by best practice standards since as the database engine will not need to perform any operation regarding the removal of child records or verification of their existence, the operation in the Entity that we want is faster.
Tip
If you are curious, you can see the official documentation on Delete Rules here: https://success.outsystems.com/Documentation/11/Developing_an_Application/Use_Data/Data_Modeling/Entity_Relationships/Delete_Rules.
The view of an Entity is as shown in Figure 5.1:
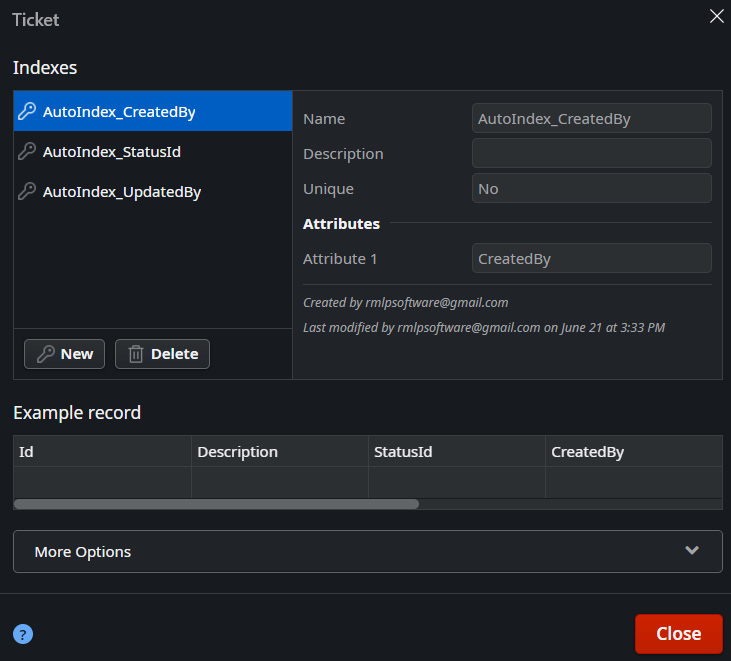
Figure 5.1 – Entity view in Service Studio
Tip
If you are curious, you can see the official documentation on Entities here: https://success.outsystems.com/Documentation/11/Developing_an_Application/Use_Data/Data_Modeling/Entities.
Many of the business rules can be more robustly guaranteed by taking advantage of all the mentioned parameterizable attributes of Entities. At a later stage, we must take care to make the visibility of these rules as user-friendly as possible, considering that the end user does not need to understand the technological complexity imposed in this part of the development.
In order to visualize and manipulate the data of our Entities, when we create them, the platform automatically provides the following operations:
- Create: Create a new record in the Entity.
- CreateOrUpdate: Create a new record or update an existing one (if the Identifier is null, it will be seen as new).
- Update: Update an existing record in the Entity.
- Get: Get a record from the Entity.
- GetForUpdate: Get a record from the Entity and lock it, preventing someone from changing it until we make a change.
- Delete: Delete a record from the Entity.
These operations are called CRUD operations (Create, Read, Update, Delete).
In summary, Entities allow us to store our information with different types, thus guaranteeing the robustness of the information. They can be related and organized through the use of foreign keys, thus facilitating the design of the data model.
In addition, we can use a special Entity type that simplifies many cataloging and typing issues: the Static Entities that we'll look at in the next section.
What are Static Entities?
Static Entities can be seen as literal values stored in the database and with global context between environments (such as typical enumeration).
These Entities only provide the Get Entity method, and any record to be added, edited, or deleted has to be done in Service Studio (it is not possible to programmatically perform these operations).
Natively, when creating a Static Entity, four attributes are created automatically, and we can edit, delete, or create new ones in our IDE. The four attributes created automatically are as follows:
- Id: Identifies a record and is always unique. It is the only attribute on the Static Entity that can be automatically numbered.
- Label: Contains a value to be displayed in an application.
- Order: Defines the order in which records are displayed to the end user.
- Is_Active: Defines whether a record is available at runtime. For example, records with Is_Active set to false are not used when scaffolding uses the Static Entity.
Tip
If you are curious, you can see the official documentation on Static Entities here: https://success.outsystems.com/Documentation/11/Developing_an_Application/Use_Data/Data_Modeling/Static_Entities.
The view of a Static Entity is as follows:
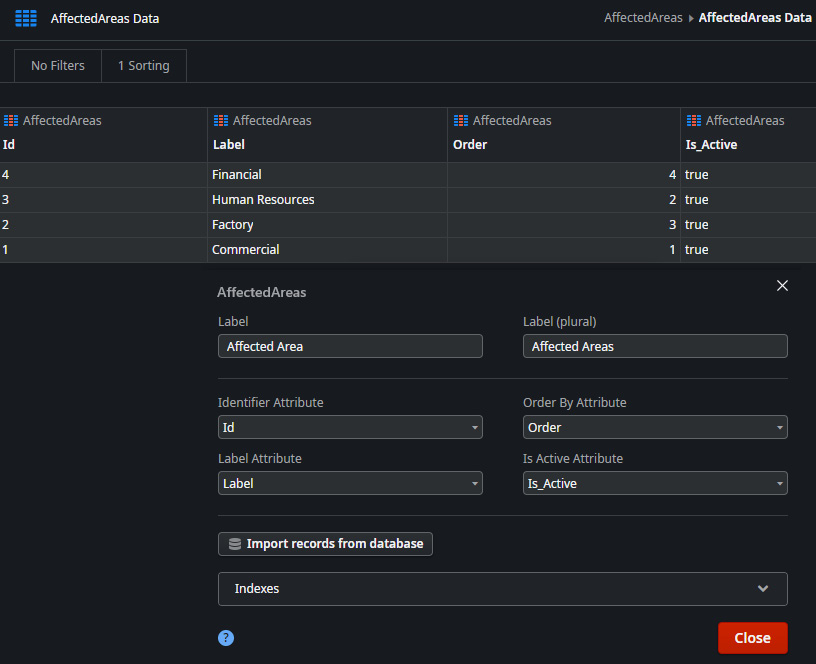
Figure 5.2 – Static Entity view in Service Studio
This type of Entity is often used when we have values that do not change over time, such as state machine statuses. Static Entities greatly facilitate development, as their structure is so robust that we can invoke certain records without having to resort to a bad practice called hardcoded values.
As we can easily understand, these types of Entities are less parameterizable and should only be used on data types that are not mutable. However, they allow much simpler robustness and maintenance of our data models.
Speaking of data models, how can we relate all these concepts? How can we relate this technical component to the application's needs? This is the focus of the next section: modeling data!
Modeling data
In data modeling, we deal with the relationships between Entities. As an example, a support ticket request from a help desk application (already setting the tone for the application that we are going to develop in the exercise) will have several fields, and not all of them will be in the same Entity. The Entity that supports the ticket must have its primary key, description, who created it, when it was created, who updated it, when it was updated, and its status. If we analyze it carefully, we can model this data through relationships with other Entities. For example, who created and who updated the record in the Entity can be foreign keys that refer to a user Entity (which the platform already makes available automatically, synchronized with the user provider). The state can be a foreign key that references a Static Entity where we will have all the states. These are examples of one-to-many relationships:
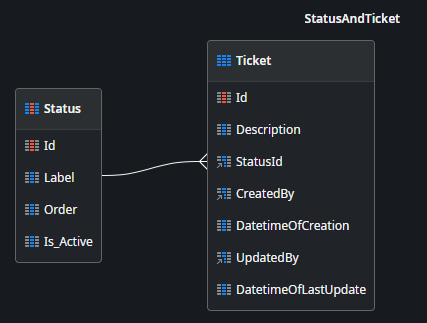
Figure 5.3 – One-to-many view in Service Studio
Now let's consider the following scenario: for each help desk support ticket, we will be able to enter the affected areas, and we can have several at the same time. In this case, we can have a Static Entity with the areas and a helper Entity that will store the ticket ID and the affected area, thus allowing multiple tickets to have multiple affected areas. This is an example of a many-to-many relationship:
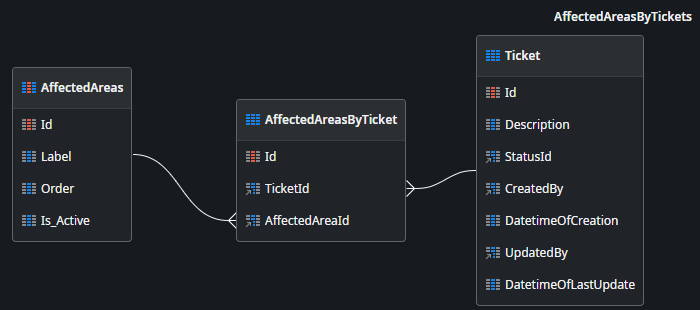
Figure 5.4 – Many-to-many view in Service Studio
There are certain cases where we only need to extend a certain Entity. Let's assume the situation where we need to add user data that is not foreseen in the original table. In this case, we can create a UserExtended Entity where its Identifier is the Identifier of the native Entity of users. This is an example of a one-to-one relationship:
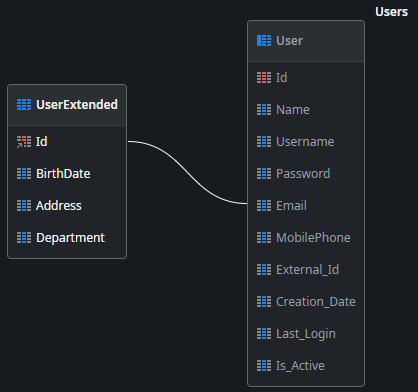
Figure 5.5 – One-to-one view in Service Studio
Tip
If you are curious, you can see the official documentation on data modeling here: https://success.outsystems.com/Documentation/11/Developing_an_Application/Use_Data/Data_Modeling.
Based on this type of relationship, we must think and design our data model well, always bearing in mind performance, security, and scalability. We must always build our Entities and relationships so that they can evolve and avoid the replication of Entities with the same purpose (avoiding replication and data synchronization).
The ways we can model our data is always adjustable and must be thought of in order to respond to the needs of the applications. We could see that the types of existing relationships allow for creativity and the search for the best balance between performance, security, robustness, and maintenance.
However, sometimes we need to massively populate our Entities with external data (often in cases of demos, proofs of concept/value, or data imports from other applications that do not have a service interface). For this, Service Studio provides accelerating features, where we can populate our Entities and even create new Entities from a given Excel file. And that's what the next section will focus on!
Bootstrapping data into Entities from an Excel spreadsheet
We often need to populate our Entities with pre-existing data, either for testing or for a production environment context. For this, the platform provides a feature (with two alternatives) to bootstrap from Excel files:
- Populate the data into an existing Entity: In this case, we will have to be careful to match the Entity's fields to the Excel columns. The platform automatically creates the necessary code for this purpose and a timer to load the data in the next module publishing process (the file will later be in the resources section of the module).
When we use this functionality, Service Studio, in order to ensure that the fields are correctly mapped, asks the developer about the match between the Excel fields and the Entity's attributes, as we can see in Figure 5.6:
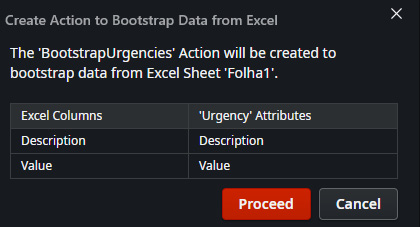
Figure 5.6 – Mapping fields from Excel to an Entity in Service Studio popup
- Create an Entity from an Excel sheet: In this case, the platform creates an Entity in which the attributes will be the fields of the Excel sheet and adds the Identifier. The platform automatically creates the necessary code for this purpose and a timer to load the data in the next module publishing process (the file will later be in the resources section of the module).
This is an example of an automatically created Action for a data bootstrap:

Figure 5.7 – Code example for an Entity bootstrap in Service Studio
Tip
If you are curious, you can see the official documentation on bootstrapping data here: https://success.outsystems.com/Documentation/11/Developing_an_Application/Use_Data/Bootstrap_an_Entity_Using_an_Excel_File.
Often, one of the requirements that exists for new projects is to migrate historical data of existing applications into new applications. One of the most commonly used methods (especially because new applications often replace jobs executed in Excel sheets) is bootstrapping from Excel, making this feature a great asset to the platform.
In this section, we understood how we can populate our database Entities in a simple and efficient way, and how Service Studio automatically generates code to accomplish this task, allowing us to speed up development.
We also realized that we can populate existing Entities with data from an Excel sheet, as we can even create an Entity that replicates the Excel sheet itself.
This is all very interesting, but the best thing is when we put into practice what we've learned.
The next section is an exercise where we will create our Entities and relate them to support our own application.
Exercise 1 – creating a data model
This section will focus on developing a data model that supports an application. We'll be able to put into practice what we've learned in previous topics in this chapter about creating Entities and setting up relations between them to support an application.
To better understand how all this works, there is nothing better than practicing.
For this, we will do an exercise that is basically the initial part of the application to be developed while working through the rest of this book.
So, to start the exercise, we must follow these steps:
- Create a new Reactive web application and name it Help Desk:
- To do this, open Service Studio and click on the New Application button:
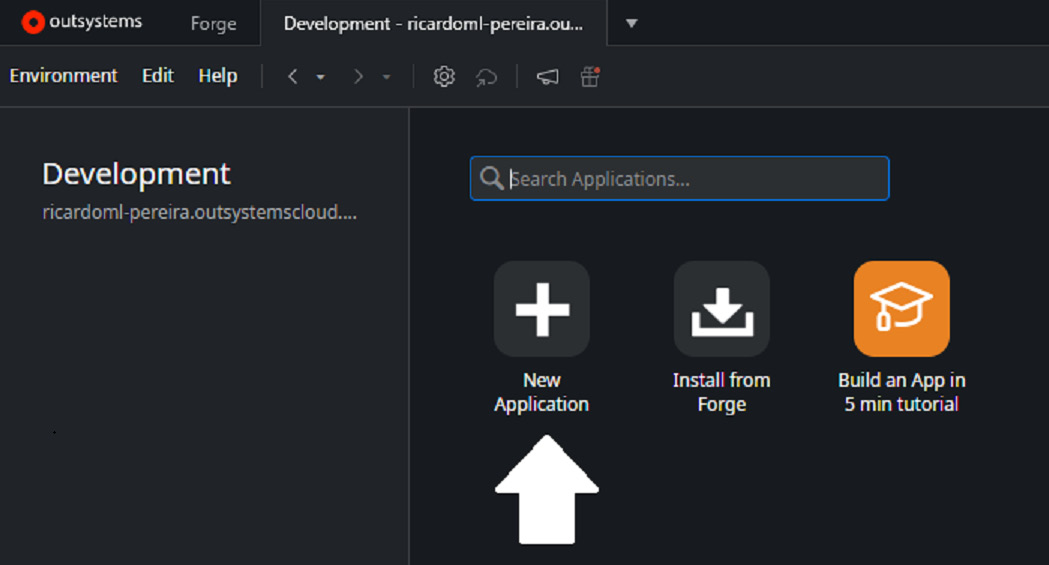
Figure 5.8 – New Application button in Service Studio

Figure 5.9 – Start from scratch in Service Studio
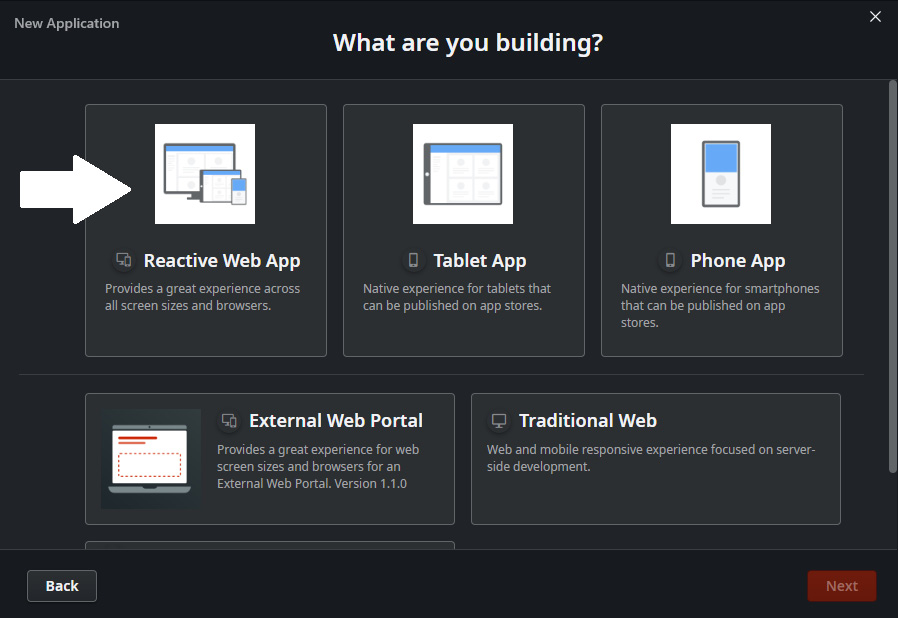
Figure 5.10 – Selecting the type of application in Service Studio
- Now, we set the name as Help Desk, fill in a brief description of the application purpose, select the main color of the theme in the color picker (or upload an icon file), and click Create App:

Figure 5.11 – Filling in details for a new application in Service Studio
- Create a Core Services module to support the data model:
- In the Module name field, we put HelpDesk_CS, set the module type to Service, and click Create Module:
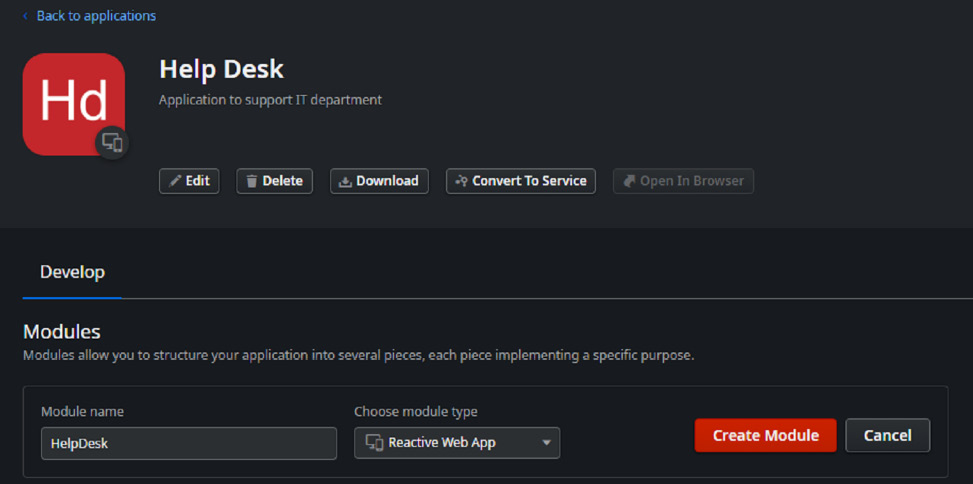
Figure 5.12 – Creating a new module in an application in Service Studio
- To save the module permanently before we start implementing the data model, click on the Publish button:

Figure 5.13 – Publishing a module in Service Studio
- Create a data model inside our new module:
- Click on the Data tab, then right-click on Database and select Add Entity:

Figure 5.14 – Adding an Entity to the database
- Name the Entity Ticket. Then, right-click and select the Add Entity attribute option. Name this new attribute Description:
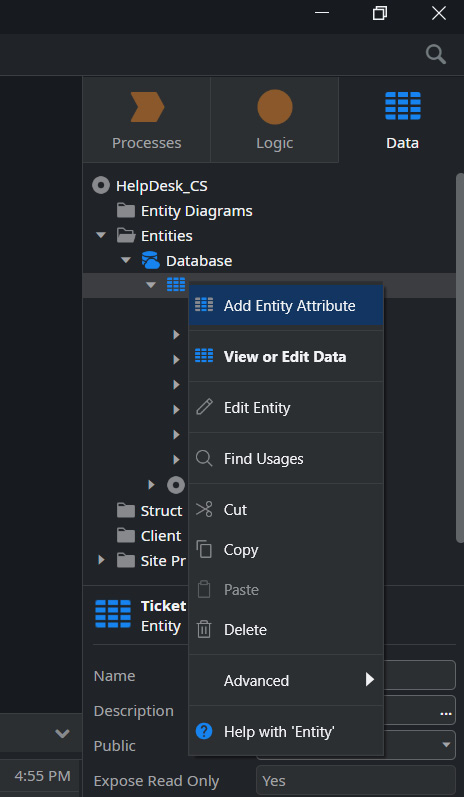
Figure 5.15 – Creating an attribute on an Entity

Figure 5.16 – Adding a Static Entity to a database
- Expand the newly created Status Static Entity, right-click on the Records folder, and select the Add Record option. Name it New. Repeat the process of adding records to create the Open, Discarded, and Closed records:
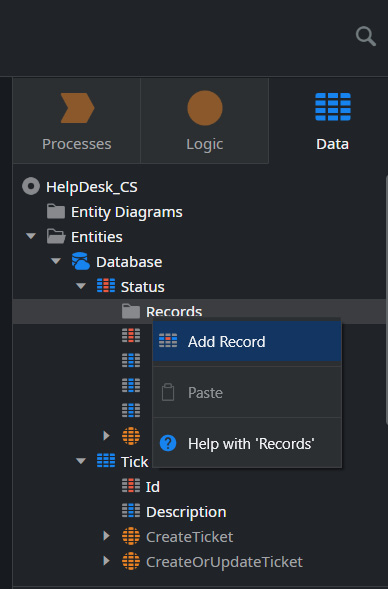
Figure 5.17 – Creating a record on a Static Entity
The new Static Entity should look like this:
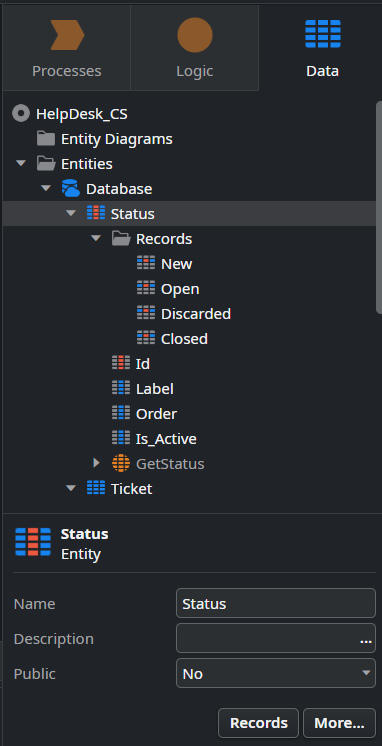
Figure 5.18 – Status Static Entity with records view
- The next step is to use the same technique for creating a new Static Entity but for AffectedAreas. This Entity must have the Commercial, HumanResources, Factory, and Financial records. In the end, the Entity must have the following structure:

Figure 5.19 – AffectedAreas Static Entity with records view
Tip
The label that is shown later can be edited directly in the record. To do this, we just click on the record in question, go to the properties, and customize the label's value. This can be very useful to make the value more human-readable.
- Now, we are going to create an auxiliary Entity that allows us to implement a many-to-many relationship between the tickets and the affected areas. To do this, right-click on Database again and select Add Entity. Name this Entity AffectedAreasByTicket. Next, drag and drop the Ticket Entity on top of the newly created Entity. Do the same with the AffectedAreas Entity. We will see that Service Studio automatically creates the foreign keys for these two Entities in our new Entity, thus making the many-to-many relationship:

Figure 5.20 – Affected areas by ticket auxiliary Entity with their foreign keys
- Both foreign keys must be mandatory. To do this, click on the attributes sequentially and change the Is Mandatory parameter to true in the properties section, looking like this:
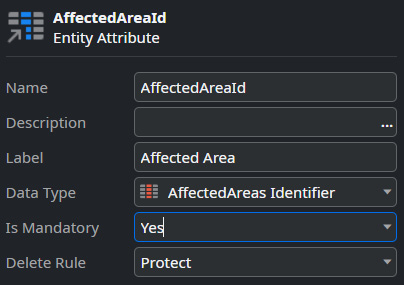
Figure 5.21 – Foreign key properties and focus on the Is Mandatory attribute
- The next step is to add the missing attributes to the Ticket Entity. Foreign keys relating to the Status, CreatedBy, and updatedBy attributes can be created by simply dragging the Entity to be related on top of the Ticket Entity, but let's see another way to do it. Let's create the StatusId, CreatedBy, and UpdatedBy attributes, as explained in the previous steps for creating attributes in Entities. Let's confirm that the platform automatically inferred the attribute types for the intended foreign keys:

Figure 5.22 – Foreign keys in the Ticket Entity with Is Mandatory set to No
Tip
The platform infers the attribute type based on the name we give it. If we want something more personalized and the platform cannot infer the correct type, clicking on the attribute, in the same properties box, we can change the type in the Data Type dropdown.
- Now we must make these three new attributes mandatory using the method explained in the previous steps. It should look like this:

Figure 5.23 – Foreign keys in the Ticket Entity with Is Mandatory set to Yes
- Finally, let's create the last two attributes needed for this phase: CreatedOn and UpdatedOn. Right-click on the Ticket Entity and select Add Entity Attribute for each one of them. In the properties section of each of these attributes, we must set the Is Mandatory parameter to Yes. It should look like this:
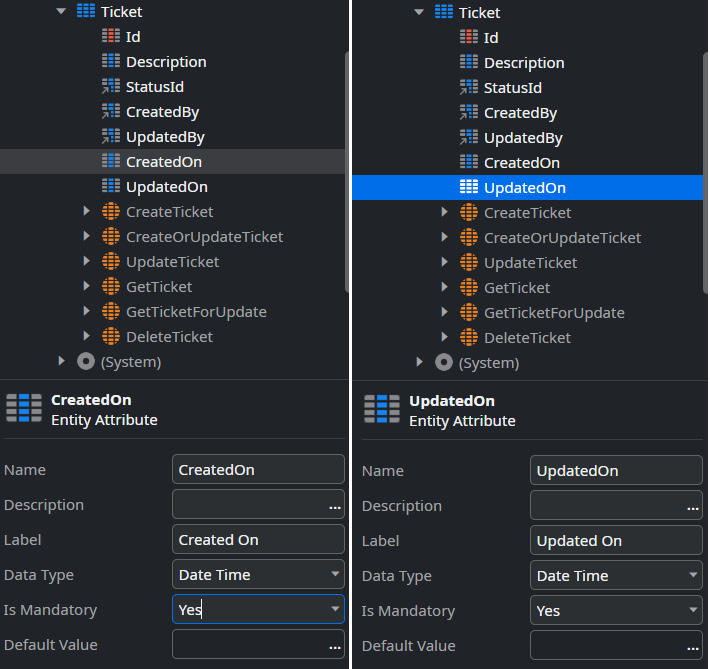
Figure 5.24 – Ticket Entity with attributes to audit updates
Tip
In the section with the properties of Entities and their attributes, there is a parameter called Description. Here, we can write a brief explanation of the concept of the respective Entity or attribute. With this, we facilitate future interpretations of the implementation of our applications.
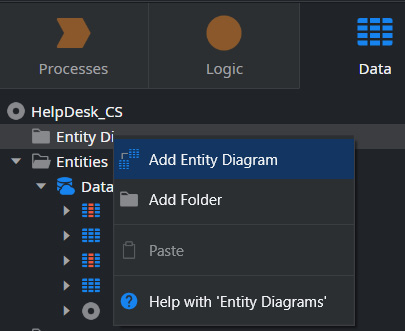
Figure 5.25 – Add Entity Diagram in Service Studio
- To finish the diagram, we drag and drop all the necessary Entities to the canvas. The end result will be the visualization of Entities and their relationships in our data model:
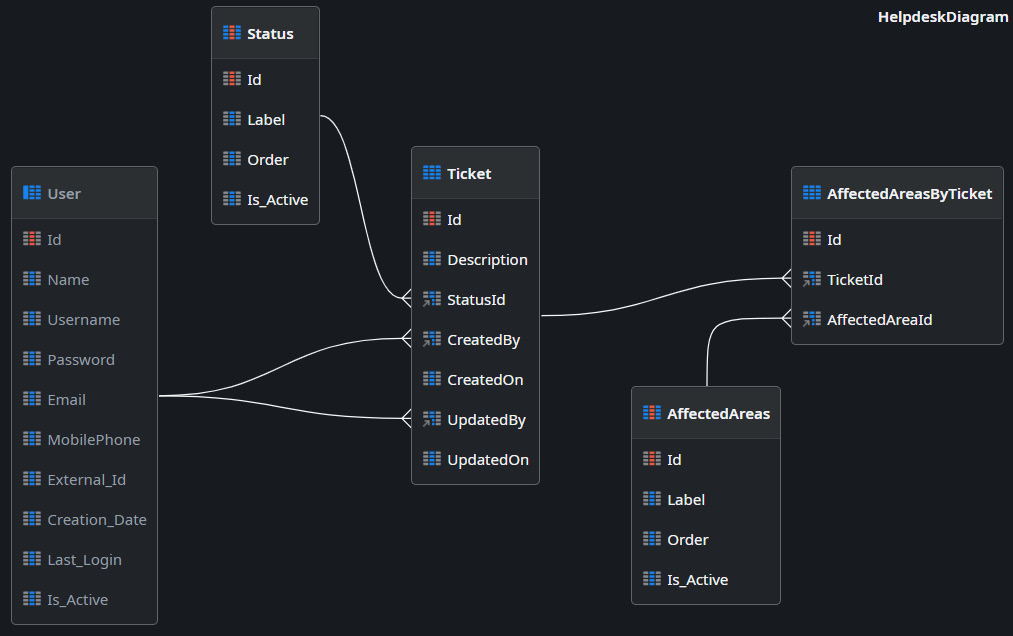
Figure 5.26 – Entity diagram view in Service Studio

Figure 5.27 – Publishing new developments in Service Studio
Graphically, the representation of the various components of Entities are numbered in Figure 5.27 as follows:
- Static Entity symbol
- Entity symbol
- Symbol of a regular attribute (not primary or foreign key)
- Primary key symbol
- Foreign key symbol
With this exercise, we understood how to create our Entities and how to set up relations between them in order to store all the necessary information efficiently.
Although simple, we have an efficient data model capable of supporting the needs of our application. All this is done in just minutes, unlike native technologies. Fantastic, isn't it?
Summary
In this section, we learned how to build our relational database and the importance of this topic for the development of a functional application.
The topics discussed here that are of great importance were Entities, Static Entities, Entity diagrams, and how to bootstrap our Entities with data from Excel files.
The quality of our data model will largely dictate how easy, quick, and scalable our application can be in the future.
Furthermore, we were able to carry out this type of development very quickly and safely. But beware, the fact that we develop very fast can also make us fail faster!
In the next chapter, we will learn how to manipulate and use our data through logic Actions and variables, using a set of decision and iteration artifacts provided by our IDE, Service Studio. We'll also continue with exercises so we can put into practice what we've learned!