
Chapter 10: Client-Side Logic
For our frontend to work smoothly, efficiently, and with all the necessary capabilities, it's just not enough for us to have a good backend and very well-designed screens.
There is a very powerful feature in frontend development that gives us the ability to work our features down to the smallest detail: Client Actions!
These actions are implemented in a very similar way to server actions but must always be developed considering that they occur on the client side—that is, in the browser. In short, they're implemented in the same way, but the approach is slightly different.
Client Actions can exist at a screen level and a module level.
In this chapter, we will focus on client-side logic and explore the following topics:
- Screen actions
- Data actions
- Client logic actions
- Exercise 6 – creating Client Actions and using them on the frontend
By the end of this chapter, we should be able to implement screen actions and understand their scope, obtain data from the server or other sources with data actions, and create Client Actions and use them on the frontend.
Technical requirements
Check out the following video to see the code in action: https://bit.ly/3rcHLvt.
Screen Client Actions
In this section we will learn how to develop the features on our applications screens. For that we need actions. These actions are Screen Client Actions
Screen Client Actions implement logic that can only be used in the scope of the screen itself.
Note
Screen actions can be created and used in blocks as well, as they are reusable elements of screen parts.
With this, they have access to the existing scope on the screen and can even be called to the logic of another screen action on the same screen.
You can see an example of a screen action, that is SaveDetail Screen Client Actions under the TicketDetail screen scope, as shown in the following screenshot:

Figure 10.1 – Screen action example
The behavior, use, and implementation of these actions are identical in both reactive web and mobile applications (as mentioned, the development paradigms are very similar).
These actions have the following properties:

Figure 10.2 – Screen action properties
A screen action can have input variables and local variables (it does not need output variables, as they are used in the context of the screen and have access to all data and variables used in the generalized streams of the screen). These can be of any available type—from text, entity, or structure records, lists of records or structures, or even a composition of several types.
Note that local variables used and defined within Client Actions only have a context within themselves.
A limitation found in these actions is the fact that it is not possible to obtain information from the database (server side), and for that, there is another type of action at the screen level: a data action (if it is not a request for complex data or external systems, we can do this with aggregates).
Data actions
For our applications to work, we have to get data from certain sources. This can be the OutSystems database as an external source.
To obtain data from the OutSystems database, we can use aggregates. These can trigger further actions that run in On After Fetch events.
We can configure its name, description, server request timeout, its start index, the maximum number of records to return, and when it happens—if at the start or only when we ask for it (only on demand)–as illustrated in the following screenshot:
Note
The Fetch property is very important because this helps us to manage the data we need at the start of the screen or when we need it, which is called on demand.
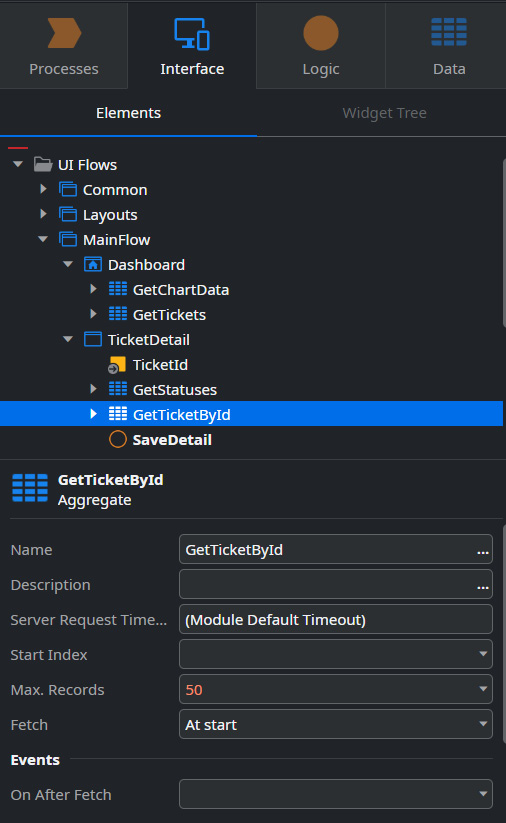
Figure 10.3 – Screen aggregate properties
Sometimes, we need to get data that the aggregates cannot supply—that is, we have high complexity. We may also have cases where our data sources are external (such as Simple Object Access Protocol (SOAP) web services or Representational State Transfer (REST) methods). For this, we have another way to obtain this data: through data actions.
In these data actions, we have as properties, the action's name, description, server request timeout, and when we intend to get the data: at the beginning or only when necessary (only on demand).
These data actions have an On After Fetch event where we can decide what to do after getting the data.
Note that these actions must have at least one output, which will be the result (assigned inside the data action) of the data retrieval, as illustrated in the following screenshot:

Figure 10.4 – Screen aggregate properties (continued)
With these two mechanisms, we are able to fetch the data that we intend to display and manipulate in our applications, providing an enormous capacity for adjustment and measurement to the different application contexts required in the market.
But after fetching the data, we often need to operationalize the smallest detail of the features of our applications, which often need to be centralized for reuse or complexity reduction. For that, we have Client Actions (these are not at the screen level).
Client logic actions
General Client Actions work on the client side (in the browser), just as with screen actions (which are also Client Actions as discussed earlier).
This artifact is extremely useful for manipulating data and behaviors on the browser side, allowing a user experience (UX) within expectations and without resorting to the server side for processing.
These actions can be found under the Logic tab in the Client Actions section, as illustrated in the following screenshot:
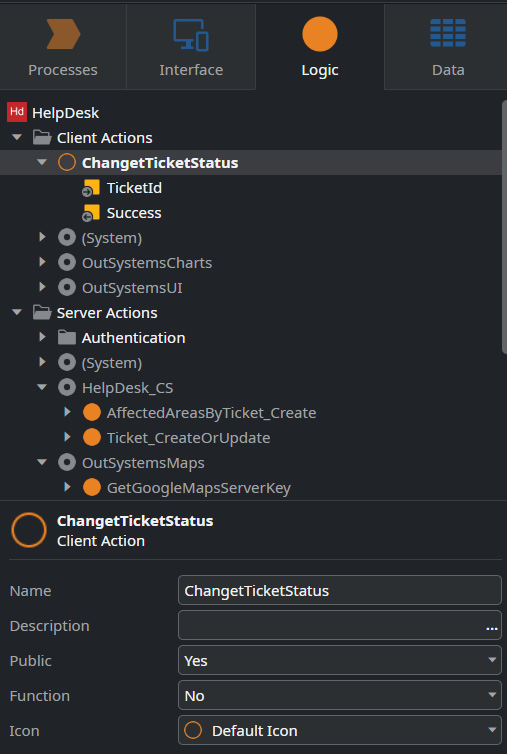
Figure 10.5 – Client Actions in the Logic tab
Regarding Client Actions, these differ from screen actions in the following aspects:
- They can be used in any other client action, general action, or screen action
- They allow you to have outputs
- They can be defined as public in order to be shared and reused by other modules
- They can be defined as functions to be used in expressions and calculation formulas (this is only possible if, on the action flow, no server action is used)
Furthermore, these are its main features:
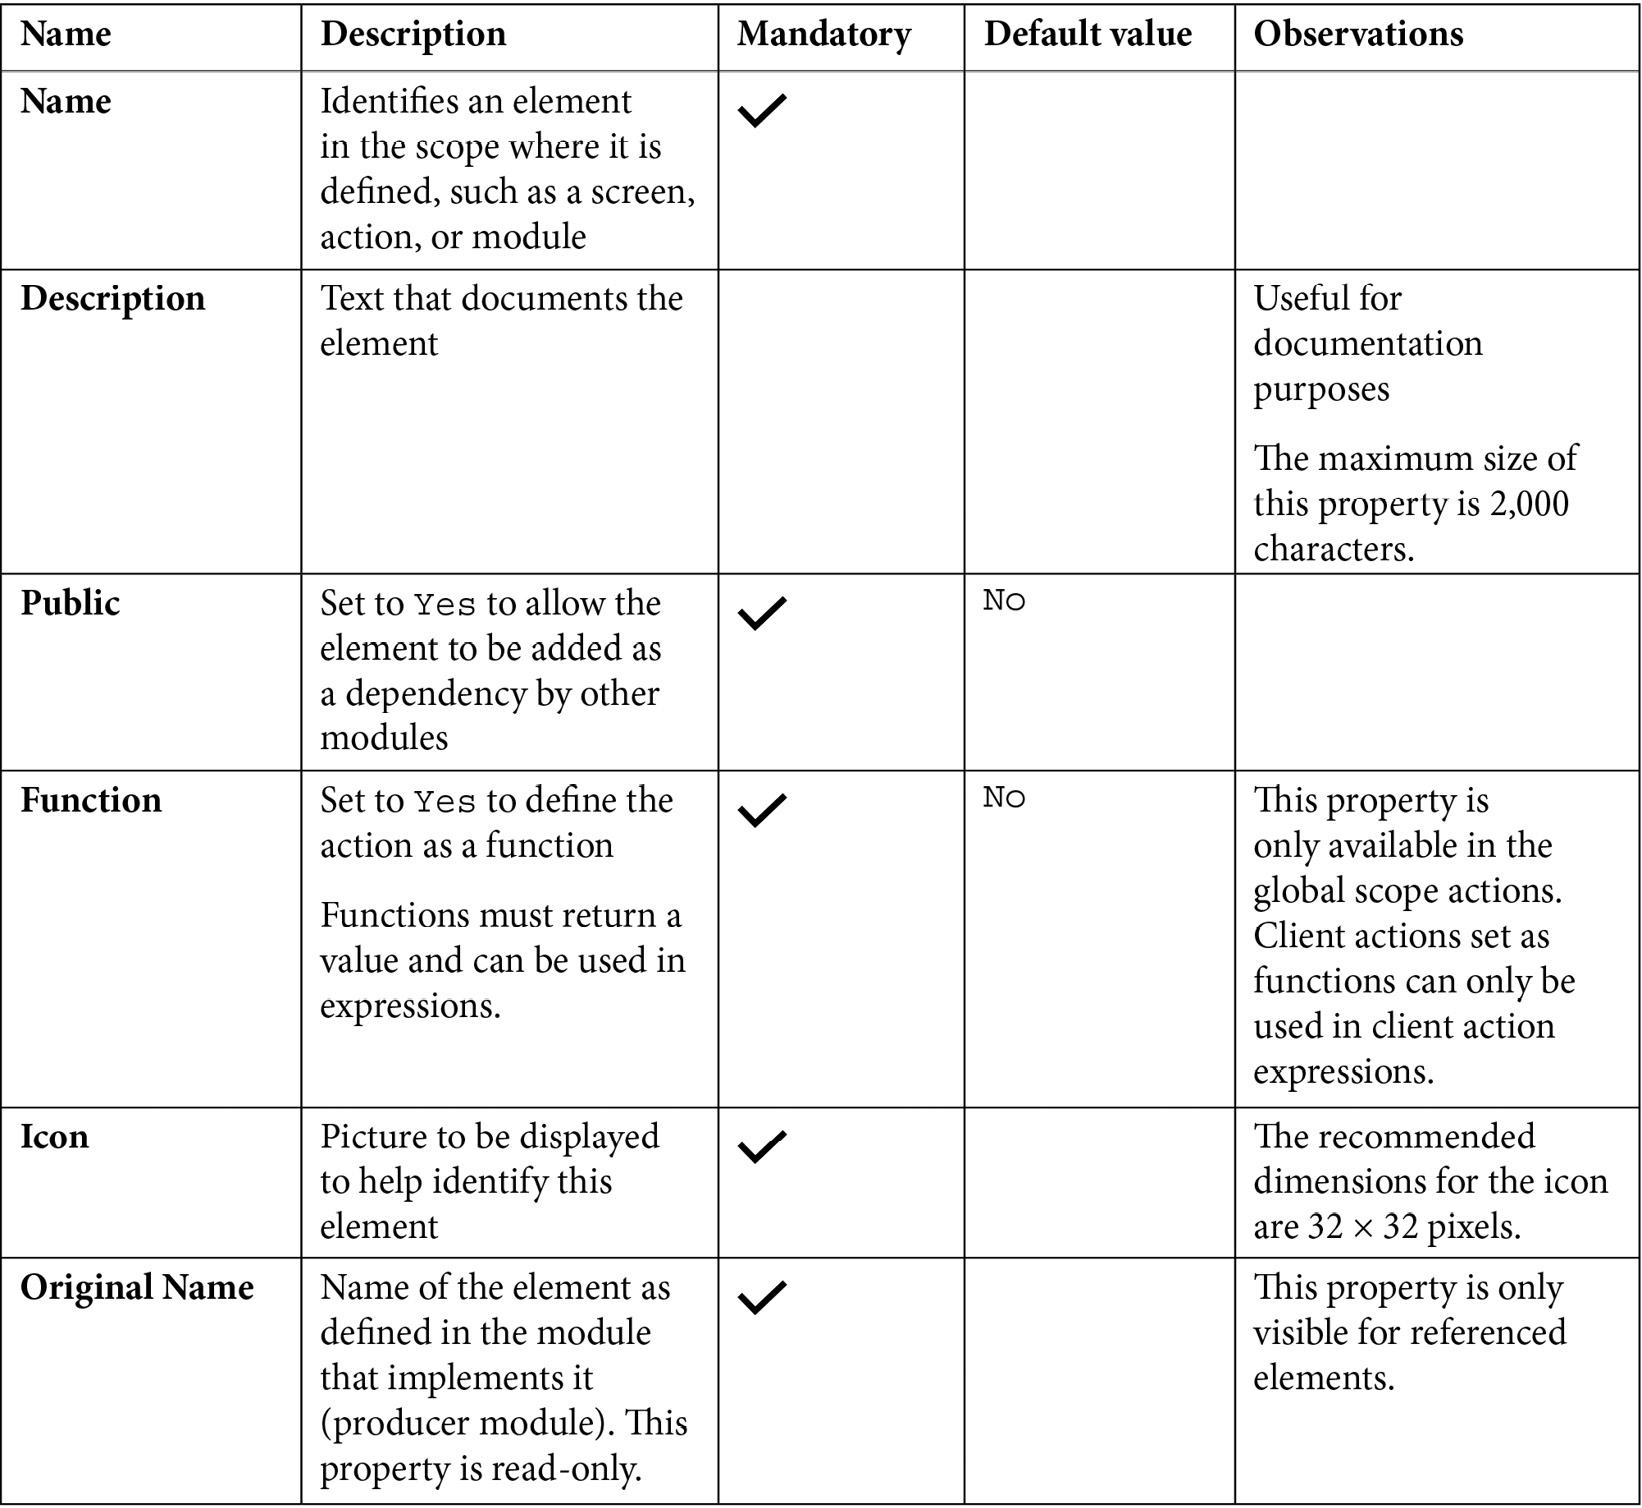
Figure 10.6 – Client Actions properties
We must always bear in mind that Client Actions cannot be defined as public if any of their inputs or outputs are not defined as public (in case they are structures or records of entities).
Tip
If you are curious, you can see the official documentation on Client Actions here:
Client Actions can call server actions if they need, and for code optimization, they should only call ONE server action in all their flow. This is because each server action corresponds to a transaction to the server, which has an impact on performance (in fact, if there is more than one server action in the flow, Service Studio's TrueChange will throw a warning about it).
We must always keep in mind when using Client Actions that the client side is much more vulnerable in terms of security issues, so we always have to calculate the trade-off between performance and security.
As we can see, Client Actions allow us to have much more power over what goes on in our frontend without having to resort so often to the server or JavaScript in order to get the expected behaviors.
Now, as a good way to better understand how we should use Client Actions let's do a simple exercise to see how this can help us!
Exercise 6 – creating Client Actions and using them on the frontend
In this exercise, we will continue the application that has been developed in the previous exercises. Let's create a client action that allows us to change the state of a ticket to Closed and use it on the ticket listing page, making it available for each of the tickets that are not yet in that state. Proceed as follows:
- Select the Logic tab, right-click on the Client Actions folder, and select Add client action. Name it Ticket_Close, as illustrated in the following screenshot:

Figure 10.7 – Creating Ticket_Close client action in the Client Actions section

Figure 10.8 – Creating TicketId input parameter of type Ticket Identifier
- Next, open the Manage Dependencies popup and select the Ticket_Close server action from the HelpDesk_CS module, as illustrated in the following screenshot:
Tip
First, we must create a Ticket_Close server action in the HelpDesk_CS module, as we learned in Chapter 6, Server-Side Logic.
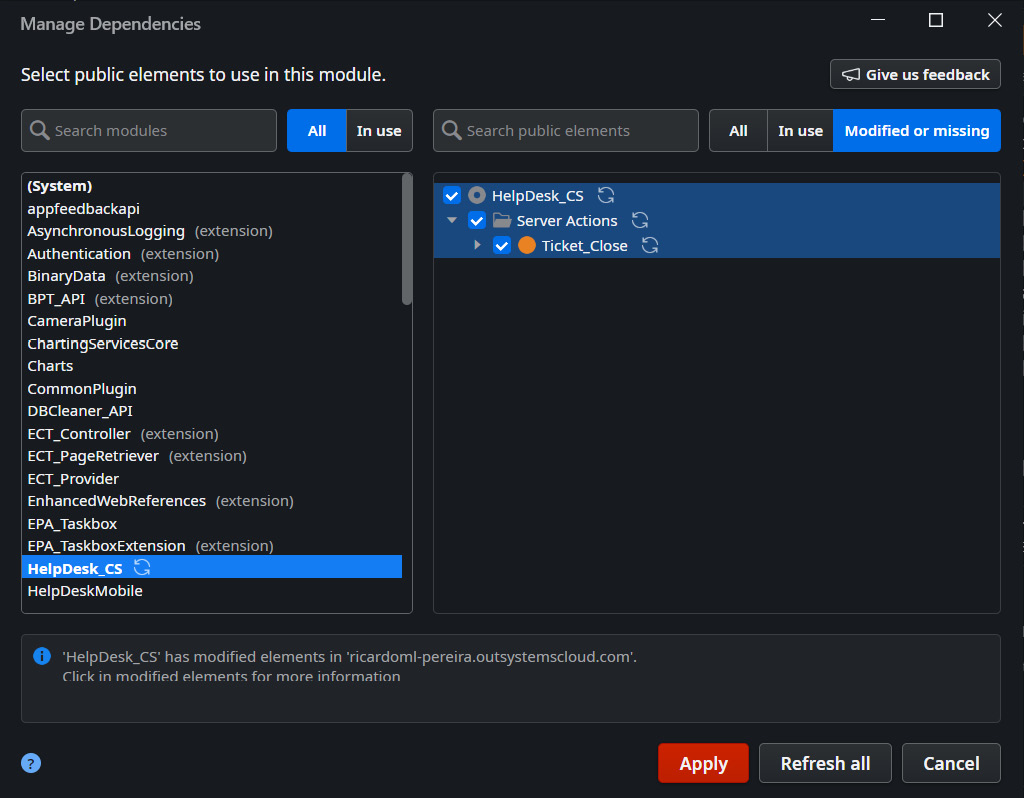
Figure 10.9 – Adding a Ticket_Close server action as a dependency
- Navigate to the Logic tab and drag the Ticket_Close server action into the flow of the Ticket_Close client action and assign the TicketId variable to its input, as illustrated in the following screenshot:

Figure 10.10 – Dragging and dropping Ticket_Close server action into the client action flow
- Let's add a success message to the end of the client action flow, just before the End node, as follows:

Figure 10.11 – Adding a success message at the end of the client action flow
- Finally, we go to the Interface tab and open the Tickets screen. In the table, we add a column at the end and put in a link, as illustrated in the following screenshot:
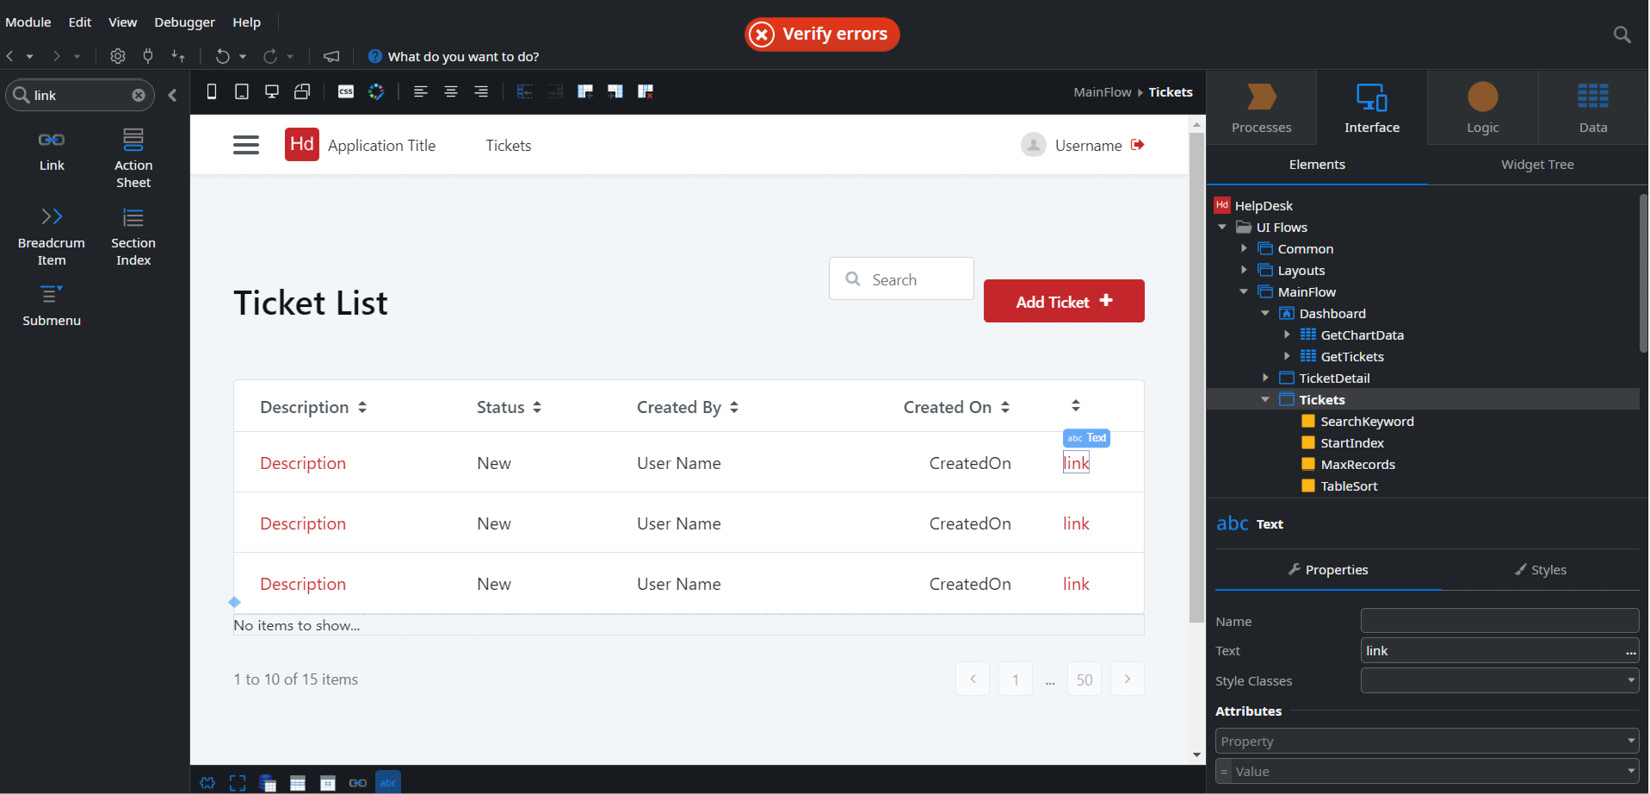
Figure 10.12 – Adding a new table column and a link
- We then change the text inside the link to Close. Then, for the Visible attribute in the properties of the link, we put that it only must be visible if the status of the current ticket is different from Closed. In the On Click event, we select New Client Actions and drag to its client action flow we created earlier, and pass TicketId as the identifier (ID) of the current record, as illustrated in the following screenshot:
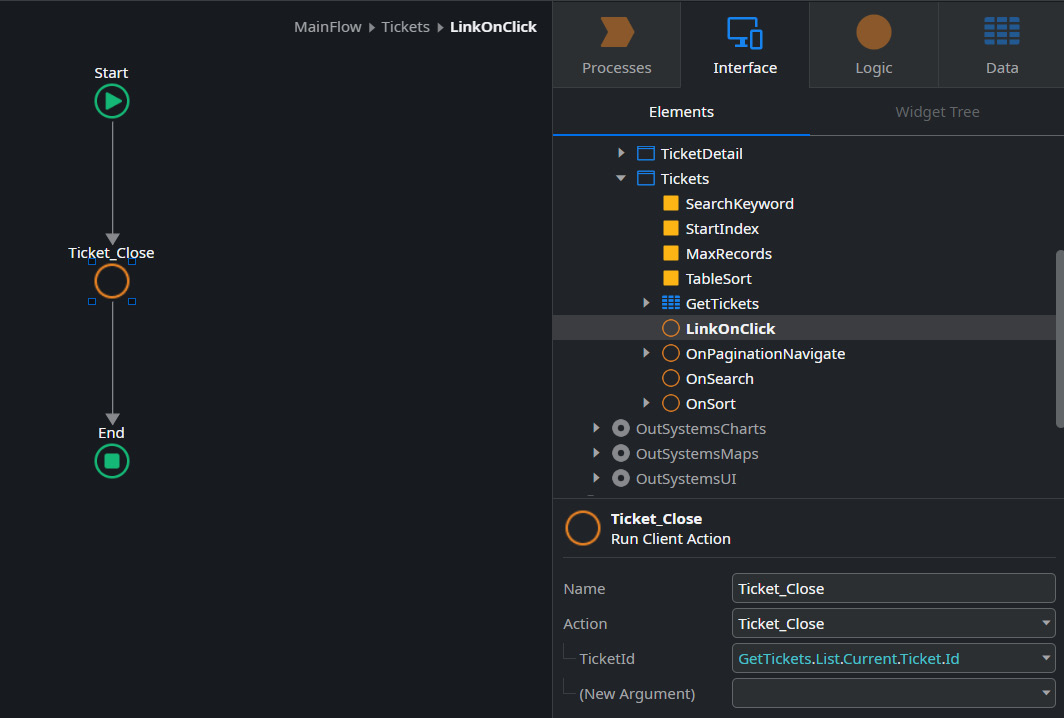
Figure 10.13 – Dragging and dropping the Ticket_Close client action into the screen action

Figure 10.14 – Published HelpDesk reactive web application
Tip
The procedure is exactly the same for building these features in both reactive web and mobile applications.
With this type of approach, we can abstract the complexity of our logic, making the code reusable and easier to maintain.
Furthermore, in case it is something transversal to several concepts, we can have the Client Actions as public and make them available as dependencies.
Summary
In this chapter, we learned how client-side logic works, about the available artifacts, and how to combine them to obtain the behaviors intended by our actions in our frontend.
We learned what screen actions, Client Actions and data actions are and looked at the concept of variables in the context of Client Actions how to create logic in Client Actions and the properties of the action attributes.
We should never forget the following: screen actions are defined at the screen level, Client Actions are defined at the module level and run on the client side, and server actions are defined at the module level and run on the server side!
Something very important to remember is this: whenever possible, abstract and isolate the manipulation of our data in data actions or aggregates so that we can better control their integrity (since these calls are asynchronous).
As we can see, we were able to develop code in a super-intuitive way, with little scope for errors (the typical cases in textual languages that take hours to understand were solved here in less than half the time) and largely in a visual way. Another good thing is that we develop client-side logic in a very similar way to server-side logic, although we have to take some extra care and attention due to the context in which it is used (security, performance, and UX/UI).
In the next chapter, we will cover a very particular feature that exists for mobile applications and that can benefit a lot in terms of performance. However, as these are applications that run on less secure devices, we must always take security into consideration. So, right away, let's move on to local storage and data synchronization!