
Chapter 7: Exceptions Handling
It's great that everything was a bed of roses while our applications were running, but sometimes incidents happen or even something unexpected.
The process of Exception handling is what allows us to handle these types of events. It's something that allows us to avoid catastrophes and turn around unexpected situations. Basically, in the midst of chaos, it gives us control. Errors can be caused by various reasons, such as the following:
- Unavailability of third-party systems: Communication failure caused by the unavailability of both internal and external producer systems
- Database unavailability: Communication failure caused by the unavailability of the database server
- Frontend server unavailability: Communication failure caused by a crash or DNS resolution of the frontend server(s)
- Handling of access authorizations: Attempts to access data or functionality by users not provided with the necessary permissions
- Errors foreseen by the developers derived from attempts to misuse the applications: Use of preventive code to protect applications from malicious attempts of corrupting data or the application itself
To better understand these concepts, the material in this chapter is divided as follows:
- Raising Exceptions
- Exception handler flows
- Global Exception handler
- Exercise 3 – raising and handling of an Exception
By the end of this chapter, we should be able to understand the usefulness of Exceptions, in what context we should use them, and how to throw and handle them.
Technical requirements
Check out the following video to see the code in action: https://bit.ly/3FFpQBu.
Raising Exceptions
The OutSystems platform, out of the box, already provides a system to handle Exceptions. However, we can raise them in our code wherever we see fit. With this, we can gain greater control over unexpected events and process them in a more user-friendly and understandable way. Once again, it all comes down to being able to take a neat leap.
Something to bear in mind whenever we raise an Exception is that it will be logged and visible on the Service Center console, which allows us to subsequently have a more careful and in-depth analysis of anomalies and a more precise intervention.
We can perform raise Exceptions on our Server Actions, Service Actions, and Client Actions (these last two will be seen in Chapter 10, Client-Side Logic).
Whenever we foresee a possibility of unexpected behavior, through the decision elements seen in Chapter 6, Server-Side Logic (If and Switch), we can trigger an Exception of the following types:

Figure 7.1 – Raising a User Exception (customized as a Ticket Exception) in a Server Action
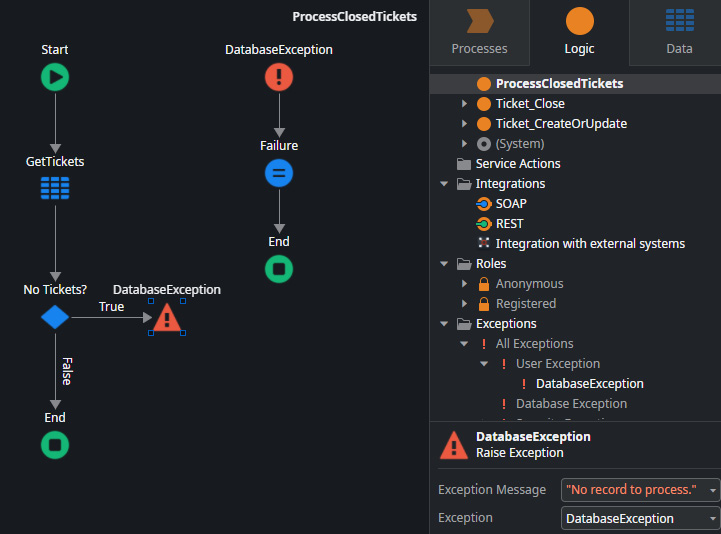
Figure 7.2 – Raising a Database Exception in a Server Action
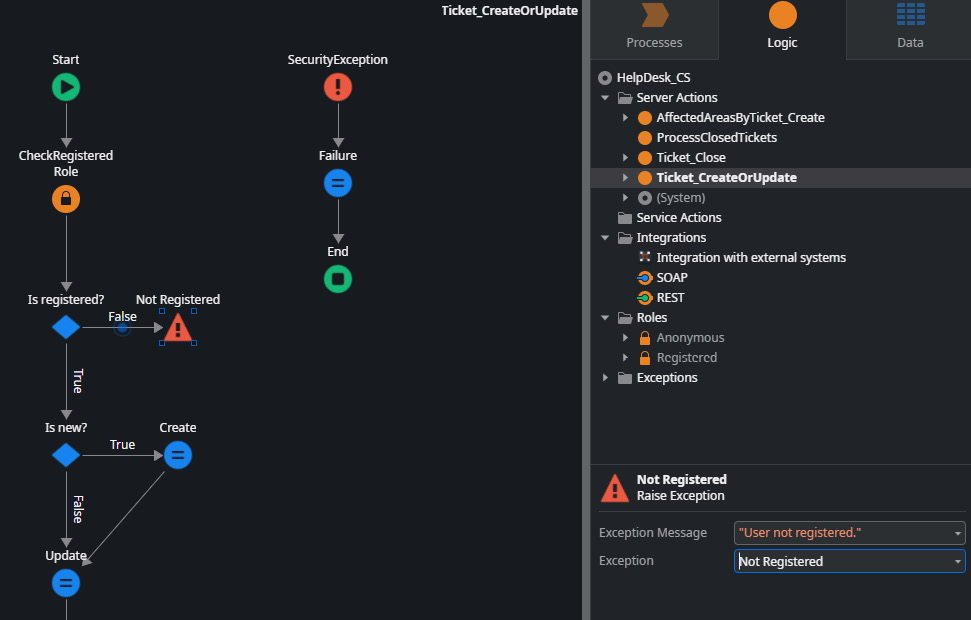
Figure 7.3 – Raising a Security Exception in a Server Action
- Abort activity change Exceptions: Exceptions related to anomalies in BPT processes that allow their control at the level of retries or aborts
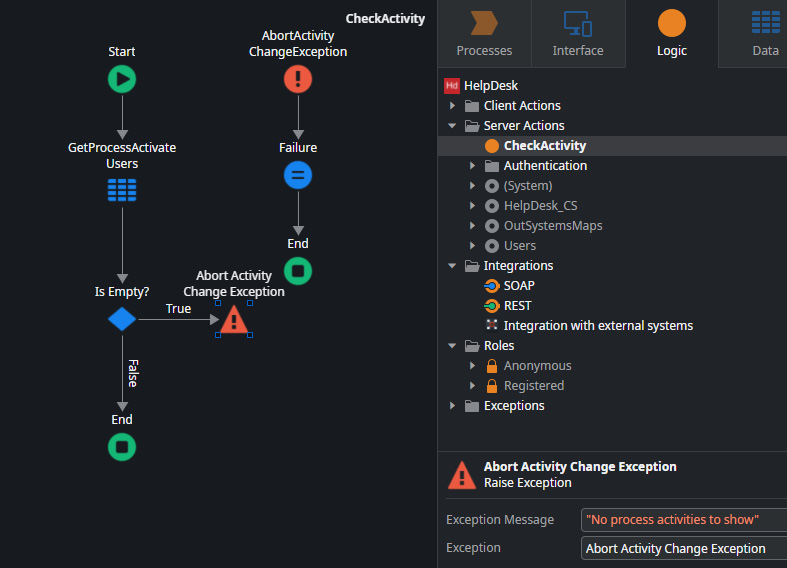
Figure 7.4 – Raising a Abort Activity Change Exception in a Server Action Exception
As a rule, if we want the log of this event to be scaled to the module level in which it occurs, we must add the respective handler in parallel to the "happy path" flow of the respective Server Action (as we can see in Figure 7.1).
We can also create Exceptions as needed by our applications, since many times, the ones that already exist by default do not cover all the scenarios we intend. Our custom Exceptions are called user Exceptions and we can raise them in our flows whenever necessary. These Exceptions are considered child nodes of general user Exceptions and we can create them in the Exceptions section in the Service Studio Logic tab. Just right-click on User Exceptions and select the Add User Exception option. The only property we have to define is its name (we must be careful to choose a self-explanatory name). From that moment on, that Exception can be invoked in our flow and we have the handler available to use in our Actions.
What can we do to treat our Exceptions? How do we process the flow of our handlers? That's what we'll see in the next section!
Exception handler flows
Whenever an unexpected event of an Action occurs and it is redirected to a handler, it can be customized and have its own logic in order to give us flexibility in handling errors and allow a reduction of impact on the end user.
In Exception handlers, we can choose between aborting the transaction or not (rollback of all inserts, updates, or deletes made to the database during the flow that has not been committed) and whether we want to log the error or not, as shown in Figure 7.2:
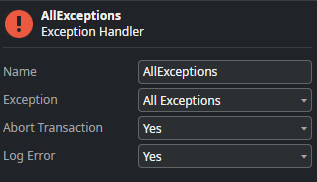
Figure 7.5 – Parameterization of an abort transaction and log error of an Exception handler
Sometimes, in scenarios where we want to scale the error to module or consumer Actions, we define an output variable for this purpose, being of the type of a structure with two attributes:
- HasSucess: A Boolean that returns True if everything goes as expected or False if unexpected behavior occurs.
- Message: A text field used to return a specific message. If HasSuccess is False, it usually returns either the error message returned by the Exception handler or a more user-friendly message that can be easily interpreted by consumers (should be used as a best practice when implementing our own Exceptions).
In the flows of Exception handlers, we can manipulate these variables and any others within the scope of the Action. There are cases of high complexity where the logic used in Exceptions handlers allows us to carry out sets of operations that keep all types of information related to the error, thus facilitating its tracking and allowing faster analysis, as shown in Figure 7.3:
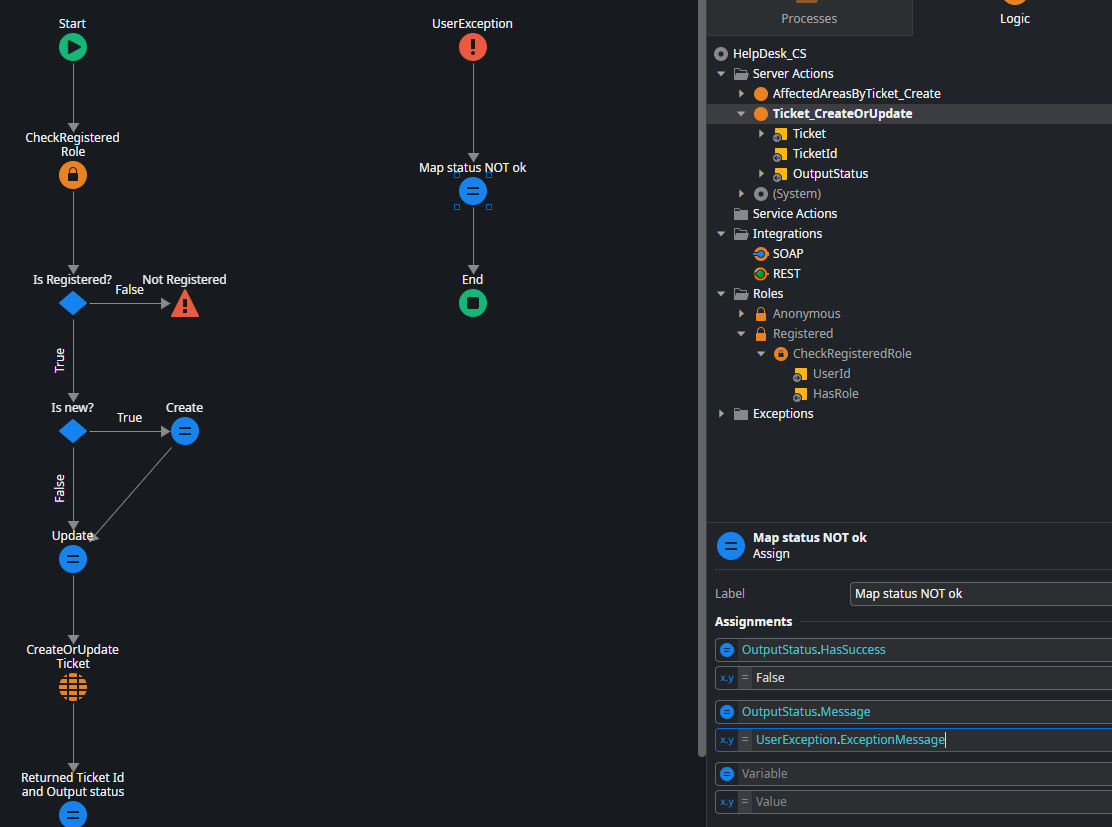
Figure 7.6 – Handling variables in the Exception handler's flow
We can make raise Exceptions without having the Exception handler defined in our Server Action, so that the same Exception bubbles up to the next modular level until it finds its handler. In cases where you reach the highest level without finding the Exception handler, it is processed by the global Exception.
Tip
If you are curious, you can see the official documentation on handle Exceptions at https://success.outsystems.com/Documentation/11/Developing_an_Application/Implement_Application_Logic/Handle_Exceptions and https://success.outsystems.com/Documentation/11/Developing_an_Application/Implement_Application_Logic/Handle_Exceptions/Exception_Handling_Mechanism.
What is a global Exception and how does it work? What is it for? As we'll see in the next section, it can be seen as our lifeline.
Global Exception handler
A global Exception is intended to log all events arising from Exceptions not handled during the operation of applications.
In cases where there is no specific Exception handler to handle something that occurs at a certain level, it will bubble up through the functionality's call stack until it finds the handler it needs. If you don't find it until you reach the last level (usually the frontend module of the application), the global Exception of that module does the job.
These handlers are defined in a frontend flow and are then associated with the module in the Global Exception Handler attribute, as shown in Figure 7.4:

Figure 7.7 – Use and definition of a global Exception in the frontend module
With this, we realize that the global Exception handler is our last resort as it allows us to handle errors and unexpected events, and it prevents our application from being in limbo in case of a crash or accident. This way, we can understand what is wrong or what happened with the application.
Now, in the next section, in order to consolidate these topics, we will do an exercise (following the previous exercises related to the Help Desk application) where we will raise and handle an Exception.
Exercise 3 – raising and handling an Exception
In this exercise, we will implement a raise Exception and its handler to handle calls made to the Ticket_CreateOrUpdate Server Action by users who are not registered (who did not authenticate themselves through a set of credentials on a login page):
- Put the Check Registered roles in our flow, use If to validate the result, and, in case of failure, set the raise Exception:
- Click on the Logic tab, expand the Roles folder, expand the Registered role, and drag the CheckRegisteredRole Action to our flow, right after the start, as shown in Figure 7.5:
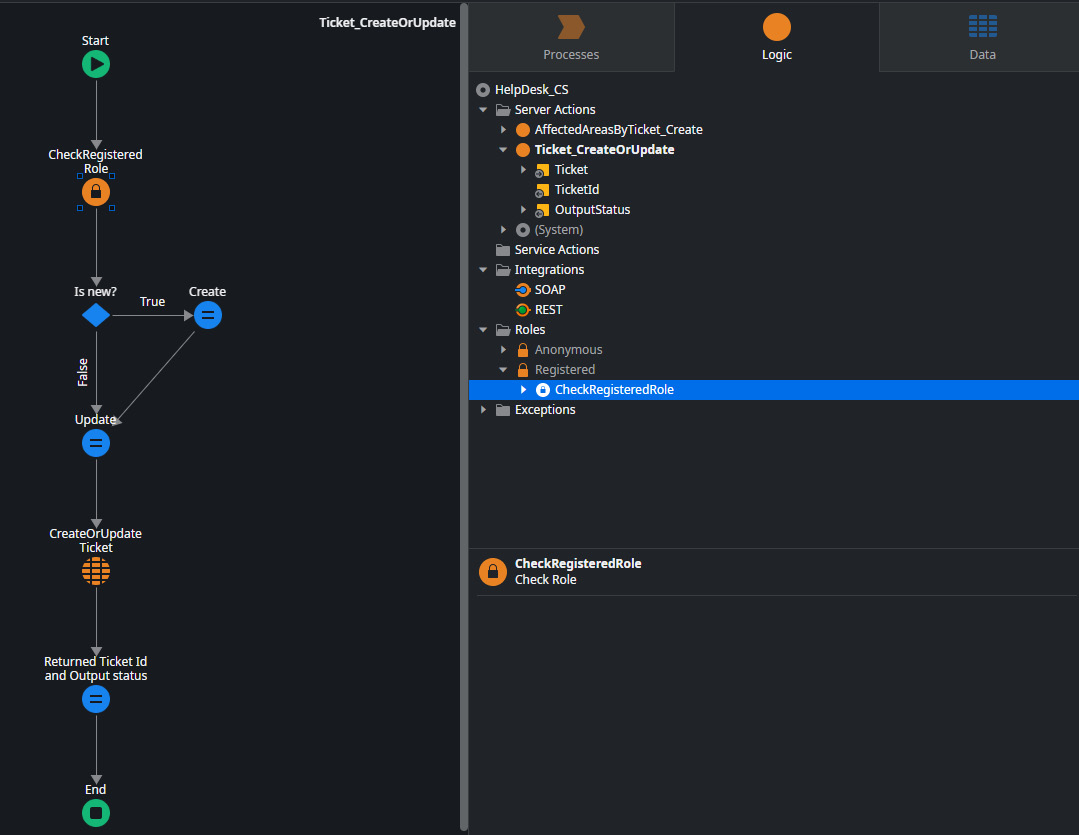
Figure 7.8 – Adding the CheckRegisteredRole Action to the flow
- Drag and drop an If from the toolbox to the flow, right after the CheckRegisteredRole Action, and in the condition, validate whether the return of that same Action is True, as shown in Figure 7.6:

Figure 7.9 – Adding an If artifact to verify the result of the CheckRegisteredRole Action
- Drag and drop a Raise Exception from the toolbox to the right side of the If, set it as Not Registered from the Security Exceptions group, link its False branch to Raise Exception, and set its message to User not registered:

Figure 7.10 – Defining the raise Exception in the Action flow
- Create the Exception handler and its structure and output variable to expose the error to consumers:

Figure 7.11 – Adding Exception Handler to the Action
- Click on the Data tab, right-click on the Structures folder, and select Add structure. We call it OutputStatus. Then, we right-click on the structure and select Add structure attribute. We call it HasSuccess (the default value is False). We've repeated this last process again, but now the name is Message. We define the structure as public, as shown in Figure 7.9:
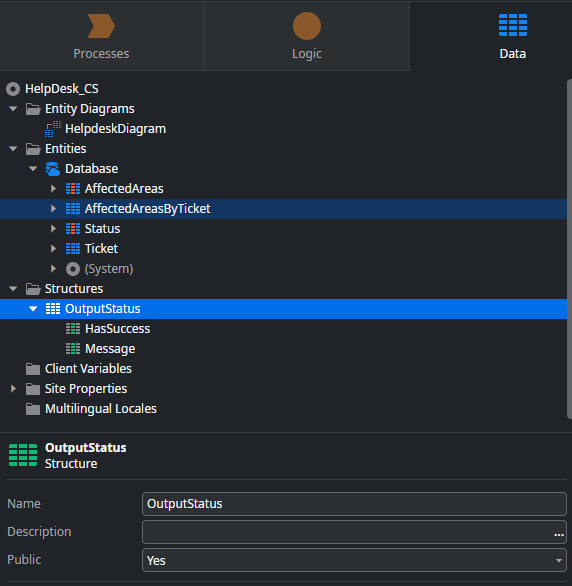
Figure 7.12 – Structure with handling attributes to be used as the type in Actions output variables
- Click on the Logic tab, click with the right mouse button on the Ticket_CreateOrUpdate Action, and select Add output variable. Give it the name OutputStatus:

Figure 7.13 – Output variable in the Server Action to return success conditions
- Map the success values at the end of the normal flow of the Action. The HasSuccess attribute of the OutputStatus output variable is mapped with the value True and the Message field is empty (""), as shown in Figure 7.11:
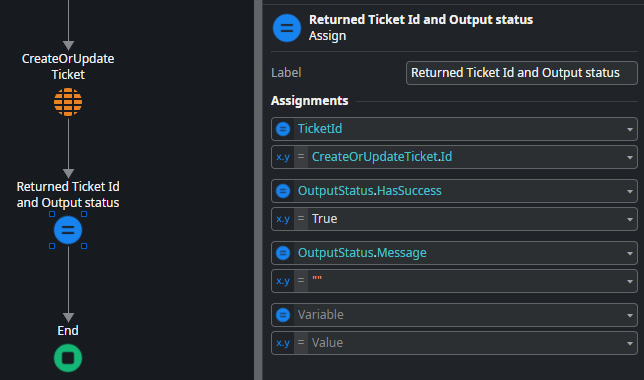
Figure 7.14 – Mapping success values to the output variable
- Map the failure values into the Action's Exception handler stream. The HasSuccess attribute of the OutputStatus output variable is mapped with the value False and the Message field has the value of the message returned by the Exception handler. To carry out this mapping, drag an Assign artifact from the toolbox to the Exception handler's flow and map the referred values. Click on the Publish button to save the new developments:
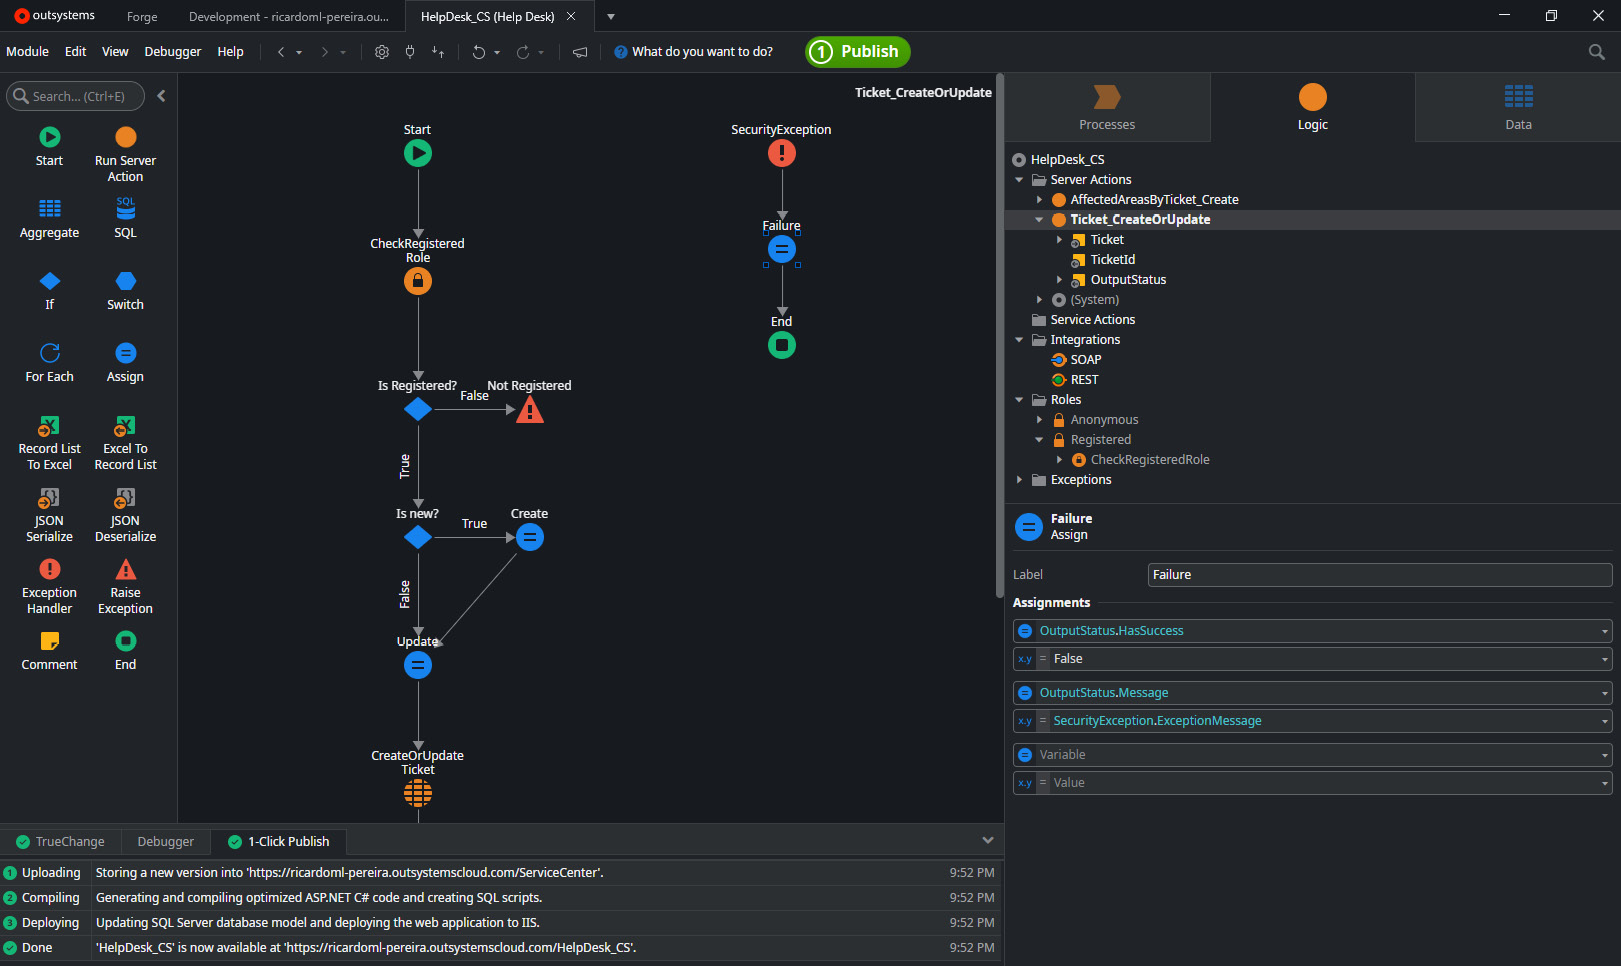
Figure 7.15 – Mapping failure values to the output variable in the Exception handler flow
With these steps, we guarantee that if someone unregistered uses the functionality, we log the event associated with the module in question, and, in addition, we expose the error in a user-friendly manner to consumers so that they can better understand the behaviors obtained in the situation that triggered the exception handler.
Summary
In this chapter, we understood that the platform provides artifacts that make it easier for us to process unexpected events in our applications. Furthermore, the way they relate and can be applied provides us with much greater control over what happens to these events, thus ensuring a much more understandable behavior for users (that is, better management of expectations).
With this, we realize that we can trigger our own Exceptions, we can use the Exception handlers in the most convenient way, the platform automatically bubbling up the events that do not find a handler to the Exception that was thrown, and, as a last resort, we have our safeguard: a global Exception handler.
All these features help a lot in two extremely important points of our applications: tracking errors and trends and making our applications more robust in case of errors.
All of this is an incredibly simple and fast way, without having to lose focus on business concepts, to write countless lines of code.
Do you know where we will be able to enjoy the results of applying these features? What we'll see in the next chapter: the frontend!
Let's start by looking at premade patterns, widgets, and templates that save us a lot of development time!
We will also learn how to scaffold screens (another superb accelerator in Service Studio) and how we can easily customize our CSS and insert our JavaScript! Incredible! Come on!