
Chapter 14: Integrating OutSystems with Your Ecosystem
When we reach an enterprise level, we need to integrate the OutSystems platform with the existing systems in the enterprise ecosystem. For this, we have to resort to different ways of doing it, from connections to web services (REST/SOAP or SAP), connections to external databases, or even, in the case of older legacy systems, through customized C#/.NET extensions. Using the last one, we can also extend features that are not found in OutSystems through native code.
To understand all this, the chapter is divided into the following sections:
- Creating your own C#/.NET code and using it inside the OutSystems platform
- Connecting with external databases
- Connecting with other systems through web services (REST/SOAP)
By the end of this chapter, we should understand how to set up the necessary connections to external systems and how to assess the best way to do this. We should understand the importance of Integration Studio when it comes to connecting to external databases and creating C#/.NET native code.
Furthermore, we must master the basic and simple principles of web services integration directly in Service Studio.
From a description alone, we are already excited! So, let's start by creating our own C#/ .NET code!
Creating your own C#/.NET code and using it inside the OutSystems platform
Tip
To get the most out of this section, you should have some knowledge of C#/ .NET development, as the intention is to adapt our custom code to be available in OutSystems.
Sometimes, we can come across situations where the external systems we want to connect with only have services that cannot be integrated in OutSystems natively, or we need to integrate a feature of our custom code.
In order for us to create our custom code in C#/.NET, Integration Studio integrates with Visual Studio (Microsoft's IDE). With this, we define our Actions, inputs, and outputs in Integration Studio, before moving on to editing it (developing its content) in Visual Studio.
With this, we can abstract our code into Actions that can be used according to the Service Studio visual model.
This feature allows us to do the following:
- Write our own C# code.
- Reuse all .NET frameworks.
- Reuse all existing libraries.
There is an example of an extension that wraps AddTimetoDatetime, which is available in the Forge.

Figure 14.1 – Extension example made with Visual Studio integrated with Integration Studio
The Actions defined in Integration Studio are available for use in Service Studio within the visual paradigm (one of the great definitions of low code), while also acquiring the following capabilities:
- Exception logging: Exceptions generated by Actions abstracted in the extension are generated and logged automatically, and can be consulted in the Service Center.
- Monitoring: The code is automatically monitored by the platform, and its performance can be analyzed and reports generated for this (Service Center features).
Since we've already done the Integration Studio walk-through in Chapter 2, Components, Tools, and Capabilities, we'll go on to show you how the AddTimeToDatetime extension was created by taking advantage of existing libraries.
First, an extension was created in Service Studio.
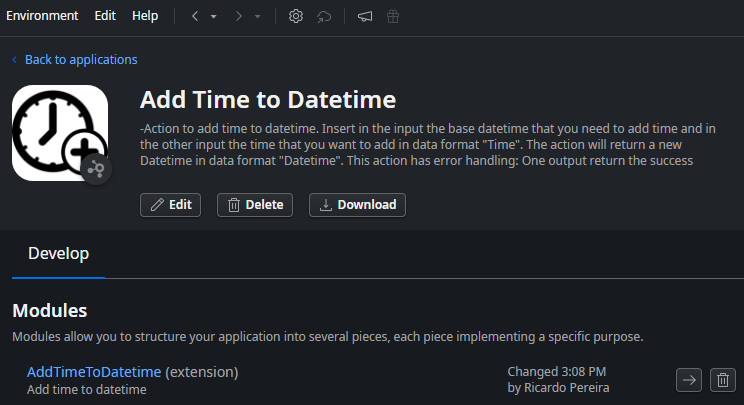
Figure 14.2 – Creating a new extension – AddTimeToDatetime
Then, and after authenticating in Integration Studio, the necessary Actions were created (in the case shown, there are two: adding time and removing time from a Datetime variable):
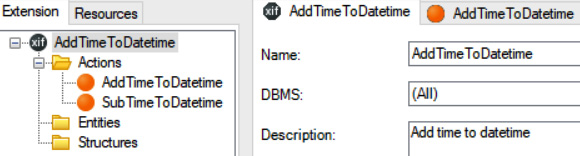
Figure 14.3 – Actions created in the new extension
In the next step, the necessary input and output variables were created (in this case, there are two error-handling variables, Result and ErrorMessage). In both Actions, the output is a Datetime variable resulting from the calculation made in the Action:
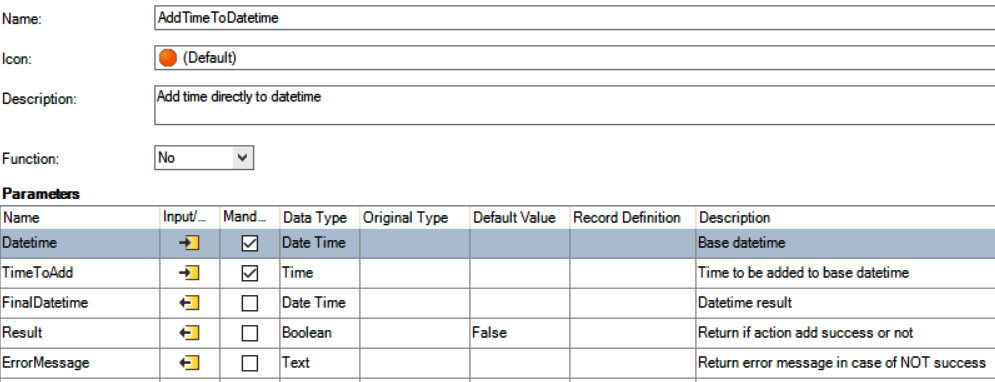
Figure 14.4 – Variables created in the action
After this parameterization in the two Actions, the button in the upper area of Edit Source Code .NET (we can see that button in Figure 14.1, in top right) was pressed to open Visual Studio.
After opening Visual Studio, open the corresponding .cs document:
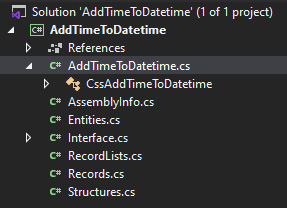
Figure 14.5 – Solution Explorer in Visual Studio
The custom code for the Actions looks like this:
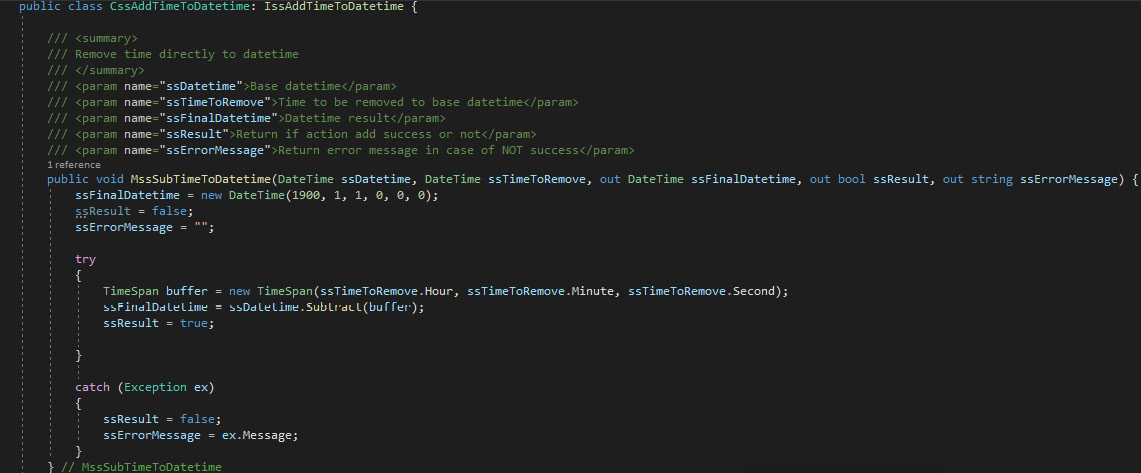
Figure 14.6 – Customized code in action
Note the use of Result and ErrorMessage variables in line with Try/Catch so as to allow better tracking and debugging of the functions themselves.
The next step was to build the solution, through the Build menu, by selecting the Build Solution item.
Finally, in Integration Studio, Publish was performed.
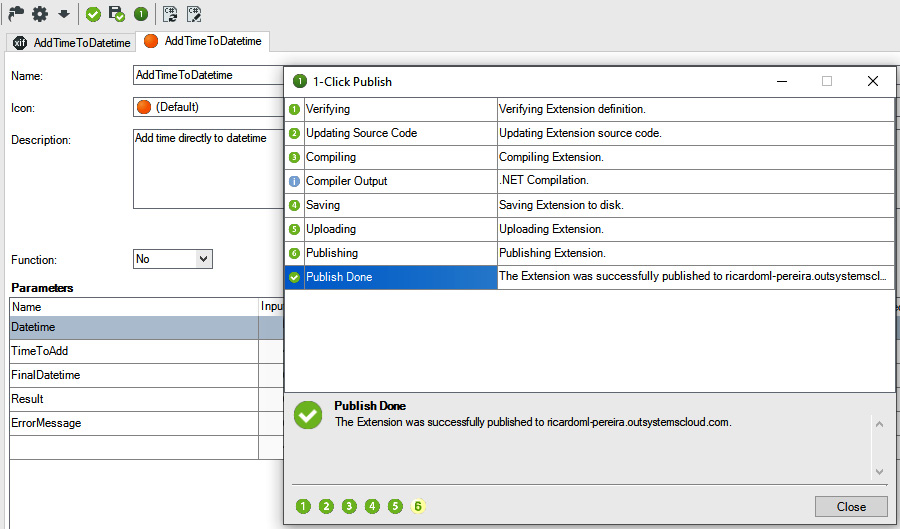
Figure 14.7 – Result after publishing the extension
From this moment on, the Actions are ready to be used in the modules that need their functionalities. Just add the dependency via the Manage Dependencies dialog, selecting the extension and the Actions you want.

Figure 14.8 – Adding extension Actions as a dependency
Tip
You can see more details about using C# code here: https://www.outsystems.com/training/courses/117/using-c-code/.
As we can see, in addition to the need to have some knowledge of C#/.NET to take full advantage of this ability, the process for taking advantage of it is relatively simple and can be achieved with practice.
Another of the uses that Integration Studio has, in partnership with the Service Center, is the creation of links to external databases.
Curious? Well, let's read about it in the next section!
Connecting with external databases
The scenario of connecting to external databases is somewhat common in the enterprise context. We often need to fetch, create, or edit data on other systems, and they may not have another standardized way of doing it.
With that in mind, OutSystems allows you to make these connections simply.
These connections are made in two steps: the creation of the database connection, and the mapping of tables to entities in an extension. Note that we can also map to existing views in these databases.
At this time, out-of-the-box connections with databases from the following systems are natively possible:
- Microsoft SQL Server
- Microsoft Azure SQL
- Oracle
- MySQL
- IBM DB2
Tip
You can see more system requirements for external database connections here: https://success.outsystems.com/Documentation/11/Setting_Up_OutSystems/OutSystems_system_requirements#integration-with-external-systems.
Creating an integration with an external database follows a sequential set of steps to ensure everything runs smoothly:
- Define an external database connection in Service Center.
- Create an extension-type module in Integration Studio to map the necessary tables and views to OutSystems entities.
- Configure the extension created in Integration Studio on Service Center to use the connection created in step 1.
- Finally, reference the entities we need in our applications by calling them in the Manage Dependencies functionality.
So, let's look at these items in more detail.
To start, open Service Center in the Administration tab and select the Database Connections option.

Figure 14.9 – Database Connections screen in Service Center
Then, click on the New Database Connection link and fill in the necessary fields for the configuration of the connection (don't forget to choose the correct DBMS so that the correct fields to fill in appear).
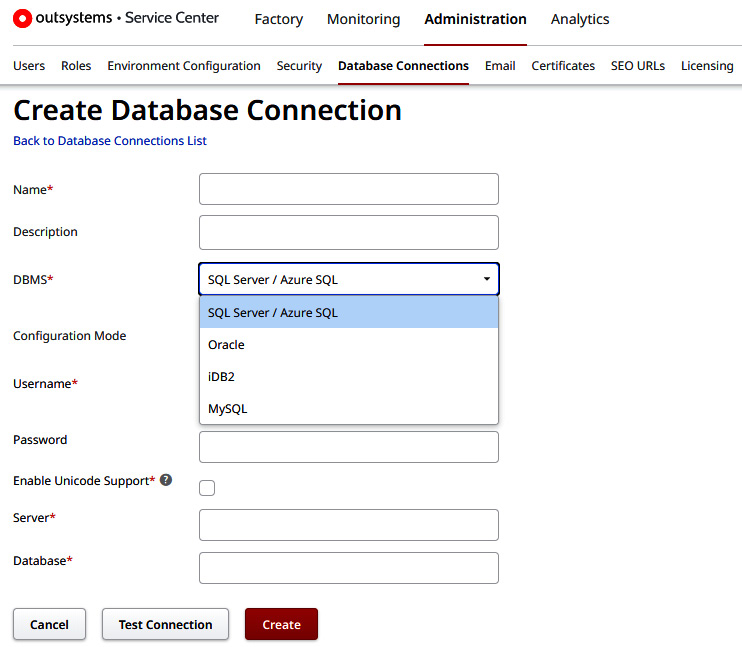
Figure 14.10 – Database Connection form screen in Service Center
After filling in all the necessary fields, click on the Test Connection button to validate that the connection is working. If successful, we can click on Create.
The next step is to map the tables and views we want from this database into OutSystems entities. For this, an extension is created with Integration Studio.
In this case, we open the application where we want to create the extension in Service Studio, select the New Module option, and create a new one of the Extension type.
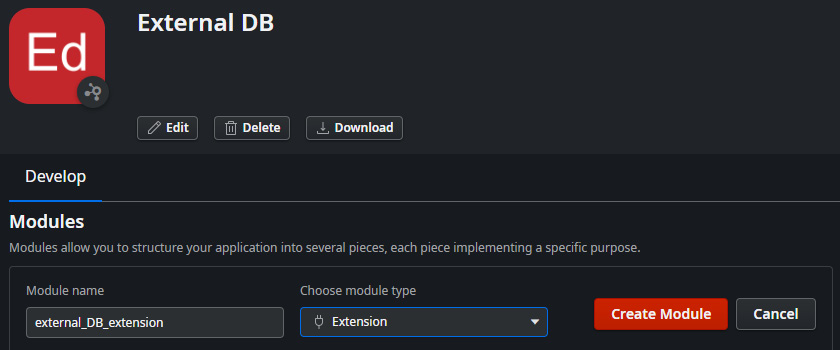
Figure 14.11 – Creating an extension to map external tables into entities
When we click on Create Module, Integration Studio opens automatically. We must authenticate ourselves in the environment where we created the connection in Service Center.
The next step is to right-click on the Entities folder and select the Connect to External Table or View… option.

Figure 14.12 – Selecting the Connect to External Table or View... option in Integration Studio
Then, follow the wizard presented, making sure you select the connection created previously and to select the tables and views we need.
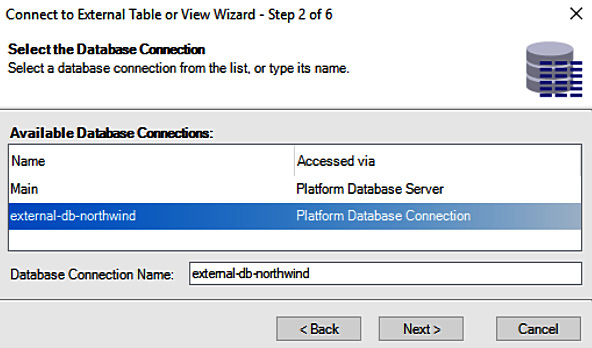
Figure 14.13 – Connect to External Table or View Wizard in Integration Studio
Upon completion of the wizard, we should review the imported content, such as Entity names, attribute names, and their types. Following confirmation, click on 1-Click Publish.
During the publishing phase, Integration Studio will ask us to configure the connection to the database that the extension will use. For this, in the Publish window, we select the Missing Configuration warning and then click on the Configure button.
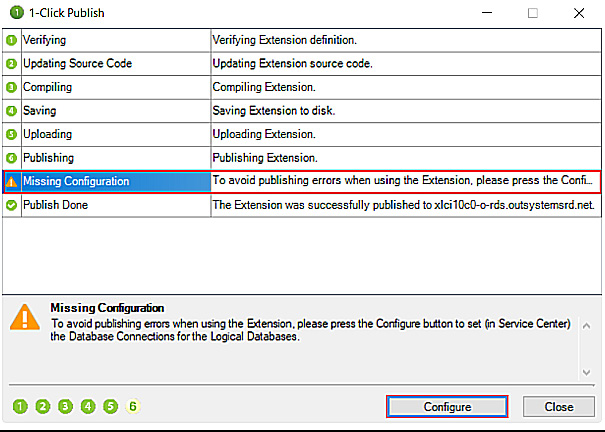
Figure 14.14 – 1-Click Publish summary window with the Missing Configuration option
This action redirects us to Service Center, to the Operation tab of the extension we are creating. In this section, we must select the connection that was created at the beginning of the procedures associated with the extension and then click Apply.
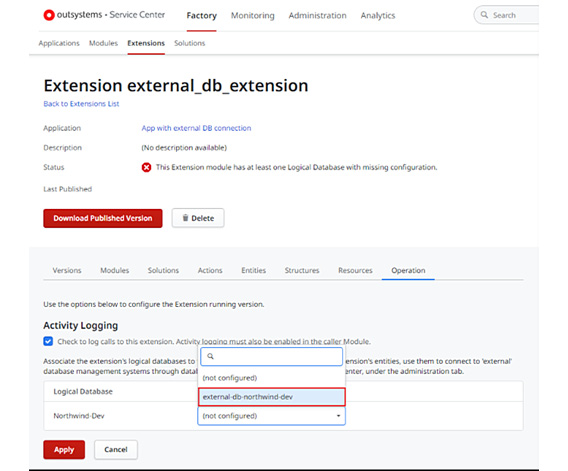
Figure 14.15 – Mapping a database connection to the extension created in Service Center
From this moment on, the entities are ready to be used by our applications. Just use Manage Dependencies and, from there, select the extension created and the respective entities.
We should always keep in mind that, in OutSystems, values that are returned as NULL in the attributes of external entities will never be NULL. A NULL integer will be 0, a NULL string will be an empty string (""), an empty Boolean will be False, and so on.
In terms of performance, we must bear in mind that queries made to external entities have a degrading performance the bigger they are. The fact that they have to be executed and then loaded leads us to think of alternatives, such as mapping the data to OutSystems entities and using them as a cache.
With regard to making joins (Left, Right, Full, or Inner), we cannot make joins between OutSystems entities and external database tables. This is one more reason to consider whether it makes sense to map data to OutSystems entities and use them as a cache.
This type of solution for connecting with external systems has some functional limitations since business rules or extra validations to databases are not provided for in order to generate information.
If external systems have an API interface, it is preferable to use these interfaces, since, as a rule, they have these necessary validations and rules to avoid obtaining data that should not arise and creating data without complying with the rules planned.
In other words, in the case of external systems having an interface for REST, SOAP, or SAP web services, we can make the integration through these protocols quickly and simply. This is the subject of the next section.
Connecting with other systems through web services (REST/SOAP)
The concepts of SOAP and REST APIs in OutSystems are very simple.
The way we can consume and expose these services is done very simply and always within the visual concept used in everything else in OutSystems development.
In addition, the platform has built-in debug, monitoring, and troubleshooting features for these services.
To better understand how it works, let's separate REST from SOAP and each of them into consuming and exposing.
Consuming SOAP
To ensure that we comply with the ideal architecture model, we should make this type of implementation in layered foundation application modules and of the integration type (*_IS).
Starting with the consumption of SOAP services, in Service Studio, open the Logic tab, right-click on the SOAP icon in the Integrations folder, and select the Consume SOAP Web Service SOAP option.

Figure 14.16 – Preparing to consume the SOAP web service
Next, we must insert the URL for the web service's WSDL in the window to do this.
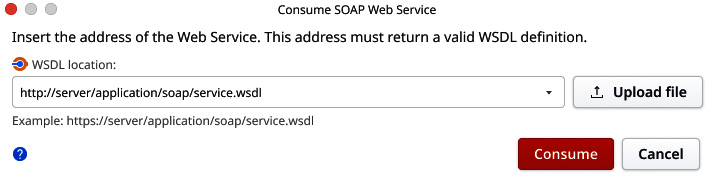
Figure 14.17 – WSDL input in the Service Studio window
Tip
We can directly insert a WSD file that is on our machine by clicking the Upload file button and uploading the file.
Automatically, the OutSystems platform will create the web service with the respective available methods and their inputs and outputs. Furthermore, if the input and/or output are complex types, the platform also creates the structures in the Structure section of the Data tab in order to support those types.
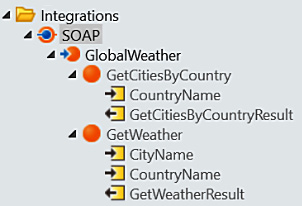
Figure 14.18 – Consumed SOAP web service integrated in OutSystems
From now on, we can use the methods of this service directly in our code in the same way we use any other type of action. Just drag the methods to the location of the flow you want.

Figure 14.19 – Using the SOAP method in the OutSystems Server Action
If we so wish, to improve our understanding of the code, we can change the name of the SOAP services, their methods, parameters, and structures, and they will continue to work.
Exposing SOAP
Sometimes, instead of consuming data from other external systems, we have to provide it ourselves. We can do this by exposing SOAP web services.
To ensure that we comply with the ideal architecture model, we must make this type of implementation in application modules of the Core Layer and interface type (*_API).
To expose a SOAP web service, on the Logic tab, we click on the SOAP icon in the Integrations folder and select the Expose SOAP Web Service option.
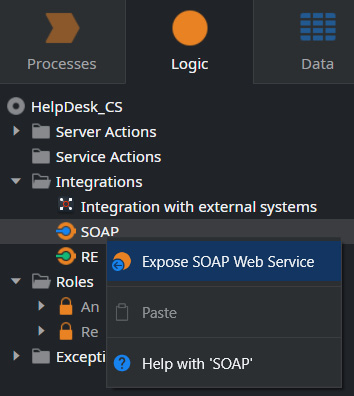
Figure 14.20 – Preparing to expose the SOAP web service
Then, set the name of the SOAP web service and the remaining properties.

Figure 14.21 – New exposed SOAP web service and the property section
Right-click the new SOAP web service and select Add Web Service method.
Then, set the method name and create some logic for it.

Figure 14.22 – SOAP method and its logic
When it's done, just publish the module. The service's WSDL is available at http(s)://<hostname>/<ModuleName>/<WebServiceName>.asmx?WSDL.
The SOAP web service will be exposed using a WSDL document/literal with SOAP 1.1 and SOAP 1.2 bindings.
If you want, and if it is necessary to provide to those who will integrate the services created, we can open the documentation by right-clicking on the SOAP web service created and selecting the Open Documentation option.
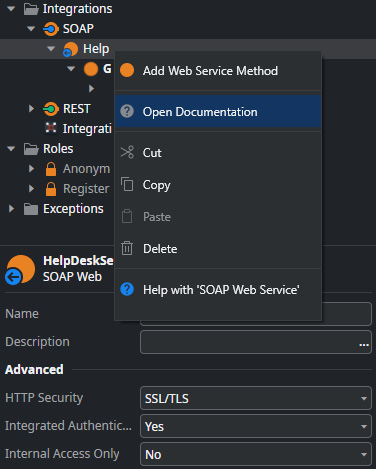
Figure 14.23 – Opening SOAP web service documentation
So far, we have understood how to work with SOAP web services. But what about REST web services? They are not very different. In fact, these integration mechanisms were so well thought out that we can easily adapt them to one another. So, let's start by looking at how to consume REST services.
Consuming REST services
The first thing to do in order to consume a REST API is to read its documentation and get a good feel for how it works. We must keep in mind that we must know its base URL, authentication requirements, and definitions of its methods.
To ensure that we comply with the ideal architecture model, we should make this type of implementation in layered foundation application modules and of the integration type (*_IS).
In order to integrate the REST service, click on the Logic tab and then right-click on the REST icon in the Integrations folder, selecting the Consume REST API... option.
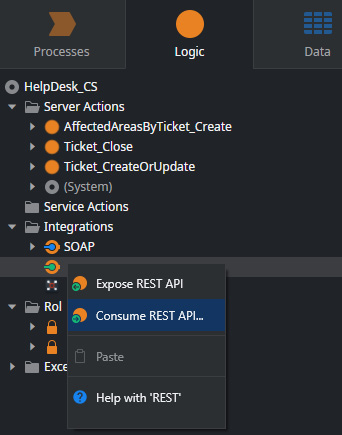
Figure 14.24 – Preparing to consume a REST API
Next, in the Consume REST API window, we must select whether we want to integrate only one method or all methods. Note that to add all the methods of a REST API, it must be compliant with the Swagger specification, otherwise, you must integrate it method by method.

Figure 14.25 – Consume REST API window for selecting the integration approach
Since, if we select the Add multiple methods option, the integration is done automatically, we will demonstrate the case of single-method integration.
In this case, we must fill in the information of the method itself, from the URL, the verb (GET, POST, PUT, DELETE, or PATCH), and parameters. Input parameters can be inserted with { } in the URL, following the ?.
If, in the documentation, we identify that the API has an authentication mechanism and specific headers, we can open the Headers and Authentication tab and insert the necessary information there.
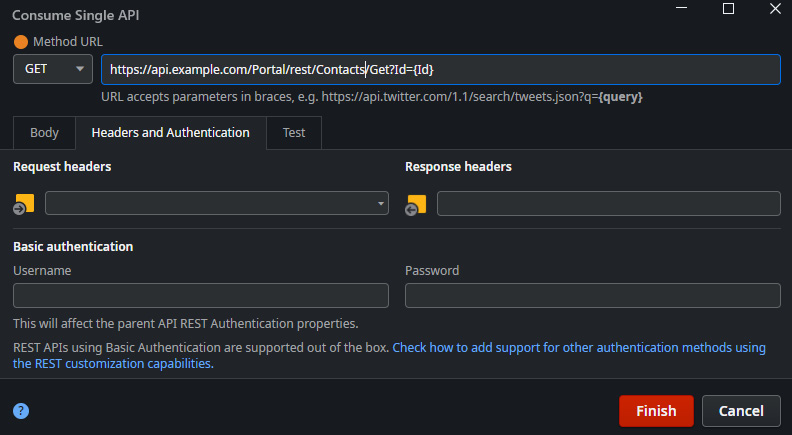
Figure 14.26 – Configuring the REST API method
The next step is to fill in the Request and Response information. The simplest way to do this is to run a test in the API and use the test result – alternatively, you can add the JSON structure or plaintext example directly to the Request and Response fields on the Body tab. Open the Test tab. If you have parameters in the method URL, you will need to enter the parameter values to run the test.
The most complex cases are the methods of the PUT and POST verbs, in which we must complete the Request field with the intended structure as shown in Figure 14.27:
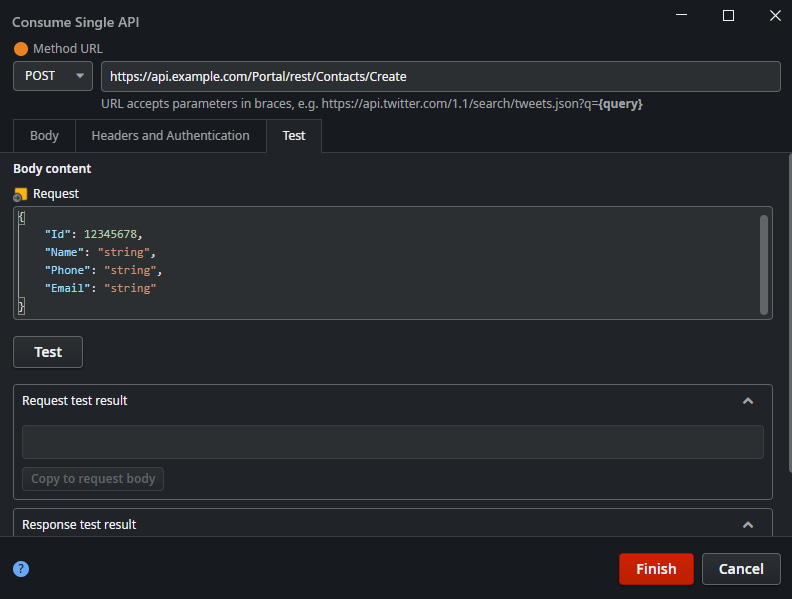
Figure 14.27 – Configuring the REST API method
To confirm that the structure defined in the Request field is correct, we click on the Test button and check the result on the Response tab.
If everything is OK, we click on COPY TO RESPONSE BODY in the Response tab. If the method is from POST or PUT verbs (manipulation methods), we do the same in the Request tab, clicking COPY TO REQUEST BODY.
After confirming on the Body tab that all the parameters comply, we click on the Finish button.
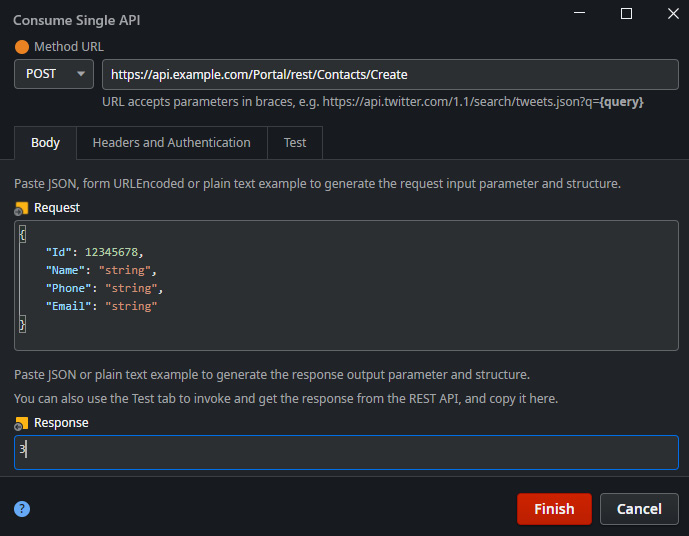
Figure 14.28 – Finalizing REST API method integration
From that moment on, the platform automatically creates the integration with the REST API, the respective methods (in the case of selecting all methods when choosing the type of integration process, integrates all those defined in Swagger), and structures necessary for the correct functioning of the API.

Figure 14.29 – Integrated REST API
As with the SOAP services consumed, from this moment on, we can use the REST API methods directly in our code in the same way we use another type of action.
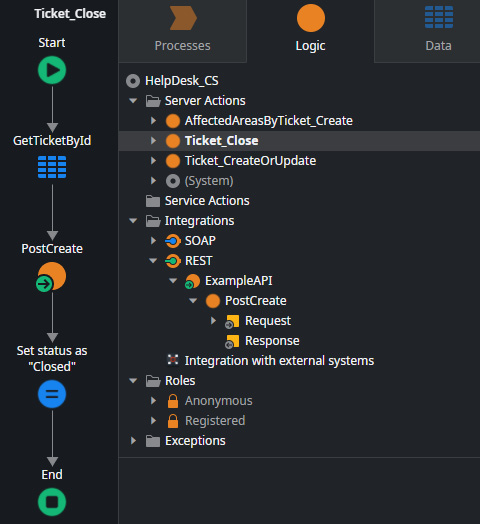
Figure 14.30 – Using the REST API method in our code
If we so wish, to improve our understanding of the code, we can change the name of the REST API and its methods, parameters, and structures, and they will continue to work.
Exposing REST
Just like with SOAP web services, we can provide data or functionalities to external systems by exposing the REST API.
To ensure that we comply with the ideal architecture model, we must make this type of implementation in application modules of the Core Layer and interface type (*_API).
In order to expose a REST API, on the Logic tab, we click on the REST icon in the Integrations folder and select the Expose REST API option.
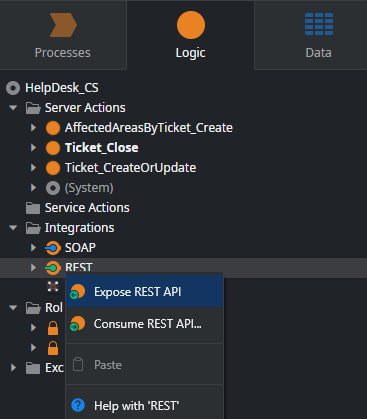
Figure 14.31 – Preparing to expose the REST API
Then, set the name of the REST API and the remaining properties.
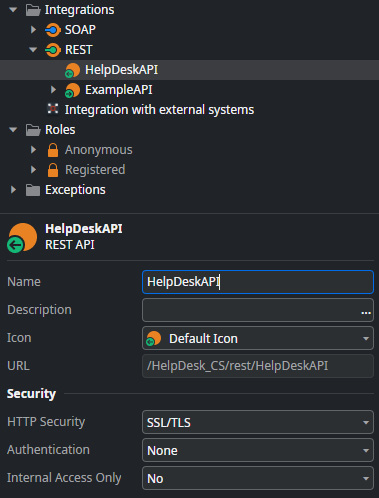
Figure 14.32 – Configuring the REST API name and properties
In the Properties window, we can configure some strategic points of the REST API.
We can configure the authentication type. This can be as follows:
- None – Without any authentication type
- Basic – Uses the default authentication of the user provider defined in the module
- Custom – For advanced cases that we want to handle in a customized way
We can also define whether we want the application to be for internal use only, which is an added value in terms of security if we want the REST API to only be used within our company's network.
We can preprocess the API call input data (such as a header or URL manipulation) just by defining an OnRequest action in the REST API properties.
In the same way as we handle input with OnRequest, we can also handle output (we can use this to handle response codes or messages), but this time with OnResponse.
There is an interesting item in the Advanced parameters of the properties: the Send Default values. If Yes, send the input parameter value in the response payload (if it is holding its default value).
We can parameterize any of these values at any time during our API development.
But now we need methods! So, let's go!
Right-click the new REST API and select the Add REST API method.
Set the method name and create logic for it.

Figure 14.33 – REST API method and its logic
Note that the HTTP Method property is set to the HTTP verb corresponding to the action your method will perform:
- GET – Read
- POST – Create
- PUT – Update
- DELETE – Delete
Tip
For manipulation methods where the input parameter is a record (such as POST or PUT), you will have to add the content-type header to the request with the application/JSON value.
When it's done, just publish it. The REST API method is available at http://<hostname>/<ModuleName>/rest/<RESTAPIName>/swagger.json.
If you want, and if it is necessary to provide to everyone that will integrate the services created, we can open the documentation by right-clicking on the REST API created and selecting the Open Documentation option first. Check whether the Documentation value in the Advanced properties of the REST API is set to Yes.
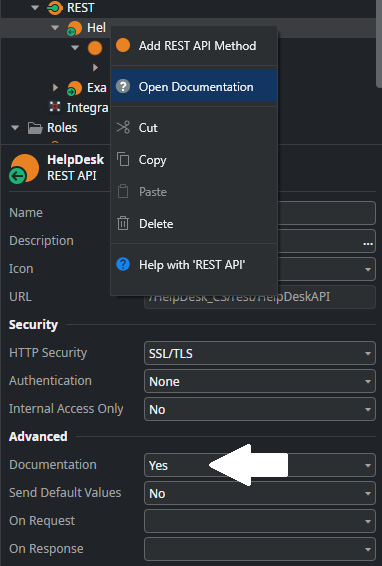
Figure 14.34 – Opening the REST API documentation
Through these two integration protocols (SOAP and REST), OutSystems covers most of the standard scenarios existing in the recent market. We can see that the integration or service exposure procedures are very similar between the two variants and that they are even simple to do.
When exposing services, we must always consider the generality and context of possible consumers in order to assess which protocol to use, be it REST or SOAP (we may have consumers that do not integrate with one of the protocols, thereby creating a technical barrier to the growth of the ecosystem).
A useful piece of advice is that, in the SOAP and REST services consumed, we must always pay attention to reading the documentation provided by their producer so as to understand the correct functioning and details.
Summary
This chapter is very useful when working in companies with an ecosystem composed of multiple systems, as well as when working with multiple third parties. The OutSystems platform becomes a much more attractive proposition with these features.
Thus, in this chapter, we saw how to create our own code in C#/.NET to extend the platform's functionalities, and we realized how we can easily connect to external systems databases and how to consume and expose SOAP and REST services.
Here, we realize that the OutSystems world goes far beyond the code we create, allowing a global expansion in the ecosystem in an extremely fast and practical way.
At the moment, a hot topic is missing regarding the platform's potential. We need to talk about the ability to create process flows and sub-processes to guarantee agility as regards our applications. This capability in OutSystems is called BPT (Business Process Technology) and is the topic covered in the next chapter.