
5
PI SPY PART 1: HACKING WEBCAMS FOR SECRET SURVEILLANCE
IN THIS CHAPTER, YOU’LL USE THE RASPBERRY PI WITH A CLASSIC USB WEBCAM TO SPY FOR YOU. YOU’LL LEARN HOW TO SET UP THE WEBCAM WITH YOUR PI. THEN YOU’LL STREAM THE FEED FROM THE CAMERA TO A REMOTE DEVICE, LIKE YOUR PHONE, TO MAKE A CHEAP HOME-SURVEILLANCE SYSTEM. WITH THE WEBCAM, YOU CAN KEEP AN EYE ON YOUR PET, YOUR GARDEN, OR YOUR SIBLING. YOU CAN EVEN HIDE IT SOMEWHERE INCONSPICUOUS AND FIND OUT WHO KEEPS EATING ALL THE CHOCOLATE IN YOUR HOUSE!
WHAT YOU’LL NEED
Here are the items you’ll need for this project:
- Raspberry Pi
- USB portable battery
- USB webcam
Nowadays, most computers or computer monitors come with a built-in webcam, so the original USB models tend to be available online for a low cost. You might even find one hidden away at the back of a drawer. If you’re buying a webcam for this project, choose one from the list at https://elinux.org/RPi_USB_Webcams that’s proven to work with the Pi.
You’ll use a USB battery supply to provide power and make the spy camera portable—so it’s worth buying a branded battery. Even though they’re slightly more expensive, they’re of higher quality and will last longer than the budget options. You can hide the webcam in the shed or an empty cereal box in the house without having to worry about plugging it into a power socket. That way, a wire won’t be on display and give the game away.
SETTING UP YOUR WEBCAM
You’ll start by attaching the webcam to your Pi and testing their compatibility. Boot up your Raspberry Pi and attach your monitor, keyboard, and mouse. You’ll remove these after you’ve completed the setup. Simply take the USB end of the webcam wire and plug it into one of the spare USB ports, as shown in Figure 5-1.
Now check that the webcam is working using the following steps.

FIGURE 5-1 Attaching the webcam
- Recognize the webcam: You can check that the Raspberry Pi has picked up the webcam by opening the terminal and entering the ls command. This command lists all the devices currently connected to the USB ports and looks something like this:
pi@raspberrypi:- $ lsusb
Bus 001 Device 007: ID 1908:2311 GEMBIRD
Bus 001 Device 006: ID 093a:2510 Pixart Imaging, Inc. Optical
Mouse
Bus 001 Device 005: ID 0e6f:0149 Logic3
Bus 001 Device 004: ID 05e3:0610 Genesys Logic, Inc. 4-port hub
Bus 001 Device 003: ID 0424:ec00 Standard Microsystems Corp.
SMSC9512/9514 Fast Ethernet Adapter
Bus 001 Device 002: ID 0424:9514 Standard Microsystems Corp.
SMC9514 Hub
Bus 001 Device 001: ID 1d6b:0002 Linux Foundation 2.0 root hub
My webcam is a Logic3, which you can see on the third line of the output. You can look for the brand name of your webcam or remove all other connected USB devices (except the keyboard) and see which device is still listed. If your webcam is not listed in the output, try restarting your Raspberry Pi and running the code again. If the webcam still doesn’t appear in the output, your model is probably incompatible and you’ll need another. The website provided earlier has a list of webcams that do and don’t work with the Pi.
- Install the webcam software: Now you’ll install a program called fswebcam that will test that the camera is working correctly before moving on to the main project program. There’s nothing worse than typing your program and then finding it doesn’t work because the hardware is incompatible! Return to the terminal window and enter the following line to download and install the required software:
pi@raspberrypi:- $ sudo apt-get install fswebcam
- Take a test image: Once the program has finished installing, you can test the webcam by taking an image. In the terminal, enter the following command to take a picture from the webcam and save it as an image file called test:
pi@raspberrypi:- $ fswebcam test.jpg
To view the image, open your Pi home folder, find the test.jpg file, and double-click it. If it has taken a picture, the webcam is working correctly! Figure 5-2 shows the output to the terminal window when an image is successfully captured. If it hasn’t taken a picture, you might need to use a different webcam. Also, check that the webcam is connected and ensure that the code is correct.
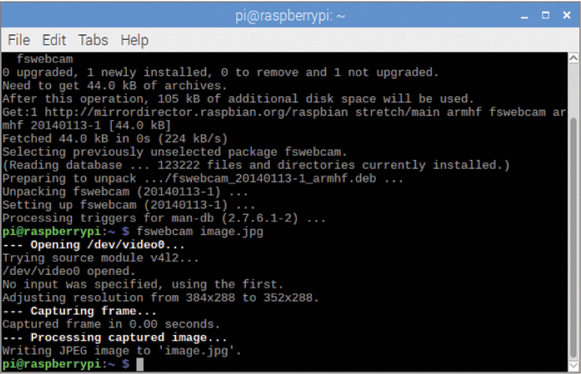
FIGURE 5-2 Capturing the image from the webcam
STREAMING A VIDEO FROM THE WEBCAM
Now that you know your webcam is installed and working correctly, you can write a short program to stream the image from the webcam to the Raspberry Pi. You’ll use a code package called PyGame, which is a set of Python modules designed for writing video games. However, it also includes computer graphics, videos, and sound libraries designed to be used with Python. You’ll borrow some functions and tools from PyGame to save you the trouble of writing them yourself.
PyGame comes preinstalled on the Raspberry Pi operating system, so you don’t need to download it. Open a new Python file and save it as pi_spy.py. Then enter the code in Listing 5-1, which is the first part of the code.
❶ import sys
❷ import pygame
   import pygame.camera
❸ pygame.init()
   pygame.camera.init()
   # set the size of the window
❹ screen = pygame.display.set_mode((320,240),0)
LISTING 5-1 The first part of the Pi spy code
As with most programs, you begin by importing the required modules and PyGame libraries. First, you import the system module ❶, and then you import pygame. From pygame, you import the pygame.camera module ❷.
Next, you initialize pygame and the camera commands ❸. This prepares pygame to run. The last line of code sets the size of the pygame window ❹. PyGame runs its programs in a separate window, and this line creates that window when you run the program. You can adjust the size by changing the width and height measurements, which are currently set to 320 × 240. Figure 5-3 shows that the window takes up only a small part of the screen. Some webcams will support higher resolutions. You’ll find several options at https://elinux.org/RPi_USB_Webcams.

FIGURE 5-3 The webcam window
Next, you’ll use PyGame to find the attached webcam and start it running. To do this, add the code in Listing 5-2 to your program.
   # locate the camera and turn it on
❶ cam_list = pygame.camera.list_cameras()
❷ print (cam_list)
❸ webcam = pygame.camera.Camera(cam_list[0],(32,24))
❹ webcam.start()
LISTING 5-2 The second part of the program: turning on the webcam
First, you need PyGame to find the webcam by asking it to list available cameras. You create a variable to hold the results of the camera search ❶, which should return your single webcam. These results are stored in a list of one item, because there’s only one webcam.
You then print the list of results ❷ to make sure your camera was found. If you have only one webcam connected to your Pi, it should be listed in position 0. Remember that list numbering always starts at 0 not 1.
Then you set up the webcam and store the details in a variable named webcam so you can call it again more easily later in the program ❸. The name of the camera is pulled from the cam_list you got earlier by passing the list name with [0], which tells Python to take the first item in the list held in position 0.
You also specify the dimensions of the webcam image. You can see that these dimensions are in parentheses, not square brackets, with a comma between values: this is a data type known as a tuple, and it’s like a list but with values that don’t change. Tuples are often referred to as immutable, which means that the data held inside them cannot be changed while the program is running. The code at ❸ changes the quality of the image displayed in the stream window. If you set the dimensions to 32 × 24, the video stream will look more pixelated, but the PyGame window remains the original size of 320 × 240. To change it, you’d have to return to the code, edit the sizes, and then rerun the program.
The last line of code tells the camera to start ❹, which turns it on.
Now for the final part of the program. Add the code in Listing 5-3 to your program.
❶ while True:
       # stream the images and scale to a set size
    ❷ stream = webcam.get_image()
    ❸ stream = pygame.transform.scale(stream,(320,240))
    ❹ screen.blit(stream,(0,0))
       # update the display
    ❺ pygame.display.update()
LISTING 5-3 The final code for the Pi spy: streaming the video
You begin by creating a while loop to keep the program running the instructions that follow ❶. The loop tells PyGame to keep pulling images from the webcam and displaying them onscreen.
You then create a variable to store the image from the attached webcam ❷. The next line of code ❸ scales each image so it fits the screen size you entered earlier. In this case, it scales the image to 320 × 240 to match the dimensions you set at the start of the program in the screen = pygame.display.set_mode((320,240),0) variable. If you change either the window size or the scale, make sure those measurements match.
To draw the video image on your screen, you use a PyGame function called blit() ❹. Your display is made up of millions of tiny dots called pixels, which can be turned on or off. When you display an image onscreen, your software manages which pixels are on or off as well as their colors. Pixels also make up your image. The video from your webcam is made up of lots of still images played together one after the other, similar to a flip book or animation. Blitting takes a full copy of the pixels from one of the images and copies them to the pixels on your screen, displaying the image. Then, when the program loops, the next image is captured from the webcam and saved. The pixels are updated using the blit() function to make a video.
The final line of code ❺ updates the PyGame window, displaying the webcam stream for you to watch. The program then loops again, collects a new image, blits it, and then displays it on your screen.
Save your program and run it! Remember that pressing F5 will save and execute the program. A small PyGame window will pop open, and you’ll see a live stream from the webcam.
LIVE STREAMING TO A DEVICE
So far, your Pi streaming video is from the same location as your Pi, which is fine if you’re sitting at your desk with your Pi and can watch the PyGame window. But say you want to spy at a different location. For example, what if you want to set up a webcam at a window that overlooks the front door of your house so you can see visitors approach? Or perhaps you want to hide the webcam in the kitchen and watch what your pets do when you leave them home alone. You could even use the webcam as a simple bedroom monitor. This next program shows you how to make a portable spy camera for such projects.
Make sure your webcam is still plugged into the Pi USB port. Then you’ll need to download and configure a handy piece of software called motion, which enables you to stream images from your webcam to a particular device, like your phone or tablet. For this, you need to make sure your Raspberry Pi and the viewing device are connected to your home network. Follow these steps:
- Install the software: To download and install the motion program, open the terminal and enter the following command:
pi@raspberrypi:- $ sudo apt install motion
- Find your IP address: To access the live stream from another device, you’ll need your Raspberry Pi’s IP address. An IP address identifies each device on a network. This is how your Pi, games console, and smart TV can all be online at the same time and not accidentally receive the wrong data. To find your Pi’s IP address in the terminal, enter the following:
pi@raspberrypi:- $ ip addr show
Or enter this:
pi@raspberrypi:- $ hostname -I
This command will list lots of data related to the network connections. Look for the line that begins with wlan0. On the second line, you’ll find the IP address, which begins with inet and looks like this: 192.168.1.751. This is your Pi’s personal IP address. Write it down, because you’ll need it later.
- Create a daemon to run the program: In computing terms, a daemon is a program that runs in the background, doing its thing. You, the user, don’t need to control it directly. The webcam stream doesn’t require any user interaction and can run as a background process; so you’ll set it to run as a daemon by adding a line to the motion code file. In the terminal window, enter this command:
pi@raspberrypi:- $ sudo nano /etc/default/motion
This command opens a text file called motion that you can add instructions to. The motion software will recognize the motion file. At the bottom of the file, add the following line of code:
pi@raspberrypi:- $ start_motion_daemon=yes
This code tells the daemon to start the webcam server and run it as a background process, as shown in Figure 5-4. Press CTRL-X to exit, and then when prompted, press Y to save the file.
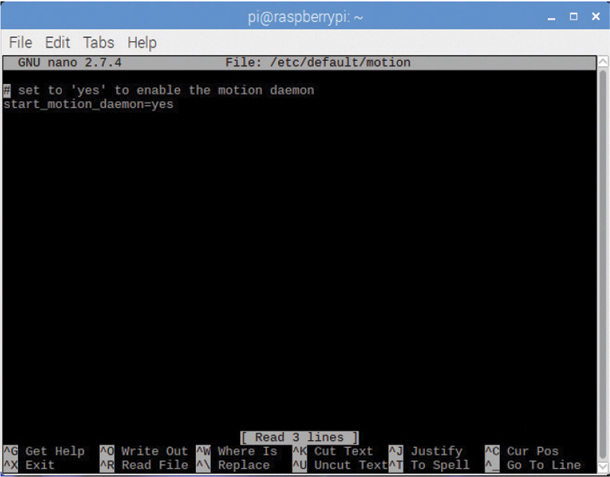
FIGURE 5-4 The webcam server window
- Change settings in the configuration file: Before you start the stream, you need to make a few more changes in the motion configuration file, motion.conf. Here you can add or alter the code to change the program’s behavior. This file is large and contains lots of settings, so let’s walk through it so you don’t get lost. Enter the following command in the terminal to open motion.conf:
pi@raspberrypi:- $ sudo nano /etc/motion/motion.conf
Configure these settings:
Turn on the daemon: To turn on the daemon, find the daemon off entry near the start of the file and change it to daemon on.
Adjust the quality: Adjust the image quality of the stream to somewhere between 1 and 50, where 50 is the highest quality. A higher quality streams clearer images but will put more strain on the Raspberry Pi and your network. If the value is too high for the Pi to handle, it might crash. I recommend setting the quality to 20 to begin with. Then you can change it later if you want a clearer image. Locate the Live Stream Server section, find the stream_quality line, and set it to 20 so it reads as follows:
stream_quality 20Adjust the frame rate: Adjusting the frame rate affects the number of frames is displayed each second. The higher the number of frames is, the smoother the video will play. The lower the number is, the jerkier the image will appear. However, sometimes setting it too high can use up too much bandwidth and make the connection slow, especially if other people are using your network. Adjust the frame capture to around 25, which will give you a near-live stream with a delay of 0.2 seconds. Locate the setting stream_maxrate and set it to 50. Again, you can adjust these settings later to suit your network capability.
Change the size of the video displayed (optional): If you’re viewing the feed on a smartphone or tablet, you might need to make the video window size smaller. In that case, locate the width and height entries in the configuration file and adjust the numbers to suit your device. You might have to experiment with a few numbers before you get the right size.
Final settings: Set the stream_localhost line to off to stream the webcam images to your mobile device rather than just the Raspberry Pi, which is the local host. After completing these changes, press CTRL-X. You’ll be prompted to save the changes to the configuration file. Press Y to select yes. To change some of the settings shown in Figure 5-5 again later, just open the file using the sudo nano /etc/motion/motion.conf command. Then make your required adjustments, exit, and save the file.

FIGURE 5-5 The settings window
- Start motion: To start the web server and capture a video feed, enter this command:
pi@raspberrypi:- $ sudo service motion start
- Access the video stream: To access the video, open a browser window on the device you’re streaming to. In the address bar, enter the Raspberry Pi’s IP address (the one you wrote down earlier); at the end of the address, add the port number :8081. The complete address should look similar to 192.168.1.56:8081. When you press ENTER, the browser should look up your Pi’s IP address and connect to it. The Pi and motion program will respond and start streaming the live video from the webcam to your device, as shown in Figure 5-6.
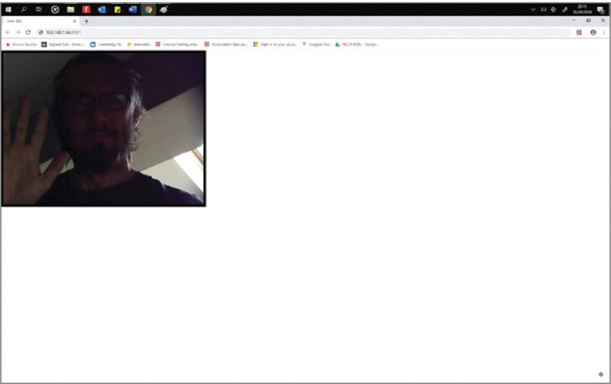
FIGURE 5-6 Streaming live video to a browser
Now you need to find somewhere you can hide your Pi and the camera to start spying; just make your camera has a clear view! You can remove the monitor, mouse, and keyboard and place your Raspberry Pi spy cam in a suitable location. Remember to ensure that your Raspberry Pi stays within range of your Wi-Fi signal so the images can be streamed to your mobile device.
STOPPING AND RESTARTING MOTION
Once you’ve finished using the web stream, you can return to your Raspberry Pi and reconnect the monitor, mouse, and keyboard. Then open the terminal and enter this command to stop the program and end the stream:
pi@raspberrypi:- $ sudo service motion stop
If you can’t access a monitor and keyboard, just remove the power from the Raspberry Pi to halt the stream.
Sometimes your motion software might stall, and the video will stop streaming. If this occurs, the image will be static or frozen. In that case, restart the software by using the following command:
pi@raspberrypi:- $ sudo service motion restart
You should also restart anytime you adjust the configuration file settings.
If you’re using your webcam covertly, remember to make sure that no one is around before accessing your Pi and restarting the program. Otherwise, you’ll give away the location of your hidden camera.
WRAPPING UP
Now you have a compact spy camera to do with what you will. You’ll be using the Pi’s image capabilities again in Chapter 11 to set up a nature box that will take surreptitious photos of anything that triggers its sensors. For now, try playing with the settings to see what resolution, frame rate, and size work best for your system.