
7
RADIO INVASION
THE RASPBERRY PI NEVER CEASES TO AMAZE ME. WITH JUST A SINGLE JUMPER WIRE, YOU CAN CONVERT THE RASPBERRY PI INTO A RADIO TRANSMITTER. THAT’S RIGHT: YOU CAN USE IT TO BROADCAST MESSAGES TO A REAL RADIO.
In this chapter’s project, you’ll create a simple soundboard to trigger and control broadcasts to the radio. You’ll record sounds or phrases, such as “Listen up, everybody” or “I want a cookie,” or create an emergency broadcast message. Then you’ll assign each sound file to its own button, which you’ll click to broadcast your message to any radios tuned in to the correct frequency. By hijacking radio waves, you’ll be able to prank unsuspecting listeners, share important gossip, or create a personal announcement system.
Radio waves are everywhere. When you watch your television, the program is likely being transmitted to you via radio waves. The Wi-Fi router in your house broadcasts data packets as radio waves. In fact, many cars now use data encoded in radio waves to unlock doors or start the engine. So how do you hack a Raspberry Pi to turn it into a radio transmitter?
Well, GPIO pin 4 can generate a spread-spectrum clock signal, which extends the bandwidth, resulting in a signal that’s spread over a range of up to 40 m. You’ll use software called PiFM to control the pin and enable it to send your FM radio waves. You can read more about the science and the project at http://www.icrobotics.co.uk/wiki/index.php/Turning_the_Raspberry_Pi_Into_an_FM_Transmitter.
LEGAL ISSUES
Before you get started, be aware that this project is purely for educational and learning purposes, not for commercial use. The standard 4-inch jumper wire supports a legal broadcast radius of approximately 30–40 m. You’re responsible for researching your country’s laws and requirements. It’s also your responsibility to conform to the requirements of those laws. This project should not be used near any airports or military bases.
WHAT YOU’LL NEED
Here are the items you’ll need for the project:
- Raspberry Pi Zero or the original Pi model (alternative: Raspberry Pi Model B+ V1.2 2014 or Raspberry Pi Model A+ V1.1 2014)
- Jumper wire
- USB microphone (recommended) or other microphone
- FM-enabled radio (digital or analog, preferably with two speakers, either external or built-in)
PREPARING THE RASPBERRY PI
Before building the main project, you’ll install the PiFM software, set up the radio, and then check that it works correctly. This is an easy project to set up.
To set up the hardware, connect one jumper wire to GPIO pin 4—the fourth physical pin on the left of the Pi, as shown in Figure 7-1. That’s it; that’s all the hardware you need to set up to broadcast your signal.
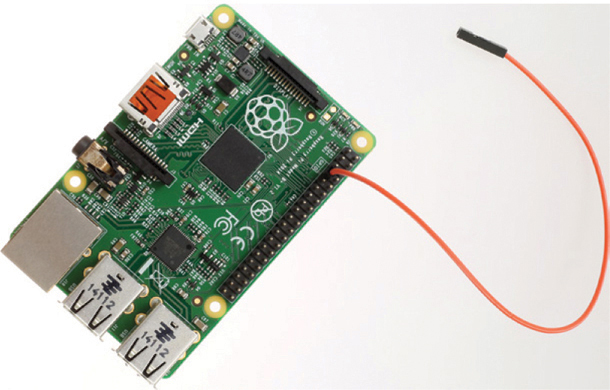
FIGURE 7-1 Attaching the jumper wire to the Raspberry Pi
Follow these steps to set up the project:
- Create a new folder: You’ll create a folder to store the program software and sound files. Open the terminal and enter the following:
pi@raspberrypi:- $ mkdir Radio
This mkdir command creates a folder named Radio. Navigate to the Radio folder by entering the following command into the terminal:
pi@raspberrypi:- $ cd Radio
The text in the command line’s prompt should now show that you’re in the Radio folder by changing to something like this:
pi@raspberrypi:- $ ~/Radio
- Download the Python library: Download the required PiFM library by entering this line in the terminal:
pi@raspberrypi:- $ wget http://www.tecoed.co.uk/uploads/1/4/2/4/14249012/pifm.tar.gz
This line downloads the program file to your Radio folder. The file is compressed, so you’ll need to uncompress it to access the files. To do so, enter this command:
pi@raspberrypi:- $ tar xvzf pifm.tar.gz
Then press ENTER to extract the program files into the Radio folder.
RUNNING A TEST PROGRAM
You need to check whether the radio works before you load your own sounds:
- Tune in to the radio: Plug in your radio and turn it on. Ensure that it’s on the FM setting and tune it to 100.0 MHz. You should hear the hiss of the radio, because nothing else is being broadcast on that frequency.
- Run the program: Return to the terminal window and enter the following code:
pi@raspberrypi:- $ sudo ./pifm sound.wav 100.0
Press ENTER; you should hear a familiar tune broadcast to your radio. If you have a portable radio, you can test the broadcast radius by walking around your home or even going outside.
- Change the frequency: You can change your frequency for broadcasting by changing the value at the end of the command. For example, to broadcast on frequency 105.0, enter this:
pi@raspberrypi:- $ sudo ./pifm sound.wav 105.0
- Broadcast in stereo: The downloaded program folder includes an audio file to test your radio’s stereo setting. You’ll need two speakers: a left and a right speaker. Enter the same command line in the terminal as before, but this time use the left_right.wav file, like this:
pi@raspberrypi:- $ sudo ./pifm left_right.wav 100.0
The tune will play on your radio again, but this time, if your radio has two separate speakers, the output will play through both, creating a stereo sound. If you don’t hear any sound, check the following:
- You’re using the correct Raspberry Pi model. (Raspberry Pi Zero, original Pi model, Raspberry Pi Model B+ V1.2 2014, or Raspberry Pi Model A+ V1.1 2014)
- You’ve connected the jumper wire to GPIO pin 4.
- The radio is tuned to the correct frequency.
- The frequency in the command line matches the frequency on the radio.
- In the terminal window, you’ve navigated to the Radio folder and run the program code from this folder.
Sometimes, if a previous file hasn’t stopped playing before another is executed, the file won’t play or you might hear a single auditory tone from the radio. Restart your Raspberry Pi and run the program again.
STREAMING AN MP3 MUSIC FILE
So far, you’ve broadcast only WAV files, but your radio can also stream MP3 files, so you can play your regular music. A WAV file has a higher sound quality than an MP3 file. But it takes up more storage space on your device, making WAV files unsuitable for streaming and downloading music. MP3 files are still high quality but take up a lot less storage space, so you can store more on your device and stream music without buffering or lag time. Most music files use MP3 as a standard format, which means you can create a kind of portable speaker with your Pi. Give it a try by following these steps:
- Download an MP3 file: Download your favorite songs and transfer them onto your Raspberry Pi (see “Transferring Files” on page 31); make sure it’s an MP3 file with an .mp3 extension. Save this file to the Radio folder. Also, I recommend renaming the file to a short name to reduce the likelihood of errors when you type it in the command to play the song.
- Install FFmpeg: Sound isn’t digital, so the signal needs to be converted from analog into a string of zeros and ones in order to be played on a computer. The process of sampling captures audio so it can be converted. The higher the sample rate is, the more captures per second there are, and the higher the audio quality will be. Most MP3 files aren’t sampled at a rate that’s compatible with the PiFM program, so you need to install the FFmpeg program, which adjusts the MP3 file’s sample rate in real time as it’s broadcast. In the terminal, enter this line:
pi@raspberrypi:- $ sudo apt install ffmpeg
This command installs the FFmpeg program.
- Play the MP3 file: After installing FFmpeg, navigate to the Radio folder by using this command:
pi@raspberrypi:- $ cd Radio
Then enter the following command, replacing name_of_your_file.mp3 with the name of your MP3 file (now you see why I encouraged you to change the filename!):
pi@raspberrypi:- $ ffmpeg -i name_of_your_file.mp3 -f s16le -ar
22.05k -ac 1 -|sudo ./pifm –
Press ENTER to execute the line of code. Then turn on your radio and tune it until you hear the MP3 playing. Congratulations, your song is on the radio! To stop the song, press Q to quit or press CTRL-X.
RECORDING AND BROADCASTING YOUR OWN FILE
Now you’ll create your own sound files and play them. Creating and editing audio files requires a lot of processing power, so it’s easiest to use another device, such as a laptop or a desktop computer. Most of these devices have built-in microphones that you can use, or if you prefer, you can attach a USB microphone.
Setting Up Your Microphone and Speakers
To edit audio files, you’ll need to install a free, open source audio editor called Audacity. If you’re using a Windows or macOS computer, navigate to the website https://www.audacityteam.org/. Click the link to download the software. Then install it on your device. If you’re using Linux, download the software using the usual terminal method.
Plug your microphone into one of the USB ports. First, you’ll record a sound just to test the mic and the speakers; you’ll need to change some settings before recording the final sound to broadcast. Once you’re ready, open Audacity and click the Record button, shown in Figure 7-2, to start recording.

FIGURE 7-2 Using the Audacity controls
Speak into your microphone. Remember that you’re only testing the program’s ability to pick up the microphone and record sound, so it doesn’t matter what you say. Once you’re finished, click the Stop button to stop recording. Click the Play button to hear your recording. Don’t forget to ensure that your speakers are turned on and the volume is turned up. If you can hear the sound, your setup is working.
Making and Playing Your Recording on the Raspberry Pi
To broadcast your new sound correctly, you’ll need to adjust the sample size before recording. The sample size is displayed at the bottom left of the program, in the Project Rate (Hz) drop-down list, as shown in Figure 7-3. Click the drop-down arrow and select 11025 from the list.
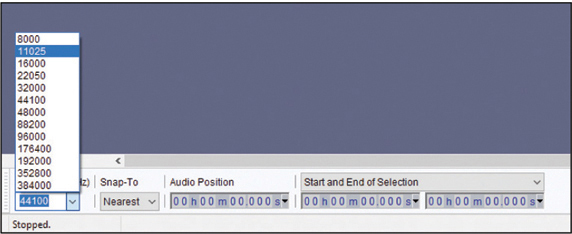
FIGURE 7-3 Changing the Project Rate to 11025 Hz
Now make your recording by clicking the Record button as you did earlier.
Once you’re happy with your sound recording, you need to export it to the required format to use it with the PiFM program and broadcast it. From the menu, click File▸export. From the list that appears, select WAV (Microsoft), with the option signed 16-bit PCM where applicable. The program will present you with the option to add metadata to the file. Metadata is information about the audio track, such as its name, its length, and the year it was made. You can skip this option by clicking OK. Figure 7-4 shows both drop-down menus.

FIGURE 7-4 Exporting the audio file
Next, you need to transfer your sound to your Raspberry Pi and save it to the Radio folder. Use one of the transfer methods discussed in “Transferring Files” on page 31, or you might find it quicker to copy the file onto a USB memory stick and then insert and copy the file to your Raspberry Pi. Ensure that you save the file to the Radio folder.
Broadcasting the File
To play your new sound file, open the terminal and enter cd Radio to navigate to the Radio folder. Then list the contents of the folder by entering this line:
pi@raspberrypi:- $ ls
You should see your newly recorded WAV file. Enter the following command replacing myfile with the name of your new sound file:
pi@raspberrypi:- $ sudo ./pifm myfile.wav 100.0
Turn on your radio, tune it to the frequency 100.0, and press ENTER. Your recording should play!
Sometimes you might hear a single audio tone instead of your recording. This occurs if the previous broadcast has been interrupted before it completes. Simply restart your Raspberry Pi and run the command again.
CODING THE SOUNDBOARD
Now that you know how to record audio files and broadcast them through the radio, you’ll create a simple graphical user interface (GUI) soundboard to trigger and control broadcasts. A GUI gives a program a user-friendly appearance to make it easier to use. GUIs are a staple of most computing devices, TVs, phones, and game consoles, because a GUI uses windows, icons, menus, and pointers to help users control the device. You’ll create a GUI with buttons to trigger sounds to avoid having to enter code into a terminal.
This project uses guizero, a Python library that makes it very simple to create GUIs. If you want to read more about guizero or add more features, check out this website: https://lawsie.github.io/guizero/. With the GUI, you’ll assign each of your homemade MP3 sound files to its own button, as shown in Figure 7-5. When you click a button, the corresponding message broadcasts to any radios tuned to the same frequency.

FIGURE 7-5 The final soundboard GUI
Creating the GUI Functions
Download and install the guizero Python library by opening the terminal and entering the following command:
pi@raspberrypi:- $ sudo pip3 install guizero
As the guizero library is further developed, its creators will add more features and functionality. You can upgrade your version to the current one by using this command:
pi@raspberrypi:- $ sudo pip3 install guizero --upgrade
Before you begin creating your soundboard, you’ll need to record and create at least three personal sound files containing the phrases you want to broadcast. To record the sound files, use the instructions in “Recording and Broadcasting Your Own File” on page 120. If you don’t want to record your own files, you can download sample files from the book’s resources at https://www.nostarch.com/raspiforkids/. The resources also have an image you can use for the GUI window. You must save all the sound files, the code, and the image for your soundboard in the Radio folder you created at the beginning of the chapter.
You’ll create the program for building the soundboard in IDLE. Open the Python IDLE editor, and then open a new script by clicking File▸New File. Save your new Python file to the Radio folder as radio_gui.py and enter the code in Listing 7-1.
❶ import os
   import time
   from guizero import App, Text, PushButton, info, Picture

❷ def message1():
     print ("Hello")
     os.system("sudo ./pifm hello.wav 100.0")
     time.sleep(1)

❸ def message2():
     print ("Bring me food")
   os.system("sudo ./pifm bringmefood.wav 100.0")
   time.sleep(1)

❹ def message3():
   print ("Let's take a selfie")
     os.system("sudo ./pifm selfie.wav 100.0")
     time.sleep(1)

❺ def close_message():
     info("Goodbye", "See you soon")
     app.destroy()
LISTING 7-1 Building a soundboard
The program begins by importing the operating system module os ❶. This module allows you to run terminal commands within Python code and programs. As a result, you can assign a terminal command to each button to avoid having to type out the commands each time you want to play a sound.
Next, you import the time module and the guizero library, and then you import the App, Text, PushButton, info, and Picture widgets. I won’t discuss each of these, but together they allow you to control the GUI application, create push buttons to trigger the sounds, display informational pop-up windows, and add an image to the soundboard.
Then you create four separate functions; each holds the instructions to trigger one of the sound files and broadcast it to the radio.
The first function is message1() ❷, which plays the audio file that matches the name of the WAV file it contains. It also prints Hello to the screen to let you know the file has been triggered.
You’ll recognize the code line including sudo ./pifm from earlier in the chapter. Notice that this time it begins with os.system(), which tells Python to run the line of code as if it were written and executed from the terminal, not from the Python editor. The code os.system() is required because you’re using Python code to write the GUI program, and PiFM uses Linux commands. The os.system() function enables you to trigger Linux commands from within a Python program. Replace hello.wav in the code with the name of your first sound file, and adjust the broadcast frequency if necessary. Then add the second ❸ and third ❹ functions for your other audio messages, remembering to change the filenames to match the names of your audio WAV files.
The fourth function closes the GUI window ❺. This function prints a short goodbye message and then destroys the app! This is less drastic than it sounds: the function app.destroy() simply closes the GUI.
Creating the Window and Buttons
Now you’re ready to add the code section that creates the actual GUI window and buttons. Add the lines in Listing 7-2 to your radio_gui.py Python program.
   # sets the size of the app window
❶ app = App(title = "My Radio", width=270, height=350, layout="grid")

   # adds the title
❷ Title = Text(app, text="CLICK A MESSAGE TO BROADCAST", size=11,
   font="consolas", grid=[0,0], align='top')

   # adds the image
❸ radio = Picture(app, image="sound.gif", grid=[2,0], align='top')
LISTING 7-2 Building the GUI appearance
The first line of code sets up the GUI window’s title and the window’s width and height in pixels ❶. You also set the window’s layout to a grid layout, which means you can use coordinates to plot and place the buttons within the window.
Next, you add a title to the window to tell the user what the GUI does ❷. You set the size of the font and the font type: you can change these to personalize your GUI, but keep in mind that you might need to alter the width and height of your GUI window to fit bigger fonts.
You set the title to grid positions 0 and 0, which is the top line of the grid, and then you align it to the center of the window, making it look neat and tidy.
Then you add the image from the book’s resources to the window ❸. The image must be in .gif format and be in the Radio folder. Again, you set the image’s grid position, this time on the second line, and align it to the top, which places it in the center of the GUI window.
NOTE
If you use a different image, you’ll need to adjust the window dimensions on the line at ❶ to ensure that the image fits.
With the functions and GUI built, you can add the last section of the program that creates the buttons and assigns each function to a button. When you run the program, clicking a button will trigger the function to execute and then broadcast the audio message. Add the code in Listing 7-3 to your program.
   # sound1
❶ button1 = PushButton(app, command = message1, text="Hello",
   grid=[3,0], align='top')

   # sound2
❷ button2 = PushButton(app, command = message2, text="Bring me food",
   grid=[4,0], align='top')
   # sound3
❸ button3 = PushButton(app, command = message3, text="Let's take a
   selfie", grid=[5,0], align='top')

   # quit the program
❹ quit_button = PushButton(app, command = close_message, text="QUIT
   PROGRAM", grid=[6,0], align='top')

❺ app.display()
LISTING 7-3 Creating the buttons and allocating functionality
You create a button with the PushButton() function ❶. For each button, you need to include the guizero class PushButton, which selects the function that will run when you click that button. Next, you add a label to the button by using text that tells the user what the button does. On the first button, the label Hello indicates that the button will broadcast the “Hello” sound. Then you set the button’s grid position within the GUI window. This button is located on line 3 of the grid and aligned to the top, which places it in the center of the window.
You use the same format to code the other three buttons ❷ ❸ ❹. Remember that if you’ve used a different image or different text lengths or sizes, you’ll need to change the grid coordinates and alignment to fit the content to your GUI window.
The last line is the code to create the GUI ❺. This code pulls together all the elements you created and displays them. After entering the code, save your program, ensuring that you save it to the Radio folder.
RUNNING YOUR PROGRAM
To run your program, follow these steps:
- Turn on your radio and tune it to the broadcast frequency, which in this program is 100.0 MHz.
- Press F5 on the keyboard to run the program. Your GUI should load, and you should see the main image and four buttons.
- Click one of the buttons to broadcast a sound file. The button will stay depressed while the sound file plays, preventing you from spamming the button (pressing the button over and over again) and blocking a broadcast.
WRAPPING UP
You can improve this project to make it do more. Try some of these enhancements for starters:
- Add more buttons.
- Create a simple music machine that lets you select a song that is then broadcast to the radio.
- Create a Halloween scare machine by recording and sharing spooky messages or scary sounds with listeners.