
8
THE AUTOMATIC TEXTING MACHINE
IN THIS CHAPTER, YOU’LL SET UP YOUR RASPBERRY PI TO SEND TEXT MESSAGES TO A REGISTERED MOBILE PHONE. ONCE YOU HAVE THAT BIT WORKING, YOU’LL CREATE A SIMPLE AUTOMATIC TEXT-REMINDER SERVICE: YOU’LL CODE A TIME AND A SHORT MESSAGE, AND WHEN THE SPECIFIED TIME IS REACHED, THE MESSAGE WILL BE SENT TO A NUMBER YOU INPUT. FOR EXAMPLE, YOU MIGHT SEND YOURSELF A MESSAGE TO REMIND YOU TO TAKE THE DOG FOR A WALK OR TO PICK SOMEONE UP, OR YOU MIGHT SEND A MESSAGE TO SOMEONE ELSE TO REMIND THEM EACH DAY THAT THEY OWE YOU $5!
WHAT YOU’LL NEED
Here are the items you’ll need for this project:
- Raspberry Pi
- A basic mobile phone that can send and receive SMS
A LITTLE ABOUT SMS
On December 3, 1992, the first Short Message Service (SMS) message, more commonly known as a text message, was sent from a computer. It read Happy Christmas. This inexpensive, fast, and easy service proved an incredibly popular method of communication between mobile phone devices.
CREATING A SIMPLE TEXT SENDER
You’ll create a simplified text sender that will send whatever message you type as input to the designated number. The first step is to set up your own account with Twilio, a cloud-based communications company. Twilio allows you to write program code that can make and receive phone calls, send SMS texts, collect call duration statistics, and much more.
Because Twilio is a cloud-based service, it uses an application programming interface (API). An API is a set of tools that lets you interact with web-based applications through code. You use the API to interact with Twilio’s web services to, for example, send an SMS message or check a call log. The Twilio website lets you create a free trial account, which is all you need for this project.
NOTE
You can set up the Twilio credentials on another computer and then log back into Twilio on your Pi if you find that easier.
Signing Up for a Twilio Account
On your Pi, head over to the Twilio website at https://www.twilio.com/. Click the red Sign up and start building button in the middle of the page, as shown in Figure 8-1.

FIGURE 8-1 Starting at the Twilio landing page
Sign up for an account by filling in the form, which may have changed since the time of writing. Enter your first name, last name, an email address, and what you want your password to be. The password must be at least 14 characters long. Once you have completed these steps, click the red Start your free trial button. Figure 8-2 shows all these options.
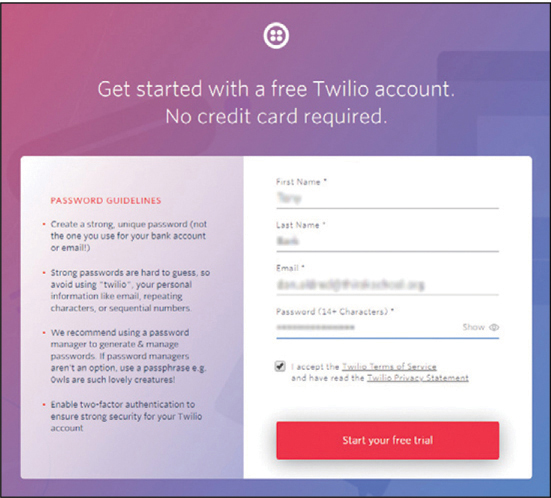
FIGURE 8-2 Signing up for a Twilio account
You should have been sent a verification email with a hyperlink at the address you used to sign up. Click the link in your email to verify your email address and assure the site that you’re not a bot.
Now, you’ll have to further assure the site that you’re not a bot. (Proving you are a human is a two-step process!) Add your mobile phone number and click the Verify button. You need to input a valid number because Twilio will send a verification code to the phone number you entered. You will need this code to continue.
Your phone should then receive an SMS message with a verification number. On the Twilio page, enter the verification number and click Submit, as shown in Figure 8-3.

FIGURE 8-3 Well done, human.
You’re now verified as a human being; you can rest easy!
You will be asked a series of questions about coding, which may have changed since the time of writing, so I’ll guide you through the questions broadly. If you’re asked if you code, say yes. You should be given a list of languages to choose from. Choose Python.
Now you will be asked something like What is your goal today? Select the option closest to Use Twilio in a project. You should also be asked what you want to do first, in which case select the option that involves sending or receiving an SMS.
Once that’s all done, you should be taken to your dashboard, which should look something like Figure 8-4.

FIGURE 8-4 The Twilio dashboard
SETTING UP A TWILIO PHONE NUMBER
The last step to set up your account is to acquire a Twilio phone number, which will be used to send the SMS messages from your Pi. Click the Get a Trial Number button. (If you can’t see the Get a Trial Number button in your dashboard, go to click the symbol with the three dots, as shown in the highlighted section of Figure 8-4, in the menu to the left, and click Programmable SMS. From there, click Get Started, and then Get a number.)
Twilio will recommend a suitable phone number for you to use. Double-check that the number is registered to the country you reside in and that it’s SMS enabled, as shown in Figure 8-5.
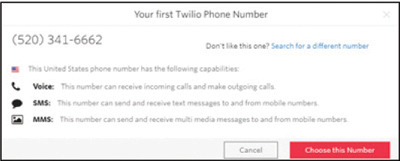
FIGURE 8-5 Twilio will choose a number for you; make sure it is based in your country and can receive and send text messages.
If the number isn’t SMS enabled, you’ll have to acquire another one by clicking Search for a different number, and you might be charged a small fee. Once you’ve checked that the details are correct, write down the phone number for later and click Choose This Number.
You’ve now set up your Twilio account, and you have a new phone number to use in your Python program. You are now ready to create your project and write the program that will send SMS texts to a phone number.
Creating a Project
Now it is time to set up your project and name it. At this point, Twilio will also show you your project’s authorization codes and credentials. Under “PROJECT NAME,” enter SMS_Phone, or any other name as long as it has SMS in it. The Dashboard will now display the title SMS_Phone Dashboard, as shown in Figure 8-6.
When you created your Twilio account you also created an ACCOUNT SID and authorization token, which you’ll need later to control communication to your verified mobile phone. You will see that the AUTH TOKEN is not displayed for security reasons. To access the token press the copy button next to it. You can now paste the token into your program code.
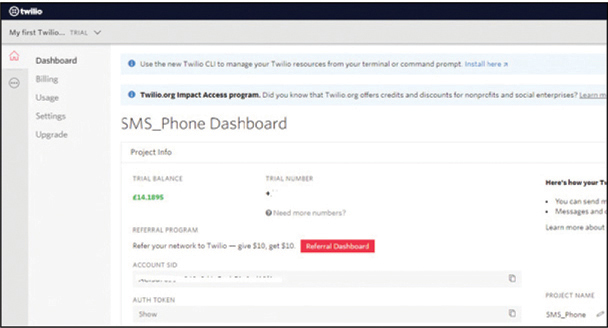
FIGURE 8-6 You’ll find your project credentials here.
Installing Twilio
To install Twilio, open the terminal window and enter the following:
pi@raspberrypi:- $ sudo pip3 install twilio
The relevant Python packages will be downloaded and installed onto your Raspberry Pi. Then restart the Pi, and when it loads, open IDLE 3, which is located on the Programming menu.
Writing the Code
Copy the code in Listing 8-1 into the file, and save it as SMS.py.
❶ from twilio.rest import Client

   # Find these values at https://twilio.com/user/account
❷ account_sid = "XXXXXXXXXXXXXXXXXXXXXXXXXXXX"
❸ auth_token = "XXXXXXXXXXXXXXXXXXXXXXXXXXXXX"

❹ message_text = input("Please enter your message ")

❺ client = Client(account_sid, auth_token)
   # Replace +999 with your own phone number and +000 with your Twilio
   number

❻ message = client.messages.create(to = "+999", from_="+000",
   body = message_text)

❼ print ("Your message is being sent")
❽ print ("check your phone")
LISTING 8-1 The simple text-sender code
You begin by importing the Client() function from twilio.rest ❶. Representational State Transfer (REST) is a method of transferring information between a computer device (your Raspberry Pi) and a web-based service (Twilio’s cloud services). You import Client() so you can use REST from Twilio.
Next, you need to add your account security identifier (SID) ❷ and the authorization token ❸. You have already found both values on your dashboard on the Twilio website, so just copy and paste them into your code in place of the X placeholders. If you choose to type these codes, ensure that you use the correct letter case.
You then create a variable called message_text ❹ and give it a phrase to prompt the user for input: input("Please enter your message "). This code line prompts the user (in this example, the user is you) to type in the SMS message they want to send; your program can send any text you want it to rather than a standard preset message.
To utilize the client to send the SMS message, you put your account_sid and your auth_token in a variable called client ❺. With that, you can create a line of code to combine your message, your Twilio credentials, and the relevant phone numbers and then transmit the SMS message.
You create a variable called message and add the command client.messages.create(). When called, message collects the details from your client variable and creates an object to reference the Python Twilio class to create the SMS message ❻.
To the same message variable, you add the mobile number you registered and verified with Twilio after the to = code. You’ll need to replace the +999 currently in the code with the cell number that you’re sending the message to (but make sure to keep the plus sign).
After from_=, you enter the Twilio-enabled phone number you set up in place of the +000 currently in the code. Next, you add the message_text variable, which contains the body of the text message. This completes the line of code to send the message.
Then you add a simple confirmation line to print when the message has been sent ❼ and another line to act as a reminder to check the mobile phone that the message has been sent to, the recipient of the message ❽.
Let’s try it out! Save the program and run it, making sure the registered mobile phone is switched on. When the program runs, you’ll be prompted to enter a short message. Enter your message and press ENTER; you should see the message appear on your mobile phone, as shown in Figure 8-7.
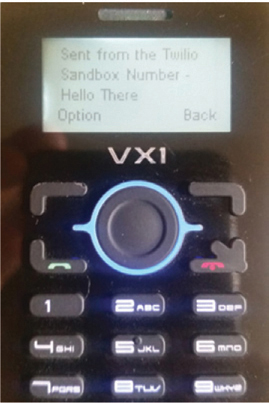
FIGURE 8-7 Receiving a Twilio message on your phone
CREATING THE AUTOMATIC SMS REMINDER MACHINE
Now that you have a basic SMS program set up, you can combine it with other Python features to create an automatic SMS reminder system, as shown in Figure 8-8. You’ll enter your reminder message and then enter the time the reminder needs to be sent.
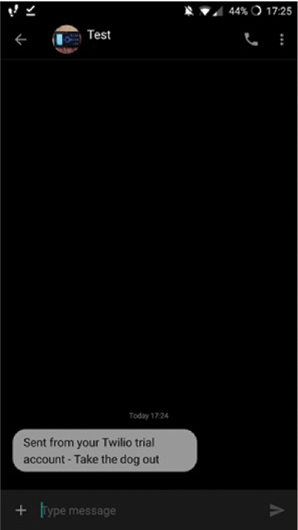
FIGURE 8-8 An automatic text reminder
The program checks the current time on your Raspberry Pi. When it reaches the designated time, it sends the reminder message to your phone. Because the time needs to be accurate, I recommend that you connect your Pi to the internet. That way, the time will be updated each time the Pi is booted up, and your reminder program will respond at the correct time.
Setting Up and Validating the Format
Open a new file in IDLE 3 or your Python code editor and add the first section of the code, as shown in Listing 8-2. Save it as reminder_machine.py.
❶ from twilio.rest import Client
   import time
   import datetime
   import sys

   # Find these values at https://twilio.com/user/account
❷ account_sid = "XXXXXXXXXXXXXXXXXXXXXXX"
   auth_token = "XXXXXXXXXXXXXXXXXXXXXXXXX"
   client = Client(account_sid, auth_token)

   # validation for time
❸ def isTimeFormat(input):
    ❹ try:
       ❺ time.strptime(input, '%H:%M')
       ❻ return True
    ❼ except ValueError:
       ❽ return False
LISTING 8-2 The first part of the reminder_machine.py code
Again, you need to import the Twilio Client ❶. But you also import the time module to add short delays and the datetime module to access the Raspberry Pi’s current time. You also add the sys module, which lets you use command line functions with the program.
As before, you need to add your Twilio account credentials to the variables account_sid and auth_token and then combine them into the variable named client ❷.
This next bit is new: you need to set up a simple validation to check that the input time is in the correct format. The user needs to input the format of hours:minutes, like this: 11:10. If a user enters the time incorrectly as 1110 or 111:0, the program will fail because it would never match the Pi’s time. To check for the correct format, you create a function called isTimeFormat() ❸, and then you use a try method to validate the input ❹. On the next line, you use the function time.strptime() ❺ to check that the input time is in the format %H:%M, which is hours:minutes, or 00:00.
If the time entered is in the correct format, the validation check returns the value True ❻. If an error occurs ❼ or the value doesn’t match the correct formatting, the value False is returned ❽. You’ll use these values later to trigger the continuation of the program to the next stage or to prompt the user to reenter the time in the correct format.
Coding the Reminder Message
Now you’re ready to add the second code section, which introduces what the program does and asks the user to enter their reminder message and time. Add Listing 8-3 to the bottom of the reminder_machine.py file.
❶ print ("Welcome to the reminder machine")
❷ print ("")
❸ time.sleep(1)
❹ reminder = input("Please enter your message ")
   print ("")

   # validation check for time format
❺ check = False

❻ while check == False:
    ❼ reminder_time = input("Please enter the reminder time.
      For example 09:45 ")
    ❽ check = isTimeFormat(reminder_time)
      print ("")
    ❾ print (check)
      print ("")
LISTING 8-3 The second part of your reminder_machine.py program
You start with a simple print() and a statement to notify the user that the reminder machine is running and ready ❶. Then you add a blank line to print between each statement to make them easier to read ❷ and pause for a second to allow the user to read the welcome message and instructions ❸.
Next, you create a variable that prompts the user to enter their reminder message ❹ and then store the message.
Then you check that the time value is in the correct format, 00:00. You set it to False by default ❺. You create a while statement that runs only while the isTimeFormat() validation check value is False ❻. Because you set it to False in the previous line, the while loop keeps looping.
Inside the while loop, you prompt the user to enter the time they want the reminder sent and store this in the variable reminder_time ❼.
To check that the time the user inputs matches the correct format, you call the isTimeFormat() function you created in Listing 8-2 and input the value stored in the reminder_time variable ❽.
Depending on whether the time has been input in the correct format, the function will return either True or False. If the returned value is False, the time input is in an incorrect format and the while loop runs again, prompting the user to enter the time in the correct format.
When the returned value is True, the time format input is correct, and the program continues to line ❾ and prints the validation value. This is for your testing purposes: you can comment out the line at ❾ after the program is operational by placing a # on the left side of the line so it looks like this: # print (check).
Matching Times and Sending the Message
The final section of the program, shown in Listing 8-4, compares the Raspberry Pi’s current time with the reminder time and, when they match, sends out the message.
❶ while True:
    ❷ current_time = datetime.datetime.now().time()
       # print (current_time)

    ❸ current_time = str(current_time) # swap the time to a string

    ❹ current_time = current_time[0:5]

    ❺ if reminder_time == current_time:
            ❻ print ("Reminder Time")
            ❼ message = client.messages.create(to = "+999999",
               from_="+00000000", body=reminder)
            ❽ time.sleep(60)
            ❾ sys.exit()
    else:
            ❿ time.sleep(1)
LISTING 8-4 The final part of reminder_machine.py: sending the message!
First, you create a while True loop to keep this section of the program running continuously, checking the current time and comparing it to the reminder time ❶.
Next, you store the current date-time reading from the Raspberry Pi operating system in a variable called current_time ❷. You’ll print this value for testing purposes, but once the program is functioning, comment it out. The value will be in the format hours:minutes:seconds:milliseconds, which contains more data than you require. So before you use the date-time value, you convert it into a string ❸ and then slice it down to just the first five characters ❹ to match the 00:00 format.
Now you can compare reminder_time with the current time: the next line checks whether, say, 11:10 equals 11:10 ❺, and if the two values match, the program prints a line indicating it’s reminder time ❻!
To send the message, you create a variable called message and add the to and from phone numbers. Then you add the reminder message you entered and stored in the reminder variable as the body of the message ❼. The client.messages.create() function creates and sends the message to your mobile phone.
The lines of code ❷ to ❿ are placed within a while loop, meaning that the program is continuously checking the conditions and sending messages when those conditions are met. If you left the program code like this, it would send you as many messages as possible in the minute that matches the time you have set. To avoid this continuous messaging, you add a delay of 60 seconds before the next line of code runs ❽. As a result, the time will move on to, say, 11:11 and no longer match when the loop runs again.
You add code to exit the program by calling the system exit command from the terminal ❾. In the final line of the program, you add a delay of 1 second, and then the whole loop will start again ❿.
That completes the program. You can now save and execute it. Keep an eye on the levels of indentation. If you have any trouble getting the program to run, first check that the lines are indented at the correct level.
Enter your reminder message and reminder time. Then leave your Raspberry Pi running, and you’ll be sent your text at the allocated time!
WRAPPING UP
You can use your automatic texting machine for all kinds of things, especially now that you have a Twilio account set up. Check out the Twilio documentation to find out what you can do (www.twilio.com/docs/quickstart). As one tip, why not try your hand at detective work: use Twilio to trace messages and phone calls to and from the phone connected to Twilio. You’ll find the code for this hack at www.tecoed.co.uk/spooking-a-mobile.html.