
10
MAGIC MUSIC BOX
IN THIS CHAPTER, YOU’LL CREATE A PERSONALIZED MP3 PLAYER THAT WE’LL CALL THE MAGIC MUSIC BOX. YOU’LL USE YOUR RASPBERRY PI’S PYGAME TO BUILD AN MP3 PLAYER THAT CAN PLAY PRELOADED MUSIC TO A SPEAKER AND THEN ADD FOUR INTERACTIVE BUTTONS: ONE TO SKIP SONGS, TWO TO ADJUST THE VOLUME, AND A POWER SWITCH TO TURN OFF THE PLAYER.
You’ll combine all the hardware into a fancy box to create your MP3 music system (Figure 10-1). The program code uses PyGame, the Python library for creating games that you used in Chapter 5. PyGame allows you to add and control sounds, images, and videos by using Python code. In this project, you’ll use PyGame to control the MP3 files, start and stop them, and adjust the music’s volume.
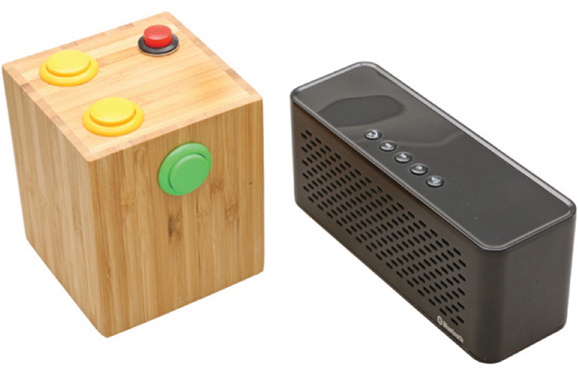
FIGURE 10-1 The finished MP3 magic music box and its speaker
WHAT YOU’LL NEED
Here are a few items you’ll need to complete the project:
- Raspberry Pi
- 4 push buttons
- 8 sets of female-to-male jumper wires
- Bluetooth speaker or audio jack speaker
- Solder and a soldering iron or conductive paint
- Small box (lunchbox, wooden, cardboard, or other)
- Drill or screwdriver (to make holes)
- USB battery (optional)
CHOOSING A SPEAKER TYPE
Depending on the Raspberry Pi model you’re using, you’ll first need to decide which method you’ll use to output the audio. The low-cost option is to use a small speaker attached to the headphone jack and hide that speaker inside the music box. You might search an online retailer or your local shops for a portable speaker with a 3.5 mm audio jack; all 3.5 mm models will work.
The downside to using small speakers is that they produce low-quality sound, and only the Raspberry Pi 2, 3, 4, and A+ models have audio ports to support them.
The other, slightly pricier, option is to use a Bluetooth speaker. This speaker usually has a high-quality sound and is portable, so you can place the speaker wherever you want it. The Raspberry Pi 3, 4, and Zero W models have onboard Bluetooth capabilities. Another advantage of the Pi Zero W is that it’s small, which makes it the easiest model to embed in the music box. If you’re using an older Raspberry Pi model that has spare USB ports, you can add Bluetooth functionality by purchasing a standard USB Bluetooth dongle (which supports Bluetooth 4 and audio) and attaching it to one of the ports.
The following table shows the speaker options suitable for the various Pi models.
MODEL |
HEADPHONE JACK |
BLUETOOTH |
PROS |
CONS |
A+ |
Yes |
No |
Small board; can support Bluetooth dongle via USB port |
Slower model |
Pi 2 |
Yes |
No |
Several USB ports |
Large board |
Pi 3B+ |
Yes |
Yes |
Good specs; cheaper than the Pi 4 |
Large board |
Pi 4 |
Yes |
Yes |
Fastest processor |
More expensive than other models |
Pi Zero W |
No |
Yes |
Smallest board; onboard Wi-Fi; can upload MP3 files remotely; inexpensive |
Slower model |
BUILDING THE MAGIC MUSIC BOX
Once you’ve selected a speaker for your board, you can build your music box. You can use anything for the music box enclosure—for example, a wooden pencil case, a plastic lunchbox, or an old cereal box. Be aware that you’ll have to make holes in the material; so if you don’t have tools to drill through wood, for example, perhaps choose a cardboard enclosure.
Before beginning the project, you should spend time arranging the buttons, speaker, and Raspberry Pi inside the box to figure out a suitable setup. You can customize the setup, but use common sense. For example, on most music players, the volume-control buttons are located next to each other.
Wiring the Buttons
Let’s make the buttons! Here are the steps:
- Attach wires: Select one of your push buttons and two male-to-female jumper wires, and locate the male ends. Using a little solder or conductive paint, attach a male end to each leg of the button (Figure 10-2). I recommend you use a black wire for one of the legs to indicate that it’s the ground (GND) wire. Follow this process for the other three buttons.
These buttons will form the main controls of the MP3 player that you’ll connect to the Raspberry Pi.
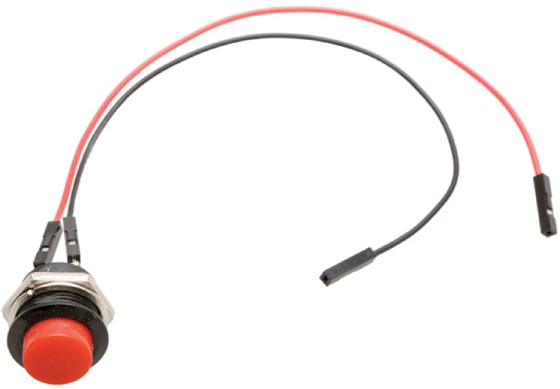
FIGURE 10-2 Attaching wires to each button
- Wire the buttons: For each button, attach the black wire (the ground wire) to any GND pin on your Raspberry Pi, and attach the other wire to the GPIO pin indicated in the following table.
PIN
BUTTON
GPIO 7
Next Song (play_skip)
GPIO 25
Volume Up
GPIO 8
Volume Down
GPIO 17
Power Off
You can use any of the GND pins located on the physical pins 6, 9, 14, 20, 25, 30, 34, and 39 (Figure 10-3). Some might be easier for the wires to reach or make neater layouts inside the box.
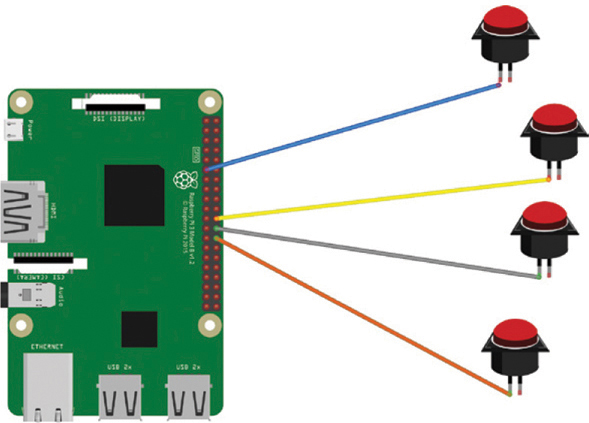
FIGURE 10-3 Wiring each button to the Raspberry Pi
- Make holes: If you’re using a wooden or plastic box, you’ll need to drill holes to house the buttons. The size of the hole depends on the size of the button (Figure 10-4). Start with a small hole and try fitting the button before resizing the hole. If you’re using a wooden box, you can ask an adult to drill the holes for you. If you’re using a cardboard box, use a sharp pencil or a pen to make holes. Decide where you want to locate the buttons, and then drill or poke four holes big enough to accommodate each button.
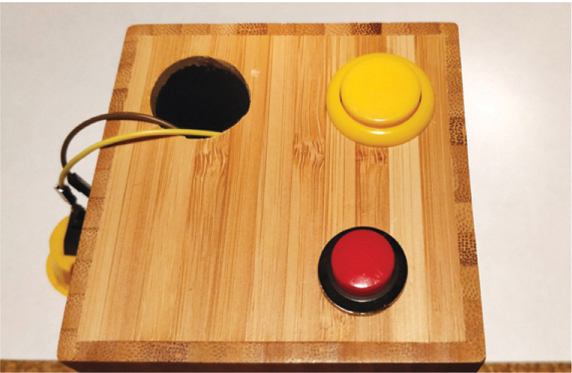
FIGURE 10-4 Drilling the holes in the box
- Attach the buttons: The way you do this depends on the type of buttons and box that you’re using. Many buttons have a small circular lip around the top that rests on the outside of the hole in your box and two flexible clips that secure the main housing of the button in place. These types of buttons are often referred to as arcade buttons. For other types of buttons, you can glue or use double-sided tape to stick the buttons in place, but do so only after you know that the program and hardware work.
Before securing your Raspberry Pi to the inside of the box, play around with the layout of the Pi so that the wires and the buttons fit. Figure 10-5 shows an example layout, and you may be able to hide the battery inside the box too. Notice that you still have access to the Raspberry Pi, as it’s best to write the program and test it before securing it and the other parts in place. That way, you can still access the buttons and wires if you need to make adjustments.
- Decorate the box: Decorate and personalize the outside of the box. You can add color, stickers, instructions for using the music player, or anything else you like.
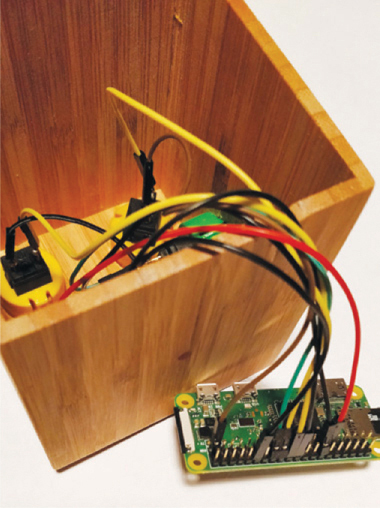
FIGURE 10-5 Preparing the internal hardware layout
Connecting the Speaker
To hear sound from the MP3 files, you need to set up the audio output. There are different ways of doing this, depending on whether you’re using a headphone jack or Bluetooth speaker. Start your Raspberry Pi and attach the monitor, keyboard, and mouse.
Using a Speaker via the Headphone Jack
If you’re using the audio jack, connect your speaker via a standard 3.5 mm jack cable to the black headphone jack on the Raspberry Pi, which is located next to the HDMI port. Plug in your Raspberry Pi and boot it up; load the Pi desktop. Locate and click the audio icon ![]() at the top of the desktop. Select Analog from the audio output drop-down menu. Now all audio will be played through your speaker.
at the top of the desktop. Select Analog from the audio output drop-down menu. Now all audio will be played through your speaker.
Using a Bluetooth Speaker
If you’re using a Bluetooth speaker, turn on the Bluetooth software on your Pi by clicking the Bluetooth icon at the top right of the screen. Then turn on your Bluetooth speaker. You’ll need to enable the settings on your speaker to make it discoverable. Click the Bluetooth icon again and select Add a Device from the drop-down menu. The Raspberry Pi will attempt to locate all Bluetooth-enabled devices, including your speaker.
When your Pi finds the speaker, it will appear in the pop-up window. Select it from the list, and click the Pair button to establish a connection between your Raspberry Pi and the Bluetooth speaker.
Once the connection is confirmed, click the audio icon ![]() and select your Bluetooth speaker from the drop-down menu. The two devices will attempt to pair and establish a connection again. Once the speaker has been set up, your Raspberry Pi will always automatically locate and connect to this speaker.
and select your Bluetooth speaker from the drop-down menu. The two devices will attempt to pair and establish a connection again. Once the speaker has been set up, your Raspberry Pi will always automatically locate and connect to this speaker.
Coding the Magic Music Box
Let’s write the code that will play the music and set up the button functions. You’ll use PyGame’s audio mixer tool to control playback of the MP3 files and the volume level. The button functions are controlled via the gpiozero library, which offers simple code to trigger events.
Creating a New Folder
First, you’ll create a folder to store the program code and the MP3 music files that you want to listen to. In the terminal, enter the following command:
pi@raspberrypi:- $ mkdir MP3
Then change to the MP3 folder by entering this command:
pi@raspberrypi:- $ cd MP3
Transfer and save all your MP3 music files to the MP3 folder. Then open a new Python file, and save it to the MP3 folder as music_box.py.
Importing the Modules and Libraries
Now you need to import all the modules and libraries you’ll use in the program. Enter the code in Listing 10-1 to start.
❶ import glob, time, pygame

   from gpiozero import Button
❷ from subprocess import check_call
   from signal import pause
   from pygame.locals import *

❸ pygame.init()
❹ pygame.display.set_mode((100, 100))

❺ global the_song
   global level
   global songs_found
   global number_of_songs
LISTING 10-1 Setting up the imports and global variables
Import glob, time, and pygame ❶. You’re already familiar with the time module. You’ll use the glob module to search for the MP3 filenames, and you’ll use the pygame library to control the playback and volume of the MP3 files.
Then import the Button class from the gpiozero library, which allows you to trigger events when each button is pressed. Next, import the check_call() function ❷, which you’ll use to call the shutdown() command to turn off the music player.
PyGame files run in a separate window, and although you won’t use the window, you still need to initialize it with pygame.init() ❸ to be able to use PyGame. Then you need to define the size of that window. Because you’re not interacting with it, you can make it very small–let’s say, 100 × 100 pixels ❹.
Next, create four variables ❺: the_song holds the name of the MP3 file that’s currently being played, level holds the volume level, songs_found holds the filenames of the MP3 songs, and number_of_songs holds the total number of songs. These variables are global variables. Global variables are declared outside a function, which means that the Python program can pull the data stored in a global variable and use it elsewhere in the program.
Assigning the Buttons to the GPIO Pins
Next, add the code in Listing 10-2, which sets up the shutdown() function and assigns each button to a GPIO pin.
❶ def shutdown():
   ❷ check_call(['sudo', 'poweroff'])

   ### Buttons for control ###
❸ play_skip = Button(7)      # begin the music green
   volume_up = Button(25)    # volume up blue
   volume_down = Button(8)     # volume down yellow
   shutdown_btn = Button(17, hold_time=2) # shutdown

❹ the_song = 0 # as first song is in position 1
❺ playing_songs = True
LISTING 10-2 Defining buttons and pins
Define the shutdown() ❶ function to use the check_call() function to call the Python program that will power off the Pi ❷. This function lets you switch off your music box without needing a screen!
Next, set up the buttons by creating a variable for each one, play_skip, volume_up, volume_down, and shutdown_btn. Then assign each variable to the GPIO pin number wired to that button ❸. If you used different pin numbers than those in this example, make sure you change the values in the parentheses.
Notice that after assigning shutdown_btn to its GPIO number, you specify the hold time, which is the number of seconds the button needs to be held down before the shutdown() function ❷ is triggered. (In this example, the hold time is 2 seconds.) Adding a hold time makes it more difficult to accidentally shut off the MP3 player if you press the button by mistake.
Next, create two more variables. The the_song variable ❹ contains the position of the song currently playing in the list of songs. The list starts with the song held at the first position, 0. The playing_songs variable specifies whether a song is playing ❺. The program uses this variable to search for and play the MP3 files. Set it to True.
Building a Playlist of Songs
The next part of the program finds the MP3 music files you saved to the MP3 folder by using the glob() function you imported earlier. This code, shown in Listing 10-3, builds a list of all the song titles, which the program uses to load and play each song. Remember that the files must be stored in the same folder as the Python program file.
❶ def find_mp3_files():
       global songs_found
       global number_of_songs

  ❷ mp3_files_playlist = glob.glob('*.mp3')
  ❸ songs_found = mp3_files_playlist
  ❹ print ("I have found the following song", songs_found)
  ❺ number_of_songs = len(songs_found)
  ❻ print ("there are", number_of_songs, "songs")

   #### set volume ###
❼ level = 0.10
❽ pygame.mixer.music.set_volume(level)
LISTING 10-3 Finding the songs
The first line defines the find_mp3_files() function that contains the code to find each MP3 file and store the filenames ❶. Because you’ll need to use the information gathered by this function later in the program, you import two global variables from earlier. These variables allow you to transfer the song details and number of songs data to the next function.
Then create another variable, mp3_files_playlist, that uses the glob() function to search for all files ending with the extension .mp3 ❷ and store them in the variable.
Next, copy the list of MP3 filenames to a new variable named songs_found ❸. This keeps the original list stored in the mp3_files_playlist variable and enables you to edit the new list without affecting the old one. If you add new music to your MP3 folder, it’s recognized and added to the song list each time the program runs.
Printing all the names of the MP3 files ❹ allows you to have a list of song titles. This works only if the filename is the same as the song name. For example, if the song is called “Life On Mars,” you need to save the MP3 file as life_on_mars.mp3. Once you detach the MP3 player from a screen and run it headless, you won’t see the printout of MP3 files, but executing this step is useful for testing.
Because you want the MP3 player to play through all the songs in the list, you need to figure out how many songs there are ❺ and see the number printed out ❻. You must do this step anytime you add or remove songs from the playlist, because that changes the length of the list.
You also need to set the initial volume level for the volume-control buttons. This value is between 0 and 1, where 0 represents no sound and 1 represents the maximum volume. The volume range depends on the type of speaker you’re using. Set the initial level at 0.10, a tenth of the full volume, for now ❼; you can change it later if it’s too loud or too quiet. The final line of code tells pygame to set the volume ❽.
Creating the Code for Playing Songs
Listing 10-4 creates the main function, which controls the magic music box buttons.
   ### Main code for playing and changing songs ###
❶ def play_mp3_songs():
      global the_song
      global level
      global songs_found
      global number_of_songs
   ❷ if playing_songs == True:
      ❸ while the_song < number_of_songs:
            ### Play a song ###
         ❹ pygame.mixer.music.load(songs_found[the_song])
         ❺ pygame.mixer.music.play()
            print ("Playing Song")
         ❻ the_song = the_song + 1
            print ("the song number is", str(the_song))

         ❼ while pygame.mixer.music.get_busy():
            ❽ pygame.time.Clock().tick(10)  # waits for song
LISTING 10-4 The magic music box playing code
It’s important to keep an eye on the indentation levels because most of the rest of the code is inside the play_mp3_songs() function. Remember that you can download the code from https://www.nostarch.com/raspiforkids/ if you get stuck.
Define a new function called play_mp3_songs() ❶ that holds the main program code. Next, you add the four global variables you created earlier: the_song to control which MP3 file is playing, level to adjust the volume level, songs_found to allow access to the list of MP3 filenames, and number_of_songs.
Create a while loop ❷ that tells the magic music box to keep playing songs until it reaches the last one in the list.
Then make sure the music player stops playing music when it reaches the last track ❸. If song number 4 of 20 is playing, the playlist will keep going, because 4 is less than the total number of songs. Once the playlist reaches song 20 of 20, it will loop back to the beginning. Later, you’ll use this part of the program to skip songs and control the volume.
The code then loads the MP3 file about to be played ❹. Because you previously set the_song to 0, PyGame will load the first song in the list of MP3 files at index 0. When loaded, the program plays the file by using the code pygame.mixer.music.play() ❺. Print the current song to see what it is and test that the name of the song matches the song that is playing.
Next, increment the value of the_song by 1 ❻. This tells the program to select the next song on the list each time the program loops.
To recap, the program selects the first song and starts playing it. It then chooses the next song to play when the current song ends (or if you press the physical Next Song button on your box). Until then, it continues to play the current song by checking that the PyGame music mixer is busy ❼. You use the PyGame clock ❽ to stop PyGame from playing the next song until the current song has stopped playing. This is used instead of the Python wait() or sleep() function because each song will have a different duration.
Programming the Next Song Button
Now, add the code in Listing 10-5, which lets you skip to the next song. This code continues from the previous listing, with the top line at the same indentation level as the last line of Listing 10-4. Use this level as a guide for indenting the rest of this code.
                ### Change the song ###
             ❶ if play_skip.is_pressed:
                ❷ time.sleep(0.5)
                   print ("End of Songs")
                ❸ pygame.mixer.music.stop()
                ❹ break
The code checks whether someone has pressed the Next Song button ❶, which was named play_skip earlier. You also add a short delay ❷, so PyGame can register the button press. Otherwise, the program might crash.
If someone has pressed the button, PyGame uses the function pygame.mixer.music.stop() ❸ to stop playing the music.
Once you’ve stopped the current song, you want the program to loop back to the beginning, where the while the_song < number_of_songs condition checks whether songs are still in the list to be played. To do this, you break out of the loop so the PyGame mixer is no longer busy ❹. PyGame will then play the next song, if there is one.
Increasing the Volume
Add the code in Listing 10-6 for the volume-control buttons. You start with the button to increase the volume, which you called volume_up earlier.
                ### Change volume up ###
             ❶ if volume_up.is_pressed:
                ❷ if level < 1:
                   ❸ level = level + 0.10
                      print (level)
                   ❹ pygame.mixer.music.set_volume(level)
                ❺ else:
                      pass
                      print ("top volume")
LISTING 10-6 Increasing the volume
As with Listing 10-5, begin by checking whether the button (volume_up) has been pressed ❶. If it has, the program needs to check that the current volume isn’t at its maximum. It does this by checking whether the current level is less than or equal to 1 ❷, which is the maximum volume. If the level is less than 1, you allow the program to increase the volume by adding 0.10 to the current level ❸.
If the program has just started, the level will be 0.10. Pressing volume_up once will add 0.10, which increases the volume to 0.20 ❹.
You code a response for when the condition “less than one” isn’t met, which is when the volume is at its maximum. Use an else statement ❺, and then enter pass to keep the volume at the maximum level.
Decreasing the Volume
Add the code in Listing 10-7 to decrease the volume by using volume_down.
                ### Change volume down ###
             ❶ if volume_down.is_pressed:
                ❷ if level > 0:
                   ❸ level = level - 0.10
                      print (level)
                      pygame.mixer.music.set_volume(level)
                ❹ else:
                       pass
                        print ("bottom volume")
LISTING 10-7 Decreasing the volume
This code is similar to the code for increasing the volume. You check whether volume_down has been pressed ❶. If it has, check the current volume level and, if the volume level is greater than 0 ❷, subtract 0.10 from the current level ❸.
Again, use an else statement ❹ to pass the button press if the level is 0, because in that case, you can’t turn it down any lower.
Turning Off the Magic Music Box
The code in Listing 10-8 allows you to turn off the music box. You’ll program the music box to stop playing when you press the Power Off button or finish playing all the songs.
             ❶ shutdown_btn.when_held = shutdown

 ❷ else:
    ❸ print ("end of playlist")
LISTING 10-8 Shutting down the music box
Add the code for the Power Off button ❶. Then use an else statement ❷ that will also shut down the music box if all the songs have been played, and print end of playlist ❸.
Ending the Program
You’ve defined the three functions that do all the work. Now finish the program by using Listing 10-9 to call each of these functions.
   ### Main Program ###
❶ find_mp3_files()
❷ button.wait_for_press()
❸ play_mp3_songs()
LISTING 10-9 Calling the magic music box’s three functions
The find_mp3_files() ❶ function locates all the MP3 files whenever the program is running. So if you add new MP3 files, the function will find them and add them to the playlist.
The button.wait_for_press() ❷ function adds the user interaction to the buttons so the box reacts accordingly when you press a button.
The play_mp3_songs() ❸ function runs the main program loop, which checks whether there are MP3 files to play and then plays each one. It also checks whether any button has been pressed and responds if it has.
Running Your Program
It’s time to test your program! If you’re using a Bluetooth speaker, check that it’s paired with your Raspberry Pi. If you’re using a speaker via the audio jack, make sure it’s properly connected. Then save the program and press F5 to run it.
The program should locate all the MP3 files in the folder and build a list of songs. It will then play the first song in the list. Press the Next Song button to change the song. Then try the volume buttons. Press the Power Off button to stop the music playing and shut down your Raspberry Pi.
If your MP3 player doesn’t work correctly, check for the following errors:
- Is the volume low or muted?
- Is the audio set to either Bluetooth or the headphone jack?
- Is the Bluetooth speaker paired?
- Are the MP3 files saved in the same folder as the Python code?
- Do the sound files end in the extension .mp3?
- Are the buttons wired to the GPIO pin numbers used in the program code?
AUTOMATICALLY STARTING THE MP3 PLAYER ON BOOT-UP
As a finishing touch, let’s make your magic music box turn on and start playing songs anytime you plug it into a power supply. You can do this in two ways, depending on whether you’re using the headphone jack or a Bluetooth speaker.
Headphone Jack Option
If you’re using the headphone jack, you’ll use cron, the time-based job-scheduling tool you used in Chapter 9. The cron program enables you to run a particular program automatically at a specific time.
To use cron, you need to create instructions about which event you want to run and when you want to run it. You do this in the crontab file, which holds instructions for which programs or events to run and, most important, when to run these events.
Open the terminal and enter the following command to open the cron console:
pi@raspberrypi:- $ sudo crontab –e
The console will present you with three methods of editing the cron file. Select option 2 and press ENTER to open the crontab file with the nano text editor. Scroll to the bottom of the text in the crontab file and locate the blank space. Then add the following line of code:
@reboot sudo python3 /home/pi/MP3/music_box.py &
The command states that every time the Raspberry Pi reboots, it should run Python in super user mode (which grants permission to run anything, just like administrative mode), open the /home/pi/MP3 folder, and execute the program called music_box.py.
If you named your code file something else, replace music_box.py with the name you gave it. Also check that the folder path is correct by opening the folder where your music_box.py program is stored and noting the file path.
The & at the end of the code line tells your program to run in the background, so you can do other tasks with your Raspberry Pi at the same time.
Once you have checked the command details and are confident that they’re correct, press CTRL-X to save and exit the crontab file. Now, each time you turn on or reboot your Raspberry Pi, the crontab file will run, starting the magic music box.
If you want to stop the program from running automatically, open the crontab file again from the terminal by entering this command:
pi@raspberrypi:- $ crontab –e
Then delete the line of code that you added earlier. Save the file and reboot.
Because the MP3 player is designed to run headless, you don’t need the Raspberry Pi to boot to the desktop and display the background screen and icons. You also don’t need to use the mouse. Booting to the desktop takes longer because of these unnecessary items, and the process uses more memory and processing power. You won’t see the desktop, so it’s pointless to load it. Instead, you’ll configure the Pi to boot from the command line. Open the terminal window and enter this command:
pi@raspberrypi:- $ sudo raspi-config
Next, select the third option, Boot Options, and press ENTER. Then select the B1 Desktop / CLI option, select the B2 Console Autologin option, select <OK>, and press ENTER (Figure 10-6). You’ll need to restart your Raspberry Pi.

FIGURE 10-6 Booting to the command line with auto login
Select the Finish option, and you’ll be prompted to save the config file and reboot. Select Yes, and your Pi will restart. As your Raspberry Pi boots, the magic music box will load.
Bluetooth Option
If you’re using a Bluetooth speaker, you can still automatically start the program on boot-up, but it’s slightly more challenging because you need to configure numerous settings.
You’ll also need to add a line of text that triggers Python to run your program, to the .bashrc file, which is a shell script that runs whenever the Raspberry Pi boots up.
Before you make a change to this file, make sure the Bluetooth speaker is paired with your Raspberry Pi. To give the Python program access to the speaker, you need to boot to the GUI desktop, not the command line. However, when PyGame runs, it turns the screen blank. This is fine, because the magic music box doesn’t require a screen. But it makes solving any issue in the code difficult because you can’t see or access the program code.
To remedy this, open the Python MP3 player program and add time.sleep(30) after the lines importing the libraries to add a 30-second delay to the start of the program. This gives you time to edit or adjust the setup code if it’s not working correctly. Just remember when you’re testing the program that you’ve added the delay, so you don’t think the program isn’t working!
If, after adding the 30-second delay, Python has loaded PyGame, and you still need to access the Raspberry Pi, you’ll need to access it remotely using SSH. But before you add the automatic startup script, enable SSH in the configuration settings. For a reminder on how to do this, refer to “Accessing the Raspberry Pi via SSH” on page 25.
Now you’re ready to create the boot-up script. Open the terminal window and enter the following command to open the .bashrc file:
pi@raspberrypi:- $ sudo nano .bashrc
Scroll down to the bottom of the file and enter python3 followed by the file path of your MP3 program—for example, python3 /home/pi/MP3/MP3_Player_BT.py (Figure 10-7).

FIGURE 10-7 The boot-up script
Remember to replace the example file path with the filename and location of your program. Save the file, and then reboot the Raspberry Pi. It should load your MP3 Python code. Remember to wait 30 seconds and ensure that your Bluetooth speaker is still paired. After the delay, the screen will turn black. Press the Next Song button for the first song.
If you can’t hear the music but suspect the code is working, try plugging a speaker or a pair of headphones into the headphone jack. If you can hear the music, you know the program is working correctly and that there’s an issue with the Bluetooth pairing.
If you encounter any other issues and you need to edit the code, you can either reboot your Raspberry Pi or open the terminal window and press CTRL-X or CTRL-Z to halt the code. Then check the various settings. If this doesn’t work, use SSH to access the Raspberry Pi and open, edit, or comment out the .bashrc file; then reboot. Continue testing your music box until you’re confident that the hardware and program code are functioning correctly.
PUTTING IT ALL TOGETHER
Once you’ve completed the program code and tested that it’s working correctly, you can begin to secure the hardware into your box. It might look something like Figure 10-8.
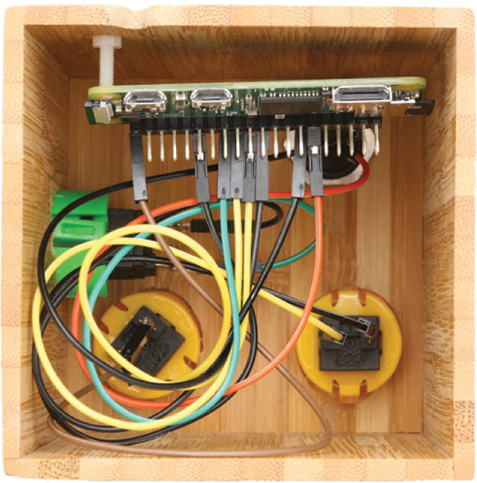
FIGURE 10-8 The finished magic music box
If you’re using a simple container, like a lunch box, place the Raspberry Pi and battery into the box and secure the lid. If you’re using a wooden box, like the one shown in Figure 10-8, you can mount the Raspberry Pi by using double-sided tape, mounting putty, or a small nylon screw.
Then you can tuck away and hide the wires from outside view. You can also make additional holes to house any power or USB cables that you need. If the program code fails, the best solution is to remove the SD card and put it into another Pi. Once you’ve resolved the problem, return the SD card to the original MP3 player Pi.
WRAPPING UP
Congratulations! You’ve built your own stand-alone magic music box. You can now add features to your magic music box, such as the following:
- More MP3 files
- An LED that flashes when the music player has loaded
- LEDs that flash as the music is playing
- A button to mute the volume
- Additional buttons to play the previous song, an excerpt of the playlist, or a secret Easter egg song
- A small LCD screen that displays the name of the current song